Testing Your Oracle ADF Faces Application with Selenium
By John Stegeman, Published March 2010
Series: Oracle ADF Development Essentials - Part 6
In addition to testing individual components and pieces of code, it is important to test that the user interface (UI) of a Web application functions as expected. Traditionally, this type of user interface testing is done by real people sitting in front of a computer manually running test scripts to verify that things work correctly. However, manually executing UI testing has some drawbacks:
Downloads:
- Oracle JDeveloper Studio Edition
- Selenium
- Sample app (HR Schema install required)
- Oracle Database XE (if needed)
How to use Selenium and JUnit together to build unit tests that test Oracle Application Development Framework Web UIs
- Manual testing takes longer than UI testing because people are inherently slower than computers.
- People can make mistakes running manual tests.
- Manual testing can be expensive—it requires salaries.
- You may not be able to run manual UI testing as often as you like due to the lack of enough testers.
Downloading and Installing Selenium IDE
The first step in using Selenium is to download and install Selenium IDE, which is used to record user actions that comprise a test. Selenium IDE is a browser add-on for Mozilla Firefox, which means that you must have Firefox 2.x or 3.x installed in order to use it. Selenium Remote Control (Selenium RC) supports both Firefox 2.x and 3.x. If you don't already have Firefox installed, you can download it from http://getfirefox.com. The current version as of this writing is 3.5.4, which I will use for this article.
Once you have Firefox installed, the next step is to install the Selenium IDE add-on. You can do this by using Firefox to open the Selenium Download Page and clicking the download link for Selenium IDE. When you click the download link, Firefox will prevent the add-on from installing as a security measure. You'll see something like this at the top of the Web page:

Figure 1: Firefox Security
Just click Allow to permit Selenium IDE to install. Firefox will prompt you with a confirmation to install the add-on. Allow the installation to proceed and click the Restart Firefox button when prompted:
Figure 2: Restarting Firefox After Selenium IDE Installation
When Firefox is finished restarting, you'll see the Add-On window informing you that the installation was successful.
Writing Your First UI Test
Now that you have Selenium IDE installed, you are ready to record your first UI test. Let's start with a very simple test that uses a public Website so that we can see how Selenium works without dealing with any of the complexities of an Oracle ADF application. To start, we need to describe what our UI test should do and what we expect as the results. Let us create a simple test that will navigate to the Oracle Technology Network (OTN) home page, click the Oracle JDeveloper 11g download link, accept the license agreement, and verify that there is a download link for Oracle JDeveloper 11 g. We can specify our test in the form of a list of actions and expectations (note that the OTN page layouts may change from time-to-time, and you may have to modify these instructions to work with OTN):
- 1. Navigate to http://www.oracle.com/technology/index.html. Expect to receive a Web page titled “Oracle Technology Network | World's Largest Community for Developers, DBAs, and Architects” and that contains (among other things) a link called Oracle JDeveloper 11 g.
- 2.
- 3. Click the Oracle JDeveloper 11g link on the Web page. Expect to receive a Web page titled “Oracle JDeveloper 11g” that has an element on it called Agreement.
- 4.
- 5. Click the Agreement radio button. Look for a link titled jdevstudio1112install.exe.
- 6.
You'll find it much easier to write good UI tests if you take the time to write down each step of the test, together with the expected outcome, in this fashion. Note that the steps for this simple test were correct at the time of writing the article. If Oracle changes the Website, or if your default language is not English, you may need to modify the steps. To record the test using Selenium IDE, just follow these steps:
1. From Firefox's Tools menu, click Selenium IDE:
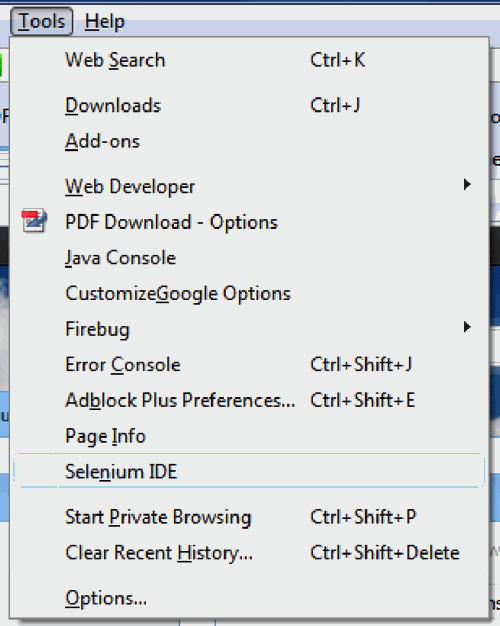
Figure 1 : Starting Selenium IDE
2.
3. You should see the Selenium IDE window open with recording automatically started (check the redRecord button at the upper right):
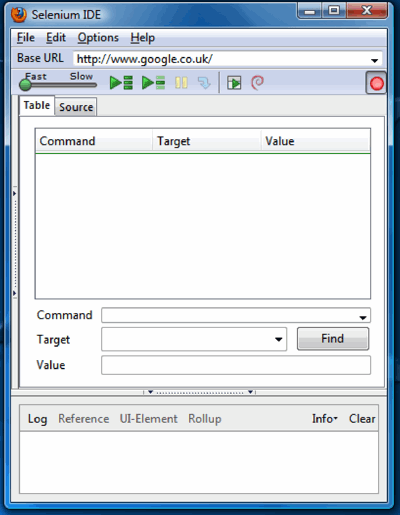
Figure 4: Selenium IDE Recording Window
4.
5. In the main Firefox window, navigate to http://www.oracle.com/technical-resources/ as per the first step in the test case. We need to verify that the title of the Web page is “Oracle Technology Network | World's Largest Community for Developers, DBAs, and Architects.” Selenium has two somewhat similar classes of commands that you can use: Verify and Assert. The difference between the two is that in case of the verification/assertion being false, Verify will allow the test to continue (albeit with a failure result at the end), whereas Assert will halt the test immediately. As a general rule, you will use Assert. To assert that the title of the page is “Oracle Technology Network | World's Largest Community for Developers, DBAs, and Architects,” right-click anywhere in the Web page, click the Show All Available Commands item, and choose assertTitle Oracle Technology Network | World's Largest Community for Developers, DBAs, and Architects:
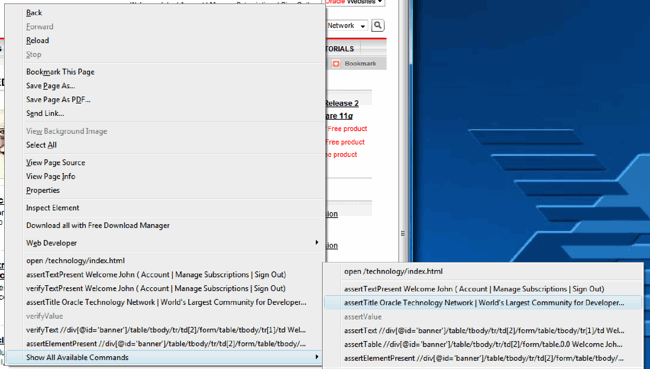
Figure 5: Asserting that the Title Is “Oracle Technology Network | World's Largest Community for Developers, DBAs, and Architects&rdquo
You should be able to see some commands in the Selenium IDE window:
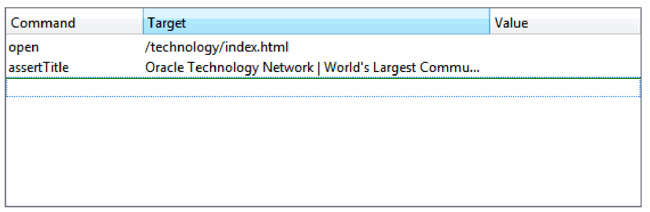
Figure 6: Initial Test Commands in Selenium IDE
The test case also asks us to assert the presence of a link on the page called Oracle JDeveloper 11g. To do this, right-click the download link for Oracle JDeveloper 11g (at the upper right), click Show All Available Commands, and chooseassertElementPresent //table[..., as shown below:

Figure 7: Asserting the Presence of an Oracle JDeveloper 11g Link
Note that the assertElementPresent command in the test script is asserting the presence based upon the HTML table ID. Although this may be OK, it's not very clear what is being searched for. You can tell Selenium to look specifically for a link with the text “Oracle JDeveloper 11g” instead; to do this, click the assertElementPresent command in Selenium IDE and change the Target value to “link=Oracle JDeveloper 11g” like this:
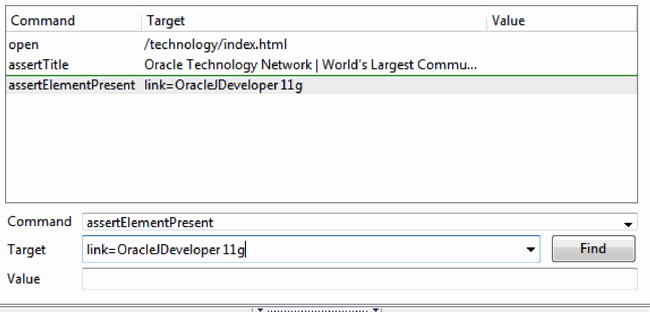
Figure 8: Changing the Target of the assertElementPresent Command
6
7. Perform the second step of the test case by clicking the download link for Oracle JDeveloper 11g. Use the same procedure you used to change the target of the assertElementPresent command to change the target of the clickAndWait command as well. Use the same procedure you used in the first step to assert the title of the resulting page (the assertTitle command). To verify the presence of theAgreement radio buttons, right-click the Accept radio button, click Show All Available Commands, and chooseassertElementPresent agreement.
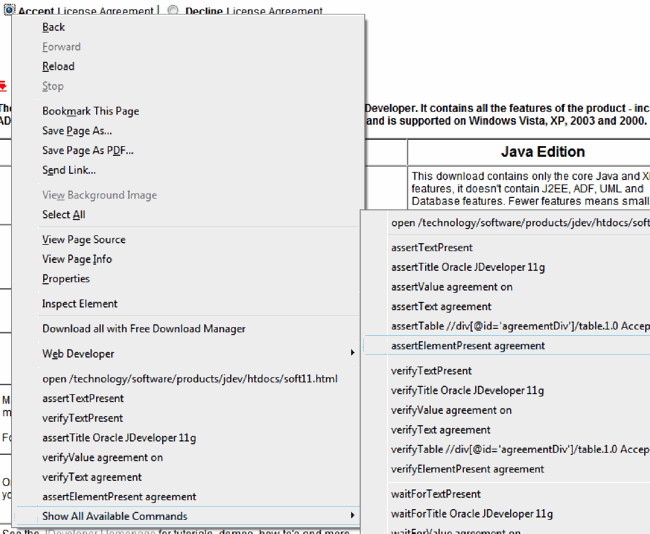
Figure 9: Asserting the Presence of the Agreement Radio Buttons
A side note here for those of you who are well-versed in HTML: there are actually two items on the page called Agreement—fortunately, the way Selenium works, it will see (and later click) the first one, so our test works just fine. As you use Selenium for more-advanced test cases, you'll need to refer to the documentation for more information.
9
10. Perform the third step of the test case by clicking the Accept radio button. To assert that the jdevestudio1111install.exe link is available, use the same technique you learned in the first step of the test case (including using Selenium IDE to change the target).
11
12. Click the red Record button in Selenium IDE to stop recording
Your recorded test case should look something like this in Selenium IDE (just click any extra steps and press the Delete key to remove them):

Figure 10: The Complete First UI Test
Use the File / Save command in Selenium IDE to save your test case. You can now do a quick-and-dirty run of the test case by
clicking thePlay current test case button:
You should see your test case executing successfully in Selenium IDE (your main browser window will show the actual Web pages and
actions performed by the test). You can see an example of a test failure by simply making an alteration to the last assertElementPresent
command's target to look for a nonexistent link. When I changed my test case to look for “link=I don't exist” and ran the test,
here is what I saw in Selenium IDE (if you do this, remember to change your test back after you finish):
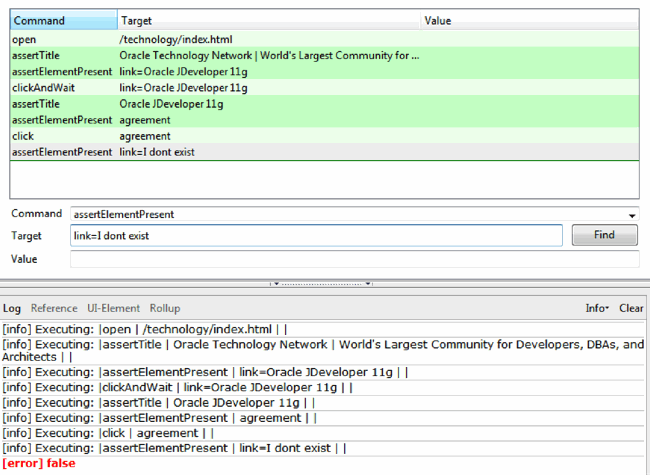
Figure 11: UI Test Failure
Creating a JUnit Test Class for the Selenium UI Test Case
The simple UI test you just created is useful; you can run the same test over and over from within Selenium IDE and see if the test fails or succeeds. However, running the test by hand using Selenium IDE doesn't achieve all of the benefits we hoped to get by fully automating the test (it still needs someone to manually open and initiate the test). To achieve the full benefit of automation, we need to convert the Selenium test into a form we can use with our chosen testing framework, JUnit. Fortunately, Selenium IDE lets us do just that; to create the JUnit test class, click Selenium IDE's File menu; the Export Test Case As... submenu; and finally, the Java (JUnit) – Selenium RC menu item:

Figure 12: Creating the JUnit test class
Give the test file an appropriate name (such as “jdevDownloadTest.java”). If you have a look at the generated source code, you'll notice a few things: first, the generated test class uses the old JUnit 3.x naming-convention-driven identification of test methods (methods must start with “test”). We'll fix this up later when we set up the class in Oracle JDeveloper 11 g. You'll also notice that the test class extends a base Selenium class called SeleniumTestCase. SeleniumTestCase is provided as part of another Selenium package called Selenium Remote Control (Selenium RC). Selenium RC has two main components: a server that is capable of launching and killing browsers and driving execution of Selenium tests and a set of client libraries for several programming languages and testing frameworks (including JUnit). In order to fully automate your UI test, you'll need to download Selenium RC from Selenium's download page. Once you have downloaded it, extract the Selenium RC zip file to an appropriate directory on your computer.
Running the UI Test in Oracle JDeveloper 11gIn order to run the generated UI test in Oracle JDeveloper 11 g, we'll need to do a few preliminary steps:
- Create an Oracle JDeveloper 11g library definition for the Selenium Java client driver.
- Create an Oracle JDeveloper 11g project to hold our UI tests.
- Place the generated JUnit test class in the appropriate location and add the appropriate annotations and imports.
- Start the Selenium Server, which will take care of starting browsers and driving them to run the UI tests.
The first step is to create an Oracle JDeveloper 11g library definition for the Selenium Java client driver. If you have been following along with this article series, you'll recall that all of the third-party libraries used in our application are stored in Subversion so that we can build and test our application on any machine. We'll continue using the application we've been developing to contain this UI test. Create a directory in the 3pLibs project directory called “selenium” and place a copy of the selenium-client-driver.jar file in that directory. Don't forget to add the file to Subversion as well (check out the Subversion articles in this series if you need help doing that). Finally, use Oracle JDeveloper 11g's Manage Libraries command in the Tools menu to create a User Library called “Selenium Java Driver”:
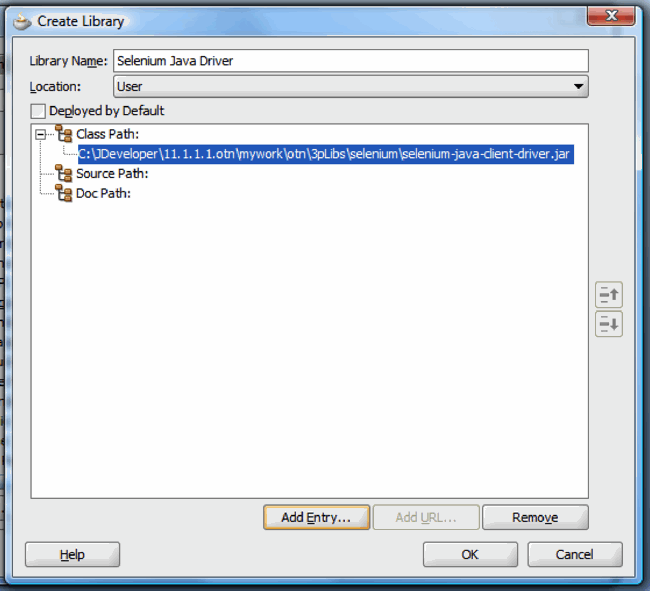
Figure 13: Creating the Selenium Java Driver Library in Oracle JDeveloper 11g
In order to make the UI tests available to our Ant scripts, use the technique from the Ant article instalment to add the library to the 3pLibs project and generate a 3pLibs.xml file (using the JDevLibsForAnt extension). Once you've generated the file and cleaned up the entries as detailed in the Ant article, it should look like this:

Figure 14: The 3pLibs.xml File
As usual, make sure you add the file to Subversion—in general, make sure you add all of the new files to Subversion and commit the changes.
The next step is to add a new Oracle JDeveloper 11g project to our application to hold the UI tests. You can do this by selecting New Project... from the Application Navigator menu in Oracle JDeveloper 11 g. Select to create a Generic Project and give it the name “UITests.” Double-click the new project in the Application Navigator and add the Selenium Java Driver and JUnit 4 Runtime libraries to the project:

Figure 15: Adding the Selenium and JUnit Libraries
The next step is to bring the generated JUnit test class into the UITests project. I usually do this by first creating a class in Oracle JDeveloper and then copying the generated Selenium test class code and pasting it into my class. Create a new class in the UITests project called testJDevDownload (I placed it in a com.stegeman.otn.view.tests package). Reformat the code to your liking and use the Oracle JDeveloper import code assist to import the com.thoughtworks.selenium.SeleneseTestCase class. Now we can add JUnit annotations (use the import code assist to get the proper imports) and change the URL of the Website we are testing to end up with a test class that looks like this:

Figure 16: Completed testJDevDownload Test Class
If you run the test class now, you'll see it fail because you haven't started the Selenium Server yet:

Figure 17: Failed Test Due to No Selenium Server
Fortunately, the Selenium Server is easy to start. Simply open a command prompt (or *nix shell), navigate to the selenium-server-x.y.z subdirectory where you unzipped Selenium RC earlier, and run the command java –jar selenium-server.jar. You should now be able to run the test class from within Oracle JDeveloper 11g and see the test execute successfully. Selenium RC Server will take care of starting Firefox, running the test, closing Firefox, and returning the success/failure back to your test class. If you'd like to run the test on Microsoft Internet Explorer instead of Firefox, you can replace the string “*chrome” with “*iexplore” in the call to setUp in your test class.
Now that you have gotten the basic flow of writing a UI test, you can proceed to writing UI tests for Oracle ADF Faces RC applications. There are a few key things you should know about using Selenium IDE with Oracle ADF Faces RC applications:
- You should always set a value for the id property of your Oracle ADF Faces RC components. This is a generally accepted good practice anyway, but Selenium requires a stable id in order to be able to access components reliably.
- Using pop-up menus within contextMenu facets (such as in an af:table) will override the right-click context menu in the browser, meaning that the Selenium IDE commands won't be accessible from the context menu. This means that you may have to manually code some steps of the UI test using Selenium commands. Context menus in general are a bit tricky in Selenium; our simple test application uses a context menu, so we'll see how it works.
- Setting the contentDelivery for an af:table to lazy (which is the default) can make it difficult for you to decipher the structure of HTML and thus to write Selenium commands manually (because lazy content delivery delivers the table contents into a hidden iFrame in a subsequent Ajax request). Lazy content delivery can also cause issues because Selenium may think the Web page is completely loaded, when in fact, there is still a pending Ajax request. You will see one possible way of dealing with this issue in the UI test below.
The first step in writing our UI test is to describe the test case in terms of actions and expectations. As you may recall from earlier articles in the series, our application is a simple one; we have one page that lists departments, with a context menu that allows the user to go to a second page to edit a department. Let's define our UI test like this:
- 1. Navigate to the Department List page. We expect that the first department listed is the Accounting department.
- 2. Use the context menu to edit the Accounting department. We expect to get a page with Save and Cancel buttons.
- 3. Change the department name to “Accounting2” and click the Cancel button. We expect to be returned to the first page with the first department name “Accounting” and not “Accounting2
- 4. Repeat Steps 2 and 3, except click the Save button. We expect the first department name to now be “Accounting2.”
- 5. Repeat Steps 2 and 4, except change the name back to “Accounting” and click the Save button. We expect the first department name to now be “Accounting.”
One thing that should be noticeable about this UI test is that it expects the database to be in a certain state in order for the test to succeed. In other words, the alphabetically first department in the database must be named “Accounting.” How to ensure a certain database state is beyond the scope of this article, but there are tools such as DbUnit (see the “Resources” section) that can help. Another possible solution is to have a backup of the “standard” database and restore it as part of a test suite.
Before we fire up Selenium IDE and start recording our test, however, let's review the earlier suggestions for Oracle ADF Faces RC applications. First, all of the pertinent components in our simple application already have the id property set, so we are fine on that front. We also know that our application uses a context menu on the Department List page, so we will have to look out for any possible quirks with how Selenium ID works in that scenario Finally, the Department List page does have an af:table with lazy content delivery, so we will need to insert specific Selenium commands into our tests to wait for the af:table to completely load before proceeding with the test.
To assist you with understanding the HTML structure of your Oracle ADF Faces RC pages, you may wish to download and install the Firebug add-on for Mozilla Firefox. The Firebug add-on provides a console window that shows you the structure of your pages as they run in the browser, and can help you in locating a specific element in the generated HTML.
Now, let's write the UI test for our application. Start by running the Department List page from Oracle JDeveloper 11g (hint: right-click andRun). This will ensure that the integrated Oracle WebLogic Server is started and that our application is deployed and running. Once the Department List page is displayed, open Selenium IDE as before. To start recording, copy and paste the URL for the Department List page, but without the extra URL parameters for session id and control state, into the Firefox address bar and press Enter. (The URL should look something like this: http://127.0.0.1:7101/otnapp-ViewController-context-root/faces/listDepartments.) When the Web page appears, click on the Accounting department (it should be the first one listed). In Selenium IDE, you should now see two commands (open followed by click). If you were to run the UI test now, it would fail. Can you guess why? Remember that our table's content delivery is set tolazy, meaning that the table data is loaded in a subsequent Ajax request. When Selenium runs the test, it sees that the page is loaded but doesn't know that it needs to wait for the subsequent Ajax request to complete. Therefore, the item referred to by the click command doesn't yet exist. In order to fix this, let's insert an explicit command in our test to wait for that element to appear. In Selenium IDE, right-click the click command and choose Insert New Command. Then you can provide the waitForElementPresent command and its parameters as shown here:
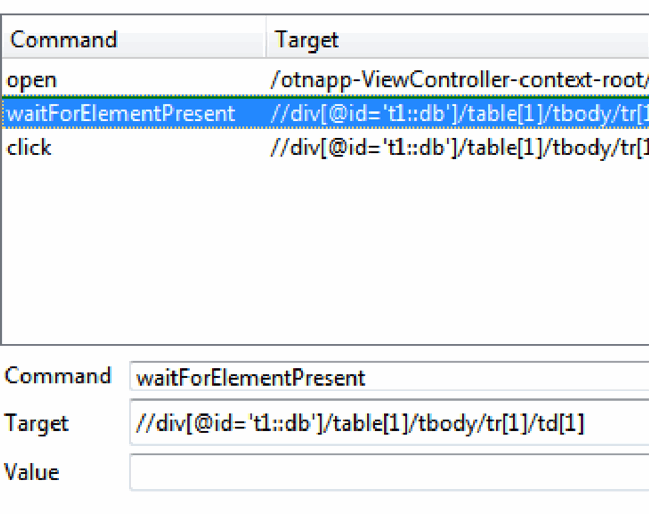
Figure 18: Waiting for Initial Ajax Request to Complete
The string used as the Target value for the command should be fairly easy to understand: it refers to the first cell (td[1]) of the first table row (tr[1]) inside the body (tbody) of the first table (table[1]) inside of the HTML DIV element with ID “t1::db.” The DIV element's ID is simply the ID of our af:table (t1) with a suffix of “::db”, which is the ID that Oracle ADF Faces RC generates for the content of an af:table. The next step is to verify that the first Department's name is “Accounting”; you can easily do this in Selenium IDE by copying and pasting a copy of the click command and changing the command to assertText with Target and Value as shown here:
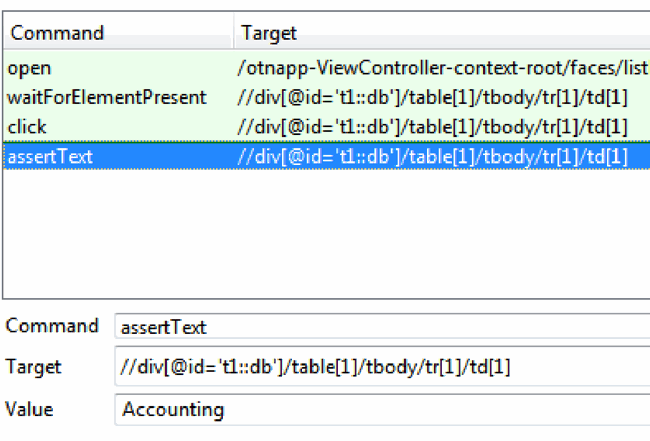
Figure 19: Asserting that the First Department Name Is “Accounting”
The assertText command asserts that the text in the specified component matches the specified value; as you develop more-sophisticated UI tests, you'll want to read through the Selenium documentation to understand what commands are available. That's all for the first step of our test. The second step is to invoke the context menu on the Accounting department: select the Edit context menu item. Because the context menu we defined replaces the browser's default context menu, we cannot use the Selenium IDE context menu to create the command. The Selenium command that is used to invoke the context menu is, intuitively enough, contextMenuAt; as in the previous step, copy the click command and paste it at the end of the UI test script. Change the command to contextMenuAt with Target and Value as shown here (the 5,5 represents a pixel offset to the upper-left corner of the component):
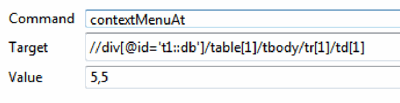
Figure 20: Invoking the Context Menu
Selenium IDE should still be recording, so record the invocation of the context menu's Edit command by right-clicking the Accountingdepartment, and when the context menu appears, choose Edit. You'll see that Selenium inserts a clickAndWait command into the test script. However, since the context menu takes a non-zero amount of time to appear, we need to insert another waitForElementPresent command between the contextMenuAt and clickAndWait commands to wait for the context menu, like this:

Figure 21: Waiting for the Context Menu to Appear
The Target value for the command is the same element that the clickAndWait command is going to click. In the Department edit page that is now showing in your browser, you can assert the presence of the Save and Cancel buttons by right-clicking and finding the Selenium commands assert Text cb1 Save and assert Text cb2 Cancel.
Step 3 of the test is to type Accounting2 as the name of the Department and click the Cancel button. You can do those steps manually, and Selenium IDE (which is still recording) will insert the appropriate commands in the UI test script. You'll have to make a small change, as Selenium inserts a click command for the button click, instead of the desired clickAndWait (which will wait for the request to be processed). As before, the lazy content delivery means that we need an explicit wait for the table to load before we assert that the Department name hasn't changed from “Accounting.” You can simply copy and paste the waitForElementPresent and assertText commands into your test script, which should now look like this:
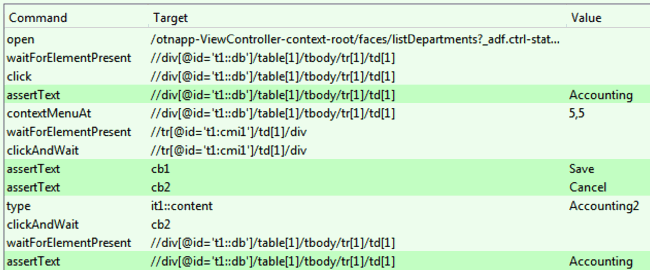
Figure 22: UI Test After Step 3
You can now complete Steps 4 and 5 of the test script by simply copying and pasting commands as appropriate (there's no need to do any more recording). The complete test script should look like this:

Figure 23: Completed Oracle ADF Faces RC UI Test
You should now be able to successfully run the test from Selenium IDE. You can also create a JUnit Test Class (as you did for the first test), clean up the test (add JUnit Annotations and specify the correct base URL for the Website you are testing, http://localhost:7101), and successfully run the test class from within Oracle JDeveloper. The final version of the test class is included in the Oracle JDeveloper 11gApplication Workspace that accompanies this article.
In most cases, I would recommend using Selenium IDE to do the rough initial recording of test cases, export them to JUnit format, and then polish and refactor the tests in Oracle JDeveloper. The format used by Selenium IDE to record test cases, which is called “Selenese,” is based upon HTML and cannot handle sophisticated constructs such as method calls/subroutines, looping, and so on. The Selenium RC documentation contains a section describing some of these benefits. There is also a section on Test Design Considerations that gives some best practices for coding the test cases.
Conclusion
Now that you know how to create basic UI tests using Selenium, you can move on to create more-advanced tests that test on different browsers and perform more-sophisticated test cases. As you have seen, there are quite a few nuances that you'll need to discover and understand in order for you to build effective and robust UI tests. You should read the Selenium documentation to understand the range of commands available for scripting the UI tests. Additionally, as is true with most open source projects, the internet provides good sources of information, from blog posts by other users to interactive forums.
In the final article in this series, you will learn how to use the Hudson continuous integration server to automate the unit testing, building, deploying to a test application server, and UI testing of your Oracle ADF applications.
More Good Stuff
- Home page for Mozilla Firefox: http://firefox.com
- Selenium home page: http://seleniumhq.org
- DbUnit ] home page: http://www.dbunit.org
- The Selenium Users Forum hosted on Google Groups: http://groups.google.com/group/selenium-users
John Stegeman ( http://stegemanoracle.wordpress.com) is an Oracle ACE Director (Oracle Fusion Middleware) and the principal architect in the EMEA region for Cambridge Solutions, a global BPO and IT services firm. He has been working with Oracle products since 1990 and with Oracle JDeveloper since Version 3.