Cube Development for Beginners
by Yuli VasilievPublished April 2011
Get the basics of data warehouse development using Oracle Warehouse Builder 11g.
From school, we know that although most math tasks have plain-English formulation, we still have to state an equation with x, or, sometimes, a system of equations with x, y, and maybe even more variables, to find a solution. Similarly, in a decision support system, we have to design a set of data objects such as dimensions and cubes, according to the business questions formulated in plain English, so that we can get those questions answered.
This article focuses on just that: constructing a dimensional environment for answering business questions. In particular, it will explain how to come from certain analytic questions to the set of data objects needed to get the answers, using Oracle Warehouse Builder as the development tool. Since things are best understood by example, the article will walk you through building a simple data warehouse.
From Questions to Answers
A typical data warehouse concentrates on sales, to help users find answers to questions regarding the state of the business using the results retrieved from a sales cube based on Time, Product, or Customer criteria. This article example deviates from this practice, however. Here, you'll look at an example of how you might analyze the outgoing traffic related to a certain Website, using the information retrieved from a traffic cube based on Geography, Resource, and Time criteria.
Suppose you have a Website whose resources are hosted on more than one server, each of which may differ from another in the way it stores traffic statistics. The storage types used vary from a relational database to flat files. You need to consolidate traffic statistics over all of the servers so that you can analyze users activity over resources being accessed, date and time, and geographical location to answer the questions such as the following:
- What are our five most attractive resources on the site?
- Users from what country loaded this resource most of all over the course of the previous year?
- Connections from what region generated most outgoing traffic on the site for the last three months?
At first glance, it looks like you can use SQL alone to get these questions answered. After all, the CUBE, ROLLUP, and GROUPING SETS extensions to SQL are specifically designed to perform aggregation over multiple dimensions of data. Remember, however, that some data here is stored in flat files, which makes the SQL-based approach impractical. Moreover, looking at the above questions, you may notice that some require one year of historical data to get answered. What this means, in practice, is that you’ll also need to access archives containing historical data derived from transaction data and implemented as separate sources. In SQL, managing all those sources and transforming the data in each one into a consistent format for unified query operations would be quite laborious and error-prone.
So, briefly, the main tasks here are:
- Consolidate data stored in disparate sources into a consistent format.
- Work with historical data derived from transaction data.
- Use preloaded data to speed up queries.
- Organize data in a way convenient for dimensional analysis.
A data warehouse is designed precisely to perform these tasks. Just to recap, a warehouse is a relational database tuned to handle analytic queries rather than transaction processing, and is kept up to date with periodical refreshes and updates, downloading a subset of data from its sources by the ETL (extraction, transformation, and loading) process (scheduled normally for a particular day of the week or at a predetermined time of the day or night). The loaded data is transformed into a consistent format, and loaded into the warehouse target object., Once populated, the warehouse is typically available for queries through dimensional objects such as cubes and dimensions. Schematically, this might look like the figure below:
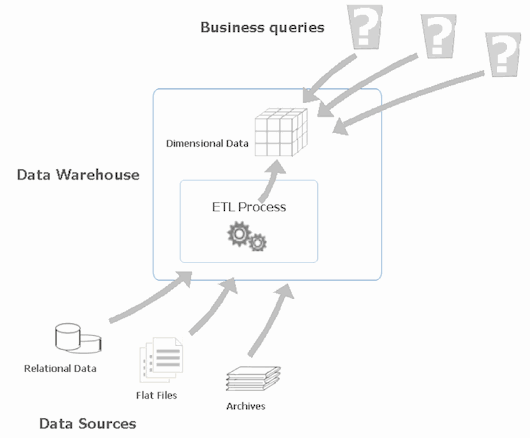
Figure 1 Gathering data from disparate sources and transforming it into useful information available to business users.
In particular, for this example, a simple warehouse consisting of a cube with several dimensions is an appropriate solution. Since the traffic is the subject matter here, you might want to define outgoing traffic as the cube measure. For simplicity, in this example we will measure outgoing traffic based on the size of the resource being accessed. For example, if someone downloads a 1MB file from your site, then it's assumed that 1MB of outgoing traffic will be generated. It's similar in meaning to how the dollar amount of a purchase depends on the price of the product chosen. While dollar amount is normally a measure of a sales cube, price is a characteristic of product that is usually used as a dimension in that cube. A similar situation is here, while outgoing traffic is our traffic cube's measure, resource size is a characteristic of resource that will be used as a dimension.
Moving on to dimensions, the set of ones to be used in the cube in this example can be determined by examining the list of questions you have to answer. So, looking over the questions listed at the beginning of this section, you might want to use the following dimensions to organize the data in the cube:
- Geography, which organizes the data related to the geography locations the site users come from
- Resource, which categorizes the data related to the site resources
- Time, which is used to aggregate traffic data across time
Each traffic record will have specific values for each geography location, for each resource, and for each day and time. To clarify, the time value in a traffic record refers to the time the resource is accessed.
The next essential step is to define the levels of aggregation of data for each dimension, organizing those levels into hierarchies. As for the Geography dimension, you might define the following hierarchy of levels (with the highest level listed first):
- Region
- Country
The hierarchy of levels for the Resource dimension might look like this:
- Group
- Resource
The time dimension might contain the following hierarchy:
- Year
- Month
- Day
In more complex and realistic scenarios, a dimension may contain more than one hierarchy—for example, fiscal versus calendar year. In this particular example, however, each dimension will have only a single hierarchy.
Implementing a Data Warehouse with Oracle Warehouse Builder
Now that you've decided what objects you need to have in the warehouse, you can design and build them .This task can be accomplished with Oracle Warehouse Builde, which is part of the standard installation of Oracle Database, starting with Oracle Database 11g Release 1. To enable it, though, some preliminary steps are required:
First of all, you need to unlock database schemas used by Oracle Warehouse Builder. In Oracle Warehouse Builder 11g Re1ease 1, the OWBSYS schema is used; in 11g Release 2, both OWBSYS and OWBSYS_AUDIT are used. These schemas hold the OWB design and runtime metadata. This can be done with the following commands, connecting to SQL*Plus as SYS or SYSDBA:
ALTER USER OWBSYS IDENTIFIED BY owbsyspwd ACCOUNT UNLOCK;
ALTER USER OWBSYS_AUDIT IDENTIFIED BY owbsys_auditpwd ACCOUNT UNLOCK;
Next, you must create a Warehouse Builder workspace. A workspace contains the objects for one or more data warehousing projects; in complex environments, you may have several workspaces. (Instructions for creating a workspace are in the Oracle Warehouse Builder Installation and Administration Guide for Windows and Linux.Follow the instructions to create a new workspace with a new user as workspace owner.)
Now you can launch the Warehouse Builder Design Center, which is the primary graphical user interface of Oracle Warehouse Builder. Click Show Details and connect to the Design Center as the newly created workspace user, with the required host/port/service name or Net Service name.
Before going any further, though, let's outline the set of tasks to accomplish. Broadly described, the tasks to be done in this example are:
- Define a data warehouse to house the dimensional objects described earlier
- Consolidate data from various data sources
- Implement the dimensional objects: dimensions and cube
- Load data extracted from the sources into the dimensional objects
The following sections describe how to accomplish the above tasks, implementing the dimensional solution discussed here. Before you proceed to it, though, you have to decide what implementation model will be used. In fact, you have two options: a relational target warehouse, which stores the actual data in relational tables, or a multidimensional warehouse. In the latter case, dimensional data is stored in an Oracle OLAP analytic workspace. This feature is available in Oracle Database 10g and Oracle Database 11g. For this example, , the dimensional model will be implemented as a relational target warehouse.
Defining a Target Schema
In this initial step, you begin by creating a new project or configuring the default one in the OWB Design Center. Then, you might identify the target schema that will be used to contain the target data objects: the dimensions and cube described earlier in this article.
Assuming you've decided to use the default project MY_PROJECT, let's move on to creating the target schema. The steps below describe the process of creating the target schema and then a target module upon that schema in the Design Center:
- In the Globals Navigator, right-click the Security->Users node and select New User in the popup menu to launch the Create User wizard.
- On the Select DB user to register screen, click Create DB User… to open the Create Database User dialog.
- In the Create Database User dialog, enter the system user password and then specify the user name, say, owbtarget and the password for a new database user. Then, click OK.
- You've now returned to the Select DB user to register screen, where the newly created owbtarget user should show up in the Selected Users pane. Click Next to continue.
- On the Check to create a location screen, make certain that the To Create a location checkbox is checked for the owbtarget user, and then click Next.
- On the Summary screen, click Finish to complete the process.
As a result of the above steps, the owbtarget schema is created in the database. (Also, the owbtarget user should show up under the Security->Users node in the Globals Navigator.) The next step is to create a target module upon the newly created database schema. As a quick recap, you use modules in Warehouse Builder to organize the objects you’re dealing with into subject-oriented groups. So, the following steps describe how you might build an Oracle module upon the owbtarget database schema:
- In the Projects Navigator, expand the MY_PROJECT->Databases node and right-click the Oracle node.
- In the popup menu, select New Oracle Module to launch the wizard.
- On the Name and Description screen of the wizard, specify a name for the module being created, say, target_mdl. As of the module status, you can leave Development.
- On the Connection Information screen, first make sure that the selected location is the one associated with the target_mdl module being created (it may appear under the TARGET_MDL_LOCATION1 name). Then, you need to provide the connection information for this location. So, click the Edit… button and provide the details of the Oracle database location, specifying owbtarget as the User Name. After you’re done with it, you might want to make sure that everything is correct and test the connection by clicking the Test Connection button. Close all of the dialogs opened by clicking OK to return to the Connection Information screen. Click Next to continue.
- On the Summary screen, click Finish.
- In the Design Center, select File->Save All to save the module you just created.
As a result of the above steps, the TARGET_MDL module should appear under the MY_PROJECT->Databases->Oracle node in the Projects Navigator. If you expand the module node, you’ll see what types of objects you can create under it. Among others, it includes nodes for holding: cubes, dimensions, tables, and external tables.
Consolidating data from disparate data sources
Here, you will need not only to extract data from disparate sources but also transform the extracted data in a way so that it can be consolidated into a single data source. Thus, this task usually has the following stages:
- Import the metadata into OracleWarehouse Builder .
- Design ETL operations.
- Load source data into the warehouse.
What you need to start with however is develop a general strategy for extracting the source data, transforming it, and loading it into the warehouse. That said, you first have to make strategic decisions about how to best implement the task of consolidating data from data sources.
As far as flat files are concerned, your first decision to be made is probably about how you’re going to move data from them into the warehouse. The available options include: utilizing SQL*Loader or through external tables. In this particular example, using external tables seems to be a preferable option because the data being extracted from the flat files has to be joined with relational data. If you recall, the example assumes the source data is to be extracted from both database tables and flat files.
Your next decision to be made is of whether to define a source module for the source data objects you’re going to use. Although it’s is generally considered good practice to keep source and target objects in separate modules, for this simple example we will create all objects in a single database module.
Now let’s take a closer look at the data sources that will be accessed.
As mentioned earlier, what we have here is a Website whose resources are hosted on more than one server, each of which differs from another in the way it stores traffic statistics. For example, one server stores it in flat files and another in the database. The content of a flat file containing real-time data and called, say, access.csv might look like this:
User IP,Date Time,Site Resource
67.212.160.0,5-Jan-2011 20:04:00,/rdbms/demo/demo.zip
85.172.23.0,8-Jan-2011 12:54:28,/articles/vasiliev_owb.html
80.247.139.0,10-Jan-2011 19:43:31,/tutorials/owb_oracle11gr2.html
As you can see, the above file contains information about accessing resources by users, storing it in comma-separated value (CSV) format.In turn, the server that uses the database in place of flat files might store this same information in an accesslog table with the following structure:
USERIP                          VARCHAR2(15)
DATETIME                        DATE
SITERESOURCE                    VARCHAR2(200)
As you might guess, in this example, IP address data is necessary to identify the geolocation of the user accessing a resource. In particular, it allows you to deduce the geographic location down to the region, country, city, and even organization the IP address belongs to. To obtain this information from an IP address, you might use one of a number of free or paid subscription geolocation databases available today. Alternatively, you might utilize the geolocation information provided by the user during his/her registration, thus relying on the information stored in your own database. In that case, however, you’d probably want to rely on the user’s id rather than the IP address.
For the purpose of this example, we will use a free geolocation database that identifies IP address ranges on a country level, such as MaxMind's GeoLite Country database. (Maxmind also offers more accurate paid databases for country and city-level geolocation data.)For more details, you can check out the MaxMind Website.
The GeoLite Country database is stored as a CSV file containing geographical data for publicly assigned IPv4 addresses, thus allowing you to determine the user's country based on the IP address. To take advantage of this database you need to download the zipped CSV file, unzip it, and then import the data into your data warehouse. The imported data will be then joined with the Web traffic statistics data obtained from the flat files and the database discussed earlier in this section.
Examining the structure of the GeoLite Country CSV file, you may notice that aside of the IP diapasons each of which is assigned to a particular country and defined by their beginning and ending IP addresses represented in dot-decimal notation, it also includes corresponding IP numbers derived from those IP addresses with the help of the following formula:
IP Number = 16777216*w + 65536*x + 256*y + z

where

IP Address = w.x.y.z
The obvious advantage of using IP numbers rather than direct IP addresses is that IP numbers, being regular decimal numbers, can be easily compared, which simplifies the task of determining to what country the corresponding IP address belongs. The problem is however, that our traffic statistics data sources store direct IP addresses rather than the numbers derived from them. You will have to transform the Web traffic data so that the result of this transformation includes IP numbers rather than IP addresses.
The following diagram gives a graphical depiction of transforming and joining data:
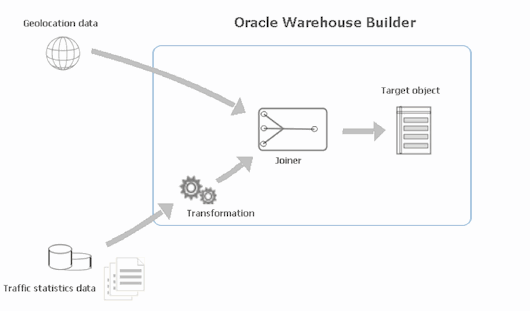
Figure 2 Oracle Warehouse Builder is extracts, transforms, and joins the source data.
Remember that dimension and cube data are usually derived from more than one data source. For this example, in addition to the traffic statistics and geolocation data, you will also need the data sources containing the resource and region information. For that purpose, you might assume you have two database tables: RESOURCES and REGIONS. Assume the RESOURCES table has the following structure:
SITERESOURCE                VARCHAR2(200)    PRIMARY KEY
RESOURCESIZE                NUMBER(12)
RESOURCEGROUP               VARCHAR2(10)

And assume the REGIONS table is defined as follows:

COUNTRYID                   VARCHAR2(2)      PRIMARY KEY
REGION                      VARCHAR2(2)
The data in the above tables will be joined with the Web traffic statistics and geolocation data.
Now that you understand the structure and the meaning of your source data, it’s time to move on and define all the necessary data objects in the Warehouse Builder. We will create the objects needed for the flat files first. The general steps to perform are the following:
- Create a new flat file module in the project and associate it with the location where your source flat files reside.
- Within the newly created flat file module, define the flat files of interest and specify their structure.
- Add external tables to the target warehouse module defined as discussed in the preceding section, associating those tables with the flat files created in the above step.
- Import the accesslog, resources, and regions database tables to the target warehouse module.
To create the flat file module, follow these steps in the Design Center:
- In the Projects Navigator, right-click the MY_PROJECT->Files node and choose New Flat File Module in the popup menu.
- On the Name and Description screen of the wizard, specify a name for the module being created, or leave the default. Then, click Next.
- On the Connection Information screen, click the Edit… button on the right of the Location select box.
- In the Edit File System Location dialog, specify the location where the flat files from which you want to extract data can be found. Click OK to come back to the wizard.
- On the Summary screen, click Finish to complete the wizard.
Now you can define a new flat file within the newly created flat file module. Let’s start with creating a flat file object for the access.csv file you saw earlier in this section:
- In the Projects Navigator, right-click the MY_PROJECT->Files->FLAT_FILE_MODULE_1 node and select New Flat File to launch the Create Flat File wizard.
- On the Name and Description screen of the wizard, specify a name for the flat file object being created, say, ACCESS_CSV_FF. Then, make sure to specify the physical file name. On this page, you can also change the character set or accept the default presented in the wizard.
- On the File Properties screen, make sure that the record delimiter character is set to carriage return: <CR>, and the field delimiter is set to (,).
- On the Record Type Properties screen, make sure that Single Record is selected.
- On the Field Properties screen, you’ll need to define the structure of the access.csv file record, setting the SQL properties for each field. Please note that the first set of properties that follows the Name property are SQL*Loader properties. You don’t have to define those properties however, because you’re going to use the external table option rather than the SQL*Loader utility. External tables are the most performant way to load flat file data into Oracle data warehouses. So, you’ll need to scroll right to get to the second set of properties: SQL properties. Define the properties as follows:
Name SQL Type SQL Length USERIP VARCHAR2 15 DATETIME DATE SITERESOURCE VARCHAR2 200 - On the Summary screen, click Finish to complete the wizard
At this point, you may want to commit your changes to the repository. Select File->Save All to commit your changes.
Repeat the above steps for the GeoIPCountryWhois.csv file that contains the geolocation data, defining the following properties on the Field Properties screen of the wizard:
Name             SQL Type       SQL Length
STARTIP          VARCHAR2       15
ENDIP            VARCHAR2       15
STARTNUM         VARCHAR2       10
ENDNUM           VARCHAR2       10
COUNTRYID        VARCHAR2       2
COUNTRYNAME      VARCHAR2       100
Once these are done, define external table objects in the the target module. These will expose the flat file data as tables in the database To define an external table upon the ACCESS_CSV_FF flat file object created earlier, follow the steps below:
- In the Projects Navigator, expand the MY_PROJECT->Databases->Oracle->TARGET_MDL node, right-click External Tables and select New External Table.
- On the Name and Description screen of the wizard, specify a name for the external table, say, ACCESS_CSV_EXT.
- On the File Selection screen, select ACCESS_CSV_FF that you should see under the FLAT_FILE_MODULE1.
- On the Locations screen, select the location where the external table will be deployed.
- On the Summary screen, click Finish to complete the wizard.
Repeat the above steps for the GEOLOCATION_CSV_FF flat file object.
Now that you have all of the necessary object definitions created you have to deploy them to the target schema before you can use them. Another preliminary step is to make sure that the target schema in the database is granted the privileges to create and drop directories. For that, you can connect to SQL*Plus as sysdba and issue the following statements:
GRANT CREATE ANY DIRECTORY TO owbtarget;
GRANT DROP ANY DIRECTORY TO owbtarget;
After that, you can come back to the Design Center and proceed to deploying. The following steps describe how to deploy the external tables:
- In the Projects Navigator, expand the MY_PROJECT->Databases->Oracle->TARGET_MDL->External Tables node and select both the ACCESS_CSV_EXT and GEOLOCATION_CSV_ EXT nodes.
- Right-click the selection and choose Deploy … The process starts with compiling the selected objects and then proceeds to deploying, which may take some time to complete.
If the deployment has completed successfully, this means you have the definitions of the external tables created in the target schema within the database, and, therefore, you can query those tables. To confirm that everything is going as planned so far, it would be a good idea to look at the data you can access through the newly deployed tables. The simplest way to do this is by selecting the Data…command in the popup menu that appears when you right-click the node of an external table in the Project Navigator.
While you should have no problem with the GEOLOCATION_CSV_ EXT table containing about 140,000 rows, you may see nothing when it comes to the ACCESS_CSV_EXT data. The first thing you might want to check out to determine where the problem lies are the ACCESS_CSV_EXT’s access parameters, which you can access through the ALL_EXTERNAL_TABLES data dictionary view. Thus, being connected as sysdba to SQL*Plus, you might issue the following query:
SELECT access_parameters FROM all_external_tables
WHERE table_name ='ACCESS_CSV_EXT';

The output should look like this:

records delimited by newline
    characterset we8mswin1252
    string sizes are in bytes
    nobadfile
    nodiscardfile
    nologfile
    fields terminated by ','
    notrim
    ("USERIP" char,
     "DATETIME" char,
     "SITERESOURCE" char
    )
Examining the above, you might notice that the DATETIME field comes with no date mask, which may cause a problem when accessing the date data whose format differs from the default. The problem can be fixed with the following ALTER TABLE statement:
ALTER TABLE owbtarget.access_csv_ext ACCESS PARAMETERS
   (records delimited by newline
    characterset we8mswin1252
    string sizes are in bytes
 nobadfile
 nodiscardfile
    nologfile
    fields terminated by ','
    notrim
    ("USERIP" char,
     "DATETIME" char date_format date mask "dd-mon-yyyy hh24:mi:ss",
     "SITERESOURCE" char
    )
   );
Now, returning to the Design Center, if you click the Execute Query button in the Data-ACCESS_CSV_EXT window, you should see the rows generated from the data derived from the access.csv file.
All that is left to complete the task of creating the data source object definitions is to import the metadata for the source database tables ACCESSLOG, RESOURCES, and REGIONS described earlier in this section. To do this, you can follow these steps:
- In the Projects Navigator, expand the MY_PROJECT->Databases->Oracle->TARGET_MDL node and right-click Tables. In the popup menu, select Import->Database Objects… to launch the Import Metadata wizard.
- On the Filter Information screen of the wizard, select Table as the type of objects you want to import.
- On the Object Selection screen, move accesslog, regions, and resources tables from the Available to the Selected pane.
- On the Summary and Import screen, click Finish to complete the wizard.
As a result of the above steps, the ACCESSLOG, REGIONS, and RESOURCES objects must appear under the MY_PROJECT->Databases->Oracle->TARGET_MDL->Tables node in the Projects Navigator.
Aggregating Data Across Dimensions with Cubes
Having the source object definitions created and deployed, let’s build the target structure. In particular, you’ll need to build a Traffic cube to be used for storing aggregated traffic data. Before moving on to building the cube, though, you’ll have to build the dimensions that will make up the edges of it.
If you recall from the discussion in the beginning of the article, you need to define the following three dimensions to organize the data in the cube: Geography, Resource, and Time. The following steps describe how you might build the Geography dimension and then load data into it:
- In the Projects Navigator, right-click node MY_PROJECT->Databases->Oracle-> TARGET_MDL->Dimensions and select New Dimension in the popup menu to launch the Create Dimension wizard.
- On the Name and Description screen of the wizard, type in GEOGRAPHY_DM in the Name field.
- On the Storage Type screen, select ROLAP.
- On the Levels screen, enter the following levels:
Region Country
- On the Level Attributes screen, make sure that all the level attributes for both the Region and Country levels are checked.
- On the Slowly Changing Dimension screen, select Type1:Do not keep history.
- After you’re done with the wizard, you should see the GEOGRAPHY_DM object under the MY_PROJECT->Databases->Oracle-> TARGET_MDL->Dimensions node in the Project Navigator. Now, right-click it and select Bind. As a result, table GEOGRAPHY_DM_TAB should appear under the MY_PROJECT->Databases->Oracle->TARGET_MDL->Tables node. Right-click it and select Deploy… Also, the GEOGRAPHY_DM_SEQ should appear under the MY_PROJECT->Databases->Oracle->TARGET_MDL->Sequences node, which you have to deploy too. After both deployments have been completed, come back to GEOGRAPHY_DM and deploy it.
Now you will define an ETL mapping that loads the GEOGRAPHY_DM dimension from the source data. The steps are as follows:
- In the Projects Navigator, expand the MY_PROJECT->Databases->Oracle->TARGET_MDL node and right-click Mappings. In the popup menu, select New Mapping to launch the Create Mapping dialog. In this dialog, specify the mapping name, say, GEOGRAPHY_DM_MAP. After you click OK, the Mapping Editor canvas should appear.
- In the Projects Navigator, expand the MY_PROJECT->Databases->Oracle->TARGET_MDL->Tables node, and then drag and drop the REGIONS table to the GEOGRAPHY_DM_MAP’s mapping canvas in the Mapping Editor.
- Then, expand the MY_PROJECT->Databases->Oracle->TARGET_MDL->Dimensions node and drag and drop the GEOGRAPHY_DM dimension to the mapping canvas, to the right of the REGIONS table operator.
- In the mapping canvas, connect the COUNTRYID attribute of the REGIONS operator to the COUNTRY.NAME attribute of GEOGRAPHY_DM, and then connect the COUNTRYID attribute of the REGIONS operator to the COUNTRY.DESCRIPTION attribute of GEOGRAPHY_DM.
- Similarly, connect the REGION attribute of the REGIONS operator to the REGION.NAME, COUNTRY. REGION_NAME and REGION.DESCRIPTION attributes of GEOGRAPHY_DM.
- In the Projects Navigator, expand the MY_PROJECT->Databases->Oracle->TARGET_MDL->Mappings node. Right-clickGEOGRAPHY_DM_MAP, and then select Deploy… in the popup menu.
- The final step here is to load the GEOGRAPHY_DM dimension. To do this, you need to execute the GEOGRAPHY_DM_MAP mapping. Thus, right-click GEOGRAPHY_DM_MAP and select Start…
- Similarly, you should create and deploy the RESOURCE_DM and RESOURCE_DM_MAP objects, using the resources table as the source and specifying the following levels in the RESOURCE_DM dimension:
Group Resource
- When defining the RESOURCE_DM dimension attributes, don’t forget to increase the length of both the NAME and DESCRIPTION attributes to 200, so that they can be connected with the SITERESOURCE attribute of the RESOURCES operator.
Finally, you need to create a time dimension. The easiest way to do this is to use the Create Time Dimension wizard, which defines both a Time Dimension object and an ETL mapping to load it for you. For details on how to create and populate a time dimension, you can refer to the Creating Time Dimensions section in the Oracle Warehouse Builder Data Modeling, ETL, and Data Quality Guide.
Once you have the dimensions set up, carry out the following steps to define a cube:
- In the Projects Navigator, right-click node MY_PROJECT->Databases->Oracle->TARGET_MDL->Cubes and select New Cube in the popup menu.
- On the Name and Description screen of the wizard, enter the cube name in the Name field: TRAFFIC.
- On the Storage Type screen, select ROLAP: Relational storage.
- On the Dimensions screen, move all the available dimensions from the Available Dimensions pane to the Selected Dimensions pane, so that you have the following dimensions selected:
RESOURCE_DM GEOGRAPHY_DM TIME_DM
- On the Measures screen, enter the following measures:
OUT_TRAFFIC with the data type NUMBER
- After the wizard is completed, the TRAFFIC cube and TRAFFIC_TAB table should appear in the Project Navigator. You must deploy them before going any further.
As with a dimension, the next step to be done is to create a mapping defining how the source data will be loaded into the cube.
Transforming the Source Data for the Cube Loading
So now, you have to design ETL mappings that will transform the source data and load it into the cube. Here is the list of the transformation operations you’ll need to design:
- Combine the rows of the access_csv_ext external table and the accesslog database table into a single row set consolidating the traffic statistics data.
- Transform IP addresses within the traffic statistics data into corresponding IP numbers to simplify the task of determining the diapason? an IP address in question belongs to.
- Join the traffic statistics data with the geographical data.
- Aggregate the joined data, loading the output data set to the cube.
As mentioned, the above operations must be described in a mapping. Before moving on to creating a mapping, though, let’s define a transformation described at the second step above. This transformation will be implemented as a PL/SQL function. The following steps describe how you might do that without leaving the Design Center:
- In the Projects Navigator, expand the MY_PROJECT->Databases->Oracle->TARGET_MDL->Transformations node and right-click Functions. In the popup menu, select New Function.
- In the Create Function dialog, specify the name for the function, say, IpToNum, and click OK. As a result, the Function Editor associated with the function being created is displayed.
- In the Function Editor, move on to the Parameters tab and add parameter IPADD, setting data type to VARCHAR2 and I/O to Input.
- In the Function Editor, move on to the Implementation tab and edit the function code as follows:
p NUMBER; ipnum NUMBER; ipstr VARCHAR2(15); BEGIN ipnum := 0; ipstr:=ipadd; FOR i IN 1..3 LOOP p:= INSTR(ipstr, '.', 1, 1); ipnum := TO_NUMBER(SUBSTR(ipstr, 1, p - 1))*POWER(256,4-i) + ipnum; ipstr := SUBSTR(ipstr, p + 1); END LOOP; ipnum := ipnum + TO_NUMBER(ipstr); RETURN ipnum; END; - In the Projects Navigator, right-click the newly created IPTONUM node and select Deploy…
Now you can create a mapping in which you then define how data from the source objects will be loaded into the cube:
- In the Projects Navigator, expand the MY_PROJECT->Databases->Oracle->TARGET_MDL node and right-click Mappings. In the popup menu, select New Mapping to launch the Create Mapping dialog. In this dialog, specify the mapping name: TRAFFIC_MAP. After you click OK, the Mapping Editor canvas should appear.
- To accomplish the task of combining the rows of the access_csv_ext and accesslog tables, first drag and drop the ACCESS_CSV_EXT and ACCESSLOG table objects from the Project Navigator to the Mapping Editor canvas. As a result, the operators representing the above tables should appear in the canvas.
- From the Component Palette, drag and drop the Set Operation operator to the mapping canvas. Then, in the Property Inspector, set the Set operation property of the operator to UNION.
- In the mapping canvas, connect the INOUTGRP1 group of the ACCESSLOG operator to the INGRP1 group of the SET OPERATION operator. As a result, all corresponding attributes under those groups will be connected automatically.
- Next, connect the OUTGRP1 group of the ACCESS_CSV_EXT operator to the INGRP2 group of the SET OPERATION operat
- The next task to accomplish is joining the traffic statistics data with the geographical data. To begin with, drag and drop the GEOLOCATION_CSV_EXT table object from the Project Navigator to the mapping canvas.
- From the Component Palette, drag and drop the Joiner operator to the mapping canvas. Then, connect the OUTGRP1 group of the GEOLOCATION_CSV_EXT operator to the INGRP1 group of the JOINER operator. Next, connect the OUTGRP1 group of the SET OPERATION operator to the INGRP2 group of the JOINER operator.
- In the Projects Navigator, expand the MY_PROJECT->Databases->Oracle->TARGET_MDL->Transformations->Functions node and drag and drop the IPTONUM function to the mapping canvas.
- In the mapping canvas, select and delete the line connecting the USERIP output attribute of the SET OPERATION operator with the USERIP input attribute of the JOINER operator. Connect the USERIP output attribute of the SET OPERATION operator with the IPADD input attribute of the IPTONUM operator. Then, connect the output attribute of the IPTONUM operator with the USERIP input attribute of the JOINER operator. You also need to change the data type of the JOINER’s USERIP input attribute for NUMERIC. This can be done on the Input Attributes tab of the Joiner Editor dialog, which you can invoke by double-clicking the header of the JOINER operator.
- In the Joiner Editor dialog, move on to the Groups tab and add an input group INGRP3. Then, click OK to close the dialog.
- From the Project Navigator, drag and drop the RESOURCES table object to the Mapping Editor canvas. Then, connect the INOUTGRP1 group of the RESOURCES operator with the INGRP3 group of the JOINER operator.
- Click the header of the JOINER operator. Then move onto the JOINER Property Inspector, in which you should click the Join Condition button. As a result, the Expression Builder dialog should appear, in which you build the following join condition:
(INGRP2.USERIP BETWEEN INGRP1.STARTNUM AND INGRP1.ENDNUM) AND (INGRP2.SITERESOURCE = INGRP3.SITERESOURCE) - Next, you need to add an Aggregator that will aggregate the output of the Joiner operator. From the Component Palette, drag and drop the Aggregator operator to the mapping canvas.
- Connect the OUTGRP1 group of the JOINER operator with the INGRP1 group of the AGGREGATOR operator. Then, click the header of the AGGREGATOR operator and move on to the Property Inspector, in which click the Ellipsis button to the right of the Group By Clause field to invoke the Expression builder dialog. In this dialog, specify the following group by clause for the aggregator:
INGRP1.COUNTRYID,INGRP1.SITERESOURCE,INGRP1.DATETIME - Double-click the header of the AGGREGATOR operator and move on to the Output tab of the dialog, where add the RESOURCESIZE attribute, specifying the following expression for it: SUM(INGRP1.RESOURCESIZE).
- From the Component Palette, drag and drop the Expression operator to the mapping canvas. Then, double-click the header of the EXPRESSION operator and move on to the Input Attributes tab of the dialog, in which define the DATETIME attribute of type DATE. Then, move on to the Output Attributes tab and define the DAY_START_DAY attribute of type DATE, specifying the following expression:
TRUNC(INGRP1.DATETIME, 'DD') - Delete the line connecting the DATETIME attribute of the JOINER operator with the DATETIME attribute of the AGGREGATOR operator. Then, connect the JOINER’s DATETIME to the EXPRESSION’s DATETIME and connect the EXPRESSION’s DAY_START_DAY to the AGGREGATOR’s DATETIME.
- In the Projects Navigator, expand the MY_PROJECT->Databases->Oracle->TARGET_MDL->Cubes node and drag and drop the TRAFFIC cube object to the canvas.
- Connect the attributes in the OUTGRP1 group of the AGGREGATOR operator with the TRAFFIC operator’s attributes as follows:
RESOURCESIZE to OUT_TRAFFIC
 COUNTRYID to GEOGRAPHY_DM_NAME
 DATETIME to TIME_DM_DAY_START_DATE
 SITERESOURCE to RESOURCE_DM_NAME
By now the mapping canvas should look like the figure below:
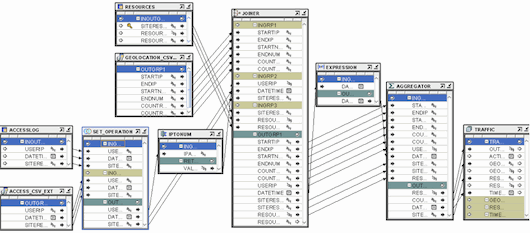
Figure 3 The mapping canvas , showing the TRAFFIC_MAP mapping that loads data from the source objects into the cube.
- You are now ready to deploy the mapping. In the Project Navigator, right-click the TRAFFIC_MAP object under the MY_PROJECT->Databases->Oracle->TARGET_MDL->Mapping node and select Deploy… This actually generates
- After the deployment has been successfully completed, you can execute the mapping, starting the job for the ETL logic defined. To do this, right-click the TRAFFIC_MAP object and select Start…

Once you’ve completed the above steps, you have the TRAFFIC cube populated with the data from the sources in accordance with the logic implemented in the mapping. Practically speaking, however, you rather have the fact table (it’s the TRAFFIC_TAB table in this particular example) populated with data. In other words, cube records are stored in the fact table. The cube itself is just a logical representation or visualization of the dimensional data used here.
Similarly, dimensions are physically bound to corresponding dimension tables, which store dimensions’ data in the database. Dimension tables are joined to the fact table with foreign keys, making up a model known as a star schema (because the diagram of such a schema resembles a star). Oracle Database's query optimizer can apply powerful optimization techniques when it comes to star queries (join queries issued against the fact table and the dimension tables joined to it), thus providing efficient query performance for the queries answering business questions.
Conclusion
Business intelligence as the process of gathering information with the purpose to support decision making needs a foundation for its environment. A data warehouse provides such a foundation being a relational database that is designed just for that: consolidating information gathered from disparate sources and providing access to that information to business users so that they can make better decisions.
As you saw in this article, a small data warehouse may consist of a single cube and just a few dimensions, which make up the edges of that cube. In particular, you looked at an example of how traffic statistics data can be organized into a cube whose edges contain values for Geography, Resource, and Time dimensions.
Yuli Vasiliev is a software developer, freelance author, and consultant currently specializing in open source development, Java technologies, business intelligence (BI), databases, and service-oriented architecture (SOA). He is the author of Oracle Business Intelligence: The Condensed Guide to Analysis and Reporting (Packt, 2010) as well as a series of other books on the Oracle technology.