HTML5 and JSF
by Josh Juneau
Published May 2014
Mix and match the two technologies to create sophisticated applications.
This article focuses on integrating HTML5 into new and existing Java EE applications using JavaServer Faces (JSF). It covers the basics of adding HTML5 components into existing JSF views and constructing entire JSF views using HTML5 markup.
This article also covers the development of server-side templates, making it easy to change the look and feel of different views within an application. You will see examples demonstrating techniques for sending data to and from the server via HTML5 components using WebSocket and JSON-P, and you will learn how to build these solutions using NetBeans IDE.
The examples in this article demonstrate how to generate the same web form using standard JSF markup, HTML5 only, and both JSF and HTML5. The examples also demonstrate how seamlessly HTML5 elements can be processed as JSF components, and vice versa. After reading this article, you should have the knowledge necessary to begin integrating HTML5 components and technologies into your JSF applications.
Originally published in the May/June 2014 issue of Java Magazine. Subscribe today.
HTML5-Compatible Markup
When developing a web application, there are many decisions that have to be made beforehand. What functionality will the application provide? What type of user will be working with the application? Which devices will be used to work with the application? These are just some of the questions that must be answered before you can choose which technology or web framework to use.
There are hundreds of frameworks and technologies that can be used for developing web applications today. JSF is a mature and robust specification that ranks among the leading choices. It provides a solid foundation for sophisticated server-side applications that have the ability to maintain state, and it allows developers to focus on building the application, rather than spending lots of time developing JavaScript and CSS. It does so by supplying a bevy of components that are ready to use for building sophisticated user interfaces, abstracting away the implementation details of each component.
HTML5 is a new standard for developing portable applications that scale across devices seamlessly. JSF 2.2 enables interactivity between HTML5 and JSF views, allowing developers to take advantage of the scalability and modernization of HTML5, while maintaining solid grounds for a robust and dependable web application. JSF 2.2 lets developers choose to use JSF components, HTML5 elements, or both.
JSF 2.2 introduced new namespaces, which can be specified for supplying pass-through elements, pass-through attributes, or both within HTML pages. Using these new features, HTML5 elements can be treated as JSF components, or JSF components can pass through to the browser without interpretation by JSF components or renderers. HTML5 pages can use JSF backing beans in the same manner as a standard JSF view, enabling seamless interactivity with JSF.
Your Choice
JSF 2.2 lets developers choose to use JSF components, HTML5 elements, or both.A Typical JSF View
Before we take a look at any HTML5, let’s look at a standard JSF view. The examples used for this article are a subset of the application for the Java developer’s paradise, Acme World Resort. In this article, we’ll focus on a form that is used to book a reservation for a stay at the resort. The JSF-only view contains a mixture of standard JSF components and PrimeFaces components. It is also good to note that the view does not contain validation, but it is important to add validation to any web application prior to release.
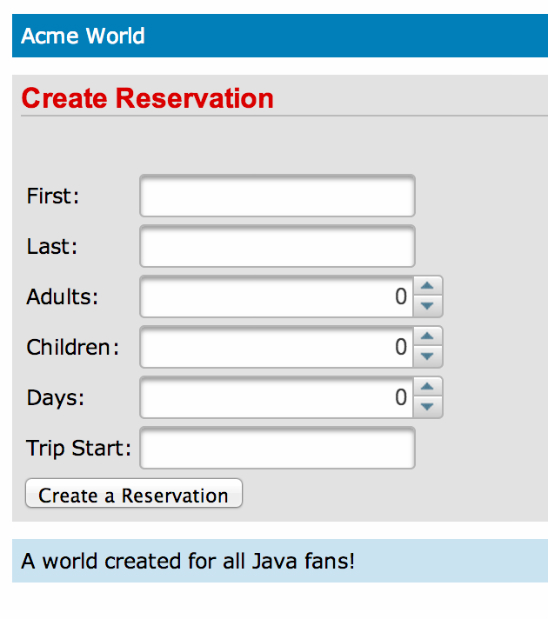
Listing 1 contains the JSF-only view for the reservation form. As you can see, the view contains a number of PrimeFaces components, specifically inputText, spinner, and calendar, to formulate the reservation form. Figure 1 shows what the JSF-only view looks like.

Figure 1
<h:form id=" parkReservationForm" >
   <h1>Create Reservation</h1>
   <br/>
   <h:messages id=" messages"
        infoStyle=" color: green;"
        errorStyle=" color: red;" />
  <br/>
  <h:panelGrid columns=" 2" >
    <label for=" firstName" >First:</label>
    <p:inputText id=" firstName"
           placeholder=" Enter First Name"
           value=" #{...firstName}" />
. . .

    <label for=" numAdults" >Adults:</label>
    <p:spinner id=" numAdults"  min=" 1"  max=" 15"
          value=" #{...numAdults}" />
. . .

    <label for=" startDate" >Trip Start:</label>
    <p:calendar id=" startDate"
          value=" #{...tripStartDate}" />

  </h:panelGrid>

  <h:commandButton id=" parkReservation"
  action=" #{parkReservationController.createReservation}"
  value=" Create a Reservation" >

  </h:commandButton>
</h:form>
Listing 1
HTML5-Only View
Now that we’ve seen how to produce the form using JSF markup only, let’s shift to HTML5. The form in Listings 2a, 2b, and 2c contains a mixture of JSF Facelets and HTML5 markup. The Facelets markup is used for template purposes only, and if the page contained no Facelets markup, it would still function properly with the JSF engine. Pass-through elements were introduced with JSF 2.2, and they are the reason that the HTML5 elements in Listings 2a, 2b, and 2c are processed as JSF components.
<form jsf:id=" parkReservationForm"  jsf:prependId=" false" >
  <h1>Create Reservation</h1>
  <br/>

  <table>
    <tr>
      <td>
        <label for=" firstName" >First:</label>
      </td>
      <td>
        <input type=" text"  jsf:id=" firstName"
            placeholder=" Enter First Name"
            jsf:value=" #{...firstName}" />
      </td>
    </tr>

    <tr>
      <td>
        <label for=" lastName" >Last:</label>
      </td>
      <td>
        <input type=" text"  jsf:id=" lastName"
            placeholder=" Enter Last Name"
            jsf:value=" #{...lastName}" />
      </td>
    </tr>
Listing 2a
<tr>
      <td>
        <label for=" numAdults" >Adults:</label>
      </td>
      <td>
        <input type=" number"  min=" 1"  max=" 10"
            jsf:id=" numAdults"
            jsf:value=" #{...numAdults}" />
      </td>
    </tr>
    <tr>
      <td>
        <label for=" numChild" >Children:</label>
      </td>
      <td>
        <input type=" number"  min=" 0"  max=" 15"
            jsf:id=" numChild"
            jsf:value=" #{...numChild}" />
      </td>
    </tr>
    <tr>
      <td>
        <label for=" numDays" >Days:</label>
      </td>
      <td>
        <input type=" number"  min=" 1"  max=" 30"
            jsf:id=" numDays"
            jsf:value=" #{...numDays}" />
      </td>
    </tr>
Listing 2b
<tr>
      <td>
        <label for=" startDate" >Trip Start:</label>
      </td>
      <td>
        <input type=" date"  jsf:id=" startDate"
            jsf:value=" #{...tripStartDate}" >
          <f:convertDateTime pattern=" YYYY-MM-dd" />
        </input>

      </td>
    </tr>
  </table>

  <button jsf:id=" parkReservation"
      jsf:action=" #{...createReservation}" >
    Create a Reservation
  </button>

</form>
Listing 2c
To get started using HTML5 elements with JSF, add the jsf namespace for the pass-through elements (xmlns:jsf="http://xmlns.jcp.org/jsf") to the page. The jsf namespace can be added to any HTML5 element attribute, allowing that element to be processed by the JSF runtime. Take a look at the <head> element:
<head jsf:id="head">
The jsf:id="head" tells the JSF engine to interpret this component as <h:head>. Similarly, reviewing an input component, we can see that attributes essential for JSF processing are passed through to the JSF runtime. In the following inputText element, the id and value are passed through:
<input type="text"
           jsf:id="firstName"
           jsf:value="#{…}"/>
As a result of the pass-through elements, the HTML5 element is treated as a first-class JSF h:inputText component that is associated with a server-side UIComponent instance. To be treated as a JSF component, at least one element must contain the jsf pass-through namespace. This allows standard HTML5 elements to accept Expression Language (EL) to retrieve and set managed bean properties. Therefore, when the form is submitted (or element values are sent to the server via JavaScript), the values are sent to the managed bean and processed accordingly.
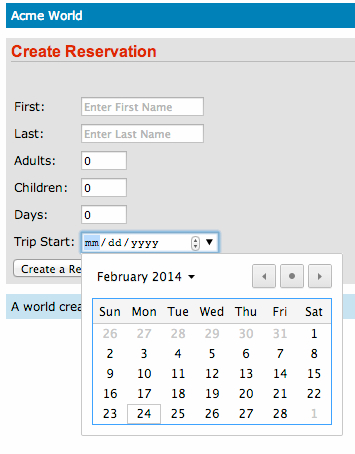
Figure 2 shows what the HTML5 page might look like. Note that this code uses the native HTML5 calendar element, which might be rendered differently across various browsers.

Figure 2
Sprinkling HTML5 into Existing JSF
JSF and HTML5 play nicely together. In fact, an HTML5 element can be added into any existing JSF view and function just as if it were a standard JSF component. However, in some cases, we might wish to use JSF components, but enhance them by specifying attributes that are available for use only via the component’s HTML5 counterpart. Such a solution is made possible using JSF 2.2’s addition of the pass-through attributes. Pass-through attributes are the converse of pass-through elements: a pass-through attribute is applied to a JSF component to signify that the specified attribute should be ignored by the JSF runtime and passed directly through to the browser. The resulting element will be the HTML5 equivalent of the JSF component, including all attributes. This capability allows you to specify any number of pass-through attributes for a JSF component, and they will be completely ignored by JSF but rendered as HTML5 in the browser. This is a very handy feature, because HTML5 is still evolving and new attributes could be added in the future. The pass-through attribute feature of JSF 2.2 enables the specification of any current or future HTML5 attribute on a standard JSF component.
There are a few different ways to use pass-through attributes within your JSF views. One technique is to declare the pass-through namespace (xmlns:p="http:// xmlns.jcp.org/jsf/passthrough") within the JSF view, and then precede any HTML5 attributes within a JSF component with the namespace prefix.
In Listing 3, the same form that was generated in the previous sections has been reimplemented using JSF components with pass-through attributes. Reviewing the first inputText component in the view, the HTML5 placeholder attribute has been specified, which allows a textual hint to be added to the text box on the rendered view. Because the placeholder attribute is not available on the input Text component, it must be passed through to the HTML5 rendering engine:
h:inputText …
p:placeholder="text here"…<h:form id=" parkReservationForm" prependId=" false" >
<h1>Create Reservation</h1>
<br/>
<h:messages id=" messages" infoStyle=" color: green;"
errorStyle=" color: red;" />
<br/>
<h:panelGrid columns=" 2" >
<label for=" firstName" >First:</label>
<h:inputText id=" firstName"
p:placeholder=" Enter First Name"
value=" #{...firstName}" />
. . .
<label for=" numAdults" >Adults:</label>
<h:inputText id=" numAdults" p:type=" number"
p:min=" 1" p:max=" 15"
value=" #{...numAdults}" />
. . .
<label for=" startDate" >Trip Start:</label>
<h:inputText p:type=" date" id=" startDate"
value=" #{...tripStartDate}" >
<f:convertDateTime pattern=" YYYY-MM-dd" />
</h:inputText>
</h:panelGrid>
<h:commandButton id=" parkReservation"
action=" #{...createReservation}"
value=" Create a Reservation" >
</h:commandButton>
</h:form>Listing 3
Similarly, pass-through attributes are used with inputText components to signify the type of component that should be rendered. In this case, HTML5 number and date elements will be rendered:
<h:inputText …
 p:type="number"…
…
<h:inputText …
 p:type="date"…
If only a single pass-through attribute is needed, it is possible to specify it by nesting the f:passThroughAttribute tag within a component tag. Listing 4 demonstrates how to use the f:passThroughAttribute tag to specify the type of an inputText component to render an HTML5 date element. The f:passThroughAttribute tag accepts name and value attributes to specify the type of attribute along with the value.
<h:inputText id=" startDate"                        value=" #{parkReservationController…tripStartDate}" >
 <f:passThroughAttribute name=" type"  value=" date" />
</h:inputText>
Listing 4
To specify more than one attribute using this same technique, nest the f:passThroughAttributes tag within a component tag, and use an EL expression to specify the value as a Map<String, Object> within the managed bean. The Map should be composed of a name/value pair for each attribute to be used. Listing 5 demonstrates how to construct such a Map, and Listing 6 demonstrates how to specify the f:passThroughAttribute tag to render an HTML5 number element. All of the resulting forms will look similar to Figure 2.
public Map<String, Object> getNumberAttributes() {
  if(this.numberAttributes == null){
      numberAttributes = new HashMap<>();
      numberAttributes.put("type" , "number" );
      numberAttributes.put("min" , "1" );
      numberAttributes.put("max" , "30" );
  }
  return numberAttributes;
}
Listing 5
<h:inputText id=" numDays"
       value=" #{...numDays}" >
  <f:passThroughAttributes
   value=" #{...numberAttributes}" />
</h:inputText>
Listing 6
Stateless Views
By default, JSF stores the state of all UI components after each request. With HTML5 and some of the popular web frameworks today, state is sometimes becoming less of a requirement. For instance, if you are creating a login page, you typically do not wish to persist stateful values in memory. Rather, you simply want to pass the values through for processing, and then move onto the next task. A new feature in JSF 2.2 is the ability to create stateless views. You can choose to mark a view as stateless by including the transient attribute on the f:view tag, and specifying true as its value:
<f:view transient="true">
If you are using a stateless view, it is important to use the proper session management within the managed bean. Therefore, @RequestScoped should be specified on a managed bean, rather than @ViewScoped or @SessionScoped.
Note: Be sure to use the javax .enterprise.context.RequestScoped annotation for a CDI application.
Server-Side Templating
A significant feature of JSF is its ability to perform server-side templating. JSF ships with Facelets technology, which provides support for developing templates that can be applied across different views within an application. It can be advantageous to use server-side templating, even if you are developing an application that harnesses the client, such as an HTML5/JavaScript front end. The JSF 2.2 feature known as Resource Library Contracts provides the ability to supply an alternative look and feel for different portions of one or more applications, without the need to use multiple templates for each.
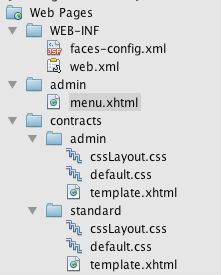
To make use of Resource Library Contracts, specify a contracts folder within your JSF application. Create one or more named contracts (directories) within that folder. Each contract should contain resources that are required for supplying the look and feel for that contract. For instance, suppose that the Acme World website had a different look and feel for those logged in as administrators. You could create two different contracts, by following an application structure such as that shown in Figure 3.

Figure 3
To configure the contracts, specify the resource-library- contracts element within the faces-config.xml file accordingly. Listing 7 demonstrates how to specify the configuration to use different templates for both the standard and admin contracts in our example. All pages can specify the same template name, and the resource library contract handles the job of determining which template to apply:
<ui:composition
 template="/template.xhtml">


<resource-library-contracts>
  <contract-mapping>
    <url-pattern>/admin/*</url-pattern>
    <contracts>admin</contracts>
  </contract-mapping>
  <contract-mapping>
    <url-pattern>*</url-pattern>
    <contracts>standard</contracts>
  </contract-mapping>
</resource-library-contracts>
Listing 7
The template can also be packaged up in a JAR file so that it can be applied to more than one application, if desired.
WebSocket, HTML5, and JSF
HTML5 solutions require fast communication, and WebSockets provide that communication channel. WebSockets allow for full-duplex communication over a single TCP connection. What does this mean? Instead of sending separate requests for each transmission, a connection can be opened for two-way communication, remain open while needed, and then be closed when the communication is complete.
This section is not a primer on WebSocket; to learn details regarding the technology, please refer to the WebSocket section of the Java EE 7 tutorial. Instead, this section will demonstrate how to develop an application that uses a combination of JSF and HTML5 for the chat web view, along with WebSocket for communication.
In this example, we’ll take a look at a simple chat view that uses a WebSocket connection to openly broadcast messages to all sessions connected to the same server endpoint. The simplistic chat application is shown in Figure 4.

Figure 4
Every WebSocket transmission follows a similar procedure: open the WebSocket connection, send messages from various clients to the WebSocket endpoint, and then close the connection. In our example, the user types in a chat username, and then clicks the Start Chat Session button to open a WebSocket communication channel. Once that has been completed, the user can type messages and send them to the chat room. After the connection is established, the user will begin to see any messages sent to the WebSocket endpoint from other users.
Listing 8 shows the source code for the simple chat room Facelets view, which contains three PrimeFaces commandButton components and a couple of HTML5 text input elements. This mixture of JSF and HTML5 is used for interacting with the JSF backing bean and WebSocket endpoint, and the output of the chat (returned from the endpoint) is displayed within a div near the bottom of the form.
<form jsf:id=" chatForm"  jsf:prependId=" false" >
  Please enter a username to chat (a valid email address).
  <br/><br/>
  <label>Username:</label>
  <input type=" text"  jsf:id=" username"
      jsf:value=" #{chatController.current.username}" />
  <br/><br/>
  <p:commandButton onclick=" initiateChatSession();"
         update=" sendMessage jsfOutput"
         value=" Start Chat Session"
         action=" #{chatController.startSession}" />
  <p:commandButton onclick=" closeChatSession()"
         update=" sendMessage jsfOutput"
         value=" Close Chat Session"
         action=" #{chatController.closeSession}" />
  <br/><br/>
  Message:<br/>
  <input type=" text"  jsf:id=" message"
      jsf:value=" #{chatController.current.message}" />
  <br/>
  <p:commandButton value=" Chat"  id=" sendMessage"
         disabled=" #{!chatController.sessionOpen}"
         onclick=" sendChatMessage()"
         action=" #{chatController.sendMessage}" />
  <hr/>
  Session Content:<br/>
  <div id=" output"  class=" chatOutput" >
    <h:outputText id=" jsfOutput"
         value=" #{chatController.chatOutput}" />
  </div>

</form>
Listing 8
The PrimeFaces command Button components communicate with the JSF runtime via action attributes, which are bound to a backing bean identified as ChatController. They also communicate with the WebSocket connection via JavaScript using the onclick event. Listings 9a and 9b show the JavaScript that is invoked via the button events. For instance, when the Chat button is clicked, the sendChatMessage() JavaScript function is invoked, sending the message contained within the corresponding text box to the WebSocket endpoint.
var chatEndpoint =
 "ws://localhost:8080/JavaMagazine-HTML5JSF/chat" ;
var ws;
var previous;
function initiateChatSession()
{
  if ("WebSocket"  in window)
  {
    // Let us open a web socket
    ws = new WebSocket(chatEndpoint);
    ws.onopen = function()
    {
      // Web Socket is connected,
      ws.send("Initiating Session" );
    };
    ws.onmessage = function(evt)
    {
     var received_msg = evt.data;
     var output = document.getElementById("output" );
     previous = output.innerHTML;
     output.innerHTML = previous
          + '<br/>' + received_msg;
    };
    ws.close = function() {
      ws.send("Closing Session..." );
    };

  } else {
    // The browser doesn't support WebSocket
    alert("WebSocket NOT supported!" );
  }
}
Listing 9a
function sendChatMessage() {
  var user = document.getElementById("username" );
  var message = document.getElementById("message" );
  var chatobj = "{ \" username\"  : \" "  +
      user.value + "\" , \" message\"  : \" "
      + message.value + “\" }" ;
  if (ws == null) {
    alert('problem with WebSocket, ' +
        'please initiate session again');
  } else {
    ws.send(chatobj);
  }
}

function closeChatSession() {
  var output = document.getElementById("output" );
  output.innerHTML = previous +
      "<br/>Closing Connection..." ;
  ws.close();
}
Listing 9b
The WebSocket endpoint class is identified as ChatServerEndpoint (see Listings 10a and 10b). The @ServerEndpoint annotation marks the class as a WebSocket endpoint, and the encoders and decoders attributes are used to list the classes that can be used to translate the message for use. The value attribute contains a path that specifies the endpoint that is made accessible to clients. In this case, the WebSocket is accessible at ws://localhost:8080/JavaMagazine-HTML5JSF/chat.
@ServerEndpoint(value = "/chat" ,
    encoders = ChatEncoder.class,
    decoders = ChatDecoder.class)
public class ChatServerEndpoint {
  static ArrayList<Session> sessions =
      new ArrayList<>();
  private final Logger log =
      Logger.getLogger(getClass().getName());

  /**
   * Message receiver method
   *
   * @param message
   * @return
   */
  @OnMessage
  public void messageReceiver(Chat message) {
    System.out.println("Received message:"  +
        message.getMessage());

    try {
      for (Session s : sessions) {
        if (s.isOpen()) {
          s.getBasicRemote().sendObject(message);
        }
      }
    } catch (IOException | EncodeException e) {
      log.log(Level.WARNING, "onMessage failed" , e);
    }
  }
Listing 10a
@OnOpen
  public void onOpen(Session session) {
    System.out.println("onOpen: " + session.getId());
    sessions.add(session);
  }

  @OnClose
  public void onClose(Session session) {
    System.out.println(session.getId());
    sessions.remove(session);
  }
}
Listing 10b
The sendChatMessage() client JavaScript function encodes the message into a JSON object by stringing together the username and message into a JSON string of name/value pairs. It then sends the JSON string to the ChatServerEndpoint. When the endpoint receives the message, the method annotated with @OnMessage is invoked, but it does not perform any message translation, because a decoder (see Listing 11) is used to parse the object via the JSON-P API upon message receipt, and an encoder (see Listing 12) is used to put the resulting message into a presentable String to transmit to all clients.
public class ChatDecoder
  implements Decoder.Text<Chat> {
  @Override
  public void init(final EndpointConfig config) {
  }

  @Override
  public void destroy() {
  }

  @Override
  public Chat decode(final String textMessage)
      throws DecodeException {
    Chat chatMessage = new Chat();
    JsonObject obj = Json.createReader(
        new StringReader(textMessage))
        .readObject();
    chatMessage.setMessage(obj.getString("message" ));
    chatMessage.setUsername(obj.getString("username" ));
    chatMessage.setChatDate(new Date());
    System.out.println("decoder..." );
    return chatMessage;
  }

  @Override
  public boolean willDecode(final String s) {
    return true;
  }
}
Listing 11
public class ChatEncoder
    implements Encoder.Text<Chat> {

  @Inject
  ChatController chatController;

  @Override
  public void init(final EndpointConfig config) {
  }

  @Override
  public void destroy() {
  }

  @Override
  public String encode(final Chat chatMessage)
      throws EncodeException {
    System.out.println("Received in encoder" );
    return chatMessage.getUsername() + "("
        + chatMessage.getChatDate() + "): "
        + chatMessage.getMessage();
  }
}
Listing 12
The ChatServerEndpoint class maintains a list of open WebSocket sessions, and each time a message is sent to the endpoint, it is broadcast to each session. The ChatController CDI backing bean (see Listing 13) is used for loading the current chat message into the session scope for further use, if needed. The username is also stored within the bean for any further use, and the bean maintains a Boolean indicating whether the chat session is active.
@Named
@SessionScoped
public class ChatController implements Serializable {

  private String username;
  private String chatOutput;
  private boolean sessionOpen;
  Chat current;

  public Chat getCurrent(){
    if(current == null){
      current = new Chat();
    }
    return current;
  }
…
  public void startSession(){
    getCurrent();
    setSessionOpen(true);

    setChatOutput("Chat Session Started..." );
    System.out.println("Starting Session" );
  }

  public void closeSession(){
    current = null;
    setSessionOpen(false);
  }
…
}
Listing 13
This simple chat client demonstrates that both HTML5 and JSF can be used while working with WebSocket. You are encouraged to visit the Java EE 7 tutorial to learn more about WebSocket so that you can begin to create sophisticated solutions using this technology.
HTML5 Development with NetBeans IDE
The NetBeans IDE makes it particularly easy to work with HTML5. For starters, when the NetBeans Connector extension is installed into a Chrome browser, a NetBeans action menu is added to Chrome, enabling features for making HTML5 development more productive. NetBeans provides a live preview of web pages, which allows automatic redeployment of pages upon save. Users can save changes and see the changes applied immediately within the web page if they are using Chrome or they are on mobile devices running Android or iOS. This feature enables automatic page refresh while making modifications within HTML pages or JSF views alike.
Speaking of mobile development, NetBeans provides responsive web design capability, allowing developers to choose the layout of choice within the browser plugin (see Figure 5). Using the plugin, content can be dynamically reformatted to size, depending upon the selected dimensions. This enables developers to see what their applications might look like across the screens of different devices.

Figure 5
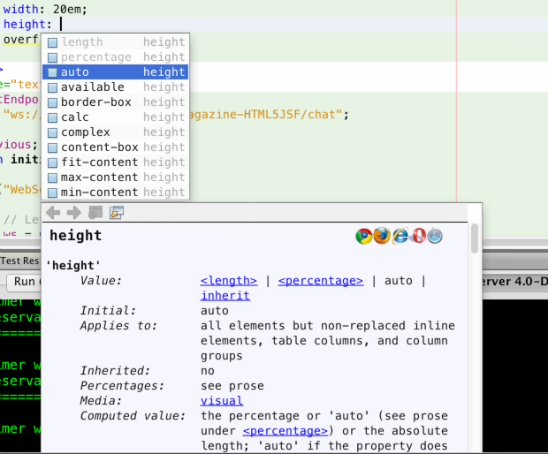
NetBeans provides excellent code completion when working with HTML5 elements, JSF components (even if you are using a library such as PrimeFaces), JavaScript, CSS, and more. This makes development more productive; rather than parsing through documentation, the available options can be displayed onscreen as code is typed. For instance, when typing CSS tags, pressing the Ctrl and space keys simultaneously will provide CSS rule code completion (see Figure 6).

Figure 6
The NetBeans IDE also includes an HTML5 project type. These projects enable full support for libraries such as AngularJS, Knockout, and more. It is even simple to develop a Cordova application and deploy directly to a mobile device. These are just a few of the options that are made available to developers using NetBeans. NetBeans IDE is one of the best choices available for HTML5 and JSF development.
Learn More
Conclusion
JSF plays an important role in Java web development. With the release of Java EE 7, JSF has been enhanced to provide seamless integration with HTML5, enabling JSF developers to take advantage of the features that HTML5 has to offer, and vice versa. Developers can mix and match the two technologies to suit their needs, enabling the development of sophisticated applications.
JSF also works well with HTML5-geared APIs such as WebSocket and JSON-P. This article demonstrated solutions integrating these technologies, and showed how to harness an IDE such as NetBeans for building these solutions.

Josh Juneau is an application developer, system analyst, and DBA who uses Java, PL/SQL, and Jython/Python. He manages the Jython Monthly newsletter, Jython Podcast, and the Jython website. He authored Java EE 7 Recipes (Apress, 2013) and Introducing Java EE 7 (Apress, 2013), and is working on Java 8 Recipes, which Apress will publish later this year.