
Getting Started with Java® SE Embedded on the Raspberry Pi
by Bill Courington and Gary Collins
Published August 2012
How to get Linux and Java SE Embedded running on the Raspberry Pi in less than an hour
It is hardly larger than a credit card. It costs about the same as a book on Java programming.
It's the Raspberry Pi computer, and it can support a full Java SE runtime for headless embedded applications. This article gets you started with Java on the Raspberry Pi programming with these topics:
- The Raspberry Pi: A brief introduction
- Prerequisites: What you need to have and know
- Essential Linux Setup: How to install Debian Linux
- Java SE Embedded Setup: How to acquire and install Java SE Embedded
- Optional Linux Tuning and Tweaking: How to make Linux work better for you
NOTE: There are many potential variations of the instructions given here, especially which operations you execute on a host (desktop or laptop) computer, and which you execute on the Raspberry Pi. Use your knowledge and preferences (and perhaps some of the topics in the Optional Linux Tuning and Tweaking section) to create a workflow that works for you.
The Raspberry Pi
The Raspberry Pi is a small, low-power board built around a 700mHz ARMv6 CPU with hardware floating point and graphics processor integrated in a single chip. The graphics processor and the CPU share 256MB of RAM. There are connections for USB, Ethernet, high-definition graphics, audio, an SD card, and general-purpose I/O. Figure 1 shows a Raspberry Pi model B with an SD card inserted for scale. The SD card plays a special role: The Raspberry Pi boots from it. This article largely consists of instructions for creating and modifying files on a bootable SD card.

Figure 1. Raspberry Pi Model B
You can interact with the Raspberry Pi with a USB keyboard and mouse and an HDMI monitor or television (up to 1080p). The board’s Ethernet connection gives another option: interacting from a networked host via ssh. The Optional Linux Tuning and Tweaking section of this article describes how to enable ssh logins.
Prerequisites
To set up the Raspberry Pi model B to run Java SE Embedded, you need the following:
- A wired network to which you can connect the Raspberry Pi by an Ethernet cable. The network must supply DHCP IP addresses.
-
A Linux host computer on the same wired Ethernet network as the Raspberry Pi. You can perform equivalent operations on a Windows or Mac host, but the details differ and this article does not describe them. You need the root password for the host computer. On the host you also need:
- A way to download a file from a website, such as a web browser or the
wgetutility. - A disk partitioning tool. In this article we use GParted, which is simple and effective. If you don’t have GParted, you can acquire and install it on the host as follows:
$ sudo apt-get install gparted - A web browser and email client for downloading Java SE Embedded from Oracle
- An SD card reader/writer. If your host is running Linux in a virtual machine, be sure it can read and write SD cards.
- A way to download a file from a website, such as a web browser or the
- A monitor that can connect directly or by an adapter to the Raspberry Pi’s HDMI port.
- A USB keyboard and mouse connected to the Raspberry Pi by a powered USB hub.
- An SD card to hold the Raspberry Pi’s operating system and Java runtime. A 4GB card has adequate capacity for Linux, Java SE Embedded, and most embedded applications.
NOTE: Not all SD cards work with the Raspberry Pi. High speed cards can be too fast for the Raspberry Pi bus. We have been successful with Transcend 4GB Micro and Patriot 4GB class 4 cards. http://elinux.org/RPi_VerifiedPeripherals#SD_cards has lists of cards that have and have not worked for Raspberry Pi users.
- A 5V DC Micro USB power supply capable of at least 700mA. According to the Raspberry Pi website, do not use a USB hub or a computer as a power source.
Essential Linux Setup
When power is applied, the Raspberry Pi firmware boots from the SD card slot. Java SE Embedded runs on Linux, therefore your first task is to get Linux on an SD card.
Download the Debian Squeeze Linux Image for the Raspberry Pi
NOTE: These instructions are for Debian Squeeze. Other Linux implementations for the Raspberry Pi might work, but they must have been built for the ARM chip's software floating point. Images linked from the Raspberry Pi website might have been built for hardware floating point; they will not work with Java SE for Embedded.
You can find a link to a zipped Debian Squeeze image for the Raspberry Pi here: http://elinux.org/RPi_Distributions#Debian_ARM. The file size is about 450MB. The following instructions assume that you have downloaded to a new directory ~/RaspberryPi/. To verify the downloaded file, follow the SHA-1 Checksum instructions on the page that is displayed when the download starts.
Unzip the image as follows:
$ cd ~/RaspberryPi
$ unzip *.zip
Unzipping creates a subdirectory called something like debian6-19-04-2012.
Copy the Debian Squeeze Image to the SD Card
On your host computer, discover the SD card device handle as follows (use a different way if you prefer):
- In a Linux terminal window, run
dmesg | tailwhich shows messages associated with device mounts. Only the final messages are of interest. - Insert the SD card into the reader/writer.
-
In a second terminal window, run
dmesg | tailagain. The additional lines (compared to the first window) relate to the newly mounted SD card. They will vary in detail, but should look something like this:[ 110.084625] sdb: detected capacity change from 0 to 3963617280 [ 118.055249] sd 2:0:0:0: [sdb] 7741440 512-byte logical blocks: (3.96 GB/3.69 GiB) [ 118.059409] sd 2:0:0:0: [sdb] Assuming drive cache: write through [ 118.064547] sd 2:0:0:0: [sdb] Assuming drive cache: write through [ 118.066015] sdb: sdb1The clue is
sdb, meaning that the device handle is/dev/sdb.sdb1refers to the example card’s single partition. Your card might have multiple partitions.
In the following instructions, we assume that the SD card device handle is /dev/sdb and that it has a single partition sdb1. Adjust the instructions if necessary for your environment.
-
Unmount the SD card partition(s):
$ sudo umount /dev/sdb1 -
Copy the Debian image to the SD card with
dd.NOTE: In the following command, be certain to enter the
of(output file) argument value correctly. You are about to invoke a low-level disk copy that overwrites all data. Specifying the wrong device will destroy data.$ cd ~/RaspberryPi/debian6-19-04-2012 $ sudo dd if=yourDebian.img of=/dev/sdb bs=1M 1859+1 records in 1859+1 records out 1950000000 bytes (2.0 GB) copied, 212.344 s, 9.2MB/sdd-ing to an SD card is a slow operation. It can take 5-10 minutes for a 4GB class 4 card.ddgives no indication of progress, so be patient while it slowly does its work.
If you want to be sure now that your SD card Linux works, skip to the First Boot section, then return to Resize the SD Card Partitions.
The SD card now contains three partitions and unallocated space. Now we'll add the unallocated space to the Linux file system to make more room for Java SE Embedded and applications. To assign unallocated space to the file system, we modify the partitions on the SD card, deleting and recreating one of the partitions, and resizing another.
-
Start GParted:
$ sudo gpartedGparted initially shows the partitions of the host's disk. You do not want to change these partitions.
-
Choose GParted -> Devices to display the partitions and unallocated space on
/dev/sdb:
Figure 2. Initial SD Card Partitions

The three partitions are:
/dev/sdb1: Boot partition/dev/sdb2: Linux root file system. Most of its 1.5GB allocation is already used./dev/sdb3: Linux swap area.
About half the card’s space is unallocated. The biggest chunk of free space follows the /dev/sdb3 partition. To add this space to /dev/sdb2 (the file system), we temporarily delete /dev/sdb3, extend /dev/sdb2, then re-create /dev/sdb3.
-
In the Partition column, select
/dev/sdb3(linux-swap), right click and choose Delete. The partition is shown as deleted, but GParted has queued the operation and will run it later.
Figure 3. SD Card Partitions after Queuing Delete
-
In the Partition column, select
/dev/sdb2, which is the Linux file system, right click, and choose Resize/Move. In the dialog box that appears, drag the right arrow until “Free space following” is about 512 (or however much you want to leave for swap). You might not be able to drag to exactly 512, but the exact size is not important.
Figure 4. 512MB for Swap
- Click Resize/Move to queue the change. In the “Moving a partition” warning dialog that appears, click OK.
- Now that we’ve grown the file system partition, we re-create a swap partition. Select the 512MiB unallocated partition, right click, and choose New.
-
In the Create new Partition dialog, in the File system drop-down, choose linux-swap.

Figure 5. New Swap Partition
- Click Add.
-
In the main GParted window, choose Edit > Apply All Operations, which performs the operations we’ve queued. In the “Are you sure” dialog, click Apply. The repartitioning is another lengthy operation, easily running several minutes. A dialog shows progress. Click Close when it completes.
The new partition map is similar to this:

Figure 6. New Partition Map
- Quit GParted and eject the SD card so you can try your first boot.


First Boot
Note: For these steps, you must have these components connected to the Raspberry Pi: a monitor, a keyboard, and a known-to-work Ethernet cable.
-
With the Raspberry Pi power disconnected, insert the Linux SD card in the slot, then connect the power. In a few seconds, boot progress messages should appear on the monitor. If they do not, the SD card is likely the wrong type or formatted incorrectly.
It’s normal for error messages to appear during the first boot because some services are not yet configured. The first boot might also appear to hang waiting for portmap to shut down. As a console message indicates, you can either let it run (typically for a few minutes) or disconnect the Raspberry Pi power and, optionally, boot again. Subsequent boots are comparatively fast.
-
After you get the login prompt, login with the Raspberry Pi user name and password. At the time this article was written, they were “pi” and “raspberry”, respectively.
NOTE: An incompatible keyboard can prevent login, for example, by repeating characters. If you cannot login, try another keyboard.
If "pi" and "raspberry" do not work, consult the Linux distribution website.
-
Obtain and write down the Raspberry Pi's IP address as follows:
$ sudo /etc/rc.local RaspberryIP -
Permit
sshlogins with this command:$ sudo update-rc.d -f ssh defaults 20 -
Reboot to actually enable
sshlogins:$ sudo sync; sudo shutdown -r nowIf the shutdown takes too long, you can power cycle the Raspberry Pi.
Now we can read and write the Raspberry Pi SD card over the network from the host computer.
Java SE Embedded Setup
In this section we use the host to download Java SE Embedded and copy it over the network to the Raspberry Pi’s Linux file system. Then, still working remotely, we unpack the download and launch Java.
Acquire the Java SE Embedded Evaluation Software
-
In the host computer’s web browser go to http://www.oracle.com/technetwork/java/embedded/downloads/javase/index.html. The web page might have changed in detail since this article was written.

Figure 7. First Download Link
- In the Java SE Embedded 7 column, click EABI, VFP, SoftFB ABI, Little Endian.
A survey page appears.
- Complete the survey and click Submit. A verification page appears.
-
Examine the verification page for correctness (in particular, your email address), then click Submit.
In a short time, an email from JavaSE-Embedded-LinkNotify appears in your inbox.
-
Click the link in the email. Another download page appears (some details might have changed since this article was written):
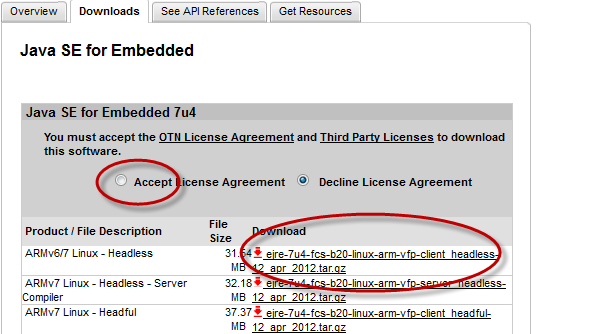
Figure 8. Second Download Link
-
Select Accept License Agreement, then click the link in the ARMv6/7 Linux - Headless row.
NOTE: At the time this article was written, the ARMv7 Linux - Headful software had not been tested on the Raspberry Pi. The ARMv7 Linux - Headless - Server Compiler software does not work on the Raspberry Pi because that software requires an ARM v7 chip.
- Save the
.gzfile to yourDownloadsdirectory. -
Login over the network to the Raspberry Pi as user pi, and create a directory for the Java download:
$ ssh pi@RaspberryIP mkdir /home/pi/java -
Copy the Java download to the new directory on the Raspberry Pi:
$ scp ~/Downloads/*.gz pi@RaspberryIP:/home/pi/java -
Unpack the Java download:
$ ssh pi@RaspberryIP $ cd /home/pi/java $ tar -zxvf *.gz ... - Launch Java:
-
Optionally, remove the download file:
$ rm /home/pi/java/*.gz


$ ls ejre*
ejre1.7.0_04
$ cd ejre*
$ ./bin/java -version
java version "1.7.0_04-ea"
Java(TM) SE Runtime Environment for Embedded (build 1.7.0_04-ea-b20, headless)
Java Hotspot(TM) Embedded Client VM (build 23.0-b21, mixed mode)Optional Linux Tuning and Tweaking
The commands in this section can make your Raspberry Pi system run more reliably, more responsively, or more conveniently. Choose those you like and run them on the Raspberry Pi. To simplify diagnosing problems, reboot after each change you make.
In this section:
- Set Up Static IP Address
- Enable Swapping and Optimize File System Access Time
- Set Time Zone and Locale
- Set Up a Time Server
- Set Up an Internet Proxy
- Remap the Keyboard
- Update Debian Packages
- Automatically Start the Graphical User Interface
- Add a Different Web Browser
- Enable Sound
If your network re-uses dynamic IP addresses, you can skip changing to a static IP because the Raspberry Pi’s IP address will effectively be constant. If the Raspberry Pi’s dynamic IP address is likely to differ each time it is booted, a static IP address is more convenient for ssh-ing. In the following instructions, we assume that you want to assign the hostname raspberrypi to the Raspberry Pi.
Begin by opening /etc/hosts as superuser in a text editor (for example, sudo vi /etc/hosts). Add a line for the Raspberry Pi consisting of a static IP address that is valid in your network, an optional domain name, and aliases. Here is a hypothetical example, in which we designate the Raspberry Pi as raspberrypi:
127.0.0.1 localhost192.168.0.100 raspberrypi.yourDomain raspberrypi loghost
Save the file and exit the editor.
As superuser, open /etc/hostname in a text editor. Add a line analogous to this:
raspberrypi
Save the file and exit the editor.
The following instructions can prevent a problem in which an overloaded network causes the operating system to change the Raspberry Pi's static IP address. As a result, ssh or other operations that use the static IP address stop working.
Discover the Ethernet port’s hardware address as follows.
First, determine the name of the Ethernet controller (x's stand for address digits):
$ ip a
1: lo: <LOOPBACK,UP,LOWER_UP> mtu 16436 qdisc noqueue state UNKNOWN
   link/loopback 00:00:00:00:00:00 brd 00:00:00:00:00:00
   inet 127.0.0.1/8 scope host lo
2: eth0: <BROADCAST,MULTICAST,UP,LOWER_UP> mtu 1488 qdisc pfifo_fast state UNKNOWN qlen 1000
   link/ether b8:27:eb:b5:e8:90 brd ff:ff:ff:ff:ff:ff
   inet xx.xxx.xxx.xx/xx brd xx.xxx.xxx.xxx scope global eth0
In this example, it’s eth0. The hardware address is the hex digits following link/ether, in this example, b8:27:eb:b5:e8:90.
Now that you have the Ethernet controller’s hardware address, as superuser, open /etc/network/interfaces in a text editor and add lines analogous (substitute your network details) to those following the # New entries comment shown below.
# Used by ifup(8) and ifdown(8). See the interfaces(5) manpage or

# /usr/share/doc/ifupdown/examples for more information.
auto lo
iface lo inet loopback
#
# New entries to support static IP follow:

auto eth0
iface eth0 inet static
hwaddress ether b8:27:eb:b5:e8:90
address 192.168.0.100
network 192.168.0.0
netmask 255.255.255.0
broadcast 192.168.0.255
gateway 192.168.0.1
Enable Swapping and Optimize File System Access Time
By default, swapping is disabled in Debian Linux. If an operation exceeds the Raspberry Pi’s 256KB RAM size, the system crashes. Less serious, by default, the file system spends time maintaining a last-accessed time for each file, which is of little use in embedded applications. Maintaining last-accessed times can also reduce the life of an SD card. Both default behaviors are specified in the /etc/fstab file.
As superuser, open /etc/fstab in an editor such as vi. The file looks like this:
proc            /proc           proc    defaults        0       0
/dev/mmcblk0p1  /boot           vfat    defaults        0       0
#/dev/mmcblk0p3  none            swap    sw              0       0
To enable swapping, uncomment the third line.
NOTE: Swapping is slow on an SD card. For an embedded application, you probably want to manage memory so as to avoid it.
To eliminate the last-accessed overhead, insert a p2 mount point between p1 and p3. The noatime and nodiratime options do the job. When the file looks like this, save it and exit the editor:
proc            /proc           proc    defaults        0       0
/dev/mmcblk0p1  /boot           vfat    defaults        0       0
/dev/mmcblk0p2  /               auto    rw,noatime,nodiratime,errors=remount-ro 0 1
/dev/mmcblk0p3  none            swap    sw              0       0
Now assign p3 (the swap partition we created on the host as /dev/sdb3) to swap space:
$ sudo mkswap /dev/mmcblk0p3
By default, the Raspberry Pi is configured for the Europe/London time zone and the en_GB_UTF-8 locale. To localize your computer, follow these instructions.
To change the time zone, enter this command:
$ sudo dpkg-reconfigure tzdata
A pseudo graphic interface appears.

Figure 9. Time Zone User Interface
Move the selection cursor through regions and cities with the up-down arrow keys. Use the left-right arrow keys to select <Ok> or <Cancel>. Press Return to enter a selection.
Set the locale as follows:
$ sudo dpkg-reconfigure -p low locales
The user interface is similar to that for setting the time zone.
Many operations, including software package updates, rely on a correct date and time. To set the date and time automatically, learn the identity of a network time server, then run this command:
$ sudo ntpdate yourNTPServer
To set the time on each boot, as superuser, edit /etc/rc.local, adding this line before the script exits:
ntpdate yourNTPServer
Ping a well-known Internet host, such as www.lego.com. If the host does not respond, find out if your network is behind a proxy and If necessary, set the environment variable http_proxy according to your network conventions, for example (hypothetical):
$ sudo export http_proxy =’http:192.168.0.1:3128’
To set the proxy each time you login, add the export command to ~/.bash_profile, or equivalent if you use a different shell.
If keyboard keys are being misinterpreted, or you want to change the keyboard layout, use this command:
$ sudo dpkg-reconfigure keyboard-configuration
The user interface is similar to that described in the Set Time Zone and Locale section of this article.
Before updating the packages distributed with Debian, as superuser, open /etc/apt/sources.list in a text editor. This file contains the repository locations of new/updated packages. As distributed, the locations have ftp.uk in their URLs. If you are not located in the United Kingdom, you can improve performance by changing the entries to a location physically closer to you. For example, you can globally change ftp.uk to ftp.us if you are in the United States. This site has information about Debian repository locations: http://ftp.debian.org/debian/README.mirrors.html.
To update your installed packages, after verifying that the Raspberry Pi has an Internet connection, enter these commands:
$ sudo apt-get update
$ sudo apt-get upgrade
If you get a message that there are duplicates in the package list, open /etc/apt/sources.list again in an editor and comment out one of the duplicate entries. The entry containing more information is usually the best one to keep.
Automatically Start the Graphical User Interface
If you want the window system to start automatically when you login locally to the Raspberry Pi, change the default runlevel as follows. As superuser, open /etc/inittab in a text editor. Find this entry:
# The default runlevel.
id:2:initdefault:
Change it to 5:
# The default runlevel.
id:5:initdefault:
NOTE: Graphics consumes a large chunk of the Raspberry Pi’s RAM, on the order of 90MB.
If you experience difficulties with the default midori browser, try iceweasel:
$ sudo apt-get update
$ sudo apt-get install iceweaselRaspberry Pi sound output does not work by default. To enable it, as superuser, open /etc/modules in a text editor. Add this line to the end of the file:
snd_bcm2835
Save and close the file. Sound is enabled when you reboot the Raspberry Pi.