
JavaFX with Alternative Languages
by Josh Juneau
Published July 2014
Alternative languages and custom APIs enable rapid JavaFX application development.
In this day and age, the more tools you have in your toolbox, the better. That is, it makes sense to know more than one way to implement a solution, because in some cases one implementation might have advantages over others. Although the JavaFX 8 API is very nice, there are advantages to knowing more than one way to develop a JavaFX application.
Originally published in the July/August 2014 issue of Java Magazine. Subscribe today.
This article demonstrates how to develop JavaFX applications using alternative languages, so that you can add some additional tools to your toolbox. In the first section of this article, we’ll take a look at a JavaFX drawing application, and we will compare its implementation across a couple of different languages. In the second section, we will take a look at GroovyFX, a JavaFX API for the Groovy language, which is focused on rapid JavaFX application development.
Note: The source code for this article can be found on GitHub.
Bare-Bones JavaFX Development with Altern ative Languages
In this section, we will not use any special APIs, but rather, we will implement a simple JavaFX application using only the standard features of a couple of different languages.
The application in this section is written using JavaFX 8 without FXML, and it is a drawing application. It allows the user to select from a handful of different colors, change the size of the pen, and reset the canvas to do it all over again. The application contains two ChoiceBox nodes for choosing the color and size of the pen, a Canvas to draw upon, and a Button to reset the canvas. Figure 1 shows what the application looks like when it is executed (and a great artist has spent some time sketching).

Figure 1
Take a look at Listing 1, which contains the complete code for the application, written using the JavaFX 8 API. As with all JavaFX applications, it is launched via the execution of a main() method, and the start() method contains the primary stage construction and much of the application implementation.
Note: The following listing has been excerpted for space, as noted by the ... symbol. The full code listing is available by downloading the code listings for this issue.
public class JavaFXDraw extends Application {

    public static void main(String[] args) {
        Application.launch(JavaFXDraw.class, args);
    }
    @Override
    public void start(Stage primaryStage) {

        StackPane root = new StackPane();
        Screen screen = Screen.getPrimary();
        Rectangle2D rect = screen.getVisualBounds();
        Canvas canvas = new Canvas(rect.getWidth()/2 + 50,
                rect.getHeight()/2 + 300 );
        final GraphicsContext graphicsContext =
                canvas.getGraphicsContext2D();

        final Button resetButton = new Button("Reset");
        resetButton.setOnAction(actionEvent-> {
            graphicsContext.clearRect(1, 1,
            graphicsContext.getCanvas().getWidth()-2,
            graphicsContext.getCanvas().getHeight()-2);
        });
        resetButton.setTranslateX(10);

        // Set up the pen color chooser
        ChoiceBox colorChooser = new ChoiceBox(
            FXCollections.observableArrayList(
        "Black", "Blue", "Red", "Green", "Brown", "Orange"
        ));
…
Listing 1
To note a few pieces of code in particular, let’s first take a look at the Reset button event handler, because it is implemented using a lambda expression. When the user clicks the Reset button, the canvas is cleared.
Next, let’s look at one of the canvas action listeners, which in JavaFX 8 can also be written as a lambda expression. When the user presses the mouse button while on the canvas, a stroke marks the canvas until the mouse button is released:
canvas.addEventHandler(
    MouseEvent.MOUSE_PRESSED,
      (MouseEvent event) -> {
  graphicsContext.beginPath();
  graphicsContext.moveTo(
          event.getX(),
          event.getY());
    graphicsContext.stroke();
});
The rest of the code is fairly straightforward. The two ChoiceBox controls are constructed containing observable array lists of values. The Button and ChoiceBox controls are grouped together within an HBox, which is then added to the top of a BorderPane, and the Canvas is added to the center of the BorderPane. Finally, the BorderPane is added to a StackPane to create the stage. Before the stage is fully constructed and made visible, the Canvas is initialized by calling a separate initDraw() method. Now let’s take a look at how this same application differs when implemented in Groovy and Jython.
JavaFX 8 and Groovy. In this section, we’ll implement the JavaFXDraw application via the Groovy language. If you are new to Groovy, it is a very easy alternative language to start with because it allows you to code using either the standard Java syntax or the Groovy syntax, providing an environment that is easy to begin working in for any experienced Java developer. This example takes advantage of the ability to mix both Java and Groovy syntax together.
Listing 2 contains code for the entire Groovy implementation, which is a few lines shorter than the JavaFX 8 implementation. The code could have used more of the Groovy syntax, but much of the Java syntax was retained to demonstrate the benefits of mixing both Java and Groovy. For starters, note that the Groovy application still launches within the main method, and much of the code remains the same. However, the Groovy code is a bit more concise because it does not contain semicolons, since they are optional in Groovy. The Groovy code also uses closures—as opposed to Java SE 8 lambdas—which have a slightly different syntax but provide the same overall benefit.
Tailor-Made
Implementing JavaFX applications with alternative languages can have advantages. There are even more advantages to using an API that is tailored specifically for use with JavaFX.Note: The following listing has been excerpted for space, as noted by the ... symbol. The full code listing is available by downloading the code listings for this issue.
class JavaFXDrawGroovy extends Application {
    static void main(args)
    {
        Application.launch(JavaFXDrawGroovy.class, args)
    }

    void start(Stage stage)
    {
        def root = new StackPane()
        def screen = Screen.getPrimary()
        def rect = screen.getVisualBounds()
        def canvas = new Canvas(rect.getWidth()/2 + 50,
            rect.getHeight()/2 + 300 )
        def graphicsContext = canvas.getGraphicsContext2D()

        def resetButton = new Button("Reset")
        resetButton.setOnAction({
                graphicsContext.clearRect(1, 1,
                graphicsContext.getCanvas().getWidth()-2,
                graphicsContext.getCanvas().getHeight()-2)
            } as EventHandler)
        resetButton.setTranslateX(10)

        // Set up the pen color chooser
        def colorChooser = new ChoiceBox(
         FXCollections.observableArrayList(
         "Black", "Blue", "Red", "Green", "Brown", "Orange"
        ))
…
Listing 2
Let’s take a look at the Reset button in the Groovy implementation, and compare it to the JavaFX 8 API code shown earlier. The Reset button code uses a closure to encapsulate the event handling implementation. Similarly, the canvas “mouse button pressed” event listener is implemented using a Groovy closure:
canvas.addEventHandler(
   MouseEvent.MOUSE_PRESSED, {
  MouseEvent event->
  graphicsContext.beginPath()
  graphicsContext.moveTo(
      event.getX(),
      event.getY())
  graphicsContext.stroke()
 } as EventHandler)
A few more notes about Groovy: Although the code in Listing 2 contains switch statements that compare int values, it is possible to compare any type of switch value within a Groovy switch statement. Groovy switch statements can also perform different types of matching. Groovy contains many builders, making it easier to construct objects than with standard Java. There are many more features available in Groovy, and to learn more about them, take a look at the Groovy User Guide.
It is easy (and fun) to implement JavaFX 8 applications using Groovy. However, later in this article, we’ll take a look at an even groovier way to write JavaFX using Groovy.
Note: You should use Groovy 2.3.x to ensure full compatibility with Java SE 8.
JavaFX 8 and Jython. It is said that Python allows developers to get things done without getting in the way. Python code is concise, easy to follow, and very productive. Jython is the Python language implemented for the Java Virtual Machine (JVM). Implementing JavaFX applications in Jython can be quite effective, and it is easy to translate Java to Python syntax.
Note: The code for this example was written with the beta versions of Jython 2.7 and JavaFX 8.
Listing 3 contains the complete code for our drawing application written in Jython. Note that the Jython implementation is even fewer lines than JavaFX 8 or Groovy. For starters, the application is launched a bit differently from Jython, although the same concept as the main method applies. The Jython main method looks a bit different than in the other two languages:
if __name__ == "__main__":
    …
In Listing 3, the JythonFXDraw class implements Application, per the JavaFX standard. The start method contains the same logic as with the other implementations, but it is written in the Python language syntax.
Note: The following listing has been excerpted for space, as noted by the ... symbol. The full code listing is available by downloading the code listings for this issue.
class JythonFXDraw(Application):

    def start(self, primaryStage):
        primaryStage.setTitle("JythonFX Draw")
        root = StackPane()
        screen = javafx.stage.Screen.getPrimary()
        rect = screen.visualBounds
        canvas = Canvas(rect.width/2 + 50,
                        rect.height/2 + 300)
        graphics_context = canvas.graphicsContext2D

        def resetAction(event):
            graphics_context.clearRect(1,1,
            graphics_context.canvas.width-2,
            graphics_context.canvas.height-2)
...
Listing 3
Again, let’s take a look at the Reset button implementation to see how it differs from the others. The event handler is written by assigning the resetAction function to the onAction property. The resetAction function contains the same logic as the others for clearing the canvas:
Button("Reset",
       onAction=resetAction)
Similarly, the canvas action listeners are implemented as functions, and then assigned to the canvas. The following code shows the “mouse pressed” listener implementation:
def mouse_pressed(event):
    graphics_context.
        beginPath()
    graphics_context.
        moveTo(event.x,
               event.y)
    graphics_context.
        Stroke()
Jython does not contain a switch statement, so the implementation for the ChoiceBox selection uses an if statement instead:
if idx == 0:
    new_color = Color.BLACK
elif idx == 1:
    new_color = Color.BLUE
elif idx == 2:
    new_color = Color.RED
…
If you are new to Python, you’ll see that there is a standard indentation structure to which you must adhere. That said, the code is concise and easy to follow. Another note about Jython is that, just as in Groovy, there is no need to declare types, so function parameters and variables are typeless.
Using Custom APIs to Develop JavaFX Applications
We’ve already seen that implementing JavaFX applications with alternative languages can have advantages. While there are some advantages to coding with alternative languages, there are even more advantages to using an API that is tailored specifically for use with JavaFX. In this section, we will take a look at the GroovyFX API, which completely changes the way in which a developer can construct a JavaFX application. The developers of GroovyFX have made it easy to visually see the scene graph as it is being built, making code easier to read, understand, and visualize.
GroovyFX at a glance. GroovyFX is an API that allows you to construct a JavaFX application using the Groovy builder syntax. The resulting code is very clean and easy to read, making the construction of JavaFX applications very easy. GroovyFX also eliminates lots of boilerplate code, allowing you to concentrate on what you’d like to get done, rather than on worrying about specific API calls. This is possible because GroovyFX takes advantage of Groovy’s powerful domain-specific language (DSL) features and abstract syntax tree (AST) transformation.
Let’s begin by transforming the application that was written in the first section of this article using Groovy and Jython so it adheres to the GroovyFX API. Listing 4 contains the code for the GroovyFXDraw application. The code is significantly shorter than any of the other code we’ve looked at thus far. It is also easy to read because it uses the Groovy builder pattern.
Note: The following listing has been excerpted for space, as noted by the ... symbol. The full code listing is available by downloading the code listings for this issue.
import static groovyx.javafx.GroovyFX.start
import groovyx.javafx.beans.FXBindable
import javafx.stage.Screen
import javafx.scene.input.MouseEvent;
import javafx.scene.paint.Color
import javafx.collections.FXCollections
import javafx.scene.canvas.Canvas
import javafx.scene.canvas.GraphicsContext
import javafx.stage.Screen

start {
    stage(title: 'GroovyFX Draw', visible: true) {
        scene = scene(id: "sc", fill: WHITE,
            width: Screen.getPrimary()
                .getVisualBounds().getWidth(),
            height: Screen.getPrimary()
              .getVisualBounds().getHeight()) {

            canvas = canvas(id: "drawcanvas",
                width: bind(sc.width()),
                height: bind(sc.height()))
            GraphicsContext graphicsContext =
              canvas.graphicsContext2D
            canvas.onMousePressed {
                MouseEvent event->
                graphicsContext.beginPath()
                graphicsContext.moveTo(event.getX(),
                                       event.getY())
                graphicsContext.stroke()
            }
...
Listing 4
Another significant difference is the way in which the application is launched, because no main method is defined. Instead, a Groovy closure that contains the application constructs is simply passed to the static groovyx.javafx.GroovyFX.start method to initiate the application:
start {
  // Declare JavaFX
  // scene graph nodes
}
An additional important difference is the way in which the code is constructed. Each node embedded into the scene graph is constructed as a Groovy closure, and in some cases nodes are embedded within each other. This visual syntax provides an easy way to see how the user interface will be laid out. The properties of each node are also specified differently with GroovyFX, because they are treated as key/value pairs. Each node can have its own set of properties specified by placing them within a comma-separated key/value format, as seen here:
hbox(spacing:10, padding:10) {
…
Getting started with GroovyFX. There are a couple of easy steps you need to take before you can use GroovyFX. To use GroovyFX in any environment (without the use of an IDE), first, download GroovyFX using the latest distribution from the GroovyFX site. Alternatively, you can build the GroovyFX Project from the source code by cloning the project from GitHub.
To clone the project, ensure that you have Git installed on your system, and then clone the project by executing the following command:
git clone git://github.com/
groovyfx-project/groovyfx.git.
Note: Please ensure that you are using GroovyFX 0.4.0 for Java 8 and JavaFX 8 compatibility. The examples for this article were written with GroovyFX 0.3.1 and Java SE 7, as GroovyFX 0.4.0 was not available at the time.
Once you’ve cloned the project, you can build it from source code using Gradle. The current release, 0.4.0, includes support for JavaFX 2.2 on Java 7 or JavaFX 8 on Java 8.
git clone -b 0_4_SNAPSHOT git://
github.com/groovyfx-project/
groovyfx.git

cd <<groovyfx_location>>
gradlew build
You can then run any of the packaged examples using the gradlew command, followed by the name of the example. For example, to run HelloWorldDemo, use the following command:
gradlew HelloWorldDemo
If you prefer to use an IDE such as NetBeans, simply clone the GroovyFX project and open it within NetBeans. By default, the GroovyFX project distribution is a NetBeans IDE project. You can run any of the demos within the NetBeans IDE by expanding the Demo Programs folder, right-clicking the demo, and choosing Run. There are some excellent GroovyFX examples contained in the distribution. If you wish to use an IDE other than NetBeans, you can refer to the GroovyFX Guide for details.
Building a basic GroovyFX application. As mentioned previously, all GroovyFX applications are launched using the static groovyx.javafx.GroovyFX.start method. The scene graph is passed to the start method by enclosing it within brackets. We’re able to use the Groovy builder syntax, but behind the scenes, GroovyFX’ SceneGraphBuilder is used to construct the scene graph.
Each of the JavaFX controls is available to GroovyFX, but the syntax is a bit different than usual. For instance, each of the controls when used in Java code begins with a capital letter. However, its GroovyFX counterpart must begin with a lowercase letter.
Another difference is that instead of using Java “setters” to configure different control properties, GroovyFX allows you to pass a map (key/value pairs) of different properties to be set. Take, for instance, the JavaFX Button control. In JavaFX, the control must be instantiated and then set to different properties, and setter methods must be called upon the Button instance. In GroovyFX, a Button control is instantiated by placing it within the Scene closure, and different properties are set by enclosing them as key/value pairs within parentheses, as follows:
Easy Does It
JavaFX 8 makes it easy to develop animations, and GroovyFX makes it even easier!button("Save",
style:"-fx-font: 14 arial",
onAction: {
textEntry =
text.getText()
println textEntry
})Note that the event handler is written inline as a Groovy closure, and it is assigned to the onAction property. Styles are set inline as well using the style property. You can also access the javafx.scene.text.Font directly as a node property. For example, the style property from the previous example could be changed to font: '14pt arial', as follows, instead of listing out the full style string:
button("Save",
font: '14pt arial',
onAction: {
textEntry =
text.getText()
println textEntry
})The code in Listing 5 includes this Button control, along with a TextField and Label. The basic application allows you to enter some text into the TextField, click the button, and have the text printed to the server log file. It is a very simple application, but you can see that it demonstrates basic layout with GroovyFX, and it uses an HBox. In this example, the HBox contains the label and the TextField, with a spacing of 5.
hbox(spacing: 5){
...
}
import static groovyx.javafx.GroovyFX.start
start{
def textEntry;
stage(title: "GroovyFX Introduction", width: 600,
height: 300, visible: true){
scene(fill: groovyblue){
hbox(spacing: 5){
label("Place Text Here:",
textFill: white,
halignment: center,
valignment: center)
text = textField(promptText: "Type here",
prefColumnCount: 25)
}
button("Save",
  style:"-fx-font: 14 arial",
   onAction: {
   textEntry =
      text.getText()
      println textEntry
})
}
}
}Listing 5
In addition, colors and paints can be set using either the JavaFX Paint or Color objects, or via pseudo color variables (RED, ORANGE, GREEN, and so on). Colors can even be defined as a hex string or a JavaFX cascading style sheet (CSS) style, making GroovyFX very flexible. GroovyFX includes a multitude of handy shortcuts; to learn about them, I recommend taking a look at the GroovyFX documentation.
Abstracting inline code. Additional code can be placed outside the scene graph, and it will still reside within scope for use via scene graph nodes. Listing 6 demonstrates an example of placing code outside the scene graph in an effort to organize. The code in Listing 6 is for the GroovyFXDraw application, but the Button control for resetting the Canvas has had its event handler code abstracted and placed within a closure that has been defined outside the scene graph.
import static groovyx.javafx.GroovyFX.start
import groovyx.javafx.beans.FXBindable
import javafx.stage.Screen
import javafx.scene.input.MouseEvent;
import javafx.scene.paint.Color
import javafx.collections.FXCollections
import javafx.scene.canvas.Canvas
import javafx.scene.canvas.GraphicsContext
import javafx.stage.Screen

def reset = { graphicsContext ->
    graphicsContext.clearRect(1, 1,
    graphicsContext.getCanvas().getWidth()-2,
    graphicsContext.getCanvas().getHeight()-2)
}

start {
    ...

            hbox(spacing: 10, padding: 10) {
                button("Reset",
                onAction: {reset(graphicsContext)})
                …
                }
                ...
}
Listing 6
This style of coding for GroovyFX applications can come in very handy when working with large scene graphs that contain many events. It also can be handy if you want to make a class accessible within your scene graph, but still place it within the same Groovy file.
Binding properties with GroovyFX. One of the most powerful features of JavaFX is its binding ability. Binding allows nodes within a scene graph to exchange data and react together in real time. For instance, if the text property of a TextField control is bound to a Label, then the Label text will reflect any changes that are made to the TextField contents as a user is typing. JavaFX binding can contain lots of boilerplate code, and GroovyFX reduces the boilerplate by using its bind utility. The following Label written in GroovyFX demonstrates binding to a TextField named text.
Other Options
Although the JavaFX 8 API is very nice, there are advantages to knowing more than one way to develop a JavaFX application.Label(text:bind(text, 'text'))
The code in Listing 7 demonstrates simple binding using this technique. When the code is executed, the Label will mirror any text typed into the TextField (see Figure 2).
String textEntry
start{

    stage(title: "GroovyFX Introduction", width: 600,
        height: 300, visible: true){
        scene(fill: groovyblue){
            gridPane(hgap: 5, vgap: 10,
                     padding: 20){
                hbox(spacing: 5, row:1,
                     columnSpan:2 ){
                    label("Place Text Here:",
                          textFill: white,
                          halignment: center,
                          valignment: center)
                    text = textField(
                            promptText: "Type here",
                            prefColumnCount: 25)
                }

                button("Save", font: "14pt arial",
                        row: 2, column: 1,
                    onAction: {
                        textEntry = text.getText()
                        println textEntry
                    })
                label(text: bind(text, 'text'),
                       row: 3, column: 1)
            }
        }
    }
}
Listing 7

Figure 2
GroovyFX also provides a convenience annotation, @FXBindable, to automatically mark a property or entire class as bindable. By applying the @FXBindable annotation to a property or class, the binding logic will be automatically added to the code at runtime, alleviating the need to write redundant boilerplate code.
In the next example, a simple form has been generated for entering car information (see Figure 3). The form fields are each bound to fields within a Car object. The form button adds the current Car object to a List of Car objects, and the current List size is automatically incremented and displayed as a Label on the form. Take a look at Listing 8 to see the code for this example.
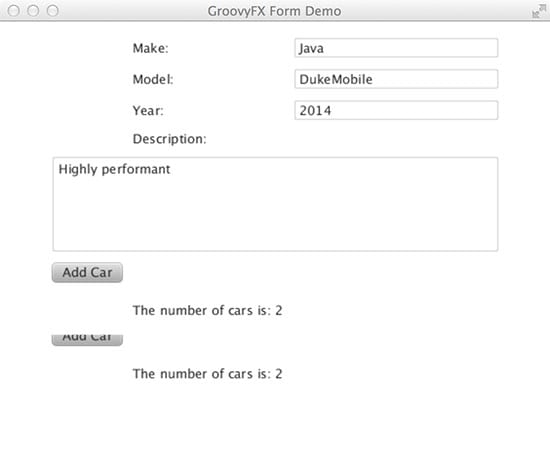
Figure 3
Note: The following listing has been excerpted for space, as noted by the ... symbol. The full code listing is available by downloading the code listings for this issue.
@FXBindable
class Car{
    String make
    String model
    String year
    String description
}

@FXBindable
class CarHotel{

  List<Car> carList = new ArrayList()
  Car car = new Car()
  String carCount

  def addCar(car){
      print "Adding car: ${car.make}"
      carList.add(car)
      carCount = "The number of cars is: ${carList.size()}"
      car = new Car()
    }

}
…
Listing 8
Animation with GroovyFX. Now, I am primarily an enterprise developer . . . so animation is not my forte. However, JavaFX 8 makes it easy to develop animations, and GroovyFX makes it even easier! Animations occur on a timeline, and different activities can occur within the span of the timeline.
In this example, the timeline contains two simple change effects that occur indefinitely, beginning at 1,000 milliseconds. This example animates a circle and a line to create a yo-yo effect (see Figure 4). Therefore, the circle is changed every 1,000 milliseconds to move from its starting centerY value of 60 to a centerY value of 340. Similarly, the line is changed every 1,000 milliseconds to expand from its starting Y value of 0 to an ending Y value of 280, and then back again. To make the example even more fun, I added some fading text, which fades from 0 opacity to 1 over a specified time span.
Learn More

Figure 4
To see the code for the animation example, see Listing 9.
Note: The following listing has been excerpted for space, as noted by the ... symbol. The full code listing is available by downloading the code listings for this issue.
import static groovyx.javafx.GroovyFX.start
start {
    stage(title: "GroovyFX YoYo", width: 500,
        height: 400, visible: true) {
        scene(fill: GROOVYBLUE) {
            circle = circle(centerX: 250,
                centerY: 60,
                radius:60,
                fill: WHITE,
                stroke: BLACK){
                effect: boxBlur(10, 10, 3)
            }
            line   = line (startX: 250,
                endX: 250,
                startY: 0,
                endY: 0,
                strokeWidth: 3)
            myTxt = text("Groovy!",
                x:  200, y: 150, fill: ORANGE,
                font: "bold 26pt Arial"){
                  fade = fadeTransition(
                              duration: 5000.ms,
                              fromValue: 0.0,
                              toValue: 1.0)
                  effect dropShadow(offsetY: 4)
                }
        }
    }
...
Listing 9
FXML support. Placing view code into FXML files is a recommended approach for separating view code from business logic for JavaFX applications. GroovyFX supports the use of FXML by referencing the files via an fxml node within the scene graph:
scene {
fxml(new File('./myfxml.fxml')
 .text)
…
Other Alternative APIs
Other alternative languages, such as JRuby and Scala, can be used to develop JavaFX applications as well. In fact, these two languages, in particular, have their own specialized APIs for JavaFX development: JRubyFX and ScalaFX, respectively. These APIs are similar to GroovyFX in that they provide an easy way to work with the JavaFX API in the alternative language syntax. For more information, check out their project websites.
Conclusion
JavaFX 8 contains a bevy of new features, and the ability to make use of Java SE 8 constructs, such as lambdas and streams, makes JavaFX development even easier. Alternative languages can provide benefits over—and in some cases work hand in hand with—the JavaFX API. In some cases, alternative languages have their own DSLs for developing JavaFX, which can be even more productive and easy to use.
Add a new tool to your JavaFX toolbox today by learning an alternative approach to developing JavaFX applications.

Josh Juneau is an application developer, system analyst, and DBA who uses Java, PL/SQL, and Jython/Python. He manages the Jython Monthly newsletter, Jython Podcast, and the Jython website. He authored Java EE 7 Recipes (Apress, 2013) and Introducing Java EE 7 (Apress, 2013), and is working on Java 8 Recipes, which Apress will publish later this year.