Spring to Java EE Migration, Part 1
By David Heffelfinger
CTO and ardent Java EE fan David Heffelfinger demonstrates how easy it is to develop the data layer of an application using Java EE, JPA, and the NetBeans IDE instead of the Spring Framework.
Downloads:
Introduction
Proponents of the Spring Framework claim that their framework of choice is much easier to work with than Java Platform, Enterprise Edition (Java EE). It is no big secret that I am a Java EE fan, having written several books covering the technology. Nevertheless, just like most developers, I don't always have the choice of picking my technology stack, and in some cases, I've had to work on projects using Spring.
Every time I work on a Spring project, I start mumbling under my breath. I know I will have to go through long and convoluted XML files to determine what is going on with the project. I also know that my project will have approximately 10,000 dependencies and that the generated WAR file is going to be a monster.
When working with Java EE, most of the services I need are provided by the application server. Therefore, the number of required dependencies is minimal. In most cases, Java EE provides configuration by exception, meaning there is very little configuration to be done, and sensible defaults are used in the vast majority of cases. When configuration is needed, it is usually done through annotations, which allows me to get the whole picture just by looking at the source code, without having to navigate back and forth between XML configuration files and source code.
In addition to all the advantages mentioned in the previous paragraph, when working in Java EE projects, I get to take advantage of the advanced tooling available from NetBeans. And if I am lucky enough to be using GlassFish Server Open Source Edition or Oracle GlassFish Server as the application server, I can take advantage of the “deploy on save” feature, which means that every time I save a file in my project, the updated version is automatically deployed to the GlassFish server in the background. All I need to do is reload the page on the browser and the changes are reflected immediately. This is a huge time saver, and every time I am forced to go back to the edit-save-deploy-refresh cycle, I feel like I am working with one hand tied behind my back.
In this series of articles, we will rewrite the sample Pet Clinic application provided with Spring using Java EE. In this first article, I illustrate how we can quickly develop an application that has equivalent functionality to the Spring version by taking advantage of the excellent Java EE tooling provided by NetBeans. The Java EE version employs JavaServer Faces (JSF) for the user interface, Data Access Objects (DAOs) are implemented using Enterprise JavaBeans (EJB) 3.1 session beans, and data access is provided by Java Persistence API (JPA) 2.0.
In this first part, we start developing the Java EE version of the application by generating the persistence layer from an existing database. In part 2, we will see how NetBeans can help us generate EJB 3.1 session beans that act as DAOs, as well as the JSF 2.0 user interface.
Setting Up Our Project
Here we are assuming that MySQL is installed on our local workstation and that the petclinic database already exists. (It can be created easily by running the setupDB ANT target included with Pet Clinic.)
The first thing we need to do is create a new Web project, as shown in Figure 1.

Figure 1. Creating a New Project
We then need to specify a name and location for our project, as shown in Figure 2. Usually, the default location and folder are reasonable defaults.

Figure 2. Specifying a Name and Location for the New Project
At this point, we can optionally add any frameworks that our application will use. Since our application will use standard Java EE frameworks, we should select JavaServer Faces, as shown in Figure 3.

Figure 3. Selecting JavaServer Faces as the Framework
Now we need to select the Java EE server and the Java EE version, as shown in Figure 4. The default values suit our project well, and the default context path will suffice for our purposes.

Figure 4. Selecting the Server and Java EE Version
At this point, we click Finish and our project is created, as shown in Figure 5.

Figure 5. The Newly Created Project
We now are ready to develop our application.
Developing the Application
NetBeans generates most of the code we need to develop our Java EE applications. It can help us generate the JPA entities, as well as DAOs, JSF pages, and JSF managed beans.
The first thing we should do is develop our JPA entities. Most JPA implementations include the ability to automatically generate database tables from JPA entities; however, the inverse is not true. JPA does not provide the ability to generate JPA entities from existing database tables.
For this reason, when working with an existing schema, in most cases, we need to code our JPA entities manually, adding the appropriate annotations, properties, getters, setters, and so on. However, we are using NetBeans, which provides the ability to automatically generate JPA entities from an existing schema. We simply select File | New, select the Persistence category, and select the Entity Classes from Database file type, as shown in Figure 6.
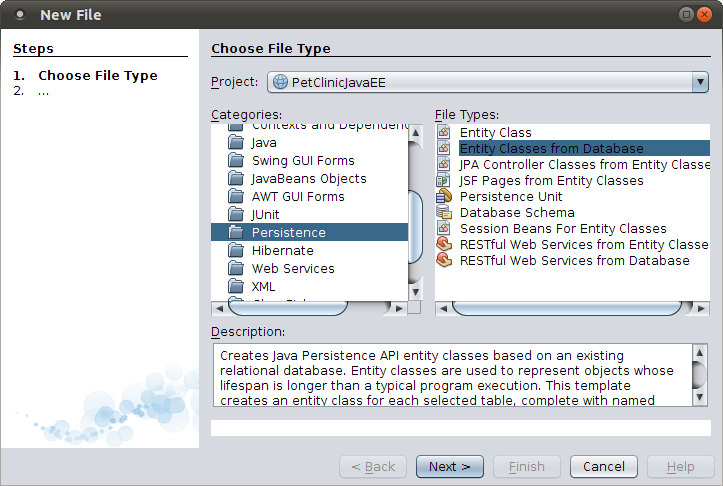
Figure 6. Selecting Entity Classes from Database
At this point, we need to select a data source. If we don't already have one set up, NetBeans allows us to create one on the fly, as shown in Figure 7.

Figure 7. Creating a Data Source
To create a new data source on the fly, we simply need to enter its Java Naming and Directory Interface (JNDI) name. We get to make up the name since the data source doesn't exist yet. Then we select a database connection, as shown in Figure 8.

Figure 8. Selecting a Database Connection
Once again, if we don't have a database connection set up to connect to the desired database, we can create the connection on the fly from the wizard. When creating a new database connection, the first thing we need to do is select the appropriate Java Database Connectivity (JDBC) driver for our database, as shown in Figure 9.

Figure 9. Selecting a Driver
In the next screen, we need to enter the host, port, database, and user credentials, as shown in Figure 10. It is a good idea to click the button labeled Test Connection to make sure all the values are correct. We should see the message “Connection Succeeded” if everything is in order.

Figure 10. Specifying Additional Details and Testing the Connection
When using MySQL, a schema is synonymous with a database. Therefore, the Select schema list is grayed out, as shown in Figure 11.
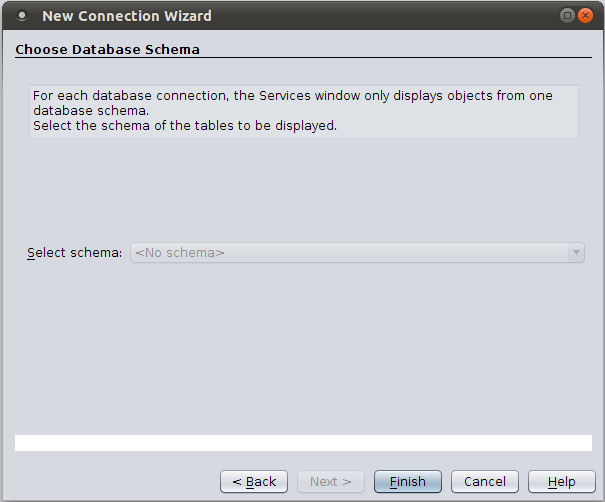
Figure 11. Selecting a Schema
At this point, we click Finish to create the database connection, and we continue clicking OK until we are back to the New Entity Classes from Database screen, as shown in Figure 12.

Figure 12. Specifying Entity Classes
At this point, we need to select the tables that we will be working with. In this particular case we want all of the tables so we can simply click on the button labeled "Add All" then click the "Next >" button as shown in Figure 13.
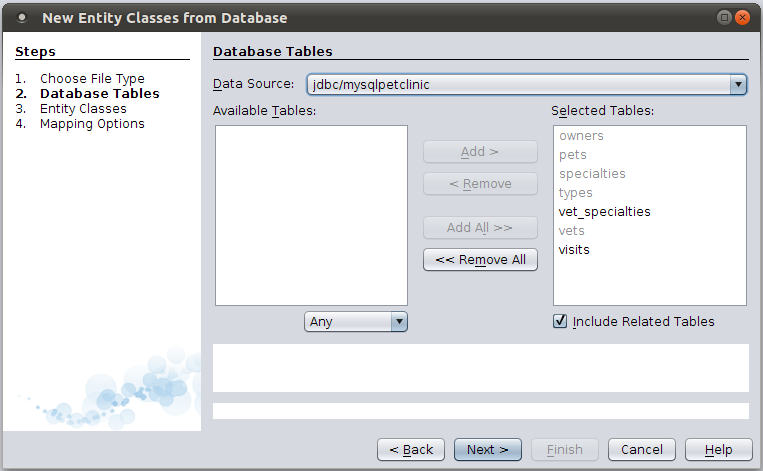
Figure 13. Database Tables
NetBeans attempts to guess the desired name of our entity classes by examining the database table names. The petclinic database uses plural names for its tables (for example, owners, pets, specialties, and so on). However, we would like our corresponding entity names to be singular nouns (Owner, Pet, Specialty, so on). Conveniently, NetBeans allows us to modify the suggested JPA entity class names in this step by simply double-clicking the name and modifying as necessary.
At this point, we can optionally select to generate named queries for each field in our JPA entities, generate Java API for XML Binding (JAXB) annotations, and create a persistence unit. In most cases, it is a good idea to generate the named queries and create the persistence unit. We might not need the JAXB annotations, but it doesn't hurt to have them. Therefore, in this example, we chose to generate them as well.
After clicking Next, we can specify mapping options, as shown in Figure 14.
In the Association Fetch list, we can select how associated entities are loaded. The default behavior is to fetch one-to-one and many-to-one relationships eagerly and to fetch one-to-many and many-to-many relationships lazily. We can select the default behavior, or we can specify that all relationships will be fetched either eagerly or lazily. In most cases, the default behavior is the most sensible approach.

Figure 14. Specifying How Associated Entities Are Loaded
Selecting the Fully Qualified Database Table Names check box causes the @Table annotation in the generated JPA entities to have the catalog and schema attributes set. These attributes are used when generating the database from JPA entities.
Selecting the Attributes for Regenerating Tables check box results in additional attributes being added to the @Column (and, in some cases, the @Table) annotation on the generated JPA entities. When this check box is selected, metadata is obtained from the database and used to add additional attributes to the JPA annotations with the obtained values.
If the database does not allow the mapped column to be null, the nullable attribute (with a value of false) is added to the corresponding @Column annotation. For attributes of type String, the length attribute is added to the @Column annotation. This attribute specifies the maximum length allowed for the corresponding property. For decimal types, the precision (number of digits in a number) and scale (number of digits to the right of the decimal point) are added to the @Column annotation. If there are any unique constraints, the uniqueConstraints attribute is added to the @Table annotation.
If the Use Column Names in Relationships check box is selected, the generated field name in a relationship is named after the column name in the “one” part of the relationship. For example, if we have a table named CUSTOMER that has a one-to-many relationship with a table named ORDERS, and the column in the CUSTOMER table that points to the primary key in the ORDERS table is named ORDER_ID, the generated field in the JPA entity will be named orderId. If we deselect this check box, the generated field will be named order. In my experience, deselecting this check box results in saner naming in most cases.
After clicking Finish, we can see the generated JPA entities in our project, as shown in Figure 15.
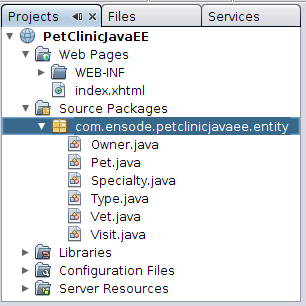
Figure 15. Generated JPA Entities
As we can see, NetBeans has already saved us a lot of work by automatically generating all the JPA entities needed for the project. Andrew Hunt and Dave Thomas offer this advice in their excellent book The Pragmatic Programmer: “Don’t use wizard code you don’t understand.” This is excellent advice.
Let's take a look at one of the generated entities to make sure we understand before moving on.
Listing 1. Examining a Generated Entity
        package com.ensode.petclinicjavaee.entity;

//imports omitted for brevity

@Entity
@Table(name = "owners", catalog = "petclinic", schema = "")
@XmlRootElement
@NamedQueries({
    @NamedQuery(name = "Owner.findAll", query = "SELECT o FROM Owner o"),
    @NamedQuery(name = "Owner.findById",
        query = "SELECT o FROM Owner o WHERE o.id = :id"),
    @NamedQuery(name = "Owner.findByFirstName",
        query = "SELECT o FROM Owner o WHERE o.firstName = :firstName"),
    @NamedQuery(name = "Owner.findByLastName",
        query = "SELECT o FROM Owner o WHERE o.lastName = :lastName"),
    @NamedQuery(name = "Owner.findByAddress",
        query = "SELECT o FROM Owner o WHERE o.address = :address"),
    @NamedQuery(name = "Owner.findByCity",
        query = "SELECT o FROM Owner o WHERE o.city = :city"),
    @NamedQuery(name = "Owner.findByTelephone",
        query = "SELECT o FROM Owner o WHERE o.telephone = :telephone")})
public class Owner implements Serializable {
    private static final long serialVersionUID = 1L;
    @Id
    @GeneratedValue(strategy = GenerationType.IDENTITY)
    @Basic(optional = false)
    @NotNull
    @Column(name = "id", nullable = false)
    private Integer id;
    @Size(max = 30)
    @Column(name = "first_name", length = 30)
    private String firstName;
    @Size(max = 30)
    @Column(name = "last_name", length = 30)
    private String lastName;
    @Size(max = 255)
    @Column(name = "address", length = 255)
    private String address;
    @Size(max = 80)
    @Column(name = "city", length = 80)
    private String city;
    @Size(max = 20)
    @Column(name = "telephone", length = 20)
    private String telephone;
    @OneToMany(cascade = CascadeType.ALL, mappedBy = "owner")
    private Collection<Pet> petCollection;

    public Owner() {
    }

    public Owner(Integer id) {
        this.id = id;
    }

    //getters and setters omitted for brevity

    @Override
    public int hashCode() {
        int hash = 0;
        hash += (id != null ? id.hashCode() : 0);
        return hash;
    }

    @Override
    public boolean equals(Object object) {
        // TODO: Warning - this method won't work in the case the id
        // fields are not set
        if (!(object instanceof Owner)) {
            return false;
        }
        Owner other = (Owner) object;
        if ((this.id == null && other.id != null) ||
              (this.id != null && !this.id.equals(other.id))) {
            return false;
        }
        return true;
    }

    @Override
    public String toString() {
        return "com.ensode.petclinicjavaee.entity.Owner[ id=" + id + " ]";
    }
}
The actual code in the JPA entity in Listing 1 is pretty mundane (dare I say, “boring”). It is just a standard JavaBean with private properties and public getters and setters. The interesting stuff is in the annotations.
The class is obviously annotated with an @Entity annotation, since this is a requirement for every JPA entity.
Next, we see the @Table annotation. The most common reason to use this annotation is to map the JPA entity to the corresponding table via the annotation's name attribute. This is needed only when the name of the JPA entity does not match the name of the table (which is the case in our example).
In this specific case, our @Table annotation also has the catalog and schema attributes set. This is the case because we selected the Fully Qualified Database Table Names check box in the wizard. MySQL doesn't distinguish between “schemas” and “databases.” Therefore, the generated value for the schema attribute is empty. What is meant as a “catalog” is different depending on the database vendor. In the case of MySQL, the catalog is simply the database name. Therefore, we see the corresponding value in the catalog attribute.
Next, we see the @XmlRootElement annotation. This annotation is used by JAXB to map our entity to XML. It was added because we selected the Generate JAXB Annotations check box in the wizard. We are not going to use this functionality in our example, but it doesn't hurt to have it, especially since we got it “for free.”
The generated @NamedQueries annotation encapsulates all the generated @NamedQuery annotations. The NetBeans wizard generates a @NamedQuery annotation for each field in our entity. JPA named queries allow us to define Java Persistence Query Language (JPQL) queries right in the corresponding JPA entity, which means we don't need to hard-code the queries elsewhere in our code.
JPQL queries defined in @NamedQuery annotations can be accessed through the createNamedQuery()method in the JPA EntityManager. Identifiers preceded by a colon (:) are named parameters. These parameters need to be replaced by the appropriate values before executing the query, which is done by invoking the setParameter() method on a Query object.
The @Id annotation specifies that the id property of our entity is its primary key. The NetBeans wizard detected that the primary key in the corresponding table in the database is automatically incremented and used the appropriate JPA primary key generation strategy, which is denoted by the @GeneratedValue annotation.
The @Column annotation for the @Id field has its nullable attribute set to false. The NetBeans wizard detected that the corresponding column in the database does not accept nulls and automatically added this attribute to the annotation. Similarly, every @Column annotation for every field of type String has a length attribute. The value of the attribute corresponds to the maximum length allowed for the corresponding column in the database.
The nullable and size attributes were added because we selected the Attributes for Regenerating Tables check box in the wizard.
The @Basic annotation is JPA-specific. Setting its optional attribute to false prevents us from attempting to persist an entity with a null value for the attribute that this annotation decorates.
The @NotNull and @Size annotations are part of Bean Validation, a new feature introduced in Java EE 6.
The @Size annotation allows us to specify the minimum (not shown in Listing 1) and maximum length that a field can have. The values in our entity were derived from the corresponding database columns. The @NotNull annotation makes the annotated field non-nullable. The @NotNull and @Size annotations are part of the Bean Validation specification and are always added by the wizard when appropriate. The corresponding attributes for @Column (nullable and length) are added only if we select the Attributes for Regenerating Tables check box. The former is used for validation, and the latter is used for regenerating the database tables from the JPA entities.
Conclusion
As you can see, developing the data layer of our application is very easy when using JPA and NetBeans, because most of the code is actually generated by the NetBeans wizard. In part 2 of this series, we will see how NetBeans can help us generate the other layers of our application.
See Also
- Spring to Java EE Migration, Part 2
- Spring to Java EE Migration, Part 3
- Spring to Java EE Migration, Part 4
- Spring Framework
- NetBeans
- Java EE 6
About the Author
David Heffelfinger is the Chief Technology Officer of Ensode Technology, LLC, a software consulting firm based in the greater Washington D.C. area. He has been architecting, designing, and developing software professionally since 1995 and has been using Java as his primary programming language since 1996. He has worked on many large-scale projects for several clients including the U.S. Department of Homeland Security, Freddie Mac, Fannie Mae, and the U.S. Department of Defense. He has a masters degree in software engineering from Southern Methodist University.