
Jumpstart for Oracle Service Bus Development: Tutorial #2
Tutorial 2: New Adapters
by Ronald van Luttikhuizen and Eric Elzinga
Architect: SOA
Published October 2009
In this tutorail you will add self-service capabilities for Foo Inc. Customers of Foo Inc. can use this new service to email their personal information,which will be automatically be added to the back office systems, enabling customer to make online purchases.
More specifically we will create an OSB project that retrieves mail messages from a mail server and transform their content into the English canonical data model. The customer details will be used as input for the "AddCustomer" operation of the OSB Customer Service that was created in the previous tutorial. This service will then store the new customer information. This tutorial introduces MFL (Message Format Language) capabilities and Service Accounts.
Goal
Getting to know adapter support in Oracle Service Bus such as the email adapter. This is particularly interesting since Oracle ESB does not offer an email adapter.
Let's begin by creating a new project.
Oracle Service Bus Project
- Create a new OSB Project and name it "WAAI_Case2_CreateCustomer_Service". Create the following folders in the project: proxy, xquery, and service_accounts. These folders will contain the various OSB artifacts.
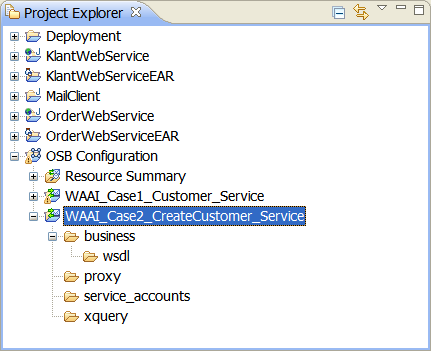
Figure 1: Folder structure of the new OSB project

Service Account
OSB uses a Service Account to access the mailbox on the mail server through polling. Service Account resources provide a user name and password that Proxy and Business Services use for outbound authentication to a local or remote resource, such as an FTP server or a JMS server.
- Select the service_accounts folder. Select File → New → Service Account from the menu. Create a new account, enter "EmailAccount" as name, and click "Finish". Configure the account depending on the configuration of the mail server you use. The tutorial uses the following settings:
- Resource Type: "Static"
- User Name: "waai@mydomain.com"
- Password: "waai"
- Confirm Password: "waai"

Figure 2: Configuration of the Service Account

Message Format Language (MFL)
To use the mail content in the remainder of the pipeline we need to transform its plain-text data into XML. Oracle Service Bus uses MFL (Message Format Language) to convert non-XML into XML or XML into non-XML.
- Select the WAAI_Case2_CreateCustomer_Service project in the "Project Explorer". Select File → New → MFL from the menu.
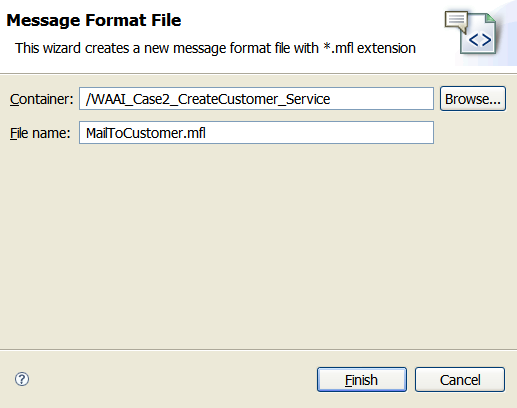
Figure 3: Creating a Message Format File
Enter "MailToCustomer.mfl" as "File Name" and click "Finish". This will open the "Format Builder Tool" dialog. We will use this tool to transform the mail content into XML format. Select File → Properties from the menu and change the "Message Format Version" to "2.0.2". Click "OK".
Right-click the "MailToCustomer" item and select "Insert Field". Add the following elements:
- customerId (type = String, Field Occurrence = Once, Delimiter = ;)
- firstName (type = String, Field Occurrence = Once, Delimiter = ;)
- lastName (type = String, Field Occurrence = Once, Delimiter = ;)
- age (type = String, Field Occurrence = Once, Delimiter = \n)
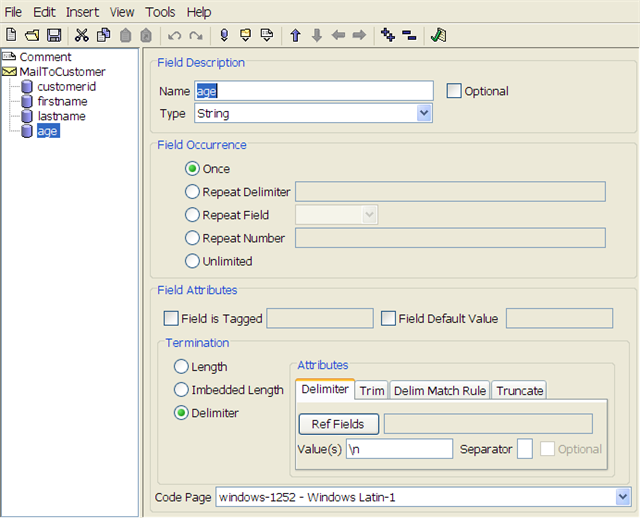
Figure 4: Configuration of the MFL after adding all elements
Save all changes. Let's test the newly created transformation to see if the MFL transforms our mail message to a corresponding XML document.
- Select Tools → Test... from the menu. This opens the "Format Tester". Select the "Text" tab at the bottom and use the following test input: "10;Eric;Elzinga;10". Select Transform → Non-XML to XML .

Figure 5: The generated XML as result of the transformation


The MFL works and the target XML is shown in the dialog! We continue by routing the XML document to the Customer Proxy Service from the previous tutorial.
Routing and Transformation
We will use the information from the mail message to invoke the "AddCustomer" operation of the Customer Proxy Service we created in the first tutorial. Although the MFL has generated XML, we still need to transform its contents into a valid request payload for the Customer Proxy Service. We will create an XQuery transformation to achieve this.
- Create a new XQuery document in the XQuery folder by right-clicking it and selecting New → XQuery Transformation . Enter "MailtoAddCustomer" as name. Select "Non-XML" as "Source Type". Select "MailToCustomer" from the "MailToCustomer.mfl" file.
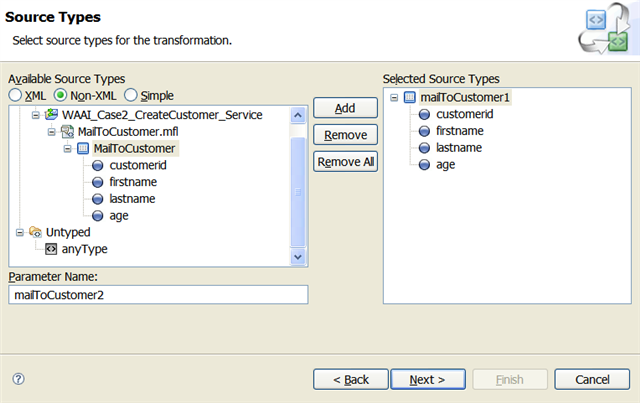
Figure 6: Creating the XQuery using the MFL XML response as Source Type
Select "XML" as "Target Type" and select the "AddCustomerRequest" element from the "WAAI_Case1_Customer_Service" project.
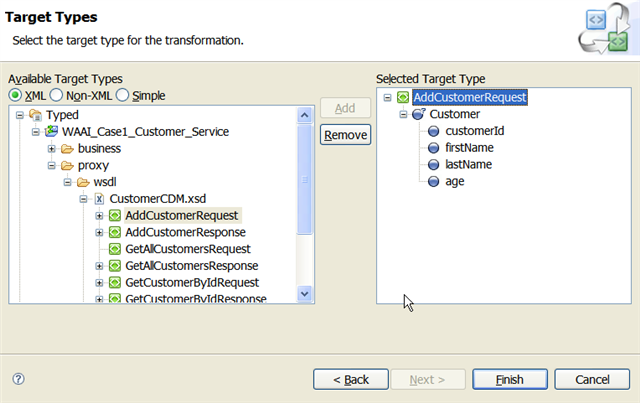
Figure 7: Creating the XQuery using the AddCustomerRequest variable as target
Finish the transformation by mapping the source element to the target elements. See the first tutorial in case you don't know how to apply type conversion.
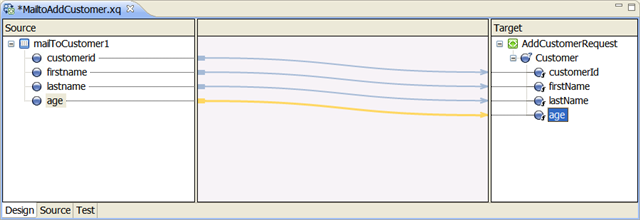
Figure 8: XQuery mapping between the mail content and AddCustomer request payload


Proxy Service
The following step involves defining a Proxy Service that will make use of the Service Account we created earlier to poll for new mail messages.
- Create a Proxy Service by right-clicking the proxy folder and selecting New ? Proxy Service. Enter "MFLMailtoAddCustomer" as "File name". Select "Messaging Service" as "Service Type".
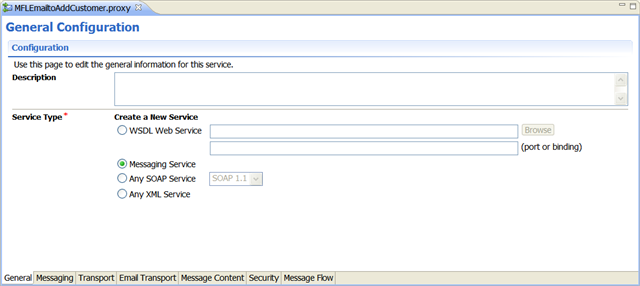
Figure 9: Configuration of the Proxy Service
Select "MFL" as "Request Message Type" in the "Messaging" tab and browse to the MFL file. Select "None" as "Response Message Type" as the Proxy Service won't be routing back any response; this is a fire-and-forget service. Save the Proxy Service.

Figure 10: Configuring the Proxy Service Message Type


Next we select the transport to use for this Proxy Service; in this case we will use the email transport.
Select "email" as "Protocol" in the "Transport" tab of the Proxy Service. Enter "mailfrom:server:port" as "Endpoint URI" and replace "server" and "port" with the settings of your mail server.

Figure 11: Configuring the email transport
Select the "Email Transport" tab to complete the configuration of the Proxy Service. Use the following setting:
- Select "EmailAccount.sa" as "Service Account".
- Enter a download directory to which mail messages will be copied when they are processed; for example c:\maildownload.
- Enter an error directory to which mail messages will be stored in case an error occurs during processing; for example c:\mailerror.
- Possibly specify an archive directory if you have set the "Post Read Action" to archive; for example c:\mailarchive.
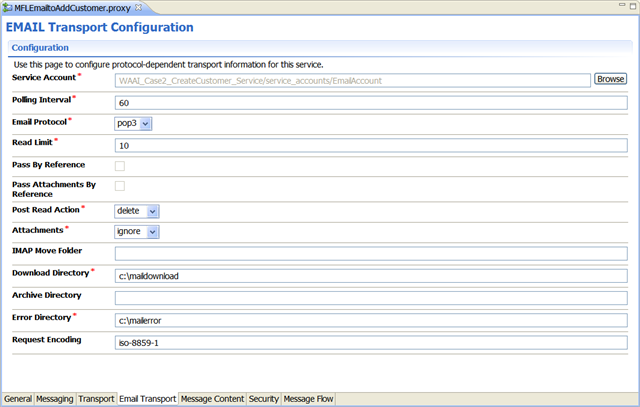
Figure 12: Configuring the email transport
Next we need to complete the Message Flow by connecting the Proxy Service to the "AddCustomer" operation of the Customer Proxy Service and adding the required transformation activities.
- Select the "Message Flow" tab. Add a Route activity by right-clicking the "MFLMailToAddCustomer" icon and selecting Insert Into →Route . Add a Routing activity by selecting the Route activity and selecting Insert Into ? Communication ? Routing. In the "Properties" tab of the Routing activity browse to the "CustomerPS" Proxy Service from the first tutorial and select the "AddCustomer" operation as service endpoint.
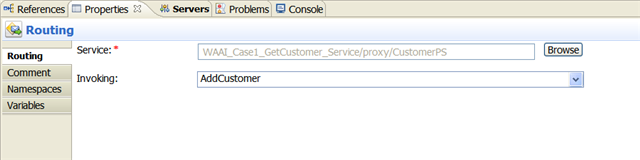
Figure 13: Routing the Message Flow to the AddCustomer operation of the Customer Proxy Service

Let's add the transformation logic in order to create a valid request payload for the Customer Proxy Service.
- Add an Assign activity by right-clicking the Request Action flow and selecting Insert Into → Message Processing → Assign . Click "Expression", select the "XQuery Resources" tab and select the "MailtoAddCustomer.xq" XQuery transformation we created earlier. Expand the "Variable Structure", select body → $body (request) → MailToCustomer , and drag it onto the "Binding" window. Click "OK" and enter "mailToCustomer" as "Variable".
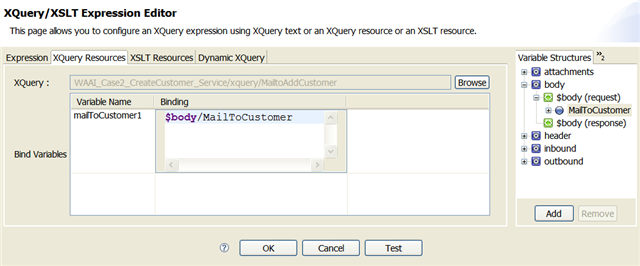
Figure 14: Assigning the outcome of the XQuery transformation to the "mailToCustomer" variable

We have now applied the XQuery transformation to the XML output of the mail message. The result of the transformation is assigned to the "mailToCustomer" variable.
The final step in the Message Flow involves defining a valid request payload for the Customer Proxy Service using the "mailToCustomer" variable.
- Add a Replace activity by right-clicking the Assign activity and select Insert After ? Message Processing ? Replace. Use it to replace the contents of the request body with the value of the "mailToCustomer" variable.
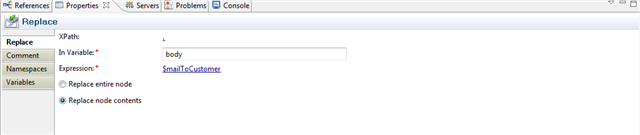
Figure 15: Replacing the request body with the contents of the "mailToCustomer" variable

The Message Flow is now completed and looks like the following:
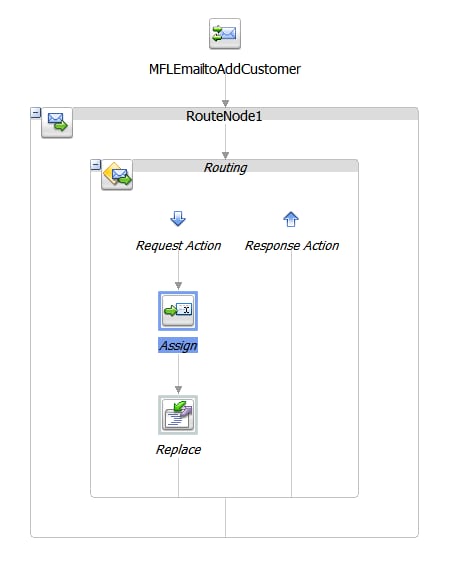
Figure 16: Message Flow after adding all routing and transformation logic
This completes the OSB project! We are now ready to test it.
Deployment and Testing
Deploy the OSB project to WebLogic Server as previously outlined and open Oracle Service Bus Console to inspect it.
The projects you imported in Oracle Workshop during the installation and configuration guide include a project called "MailClient" that can be used to test the OSB service. The test project contains a simple Java class that creates and sends a mail message to the mail server. This mail server is polled by the OSB project and the message is picked up and initiates an instance of the OSB project.
Open the MailClient.java class in the MailClient project and change the settings according to your mail server. Run the client by right-clicking the Java class and selecting Run As → Java Application .
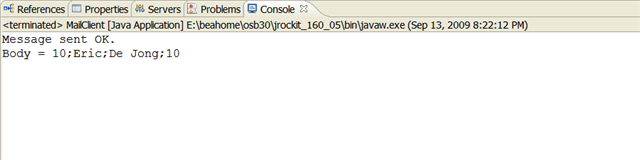
Figure 17: Test result of the MailClient.java — the mail message is sent
The messages is routed to the "AddCustomer" operation of the Customer Proxy Service, which will route the message to the "AddKlant" operation of the KlantWebService project as outlined in the first tutorial. The Web Service implementation logs the Dutch input to the Console.
After sending the mail message the Console in Oracle Workshop logs the following:

Figure 18: Test result of invoking the "AddCustomer" operation
Also inspect the mail folders you have defined during the creation of the Proxy Service. These should contain the mail message that is processed by OSB.
We have now successfully tested the OSB project!
Lessons Learned
You have added self-service capabilities for Foo Inc. in this tutorial. Using this new service, Foo Inc. customers can email their personal information, which will automatically be added to the back office systems, enabling customers to make online purchases.
You have used OSB's support for mail transport, Service Accounts, and MFL to poll for new mail messages and convert its non-XML payload into XML format.