Back Up a Thousand Databases Using Enterprise Manager Cloud Control 12c
by Porus Homi Havewala
January 2014
A faster, more efficient alternative to Unix shell scripting and cron jobs.
Downloads
Oracle has long supplied a powerful utility, Oracle Recovery Manager (RMAN), along with the database software install, which is used to backup and recover Oracle databases, either as a complete or incremental backup. The scripts are placed in a shell script wrapper at the Unix level, and then scheduled using the Unix cron job facility. These scripts need to be tested, verified and maintained.
While this task is manageable for one or two databases, the same task must be repeated with every new database or every new database server that is provisioned-and the time spent on setting up such backups increases correspondingly.
In this technical article, we will see how the DBA can set up and schedule RMAN database backups for thousands of databases using Enterprise Manager Cloud Control 12c more easily and efficiently than the older, more time-consuming, manual method of performing Unix shell scripting and cron jobs for each database to be backed up.
Using Enterprise Manager also removes the need to continuously maintain customized RMAN scripts with every new database release. As and when Oracle releases new versions of the Oracle database, the future versions of the Oracle Enterprise Manager database plug-in would automatically cater to the new release, and any special feature in that release, making RMAN script maintenance unnecessary. New RMAN features (such as compression, encryption, block change tracking, etc.) would be available when setting up the backup in Enterprise Manager itself.
With the Enterprise Manager approach, you can set up and schedule database backups without writing any script-Enterprise Manager will create the RMAN script and schedule it-and without using the Unix cron job utility, by simply using Oracle Enterprise Manager Cloud Control. This results in time and cost savings due to increased productivity and automation of the entire approach.
Initial Steps
Suppose you want to back up a database that is already a target in the Enterprise Manager system, i.e., the Enterprise Manager Agent has been installed on the database server and the database has been discovered and promoted as a managed target.
Move to the Database home page via Targets > Databases, and click on the database name. When the home page appears (make sure you are logged in to the database with SYSDBA credentials), set up the Fast Recovery Area (FRA) to help automate the backups.
The FRA can be set up by selecting Availability > Backup & Recovery > Recovery Settings from the Target menu:
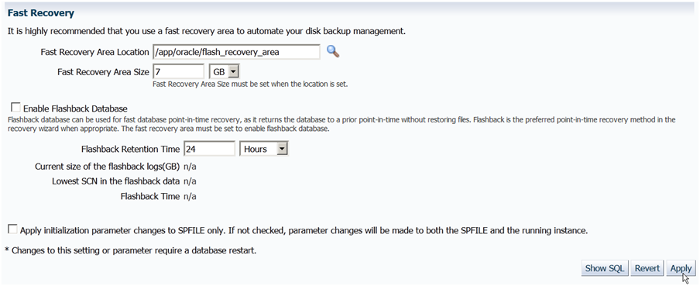
Figure 1: Setting up the Fast Recovery Area
Simply specify a location for the FRA, and the size in GB.
Click Apply.
Remember to specify an appropriate size depending on the size of the database and how exactly you will be backing up-for example, if you will be using image copies of your datafiles or only compressed backup sets (which will take up much lesser space). It is possible to resize the FRA later on, but if it runs out of space, archive logs (if in Archivelog Mode) may stop being generated, and the database will not process any transaction after that unless the space issue is resolved.
After the FRA is set up, the next step is to enable ARCHIVELOG Mode for the database. This allows you to take online backups and point-in-time recovery. You can enable ARCHIVELOG Mode on the page where you set up the FRA, as shown below:
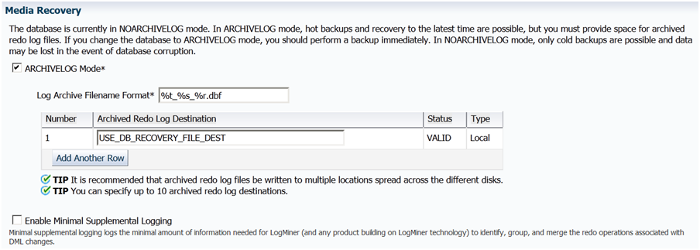
Figure 2: Setting ARCHIVELOG Mode
After the ARCHIVELOG Mode is set, Enterprise Manager will prompt you to restart the database and then immediately take a whole database backup.
The database is now opened in ARCHIVELOG Mode, and you can proceed with the backup.
Backup SettingsFrom the Database home page, select Availability > Backup & Recovery > Backup Settings. This page appears:
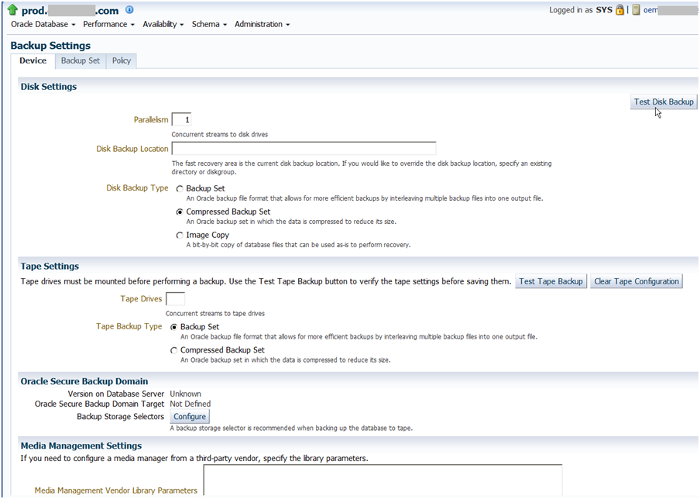
Figure 3: Entering Backup Settings
In the Disk Settings section of the Device tab, select a Parallelism of 1 (the default) and the Disk Backup Type Compressed Backup Set. Selecting a larger parallelism will increase the number of concurrent RMAN streams to the disk backup location; use this feature with care, since it depends on how much the disk can handle. Using such a setting will increase the speed of the backup, but this will also depend on the disk subsystem structure.
The options for Disk Backup Type are to create a Backup Set, a Compressed Backup Set, or an Image Copy. Select the Compressed option for the best use of the backup space. This sort of backup compression was introduced in Oracle 10g and was welcomed by DBAs.
Instead of a backup set, you can also select an Image Copy as the backup type. This will create an exact copy of each datafile. This is also useful for fast recovery, as we will discuss below.
Keep the disk backup location as blank, so as to use the FRA, provided it has been set up.
Use the Test Disk Backup button to make sure the disk backup is set up properly. This requires that the Host Credentials section at the bottom of this tab be filled up. The test will write some test backup files to the disk backup location, and let you know if successful.
Likewise, if you want your backups to be created on tape, fill in the Tape Settings section.
The other sections on the page let you specify Oracle Secure Backup (OSB) domains and parameters. Oracle's integrated secure tape backup management system, OSB provides an alternative to third-party tape backup solutions that may not be tightly integrated with Oracle RMAN and Oracle Enterprise Manager.
OSB protects not just the Oracle 9i, 10g, 11g and 12c databases, but also the entire environment, including heterogeneous application file systems (from OSB 10.2 onwards). You can read more about Oracle Secure Backup here.
Alternatively, if using a third-party vendor's media manager, you can specify the library parameters in the Media Management Settings section.
Let's move on to the Backup Set tab.
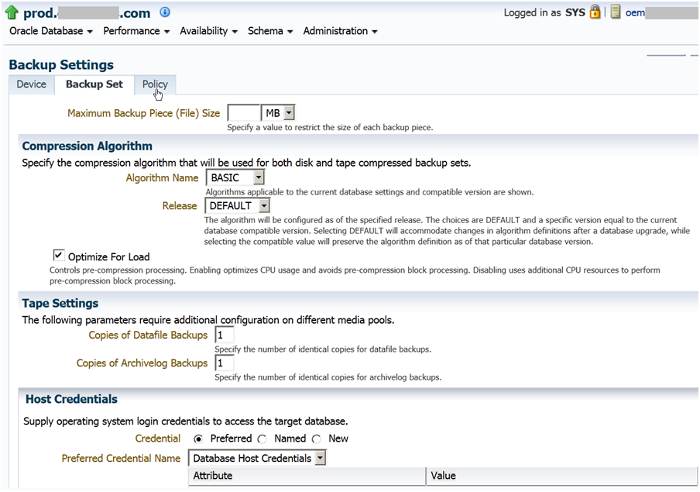
Figure 4: The Backup Set Tab
In this tab, you can specify the Maximum Backup Piece (File) Size. as well as the Compression Algorithm (choose Basic, Low, Medium or High compression).
The Release can be selected as either Default or as a specific version, such as 11.2.0.0.0, to preserve the algorithm definition for that database version.
You can also optimize the compression's CPU usage, in particular by avoiding pre-compression block processing.
Click the Policy tab.
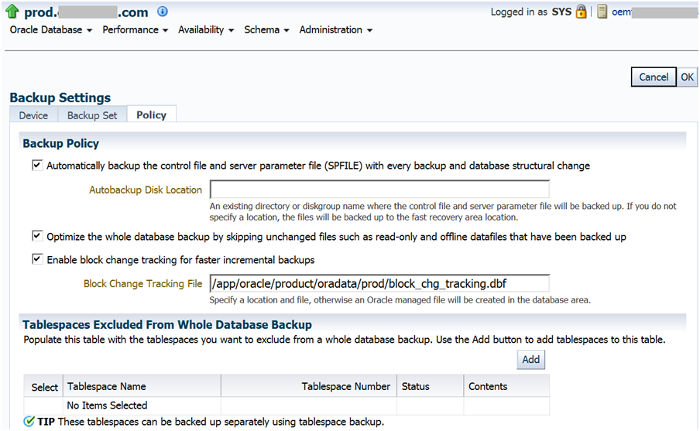
Figure 5: The Backup Policy Tab
In the Backup Policy tab, you can specify that the Database Control File and Server Parameter File (SPFILE) be backed up automatically with every database backup or database structural change.
Note: Specifying this automatic backup is strongly recommended, since these are very important files for the database. Since you are using the nocatalog mode of RMAN, it is of utmost importance to ensure the safety of the control file and make certain it is backed up, because the control files contains the history of all the backups.
If the Autobackup Disk Location is not specified, it will default to the FRA.
You can also optimize the database backup by skipping unchanged read-only or offline datafiles that have been previously backed up. It is not necessary to back up such datafiles again.
Block Change Tracking can also be enabled on this tab, and a file name specified for this purpose. This feature was introduced in Oracle 10g and helps considerably to increase the speed of incremental backups, since all database block changes are tracked in this special file (only tens of MB in size). The RMAN process in this case will not need to scan the entire datafile for changed blocks, when taking incremental backups.
Such full scanning took place during incremental backups in 9i, and as a result the incremental backups were much slower in that version. This is no longer the case in 10g onwards. Incremental backups are much faster with block change tracking.
The lower half of the Policy tab shows the Retention Policy and the Archived Redo Log Deletion Policy:
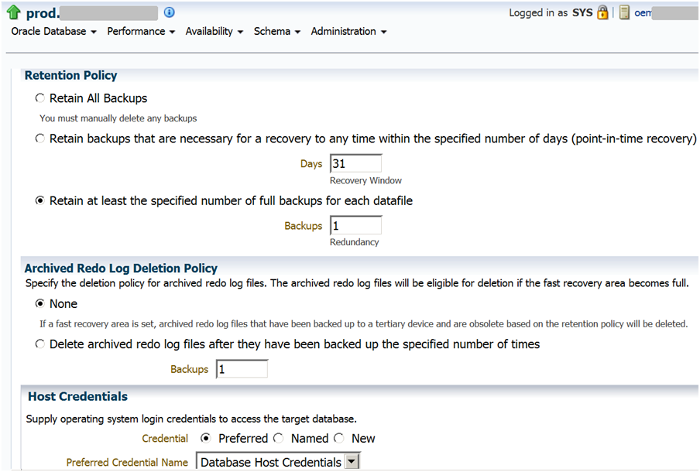
Figure 6: Retention Policy
Choose a retention policy based on redundancy instead of a recovery window. Select Retain at least the specified number of full backups for each datafile, and enter 1 as the number of backups to retain at any one time - this is your redundancy. (1 is actually the default setting.)
The result is that, when a new backup is taken, the older backup will be marked as obsolete-since only one backup is to be retained at any time. Obsolete backups can then be deleted by RMAN maintainance commands such as:
DELETE NOPROMPT OBSOLETE DEVICE TYPE DISK;
If using the Recovery Window ("Retain backups that are necessary for a recovery to any time within the specified number of days"), you must specify the number of days instead of the number of backups. In this case, backups would be retained to allow recovery of the database up to the specified number of days.
Suppose the RMAN Retention Policy is specified as a recovery window of 7 days, indicating that database backups will be retained to enable recovery up to the last 7 days. However, retaining more than 1 database backup on disk could have space repercussions. You must take into account the following:
- The total size of the database
- The types of backups taken each day (full or incremental)
- The amount of archive logs generated each day (since archive log backups are also included)
- The amount of finite space allocated to the database's FRA
The database administrator must keep all these factors in mind, and closely monitor the database backup space available over the next few weeks, adjusting the Recovery Window if required or changing the Retention Policy to Redundancy instead of a Recovery Window.
The "Archived Redo Log Deletion Policy" section specifies the deletion policy for archived redo logs, which can be made eligible for deletion in one of two ways when the FRA becomes full:
- Select None to disable the Archived Redo Log Deletion Policy. Assuming that the FRA is set, the archived redo logs that have been backed up and are obsolete as per the retention policy will be deleted by the RMAN maintenance commands.
- Select Delete archived redo logs after they have been backed up the specified number of times to specify the number of backups to a tertiary device after which the archived redo logs will be deleted.
If this is a primary database-and not a standby database-in an Oracle Data Guard configuration, one more option, Delete archived redo log files, will appear on the page; it has two sub-options:
- After they have been applied to all standby databases: archived redo logs will be deleted after being applied or consumed on all remote destinations. The destinations may or may not be mandatory.
- After they have been shipped to all standby databases: archived redo logs will be deleted after transfer to all remote destinations, which may or may not be mandatory.
It is also possible to select both Delete archived redo log files and Delete archived redo logs after they have been backed up the specified number of times. This option deletes the archived redo logs that have been applied or shipped to all remote destinations, and also deletes archived logs after considering whether the specified number of archived log backups have been backed up to a tertiary device.
We've discussed the options available for a primary database. In the case of a standby database, there are three main options:
1. None
2. Delete archived redo log files after they have been applied to the standby database
3. Delete archived redo logs after they have been backed up the specified number of times.
Click OK to save the backup settings in the control file of the database (because you are not using an RMAN catalog database).
To confirm the changed settings, log into RMAN at the command prompt. Execute the show all command, which displays the RMAN configuration:
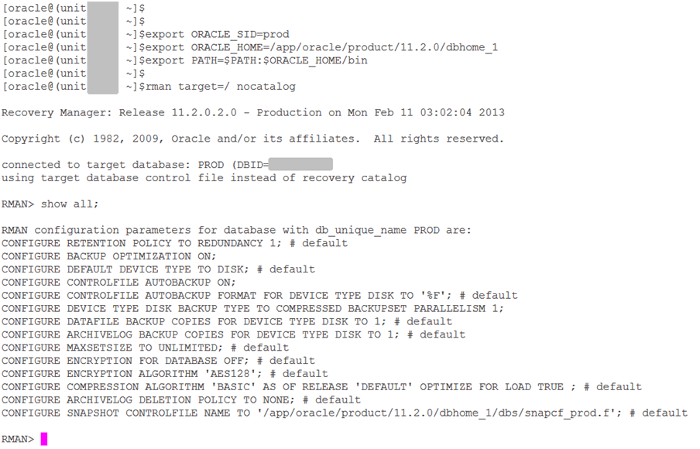
Figure 7: Output of Show All
Your modifications in the Backup Settings tabs of Enterprise Manager Cloud Control 12c have been saved as the configuration settings in RMAN. They are stored in the control file of the PROD database.
The # default comment shows the unchanged configuration settings; conversely, the settings without this comment have been modified. Backup optimization is ON, controlfile autobackup is ON, and there is a parallelism of 1 using a compressed backupset. These are all the settings that you had changed in the preceding pages.
Scheduling a Full Backup
We can now proceed to schedule the database backup.
In the Enterprise Manager Cloud Control 12c console, select Availability > Backup & Recovery > Schedule Backup from the Home page of the PROD database.

Figure 8: Schedule Backup
In the Customized Backup section of the Schedule Backup screen, select Whole Database, then click Schedule Customized Backup.
The Customized Backup section also allows you to backup individual Tablespaces, Datafiles, or only the Archived Logs. The final option on this page is to backup All Recovery Files on Disk. Choose this option to backup the FRA of the database to tape.
You can create the FRA only in an Oracle Database version 10g or later. This area is where all the RMAN backup pieces, image copies, and archive logs are stored. Backing up the FRA creates a backup of your backup—ideally, as Oracle recommends—to a less expensive disk (i.e., not your tier 1 or even tier 2 disk) instead of tape. The DBA can then perform a fast recovery from the available disk-based backup, in case of any production issues, rather than waiting for the tape to be located and the tape backup to be restored to the disk.
The FRA, which contains the disk-based database backups, can then be backed up to tape once a week, allowing offsite tape backups as well as onsite disk backups. This would be a suitable Oracle backup strategy.
Next: the Schedule Customized Backup: Options page.
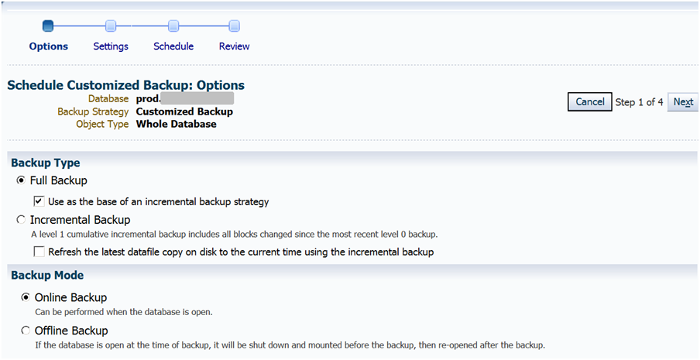
Figure 9: Options for Schedule Customized Backup
First, select Full Backup as the Backup Type, then check Use as the base of an incremental backup strategy. We are going to set up a full backup of this type on Sundays, as well as a daily incremental backup of the database.
Select Online Backup as the Backup Mode, then scroll down to the Advanced section.
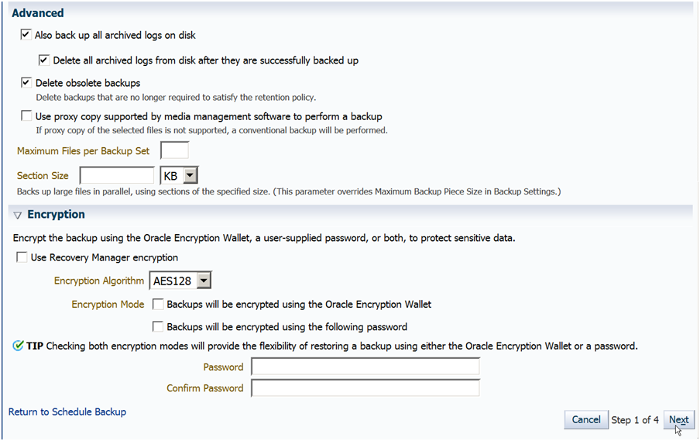
Figure 10: Advanced Section
Select Also back up all archived logs on disk as well as Delete all archived logs from disk after they are successfully backed up.
Selecting these options configures the backup to include all archive logs with the full database backup and deletes the archive logs from disk after they are backed up. To delete backups marked as obsolete (as per the retention policy), select Delete obsolete backups.
Click the Encryption icon to expand it and display the Encryption fields that are applicable to your target database version. Backup Encryption was first introduced in Oracle Database 10g Release 2 and is available for all later versions.
Note that Oracle's Advanced Security Option is required if you wish to create encrypted backups on disk with RMAN. You must make sure you are licensed to use this option, because being licensed for the Oracle Database Enterprise Edition (EE) does not automatically mean you are licensed to use the Advanced Security Option.
The other alternative is to use Oracle Secure Backup (OSB) to create encrypted backups on tape. Again, you must make sure you are licensed to use this product. OSB must be installed separately.
If you decide to select Use Recovery Manager Encryption, you can select encryption using the Oracle Wallet as well as encryption using the password. Specify the password in the field below and confirm. This will encrypt the backup using both these methods. Also, there will be greater flexibility since you can use either the wallet or the password when the RMAN backup needs to be restored. By default, AES128 is selected as the Encryption Algorithm. We have decided not to use encryption in this case.
Move to the next page.
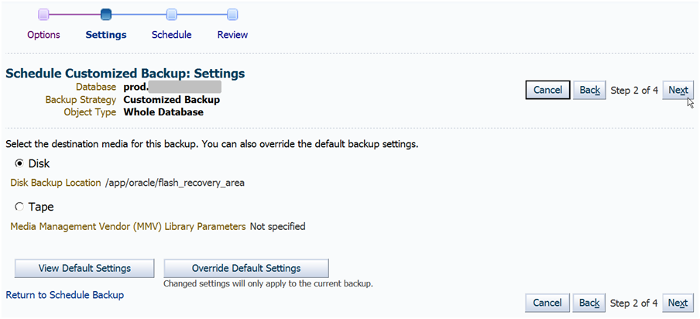
Figure 11: Destination Media for Backup
The Disk Backup Location is displayed as the FRA. This is configured in our case as /app/oracle/flash_recovery_area. You can name this location whatever you wish as per your company standards.
Move to the next page, which is the Scheduling screen. This is where you set the day and time you want your backup to run.
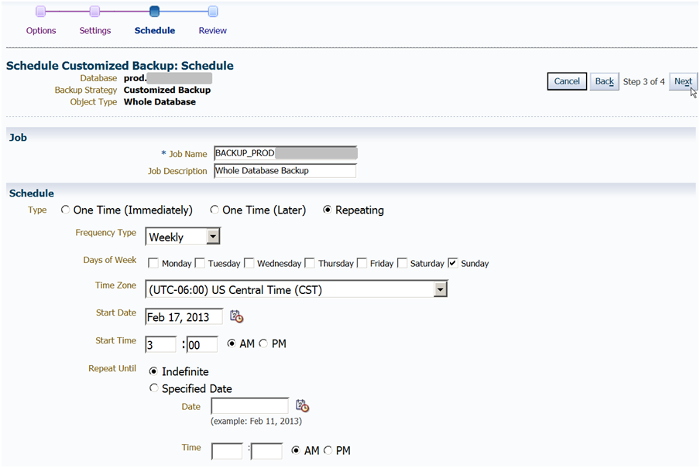
Figure 12: Setting the Schedule
There are three options. You can schedule the backup to run once, immediately; once, at a later time; or repeatedly, at a schedule you define.
The second and third options allow you to specify the start date and time you wish the backup to run and the time zone associated with the time you specify. The repeating option also lets you select the frequency type (e.g., days or weeks) and the frequency. For example, if you select days as the frequency type and 1 as the frequency, the back up will run once every day at the time you have specified.
You can repeat the frequency type and frequency you select indefinitely, or until a specified date and time. The current time is shown as the suggested setting for the backup. We suggest 3 AM the following morning so that the backup will start at this time of low activity.
Weekly is selected as the Frequency Type since we want a full database backup to be performed each week. Under the "Days of the Week," we have selected Sunday.
Select the Repeat until Indefinite radio button, which means that the backup schedule will be continued indefinitely with no end date or time.
Move to the next page. This is the Scheduled Customized Backup: Review screen.

Figure 13: Review of the Scheduled Backup
Enterprise Manager Cloud Control 12c has generated the RMAN script that will be used in the backup, based on the input criteria you identified in the previous screens.
The RMAN commands perform a full database and archivelog backup. The archive logs are deleted after backup, after which the maintenance commands that delete obsolete diskbackups are executed. These actions are derived from what we previously specified in the Cloud Control backup setup and backup schedule wizard pages.
To make modifications to the generated script and then submit it, click Edit RMAN Script. Once modifications are made, you cannot return to the previous pages of the Wizard. Nevertheless, you may want to change the RMAN script to include extra maintenance commands that will crosscheck backups and archivelogs, and delete the backups and archivelogs that have expired. These commands can be:
 allocate channel for maintenance device type disk;
  crosscheck backup;
  delete noprompt expired backup;
  delete noprompt obsolete device type disk;
  crosscheck archivelog all;
  delete noprompt expired archivelog all;
  release channel;
Click Submit Job. After the job is submitted successfully, you can then select View Job to see the job's status and progress:
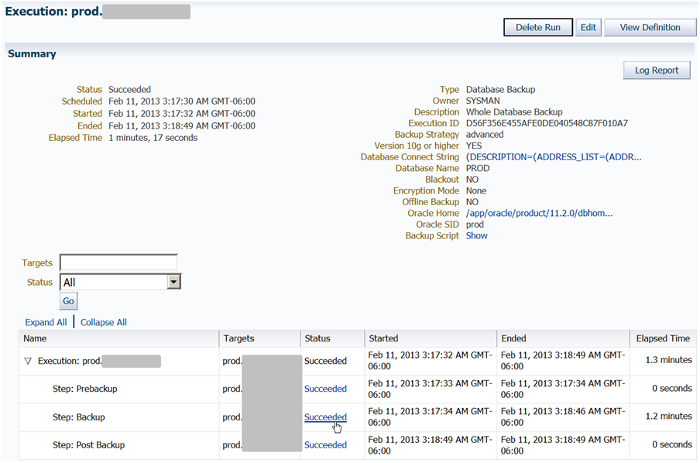
Figure 14: Job Summary
Click the Succeeded link in the status column to view the output in detail.
The RMAN output appears as follows:

Figure 15: RMAN Output
The entire RMAN output of this step is reproduced below.
The entire RMAN output of this step is reproduced below.

Output Log

Recovery Manager: Release 11.2.0.2.0 - Production on Mon Feb 11
03:17:35 2013
Copyright (c) 1982, 2009, Oracle and/or its affiliates. All rights
reserved.

RMAN>
connected to target database: PROD (DBID=nnnnnnnnnnn)
using target database control file instead of recovery catalog

RMAN>
echo set on

RMAN> set command id to 'BACKUP_PROD.ORACLE_021113031732';
executing command: SET COMMAND ID

RMAN> backup incremental level 0 cumulative device type disk tag
'BACKUP_PROD.ORACLE_021113031732' database;
Starting backup at 11-FEB-13
allocated channel: ORA_DISK_1
channel ORA_DISK_1: SID=28 device type=DISK
channel ORA_DISK_1: starting compressed incremental level 0 datafile
backup set
channel ORA_DISK_1: specifying datafile(s) in backup set
input datafile file number=00001 name=/app/oracle/product/oradata/prod/system01.dbf

input datafile file number=00002
name=/app/oracle/product/oradata/prod/sysaux01.dbf

input datafile file number=00005
name=/app/oracle/product/oradata/prod/example01.dbf
input datafile file number=00003
name=/app/oracle/product/oradata/prod/undotbs01.dbf

input datafile file number=00004
name=/app/oracle/product/oradata/prod/users01.dbf

input datafile file number=00006
name=/app/oracle/product/11.2.0/dbhome_1/dbs/demo_01.dbf

channel ORA_DISK_1: starting piece 1 at 11-FEB-13

channel ORA_DISK_1: finished piece 1 at 11-FEB-13
piece
handle=/app/oracle/flash_recovery_area/PROD/backupset/2013_02_11/
o1_mf_nnnd0_BACKUP_PROD_ORACLE_0_8kkfsjn2_.bkp
tag=BACKUP_PROD.ORACLE_021113031732 comment=NONE
channel ORA_DISK_1: backup set complete, elapsed time: 00:01:05
Finished backup at 11-FEB-13

Starting Control File and SPFILE Autobackup at 11-FEB-13
piece
handle=/app/oracle/flash_recovery_area/PROD/autobackup/2013_02_11/
o1_mf_s_807074321_8kkfvkvb_.bkp comment=NONE
Finished Control File and SPFILE Autobackup at 11-FEB-13

RMAN> backup device type disk tag
'BACKUP_PROD.ORACLE_021113031732' archivelog all not backed up
delete all input;
Starting backup at 11-FEB-13
current log archived
using channel ORA_DISK_1
channel ORA_DISK_1: starting compressed archived log backup set
channel ORA_DISK_1: specifying archived log(s) in backup set
input archived log thread=1 sequence=187 RECID=1 STAMP=807074323
channel ORA_DISK_1: starting piece 1 at 11-FEB-13
channel ORA_DISK_1: finished piece 1 at 11-FEB-13
piece
handle=/app/oracle/flash_recovery_area/PROD/backupset/2013_02_11/
o1_mf_annnn_BACKUP_PROD_ORACLE_0_8kkfvmfh_.bkp
tag=BACKUP_PROD.ORACLE_021113031732 comment=NONE
channel ORA_DISK_1: backup set complete, elapsed time: 00:00:01
channel ORA_DISK_1: deleting archived log(s)
archived log file
name=/app/oracle/flash_recovery_area/PROD/archivelog/2013_02_11/
o1_mf_1_187_8kkfvm0n_.arc RECID=1 STAMP=807074323
Finished backup at 11-FEB-13

Starting Control File and SPFILE Autobackup at 11-FEB-13
piece handle=/app/oracle/flash_recovery_area/PROD/autobackup/2013_02_11/
o1_mf_s_807074324_8kkfvnot_.bkp comment=NONE
Finished Control File and SPFILE Autobackup at 11-FEB-13

RMAN> allocate channel for maintenance type disk;
released channel: ORA_DISK_1
allocated channel: ORA_MAINT_DISK_1
channel ORA_MAINT_DISK_1: SID=28 device type=DISK

RMAN> delete noprompt obsolete device type disk;
RMAN retention policy will be applied to the command
RMAN retention policy is set to redundancy 1
Deleting the following obsolete backups and copies:
Type                Key    Completion Time  Filename/Handle
– – – – – – – – – – –   – – –   – – – – – – – – – – –   – – – – – – – – – –
Backup Set                     3           11-FEB-13
Backup Piece                     3           11-FEB-13
/app/oracle/flash_recovery_area/PROD/autobackup/2013_02_11/
o1_mf_s_807074321_8kkfvkvb_.bkp
deleted backup piece
backup piece handle=/app/oracle/flash_recovery_area/PROD/autobackup/2013_02_11/
o1_mf_s_807074321_8kkfvkvb_.bkp RECID=3 STAMP=807074321
Deleted 1 objects

RMAN> release channel;
released channel: ORA_MAINT_DISK_1

RMAN> exit;

Recovery Manager complete.
Understanding the Output
On studying the RMAN output, we can gain a clear understanding of the entire sequence of events that occurred during the backup job.
First, a compressed full backup set for the database is created. This is an incremental level 0 cumulative backup that can be used as the basis of an incremental backup strategy. After this database backup is completed, a control file and SPFILE autobackup are also created, because we identified earlier that we wanted these files to be automatically backed up with each backup.
A compressed archived log backup set is then created to backup the archive logs. After successful backup, RMAN deletes the archivelogs from their disk location because of the included delete input clause.
But what if you require any of these deleted archive logs during a database recovery? During such a recovery-complete or incomplete-Oracle uses the archive logs to apply all the changes, so as to restore the database to any point of time (the main purpose of archive logging). So some or all of the archive logs may be needed by the recovery. In the past, DBAs had to perform a manual restore of the archive logs from their compressed Unix tape archiving (or tar) archives and then place the restored archive logs in a directory accessible by the Oracle-controlled recovery. DBAs had to do all the searches for the necessary archive log files manually. This kind of manual searching and restoring of the archive logs is no longer needed in the case of RMAN, which automatically locates the archive log backup sets needed and extracts the archive logs required for the recovery.
This is another tremendous benefit of using RMAN as your Oracle database backup mechanism of choice. When the backup is completed, we see that the database backups, archivelogs backups, Control file and SPFILE autobackups, all RMAN backup pieces, are created in the appropriate sub-directories in the FRA as follows:
/app/oracle/flash_recovery_area/PROD/backupset/2013_02_11
/app/oracle/flash_recovery_area/PROD/autobackup/2013_02_11
/app/oracle/flash_recovery_area/PROD/archivelog/2013_02_11
Because the database is using the FRA, Oracle automatically handles the creation of the directory structure using the database name PROD, and creates subdirectories for the backupset, autobackup and archivelog. The first two subdirectories will be used for the backup and the autobackup, and the archivelog subdirectory will be used to store normal archive logs that are generated by the database in archivelog mode.
A further subdirectory is also created for the date the backups have taken place. This happens every time a backup is taken and if the directory structure up to the day level doesn't exist, it is created. As we can see in the RMAN output, another control file and SPFILE autobackup takes place after the archive logs backup. Once configured, these autobackups will automatically occur after any RMAN database backup or archive logs backup completes.
The maintenance actions are next. The names of the backup files and archive log files have been catalogued by RMAN and exist as entries in the control file records. During the RMAN maintenance activities that are started by the maintenance commands you included (including the extra ones we had listed), these entries are crosschecked to verify that they physically exist on disk.
If the file does not physically exist, the corresponding entry is marked as expired (i.e., not found). Similarly, since the database backup, archivelog backup, and the autobackup in this job have succeeded, the entries of the previous backup and autobackup files are checked to see if they still need to be retained, as per the retention policy.
If they are no longer required, they are marked as obsolete. After this, the "delete noprompt expired..." and "delete noprompt obsolete..." commands are used one after the other to delete all the expired or obsolete database backup, archivelog backup, and controlfile backup entries, as well as the archivelog file entries from the controlfile records. In the case of obsolete records, the actual physical backup files are also deleted from the disk. The maintenance commands are obviously very important for space management.
Managing Backups
To manage the current backups of the database, select Availability> Backup & Recovery > Manage Current Backups. The following screen appears.
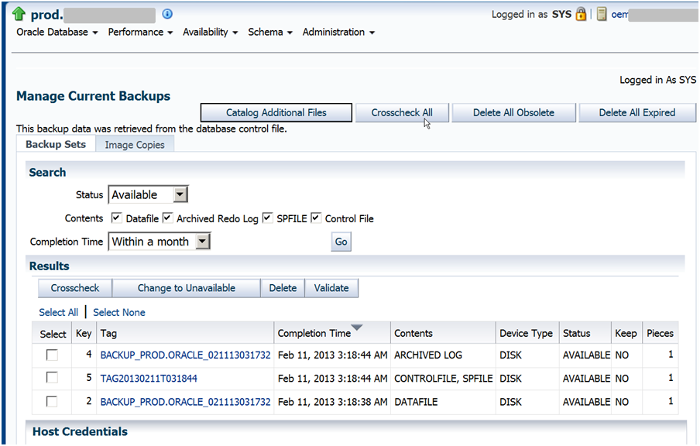
Figure 16: Manage Current Backups
On this screen you can search for backups with the following status: All, Available, Expired, Unavailable, or Other.
You can select if you want to see Datafile, Archived Redo Log, SPFILE or Control File backups, with a Completion Time of within a month, a week, two days, one day, within 8 hours, or all of these.
You can use the buttons on this page to perform the RMAN maintenance commands, such as Crosscheck All, Delete All Obsolete and Delete All Expired. This is a fast and easy way to perform RMAN maintenance if you are running out of space.
Here, you can also "Catalog Additional Files," such as operating system copies of datafiles you may have taken, filer snapshot files, etc. Cataloging allows RMAN to use such files.
Scheduling an Incremental Backup
We have prepared a full backup of the database to take place on every Sunday. The next step is to schedule a daily incremental backup.
Select Availability > Backup & Recovery > Schedule Backup from the Home page of the PROD database. In the Schedule Backup screen, select Whole Database in the Customized Backup section. Then click Schedule Customized Backup.

Figure 17: Selecting an Incremental Backup
This time, we select an Incremental Backup. This will create a level 1 cumulative incremental backup, as opposed to the level 0 backup that is taking place each Sunday.
Everything else stays the same, but the scheduling of this backup will be different, as the following screenshot demonstrates:

Figure 18: Scheduling an Incremental Backup
The incremental backup has been scheduled to take place on every day of the week except Sunday (when the full backup takes place). The time selected is the same as before (i.e., 3am) when database activity in this case is assumed to be the lowest.
The RMAN script generated is displayed in the Review screen, as shown below:
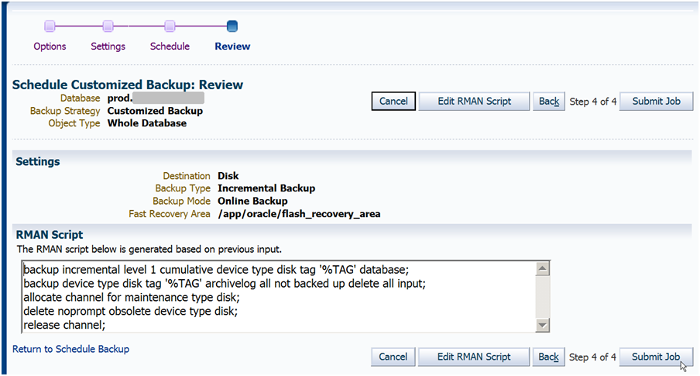
Figure 19: Generated RMAN Script for Incremental Backup
The RMAN script issues the backup incremental level 1 "cumulative… database" command. The full output of this job, after successful completion, is shown below:
Output Log

Recovery Manager: Release 11.2.0.2.0 - Production on Mon Feb 11
04:11:52 2013
Copyright (c) 1982, 2009, Oracle and/or its affiliates. All rights
reserved.

RMAN>
connected to target database: PROD (DBID=nnnnnnnnn)
using target database control file instead of recovery catalog

RMAN>
echo set on

RMAN> set command id to 'INCREMENTAL_BACKUP_021113041150';
executing command: SET COMMAND ID

RMAN> backup incremental level 1 cumulative device type disk tag
'INCREMENTAL_BACKUP_021113041150' database;
Starting backup at 11-FEB-13
allocated channel: ORA_DISK_1
channel ORA_DISK_1: SID=28 device type=DISK
channel ORA_DISK_1: starting compressed incremental level 1 datafile
backup set
channel ORA_DISK_1: specifying datafile(s) in backup set
input datafile file number=00001
name=/app/oracle/product/oradata/prod/system01.dbf
input datafile file number=00002
name=/app/oracle/product/oradata/prod/sysaux01.dbf
input datafile file number=00005
name=/app/oracle/product/oradata/prod/example01.dbf
input datafile file number=00003
name=/app/oracle/product/oradata/prod/undotbs01.dbf
input datafile file number=00004
name=/app/oracle/product/oradata/prod/users01.dbf
input datafile file number=00006
name=/app/oracle/product/11.2.0/dbhome_1/dbs/demo_01.dbf
channel ORA_DISK_1: starting piece 1 at 11-FEB-13
channel ORA_DISK_1: finished piece 1 at 11-FEB-13
piece
handle=/app/oracle/flash_recovery_area/PROD/backupset/2013_02_11/
o1_mf_nnnd1_INCREMENTAL_BACKUP_0_8kkjz9kf_.bkp
tag=INCREMENTAL_BACKUP_021113041150 comment=NONE
channel ORA_DISK_1: backup set complete, elapsed time: 00:00:01
Finished backup at 11-FEB-13

Starting Control File and SPFILE Autobackup at 11-FEB-13
piece
handle=/app/oracle/flash_recovery_area/PROD/autobackup/2013_02_11/
o1_mf_s_807077514_8kkjzbpg_.bkp comment=NONE
Finished Control File and SPFILE Autobackup at 11-FEB-13

RMAN> backup device type disk tag
'INCREMENTAL_BACKUP_021113041150' archivelog all not backed up
delete all input;
Starting backup at 11-FEB-13
current log archived
using channel ORA_DISK_1
channel ORA_DISK_1: starting compressed archived log backup set
channel ORA_DISK_1: specifying archived log(s) in backup set
input archived log thread=1 sequence=188 RECID=2 STAMP=807077515
channel ORA_DISK_1: starting piece 1 at 11-FEB-13
channel ORA_DISK_1: finished piece 1 at 11-FEB-13
piece
handle=/app/oracle/flash_recovery_area/PROD/backupset/2013_02_11/
o1_mf_annnn_INCREMENTAL_BACKUP_0_8kkjzd2b_.bkp
tag=INCREMENTAL_BACKUP_021113041150 comment=NONE
channel ORA_DISK_1: backup set complete, elapsed time: 00:00:01
channel ORA_DISK_1: deleting archived log(s)
archived log file
name=/app/oracle/flash_recovery_area/PROD/archivelog/2013_02_11/
o1_mf_1_188_8kkjzcwg_.arc RECID=2 STAMP=807077515
Finished backup at 11-FEB-13

Starting Control File and SPFILE Autobackup at 11-FEB-13
piece
handle=/app/oracle/flash_recovery_area/PROD/autobackup/2013_02_11/
o1_mf_s_807077517_8kkjzf99_.bkp comment=NONE
Finished Control File and SPFILE Autobackup at 11-FEB-13

RMAN> allocate channel for maintenance type disk;
released channel: ORA_DISK_1
allocated channel: ORA_MAINT_DISK_1
channel ORA_MAINT_DISK_1: SID=28 device type=DISK

RMAN> delete noprompt obsolete device type disk;
RMAN retention policy will be applied to the command
RMAN retention policy is set to redundancy 1
Deleting the following obsolete backups and copies:
Type          Key     Completion Time           Filename/Handle
– – – – – – – – – –   – – – – –   – – – – – – – – – –
Backup Set          5                   11-FEB-13
Backup Piece          5            11-FEB-13
/app/oracle/flash_recovery_area/PROD/autobackup/2013_02_11/
o1_mf_s_807074324_8kkfvnot_.bkp
Backup Set        7           11-FEB-13
Backup Piece        7            11-FEB-13
/app/oracle/flash_recovery_area/PROD/autobackup/2013_02_11/
o1_mf_s_807077514_8kkjzbpg_.bkp
deleted backup piece
backup piece
handle=/app/oracle/flash_recovery_area/PROD/autobackup/2013_02_11/
o1_mf_s_807074324_8kkfvnot_.bkp RECID=5 STAMP=807074324
deleted backup piece
backup piece
handle=/app/oracle/flash_recovery_area/PROD/autobackup/2013_02_11/
o1_mf_s_807077514_8kkjzbpg_.bkp RECID=7 STAMP=807077514
Deleted 2 objects

RMAN> release channel;
released channel: ORA_MAINT_DISK_1

RMAN> exit;

Recovery Manager complete.
As we can see, the incremental backup of the database is followed by the autobackup of the control file and SPFILE, which, in turn, is followed by the archivelog backup and another autobackup.
Towards the end of the output, we can also see that some obsolete autobackups have been deleted by the included maintenance commands.
Select Availability>Backup & Recovery> Manage Current Backups. The incremental backup now appears in the list.
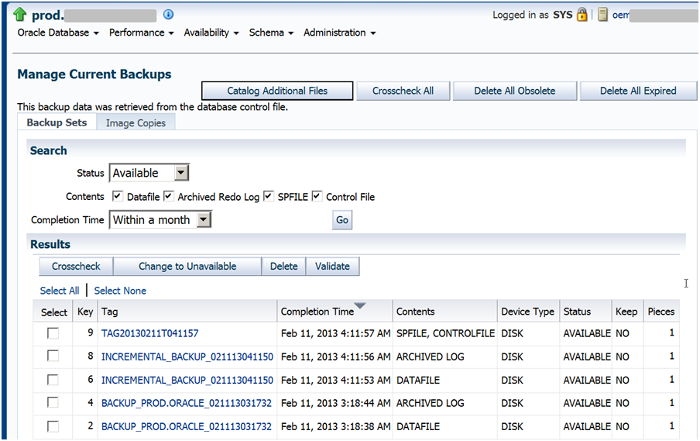
Figure 20: List of Incremental Backups
Oracle Suggested Backups
On the Schedule Backup screen, you can also create an Oracle Suggested Backup, as follows:

Figure 21: Oracle Suggested Backup
If you choose this option, an RMAN script is generated to perform backups as per this strategy, as demonstrated below:
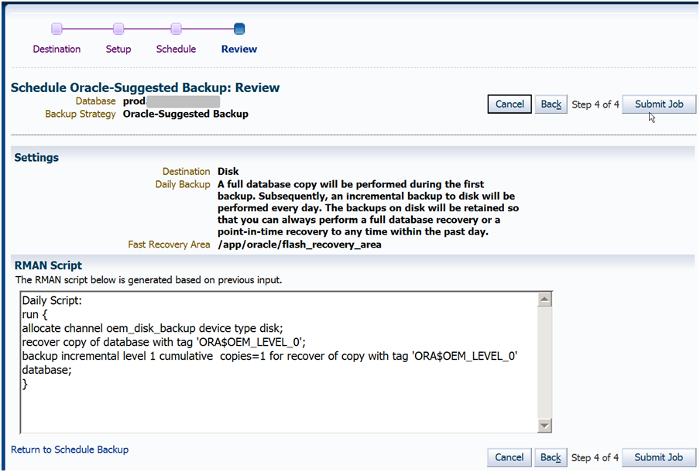
Figure 22: RMAN Script for Oracle Suggested Backup
Using this automatically generated script, RMAN will perform a full database copy on the first backup, creating datafile copies rather than RMAN backup pieces. Consequently, an incremental cumulative backup will be performed daily that updates the datafile copies with all the changes.
This means the datafile copy backup will always be up-to-date with production. The advantage is that you can easily switch over to this backup and use it as a production database in the case of an emergency, without any restore of the backup or recovery of the database.
This concept of switching to the backup and using it as a production database dramatically reduces recovery time and was one of the many advanced features of Oracle Recovery Manager (RMAN) introduced in Oracle Database 10g.
Backup Strategies
Executing a full database backup every night is fine for small- or medium-sized databases, and no one complains about the small amount of disk space the backup requires or why the backup executes in a very short time. However, when the database size is more than, say, 200 GB, it is time to rethink your backup strategy.
In most of the real-world database scenarios, having a proper and validated backup strategy is very important, even for small databases. And regular testing of your RMAN backup of all your databases is one of the DBA's mandatory responsibilities.
Consider a larger database, with some 500 GB of database files. Obviously, it is not appropriate to take a full database backup each day. You can adopt a better backup strategy by taking a full database backup once a week on a Sunday and then an incremental database backup Monday through Saturday.
Such a plan will enable you to recover the database to any time during the previous week by first restoring Sunday's full database backup and then applying the appropriate incremental backups.
The Oracle Database (10g and higher versions) offers an extremely useful facility in RMAN, which is not known to many DBAs. You can take an image copy of all the datafiles of a database once in a while, and then take an incremental backup each day that will actually refresh the image copy of the database with all the incremental changes. The datafile copies become the same as in production, since they are being brought up to date each day when the incremental backup is run.
This is extremely useful for large databases, since they will always have the latest refreshed datafile copies in the flash recovery area to fall over to in case of emergency. The datafile copies actually become the production database in this case. Technically, you have managed a recovery of the database without performing a restore of the files from backup, and this makes the entire recovery faster and simpler. If you use a backup strategy like this, which is based on incrementally updated backups, it can help minimize the media recovery time of your database.
If the refresh of the datafile copies is done daily, then at recovery time you never have more than one day of redo (archived or online) to apply. This facility is visible and easily understandable if Oracle Enterprise Manager is used to schedule RMAN backups.
New features such as these, enhanced for every version of the databases, are displayed and explained clearly in Enterprise Manager, thus playing an important role in DBA education. You can now set up the level 1 incremental backup for every weekday as before, but with this refreshing of the image copy as well, to keep the image copy up-to-date with your production database.
Database Group Backups
For the first time, with Enterprise Manager Cloud Control 12c, DBAs now have the ability to set up and schedule RMAN backups of an entire group of databases at one shot. This can be done for any databases from version 10.2 onwards. Older versions of databases that are certified targets in Enterprise Manager, such as 9.2.0.8, cannot use the group backup feature; however, their backups can still be set up individually from their Home page in Enterprise Manager.
This has the potential to ease the administrative burden even further and is a step in the right direction, since you would not need to set up and schedule backups via the menu of every database target in Enterprise Manager.
The first step is to set up a database group. From the Enterprise Manager main menu, select Targets > Groups. The following screen appears:
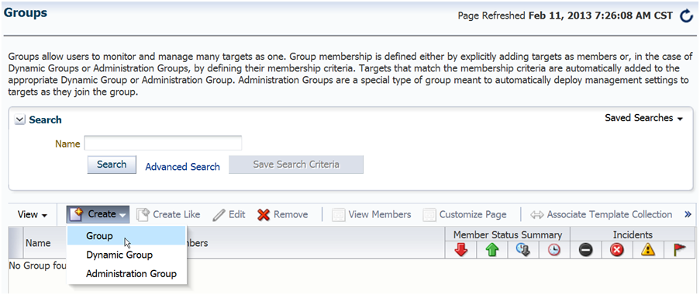
Figure 23: Creating a Group
There are no groups right now. Select Create > Group on the page.
You can now create a group on the screen that appears.

Figure 24: Sai Database Group
We have named the group "Sai Database Group" and added three database targets as members of the group.
After the group is created, open the Group Home page by selecting Targets > Groups and clicking the group name in the list that appears.

Figure 25: Selecting Backup Configurations from Group Menu
On the Group Home page, there is a new menu option named "Backup Configurations." This is a feature of Enterprise Manager Cloud Control 12c onwards.
When you select this option, the following screen appears.
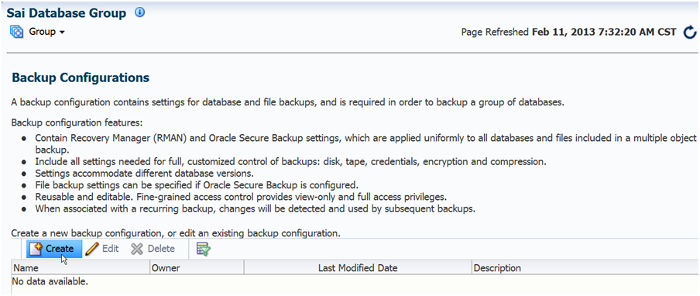
Figure 26: Create Backup Configuration
As mentioned on the screen, a backup configuration contains settings to backup a group of databases. It can also contain file backup settings if Oracle Secure Backup is used.
Click Create to start a new Backup Configuration.
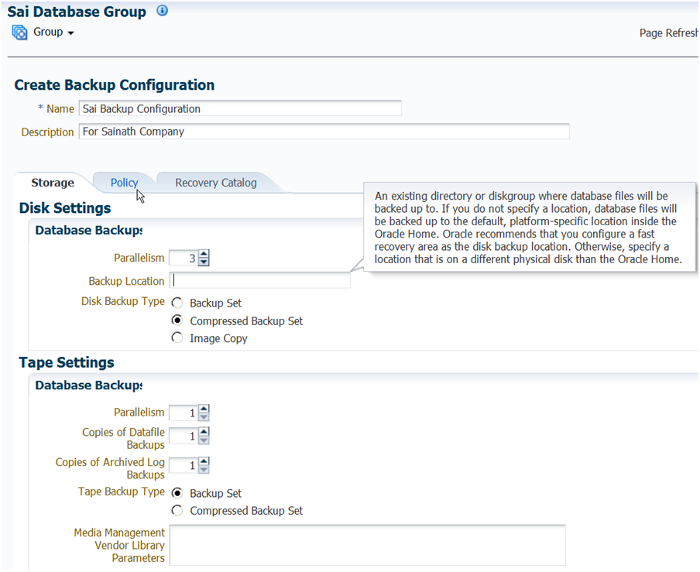
Figure 27: Storage Tab for Sai Backup Configuration
We have named the new Backup Configuration "Sai Backup Configuration." Three tabs are displayed: Storage, Policy and Recovery Catalog.
In the Storage tab, specify the Database Backup Disk Settings, such as the degree of Parallelism, the Backup Location and the Disk Backup Type, whether a normal backup set, compressed backup set or a image copy. We have selected a Parallelism of 3 and a compressed backup set.
You can also specify Tape Settings for the Database Backup on this tab.
Move to the Policy tab.
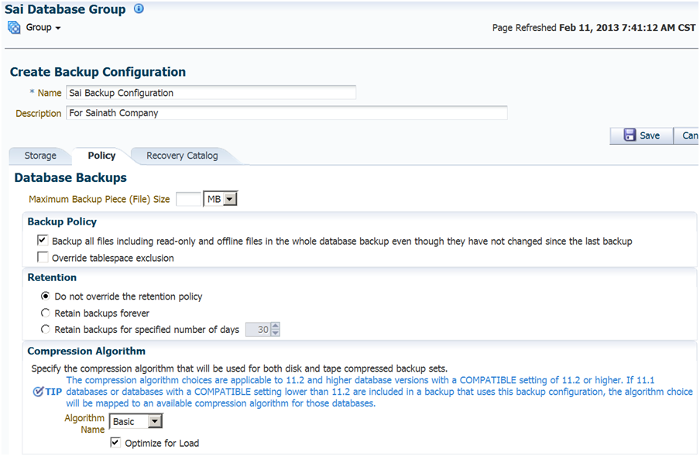
Figure 28: Policy Tab for Sai Backup Configuration
On the Policy tab, you can specify if you want to override the RMAN Retention policy set at the database level. In this case, we have chosen not to do so.
You can set the Maximum Backup Piece Size in MB, and also specify if you want to override the Backup Optimization and/or tablespace exclusion set at the database level.
It is also possible to set up the Compression Algorithm for all the databases that are to be backed up.
The lower half of the screen shows the Encryption options that can be set for all the backups.

Figure 29: Encryption Options
We have decided not to encrypt the backups.
Move to the Recovery Catalog tab.
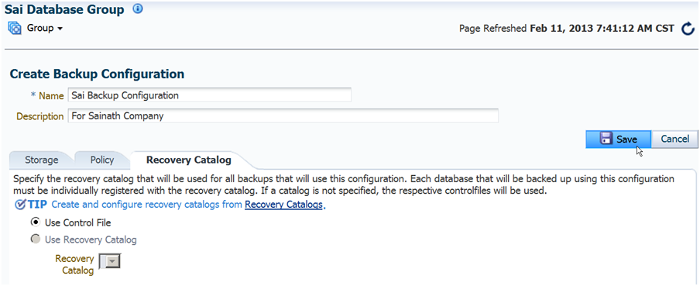
Figure 30: Recovery Catalog Tab
In this tab, you can specify a common recovery catalog to be used for all backups. In our case, we are using the Control File to record the backup for each database.
Click Save to create the backup configuration.
Scheduling Group Backups
From the Database Group menu, select Schedule Backup.
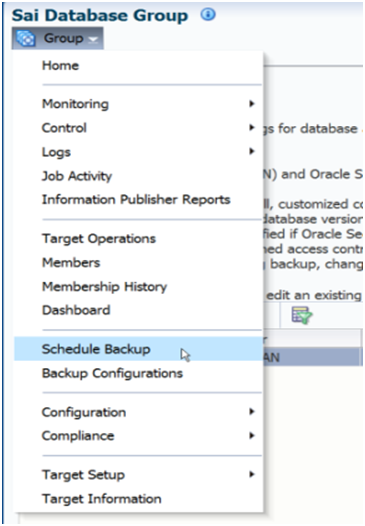
Figure 31: Scheduling a Group Backup
This will allow you to schedule a database backup for the entire group. The following screen appears.
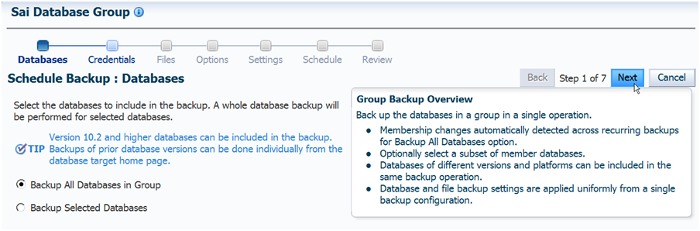
Figure 32: Backup all Databases in Group
When scheduling the group backup, you can decide whether to backup all the databases in the group or only selected databases.
This kind of group backup can be set up for any database version from 10.2 onwards.
Note that you can include databases of different versions and platforms in such a group operation.
Click Next.

Figure 33: Credentials for Backup
In this step, you need to set up the Database and Host Credentials that will be used for all databases in this group backup operation.
Click Next to continue.
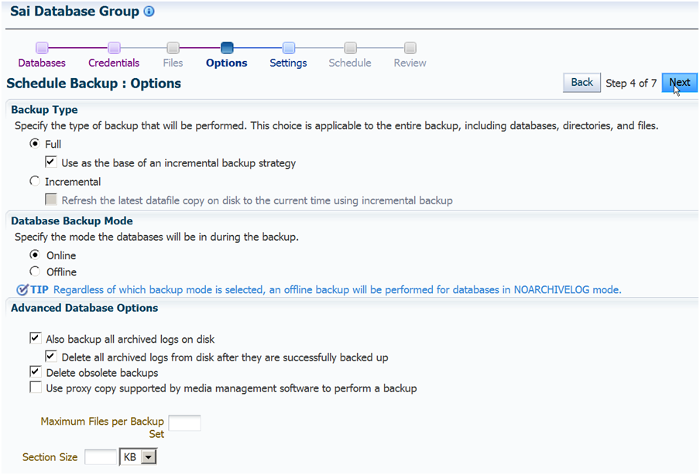
Figure 34: Options for Group
In this step, you can specify if you want a Full or Incremental database backup, Online or Offline, and other options similar to when setting up the backup for a single database.
Click Next.

Figure 35: Settings for Group Backup
On the Settings step, specify if Disk or Tape is to be used for the backup, and select the Backup Configuration that had been created before.
These settings will be applied to all the databases in the backup.
Click Next.

Figure 36: Schedule for Group Backup
In the Schedule step, we specify that this full backup will be executed every Sunday at 3am.
Click Next.
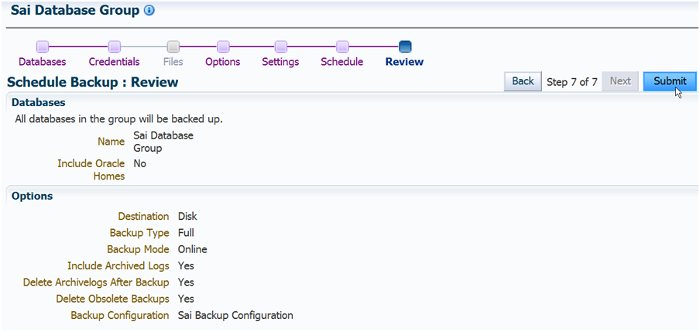
Figure 37: Review of Group Backup
The Review screen now appears. Click Submit to schedule this group backup. The job is submitted and completes successfully, as shown below:

Figure 38: Successful Group Backup
As we can see, the group backup is actually a sophisticated deployment procedure that iterates in parallel through the supplied list of Databases and Oracle Homes.
We can also see that it has backed up the three databases, and that the Archived Logs have been backed up for all databases.
It is possible to select any of the steps and view the step details, as can be seen in the screenshot. The output details for the group backup of the PROD database are reproduced below:
Step: Prebackup (Succeeded)

Checking RMAN repository settings...

Step: Backup (Succeeded)

Recovery Manager: Release 11.2.0.2.0 - Production on Mon Feb 11 08:31:40 2013

Copyright (c) 1982, 2009, Oracle and/or its affiliates. All rights reserved.

RMAN>
connected to target database: PROD (DBID=nnnnnnnnnnn)

using target database control file instead of recovery catalog

RMAN>
echo set on

RMAN> set command id to 'SBDP_JOB_BACKUP_DA_021113083133';
executing command: SET COMMAND ID

RMAN> SET COMPRESSION ALGORITHM 'BASIC' OPTIMIZE FOR LOAD TRUE;
Executing command: SET compression

RMAN> run {
2> allocate channel oem_backup_disk1 type disk format '%U';
3> allocate channel oem_backup_disk2 type disk format '%U';
4> allocate channel oem_backup_disk3 type disk format '%U';
5> backup incremental level 0 cumulative force as COMPRESSED
BACKUPSET tag 'SBDP_JOB_BACKUP_DA_021113083133' database;
> backup as COMPRESSED BACKUPSET tag
'SBDP_JOB_BACKUP_DA_021113083133' archivelog all not backed up
delete all input;
7> release channel oem_backup_disk1;
8> release channel oem_backup_disk2;
9> release channel oem_backup_disk3;
10> }
allocated channel: oem_backup_disk1
channel oem_backup_disk1: SID=259 device type=DISK

allocated channel: oem_backup_disk2
channel oem_backup_disk2: SID=29 device type=DISK

allocated channel: oem_backup_disk3
channel oem_backup_disk3: SID=263 device type=DISK

Starting backup at 11-FEB-13
channel oem_backup_disk1: starting compressed incremental level 0
datafile backup set
channel oem_backup_disk1: specifying datafile(s) in backup set
input datafile file number=00001
name=/app/oracle/product/oradata/prod/system01.dbf
input datafile file number=00006
name=/app/oracle/product/11.2.0/dbhome_1/dbs/demo_01.dbf

channel oem_backup_disk1: starting piece 1 at 11-FEB-13
channel oem_backup_disk2: starting compressed incremental level 0
datafile backup set
channel oem_backup_disk2: specifying datafile(s) in backup set
input datafile file number=00002
name=/app/oracle/product/oradata/prod/sysaux01.dbf
input datafile file number=00004
name=/app/oracle/product/oradata/prod/users01.dbf
channel oem_backup_disk2: starting piece 1 at 11-FEB-13
channel oem_backup_disk3: starting compressed incremental level 0
datafile backup set
channel oem_backup_disk3: specifying datafile(s) in backup set
input datafile file number=00005
name=/app/oracle/product/oradata/prod/example01.dbf
input datafile file number=00003
name=/app/oracle/product/oradata/prod/undotbs01.dbf
channel oem_backup_disk3: starting piece 1 at 11-FEB-13
channel oem_backup_disk3: finished piece 1 at 11-FEB-13
piece
handle=/app/oracle/product/11.2.0/dbhome_1/dbs/0co1mgre_1_1
tag=SBDP_JOB_BACKUP_DA_021113083133 comment=NONE
channel oem_backup_disk3: backup set complete, elapsed time:
00:00:16
channel oem_backup_disk2: finished piece 1 at 11-FEB-13
piece
handle=/app/oracle/product/11.2.0/dbhome_1/dbs/0bo1mgre_1_1
tag=SBDP_JOB_BACKUP_DA_021113083133 comment=NONE
channel oem_backup_disk2: backup set complete, elapsed time:
00:00:36
channel oem_backup_disk1: finished piece 1 at 11-FEB-13
piece
handle=/app/oracle/product/11.2.0/dbhome_1/dbs/0ao1mgre_1_1
tag=SBDP_JOB_BACKUP_DA_021113083133 comment=NONE
channel oem_backup_disk1: backup set complete, elapsed time:
00:00:46
Finished backup at 11-FEB-13

Starting backup at 11-FEB-13
current log archived
channel oem_backup_disk1: starting compressed archived log backup
set
channel oem_backup_disk1: specifying archived log(s) in backup set
input archived log thread=1 sequence=189 RECID=3
STAMP=807093148
channel oem_backup_disk1: starting piece 1 at 11-FEB-13
channel oem_backup_disk1: finished piece 1 at 11-FEB-13
piece
handle=/app/oracle/product/11.2.0/dbhome_1/dbs/0do1mgst_1_1
tag=SBDP_JOB_BACKUP_DA_021113083133 comment=NONE
channel oem_backup_disk1: backup set complete, elapsed time:
00:00:01
channel oem_backup_disk1: deleting archived log(s)
archived log file
name=/app/oracle/flash_recovery_area/PROD/archivelog/2013_02_11/
o1_mf_1_189_8kl07wsw_.arc RECID=3 STAMP=807093148
Finished backup at 11-FEB-13

Starting Control File and SPFILE Autobackup at 11-FEB-13
piece
handle=/app/oracle/flash_recovery_area/PROD/autobackup/2013_02_11/
o1_mf_s_807093150_8kl07ybh_.bkp comment=NONE
Finished Control File and SPFILE Autobackup at 11-FEB-13

released channel: oem_backup_disk1

released channel: oem_backup_disk2

released channel: oem_backup_disk3

RMAN> run {
2> allocate channel oem_backup_disk1 type disk format '%U'
maxpiecesize 1000 G;
3> allocate channel oem_backup_disk2 type disk format '%U'
maxpiecesize 1000 G;
4> allocate channel oem_backup_disk3 type disk format '%U'
maxpiecesize 1000 G;
5> backup force as COMPRESSED BACKUPSET tag
'SBDP_JOB_BACKUP_DA_021113083133' current controlfile;
6> release channel oem_backup_disk1;
7> release channel oem_backup_disk2;
8> release channel oem_backup_disk3;
9> }
allocated channel: oem_backup_disk1
channel oem_backup_disk1: SID=259 device type=DISK

allocated channel: oem_backup_disk2
channel oem_backup_disk2: SID=29 device type=DISK

allocated channel: oem_backup_disk3
channel oem_backup_disk3: SID=263 device type=DISK

Starting backup at 11-FEB-13
channel oem_backup_disk1: starting compressed full datafile backup
set
channel oem_backup_disk1: specifying datafile(s) in backup set
including current control file in backup set
channel oem_backup_disk1: starting piece 1 at 11-FEB-13
channel oem_backup_disk1: finished piece 1 at 11-FEB-13
piece
handle=/app/oracle/product/11.2.0/dbhome_1/dbs/0fo1mgsv_1_1
tag=SBDP_JOB_BACKUP_DA_021113083133 comment=NONE
channel oem_backup_disk1: backup set complete, elapsed time:
00:00:01
Finished backup at 11-FEB-13

Starting Control File and SPFILE Autobackup at 11-FEB-13
piece
handle=/app/oracle/flash_recovery_area/PROD/autobackup/2013_02_11/
o1_mf_s_807093153_8kl081xm_.bkp comment=NONE
Finished Control File and SPFILE Autobackup at 11-FEB-13

released channel: oem_backup_disk1

released channel: oem_backup_disk2

released channel: oem_backup_disk3

RMAN> allocate channel for maintenance type disk; allocated channel: ORA_MAINT_DISK_1
channel ORA_MAINT_DISK_1: SID=259 device type=DISK

RMAN> delete noprompt obsolete device type disk;
RMAN retention policy will be applied to the command
RMAN retention policy is set to redundancy 1
Deleting the following obsolete backups and copies:
Type                Key    Completion Time    Filename/Handle
– – – – – – – – – –   – – –   – – – – – – – – –   – – – – – – – – –
Backup Set 2 11-FEB-13
Backup Piece 2 11-FEB-13
/app/oracle/flash_recovery_area/PROD/backupset/2013_02_11/
o1_mf_nnnd0_BACKUP_PROD_ORACLE_0_8kkfsjn2_.bkp
Backup Set 4 11-FEB-13
Backup Piece 4 11-FEB-13
/app/oracle/flash_recovery_area/PROD/backupset/2013_02_11/
o1_mf_annnn_BACKUP_PROD_ORACLE_0_8kkfvmfh_.bkp
Backup Set 6 11-FEB-13
Backup Piece 6 11-FEB-13
/app/oracle/flash_recovery_area/PROD/backupset/2013_02_11/
o1_mf_nnnd1_INCREMENTAL_BACKUP_0_8kkjz9kf_.bkp
Backup Set 8 11-FEB-13
Backup Piece 8 11-FEB-13
/app/oracle/flash_recovery_area/PROD/backupset/2013_02_11/
o1_mf_annnn_INCREMENTAL_BACKUP_0_8kkjzd2b_.bkp
Backup Set 9 11-FEB-13
Backup Piece 9 11-FEB-13
/app/oracle/flash_recovery_area/PROD/autobackup/2013_02_11/
o1_mf_s_807077517_8kkjzf99_.bkp
Backup Set 14 11-FEB-13
Backup Piece 14 11-FEB-13
/app/oracle/flash_recovery_area/PROD/autobackup/2013_02_11/
o1_mf_s_807093150_8kl07ybh_.bkp
Backup Set 15 11-FEB-13
Backup Piece 15 11-FEB-13
/app/oracle/product/11.2.0/dbhome_1/dbs/0fo1mgsv_1_1
deleted backup piece
backup piece
handle=/app/oracle/flash_recovery_area/PROD/backupset/2013_02_11/
o1_mf_nnnd0_BACKUP_PROD_ORACLE_0_8kkfsjn2_.bkp RECID=2
STAMP=807074256
deleted backup piece
backup piece
handle=/app/oracle/flash_recovery_area/PROD/backupset/2013_02_11/
o1_mf_annnn_BACKUP_PROD_ORACLE_0_8kkfvmfh_.bkp RECID=4
STAMP=807074323
deleted backup piece
backup piece
handle=/app/oracle/flash_recovery_area/PROD/backupset/2013_02_11/
o1_mf_nnnd1_INCREMENTAL_BACKUP_0_8kkjz9kf_.bkp RECID=6
STAMP=807077513
deleted backup piece
backup piece
handle=/app/oracle/flash_recovery_area/PROD/backupset/2013_02_11/
o1_mf_annnn_INCREMENTAL_BACKUP_0_8kkjzd2b_.bkp RECID=8
STAMP=807077516
deleted backup piece
backup piece
handle=/app/oracle/flash_recovery_area/PROD/autobackup/2013_02_11/
o1_mf_s_807077517_8kkjzf99_.bkp RECID=9
STAMP=807077517
deleted backup piece
backup piece
handle=/app/oracle/flash_recovery_area/PROD/autobackup/2013_02_11/
o1_mf_s_807093150_8kl07ybh_.bkp RECID=14
STAMP=807093150
deleted backup piece
backup piece
handle=/app/oracle/product/11.2.0/dbhome_1/dbs/0fo1mgsv_1_1 RECID=15
STAMP=807093152
Deleted 7 objects

RMAN> release channel;
released channel: ORA_MAINT_DISK_1

RMAN> exit;

Recovery Manager complete.

Step: Post Backup (Succeeded)
You can view the completed group backup jobs by selecting Enterprise > Provisioning and Patching > Procedure Activity from the Enterprise Manager menu.

Figure 39: List of Group Backups
The group backups also become visible in the Manage Current Backups screen that we saw earlier.

Figure 40: Group Backups Appearing in Manage Current Backups
This new group backups feature can potentially help the DBA in setting up RMAN backups for a large number of databases at the group level, as opposed to going through each database Home Page in Enterprise Manager and setting up and scheduling RMAN backups at the database level. If used carefully, this could save a lot of time, particularly in the case of self-service databases created by Cloud Self Service users.
The group backup feature also allows backup of Oracle Homes and other File systems, provided Oracle Secure Backup is being used.
What's New for Oracle Database 12c
The brand new Oracle Database 12c (released in June 2013) features a new concept of Container Databases (CDBs) and Pluggable Databases (PDBs). If you are backing up a 12c Database using Enterprise Manager, you can select either the Whole Database, or the Container Database Root, or the Pluggable Databases to be backed up in an RMAN backup when a Customized Backup is being scheduled.
This is on the Schedule Backup page (via Availability > Backup and Recovery > Schedule Backup from the Database target menu in Enterprise Manager), as seen in the screenshot below:

Figure 41: Customized Backup for Oracle Database 12c
In the next page, we are asked to select the PDBs we want to backup.
We have selected only two of three PDBs to be included in this Customized Backup, as seen in the following screenshot:
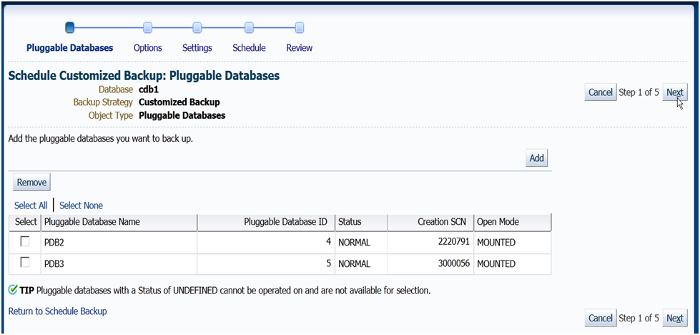
Figure 42: Selected two PDBs to be included in Customized Backup of a 12c Database
On the next page, we can decide to perform either a full backup, or an incremental backup of the selected PDBs.
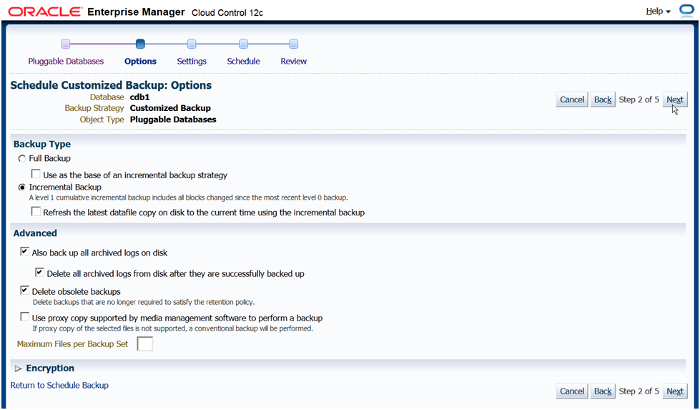
Figure 43: Full or Incremental Backup of the PDBs
The RMAN script generated shows the PDB backup command. This demonstrates how RMAN now understands the concept of CDBs and PDBs, in the case of Oracle Database 12c.
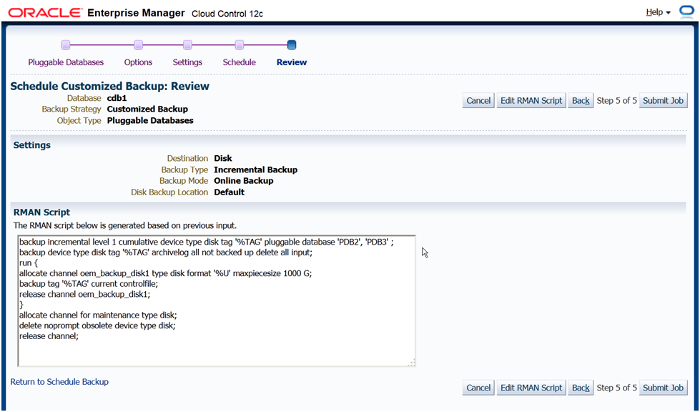
Figure 44: RMAN Script generated for a 12c Database
We have seen that RMAN cannot backup individual schemas, and it has always been difficult to perform point-in-time-recovery (PITR) at an individual schema level, since schemas can easily be distributed across multiple tablespaces. The advantage in using PDBs in a Container Database is that you can easily set up RMAN backups at the Container Database level, and yet perform PITR at the PDB level. This is a clear technical advantage of the Multi-tenant architecture of Oracle Database 12c.
Summary
The Oracle Database has always required a solid database strategy. So the ability to set up and schedule database backups easily-as done by Enterprise Manager-using all the modern techniques of RMAN has great importance.
Enterprise Manager allows a centralized control of database backups. It is possible to set up and schedule RMAN backups for all the databases in a large company, use a consistent backup strategy, and refer to all past RMAN output logs at any time, since they are stored in the Enterprise Manager Cloud Control repository. There is no need to use a central RMAN catalog, because information about the backups is centrally available from Enterprise Manager. And with the group backup feature new to Enterprise Manager Cloud Control 12c, it can be even faster to set up RMAN backups for all the databases-even if there are thousands-that are part of an Enterprise Manager group.
Additional Reading
About the Author
Porus Homi Havewala is the Senior Manager in the Enterprise Technology Program Office of Oracle Singapore, and is the ASEAN regional SME and business development lead on Oracle Enterprise Manager technology. A Double Oracle Certified Master (OCM) in Oracle 10g and Oracle 11g, Porus has more than 25 years of experience in the IT industry, including more than 18 years of experience using Oracle technologies. He is the author of two books, Oracle Enterprise Manager Cloud Control 12c: Managing Data Center Chaos (2012, Packt Publishing) and Oracle Enterprise Manager Grid Control: Advanced OEM Techniques for the Real World (2010, Rampant TechPress), and the author of the Oracle Enterprise Manager Cloud Control 12c blog.