How to Migrate a Running Oracle Database to Another System
Using Oracle VM Server for SPARC 2.1
by Orgad Kimchi and Roman Ivanov, February 2012
Using Oracle VM Server for SPARC 2.1
by Orgad Kimchi and Roman Ivanov, February 2012
How to set up an Oracle server and its associated storage array so you can migrate a running Oracle database from one system to another without interruption. Includes an overview of, and instructions for, the live migration procedure.
This article describes how to take advantage of the Live Migration capability in Oracle VM Server for SPARC 2.1 (previously called Sun Logical Domains) to migrate a running a single instance of Oracle Database 11g Release 2 to another system without interruption.
Note: Oracle Database 11g Release 2 with Oracle VM Server for SPARC has been certified starting with Oracle Solaris 10 10/08. This paper used Oracle Solaris 10 9/10 to evaluate the Live Migration feature of Oracle VM Server for SPARC 2.1.
Understanding these concepts will help you better understand the system configuration we recommend.
When discussion high availability, we need to distinguish between planned downtime and unplanned downtime.
Planned downtime is a preventive or corrective maintenance task that interrupts day-to-day system operations. Usually, due to constraints that are imposed by the system's software and hardware design, this downtime cannot be delayed.
Planned downtime should be scheduled to minimally impact the availability of a system, because even a minor modification to subsystems can cause a disruption to availability and affect business needs.
Planned downtime is the result of maintenance events, such as repair, backup, or upgrade operations. Repairs are intended to remove faulty components and restore a system to a functional state. Upgrades are implemented to replace the current hardware or software with newer (or enhanced) versions.
Unplanned downtime occurs as the result of hardware faults and environmental events. It is usually urgent to resolve such downtime immediately. This paper does not address this type of downtime.
Oracle VM Server for SPARC 2.1 is supported on Oracle's UltraSPARC T2 and UltraSPARC T2 Plus platforms and on Oracle's SPARC T3 and SPARC T4 platforms.
Oracle VM Server for SPARC enables you to create multiple virtual systems on a single physical system. Each virtual system is called a logical domain and runs its own instance of Oracle Solaris 10 or Oracle Solaris 11.
Oracle VM Server for SPARC enables the fine-grained assignment of CPU and memory resources to a workload. This paper describes how to migrate an active domain by using the Live Migration feature. A live migration between two machines minimizes the disruption to running applications and provides a powerful platform for managing production environments.
Oracle Database is the leading database application, and as such, it is frequently used on servers. By using virtualization and consolidation, Oracle Database can now run on selected, certified virtual environments, such as Oracle VM Server for SPARC.
The Oracle VM Server for SPARC 2.1 release introduces the Live Migration feature, which enables an active domain to be migrated to another system while the domain continues to run.
Live Migration uses SSL to encrypt logical domain memory structures as they are securely transferred over the network.
The host where the migration is initiated is called the source machine and the host to which the domain is migrated is called the target machine.
Similarly, once a migration begins, the domain to be migrated is referred to as the domain to be migrated. While the migration is in progress, the domain created on the target machine is referred to as the migrated domain.
Live Migration has a set of requirements and restrictions for CPUs, memory, and I/O that must be satisfied on the source and target machines. See "Live Domain Migration Requirements" in the Oracle VM Server for SPARC 2.1 Release Notes.
Using Live Migration offers the following benefits:
Before you begin, be sure your software and hardware meet these requirements.
To run an Oracle Database single-instance configuration on Oracle VM Server for SPARC, you must use Oracle Database 11g Release 2 (Oracle Database 11.2.0.1). Later versions might also be supported. See the Oracle Database documentation to verify that a particular version is supported and to check for additional requirements. Also see the My Oracle Support Web site (registration required).
Any server that supports Oracle VM Server for SPARC can be used with Oracle Database. Additional hardware, such as external storage arrays or network switches, might be required based on the selected configuration and deployment variant.
Figure 1 shows a typical hardware configuration and cabling that is compliant with domain Live Migration. This example uses the following hardware:
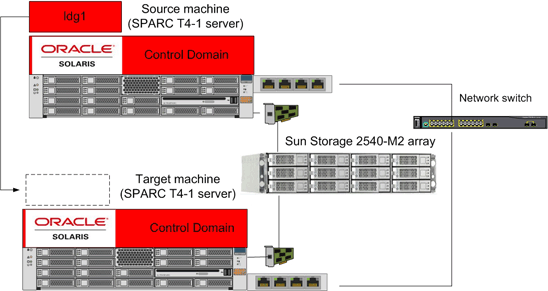
Figure 1. Hardware Configuration and Cabling
Each guest domain that runs Oracle Database should have a minimum of 16 CPUs (2 CPU cores) and 4 GB of memory.
Each control domain that provides virtual devices (virtual disk and virtual network) to an Oracle Database single-instance guest domain should have a minimum of 8 CPUs (1 CPU core) and 4 GB of memory.
In the example presented in this document, the source server is configured with the control domain and one guest domain (named ldg1) that hosts the Oracle Database. The control domain, named primary, is also an I/O domain. Furthermore, the control domain is used as a service domain that provides virtual device services (virtual disk and virtual network) to the guest domain.
To act as a service domain, the control domain provides the following virtual device services:
primary-vds0) exports physical disks as virtual disks to the guest domain.primary-vcc0) provides access to the virtual console of the guest domain. This service uses the port range 5000–5100 for access to virtual consoles.primary-vsw0) is associated with the primary network interface (nxge0).Follow the steps below to configure your environment for live migration.
Oracle Solaris comes preinstalled on new SPARC servers. For these systems, ensure that the appropriate release of Oracle Solaris is installed and verify that the required patches are present.
To reinstall Oracle Solaris on a SPARC system, refer to the Oracle Solaris 10 documentation or Oracle Solaris 11 documentation. In this paper's example, the operating system is installed on the first internal disk of the server.
After Oracle Solaris is installed, the system can be configured and enabled to use the Oracle VM Server for SPARC 2.1 software.
The Oracle VM Server for SPARC software also comes preinstalled on new SPARC servers. For these systems, ensure that the appropriate version of Oracle VM Server for SPARC is installed and verify that any required patches are present.
If Oracle Solaris has been reinstalled on the server, you might have to reinstall the Oracle VM Server for SPARC software. Refer to the Oracle VM downloads page.
The following example shows the actions that are performed on each physical server. Each server already has Oracle Solaris and the required patches installed.
SUNWldm.v package. See "Installing Oracle VM Server for SPARC Software on a New System" in the Oracle VM Server for SPARC 2.1 Administration Guide. primary# pkgadd -d OVM_Server_SPARC-2_1/Product SUNWldm.v
The Sun Storage 2540-M2 storage array is connected to the control domain, which exports two LUNs (LUN 0 and LUN 1) as virtual disks to the guest domain.
The guest domain uses the first LUN (LUN 0) as the system disk for the operating system and the second LUN (LUN 1) as a disk to store Oracle Database data files. Figure 2 shows the storage layout of the source and target machines.
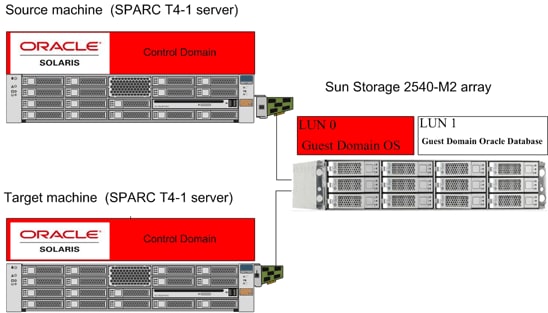
Figure 2. Storage Configuration
After installing the Oracle VM Server for SPARC software, reconfigure the current system to become the control domain. Perform the following actions on each physical server:
vcc) service for use by the virtual network terminal server daemon (vntsd) and as a concentrator for all logical domain consoles. primary# ldm add-vcc port-range=5000-5100 primary-vcc0 primary
vds). primary# ldm add-vds primary-vds0 primaryvsw) to enable networking between virtual network (vnet) devices in logical domains. primary# ldm add-vsw net-dev=igb0 primary-vsw0 primaryldm list-services command, as shown in Listing 1.Listing 1. Verifying Services
primary# ldm list-services primary

VDS
   NAME         VOLUME OPTIONS DEVICE
   primary-vds0
VCC
   NAME         PORT-RANGE
   primary-vcc0 5000-5100
VSW
   NAME         MAC               NET-DEV  DEVICE   MODE
   primary-vsw0 02:04:4f:fb:9f:0d nxge0    switch@0 prog,promisc
VCC
   NAME          LDOM     PORT-RANGE
   primary-vcc0  primary  5000-5100
VSW
   NAME          LDOM    MAC               NET-DEV ID DEVICE    LINKPROP DEFAULT-VLAN-ID PVID VID ...
   primary-vsw0  primary 00:14:4f:f8:28:c2 igb0    0  switch@0  1        1               1500 on
VDS
   NAME          LDOM      VOLUME  OPTIONS  MPGROUP  DEVICE
   primary-vds0  primary
Oracle VM Server for SPARC uses SSL to encrypt migration traffic to protect sensitive data from exploitation and to eliminate the requirement for additional hardware and dedicated networks.
The speed of the migration operation increases when the primary domain on the source and target machines has cryptographic units assigned. This increase in speed occurs because the SSL operations can be offloaded to the cryptographic units.
Note: The SPARC T4 CPUs have cryptographic instructions built in, so you do not need to assign them to the CPU.
primary# ldm list -o crypto primary
primary# ldm set-crypto 1 primaryYou can reduce the overall migration time by adding more CPUs to the primary domain on the source machine. It is best to have at least eight CPUs assigned to each primary domain. For example, the following commands assign eight CPUs and 4 GB of memory to the control domain.
primary# ldm start-reconf primaryprimary# ldm set-vcpu 8 primary
primary# ldm set-memory 4G primary
primary# init 6After the system reboots, Oracle VM Server for SPARC is enabled and the system is configured with one domain: the control domain, primary. From the control domain, you can create and configure additional domains.
ldmd) and the Virtual Network Terminal Server (vntsd) services are enabled. primary# svcadm enable ldmdprimary# svcadm enable vntsd
initial. primary# ldm add-config initialprimary# ldm list-configfactory-default
initial [current]
After the control domain has been configured, create the guest domain to be used as the Oracle Database node. Only one guest domain is created on the physical server that will be the source machine. The other physical server will eventually become the target machine.
The guest domain ldg1 is initially created with the following resources:
vnet0) that is connected to the virtual switch primary-vsw0.c0d0 in the guest domain and is a LUN from the storage array. The domain ldg1 uses LUN 0 of the storage array (c2t6d0).c0d1 in the guest domain and is a LUN from the storage array. The domain ldg1 uses LUN 1 of the storage array (c2t6d1). This virtual disk is used to store Oracle Database files.Perform the following steps to create each guest domain:
ldg1 guest domain from the control domain on the source machine. Note: Perform only the ldm set-crypto command if your server is not a SPARC T4-based system.
primary# ldm create ldg1

primary# ldm set-vcpu 24 ldg1
primary# ldm set-memory 8G ldg1
primary# ldm set-crypto 3 ldg1
primary# ldm add-vnet vnet0 primary-vsw0 ldg1
primary# ldm add-vdsdev /dev/dsk/c2t6d0s2  vol1@primary-vds0
primary# ldm add-vdisk vol1 vol1@primary-vds0 ldg1
primary# ldm add-vdsdev /dev/dsk/c2t6d1s2 oradata@primary-vds0
primary# ldm add-vdisk oradata oradata@primary-vds0 ldg1
primary# ldm bind ldg1primary# ldm start ldg1
primary# ldm ls ldg1NAME             STATE      FLAGS   CONS    VCPU  MEMORY   UTIL UPTIME
ldg1             active     -n----  5000    24    8G       0.0%  1h 1m
ldg1 domain by using the telnet command. primary# telnet localhost 5000After the guest domain is started, ensure that the appropriate Oracle Solaris OS and patches are installed in the guest domain. You can perform the installation over the network, from a DVD, or by using a DVD ISO image. Refer to the Oracle VM Server for SPARC 2.1 Administration Guide.
Note: LUNs often appear with different names on different servers. LUN names in control domains are not required to be identical. But the control domains on both systems must virtualize the same LUNs (LUN 0 and LUN 1) with the same volume names (vol1 and oradata).
The example in Listing 2 shows how a domain called ldg1 is configured with eight CPUs, 24 GB of memory, and two LUNs from the Sun Storage 2540-M2 storage array.
Listing 2. Example Domain Configuration
primary# ldm ls -l ldg1

NAME             STATE      FLAGS   CONS    VCPU  MEMORY   UTIL  UPTIME
ldg1             active     -n----  5000    24    8G       0.0%  1h 1m
SOFTSTATE
Solaris running
MAC
    00:14:4f:fb:96:89
HOSTID
    0x84fb9689
CONTROL
    failure-policy=ignore
DEPENDENCY
    master=
VCPU
    VID    PID    UTIL STRAND
    0      16     0.2%   100%
    1      17     0.0%   100%
    2      18     0.5%   100%
    3      19     0.0%   100%
    4      20     0.0%   100%
    5      21     0.0%   100%
    6      22     0.1%   100%
    7      23     0.0%   100%
    8      24     0.1%   100%
    9      25     0.0%   100%
    10     26     0.0%   100%
    11     27     0.0%   100%
    12     28     0.0%   100%
    13     29     0.0%   100%
    14     30     0.0%   100%
    15     31     0.0%   100%
    16     32     0.0%   100%
    17     33     0.0%   100%
    18     34     0.0%   100%
    19     35     0.0%   100%
    20     36     0.0%   100%
    21     37     0.0%   100%
    22     38     0.0%   100%
    23     39     0.1%   100%
MEMORY
    RA               PA               SIZE
    0x8000000        0x408000000      8G
VARIABLES
    boot-device=vdisk1
    keyboard-layout=US-English
NETWORK
    NAME      SERVICE                ID  DEVICE     MAC                MODE  PVID  VID   MTU   LINKPROP
    vnet1     primary-vsw0@primary   0   network@0  00:14:4f:f9:c0:62         1          1500
DISK
    NAME      VOLUME                 TOUT ID   DEVICE  SERVER         MPGROUP
    vdisk1    vol1@primary-vds0           0    disk@0  primary
    oradata   oradata@primary-vds0        1    disk@1  primary
VCONS
    NAME      SERVICE                     PORT
    ldg1      primary-vcc0@primary        5000
The example in Listing 3 shows the control domain's configuration. Use the ldm list-services command to verify that the services have been created.
Listing 3. Example Control Domain Configuration
primary# ldm ls-services primary

VCC
    NAME          LDOM     PORT-RANGE
    primary-vcc0  primary  5000-5100
VSW
    NAME          LDOM     MAC               NET-DEV   ID   DEVICE    LINKPROP  DEFAULT-VLAN-ID ...
    primary-vsw0  primary  00:14:4f:f9:32:b0 nxgeg0    0    switch@0  1          1              ...
VDS
    NAME          LDOM     VOLUME   OPTIONS  MPGROUP        DEVICE
    primary-vds0  primary  vol1                             /dev/dsk/c2t6d0s2
                           oradata                          /dev/dsk/c2t6d1s2
Ensure that the appropriate release of Oracle Solaris is installed in the guest domain, and verify that the required patches are present.
After Oracle Solaris is installed in the guest domain, the system can be configured and enabled to use the Oracle Database.
Installation of the Oracle Database software is similar to a standard Oracle Database installation. Start with the installation of Oracle Database and then apply the latest patch set. Use the second LUN to create a UFS or ZFS file system for storing Oracle Database data files.
For more information about using ZFS for an Oracle Database, see Configuring Oracle Solaris ZFS for an Oracle Database.
Prepare the target server as follows.
To add the first LUN (LUN 0) and second LUN (LUN 1) to the target machine, execute the following commands from the control domain of the target server:
# ldm add-vdsdev /dev/dsk/c2t6d0s2 vol1@primary-vds0

# ldm add-vdsdev /dev/dsk/c2t6d1s2 oradata@primary-vds0
Note: LUNs often appear with different names on different servers. LUN names in control domains are not required to be identical. But the control domains on both systems must virtualize the same LUNs (LUN 0 and LUN 1) with the same volume names (vol1 and oradata).
# ldm add-vsw net-dev=nxge0 primary-vsw0 primary