How to Set Up a MongoDB NoSQL Cluster Using Oracle Solaris Zones
Published June 2013
How to set up a MongoDB NoSQL cluster on an x86-based system using Oracle Solaris Zones and the Oracle Solaris 11 Service Management Facility and DTrace analysis tool.
- About MongoDB and Oracle Solaris Zones
- Download and Install MongoDB
- Create the Virtual Network Interfaces
- Configure the Network Time Protocol
- Edit the ZFS Memory Consumption Configuration
- Create the MongoDB Zones
- Configure the Service Management Facility
- Verify Name Resolution
- Set Up MongoDB Replication
- Perform Basic Database Operations
- Check the MongoDB Cluster Redundancy
- Use DTrace for Better Operating System Observability
- Conclusion
- See Also
- About the Author
This article starts with a brief overview of MongoDB and follows with an example of setting up a three-node MongoDB cluster on an x86-based system. As a prerequisite, you should have a basic understanding of Oracle Solaris Zones and networking administration.
About MongoDB and Oracle Solaris Zones
MongoDB is a NoSQL open source document-oriented database that stores structured data as JavaScript Object Notation (JSON)–like documents with dynamic schemas. This enables rapid development since the database schemas can be modified quickly as applications evolve without the need to shut down the database. In addition, MongoDB supports master-slave replication using a replication set, and it also provides horizontal scalability with the sharding feature, which enables you to distribute the data (based on a shard key) on multiple MongoDB servers.
The following are benefits of using Oracle Solaris for a MongoDB cluster:
- You can add new MongoDB hosts to the cluster in minutes instead of hours using the zone cloning feature. Using Oracle Solaris Zones, you can easily scale out your MongoDB cluster.
- In case there is a user error or software error, the Service Management Facility ensures the high availability of each cluster member and ensures that MongoDB replication failover will occur only as a last resort.
- You can discover performance issues in minutes versus days by using DTrace, which provides increased operating system observability. DTrace provides a holistic performance overview of the operating system and allows deep performance analysis through cooperation with the built-in MongoDB tools.
- ZFS built-in compression provides optimized disk I/O utilization for better I/O performance.
In the example presented in this article, all the MongoDB cluster building blocks will be installed using the Oracle Solaris Zones, Service Management Facility, ZFS, and network virtualization technologies. Figure 1 shows the architecture:
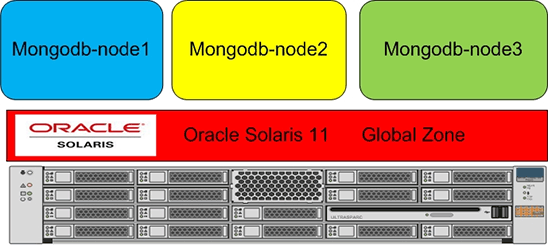
Figure 1. Architecture
Download and Install MongoDB
For this article, I used Oracle Solaris 11.1, which you can download here.
- To get a MongoDB distribution, download a recent stable release from the MongoDB download site. For this article, I used the MongoDB Oracle Solaris 64-bit 2.4.1 release.
Note: Only versions for Oracle Solaris on x86-based systems are available. No versions are available for SPARC-based systems.
- On the global zone, create the
/usr/localdirectory if it doesn't exist. The cluster configuration will share the MongoDB directory structure across the zones as a read-only file system.root@global_zone:~# mkdir -p /usr/local- Copy the MongoDB tarball into
/usr/local:root@global_zone:~# cp /tmp/mongodb-sunos5-x86_64-2.4.1.tgz /usr/local- Unpack the tarball:
root@global_zone:~# cd /usr/local root@global_zone:~# tar -xvfz /usr/local/mongodb-sunos5-x86_64-2.4.1.tgz- Rename the location of the MongoDB binaries:
root@global_zone:~# ln -s /usr/local/mongodb-sunos5-x86_64-2.4.1 /usr/local/mongodb- Create the MongoDB configuration directory:
root@global_zone:~# mkdir /usr/local/mongodb/etc- Create the MongoDB extra libraries directory:
root@global_zone:~# mkdir /usr/local/mongodb/mongo-extra-64- MongoDB requires an updated version of
libstdc. Download thelibstdcpackage from http://mirror.opencsw.org/opencsw/allpkgs/libstdc%2b%2b6-4.7.2%2cREV%3d2013.03.28-SunOS5.10-i386-CSW.pkg.gz.- Unzip the
libstdcpackage:root@global_zone:~# gzip -d /tmp/libstdc++6-4.7.2,REV=2013.03.28-SunOS5.10-i386-CSW.pkg.gz- Convert the package to a file system format using the
pkgtranscommand:
root@global_zone:~# cd /tmp root@global_zone:~# pkgtrans /tmp/libstdc++6-4.7.2\,REV\=2013.03.28-SunOS5.10-i386-CSW.pkg /tmp- The following output will appear. Press Enter at the prompt:
The following packages are available: 1 CSWlibstdc++6 libstdc++6 - The GNU Compiler Collection, libstdc++.so.6 (i386) 4.7.2,REV=2013.03.28 Select package(s) you wish to process (or 'all' to process all packages). (default: all) [?,??,q]:- Copy the
libstdclibrary to/usr/local/mongodb/mongo-extra-64/:root@global_zone:~# cp /tmp/CSWlibstdc++6/root/opt/csw/lib/amd64/libstdc++.so.6.0.17 \ /usr/local/mongodb/mongo-extra-64/- Create the MongoDB group:
root@global_zone:~# groupadd mongodb- Add the MongoDB user and set the user's password:
root@global_zone:~# useradd -g mongodb mongodb root@global_zone:~# passwd mongodb- Create the MongoDB user's home directory:
root@global_zone:~# mkdir -p /export/home/mongodb root@global_zone:~# chown -R mongodb:mongodb /export/home/mongodb- Edit the MongoDB configuration files, which are shown in Table 1:
Table 1. MongoDB Configuration Files
File Name Description mongodb-startStart-up script for the MongoDB daemon mongodb.confFile that specifies parameters relevant to the MongoDB daemon Note: To learn more about how MongoDB is controlled by these configuration files, see the MongoDB manual.
- Change directories:
root@global_zone:~# cd /usr/local/mongodb/etc - Then edit the
mongodb.conffile to set the property values described in Table 2:root@global_zone:~# vi mongodb.conf fork = true quiet = true logpath = /var/log/mongodb/mongod.log logappend = true replSet = rs0 rest = trueTable 2. MongoDB Configuration Properties?
Property Value Description forktrueEnables a daemon mode for mongod, which is the primary daemon process for the MongoDB system. It handles data requests, manages data format, and performs background management operations.quiettrueThis is the verbose level of the log. In diagnostic or testing situations, set this value to false.logpath/var/log/mongodb/mongod.logSpecifies file to which the mongoddaemon will write its output. If you do not set this value,mongodwrites all output to standard output (for example,stdout).logappendtrueEnsures that mongoddoes not overwrite an existing log file following the server start operation.replSetrs0Specifies the replica set this server is associated with. resttrueEnables the REST interface that allows HTTP clients to run commands against the server. - Edit the MongoDB startup script file so it looks like the following:
root@global_zone:~# vi  /usr/local/mongodb/bin/mongodb-start

#!/usr/bin/bash
export LD_PRELOAD_64=/usr/local/mongodb/mongo-extra-64/libstdc++.so.6.0.17:/lib/amd64/libumem.so
export LC_ALL=C
/usr/local/mongodb/bin/mongod -f /usr/local/mongodb/etc/mongodb.conf
- Change the directory ownership:
root@global_zone:~# chown -R mongodb:mongodb /usr/local/mongodb-sunos5-x86_64-2.4.1

root@global_zone:~# chmod -R 755 /usr/local/mongodb-sunos5-x86_64-2.4.1
Create the Virtual Network Interfaces
Create a series of virtual network interfaces (VNICs) for the MongoDB zones:
root@global_zone:~# dladm create-vnic -l net0 mongodb_node1

root@global_zone:~# dladm create-vnic -l net0 mongodb_node2
root@global_zone:~# dladm create-vnic -l net0 mongodb_node3
Configure the Network Time Protocol
We should ensure that the system clock on the MongoDB zones is synchronized by using the Network Time Protocol (NTP).
Note: It is best to select an NTP server that can be a dedicated time synchronization source so that other services are not negatively affected if the machine is brought down for planned maintenance.
In the following example, the global zone is configured as an NTP server.
- Configure an NTP server:
root@global_zone:~# cd /etc/inet root@global_zone:~# cp ntp.server ntp.conf root@global_zone:~# touch /var/ntp/ntp.drift - Edit the NTP server configuration file, as shown in Listing 1:
root@global_zone:~# vi /etc/inet/ntp.conf


server 127.127.1.0 prefer
broadcast 224.0.1.1 ttl 4
enable auth monitor
driftfile /var/ntp/ntp.drift
statsdir /var/ntp/ntpstats/
filegen peerstats file peerstats type day enable
filegen loopstats file loopstats type day enable
filegen clockstats file clockstats type day enable
keys /etc/inet/ntp.keys
trustedkey 0
requestkey 0
controlkey 0
Listing 1. NTP Server Configuration File
- Enable the NTP server service:
root@global_zone:~# svcadm enable ntp- Verify that the NTP server is online by using the following command:
root@global_zone:~# svcs -a | grep ntp online 16:04:15 svc:/network/ntp:defaultEdit the ZFS Memory Consumption Configuration
Both MongoDB and Oracle Solaris ZFS are memory-intensive processes. In order to avoid a memory shortage for the MongoDB instance, you need reduce the memory consumed by the ZFS ARC cache by tuning the
zfs_arc_maxparameter to a low value.- Set the parameter to low value, for example 2 GB, as shown in the following example:
root@global_zone:~# echo "set zfs:zfs_arc_max=2147483648" >> /etc/system- Use the following command to monitor how much memory the ZFS ARC is using:
root@global_zone:~# kstat -m zfs -s c_max module: zfs instance: 0 name: arcstats class: misc c_max 2147483648
You can see from the output that the
zfs_arc_maxproperty's value is now 2 GB. (c_maxis the value forzfs_arc_maxin the output ofkstatcommand.)- Restart the system in order to enforce the property value in
/etc/system.root@global_zone:~# rebootCreate the MongoDB Zones
Table 3 shows a summary of the MongoDB zone configuration we will create:
Table 3. Zone Summary
Zone Name Function ZFS Mount Point VNIC Name IP Address Memory Required mongodb-node1Primary /zones/mongodb-node1mongodb_node1192.168.1.1 14 GB mongodb-node2Secondary /zones/mongodb-node2mongodb_node2192.168.1.2 14 GB mongodb-node3Secondary /zones/mongodb-node3mongodb_node3192.168.1.3 14 GB - If you don't already have a file system for the MongoDB zones, run the following command:
root@global_zone:~# zfs create -o compression=on -o mountpoint=/zones rpool/zones- Create the
mongodb-node1zone, as shown in Listing 2:root@global_zone:~# zonecfg -z mongodb-node1 Use 'create' to begin configuring a new zone. zonecfg:mongodb-node1> create create: Using system default template 'SYSdefault' zonecfg:mongodb-node1> set limitpriv="default,sys_time" zonecfg:mongodb-node1> set autoboot=true zonecfg:mongodb-node1> set zonepath=/zones/mongodb-node1 zonecfg:mongodb-node1> add fs zonecfg:mongodb-node1:fs> set dir=/usr/local zonecfg:mongodb-node1:fs> set special=/usr/local zonecfg:mongodb-node1:fs> set type=lofs zonecfg:mongodb-node1:fs> set options=[ro,nodevices] zonecfg:mongodb-node1:fs> end zonecfg:mongodb-node1> add net zonecfg:mongodb-node1:net> set physical=mongodb_node1 zonecfg:mongodb-node1:net> end zonecfg:mongodb-node1> add capped-memory zonecfg:mongodb-node1:capped-memory> set physical=14g zonecfg:mongodb-node1:capped-memory> end zonecfg:mongodb-node1> verify zonecfg:mongodb-node1> exitListing 2. Creating the
mongodb-node1Zone- Create the second MongoDB zone, as shown in Listing 3:
root@global_zone:~# zonecfg -z mongodb-node2 Use 'create' to begin configuring a new zone. zonecfg:mongodb-node2> create create: Using system default template 'SYSdefault' zonecfg:mongodb-node2> set limitpriv="default,sys_time" zonecfg:mongodb-node2> set autoboot=true zonecfg:mongodb-node2> set zonepath=/zones/mongodb-node2 zonecfg:mongodb-node2> add fs zonecfg:mongodb-node2:fs> set dir=/usr/local zonecfg:mongodb-node2:fs> set special=/usr/local zonecfg:mongodb-node2:fs> set type=lofs zonecfg:mongodb-node2:fs> set options=[ro,nodevices] zonecfg:mongodb-node2:fs> end zonecfg:mongodb-node2> add net zonecfg:mongodb-node2:net> set physical=mongodb_node2 zonecfg:mongodb-node2:net> end zonecfg:mongodb-node2> add capped-memory zonecfg:mongodb-node2:capped-memory> set physical=14g zonecfg:mongodb-node2:capped-memory> end zonecfg:mongodb-node2> verify zonecfg:mongodb-node2> exitListing 3. Creating the
mongodb-node2Zone- Create the third MongoDB zone, as shown in Listing 4:
root@global_zone:~# zonecfg -z mongodb-node3 Use 'create' to begin configuring a new zone. zonecfg:mongodb-node3> create create: Using system default template 'SYSdefault' zonecfg:mongodb-node3> set limitpriv="default,sys_time" zonecfg:mongodb-node3> set autoboot=true zonecfg:mongodb-node3> set zonepath=/zones/mongodb-node3 zonecfg:mongodb-node3> add fs zonecfg:mongodb-node3:fs> set dir=/usr/local zonecfg:mongodb-node3:fs> set special=/usr/local zonecfg:mongodb-node3:fs> set type=lofs zonecfg:mongodb-node3:fs> set options=[ro,nodevices] zonecfg:mongodb-node3:fs> end zonecfg:mongodb-node3> add net zonecfg:mongodb-node3:net> set physical=mongodb_node3 zonecfg:mongodb-node3:net> end zonecfg:mongodb-node3> add capped-memory zonecfg:mongodb-node3:capped-memory> set physical=14g zonecfg:mongodb-node3:capped-memory> end zonecfg:mongodb-node3> verify zonecfg:mongodb-node3> exitListing 4. Creating the
mongodb-node3Zone- Now, install the
mongodb-zone1zone; later we will clone this zone in order to accelerate zone creation for the other zones.root@global_zone:~# zoneadm -z mongodb-node1 install- Boot the
mongodb-node1zone and check the status of the zones we've created, as shown in Listing 5:root@global_zone:~# zoneadm -z mongodb-node1 boot root@global_zone:~# zoneadm list -cv ID NAME STATUS PATH BRAND IP 0 global running / solaris shared 1 mongodb-node1 running /zones/mongodb-node1 solaris excl - mongodb-node2 configured /zones/mongodb-node2 solaris excl - mongodb-node3 configured /zones/mongodb-node3 solaris excl root@global_zone:~# zlogin -C mongodb-node1Listing 5. Booting the
mongodb-node1Zone- Provide the zone host information by using the following configuration for the
mongodb-node1zone:
- For the host name, use
mongodb-node1. - Ensure the network interface for
mongodb_node1has an IP address of 192.168.1.1/24. - Ensure the name service is based on your network configuration. In this article, we will use
/etc/hostsfor name resolution. Optionally, you can set up DNS for host name resolution.
- After finishing the zone setup, you will get the login prompt. Log in to the zone as
rootusing the root password.- MongoDB requires libraries for its environment, so install the gcc compiler version 4.5 using the following command:
root@mongodb-node1:~# pkg install gcc-45- Create the MongoDB group:
root@mongodb-node1:~# groupadd mongodb- Add the MongoDB user and set the user's password:
root@mongodb-node1:~# useradd -g mongodb mongodb root@mongodb-node1:~# passwd mongodb- Create the MongoDB user's home directory:
root@mongodb-node1:~# mkdir -p /export/home/mongodb- Edit the MongoDB user's bash shell initialization script, as shown in Listing 6:
root@mongodb-node1:~# vi /export/home/mongodb/.profile PATH=/usr/local/mongodb/bin:$PATH export LD_PRELOAD_64=/lib/secure/64/libstdc++.so.6.0.1 export LC_ALL=C ulimit -n 20000 case ${SHELL} in *bash) typeset +x PS1="\u@\h:\w\\$ " ;; esacListing 6. Editing the Initialization Script
- Change the MongoDB home directory ownership:
root@mongodb-node1:~# chown -R mongodb:mongodb /export/home/mongodb- Create a directory for the MongoDB data files:
root@mongodb-node1:~# mkdir -p /data/dbroot@mongodb-node1:~# chown -R mongodb:mongodb /data/db- Create a directory for the MongoDB log files:
root@mongodb-node1:~# mkdir /var/log/mongodbroot@mongodb-node1:~# chown -R mongodb:mongodb /var/log/mongodb- Create a symbolic link for the
libstdclibrary in order to add it as a secure library:root@mongodb-node1:~# ln -s /usr/local/mongodb/mongo-extra-64/libstdc++.so.6.0.17 /lib/secure/64- Configure an NTP client, as shown in the following example:
- Install the NTP package:
root@mongodb-node1:~# pkg install ntp - Create the NTP client configuration files:
root@mongodb-node1:~# cd /etc/inet root@mongodb-node1:~# cp ntp.client ntp.conf root@mongodb-node1:~# touch /var/ntp/ntp.drift
- Edit the NTP client configuration file as follows:
root@mongodb-node1:~# vi /etc/inet/ntp.conf server <ntp-server> prefer driftfile /var/ntp/ntp.drift statsdir /var/ntp/ntpstats/ filegen peerstats file peerstats type day enable filegen loopstats file loopstats type day enableNote: Replace the IP address
ntp-serverwith the IP address or host name of your local time server or with the IP address or host name of a server recommended at http://support.ntp.org/bin/view/Servers/NTPPoolServers.- Enable the NTP client service:
root@mongodb-node1:~# svcadm enable ntp- Verify the NTP client status:
root@mongodb-node1:~# svcs ntp STATE STIME FMRI online 12:44:01 svc:/network/ntp:default- Check whether the NTP client can synchronize its clock with the NTP server:
root@mongodb-node1:~# ntpq -p- Add the MongoDB cluster members' host names and IP addresses to
/etc/hosts:root@mongodb-node1:~# cat /etc/hosts ::1 localhost 127.0.0.1 localhost loghost 192.168.1.1 mongodb-node1 192.168.1.2 mongodb-node2 192.168.1.3 mongodb-node3
Note: If you are using NTP, you need to add the NTP server host name and IP addresses to
/etc/hosts.Configure the Service Management Facility
The Service Management Facility is a feature of Oracle Solaris for managing system and application services, replacing the legacy
initscripting startup. Service Management Facility improves the availability of a system by ensuring that essential system and application services run continuously even in the event of hardware or software failures. In addition, the Service Management Facility auto-restart capability can restart operating system services in case of error without any human intervention.- Use the
svcbundletool to create a Service Management Facility manifest that will automatically start MongoDB upon reboot and restart the service if there is an error.root@mongodb-node1:~# svcbundle -s service-name=application/mongodb \ -s start-method="/usr/local/mongodb/bin/mongodb-start" \ -s model=daemon -o mongodb.xml - Edit the
mondodb.xmlmanifest to enable service startup using the MongoDB group and user. To do this, after the line that contains</dependency>, add the following lines:<method_context> <method_credential group="mongodb" user="mongodb"/> </method_context>
Listing 7 shows the MongoDB Service Management Facility manifest after the modification:
root@mongodb-node1:~# vi mongodb.xml <?xml version="1.0" ?> <!DOCTYPE service_bundle SYSTEM '/usr/share/lib/xml/dtd/service_bundle.dtd.1'> <!-- Manifest created by svcbundle (2013-Apr-10 11:04:28+0300) --> <service_bundle type="manifest" name="application/mongodb"> <service version="1" type="service" name="application/mongodb"> <!-- The following dependency keeps us from starting until the multi-user milestone is reached. --> <dependency restart_on="none" type="service" name="multi_user_dependency" grouping="require_all"> <service_fmri value="svc:/milestone/multi-user"/> </dependency> <method_context> <method_credential group="mongodb" user="mongodb"/> </method_context> <exec_method timeout_seconds="60" type="method" name="start" exec="/usr/local/mongodb/bin/mongodb-start"/> <!-- The exec attribute below can be changed to a command that SMF should execute to stop the service. See smf_method(5) for more details. --> <exec_method timeout_seconds="60" type="method" name="stop" exec=":kill"/> <!-- The exec attribute below can be changed to a command that SMF should execute when the service is refreshed. Services are typically refreshed when their properties are changed in the SMF repository. See smf_method(5) for more details. It is common to retain the value of :true which means that SMF will take no action when the service is refreshed. Alternatively, you may wish to provide a method to reread the SMF repository and act on any configuration changes. --> <exec_method timeout_seconds="60" type="method" name="refresh" exec=":true"/> <!-- We do not need a duration property group, because contract is the default. Search for duration in svc.startd(1M). --> <instance enabled="true" name="default"/> <template> <common_name> <loctext xml:lang="C"> <!-- Replace this comment with a short name for the service. --> </loctext> </common_name> <description> <loctext xml:lang="C"> <!-- Replace this comment with a brief description of the service --> </loctext> </description> </template> </service> </service_bundle>
Listing 7. MongoDB Service Management Facility Manifest
- Validate the manifest using the following command:
root@global_zone:~# svccfg validate mongodb.xml- Start the MongoDB service:
root@global_zone:~# svccfg import mongodb.xml- Verify that the MongoDB service has been started:
root@mongodb-node1:~# svcs mongodb STATE STIME FMRI online 14:51:52 svc:/application/mongodb:default- You can monitor the MongoDB start-up messages using the following commands:
root@mongodb-node1:~# su - mongodb mongodb@mongodb-node1:~ tail -f /var/log/mongodb/mongod.log- Check that MongoDB runs by running the
mongotopcommand, which shows the amount of time a MongoDB instance spends reading and writing data:mongodb@mongodb-node1:~ /usr/local/mongodb/bin/mongotop connected to: 127.0.0.1 ns total read write 2013-04-08T16:44:12 mydb.system.users 0ms 0ms 0ms local.system.users 0ms 0ms 0ms local.system.replset 0ms 0ms 0ms local.system.indexes 0ms 0ms 0ms local.startup_log 0ms 0ms 0ms local.replset.minvalid 0ms 0ms 0ms local.oplog.rs 0ms 0ms 0ms local.me 0ms 0ms 0msListing 8. Verifying That MongoDB Is Running
- From the global zone, run the following commands to create the
mongodb-node2zone as a clone ofmongodb-node1:root@global_zone:~# zoneadm -z mongodb-node1 shutdown root@global_zone:~# zoneadm -z mongodb-node2 clone mongodb-node1- Boot the
mongodb-node2zone:root@global_zone:~# zoneadm -z mongodb-node2 boot root@global_zone:~# zlogin -C mongodb-node2- As we experienced previously, the system configuration tool is launched. So do the final configuration for the
mongodb-node2zone:
- For the host name, use
mongodb-node2. - For the network interface, use
mongodb_node2. - Use an IP address of 192.168.1.2/24.
- Ensure the name service is set to
none.
- From the global zone, perform similar steps for
mongodb-node3:root@global_zone:~# zoneadm -z mongodb-node3 clone mongodb-node1 root@global_zone:~# zoneadm -z mongodb-node3 boot root@global_zone:~# zlogin -C mongodb-node3- Do the final configuration for the
mongodb-node3 zone:
- For the host name, use
mongodb-node3. - For the network interface, use
mongodb_node3. - Use an IP address of 192.168.1.3/24.
- Ensure the name service is set to
none.
- Boot the
mongodb-node1zone:
root@global_zone:~# zoneadm -z mongodb-node1 boot- Verify that all the zones are up and running:
neadm list -cv ID NAME STATUS PATH BRAND IP 0 global running / solaris shared 1 mongodb-node1 running /zones/mongodb-node1 solaris excl 2 mongodb-node2 running /zones/mongodb-node2 solaris excl 3 mongodb-node3 running /zones/mongodb-node3 solaris exclVerify Name Resolution
Verify that all the MongoDB zones have the following host entries in
/etc/hosts:# cat /etc/hosts ::1 localhost 127.0.0.1 localhost loghost 192.168.1.1 mongodb-node1 192.168.1.2 mongodb-node2 192.168.1.3 mongodb-node3Note: If you are using an NTP server, you must also add its host name and IP address to
/etc/hosts.Set Up MongoDB Replication
Replication occurs through groups of servers known as replica sets. Most replica sets consist of two or more
mongodinstances with at most one of these designated as the primary member and the rest as secondary members. Clients direct all writes to the primary member, while the secondary members replicate from the primary asynchronously. Database replication with MongoDB provides redundancy and helps to ensure high availability. In addition, it simplifies backups and might increase read capacity. Most production deployments use replication.In this example,
mongodb-node1will be the primary member andmongodb-node2andmongodb-node3will be secondary members on thers0replica set, as shown in the Table 4.Table 4. Replication Configuration
Host Name Function Replica Set mongodb-node1primary rs0mongodb-node2secondary rs0mongodb-node3secondary rs0- On every zone, verify that the MongoDB instance is up and running using the following command:
root@mongodb-node1:~# svcs mongodb STATE STIME FMRI online 14:51:52 svc:/application/mongodb:default- On the first node (
mongodb-node1), connect to the MongoDB shell using the following command:root@mongodb-node1:~# su - mongodb mongodb@mongodb-node1:~ /usr/local/mongodb/bin/mongo- Enter the following command sequence in order to add
mongodb-node1into thers0replica set.> rsconf = { _id: "rs0", members: [ { _id: 0, host: "mongodb-node1:27017" } ] }
You should get the following output:
{ "_id" : "rs0", "members" : [ { "_id" : 0, "host" : "mongodb-node1:27017" } ] }- Use the following command to initiate a replica set consisting of the current member and using the default configuration:
> rs.initiate( rsconf )You should get the following output:
{ "info" : "Config now saved locally. Should come online in about a minute.", "ok" : 1 }- Display the current replica set configuration:
> rs.conf()You should get the following output, which shows only one node (
mongodb-node1) in the replica set:{ "_id" : "rs0", "version" : 1, "members" : [ { "_id" : 0, "host" : "mongodb-node1:27017" } ] }- Next, add the second and third
mongodinstances (mongodb-node2,mongodb-node3) to thers0replica set using thers.add()method:rs0:PRIMARY> rs.add("mongodb-node2") { "ok" : 1 } rs0:PRIMARY> rs.add("mongodb-node3") { "ok" : 1 }- Run the following command to ensure that replication is properly configured and to check the connections between the current members of the replica set.
rs0:PRIMARY> rs.status()The output shown in Listing 9 should appear:
{ "set" : "rs0", "date" : ISODate("2013-04-10T08:23:00Z"), "myState" : 1, "members" : [ { "_id" : 0, "name" : "mongodb-node1:27017", "health" : 1, "state" : 1, "stateStr" : "PRIMARY", "uptime" : 536, "optime" : { "t" : 1365582138, "i" : 1 }, "optimeDate" : ISODate("2013-04-10T08:22:18Z"), "self" : true }, { "_id" : 1, "name" : "mongodb-node2:27017", "health" : 1, "state" : 2, "stateStr" : "SECONDARY", "uptime" : 58, "optime" : { "t" : 1365582138, "i" : 1 }, "optimeDate" : ISODate("2013-04-10T08:22:18Z"), "lastHeartbeat" : ISODate("2013-04-10T08:22:58Z"), "lastHeartbeatRecv" : ISODate("2013-04-10T08:22:58Z"), "pingMs" : 0 }, { "_id" : 2, "name" : "mongodb-node3:27017", "health" : 1, "state" : 2, "stateStr" : "SECONDARY", "uptime" : 42, "optime" : { "t" : 1365582138, "i" : 1 }, "optimeDate" : ISODate("2013-04-10T08:22:18Z"), "lastHeartbeat" : ISODate("2013-04-10T08:22:58Z"), "lastHeartbeatRecv" : ISODate("2013-04-10T08:22:59Z"), "pingMs" : 0 } ], "ok" : 1 }Listing 9. Checking the Replication Configuration
You can see from the output that
mongodb-node1is the primary andmongodb-node2andmongodb-node3are the secondary cluster members.Perform Basic Database Operations
The MongoDB database holds a set of collections. A collection holds a set of documents. A document is a set of key-value pairs.
Documents have dynamic schema, which means that documents in the same collection do not need to have the same set of fields or structure, and common fields in a collection's documents may hold different types of data.
To display the list of databases, use the following command:
rs0:PRIMARY> show dbs local 6.0751953125GBTo switch to a new database named
mydb, use the following command:Note: You don't need to create the database before using it for the first time.
rs0:PRIMARY> use mydb switched to db mydbTo insert documents into a new collection named
thingswithin the new database namedmydb, do the following.- Create two documents, named
jandk, using the following sequence of operations:rs0:PRIMARY> j = { name : "mongo" } { "name" : "mongo" } rs0:PRIMARY> k = { x : 3 } { "x" : 3 }- Insert the
jandkdocuments into the collectionthingsusing the following sequence of operations:rs0:PRIMARY> db.things.insert( j ) rs0:PRIMARY> db.things.insert( k )- Confirm that the documents exist in the collection
thingsby issuing this query on thethingscollection:rs0:PRIMARY> db.things.find() { "_id" : ObjectId("5162ef329e3aac3f0f6972de"), "name" : "mongo" } { "_id" : ObjectId("5162ef3c9e3aac3f0f6972df"), "x" : 3 }Note: Your document ID values will be different.
- Exit from the MongoDB shell:
rs0:PRIMARY> exitCheck the MongoDB Cluster Redundancy
Let's test the cluster resiliency by simulating the failure of a cluster node.
If the primary MongoDB instance goes down or the other cluster members can't connect because of a network failure, the MongoDB cluster will initiate the election process in order to elect new primary node for the cluster.
- As user
root, stop the MongoDB service on themongodb-node1zone:root@global_zone:~# zlogin mongodb-node1 root@mongodb-node1:~# svcadm disable mongodb - Connect to the second MongoDB zone (
mongodb-node2) and run the MongoDB shell:root@global_zone:~# zlogin mongodb-node2 root@mongodb-node2:~# su - mongodb mongodb@mongodb-node2:~ /usr/local/mongodb/bin/mongo - Run the
rs.status()command to get the replication set status.rs0:PRIMARY> rs.status()You will see that
mongodb-node2has been promoted to primary node whilemongodb-node3is still a secondary node.Note: During the election process, different hosts can be elected as primary; for example,
mongodb-node3could be made the primary member andmongodb-node2could be a secondary member. You can define the priority by giving a member higher priority value than other members in the set. Refer to the MongoDB documentation for an example. - Bring up the MongoDB instance on the
mongodb-node1zone:root@mongodb-node1:~# svcadm enable mongodb - Verify that the MongoDB service is up and running:
root@mongodb-node1:~# svcs mongodb STATE STIME FMRI online 11:29:09 svc:/application/mongodb:default - Connect to the
mongodb-node1zone and run the MongoDB shell:root@mongodb-node1:~# su - mongodb mongodb@mongodb-node1:~ /usr/local/mongodb/bin/mongo rs0:SECONDARY> rs.status()You will see that
mongodb-node1is a secondary member now andmongodb-node3is still a secondary member.Note: Your cluster membership level might be different because of the election process.
- Exit from the MongoDB shell:
rs0:SECONDARY> exit - (Optional) You can monitor the MongoDB the election process by monitoring the MongoDB log file:
mongodb@mongodb-node1:~ tail -f /var/log/mongodb/mongod.log
Use DTrace for Better Operating System Observability
The MongoDB software includes built-in tools for analyzing the database workload. However, to get the full picture during performance analysis, you need to observe the operating system in addition to the database. Oracle Solaris includes a comprehensive dynamic tracing facility named DTrace. Using this facility, you can examine the behavior of both user programs and of the operating system itself.
The following example demonstrates how we can use DTrace to analyze an I/O workload pattern during MongoDB database load. We will use the DTrace Toolkit, which is a collection of DTrace scripts located in
/usr/dtrace/DTT/, to run the disk I/O performance analysis.- Get the MongoDB primary instance name using the
rs.status( )command from the MongoDB shell. You can find the same information on the Replica Set Status page athttp://<mongodb_IPaddress>:28017/_replSet, as shown in Figure 2.
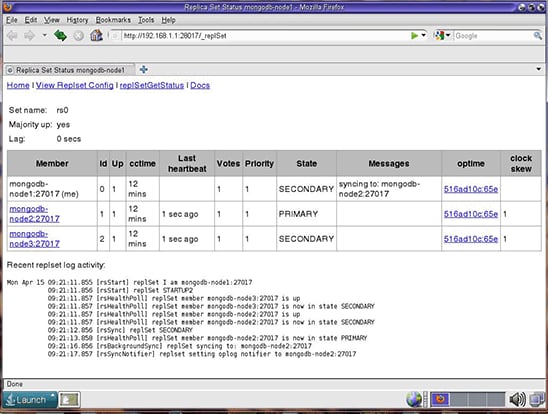
Figure 2. Replica Set Status Page
- As the
mongodbuser, run the following command on the primary MongoDB instance to generate load on the MongoDB database.
Note: In this example, the primary is
mongodb-node2; however, it can be a different host.root@global_zone:~# zlogin mongodb-node2 root@mongodb-node2:~# su - mongodb mongodb@mongodb-node2:~ /usr/local/mongodb/bin/mongo rs0:PRIMARY> res = benchRun( { ops : [ { ns : "test.foo" , op : "insert" , doc : { y : { "#RAND_STRING" : [ 10 ] } } } ] , parallel : 2 , seconds : 1000 , totals : true } );Listing 10. Generating Load
- From another terminal on the global zone, run the DTrace
iopatternscript, as shown in Listing 11, to analyze the type of disk I/O workload:root@global_zone:~# /usr/dtrace/DTT/iopattern %RAN %SEQ COUNT MIN MAX AVG KR KW 84 16 196 512 1032704 42302 5 8092 80 20 98 1024 189952 53221 0 5093 72 28 68 4096 97280 58910 0 3912 75 25 77 2048 96256 59910 2 4503 75 25 72 4096 97280 58887 0 4140 76 24 180 512 1046016 141405 0 24856 87 13 110 512 181248 46982 115 4932 75 25 73 4096 96768 58557 158 4016 79 21 77 4096 97280 58387 0 4390 73 27 75 4096 174080 57603 159 4060 66 34 140 512 1048064 262645 0 35908 84 16 120 512 437248 36369 0 4262 79 21 72 4096 97280 58368 0 4104 75 25 74 2560 97280 57489 2 4152Listing 11. Analyzing the Workload
The following items are shown in the output:
%RANis the percentage of events of a random nature.%SEQis the percentage of events of a sequential nature.COUNTis the number of I/O events.MINis the minimum I/O event size.MAXis the maximum I/O event size.AVGis the average I/O event size.KRis the total kilobytes read during the sample.KWis the total kilobytes written during the sample.
You can see from the script output that the I/O workload is mainly random writes (
%RANandKW).
Conclusion
In this article, we saw how we can leverage Oracle Solaris Zones, and the ZFS, DTrace, and Service Management Facility technologies of Oracle Solaris to build, observe, and manage a MongoDB database cluster.
See Also
- For more information about MongoDB, see http://www.mongodb.org/
- For more information about Oracle Solaris Zones, see Oracle Solaris 11.1 Administration: Oracle Solaris Zones, Oracle Solaris 10 Zones, and Resource Management
- For more information about DTrace, see the Oracle Solaris Dynamic Tracing Guide
- For more information on big data technologies that can be used with Oracle Solaris, see "How to Build Native Hadoop Libraries for Oracle Solaris 11"
Also see these additional publications by this author:
- "Increasing Application Availability by Using the Oracle VM Server for SPARC Live Migration Feature: An Oracle Database Example" (PDF)
- Orgad's blog: The Art of Virtualization: Cloud Computing and Virtualization Use Cases and Tutorials
And here are additional Oracle Solaris 11 resources:
- Download Oracle Solaris 11
- Access Oracle Solaris 11 product documentation
- Access all Oracle Solaris 11 how-to articles
- Learn more with Oracle Solaris 11 training and support
- See the official Oracle Solaris blog
- Follow Oracle Solaris on Facebook and Twitter
About the Author
Orgad Kimchi is a principle software engineer on the ISV Engineering team at Oracle (formerly Sun Microsystems). For 5 years he has specialized in virtualization and cloud computing technologies.
Revision 1.1, 07/18/2013 - Insert the
- On the first node (
- Start the MongoDB service:
- Create the
- Use the following command to monitor how much memory the ZFS ARC is using:
- Verify that the NTP server is online by using the following command:
- Copy the MongoDB tarball into