Understanding and Using Trusted Extensions in Oracle Solaris 11
Published June 2013
An introduction to the evolution, installation, and usage of the security extensions incorporated in Oracle Solaris 11.
Trusted Extensions is a powerful security technology of Oracle Solaris that allows you to create a multilevel (labeled) security environment in which users with different access permissions can work simultaneously with data that has different access controls, thus enabling you to enforce strict access controls for your data based on both data sensitivity and data ownership.
This article unveils some history and background on Trusted Extensions and then explains how to install and enable the feature in Oracle Solaris 11. It covers how to create and configure a Trusted Extensions system with the help of tools available in Trusted Extensions, including the txzonemgr script, Labeled Zone Manager, and Label Builder.
From Trusted Solaris to Trusted Extensions
Historically, Trusted Solaris was a family of security-enhanced operating systems based on the Oracle Solaris operating system. Being an enhanced version of the Oracle Solaris operating system, Trusted Solaris offered special security features that enabled an organization to define and implement a set of rules and practices (a security policy) helping protect both information and hardware on a single workstation or on a network of workstations running Oracle Solaris. The last release of a separate Trusted Solaris operating system was Trusted Solaris 8.
Starting with Oracle Solaris 10 11/06, the mainstream Oracle Solaris releases now include Trusted Extensions as the successor to Trusted Solaris, thus eliminating the need to use an Oracle Solaris release that has a modified kernel to take advantage of labeled security environments. Most of the Trusted Solaris features—such as user rights profiles, mandatory access controls and file labeling—were incorporated into Trusted Extensions, as a standard part of the Oracle Solaris operating system.
It's important to note, though, that the transition from Trusted Solaris to Trusted Extensions was not just a porting job of merging Trusted Solaris software into the standard Oracle Solaris operating system. In fact, a number of Trusted Solaris features, such as privileges and networking, had been re-implemented and changed in Trusted Extensions. And some features found in Trusted Solaris, such as forced privileges and allowed privileges for files, were removed. However, the main architectural innovation is that Trusted Extensions implements multilevel security with labeled zones. Figure 1 provides a high-level view of this architecture.
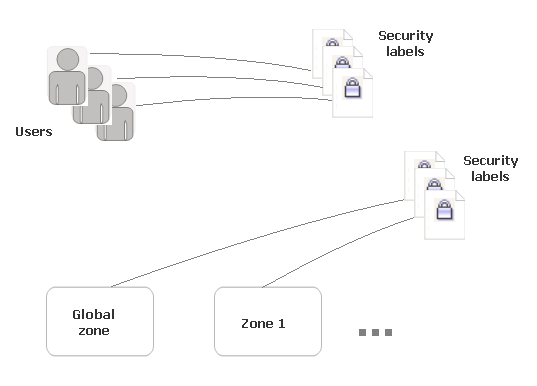
Figure 1: Both zones and users are assigned security labels.
Originally, each zone had to be assigned a unique label. Starting with Oracle Solaris 11.1, though, labeled zones can share the same label, thus providing more flexibility when it comes to isolating related service tiers into separate zones.
For a detailed overview of the changes that occurred to Trusted Solaris software, refer to the Solaris Trusted Extensions Transition Guide.
Evolution of Trusted Extensions
Having become a bundled feature in regular Oracle Solaris releases, Trusted Extensions continues to evolve. For example, Oracle Solaris 11 came with great improvements in labeled networks, allowing you to configure each zone with its own DHCP server and IP routers. Starting with Oracle Solaris 11, you can use a new command tncfg(1M) to manage labeled zones and networks. For details on using this command, refer to the tncfg man page in man pages section 1M: System Administration Commands of the Oracle Solaris 11 documentation.
Oracle Solaris 11 also came with labeled support for ZFS, allowing you to explicitly set security labels on ZFS data sets. ZFS file systems are now automatically labeled during initial mounting into a labeled zone and cannot be subsequently mounted on a zone of a different label. Also, Oracle Solaris 11 added the ability to configure each labeled zone as an NFS server, allowing a zone to serve as a separate NFS domain. The multilevel desktop was also improved in Oracle Solaris 11. For example, the Common Desktop Environment (CDE) login manager used by default in Oracle Solaris 10 was replaced with the GNOME session manager, including the dialog boxes that contribute to better integration with Trusted Extensions.
The Oracle Solaris 11.1 release offers even greater enhancements related to labeling. Unlike previous releases requiring a unique label for each zone, labeled zones can now share the same label, thus allowing you to efficiently isolate related service tiers into separate zones. Also, the label policy for network clients has been enhanced so that you have the option of assigning security labels to networking interfaces, not just to the IP address of the client as before.
As for ZFS, Oracle Solaris 11.1 introduces a new option—multilevel—which allows you to label individually each file and directory in the file system, thus letting users observe only those portions of the file system they are permitted to view. Because the labels are implemented as file attributes, changing the level of security for files and directories is immediate. Provided the user you're logged in as has assumed the root role, you can create and mount a multilevel ZFS file system only in the global zone, although you can still make such a ZFS file system available to the other labeled zones with the help of loopback mounts. Also, a multilevel ZFS file system can be shared via NFS.
Now that you have an idea of where the Trusted Extensions feature comes from and how it has been evolving, let's take a look at how you might take advantage of it in the most recent Oracle Solaris operating system (Oracle Solaris 11.1 at the time of this writing). The rest of the article provides a brief introduction on how to enable Trusted Extensions, log in to it, and use it to secure your system.
Installing and Enabling the Trusted Extensions Feature
If you're planning to use the Trusted Extensions feature, it's recommended that you install Oracle Solaris securely. This applies to new installations of Oracle Solaris. For details, refer to the "Install an Oracle Solaris System Securely" section in the Trusted Extensions Configuration and Administration guide. For systems that have been in use, check out the "Prepare an Installed Oracle Solaris System for Trusted Extensions" section in the same guide.
In the present Oracle Solaris releases, Trusted Extensions is a service managed by the Service Management Facility (SMF) with the following Fault Management Resource Indicator (FMRI):
svc:/system/labeld:default
By default, the labeld service is not enabled. By assuming the root role in the global zone, you can enable it from within a terminal window, as follows:
# svcadm enable -s labeld
If your Oracle Solaris environment does not support Trusted Extensions—for example, by default, an Oracle Solaris 11.1 virtual machine running within Oracle VM VirtualBox does not support it—you'll get the following error message:
svcs: Pattern 'labeld' doesn't match any instances
If you get this message, you need to install the Trusted Extensions package. To do that, the Software Installation rights profile must be assigned to your account. Then, you'll have to assume the root role, which can be done by issuing the following command:
jxyul@solaris:~$ su - root

Password:
root@solaris: #
You have several options for downloading and installing the Trusted Extensions package. For example, you might use the pkg install command, as follows:
$ pkg install system/trusted/trusted-extensions
Or, you can invoke the Package Manager:
$ packagemanager &
If you use Package Manager, select the trusted-extensions package located under the Desktop (GNOME)->Trusted Extensions node (see Figure 2), and then click the Install/Update button.
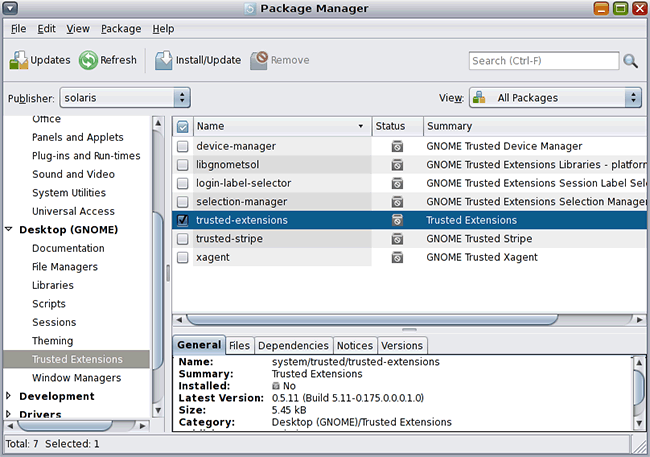
Figure 2: Installing the Trusted Extensions package Using the Package Manager.
Once the Trusted Extensions package has been successfully installed, you can return to the task of enabling the labeld service as discussed at the beginning of this section:
# svcadm enable -s labeld
If everything is OK, the command above should not produce any output. However, you can still explicitly make sure that the service has been started successfully by issuing the following command:
# svcs -x labeld

svc:/system/labeld:default (label daemon)
 State: online since March 27, 2013 02:44:15 AM UTC
   See: labeld(1M)
...See: /var/svc/log/system-labeled:default.log
Impact: None.
Alternatively, to verify that the service is enabled, you might take advantage of the SMF Services GUI that can be launched by selecting System->Administration->SMF Services. In the SMF Services window, double-click svc:/system/labeld:default in the right pane to invoke the SMF Service Inspector dialog box shown in Figure 3:
Figure 3: The SMF Service Inspector invoked for the labeld service.
Finally, you'll need to reboot the system:
# /usr/sbin/reboot
Logging In to Trusted Extensions
After you have enabled Trusted Extensions and rebooted, you can log in to Trusted Extensions using the following steps.
- The first screen you should see after rebooting and logging in to the system is the Message Of The Day (MOTD) dialog box shown in Figure 4. Examine the information presented in this dialog box, including the security attributes of your session and messages from the administrator, and then click OK.

Figure 4: The Message Of The Day (MOTD) dialog box.
- In the next screen, the Setting Session Clearance dialog box, you can choose your session clearance for a multilevel session. For a single-level session, you can select a label. Then, click OK to move on to the trusted desktop.
- Close the dialog box that says that the label PUBLIC has no matching zone.
- Next, assume the
rootrole. To do this, in the trusted desktop, click the name you've logged in as, which you should see in the trusted stripe, and select therootrole from the pull-down menu. You'll be prompted to type in therootpassword.
After completing the steps above, you're ready to create and configure a Trusted Extensions system.
Creating and Configuring a Trusted Extensions System
Since Trusted Extensions provides a multilevel desktop, you can now switch between different workspaces, setting up different levels of access for each workspace. You can change the label of a workspace with the label builder (shown in Figure 5), which you can invoke by clicking the Workspace label in the trusted stripe and then selecting the Change Workspace Label menu.
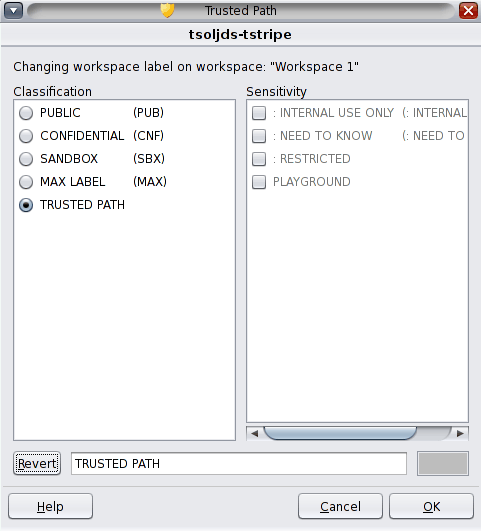
Figure 5: The label builder.
Also, you might want to configure labeled zones. You can automatically create two labeled non-global zones or you can create zones manually. Before that, though, you might need to customize your Trusted Extensions configuration by setting up the global zone in Trusted Extensions. The task map for customizing your Trusted Extensions configuration can be found in the "Setting Up the Global Zone in Trusted Extensions" section of the Trusted Extensions Configuration and Administration guide.
Creating Labeled Zones Automatically
To automatically create two labeled non-global zones from the label_encodings file, use the txzonemgr -c command.
Note: The entire procedure can be a bit time-consuming: up to 20 minutes, depending on your machine's processing capabilities.
First, move on to the fourth workspace and then issue the following command in a terminal window:
# /usr/sbin/txzonemgr -c
The command above runs the zone manager configuration utility in non-interactive mode, creating and then booting two labeled zones. The process is as follows. First, it duplicates the Oracle Solaris and Trusted Extensions software to a zone. Next, it creates a snapshot of this zone and then labels the initial zone. The snapshot is then used to create the other labeled zone. Labeling of these zones is based on the values of Default User Sensitivity Label and Default User Clearance in the label_encodings file, respectively. Finally, both of the newly created zones are booted, and you have a working Trusted Extensions system with three zones: the global zone and two labeled non-global zones.
Creating Labeled Zones with Labeled Zone Manager
Alternatively, to run the zone manager configuration utility in interactive mode, run the txzonemgr command without parameters:
#/usr/sbin/txzonemgr
This command opens the Labeled Zone Manager dialog box, which is shown in Figure 6:
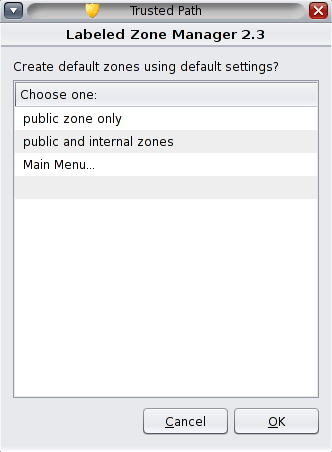
Figure 6: The Labeled Zone Manager dialog box.
Here, you can create two labeled non-global zones based on the values of Default User Sensitivity Label and Default User Clearance in the label_encodings file, or you can manually create zones. To create two labeled zones based on the definitions in the label_encodings file, follow these steps:
- In the Labeled Zone Manager dialog box, select public and internal zones, and click OK. This first installs a public zone, displaying the messages concerning the process status in a zone console window.
- In the zone console window, when asked, enter your user login and password at the zone login prompt.
- To verify that all services are configured, run the following command:
svcs -xIf everything is OK, no messages should be displayed.
- Next, type
exitto log out of the zone, and then close the zone console window.After closing the zone console, some messages should appear in the terminal window in which you launched the
txzonemgrcommand. - In the Labeled Zone Manager dialog box that appears, double-click the internal zone to see the list of commands you can apply to this zone now.
- In the Labeled Zone Manager dialog box, double-click Reboot.
- When the same screen of the Labeled Zone Manager reappears, click Cancel to return to the main screen, which should look now like Figure 7:
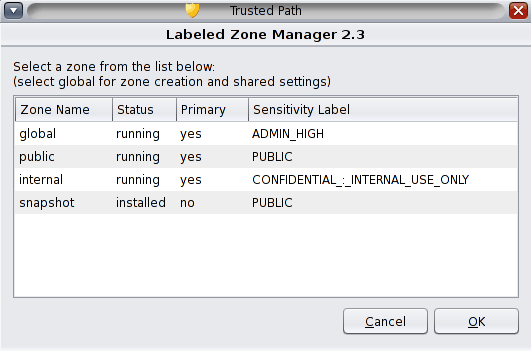
Figure 7: The Labeled Zone Manager showing zones after creating the public and internal zones.
- Click OK to close the Labeled Zone Manager.
After completing the steps above, you will have a working Trusted Extensions system with three zones: the global zone and two labeled non-global zones.
Everything Has a Label
As you saw in the preceding section, every zone in a Trusted Extensions system has a label. Provided you are in the System Administrator role in the global zone, you can run the Labeled Zone Manager by issuing the txzonemgr command to view the labels of the zones installed in your Trusted Extensions system.
The files and directories owned by a zone are at the label of the zone by default, meaning labels are implicitly assigned to files and directories. However, users can be authorized to change the label associated with a file, thus downgrading or upgrading the sensitivity of the file's information. Processes are also labeled, running at the label of the workspace in which the process is launched.
As for users operating in a labeled environment, similar to zones, they can be expressly assigned a label. In fact, users are assigned a default label and a label range. The latter allows them to operate at more than one label. Being in the global zone in the Security Administrator role, you can set a user's label range using the usermod command, as follows:
# usermod -K min_label=PUBLIC -K clearance=INTERNAL tjoe
Thus, to extend the user's label range, you can either assign a higher clearance or lower the minimum label. If a user's minimum label, clearance, and default label are not set explicitly, these settings default to those defined in the label_encodings file.
In a labeled environment, label ranges are also assigned to devices, network interfaces, and printers. You can allocate devices for use with the Device Manager. Once a device is allocated for use, you can set a label range for it. For further details, refer to the "Managing Devices for Trusted Extensions (Tasks)" section of the Trusted Extensions Configuration and Administration guide.
In Trusted Extensions, hosts (both unlabeled and labeled) are assigned security templates that define their label properties. For more details on security templates and trusted networking, check out the "Trusted Networking (Overview)" section and the "Managing Networks in Trusted Extensions (Tasks)" section of the Trusted Extensions Configuration and Administration guide.
Conclusion
As you learned from this article, starting with Oracle Solaris 10 11/06, Trusted Extensions are packages installed into a standard distribution of the Oracle Solaris operating system, which implements multilevel (labeled) security with labeled zones. In a nutshell, the idea behind labeled security is that almost everything in the operating system—including files, windows, processes, and so on—has a label associated with it. Which label is applied depends on the host or zone the resource is associated with. Also, labels can be directly assigned to system objects, such as users, devices, and network interfaces.
See Also
- Download pages:
- "Taking Your First Steps with Oracle Solaris 11" article
- Oracle Solaris Trusted Extensions data sheet
- "Clarifying Some Misconceptions About Trusted Extensions" blog
- Trusted Extensions User's Guide
- Oracle Solaris 11 Security page
- Oracle Solaris 11 page
Also see these additional resources:
- Download Oracle Solaris 11
- Access Oracle Solaris 11 product documentation
- Access all Oracle Solaris 11 how-to articles
- Learn more with Oracle Solaris 11 training and support
- See the official Oracle Solaris blog
About the Author
Yuli Vasiliev is a software developer, freelance author, and consultant currently specializing in open source development, Java technologies, business intelligence (BI), databases, service-oriented architecture (SOA) and, more recently, virtualization. He is the author of a series of books on Oracle technology, the most recent one being Oracle Business Intelligence: An Introduction to Business Analysis and Reporting (Packt, 2010).
Revision 1.0, 06/13/2013