Remote Debugging an EJB on WebLogic Server 10.0.1 with JDeveloper 10.1.3.3
An Oracle JDeveloper How To Document
Written by Juan Camilo Ruiz and Dana Singleterry, Oracle
July, 2008
Introduction
The JDeveloper IDE has the provision to remote debug applications deployed to WebLogic Server with a remote debugger. In this How To, the example Java EE application , EJB 3.0 Session Facade, will be deployed to WebLogic Server and debugged within JDeveloper.
In this how-to, we'll show you how to create a connection within JDeveloper to WebLogic server, set the WebLogic server to debug mode, open the provided project in JDeveloper, deploy the project to WebLogic Server, set the project to do remote debugging and run a remote debug session. The JDeveloper Java EE sample application can be downloaded from otn. You will also need JDeveloper, available from OTN and WebLogic Server also available from Oracle.
Create an Application Server Connection within JDeveloper to WebLogic Server
Note: When you are deploying to WebLogic from JDeveloper, ensure that the HTTP Tunneling property is enabled. From the WebLogic console under Servers > ServerName > Protocols >HTTP - check the checkbox for HTTP Tunneling. (ServerName refers to the name of your WebLogic server).
In order for JDeveloper to work with WebLogic it will need a copy of the weblogic.jar file that can be found at [WLS-root]\weblogic1001\server\lib, copy this file to [jdev-root]\jdev\lib\ext directory and restart JDeveloper.
Now let's create an application server connection from JDeveloper to your WebLogic Server. From the View Menu choose Connection Navigator. Right click the Application Server node and choose New Application Server Connection. Follow the instructions in the dialog to establish and test a connection to your WebLogic Server.
Once the connection has been established you'll be able to directly deploy from JDeveloper to your WebLogic server.
Enable Debugging on the WebLogic Server
In order for the JDeveloper debugger to debug an application deployed to WebLogic Server, the server must be started in debug mode. WebLogic Server debugging is based on the Java Platform Debugger Architecture (JPDA). Note: We are using the domain wl_server, to deploy and debug the provided application.
To start WebLogic Server in debug mode, you will need to modify the startWebLogic.cmd script in the <WLS-root>\wlserver_10.0\samples\domains\wl_server directory. <WLS-root> is the directory in which WebLogic 10.0.1 was installed into.
In the startWebLogic.cmd script, specify the JAVA OPTIONS with:
set JAVA_OPTIONS=-Xdebug -Xnoagent -Xrunjdwp:transport=dt_socket,address=4000,server=y,suspend=n
The -XDebug parameter enables debugging. The -Xnoagent parameter disables the default sun.tools.debug debug agent. The -Xrunjdwp parameter loads the JPDA reference implementation of JDWP. Debugging is enabled on port 4000. The JDWP protocol is the protocol used to debug with a remote debugger.
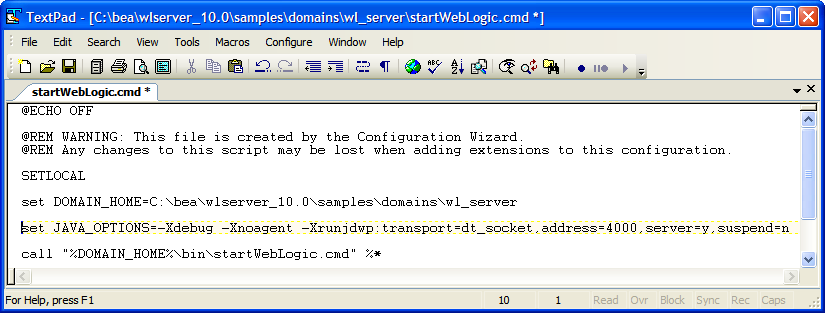
Start the WebLogic Server by invoking the startWebLogic.cmd script.
Open the Provided Java EE Project in JDeveloper and Enable the Project for Remote Debugging
If you haven't already downloaded the provided sample application, do so now and unzip it to your preferred work directory. Once unzipped, you can open the project by navigating to where you unzipped the application and opening the WebLogicApp.jws workspace file from within JDeveloper.
The remote debugger is not enabled by default within JDeveloper so right select on the application project, WLSEJB, and select "Project Properties" from context. Select "Run/Debug" from "Project Properties" and select "Edit" for the "Default Run Configurations".

Within the "Edit Run Configuration", select the "Remote Debugging and Profiling" checkbox for "Launch Settings".
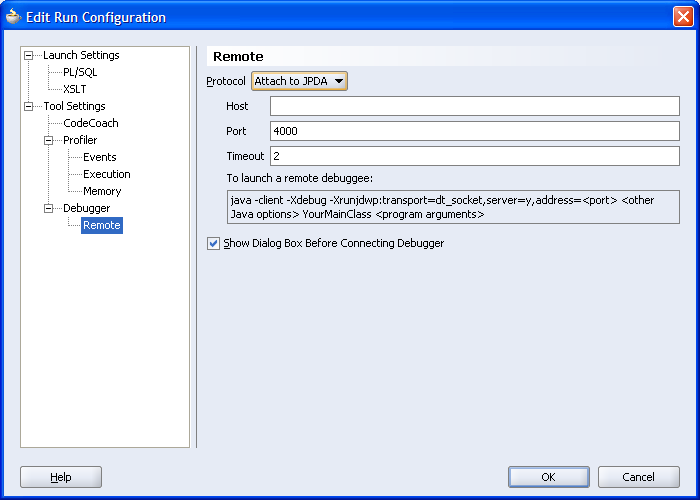
Within the "Edit Run Configuration" select the "Remote" option within the "Debugger" Configuration option and set the protocol to "Attach to JPDA".
Deploy the EJB 3.0 Application to the WebLogic Server and Test
Now that your WebLogic server is ready, it's time to deploy the applicaiton. Expand the WLSEJB Project->Resources. Locate the ejb1.deploy file and right click on it and choose deploy to->the WebLogic Server you created earlier. This will start a deployment process that you can follow through the JDeveloper log window.
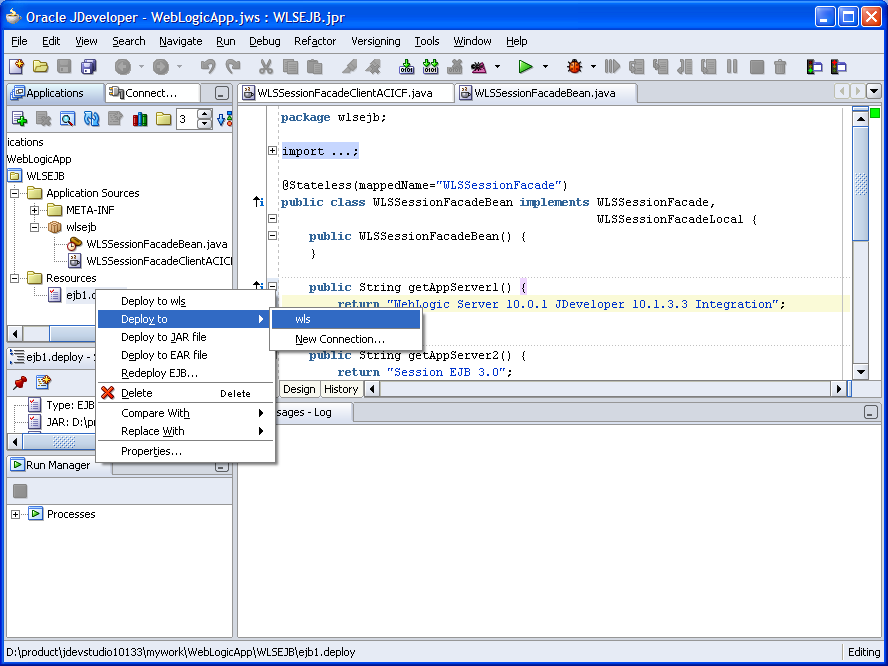
Deploy the EJB 3.0 Session Bean to the WebLogic Server by right clicking the ejb1.deploy profile and selecting "Deploy to->", the WebLogic Server you created earlier, from context. This will deploy you application, using the Application Server connection you created, to the WebLogic Server.
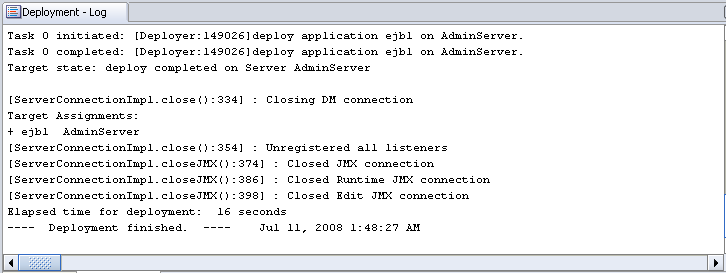
Successful deployment of your application should resemble the image above.
Before you can test the deployed applicaition, you must ensure that the Session Facade Client has the required credentials for your environment. Validate the following are set properly for your WebLogic Server.
(Context.SECURITY_PRINCIPAL,"
<WebLogic Server Administrative User ID>")
(Context.SECURITY_CREDENTIALS, "
<WebLogic Server Administrative Password>")
(Context.PROVIDER_URL, "t3://
<your_domain:port>")
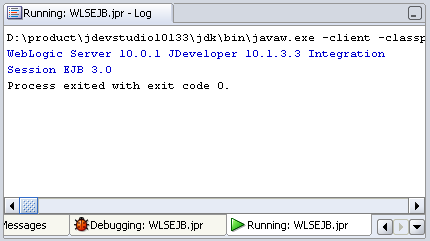
Now you can test that the application deployed successfully by right clicking on the WLSSessionFacadeClient and selecting "Run" from context. The results of running the client against the deployed EJB Session Bean are as follows:

Results of running the WLSSessionFacadeClient. Invocation of getAppServer1() returns "WebLogic Server 10.0.1 JDeveloper 10.1.3.3 Integration. Invocation of getAppServer2() returns "Session EJB 3.0".
Run a Remote Debugging Session
In order to debug the Session EJB that we deployed to the WebLogic Server, you need to set a breakpoint in WLSessionFacadeBean.

Breakpoint set on return of method getAppServer1().
Now we must start the remote debugger. Right click on the WLSSessionFacadeBean and select "Start Remote Debugger".
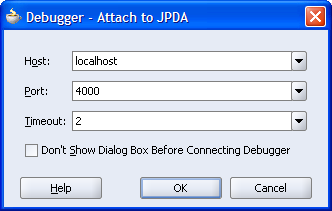
Select the Host that you deployed the Application to along with the correct Port.
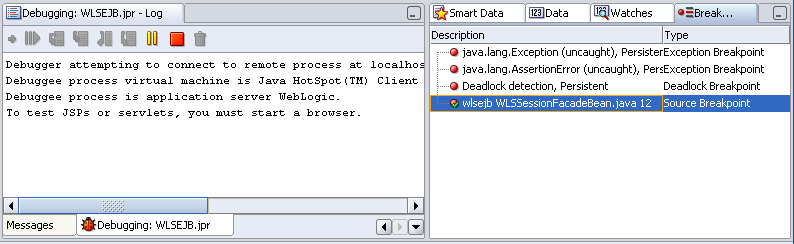
Notice that the Breakpoint has been activated.
Right click on the Session Facade Client and select Run from context to debug the Session EJB.
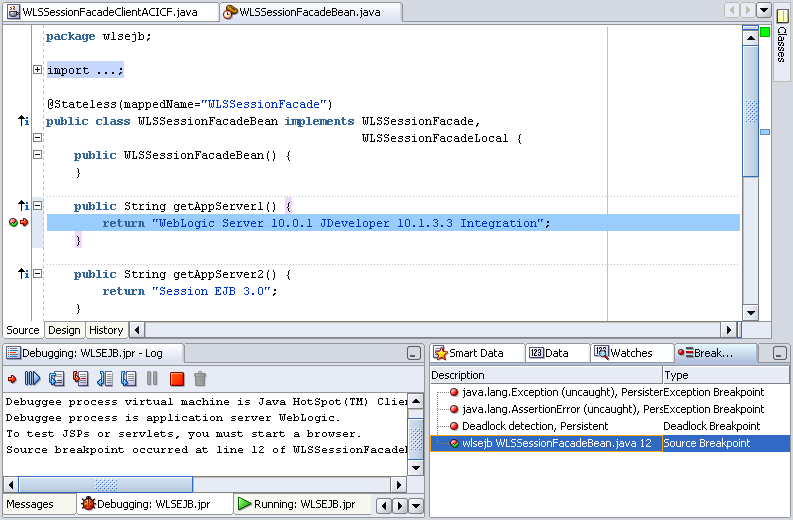
Notice that it steps into the Session Bean and halts on the return within the getAppServer1() method.
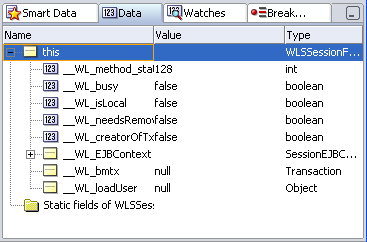
Review the current data by selecting the Data tab.
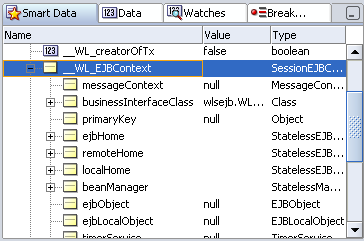
You can also review additional data for this instance in the Smart Data tab.

You can step in and step out of the breakpoint or resume the process as we do in this how-to.
Resume the process and get the same results as without debugging enabled.

To stop the debug session click the red square icon and choose detach to disconnect JDeveloper from the WebLogic Server.