Installing and Configuring Oracle® Hyperion Enterprise Performance Management System 11.1.2 with SSL Enabled on All Layers
Purpose
This tutorial covers installation and configuration of Oracle® Hyperion Enterprise Performance Management (EPM) System 11.1.2 with Secure Sockets Layer (SSL) enabled on all layers, with WebLogic 11gR1 and Oracle HTTP Server (OHS) 11gR1.
Time to Complete
Approximately 4 hours
Topics
This tutorial covers the following topics:
Overview
In this tutorial, you perform a full SSL EPM System 11.1.2 installation and configuration. You learn how to:
- Define and manage certificates for Oracle Wallet and JKS
- Configure OHS for SSL
- Configure WebLogic for SSL
- Configure EPM System for SSL
This tutorial uses the same principle as other SSL configurations (for example, SSL offloading and two-way SSL), that is separating internal and external communications flows with two URLs: epm.mycompany.com for browser and Smart View client connections to the web server; and epminternal.mycompany.com for server to server communications. Deployment architecture:
Scenario
You are tasked with enabling SSL on a new EPM System installation. Your company is using its own certification authority to sign certificates, not relying on trusted third party root ca (root certificate authority).
Your setup is composed of seven machines:
- OHS web server to proxy requests to web applications
- Two WebLogic servers to run Planning and other java applications
- Two Internet Information Services (IIS) servers to run Financial Management and other IIS application servers
- Oracle Database server
- External LDAP server
Prerequisites
Before starting this tutorial, you should:
- Download EPM System 11.1.2 assemblies from edelivery.oracle.com, including WebLogic 11gR1 and OHS 11gR1
- Define two DNS aliases - epminternal.mycompany.com and epm.mycompany.com pointing to your OHS server.
Installing EPM System
Follow the steps below to install EPM System:
- Launch installTool.cmd.
- At the bottom of the installer window, ensure the prerequisites are met, and click Next.
- Enter the Middleware home, for example, d:\Oracle\Middleware, and click Next.
- Select New Installation > Choose components by tier, and click Next.
- In the Web Application colomn, select Foundation Services Web Applications, and uncheck all other components.
- Follow the wizard steps to complete the installation.
Configuring Foundation Services and Enabling SSL
Configuring Foundation Services for SSL on WebLogic Server
- Import the root certification authority certificate for the database server for SSL JDBC into EPM Configurator keystore located in EPMSystem11r1/common/<jre-64|jre>/Sun/1.6.0/lib/security/cacerts. Use the following command:
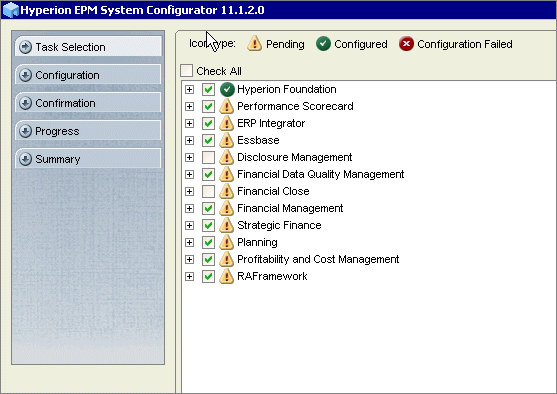
- From the Start menu, select All Programs > Oracle EPM System > Foundation Services > EPM System Configurator.
- Under Hyperion Foundation, select the following components:
- Common Settings
- Configure Database
- Configure Oracle Configuration Manager
- Deploy to Application Server
- Click Advanced options, set up the SSL JDBC URL as specified in the following figure, and click OK.
- Select Create Windows Services for configured components and Use SSL for Web application server communications (Requires manual configuration).
- Click Next.
- Select Define a new Domain to deploy the web applications and enter a password for the domain.
- Click Next.
- In the Advanced column, click Set up for each Ear/War component.
- Define a new logical address epminternal.mycompany.com (internal load balancer host) for Workspace and Shared Services. Specify the internal load balancer SSL port 19443.
- Click OK.
- Select the desired setting and click Next.
- Click Next.
- Click Next to complete the configuration.
- Click Finish.
%EPM_ORACLE_HOME%\common\JRE\Sun\1.6.0\bin\keytool.exe -import -alias myrootca -keystore %EPM_ORACLE_HOME%\common\JRE\Sun\1.6.0\lib\security\cacerts -trustcacerts -file %EPM_ORACLE_HOME%\ssl\CA.crt -storepass changeit
Note: The default password is changeit .
The EPM System Configurator is launched.
The "Set up Shared Services and Registry Database Connection associated with the instance home" dialog box is displayed.

Note: If you have an SSL SMTP server, select Use SSL to communicate with mail server.
The "Information of the WebLogic Domain to which the web applications are deployed" dialog box is displayed.
Note: Make sure the password has at least eight alphanumeric characters and at least one number or special character.
The Application Server Deployment: Oracle WebLogic dialog box is displayed.

The Advanced Setup dialog box is displayed.
The Oracle Configuration Manager Registration dialog box is displayed.
The "Set Shared Services admin user password" dialog box is displayed.
The list of products and tasks to be configured is displayed.
Configuring Web Server
- On the OHS server, launch EPM System Configurator, and select Configure Web Server.
- Click Next.
- Click Next.
- Click Next to complete the configuration.
- Click Finish.
The Configure Web Server dialog box is displayed.
Note: This step configures OHS using HTTP. SSL configuration is manual, after certificates are created.
The list of configuration tasks is displayed.
Defining and Importing Certificates
You need eight server certificates for this configuration:
- Two server certificates for OHS ( epm.mycompany.com and epminternal.mycompany.com). These two certificates are stored in the same Oracle Wallet.
- WebLogic servers 1 and 2 ( weblogic1.mycompany.com and weblogic2.mycompany.com). These certificates are stored in java keystores.
- IIS ( iis1.mycompany.com and iis2.mycompany.com). The certificates are stored in the windows keystore.
- Oracle database ( db.mycompany.com). This certificate are stored in Oracle Wallet.
- External LDAP ( ldap.mycompany.com). The certificate storage is vendor dependent.
Defining OHS Certificates
- On the OHS server, launch Wallet Manager.
- Click on Wallet/New to create a new wallet.
- Click OK.
- Click No (you don't need to create a certificate request for now).
- Right-click Trusted Certificates and select Import Trusted Certificate.
- In the Import Trusted Certificate dialog box, select Select a file that contains the certificate and click OK.
- In Oracle Wallet Manager, in the Operations drop-down list, select Add Certificate Request.
- In the Create Certificate Request dialog box, fill out the fields for epm.mycompany.com as specified in the following figure, and click OK.
- Repeat the previous two steps for epminternal.mycompany.com.
- Obtain server certificates from the certification authority (sign the certificate requests). Certificate requests are available in Wallet Manager.
- In the Operations drop-down list, select Import User Certificate.
- Select Paste the certificate and click OK.
- Remove the trailing carriage return.
- Click OK.
- Follow the steps above to sign the certificate request and add the user certificate to Wallet for epminternal .mycompany.com
- In the Wallet drop-down list:

The New Wallet dialog box is displayed.
The Oracle Wallet Manager dialog box is displayed.

The Oracle Wallet Manager is displayed.
The "The trusted certificate has been successfully imported into wallet" dialog box is displayed.
A dialog box confirming the certificate request creation is displayed.
The Import Certificate dialog box is displayed.

The Import Certificate "Please paste a BASE64 format certificate below" dialog box is displayed.
The epm.mycompany.com certificate is displayed under Trusted Certificates.
- Select Save As, and save the certificate to Oracle_home>\Middleware\user_projects\epmsystem1\httpConfig\ohs\config\OHS\ohs_component\keystores\default
- Select Auto Login
Defining WebLogic Certificates
Complete the following steps on weblogic1 server:
- Create an ssl folder under EPM_ORACLE_HOME. For example, d:\Oracle\Middleware\EPMSystem11R1\ssl.
- Use the following command to create a keystore with RSA key for server weblogic1:
- Use the following command to import your root certification authority certificate into the keystore. It is assumed the cert is called CA.crt:
- Use the following command to generate a certificate signing request for weblogic1, and name it weblogic1.csr:
- Sign the csr file and obtain your weblogic1.crt server certificate.
- Use the following command to Import weblogic1.crt into keystore:
Note: You can change the keystore password in the storepass parameter below for production systems.
%EPM_ORACLE_HOME%\common\JRE\Sun\1.6.0\bin\keytool.exe -genkey -dname "cn=weblogic1, ou=EPM, o=orcl, c=US" -alias epm_ssl -keypass password -keystore %EPM_ORACLE_HOME%\ssl\keystore -storepass password -validity 365 -keyalg RSA
Note: The common name weblogic1 has to be changed to match your WebLogic server hostname in the following line: cn=weblogic1, ou=EPM, o=orcl, c=US
%EPM_ORACLE_HOME%\common\JRE\Sun\1.6.0\bin\keytool.exe -import -alias myrootca -keystore %EPM_ORACLE_HOME%\ssl\keystore -trustcacerts -file %EPM_ORACLE_HOME%\ssl\CA.crt -storepass password
%EPM_ORACLE_HOME%\common\JRE\Sun\1.6.0\bin\keytool.exe -certreq -alias epm_ssl -keyalg RSA -file %EPM_ORACLE_HOME%\ssl\weblogic1.csr -keystore %EPM_ORACLE_HOME%\ssl\keystore -storepass password
%EPM_ORACLE_HOME%\common\JRE\Sun\1.6.0\bin\keytool.exe -import -alias epm_ssl -keystore %EPM_ORACLE_HOME%\ssl\keystore -storepass password -file %EPM_ORACLE_HOME%\ssl\weblogic1.crt
Importing Root Certificates into Java Keystores
Complete the following steps on all EPM servers. CA.crt should be located in %EPM_ORACLE_HOME%\ssl\CA.crt.
- Use the following command to import CA.crt into JDK:
- Use the following command to Import CA.crt to EPM JRE:
%EPM_ORACLE_HOME%\..\jdk160_11\jre\bin\keytool.exe -import -alias myrootca -keystore %EPM_ORACLE_HOME%\..\jdk160_11\jre\lib\security\cacerts -trustcacerts -file %EPM_ORACLE_HOME%\ssl\CA.crt -storepass changeit
%EPM_ORACLE_HOME%\common\JRE\Sun\1.6.0\bin\keytool.exe -import -alias myrootca -keystore %EPM_ORACLE_HOME%\common\JRE\Sun\1.6.0\lib\security\cacerts -trustcacerts -file %EPM_ORACLE_HOME%\ssl\CA.crt -storepass changeit
Note: If you are using a 64-bit system, you should also import CA.crt into JRE-64 (both locations).
Importing Root Certificates Into IIS Windows Keystore
Complete the following steps on all IIS servers:
- Use the following command to import CA.crt into JRockit on WebLogic servers:
- Select Start > Run > mmc.
- In the File menu, select Add/Remove Snap-in , and then click Add.
- Select Certificates, and click Add.
- In the Certificates snap-in dialog box, select an account and click Finish.
- Right-click Trusted Root Certification Authorities, then select All Tasks > Import.
%EPM_ORACLE_HOME%\..\jdk160_11\jre\bin\keytool.exe -import -alias myrootca -keystore %EPM_ORACLE_HOME%\..\jrockit_160_05\jre\lib\security\cacerts -trustcacerts -file %EPM_ORACLE_HOME%\ssl\CA.crt -storepass changeit
Note: if you changed JVM, update location above.
The Console1 window is displayed.

Configuring OHS Web Server
Configuring Listen Ports
- On OHS server, manually enable two SSL pools:
- For logical web applications, server to server communications, on port 19443
- For browser access, on port 443
- Edit ssl.conf located in <Oracle_home>\Middleware\user_projects\epmsystem1\httpConfig\ohs\config\OHS\ohs_component
- Replace Listen 19000 with Listen 443
- Add Listen 19443
Adding Internal Virtual Host
Follow the steps below to add a virtual host for internal SSL communications on port 19443:
Adding External Virtual Host
Follow the steps below to add a virtual host for external SSL communications on port 443:
Redirecting the WebLogic Server
Follow the steps below to configure WebLogic redirection in OHS server:
Proxying to IIS Applications
Follow the steps below to edit httpd.conf:
- In ssl.conf, add NameVirtualHost epminternal.mycompany.com:19443.
- Change virtual host to VirtualHost epminternal.mycompany.com:19443.
- Within the VirtualHost tag:
- Add ServerName epminternal.mycompany.com
- Check path to SSL wallet and SSL proxy wallet:
- SSLWallet ${ORACLE_INSTANCE}/config/${COMPONENT_TYPE}/${COMPONENT_NAME}/keystores/default
- SSLProxyWallet ${ORACLE_INSTANCE}/config/${COMPONENT_TYPE}/${COMPONENT_NAME}/keystores/default
- Add before closing </VirtualHost> : <Location /> Options FollowSymLinks AllowOverride None Order Deny,Allow Deny from All # list of allowed servers ip connecting on https: To be modified Allow from 10.200.33.65 10.200.32 DirectoryIndex welcome-index.html </Location>
- In ssl.conf, add NameVirtualHost epminternal.mycompany.com:19443
- Duplicate epminternal virtual host section, and change it to VirtualHost epminternal.mycompany.com:443
- Within the VirtualHost tag:
- Add ServerName epm.mycompany.com
- Check path to SSL wallet and SSL proxy wallet:
- SSLWallet ${ORACLE_INSTANCE}/config/${COMPONENT_TYPE}/${COMPONENT_NAME}/keystores/default
- SSLProxyWallet ${ORACLE_INSTANCE}/config/${COMPONENT_TYPE}/${COMPONENT_NAME}/keystores/default
- In the epm.mycompany.com virtual host section, remove the following code: <Location /> Options FollowSymLinks AllowOverride None Order Deny,Allow Deny from All # list of allowed servers ip connecting on https: To be modified Allow from 10.200.33.65 10.200.32 DirectoryIndex welcome-index.html </Location>
- In <oracle_home>\Middleware\user_projects\epmsystem1\httpConfig\ohs\config\OHS\ohs_component\mod_wl_ohs.conf
- Check that WLSSLWallet location is set to Oracle_home>\Middleware\user_projects\epmsystem1\httpConfig\ohs\config\OHS\ohs_component\keystores\default
- Make sure SecureProxy ON is defined
- In location tags, check WebLogic cluster physical nodes and SSL ports. Interop example:
- <LocationMatch ^/interop>
- SetHandler weblogic-handler
- WebLogicCluster weblogic1:28443,weblogic2:28443
- </LocationMatch>
- Add the following lines:
- LoadModule proxy_balancer_module ${ORACLE_HOME}/ohs/modules/mod_proxy_balancer.so
- LoadModule headers_module modules/mod_headers.so
- Configure mod_proxybalancer to load balance to different IIS servers:
- Add the same proxy pass and proxy balancer directives for other IIS applications (other Financial Management root contexts, FDM, Strategic Finance, EPMA).
- Copy cwallet.sso and ewallet.p12 t o Oracle_home>\Middleware\user_projects\epmsystem1\httpConfig\ohs\config\OHS\ohs_component\proxy-wallet.
Note: The IPs listed in the Location tag have to be changed to match the server environments.
Note: Tthe IPs listed in the Location tag have to be changed to match the server environments.

Note: Make sure mod_header is loaded.
Note: youriis1 and youriis2 are two physical hostnames/dns names for the IIS machines.
<Proxy balancer://iisappshfm> BalancerMember http://iis1.mycompany.com:443/hfm loadfactor=1 route=1 BalancerMember http:// iis2.mycompany.com:443/hfm loadfactor=1 route=2 ProxySet lbmethod=bytraffic </Proxy> Header add Set-Cookie "ORA_EPM_IIShfm_ROUTE_ID=iisappshfm .%{BALANCER_WORKER_ROUTE}e; path=/hfm ;" env=BALANCER_ROUTE_CHANGED
Replace existing ProxyPass directives with this: ProxyPass /hfm balancer://iisappshfm/ stickysession=ORA_EPM_IIShfm_ROUTE_ID nofailover=OnProxyPassReverse /hfm http://epm.mycompany.com:19000/hfm ProxyPreserveHost ONSSLProxyEngine On

Note: You should perform this step even if SSL Proxy Wallet location is set to Oracle_home>\Middleware\user_projects\epmsystem1\httpConfig\ohs\config\OHS\ohs_component\keystores\default
Configuring WebLogic Applications with SSL
- Start WebLogic administration console:
- Enter credentials as specified in EPM System Configurator while creating a domain.
- Click Lock & Edit.
- Select Environments > Servers > FoundationServices0.
- Deselect Listen Port Enabled for http listen port, and select SSL Listen Port Enabled:
- Navigate to the Configuration > Keystores tab, and define keystores:
- Custom Identity Keystore: <Oracle_home>\Middleware\EPMSystem11R1\ssl\keystore
- Custom Identity Keystore Type: jks
- Custom Identity Keystore passphrase: password (or else if you changed it in the keytool scripts)
- Follow the step above to fill out the information for the Trust keystore:
- Select the Configuration > SSL tab and note the Private Key Alias:
- Click Save, and then click Active Changes.
- In Windows Services, start OHS.
- In Windows Services, start Foundation Services.
- Test by connecting to https://epm.mycompany.com/interop and https://epm.mycompany.com/workspace.


Installing Remaining Products
Follow the steps below to install remaining products:
- Launch EPM System Configurator on WebLogic server.
- For each web application deployment, select Advanced setup and change the logical web application to: epminternal.mycompany.com on SSL port 19443
- Once all products are configured:
- Launch EPM System Configurator on OHS server.
- Select Configure Web Server.
- Validate WebLogic redirection and httpd.conf.
- On the IIS server, import server certificates to enable SSL:
- For Financial Management, you need to import the ldap root certificate and OHS internal URL root certificate into java keystore of the Financial Management application server
- All thick clients (for example, Financial Reporting and FDM), need root certificates of OHS external URL whether in windows keystore, or java keystore.
Summary
In this tutorial, you have learned how to:
- Install EPM System
- Configure Shared Services and Enable SSL
- Define and Import Certificates
- Configure OHS Web Server
- Configure WebLogic Applications with SSL
Resources
- Oracle® Hyperion Enterprise Performance Management System Release 11.1.2 Security Administration Guide