Download VirtualBox Templates for Oracle VM 3.2
Oracle VM Manager 3.2 VM
|
OracleVMManager3.2.4-b524.ova (md5sum 6991547426fd9dac5edc8d5f33261beb, 2.75GB)
|
Oracle VM Server 3.2 VM
|
OracleVMServer3.2.4-b525.ova (md5sum 1cc061a9cf0c3e0ac9f090ac79a37d4c, 249MB)
|
- The Oracle VM 3.2 templates require approximately 15GB each of diskspace on the host filesystem (5GB to host the .ova file download and 10GB for the actual Virtual Machine appliance).
- The virtual machine is configured with 4GB RAM, to run the software optimally.
- If you plan on running both Manager and Server on the same host double the resource requirements
- For the VirtualBox Templates for Oracle VM 3.3.
Quick Start Guide for the VirtualBox Template for Oracle VM Manager
Updated August 2013
This template contains the following software components :
- Oracle Linux 5 update 9 with the Unbreakable Enterprise Kernel (2.6.39)
- Oracle VM Manager 3.2.4
- Oracle WebLogic Server 10.3
- OMySQL 5.5
Minimum system requirements:
- The Oracle VM Manager template requires approximately 15GB of diskspace on the host filesystem (5GB to host the .ova file download and 10GB for the actual Virtual Machine appliance).
- The virtual machine is configured with 4GB RAM, to run the software optimally.
- Statically allocated IP address and hostname for the Virtual Machine - when configuring the Oracle VM Manager template you are required to provide a static IP address for the VM, along with a fixed hostname, Oracle VM Manager needs to be able to do two-way communication between the Manager instance and the Oracle VM server agents running on different servers. Once an Oracle VM server is discovered by the Manager instance, it expects the same IP address to exist for future communications.
- Oracle VM VirtualBox 4.1.8 or later - download and install Oracle VM VirtualBox for your host system prior to starting the installation of the template.

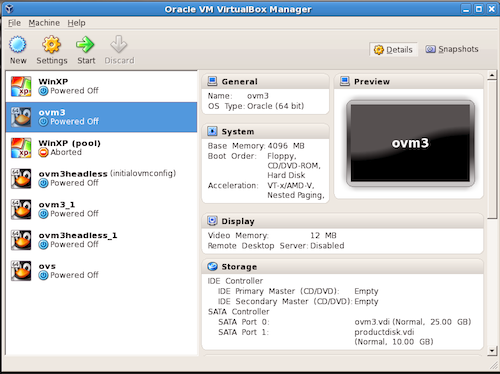
Start Oracle VM VirtualBox on your local system. If you already have a number of Virtual Machines created, you will see something similar as in this screenshot. Go to File -> import Appliance to import the Oracle VM Manager template.

In the import appliance wizard, click on Choose, and locate the OracleVMManager3.ovafile that you downloaded.

Click on Next to move to the import settings screen.

If you want to change the default Name of the Virtual Machine that will be created, double-click on Name and enter a different one. Click on Import to start the import process.

The first step of the import process is accepting the license for this template. Read the license and click on Agree or Disagree. If you Agree then the import will continue. Depending on the performance of your host system, the import can take a number of minutes to complete.

When the Import process finishes you will see the VM show up in the list on the left. In this example it is called “mymanagertemplate”. Click on the template name and then on the Settings icon at the top to modify the VM settings if needed.

You can modify various settings but it is recommended to use the defaults, to avoid any difficulties running the pre-configured environment.

Before you start, go to the Network settings and make sure that the correct host network is assigned to the Virtual Network Adapter. Click on the Name dropdown to find the networks that Oracle VM VirtualBox detected on your system. Pick the correct network from the list. When finished click OK.

To start the Virtual Machine click on the Start Icon and the VM console will pop up showing the Virtual Machine booting into Oracle Linux. This process can take a moment.

During the boot process, you will see various OS services start, including start-up of Oracle Database 11g Express Edition.

The next step is to provide a new password for the root (administrator) user of the Virtual Machine. Please enter and re-enter a new password when prompted to do so.

After the root password change, enter the Network settings for this VM template. Please have the static IPaddress, netmask, gateway and DNSserver IP addresses handy during first boot. This information is required to finish the configuration and installation.

After the network has re-started, the system will try to determine the host name and domain name. If it fails, it will prompt for a new hostname to be entered. If it finds the hostname, confirm by just hitting Enter.

Enter a key or wait 10 seconds until the VM configuration completes and the boot process finishes.

The boot process is complete when the template starts the Gnome desktop and automatically logs in as the user OVM. The desktop contains a number of links to provide easy access to get started. First double-click on the READ ME FIRST icon.

This icon will start the web browser and display a local document that contains an overview of the content of the Oracle VM Manager template including the pre-created userIDs and passwords.

To log into the Oracle VM Manager console, double click on the OracleVM Manager Login icon on the desktop. Enter username admin and default password Welcome1 to log into Oracle VM Manager.

Once logged into the application, you can start discovering Oracle VM servers and learn about the product.

The complete Oracle VM documentation is included in the template. Simply click on the Oracle VM Help or Getting Started icons on the desktop to read the documentation. We highly recommend you read the Getting Started manual prior to experimenting with Oracle VM.

Please review the white paper Oracle VM 3: Building a Demo Environment using Oracle VM VirtualBox (PDF) for additional details.
Happy VM’ing!