
How to Set Up a Hadoop Cluster Using Oracle Solaris
by Orgad Kimchi
Published October 2013
Hands-On Labs of the System Admin and Developer Community of OTN
How to set up a Hadoop cluster using the Oracle Solaris Zones, ZFS, and network virtualization technologies.
Table of Contents
Expected duration: 180 minutes
Lab Introduction
This hands-on lab presents exercises that demonstrate how to set up an Apache Hadoop cluster using Oracle Solaris 11 technologies such as Oracle Solaris Zones, ZFS, and network virtualization. Key topics include the Hadoop Distributed File System (HDFS) and the Hadoop MapReduce programming model.
We will also cover the Hadoop installation process and the cluster building blocks: NameNode, a secondary NameNode, and DataNodes. In addition, you will see how you can combine the Oracle Solaris 11 technologies for better scalability and data security, and you will learn how to load data into the Hadoop cluster and run a MapReduce job.
Prerequisites
This hands-on lab is appropriate for system administrators who will be setting up or maintaining a Hadoop cluster in production or development environments. Basic Linux or Oracle Solaris system administration experience is a prerequisite. Prior knowledge of Hadoop is not required.
System Requirements
This hands-on lab is run on Oracle Solaris 11 in Oracle VM VirtualBox. The lab is self-contained. All you need is in the Oracle VM VirtualBox instance.
For those attending the lab at Oracle OpenWorld, your laptops are already preloaded with the correct Oracle VM VirtualBox image.
If you want to try this lab outside of Oracle OpenWorld, you will need an Oracle Solaris 11 system. Do the following to set up your machine:
- If you do not have Oracle Solaris 11, download it here.
- Download the Oracle Solaris 11.1 VirtualBox Template (file size 1.7GB).
- Install the template as described here. (Note: On step 4 of Exercise 2 for installing the template, set the RAM size to 4 GB in order to get good performance.)
Notes for Oracle Open World Attendees
- Each attendee will have his or her own laptop for the lab.
- The login name and password for this lab are provided in a "one pager."
- Oracle Solaris 11 uses the GNOME desktop. If you have used the desktops on Linux or other UNIX operating systems, the interface should be familiar. Here are some quick basics in case the interface is new for you.
- In order to open a terminal window in the GNOME desktop system, right-click the background of the desktop, and select Open Terminal in the pop-up menu.
- The following source code editors are provided on the lab machines: vi (type
viin a terminal window) and emacs (typeemacsin a terminal window).
Summary of Lab Exercises
This hands-on lab consists of 13 exercises covering various Oracle Solaris and Apache Hadoop technologies:
- Install Hadoop.
- Edit the Hadoop configuration files.
- Configure the Network Time Protocol.
- Create the virtual network interfaces (VNICs).
- Create the NameNode and the secondary NameNode zones.
- Set up the DataNode zones.
- Configure the NameNode.
- Set up SSH.
- Format HDFS from the NameNode.
- Start the Hadoop cluster.
- Run a MapReduce job.
- Secure data at rest using ZFS encryption.
- Use Oracle Solaris DTrace for performance monitoring.
The Case for Hadoop
The Apache Hadoop software is a framework that allows for the distributed processing of large data sets across clusters of computers using simple programming models.
To store data, Hadoop uses the Hadoop Distributed File System (HDFS), which provides high-throughput access to application data and is suitable for applications that have large data sets.
For more information about Hadoop and HDFS, see http://hadoop.apache.org/.
The Hadoop cluster building blocks are as follows:
- NameNode: The centerpiece of HDFS, which stores file system metadata, directs the slave DataNode daemons to perform the low-level I/O tasks, and also runs the JobTracker process.
- Secondary NameNode: Performs internal checks of the NameNode transaction log.
- DataNodes: Nodes that store the data in HDFS, which are also known as slaves and run the TaskTracker process.
In the example presented in this lab, all the Hadoop cluster building blocks will be installed using the Oracle Solaris Zones, ZFS, and network virtualization technologies. Figure 1 shows the architecture:

Figure 1
Exercise 1: Install Hadoop
- In Oracle VM VirtualBox, enable a bidirectional "shared clipboard" between the host and the guest in order to enable copying and pasting text from this file.

Figure 2
- Open a terminal window by right-clicking any point in the background of the desktop and selecting Open Terminal in the pop-up menu.

Figure 3
- Next, switch to the
rootuser using the following command.Note: For Oracle OpenWorld attendees, the root password has been provided in the one-pager associated with this lab. For those running this lab outside of Oracle OpenWorld, enter the root password you entered when you followed the steps in the "System Requirements" section.
root@global_zone:~# su - Password: Oracle Corporation SunOS 5.11 11.1 September 2012 - Set up the virtual network interface card (VNIC) in order to enable network access to the global zone from the non-global zones.
Note: Oracle OpenWorld attendees can skip this step (because the preloaded Oracle VM VirtualBox image already provides configured VNICs) and go directly to step 16, "Browse the lab supplement materials."
root@global_zone:~# dladm create-vnic -l net0 vnic0 root@global_zone:~# ipadm create-ip vnic0 root@global_zone:~# ipadm create-addr -T static -a local=192.168.1.100/24 vnic0/addr - Verify the VNIC creation:
root@global_zone:~# ipadm show-addr vnic0 ADDROBJ TYPE STATE ADDR vnic0/addr static ok 192.168.1.100/24 - Create the
hadoopholdirectory; we will use it to store the lab supplement materials associated with this lab, such as scripts and input files.root@global_zone:~# mkdir -p /usr/local/hadoophol - Create the
Bindirectory; we will put the Hadoop binary file there.root@global_zone:~# mkdir /usr/local/hadoophol/Bin - In this lab, we will use the Apache Hadoop "23-Jul-2013, 2013: Release 1.2.1 " release. You can download the Hadoop binary file using a web browser. Open the Firefox web browser from the desktop and download the file.
Figure 4
- Copy the Hadoop tarball to
/usr/local/hadoophol/Bin.root@global_zone:~# cp /export/home/oracle/Downloads/hadoop-1.2.1.tar.gz /usr/local/hadoophol/Bin/Note: By default, the file is downloaded to the user's
Downloadsdirectory. - Next, we are going to create the lab scripts, so create a directory for them:
root@global_zone:~# mkdir /usr/local/hadoophol/Scripts - Create the
createzonescript using your favorite editor, as shown in Listing 1. We will use this script to set up the Oracle Solaris Zones.root@global_zone:~# vi /usr/local/hadoophol/Scripts/createzoneListing 1
#!/bin/ksh # FILENAME: createzone # Create a zone with a VNIC # Usage: # createzone <zone name> <VNIC> if [ $# != 2 ] then echo "Usage: createzone <zone name> <VNIC>" exit 1 fi ZONENAME=$1 VNICNAME=$2 zonecfg -z $ZONENAME > /dev/null 2>&1 << EOF create set autoboot=true set limitpriv=default,dtrace_proc,dtrace_user,sys_time set zonepath=/zones/$ZONENAME add fs set dir=/usr/local set special=/usr/local set type=lofs set options=[ro,nodevices] end add net set physical=$VNICNAME end verify exit EOF if [ $? == 0 ] ; then echo "Successfully created the $ZONENAME zone" else echo "Error: unable to create the $ZONENAME zone" exit 1 fi - Create the
verifyclusterscript using your favorite editor, as shown in Listing 2. We will use this script to verify the Hadoop cluster setup.root@global_zone:~# vi /usr/local/hadoophol/Scripts/verifyclusterListing 2
#!/bin/ksh # FILENAME: verifycluster # Verify the hadoop cluster configuration # Usage: # verifycluster RET=1 for transaction in _; do for i in name-node sec-name-node data-node1 data-node2 data-node3 do cmd="zlogin $i ls /usr/local > /dev/null 2>&1 " eval $cmd || break 2 done for i in name-node sec-name-node data-node1 data-node2 data-node3 do cmd="zlogin $i ping name-node > /dev/null 2>&1" eval $cmd || break 2 done for i in name-node sec-name-node data-node1 data-node2 data-node3 do cmd="zlogin $i ping sec-name-node > /dev/null 2>&1" eval $cmd || break 2 done for i in name-node sec-name-node data-node1 data-node2 data-node3 do cmd="zlogin $i ping data-node1 > /dev/null 2>&1" eval $cmd || break 2 done for i in name-node sec-name-node data-node1 data-node2 data-node3 do cmd="zlogin $i ping data-node2 > /dev/null 2>&1" eval $cmd || break 2 done for i in name-node sec-name-node data-node1 data-node2 data-node3 do cmd="zlogin $i ping data-node3 > /dev/null 2>&1" eval $cmd || break 2 done RET=0 done if [ $RET == 0 ] ; then echo "The cluster is verified" else echo "Error: unable to verify the cluster" fi exit $RET - Create the
Docdirectory; we will put the Hadoop input files there.root@global_zone:~# mkdir /usr/local/hadoophol/Doc - Download the following eBook from Project Gutenberg as a plain-text file with UTF-8 encoding: The Outline of Science, Vol. 1 (of 4) by J. Arthur Thomson.
- Copy the downloaded file (
pg20417.txt) into the/usr/local/hadoophol/Docdirectory.root@global_zone:~# cp ~oracle/Downloads/pg20417.txt /usr/local/hadoophol/Doc/ -
Browse the lab supplement materials by typing the following on the command line:
root@global_zone:~# cd /usr/local/hadoophol - On the command line, type
ls -lto see the content of the directory:root@global_zone:~# ls -l total 9 drwxr-xr-x 2 root root 2 Jul 8 15:11 Bin drwxr-xr-x 2 root root 2 Jul 8 15:11 Doc drwxr-xr-x 2 root root 2 Jul 8 15:12 ScriptsYou can see the following directory structure:
Bin—The Hadoop binary locationDoc—The Hadoop input filesScripts—The lab scripts
- In this lab we will use the Apache Hadoop "23-Jul-2013, 2013: Release 1.2.1" release. Copy the Hadoop tarball into
/usr/local:root@global_zone:~# cp /usr/local/hadoophol/Bin/hadoop-1.2.1.tar.gz /usr/local - Unpack the tarball:
root@global_zone:~# cd /usr/local root@global_zone:~# tar -xvfz /usr/local/hadoop-1.2.1.tar.gz - Create the
hadoopgroup:root@global_zone:~# groupadd hadoop - Add the
hadoopuser:root@global_zone:~# useradd -m -g hadoop hadoop -
Set the user's Hadoop password. You can use whatever password that you want, but be sure you remember the password.
root@global_zone:~# passwd hadoop - Create a symlink for the Hadoop binaries:
root@global_zone:~# ln -s /usr/local/hadoop-1.2.1 /usr/local/hadoop - Give ownership to the
hadoopuser:root@global_zone:~# chown -R hadoop:hadoop /usr/local/hadoop* - Change the permissions:
root@global_zone:~# chmod -R 755 /usr/local/hadoop*
Exercise 2: Edit the Hadoop Configuration Files
In this exercise, we will edit the Hadoop configuration files, which are shown in Table 1:
Table 1. Hadoop Configuration Files
| File Name | Description |
|---|---|
hadoop-env.sh |
Specifies environment variable settings used by Hadoop. |
core-site.xml |
Specifies parameters relevant to all Hadoop daemons and clients. |
mapred-site.xml |
Specifies parameters used by the MapReduce daemons and clients. |
masters |
Contains a list of machines that run the Secondary NameNode. |
slaves |
Contains a list of machine names that run the DataNode and TaskTracker pair of daemons. |
To learn more about how the Hadoop framework is controlled by these configuration files, see http://hadoop.apache.org/docs/r1.2.1/api/org/apache/hadoop/conf/Configuration.html.
- Run the following command to change to the
confdirectory:root@global_zone:~# cd /usr/local/hadoop/conf - Run the following commands to change the
hadoop-env.shscript:Note: The cluster configuration will share the Hadoop directory structure (
/usr/local/hadoop) across the zones as a read-only file system. Every Hadoop cluster node needs to be able to write its logs to an individual directory. The directory/var/log/hadoopis a best-practice directory for every Oracle Solaris Zone.root@global_zone:~# echo "export JAVA_HOME=/usr/java" >> hadoop-env.sh root@global_zone:~# echo "export HADOOP_LOG_DIR=/var/log/hadoop" >> hadoop-env.sh - Edit the
mastersfile to replace thelocalhostentry with the line shown in Listing 3:root@global_zone:~# vi mastersListing 3
sec-name-node - Edit the
slavesfile to replace thelocalhostentry with the lines shown in Listing 4:root@global_zone:~# vi slavesListing 4
data-node1 data-node2 data-node3 - Edit the
core-site.xmlfile so it looks like Listing 5:root@global_zone:~# vi core-site.xmlNote:
Listing 5fs.default.nameis the URI that describes the NameNode address (protocol specifier, hostname, and port) for the cluster. Each DataNode instance will register with this NameNode and make its data available through it. In addition, the DataNodes send heartbeats to the NameNode to confirm that each DataNode is operating and the block replicas it hosts are available.<?xml version="1.0"?> <?xml-stylesheet type="text/xsl" href="configuration.xsl"?> <!-- Put site-specific property overrides in this file. --> <configuration> <property> <name>fs.default.name</name> <value>hdfs://name-node</value> </property> </configuration> - Edit the
hdfs-site.xmlfile so it looks like Listing 6:root@global_zone:~# vi hdfs-site.xmlNotes:
dfs.data.diris the path on the local file system in which the DataNode instance should store its data.dfs.name.diris the path on the local file system of the NameNode instance where the NameNode metadata is stored. It is only used by the NameNode instance to find its information.dfs.replicationis the default replication factor for each block of data in the file system. (For a production cluster, this should usually be left at its default value of 3.)
Listing 6
<?xml version="1.0"?> <?xml-stylesheet type="text/xsl" href="configuration.xsl"?> <!-- Put site-specific property overrides in this file. --> <configuration> <property> <name>dfs.data.dir</name> <value>/hdfs/data/</value> </property> <property> <name>dfs.name.dir</name> <value>/hdfs/name/</value> </property> <property> <name>dfs.replication</name> <value>3</value> </property> </configuration> - Edit the
mapred-site.xmlfile so it looks like Listing 7:root@global_zone:~# vi mapred-site.xmlNote:
Listing 7mapred.job.trackeris a host:port string specifying the JobTracker's RPC address.<?xml version="1.0"?> <?xml-stylesheet type="text/xsl" href="configuration.xsl"?> <configuration> <property> <name>mapred.job.tracker</name> <value>name-node:8021</value> </property> </configuration>
Exercise 3: Configure the Network Time Protocol
We should ensure that the system clock on the Hadoop zones is synchronized by using the Network Time Protocol (NTP).
Note: It is best to select an NTP server that can be a dedicated time synchronization source so that other services are not negatively affected if the machine is brought down for planned maintenance.
In the following example, the global zone is configured as an NTP server.
- Configure an NTP server:
root@global_zone:~# cd /etc/inet root@global_zone:~# cp ntp.server ntp.conf root@global_zone:~# chmod +w /etc/inet/ntp.conf root@global_zone:~# touch /var/ntp/ntp.drift - Edit the NTP server configuration file, as shown in Listing 8:
root@global_zone:~# vi /etc/inet/ntp.confListing 8
server 127.127.1.0 prefer broadcast 224.0.1.1 ttl 4 enable auth monitor driftfile /var/ntp/ntp.drift statsdir /var/ntp/ntpstats/ filegen peerstats file peerstats type day enable filegen loopstats file loopstats type day enable filegen clockstats file clockstats type day enable keys /etc/inet/ntp.keys trustedkey 0 requestkey 0 controlkey 0 - Enable the NTP server service:
root@global_zone:~# svcadm enable ntp - Verify that the NTP server is online by using the following command:
root@global_zone:~# svcs -a | grep ntp
online         16:04:15 svc:/network/ntp:default
Exercise 4: Create the Virtual Network Interfaces
Concept Break: Oracle Solaris 11 Networking Virtualization Technology
Oracle Solaris provides a reliable, secure, and scalable infrastructure to meet the growing needs of data center implementations. Its powerful network stack architecture, also known as Project Crossbow, provides the following.
- Network virtualization with virtual NICs (VNICs) and virtual switching
- Tight integration with Oracle Solaris Zones and Oracle Solaris 10 Zones
- Network resource management, which provides an efficient and easy way to manage integrated QoS to enforce bandwidth limits on VNICs and traffic flows
- An optimized network stack that reacts to network load levels
- The ability to build a "data center in a box"
Oracle Solaris Zones on the same system can benefit from very high network I/O throughput (up to four times faster) with very low latency compared to systems with, say, 1 Gb physical network connections. For a Hadoop cluster, this means that the DataNodes can replicate the HDFS blocks much faster.
- Create a series of virtual network interfaces (VNICs) for the different zones:
root@global_zone:~# dladm create-vnic -l net0 name_node1 root@global_zone:~# dladm create-vnic -l net0 secondary_name1 root@global_zone:~# dladm create-vnic -l net0 data_node1 root@global_zone:~# dladm create-vnic -l net0 data_node2 root@global_zone:~# dladm create-vnic -l net0 data_node3 - Verify the VNICs creation:
root@global_zone:~# dladm show-vnic
LINK                OVER         SPEED  MACADDRESS        MACADDRTYPE       VID
name_node1          net0         1000   2:8:20:c6:3e:f1   random            0
secondary_name1     net0         1000   2:8:20:b9:80:45   random            0
data_node1          net0         1000   2:8:20:30:1c:3a   random            0
data_node2          net0         1000   2:8:20:a8:b1:16   random            0
data_node3          net0         1000   2:8:20:df:89:81   random            0
We can see that we have five VNICs now. Figure 5 shows the architecture layout:
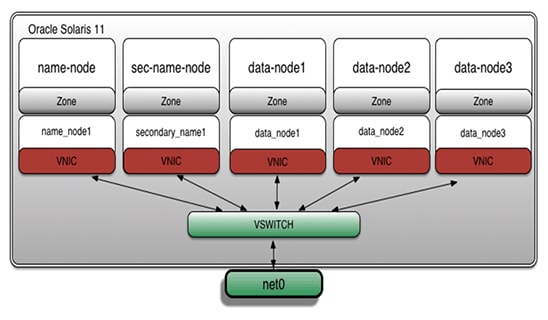
Figure 5
Exercise 5: Create the NameNode and Secondary NameNode Zones
Concept Break: Oracle Solaris Zones
Oracle Solaris Zones let you isolate one application from others on the same OS, allowing you to create an isolated environment in which users can log in and do what they want from inside an Oracle Solaris Zone without affecting anything outside that zone. In addition, Oracle Solaris Zones are secure from external attacks and internal malicious programs. Each Oracle Solaris Zone contains a complete resource-controlled environment that allows you to allocate resources such as CPU, memory, networking, and storage.
If you are the administrator who owns the system, you can choose to closely manage all the Oracle Solaris Zones or you can assign rights to other administrators for specific Oracle Solaris Zones. This flexibility lets you tailor an entire computing environment to the needs of a particular application, all within the same OS.
For more information about Oracle Solaris Zones, see "How to Get Started Creating Oracle Solaris Zones in Oracle Solaris 11."
All the Hadoop nodes for this lab will be installed using Oracle Solaris Zones.
- If you don't already have a file system for the NameNode and Secondary NameNode zones, run the following command:
root@global_zone:~# zfs create -o mountpoint=/zones rpool/zones - Verify the ZFS file system creation:
root@global_zone:~# zfs list rpool/zones NAME USED AVAIL REFER MOUNTPOINT rpool/zones 31K 51.4G 31K /zones - Create the
name-nodezone:root@global_zone:~# zonecfg -z name-node Use 'create' to begin configuring a new zone. Zonecfg:name-node> create create: Using system default template 'SYSdefault' zonecfg:name-node> set autoboot=true zonecfg:name-node> set limitpriv=default,dtrace_proc,dtrace_user,sys_time zonecfg:name-node> set zonepath=/zones/name-node zonecfg:name-node> add fs zonecfg:name-node:fs> set dir=/usr/local zonecfg:name-node:fs> set special=/usr/local zonecfg:name-node:fs> set type=lofs zonecfg:name-node:fs> set options=[ro,nodevices] zonecfg:name-node:fs> end zonecfg:name-node> add net zonecfg:name-node:net> set physical=name_node1 zonecfg:name-node:net> end zonecfg:name-node> verify zonecfg:name-node> exit(Optional) You can create the
name-nodezone using the following script, which will create the zone configuration file. For arguments, the script needs the zone name and VNIC name, for example:createzone <zone name> <VNIC name>.root@global_zone:~# /usr/local/hadoophol/Scripts/createzone name-node name_node1 - Create the
sec-name-nodezone:root@global_zone:~# zonecfg -z sec-name-node Use 'create' to begin configuring a new zone. Zonecfg:sec-name-node> create create: Using system default template 'SYSdefault' zonecfg:sec-name-node> set autoboot=true zonecfg:sec-name-node> set limitpriv=default,dtrace_proc,dtrace_user,sys_time zonecfg:sec-name-node> set zonepath=/zones/sec-name-node zonecfg:sec-name-node> add fs zonecfg:sec-name-node:fs> set dir=/usr/local zonecfg:sec-name-node:fs> set special=/usr/local zonecfg:sec-name-node:fs> set type=lofs zonecfg:sec-name-node:fs> set options=[ro,nodevices] zonecfg:sec-name-node:fs> end zonecfg:sec-name-node> add net zonecfg:sec-name-node:net> set physical=secondary_name1 zonecfg:sec-name-node:net> end zonecfg:sec-name-node> verify zonecfg:sec-name-node> exit(Optional) You can create the
sec-name-nodezone using the following script, which will create the zone configuration file. For arguments, the script needs the zone name and VNIC name, for example:createzone <zone name> <VNIC name>.root@global_zone:~: /usr/local/hadoophol/Scripts/createzone sec-name-node secondary_name1
Exercise 6: Set Up the DataNode Zones
In this exercise, we will leverage the integration between Oracle Solaris Zones virtualization technology and the ZFS file system that is built into Oracle Solaris.
Table 2 shows a summary of the Hadoop zones configuration we will create:
Table 2. Zone Summary
| Function | Zone Name | ZFS Mount Point | VNIC Name | IP Address |
|---|---|---|---|---|
| NameNode | name-node |
/zones/name-node |
name_node1 |
192.168.1.1 |
| Secondary NameNode | sec-name-node |
/zones/sec-name-node |
secondary_name1 |
192.168.1.2 |
| DataNode | data-node1 |
/zones/data-node1 |
data_node1 |
192.168.1.3 |
| DataNode | data-node2 |
/zones/data-node2 |
data_node2 |
192.168.1.4 |
| DataNode | data-node3 |
/zones/data-node3 |
data_node3 |
192.168.1.5 |
- Create the
data-node1zone:root@global_zone:~# zonecfg -z data-node1 Use 'create' to begin configuring a new zone. zonecfg:data-node1> create create: Using system default template 'SYSdefault' zonecfg:data-node1> set autoboot=true zonecfg:data-node1> set limitpriv=default,dtrace_proc,dtrace_user,sys_time zonecfg:data-node1> set zonepath=/zones/data-node1 zonecfg:data-node1> add fs zonecfg:data-node1:fs> set dir=/usr/local zonecfg:data-node1:fs> set special=/usr/local zonecfg:data-node1:fs> set type=lofs zonecfg:data-node1:fs> set options=[ro,nodevices] zonecfg:data-node1:fs> end zonecfg:data-node1> add net zonecfg:data-node1:net> set physical=data_node1 zonecfg:data-node1:net> end zonecfg:data-node1> verify zonecfg:data-node1> commit zonecfg:data-node1> exit(Optional) You can create the
data-node1zone using the following script:root@global_zone:~# /usr/local/hadoophol/Scripts/createzone data-node1 data_node1 - Create the
data-node2zone:root@global_zone:~# zonecfg -z data-node2 Use 'create' to begin configuring a new zone. zonecfg:data-node2> create create: Using system default template 'SYSdefault' zonecfg:data-node2> set autoboot=true zonecfg:data-node2> set limitpriv=default,dtrace_proc,dtrace_user,sys_time zonecfg:data-node2> set zonepath=/zones/data-node2 zonecfg:data-node2> add fs zonecfg:data-node2:fs> set dir=/usr/local zonecfg:data-node2:fs> set special=/usr/local zonecfg:data-node2:fs> set type=lofs zonecfg:data-node2:fs> set options=[ro,nodevices] zonecfg:data-node2:fs> end zonecfg:data-node2> add net zonecfg:data-node2:net> set physical=data_node2 zonecfg:data-node2:net> end zonecfg:data-node2> verify zonecfg:data-node2> commit zonecfg:data-node2> exit(Optional) You can create the
data-node2zone using the following script:root@global_zone:~# /usr/local/hadoophol/Scripts/createzone data-node2 data_node2 - Create the
data-node3zone:root@global_zone:~# zonecfg -z data-node3 Use 'create' to begin configuring a new zone. zonecfg:data-node3> create create: Using system default template 'SYSdefault' zonecfg:data-node3> set autoboot=true zonecfg:data-node3> set limitpriv=default,dtrace_proc,dtrace_user,sys_time zonecfg:data-node3> set zonepath=/zones/data-node3 zonecfg:data-node3> add fs zonecfg:data-node3:fs> set dir=/usr/local zonecfg:data-node3:fs> set special=/usr/local zonecfg:data-node3:fs> set type=lofs zonecfg:data-node3:fs> set options=[ro,nodevices] zonecfg:data-node3:fs> end zonecfg:data-node3> add net zonecfg:data-node3:net> set physical=data_node3 zonecfg:data-node3:net> end zonecfg:data-node3> verify zonecfg:data-node3> commit zonecfg:data-node3> exit(Optional) You can create the
data-node3zone using the following script:root@global_zone:~# /usr/local/hadoophol/Scripts/createzone data-node3 data_node3
Exercise 7: Configure the NameNode
- Now, install the
name-node zone; later we will clone it in order to accelerate zone creation time.root@global_zone:~# zoneadm -z name-node install The following ZFS file system(s) have been created: rpool/zones/name-node Progress being logged to /var/log/zones/zoneadm.20130106T134835Z.name-node.install Image: Preparing at /zones/name-node/root. - Boot the
name-nodezone:root@global_zone:~# zoneadm -z name-node boot - Check the status of the zones we've created:
root@global_zone:~# zoneadm list -cv ID NAME STATUS PATH BRAND IP 0 global running / solaris shared 1 name-node running /zones/name-node solaris excl - sec-name-node configured /zones/sec-name-node solaris excl - data-node1 configured /zones/data-node1 solaris excl - data-node2 configured /zones/data-node2 solaris excl - data-node3 configured /zones/data-node3 solaris excl - Log in to the
name-nodezone:root@global_zone:~# zlogin -C name-node - Provide the zone host information by using the following configuration for the
name-nodezone:- For the host name, use
name-node. - Select manual network configuration.
- Ensure the network interface
name_node1has an IP address of 192.168.1.1 and a netmask of 255.255.255.0. - Ensure the name service is based on your network configuration. In this lab, we will use
/etc/hostsfor name resolution, so we won't set up DNS for host name resolution. Select Do not configure DNS. - For Alternate Name Service, select None.
- For Time Zone Region, select Americas.
- For Time Zone Location, select United States.
- For Time Zone, select Pacific Time.
- Enter your root password.
- For the host name, use
- After finishing the zone setup, you will get the login prompt. Log in to the zone as user
root.name-node console login: root Password: - Developing for Hadoop requires a Java programming environment. You can install Java Development Kit (JDK) 6 using the following command:
root@name-node:~# pkg install jdk-6 - Verify the Java installation:
root@name-node:~# which java /usr/bin/java root@name-node:~# java -version java version "1.6.0_35" Java(TM) SE Runtime Environment (build 1.6.0_35-b10) Java HotSpot(TM) Client VM (build 20.10-b01, mixed mode) - Create a Hadoop user inside the
name-nodezone:root@name-node:~# groupadd hadoop root@name-node:~# useradd -m -g hadoop hadoop root@name-node:~# passwd hadoopNote: The password should be the same password as you entered in Step 22 of Exercise 1 when you set the user's Hadoop password.
- Create a directory for the Hadoop log files:
root@name-node:~# mkdir /var/log/hadoop root@name-node:~# chown hadoop:hadoop /var/log/hadoop - Configure an NTP client, as shown in the following example:
- Install the NTP package:
root@name-node:~# pkg install ntp - Create the NTP client configuration files:
root@name-node:~# cd /etc/inet root@name-node:~# cp ntp.client ntp.conf root@name-node:~# chmod +w /etc/inet/ntp.conf root@name-node:~# touch /var/ntp/ntp.drift - Edit the NTP client configuration file, as shown in Listing 9:
root@name-node:~# vi /etc/inet/ntp.confNote: In this lab, we are using the global zone as a time server so we add its name (for example,
global-zone) to/etc/inet/ntp.conf.Listing 9
server global-zone prefer
driftfile /var/ntp/ntp.drift
statsdir /var/ntp/ntpstats/
filegen peerstats file peerstats type day enable
filegen loopstats file loopstats type day enable
- Install the NTP package:
- Add the Hadoop cluster members' host names and IP addresses to
/etc/hosts, as shown in Listing 10:root@name-node:~# vi /etc/hostsListing 10
::1 localhost 127.0.0.1 localhost loghost 192.168.1.1 name-node 192.168.1.2 sec-name-node 192.168.1.3 data-node1 192.168.1.4 data-node2 192.168.1.5 data-node3 192.168.1.100 global-zone - Enable the NTP client service:
root@name-node:~# svcadm enable ntp - Verify the NTP client status:
root@name-node:~# svcs ntp STATE STIME FMRI online 11:15:59 svc:/network/ntp:default - Check whether the NTP client can synchronize its clock with the NTP server:
root@name-node:~# ntpq -p
Exercise 8: Set Up SSH
- Set up SSH key-based authentication for the Hadoop user on the
name_nodezone in order to enable password-less login to the Secondary DataNode and the DataNodes:root@name-node:~# su - hadoop hadoop@name-node $ ssh-keygen -t dsa -P "" -f ~/.ssh/id_dsa hadoop@name-node $ cat ~/.ssh/id_dsa.pub >> ~/.ssh/authorized_keys - Edit
$HOME/.profileto append to the end of the file the lines shown in Listing 11:hadoop@name-node $ vi $HOME/.profileListing 11
# Set JAVA_HOME
export JAVA_HOME=/usr/java
# Add Hadoop bin/ directory to PATH
export PATH=$PATH:/usr/local/hadoop/bin
Then run the following command:
hadoop@name-node $ source $HOME/.profile - Check that Hadoop runs by typing the following command:
hadoop@name-node:~$ hadoop version Hadoop 1.2.1 Subversion https://svn.apache.org/repos/asf/hadoop/common/branches/branch-1.2 -r 1503152 Compiled by mattf on Mon Jul 22 15:23:09 PDT 2013 From source with checksum 6923c86528809c4e7e6f493b6b413a9aNote: Press
~.to exit from thename-nodeconsole and return to the global zone.You can verify that you are in the global zone using the
zonenamecommand:root@global_zone:~# zonename global - From the global zone, run the following command to create the
sec-name-nodezone as a clone ofname-node:root@global_zone:~# zoneadm -z name-node shutdown root@global_zone:~# zoneadm -z sec-name-node clone name-node - Boot the
sec-name-nodezone:root@global_zone:~# zoneadm -z sec-name-node boot root@global_zone:~# zlogin -C sec-name-node - As we experienced previously, the system configuration tool is launched (see Figure 6), so do the final configuration for
sec-name-nodezone:Note: All the zones must have the same time zone configuration and the same root password.
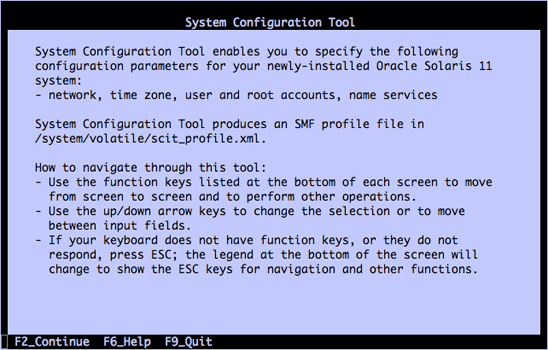
Figure 6
- For the host name, use
sec-name-node. - Select manual network configuration and for the network interface, use
secondary_name1. - Use an IP address of 192.168.1.2 and a netmask of 255.255.255.0.
- Select Do not configure DNS in the DNS name service window.
- Ensure Alternate Name Service is set to None.
- For Time Zone Region, select Americas.
- For Time Zone Location, select United States.
- For Time Zone, select Pacific Time.
- Enter your root password.
Note: Press
~.to exit from thesec-name-nodeconsole and return to the global zone.
- For the host name, use
- Perform similar steps for
data-node1,data-node2, anddata-node3:- Do the following for
data-node1:root@global_zone:~# zoneadm -z data-node1 clone name-node root@global_zone:~# zoneadm -z data-node1 boot root@global_zone:~# zlogin -C data-node1- For the host name, use
data-node1. - Select manual network configuration and for the network interface, use
data_node1. - Use an IP address of 192.168.1.3 and a netmask of 255.255.255.0.
- Select Do not configure DNS in the DNS name service window.
- Ensure Alternate Name Service is set to None.
- For Time Zone Region, select Americas.
- For Time Zone Location, select United States.
- For Time Zone, select Pacific Time.
- Enter your root password.
- For the host name, use
- Do the following for
data-node2:root@global_zone:~# zoneadm -z data-node2 clone name-node root@global_zone:~# zoneadm -z data-node2 boot root@global_zone:~# zlogin -C data-node2- For the host name, use
data-node2. - For the network interface, use
data_node2. - Use an IP address of 192.168.1.4 and a netmask of 255.255.255.0.
- Select Do not configure DNS in the DNS name service window.
- Ensure Alternate Name Service is set to None.
- For Time Zone Region, select Americas.
- For Time Zone Location, select United States.
- For Time Zone, select Pacific Time.
- Enter your root password.
- For the host name, use
- Do the following for
data-node3:root@global_zone:~# zoneadm -z data-node3 clone name-node root@global_zone:~# zoneadm -z data-node3 boot root@global_zone:~# zlogin -C data-node3- For the host name, use
data-node3. - For the network interface, use
data_node3. - Use an IP address of 192.168.1.5 and a netmask of 255.255.255.0.
- Select Do not configure DNS in the DNS name service window.
- Ensure Alternate Name Service is set to None.
- For Time Zone Region, select Americas.
- For Time Zone Location, select United States.
- For Time Zone, select Pacific Time.
- Enter your root password.
- For the host name, use
- Do the following for
- Boot the
name_nodezone:root@global_zone:~# zoneadm -z name-node boot - Verify that all the zones are up and running:
root@global_zone:~# zoneadm list -cv ID NAME STATUS PATH BRAND IP 0 global running / solaris shared 10 sec-name-node running /zones/sec-name-node solaris excl 12 data-node1 running /zones/data-node1 solaris excl 14 data-node2 running /zones/data-node2 solaris excl 16 data-node3 running /zones/data-node3 solaris excl 17 name-node running /zones/name-node solaris excl - To verify your SSH access without using a password for the Hadoop user, do the following.
- From
name_node, log in via SSH intoname-node(that is, to itself):root@global_zone:~# zlogin name-node root@name-node:~# su - hadoop hadoop@name-node $ ssh name-node The authenticity of host 'name-node (192.168.1.1)' can't be established. RSA key fingerprint is 04:93:a9:e0:b7:8c:d7:8b:51:b8:42:d7:9f:e1:80:ca. Are you sure you want to continue connecting (yes/no)? yes Warning: Permanently added 'name-node,192.168.1.1' (RSA) to the list of known hosts. - Now, try to log in to
sec-name-nodeand the DataNodes (data-node1,data-node2, anddata-node3). - Try logging in to the hosts again using SSH. You shouldn't get a prompt to add the host to the known keys list.
- From
- Edit the
/etc/hostsfiles insidesec-name-nodeand the DataNodes in order to add thename-nodeentry:root@global_zone:~# zlogin sec-name-node 'echo "192.168.1.1 name-node" >> /etc/hosts' root@global_zone:~# zlogin data-node1 'echo "192.168.1.1 name-node" >> /etc/hosts' root@global_zone:~# zlogin data-node2 'echo "192.168.1.1 name-node" >> /etc/hosts' root@global_zone:~# zlogin data-node3 'echo "192.168.1.1 name-node" >> /etc/hosts' -
Verify name resolution by ensuring that the global zone and all the Hadoop zones have the host entries shown in Listing 12 in
/etc/hosts:# cat /etc/hostsListing 12
::1 localhost 127.0.0.1 localhost loghost 192.168.1.1 name-node 192.168.1.2 sec-name-node 192.168.1.3 data-node1 192.168.1.4 data-node2 192.168.1.5 data-node3 192.168.1.100 global-zoneNote: If you are using the global zone as an NTP server, you must also add its host name and IP address to
/etc/hosts. - Verify the cluster using the
verifyclusterscript:root@global_zone:~# /usr/local/hadoophol/Scripts/verifyclusterIf the cluster setup is fine, you will get a
cluster is verifiedmessage.Note: If the
verifyclusterscript fails with an error message, check that the/etc/hostsfile in every zone includes all the zones names as described in the Step 12, and then rerun theverifiabilityscript again.
Exercise 9: Format HDFS from the NameNode
Concept Break: Hadoop Distributed File System (HDFS)
HDFS is a distributed, scalable file system. HDFS stores metadata on the NameNode. Application data is stored on the DataNodes, and each DataNode serves up blocks of data over the network using a block protocol specific to HDFS. The file system uses the TCP/IP layer for communication. Clients use Remote Procedure Call (RPC) to communicate with each other.
The DataNodes do not rely on data protection mechanisms, such as RAID, to make the data durable. Instead, the file content is replicated on multiple DataNodes for reliability.
With the default replication value (3), which is set up in the hdfs-site.xml file, data is stored on three nodes. DataNodes can talk to each other in order to rebalance data, to move copies around, and to keep the replication of data high. In Figure 7, we can see that every data block is replicated across three data nodes based on the replication value.
An advantage of using HDFS is data awareness between the JobTracker and TaskTracker. The JobTracker schedules map or reduce jobs to TaskTracker with an awareness of the data location. An example of this would be if node A contained data (x,y,z) and node B contained data (a,b,c). Then the JobTracker will schedule node B to perform map or reduce tasks on (a,b,c) and node A would be scheduled to perform map or reduce tasks on (x,y,z). This reduces the amount of traffic that goes over the network and prevents unnecessary data transfer.. This data awareness can have a significant impact on job-completion times, which has been demonstrated when running data-intensive jobs.
For more information about Hadoop HDFS see https://en.wikipedia.org/wiki/Hadoop.
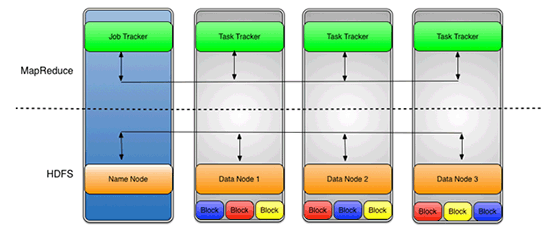
Figure 7
- To format HDFS, run the following commands and answer Y at the prompt:
root@global_zone:~# zlogin name-node root@name-node:~# mkdir -p /hdfs/name root@name-node:~# chown -R hadoop:hadoop /hdfs root@name-node:~# su - hadoop hadoop@name-node:$ /usr/local/hadoop/bin/hadoop namenode -format 13/10/13 09:10:52 INFO namenode.NameNode: STARTUP_MSG: /************************************************************ STARTUP_MSG: Starting NameNode STARTUP_MSG: host = name-node/192.168.1.1 STARTUP_MSG: args = [-format] STARTUP_MSG: version = 1.2.1 STARTUP_MSG: build = https://svn.apache.org/repos/asf/hadoop/common/branches/branch-1.2 -r 1503152; compiled by 'mattf' on Mon Jul 22 15:23:09 PDT 2013 STARTUP_MSG: java = 1.6.0_35 ************************************************************/ hadoop@name-node:$ Re-format filesystem in /hdfs/name ? (Y or N) Y - On every DataNode (
data-node1,data-node2, anddata-node3), create a Hadoop data directory to store the HDFS blocks:root@global_zone:~# zlogin data-node1 root@data-node1:~# mkdir -p /hdfs/data root@data-node1:~# chown -R hadoop:hadoop /hdfs root@global_zone:~# zlogin data-node2 root@data-node2:~# mkdir -p /hdfs/data root@data-node2:~# chown -R hadoop:hadoop /hdfs root@global_zone:~# zlogin data-node3 root@data-node3:~# mkdir -p /hdfs/data root@data-node3:~# chown -R hadoop:hadoop /hdfs
Exercise 10: Start the Hadoop Cluster
Table 3 describes the startup scripts.
Table 3. Startup Scripts
| File Name | Description |
|---|---|
start-dfs.sh |
Starts the HDFS daemons, the NameNode, and the DataNodes. Use this before start-mapred.sh. |
stop-dfs.sh |
Stops the Hadoop DFS daemons. |
start-mapred.sh |
Starts the Hadoop MapReduce daemons, the JobTracker, and the TaskTrackers. |
stop-mapred.sh |
Stops the Hadoop MapReduce daemons. |
- From the
name-nodezone, start the Hadoop DFS daemons, the NameNode, and the DataNodes using the following commands:root@global_zone:~# zlogin name-node root@name-node:~# su - hadoop hadoop@name-node:$ start-dfs.sh starting namenode, logging to /var/log/hadoop/hadoop--namenode-name-node.out data-node2: starting datanode, logging to /var/log/hadoop/hadoop-hadoop-datanode-data-node2.out data-node1: starting datanode, logging to /var/log/hadoop/hadoop-hadoop-datanode-data-node1.out data-node3: starting datanode, logging to /var/log/hadoop/hadoop-hadoop-datanode-data-node3.out sec-name-node: starting secondarynamenode, logging to /var/log/hadoop/hadoop-hadoop-secondarynamenode-sec-name-node.out - Start the Hadoop Map/Reduce daemons, the JobTracker, and the TaskTrackers using the following command:
hadoop@name-node:$ start-mapred.sh starting jobtracker, logging to /var/log/hadoop/hadoop--jobtracker-name-node.out data-node1: starting tasktracker, logging to /var/log/hadoop/hadoop-hadoop-tasktracker-data-node1.out data-node3: starting tasktracker, logging to /var/log/hadoop/hadoop-hadoop-tasktracker-data-node3.out data-node2: starting tasktracker, logging to /var/log/hadoop/hadoop-hadoop-tasktracker-data-node2.out - To view a comprehensive status report, execute the following command to check the cluster status. The command will output basic statistics about the cluster health, such as NameNode details, the status of each DataNode, and disk capacity amounts.
hadoop@name-node:$ hadoop dfsadmin -report
Configured Capacity: 171455269888 (159.68 GB)
Present Capacity: 169711053357 (158.06 GB)
DFS Remaining: 169711028736 (158.06 GB)
DFS Used: 24621 (24.04 KB)
DFS Used%: 0%
Under replicated blocks: 0
Blocks with corrupt replicas: 0
Missing blocks: 0
-------------------------------------------------
Datanodes available: 3 (3 total, 0 dead)
...
You should see that three DataNodes are available.
Note: You can find the same information on the NameNode web status page (shown in Figure 8) at
http://<NameNode IP address>:50070/dfshealth.jsp. The name node IP address is 192.168.1.1.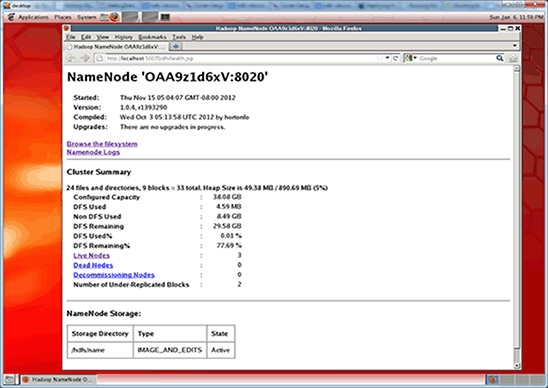
Figure 8
Exercise 11: Run a MapReduce Job
Concept Break: MapReduce
MapReduce is a framework for processing parallelizable problems across huge data sets using a cluster of computers.
The essential idea of MapReduce is using two functions to grab data from a source: using the Map() function and then processing the data across a cluster of computers using the Reduce() function. Specifically, Map() will apply a function to all the members of a data set and post a result set, which Reduce() will then collate and resolve.
Map() and Reduce() can be run in parallel and across multiple systems.
For more information about MapReduce, see http://en.wikipedia.org/wiki/MapReduce.
We will use the WordCount example, which reads text files and counts how often words occur. The input and output consist of text files, each line of which contains a word and the number of times the word occurred, separated by a tab. For more information about WordCount, see http://wiki.apache.org/hadoop/WordCount.
- Create the input data directory; we will put the input files there.
hadoop@name-node:$ hadoop fs -mkdir /input-data - Verify the directory creation:
hadoop@name-node:$ hadoop dfs -ls / Found 1 items drwxr-xr-x - hadoop supergroup 0 2013-10-13 23:45 /input-data - Copy the
pg20417.txtfile you downloaded earlier to HDFS using the following command:Note: Oracle OpenWorld attendees can find the
pg20417.txtfile in the/usr/local/hadoophol/Docdirectory.hadoop@name-node:$ hadoop dfs -copyFromLocal /usr/local/hadoophol/Doc/pg20417.txt /input-data - Verify that the file is located on HDFS:
hadoop@name-node:$ hadoop dfs -ls /input-data Found 1 items -rw-r--r-- 3 hadoop supergroup 674570 2013-10-13 10:20 /input-data/pg20417.txt - Create the output directory; the MapReduce job will put its outputs in this directory:
hadoop@name-node:$ hadoop fs -mkdir /output-data - Start the MapReduce job using the following command:
hadoop@name-node:$ hadoop jar /usr/local/hadoop/hadoop-examples-1.2.1.jar
wordcount /input-data/pg20417.txt /output-data/output1

13/10/13 10:23:08 INFO input.FileInputFormat: Total input paths to process : 1
13/10/13 10:23:08 WARN util.NativeCodeLoader: Unable to load native-hadoop library
for your platform... using builtin-java classes where applicable
13/10/13 10:23:08 WARN snappy.LoadSnappy: Snappy native library not loaded
13/10/13 10:23:09 INFO mapred.JobClient: Running job: job_201310130918_0010
13/10/13 10:23:10 INFO mapred.JobClient:  map 0% reduce 0%
13/10/13 10:23:19 INFO mapred.JobClient:  map 100% reduce 0%
13/10/13 10:23:29 INFO mapred.JobClient:  map 100% reduce 33%
13/10/13 10:23:31 INFO mapred.JobClient:  map 100% reduce 100%
13/10/13 10:23:34 INFO mapred.JobClient: Job complete: job_201310130918_0010
13/10/13 10:23:34 INFO mapred.JobClient: Counters: 26
The program takes about 60 seconds to execute on the cluster.
All of the files in the input directory (
input-datain the command line shown above) are read and the counts for the words in the input are written to the output directory (calledoutput-data/output1). - Verify the output data:
hadoop@name-node:$ hadoop dfs -ls /output-data/output1
Found 3 items
-rw-r--r--   3 hadoop supergroup          0 2013-10-13 10:30 /output-data/output1/_SUCCESS
drwxr-xr-x   - hadoop supergroup          0 2013-10-13 10:30 /output-data/output1/_logs
-rw-r--r--   3 hadoop supergroup     196192 2013-10-13 10:30 /output-data/output1/part-r-00000
Exercise 12: Use ZFS Encryption
Concept Break: ZFS Encryption
Oracle Solaris 11 adds transparent data encryption functionality to ZFS. All data and file system metadata (such as ownership, access control lists, quota information, and so on) is encrypted when stored persistently in the ZFS pool.
A ZFS pool can support a mix of encrypted and unencrypted ZFS data sets (file systems and ZVOLs). Data encryption is completely transparent to applications and other Oracle Solaris file services, such as NFS or CIFS. Since encryption is a first-class feature of ZFS, we are able to support compression, encryption, and deduplication together. Encryption key management for encrypted data sets can be delegated to users, Oracle Solaris Zones, or both. Oracle Solaris with ZFS encryption provides a very flexible system for securing data at rest, and it doesn't require any application changes or qualification.
For more information about ZFS encryption, see "How to Manage ZFS Data Encryption."
The output data can contain sensitive information, so use ZFS encryption to protect the output data.
- Create the encrypted ZFS data set:
Note: You need to provide the passphrase; it must be at least eight characters.
root@name-node:~# zfs create -o encryption=on rpool/export/output Enter passphrase for 'rpool/export/output': Enter again: - Verify that the ZFS data set is encrypted:
root@name-node:~# zfs get all rpool/export/output | grep encry rpool/export/output encryption on local - Change the ownership:
root@name-node:~# chown hadoop:hadoop /export/output - Copy the output file from HDFS into ZFS:
root@name-node:~# su - hadoop Oracle Corporation SunOS 5.11 11.1 September 2012 hadoop@name-node:$ hadoop dfs -getmerge /output-data/output1 /export/output - Analyze the output text file. Each line contains a word and the number of times the word occurred, separated by a tab.
hadoop@name-node:$ head /export/output/output1 "A 2 "Alpha 1 "Alpha," 1 "An 2 "And 1 "BOILING" 2 "Batesian" 1 "Beta 2 - Protect the output text file by unmounting the ZFS data set, and then unload the wrapping key for an encrypted data set using the following command:
root@name-node:~# zfs key -u rpool/export/outputIf the command is successful, the data set is not accessible and it is unmounted.
- If you want to mount this ZFS file system, you need to provide the passphrase:
root@name-node:~# zfs mount rpool/export/output
Enter passphrase for 'rpool/export/output':
By using a passphrase, you ensure that only those who know the passphrase can observe the output file.
Exercise 13: Use Oracle Solaris DTrace for Performance Monitoring
Concept Break: Oracle Solaris DTrace
Oracle Solaris DTrace is a comprehensive, advanced tracing tool for troubleshooting systematic problems in real time. Administrators, integrators, and developers can use DTrace to dynamically and safely observe live production systems, including both applications and the operating system itself, for performance issues.
DTrace allows you to explore a system to understand how it works, track down problems across many layers of software, and locate the cause of any aberrant behavior. Whether it's at a high-level global overview, such memory consumption or CPU time, or at a much finer-grained level, such as what specific function calls are being made, DTrace can provide operational insights that have been missing in the data center by enabling you to do the following:
- Insert 80,000+ probe points across all facets of the operating system.
- Instrument user and system level software.
- Use a powerful and easy-to-use scripting language and command line interfaces.
For more information about DTrace, see http://www.oracle.com/solaris/technologies/solaris11-dtrace.html.
- Open another terminal window and log in into
name-nodeas userhadoop. - Run the following MapReduce job:
hadoop@name-node:$ hadoop jar /usr/local/hadoop/hadoop-examples-1.2.1.jar wordcount /input-data/pg20417.txt /output-data/output2 - When the Hadoop job is run, determine what processes are executed on the NameNode.
In the terminal window, run the following DTrace command:
root@global-zone:~# dtrace -n 'proc:::exec-success/strstr(zonename,"name-node")>0/ { trace(curpsinfo->pr_psargs); }'

dtrace: description 'proc:::exec-success' matched 1 probe

 CPU   ID             FUNCTION:NAME
   0 4473  exec_common:exec-success   /usr/bin/env bash /usr/local/hadoop/bin/hadoop jar /usr/local/hadoop/hadoop-exa
   0 4473  exec_common:exec-success   bash /usr/local/hadoop/bin/hadoop jar /usr/local/hadoop/hadoop-examples-1.1.2.j
   0 4473  exec_common:exec-success   dirname /usr/local/hadoop-1.1.2/libexec/--
   0 4473  exec_common:exec-success   dirname /usr/local/hadoop-1.1.2/libexec/--
   0 4473  exec_common:exec-success   sed -e s/ /_/g
   1 4473  exec_common:exec-success   dirname /usr/local/hadoop/bin/hadoop
   1 4473  exec_common:exec-success   dirname -- /usr/local/hadoop/bin/../libexec/hadoop-config.sh
   1 4473  exec_common:exec-success   basename -- /usr/local/hadoop/bin/../libexec/hadoop-config.sh
   1 4473  exec_common:exec-success   basename /usr/local/hadoop-1.1.2/libexec/--
   1 4473  exec_common:exec-success   uname
   1 4473  exec_common:exec-success   /usr/java/bin/java -Xmx32m org.apache.hadoop.util.PlatformName
   1 4473  exec_common:exec-success   /usr/java/bin/java -Xmx32m org.apache.hadoop.util.PlatformName
   0 4473  exec_common:exec-success   /usr/java/bin/java -Dproc_jar -Xmx1000m -Dhadoop.log.dir=/var/log/hadoop -Dhado
   0 4473  exec_common:exec-success   /usr/java/bin/java -Dproc_jar -Xmx1000m -Dhadoop.log.dir=/var/log/hadoop -Dhado
^C
Note: Press Ctrl-c in order to see the DTrace output.
- When the Hadoop job is run, determine what files are written to the NameNode.
Note: If the MapReduce job is finished, you can run another job with a different output directory (for example,
/output-data/output3).For example:
hadoop@name-node:$ hadoop jar /usr/local/hadoop/hadoop-examples-1.2.1.jar
wordcount /input-data/pg20417.txt /output-data/output3
root@global-zone:~# dtrace -n 'syscall::write:entry/strstr(zonename,"name-node")>0/ {@write[fds[arg0].fi_pathname]=count();}' dtrace: description 'syscall::write:entry' matched 1 probe ^C /zones/name-node/root/tmp/hadoop-hadoop/mapred/local/jobTracker/.job_201307181457_0007.xml.crc 1 /zones/name-node/root/var/log/hadoop/history/.job_201307181457_0007_conf.xml.crc 1 /zones/name-node/root/dev/pts/3 5 /zones/name-node/root/var/log/hadoop/job_201307181457_0007_conf.xml 6 /zones/name-node/root/tmp/hadoop-hadoop/mapred/local/jobTracker/job_201307181457_0007.xml 8 /zones/name-node/root/var/log/hadoop/history/job_201307181457_0007_conf.xml 11 /zones/name-node/root/var/log/hadoop/hadoop--jobtracker-name-node.log 13 /zones/name-node/root/hdfs/name/current/edits.new 25 /zones/name-node/root/var/log/hadoop/hadoop--namenode-name-node.log 45 /zones/name-node/root/dev/poll 207 <unknown> 3131655Note: Press Ctrl-c in order to see the DTrace output.
- When the Hadoop job is run, determine what processes are executed on the DataNode:
root@global-zone:~# dtrace -n 'proc:::exec-success/strstr(zonename,"data-node1")>0/ { trace(curpsinfo->pr_psargs); }' dtrace: description 'proc:::exec-success' matched 1 probe CPU ID FUNCTION:NAME 0 8833 exec_common:exec-success dirname /usr/local/hadoop/bin/hadoop 0 8833 exec_common:exec-success dirname /usr/local/hadoop/libexec/-- 0 8833 exec_common:exec-success sed -e s/ /_/g 1 8833 exec_common:exec-success dirname -- /usr/local/hadoop/bin/../libexec/hadoop-config.sh 2 8833 exec_common:exec-success basename /usr/local/hadoop/libexec/-- 2 8833 exec_common:exec-success /usr/java/bin/java -Xmx32m org.apache.hadoop.util.PlatformName 2 8833 exec_common:exec-success /usr/java/bin/java -Xmx32m org.apache.hadoop.util.PlatformName 3 8833 exec_common:exec-success /usr/bin/env bash /usr/local/hadoop/bin/hadoop jar /usr/local/hadoop/hadoop-exa 3 8833 exec_common:exec-success bash /usr/local/hadoop/bin/hadoop jar /usr/local/hadoop/hadoop-examples-1.0.4.j 3 8833 exec_common:exec-success basename -- /usr/local/hadoop/bin/../libexec/hadoop-config.sh 3 8833 exec_common:exec-success dirname /usr/local/hadoop/libexec/-- 3 8833 exec_common:exec-success uname 3 8833 exec_common:exec-success /usr/java/bin/java -Dproc_jar -Xmx1000m -Dhadoop.log.dir=/var/log/hadoop -Dhado 3 8833 exec_common:exec-success /usr/java/bin/java -Dproc_jar -Xmx1000m -Dhadoop.log.dir=/var/log/hadoop -Dhado ^C - When the Hadoop job is run, determine what files are written on the DataNode:
(There were 222 lines of output, which were reduced for readability.)
root@global-zone:~# dtrace -n 'syscall::write:entry/strstr(zonename,"data-node1")>0/ {@write[fds[arg0].fi_pathname]=count();}' dtrace: description 'syscall::write:entry' matched 1 probe ^C /zones/data-node1/root/hdfs/data/blocksBeingWritten/blk_-5404946161781239203 1 /zones/data-node1/root/hdfs/data/blocksBeingWritten/blk_-5404946161781239203_1103.meta 1 /zones/data-node1/root/hdfs/data/blocksBeingWritten/blk_-6136035696057459536 1 /zones/data-node1/root/hdfs/data/blocksBeingWritten/blk_-6136035696057459536_1102.meta 1 /zones/data-node1/root/hdfs/data/blocksBeingWritten/blk_-8420966433041064066 1 /zones/data-node1/root/hdfs/data/blocksBeingWritten/blk_-8420966433041064066_1105.meta 1 /zones/data-node1/root/hdfs/data/blocksBeingWritten/blk_1792925233420187481 1 /zones/data-node1/root/hdfs/data/blocksBeingWritten/blk_1792925233420187481_1101.meta 1 /zones/data-node1/root/hdfs/data/blocksBeingWritten/blk_4108435250688953064 1 /zones/data-node1/root/hdfs/data/blocksBeingWritten/blk_4108435250688953064_1106.meta 1 /zones/data-node1/root/hdfs/data/blocksBeingWritten/blk_8503732348705847964 - Determine the total amount of HDFS data written for the DataNodes:
root@global-zone:~# dtrace -n 'syscall::write:entry /
  (   strstr(zonename,"data-node1")!=0 || strstr(zonename,"data-node2")!=0 ||
strstr(zonename,"data-node3")!=0 ) && strstr(fds[arg0].fi_pathname,"hdfs")!=0
&& strstr(fds[arg0].fi_pathname,"blocksBeingWritten")>0/
{ @write[fds[arg0].fi_pathname]=sum(arg2); }'
^C
Summary
In this lab, we learned how to set up a Hadoop cluster using Oracle Solaris 11 technologies such as Oracle Solaris Zones, ZFS, and network virtualization and DTrace.
See Also
- Hadoop and HDFS
- Hadoop framework
- "How to Get Started Creating Oracle Solaris Zones in Oracle Solaris 11"
- "How to Build Native Hadoop Libraries for Oracle Solaris 11"
- MapReduce
- WordCount
- "How to Manage ZFS Data Encryption"
- DTrace
About the Author
Orgad Kimchi is a principal software engineer on the ISV Engineering team at Oracle (formerly Sun Microsystems). For 6 years he has specialized in virtualization, big data, and cloud computing technologies.
Revision 1.0, 10/21/2013