Before You Begin
Purpose
In this tutorial, you'll use an image hosted on the Oracle Cloud Marketplace to provision a single-node 'Vision' Oracle Value Chain Planning virtual machine instance to Oracle Cloud, for non-production use.
Time to Complete
A minimum of 1 hour.
Background
You can rapidly provision Oracle Value Chain Planning virtual machines with the necessary codelevel, storage and networking resources on Oracle Compute Cloud Service. In this tutorial, you'll provision a single-node 'Vision' Oracle Value Chain Planning Release 12.2.5.1 Virtual Machine (VM) instance in Oracle Compute Cloud Service from an image hosted in the Oracle Cloud Marketplace.
What Do You Need?
To perform the steps in this tutorial, you must have:
- An understanding of the information in "Getting Started with Oracle Value Chain Planning in Oracle Cloud", My Oracle Support Knowledge Document 2095953.1.
- An understanding of the relevant UNIX commands. Note that all references to UNIX also apply to Linux.
- A subscription to Oracle Compute Cloud Service. You must be a user with the Compute_Operations role. For more information, see How to Begin with Oracle Compute Cloud Service Subscriptions in Using Oracle Compute Cloud Service.
- One of the following tools for generating SSH key pairs on the client machine you will use to connect to Oracle Compute Cloud Service:
- On Windows: PuTTY (http://www.putty.org)
- On UNIX: The ssh-keygen utility. Many UNIX installations already include ssh-keygen. Run the ssh-keygen command to verify that your installation has it. Otherwise, you may obtain OpenSSH from http://www.openssh.com/portable.html.
Process Overview
To create an Oracle Compute Cloud Service Oracle Value Chain Planning instance and set up HTTP access to the instance, you must complete the following tasks:
- Generate an SSH key pair on your local system.
- Upload the SSH public key to Oracle Compute Cloud Service.
- Reserve a public IP address for your instance.
- Create your instance, associate a public IP address with it, and configure it for SSH access.
- Configure your instance for HTTP access by creating a security list.
- (Optional) Create additional storage volumes and attach to your instance if necessary.
After creating the instance, you'll log in to it using your SSH private key.
Generating an SSH Key Pair
Before you create your Oracle Compute Cloud Service instance, you must generate an SSH key pair and upload the SSH public key to Oracle Compute Cloud Service. This SSH public key will be used for authentication when you log in to the instance.
Generating an SSH Key Pair on UNIX
- Run the ssh-keygen command, where the -b option specifies the number of bits to use in the key, and the -t option specifies the type of key to create:
- The command prompts you to enter the path to the file in which you want to save the key. A suggested default path and file name appears in parentheses. For example: (/home/user_name/.ssh/id_rsa).
- Enter a passphrase when prompted. Note that the passphrase does not display when you type it in.
- Confirm the passphrase when prompted to re-enter it.
Note: We recommend making a secure record of the passphrase, as it cannot be recovered if you forget it.
- The command generates a SSH key pair consisting of a public key and a private key, and saves them both in the specified path. The public key is the name of the private key file appended with a .pub extension. For example, if the file name of the SSH private key is id_rsa, then the file name of the public key would be id_rsa.pub.
- Note the path where you save the SSH key pair. When you create instances, you must provide the SSH public key. When you log in to an instance, you must specify the corresponding private key and enter the passphrase when prompted.
- To accept the default path and file name, press Enter. Alternatively, enter a required path and file name, and then press Enter.
$ ssh-keygen -b 2048 -t rsa
Generating an SSH Key Pair on Windows using the PuTTY Key Generator
- Locate and run puttygen.exe in the PuTTY folder of your computer.
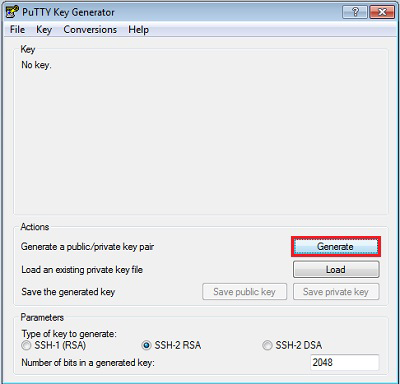
- Accept the default key type, SSH-2 RSA, and set the Number of bits in a generated key to 2048, if that is not already set. Select Generate.
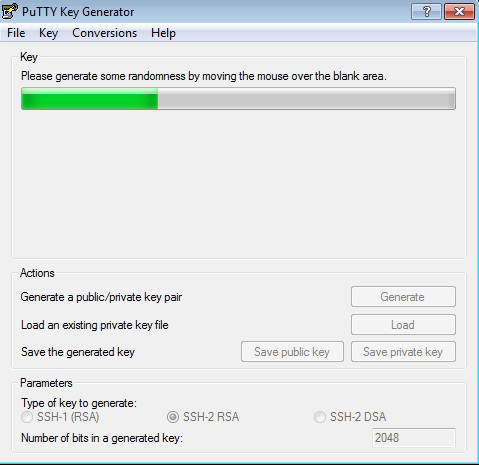
- Move your mouse around the blank area to generate randomness for the SSH key pair you generate.
- Save your private key.
- The Key comment is the name of the key. You may keep the generated key comment, or create your own.
- Enter a passphrase in the Key passphrase and the Confirm passphrase fields.
Note: We recommend making a secure record of the passphrase, as it cannot be recovered if you forget it. If you lose the passphrase, you will have to re-create the instance from scratch.
- To save the private key in the PuTTY Private Key (PPK) format, select Save private key.
Enter the same name as you used for the Key comment, so that you know which public key to use with this private key. You can use this key whenever you use PuTTY for SSH.
Note: PuTTY's Private Key (PPK) format works only with the PuTTY toolset.

- Next, save your SSH public key.
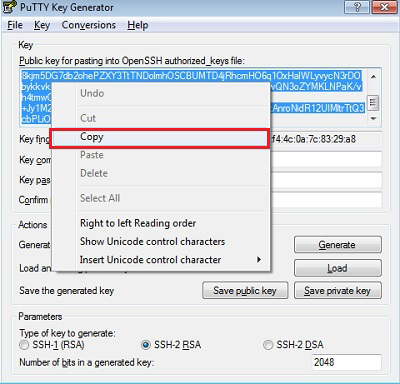
- In the PuTTY Key Generator dialog, select all the characters in the Public key for pasting into OpenSSH authorized_keys file field.
Note: Ensure you select all the characters, not just the ones you can see in the narrow window. If a scroll bar appears to the right of the characters, scroll through the entire window to select all the characters.
- Using the context menu on the selected text, select Copy.
- Open a text editor (such as vi on UNIX or Notepad on Windows) and paste in the characters you just copied. Ensure that you paste the text at the first character in the text editor, and do not insert any line breaks.
- Save the key using the same root name that you used for the private key, adding a .pub extension.
- Exit the PuTTY Key Generator.
- Make a note of the public and private key names, and where you saved them. When you create instances, you must specify the SSH public key. When you log in to an instance, you must provide the path to the corresponding SSH private key, and enter the passphrase when prompted.
Note: You do not have to use .pub as an extension, but it is a useful convention to indicate that this is a public key.
Uploading the SSH Public Key
- Sign in to the Oracle Cloud My Services application at https://cloud.oracle.com/sign_in to display the My Services Dashboard page.
- Select the
 menu at the upper left corner of the page, and select Oracle Compute Cloud Service to display the Oracle Compute Cloud Service console.
- Select the Network tab to display networking services.
- From the network services listed select the SSH Public Keys page.
- Select Add SSH Public Key to add your SSH public key to Oracle Compute Cloud Service.
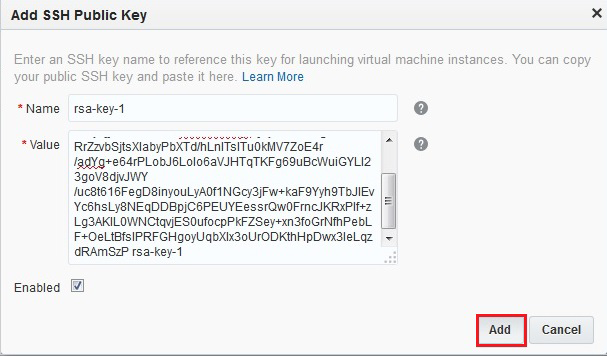
- In the Add SSH Public Key dialog box, enter a name and the value of the SSH public key you generated.
- Select Add to add your SSH public key to Oracle Compute Cloud Service.
Note: Paste the key value exactly as it was generated. Do not append or insert any extra characters, line breaks, or spaces.
(Optional) Reserving a Public IP Address
Next, create a public IP address reservation. Later in this tutorial, you'll associate this IP address to your instance when you create it.
-
On the Oracle Compute Cloud Service web console, select the Network tab.
- Select the IP Reservations tile, and then select Create IP Reservation.
- In the Create Public IP Reservation dialog box, enter a name for the IP address reservation, and then select Create.
- Note: Do not select an instance from the For Instance list. You'll use this IP address for the instance that you are about to create.
- Note: Make a note of this public IP address. You'll use it to access your instance using SSH later.

(Optional) Creating a Bootable Storage Volume
When you create an Oracle Compute Cloud Service instance, it is by default set up to boot from a non-persistent disk. To use a persistent boot disk, create a bootable storage volume. If you use a bootable storage volume as the boot disk for an instance, any changes that you make to the boot disk won't be lost even if you delete the instance.
To create a bootable storage volume:
- On the Oracle Compute Cloud Service web console, select the Overview tab. The Create Storage Volume wizard starts.
- Select the Storage tile, and then select Create Storage Volume.
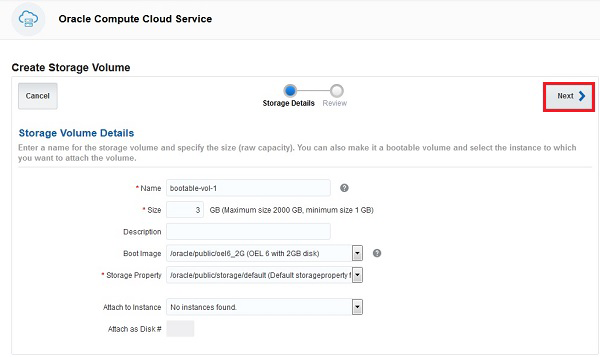
- In the Storage Details page, select or enter the information specified in the following fields, and then select Next:
- Name: Enter an appropriate name. For the purpose of this tutorial, enter VCPVISION-VOL1
- Size: Enter an appropriate size for the storage volume, in GB. The size must be at least 5% larger than the selected image size. For the VISION Instance, enter 380.
- Description: Enter a brief description. For this tutorial, enter Bootable Storage Volume for Vision Instance.
- Boot Image: Select the image that you want to use to create a bootable storage volume. For example, select OPC_OL6.7_VCP_1225_VISION_SINGLE_TIER.
- Storage Property: Select /oracle/public/storage/latency (for accessing iSCSI Volumes optimized for latency).
- Attach to Instance: Accept the default of None or No instances found. You'll attach this storage volume to the instance that you are about to create.
- Attach as Disk #: This field is grayed out when the Attach to Instance field is set to None.
- On the Review page, verify the information that you've entered, then select Create to create your storage volume.
- The storage volume will be allocated and then initialized with the image. The process takes time and can be monitored using the storage volume list view.
(Optional) Creating Additional Storage Volumes
If you want to create separate storage volumes for your applications and data, repeat the steps in "(Optional) Creating a Bootable Storage Volume" for each volume that you want to create, but do NOT select a boot image.
Creating an Oracle Value Chain Planning Instance
- First-Time Users Only: Retrieve the desired image from the Oracle Cloud Marketplace into your Compute Service account:
- Go to the Oracle Cloud Marketplace at https://cloud.oracle.com/marketplace/.
- Click on the PRODUCTS drop-down and select INFRASTRUCTURE (IaaS) > Compute Cloud
- Select the VCP 12.2.5.1 Vision Install Image listing.
- On the listing page, select the Get App button.
- Log in with your Oracle Single Sign-On. This allows Oracle to discover Oracle Compute Services associated with your user. If there are none, you will not be allowed to continue.
- Accept the Oracle Cloud Marketplace terms of use. A notification that the image is now available in your Compute account appears.
- Select Create Instance to start the Compute Console.
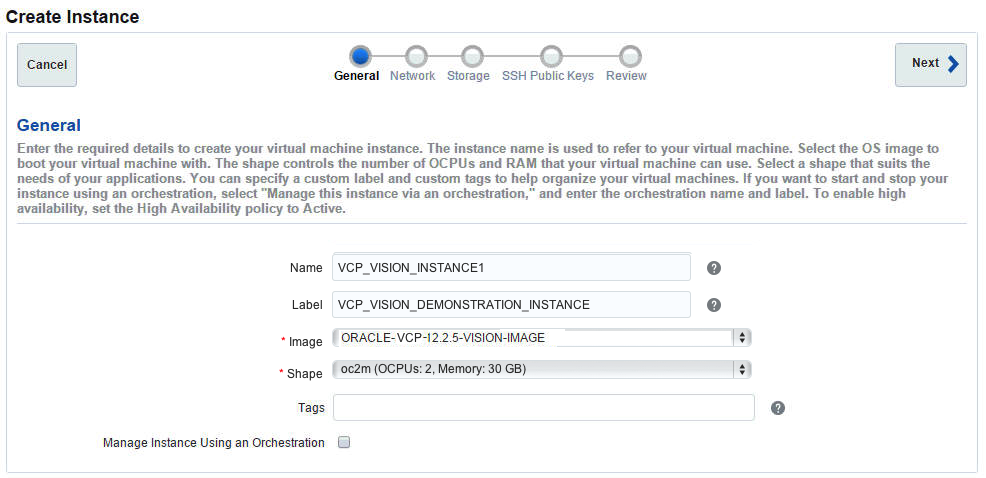
- On the General page, select or enter the following information, and then select Next:
- Name: Enter an appropriate name. If you don’t specify a name, the instance name will be generated automatically.
- Label: Enter a description to help identify the instance. If you provide a label, the label is used to list the instance on the Overview page.
- Image: Select the image that you want to use. For the purpose of this tutorial, select ORACLE-VCP-12.2.5.1-VISION-IMAGE.
- Shape: Select an appropriate shape for your instance. The shape specifies the number of CPUs and amount of RAM that your instance will have. For this tutorial, select oc5 (OCPUs: 4, Memory: 30 GB) or oc2m (OCPUs: 2, Memory: 30GB).
- Tags: If required, specify a tag to help identify your instance.
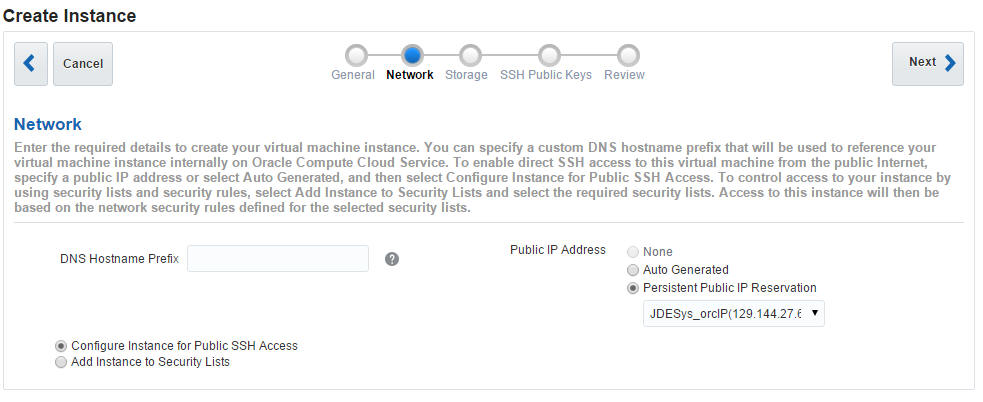
- On the Network page, select the following, and then select Next:
- DNS Hostname Prefix: Enter a string that will be used as a prefix in the domain host name for your instance. For t this tutorial, you can leave this blank.
- Public IP Address: Select Persistent Public IP Reservation, and then select from the list the IP reservation that you created earlier.
- Configure Instance for Public SSH Access: Select this option.
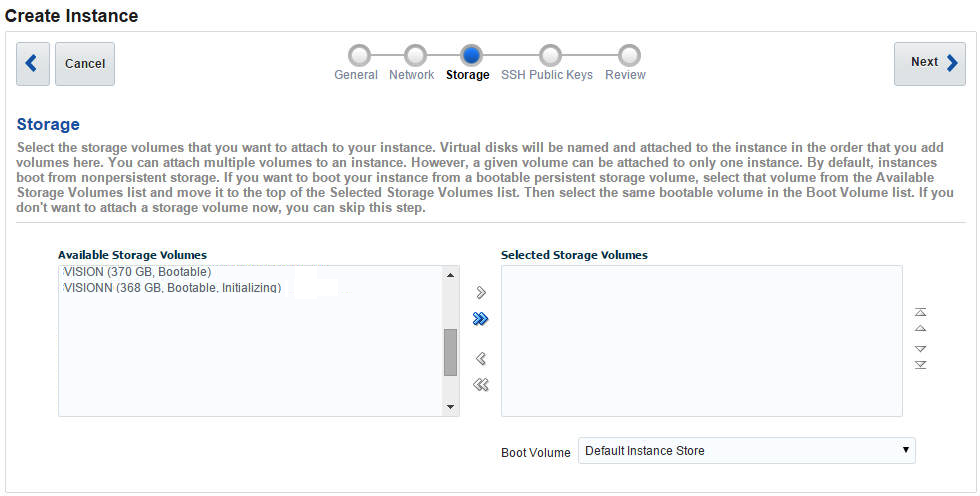
- On the Storage page, select the following, and then select Next:
- If you created storage volumes to store applications and data, select those volumes from the Available Storage Volumes list and move them to the Selected Storage Volumes list.
Note: You can select only storage volumes that are not already attached to an instance. Storage volumes that have already been attached are displayed but grayed out.
- Select the bootable storage volume bootable-vol-1 from the Available Storage Volumes list, and move it to the Selected Storage Volumes list.
- Rearrange the volumes in the Selected Storage Volumes list so that the bootable storage volume is the first volume in the list.
- From the Boot Volume list, select the bootable storage volume you created earlier.
- If you created storage volumes to store applications and data, select those volumes from the Available Storage Volumes list and move them to the Selected Storage Volumes list.
- On the SSH Public Keys page, select the following, and then select Next:
- Select the Select Existing SSH Public Key(s) option.
- From the Available SSH Public Keys list, select the SSH public key you uploaded earlier, and move it to the Selected SSH Public Keys list.

- On the Review page, verify that the information that you've entered is correct, then select Create.

The instance creation process goes through various phases, and may take about two hours to complete. At the end of provisioning, the database tier and application tier are fully configured. You can verify the installation by checking the status of the database and application tier processes.
Configuring the VCP Instance for HTTP Access
Your instance is now configured to allow public access only over SSH.
To enable access to the instance over other protocols, such as HTTP or HTTPS, you must open the required ports. In this tutorial, you'll create a security rule to enable HTTP access to your instance over port 8000.
Note: We highly recommend you to use the https protocol, not the http protocol, in all deployments. The http examples shown in this document are only intended to demonstrate how a security list can be set up: they are not a recommendation to use this protocol.
Creating a Security List
A security list is a set of instances that can communicate with each other across all protocols and ports. When you create a security rule, you specify a security list as a destination. This allows traffic from a specified source (such as the public Internet) to access all the instances that are part of the destination security list, using a specified protocol and port.
To create a security list:
- Select the Security Lists tile, and then select Create Security List.
- On the Oracle Compute Cloud Service web console, select the Network tab.
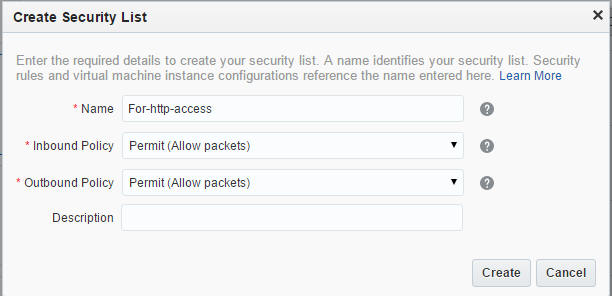
- In the Create Security List dialog box, select or enter the following information, and then select Create.
- Name: Enter an appropriate name. For this tutorial, enter For-http-access.
- Inbound Policy: Retain the default policy, Permit (Allow packets).
- Outbound Policy: Retain the default policy, Permit (Allow packets).
- Description: Enter a description.
Adding Your Instance to the Security List
- On the Oracle Compute Cloud Service web console, select the Overview tab.
- If you are not already on the Instances page, select the Instances tile.
- Go to the instance that you just created, and from the
 menu, select View.
 - On the instance details page, select Add to Security List.
- Select the security list that you just created, and then select Attach.
Your instance is added to the For-http-access security list.

Creating a Security Application
A security application is a mapping between a port number and port type (TCP, UDP, or ICMP).
To open port 8000, you must create a security application for that port.
- Select the Network tab.
- On the Network page, select the Security Applications tile.
- Select Create Security Application.
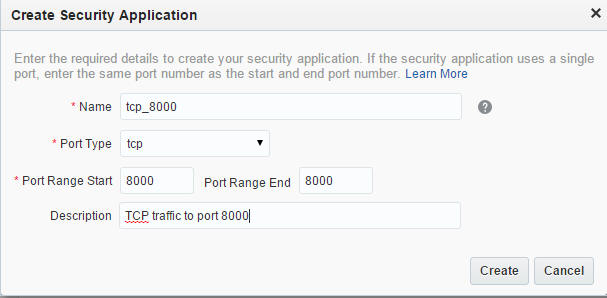
- In the Create Security Application dialog box, do the following:
- Name: Enter a name for the new security application (for example, tcp_8000). Make a note of the name, which you will use later in this tutorial.
- Port Type: Select tcp.
- Port Range Start and Port Range End: In both these fields, enter the port range that you want to open (for example, 8000 to 8001 are used for VCP).
- Description: Enter a description for the new security application (for example, TCP traffic to ports 8000-8001).
- Select Create.
- Repeat these steps to create additional security application definitions for ports 5003 and 7002 used for the VCP web tier. You can also use these steps to enable access to instances using other protocols and ports, or if you want to specify a different source or destination.
- Next, create a security rule to allow TCP traffic from the Internet on port 8000.
Creating a Security Rule
- Select the Security Rules tile.
- Select Create Security Rule, and then do the following:
- Name: Enter a name for the rule. For example, allow_vcp_tcp_8000.
- Status: Select Enabled.
- Security Application: Select the tcp_8000 security application, which you created earlier in this tutorial.
- Source: From the Security IP Lists drop-down list, select public-internet.
- Destination: Select For-http-access.
- Description: Enter a description for the rule (for example, Allow TCP traffic to http server on port 8000).

- Select Create.
- Repeat steps 1 to 3 to create security rules for the security applications defined in the prior steps for ports 5003 and 7002. Make sure you have security rules defined to cover ports 5003, 7002, 8000, and 8001. You can also repeat these steps to enable access to instances using other protocols and ports, or if you want to specify a different source or destination.
Ports 8000-8001 on the instances in the "For-http-access" are now open to HTTP requests. You can temporarily suspend security rules at any time by disabling them. You can also delete security rules you no longer need.
Logging Into Your Instance Using SSH
Logging in From a UNIX Host
- Enter the following command:
- When prompted, enter the passphrase you provided for your SSH key pair.
ssh -i /path/to/private_key opc@<public_ip_address_of_the_instance>
Note: If you don't know the public IP address of your instance, you can find it by going to the Instances tile on the Oracle Compute Cloud Service console, and selecting your instance to get to the details page.
Logging in From a Windows Host
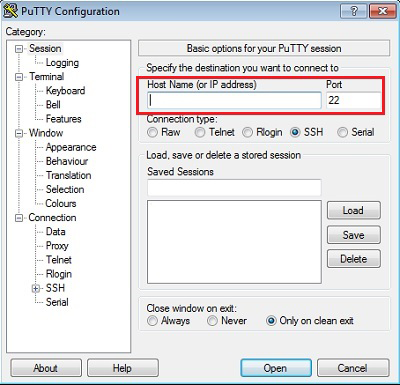
- Start PuTTY. The PuTTY Configuration window is displayed, showing the Session panel.
- In the Host Name (or IP address) field, enter the public IP address of your instance.
- In the Connection type: field, select SSH if it is not already selected.
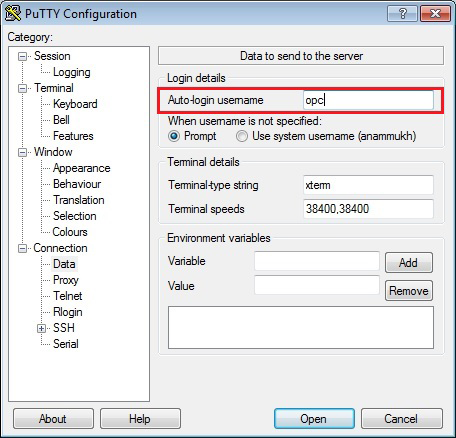
- In the Category pane, expand Connection, and then select Data to display the Data to send to the server panel.
- In the Auto-login username field, enter opc. Confirm that the When username is not specified option is set to Prompt.
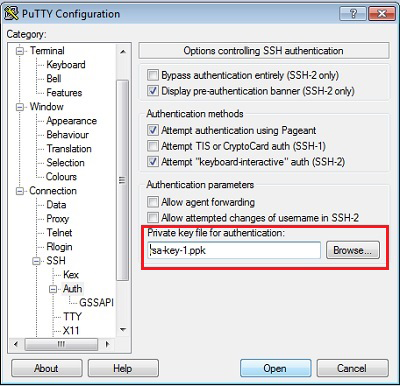
- In the Category pane, expand SSH, and then select Auth to display the Options controlling SSH authentication panel.
- In the Private key file for authentication field, select Browse and select the private key file that you saved earlier.
- In the Category tree, select Session to display the Session panel.
- In the Saved Sessions field, enter a name for this connection configuration, then select Save.
- Select Open to open the connection. The PuTTY Configuration window is closes and the PuTTY window is displays.
- Enter the passphrase you provided for your SSH key pair.
- The first time you connect to your instance, the PuTTY Security Alert window displays, prompting you to confirm the public key. Select Yes to continue.
Note: If you don't know the public IP address of your instance, you can find it by going to the Instances tile on the Oracle Compute Cloud Service console and selecting your instance to get to the details page.
Configuration of the Oracle Value Chain Planning Virtual Machine
The Oracle Value Chain Planning database and application tier configuration is automatically performed at boot time during the create instance phase. The boot script first configures the database tier file system, then the application tier file system.
The configuration may take an hour or more, depending on the shape of the virtual machine chosen during the create instance phase. Before you try to use the new Oracle Value Chain Planning environment, you should confirm that virtual machine configuration is complete by looking for entries like these in the log file "/var/log/oraclevm-template.log":
[INFO] Dec 06 11:32:48 configdhcp.sh: Cloning the DB Tier Completed Successfully
[INFO] Dec 06 12:45:03 configdhcp.sh: Cloning the Apps Tier Completed Successfully
[INFO] Dec 06 12:49:45 configdhcp.sh: VCP Configuration Completed Successfully
Instance-specific configuration details are as follows:
- Operating System Version: Oracle Linux 6 Update 7
- Oracle Value Chain Planning Database Configuration
- Oracle Value Chain Planning Application Tier Configuration
| Oracle Home Location | /u01/install/APPS/12.1.0 |
| Oracle Datafiles | /u01/install/APPS/data |
| Oracle Database Version | 12.1.0.2 |
| Oracle SID | EBSDB |
| SGA Size | 2 GB |
| Port Pool | 0 ( TNS Listener Port 1521) |
| Application Tier File System Top | /u01/install/A PPS |
| Location of the Run Edition File system | /u01/install/APPS/fs1 |
| Location of the Patch Edition File system | /u01/install/APPS/fs2 |
| Location of the Non-editioned File system | /u01/install/APPS/fs_ne |
| Location of the VCP File system | /u01/install/APPS/vcp |
| Port Pool | 0 for the run edition and 1 for the patch edition |
| Oracle Value Chain Planning Application Tier Version | 12.2.5.1 |
| Oracle WebLogic Server Version | 10.3.6.0.12 |
| Oracle WebTier Version | 11.1.1.9 |
| Oracle Forms and Reports | 10.1.2.3 |
| Critical Patch Update | OCT 2015 |
Configure the Web Entry Point
Your Oracle Value Chain Planning instance on Oracle Cloud is installed with an internal DNS name and a private IP address, so is not accessible from the public Internet. To make the instance accessible from the public Internet, you need to set the web entry point parameters in the applications context file to point to the publichostname.public domain name.
Perform the following steps to configure the web entry point.
- Identify the public IP address of your Oracle Value Chain Planning virtual machine.
- If, for example, the public IP address of the virtual machine is 129.144.28.2, the public hostname.public domain for the virtual machine will be oc-129-144-28-2.compute.oraclecloud.com.
- Check that the Oracle Value Chain Planning database tier services (database and TNS listener) are running. If they are not, start them by performing the following steps, first setting the user account to 'oracle' and then running the startdb.sh script:
- Run the following script to configure the web entry point:
- Enter the Web Entry Protocol (e.g. https/http): http
- Enter the Web Entry Host Name (e.g. public): oc-129-144-28-2
- Enter the Web Entry Domain Name (e.g. domain.com): compute.oraclecloud.com
- Enter the Web Entry Port (e.g. 443/80): 8000
- Review the parameters. If any value entered is incorrect, abort by pressing Ctrl-C.
- Press Enter. The web entry configuration is now complete.
- Log in as oracle and execute the scripts to stop and then restart the VCP application tier services, First we stop all services:
- and then restart them:
- Access the Oracle Value Chain Planning system. For example:
- VCP Main Login: http//oc-129-144-28-2.compute.oraclecloud.com:8000/OA_HTML/AppsLogin
- Demantra Workbench Login: http://oc-129-144-28-2.compute.oraclecloud.com:8001/demantra/portal/loginpage.jsp
- Demantra Anywhere Login: http://oc-129-144-28-2.compute.oraclecloud.com:8001/demantra/portal/anywhereLogin.jsp
- VCP Main Login: http//oc-129-144-28-2.compute.oraclecloud.com:8000/OA_HTML/AppsLogin
Note: You can find the public IP address by navigating to the Instances tile on the Oracle Compute Cloud Service console and reviewing the details page for your instance.
$ echo $USER
opc
$ sudo su
$ su - oracle
$ echo $USER
oracle
$ /u01/install/APPS/scripts/startdb.sh
$ /u01/install/scripts/configwebentry.sh
The script prompts for the following parameters. Enter the values as shown below. For example, to access the Oracle Value Chain Planning instance with the URL http//oc-129-144-28-2.compute.oraclecloud.com:8000:
$ /u01/install/APPS/vcp/scripts/stopvcp.sh all
$ /u01/install/APPS/vcp/scripts/startvcp.sh all
(Optional) Configure Public IP Address/Internal Hostname on Client Machine
If you have not configured a public web entry point for the Oracle Value Chain Planning application tier, follow the relevant procedure below to add key network details of the Oracle Value Chain Planning application tier to the hosts file of client machines you will use.
The format of the hosts file is:
<IP address> <hostname>.<domain> <hostname alias>
For Access From a UNIX System:
Using a text editor such as vi, modify the /etc/hosts file so that it includes the line:
129.144.28.2 oc-129-144-28-2.compute.oraclecloud.com oc-129-144-28-2
This line is made up of:
- 129.144.28.2 - <public IP address>
- oc-129-144-28-2.compute.oraclecloud.com - <public hostname>.<domain>
- oc-129-144-28-2 - <hostname alias>
For Access From a Windows System:
Using a text editor such as Notepad, modify the C:\Windows\System32\drivers\etc\hosts file so that it includes the line:
129.144.28.2 oc-129-144-28-2.compute.oraclecloud.com oc-129-144-28-2
This line is made up of:
- 129.144.28.2 - <public IP address>
- oc-129-144-28-2.compute.oraclecloud.com - <public hostname>.<domain>
- oc-129-144-28-2 - <hostname alias>
(Optional) Converting the VCP Vision Instance into a VCP Fresh Install Deployment
Follow this section ONLY if you wish to change the VCP Vision deployment into a Fresh Install Deployment.
By default, Vision VCP server includes both database and application tiers in the same server. This section describes the steps to separate those two tiers, keeping VCP's application tier on the Vision server and adding the VCP schemas to an existing Fresh EBS database located on another Oracle Public Cloud server.
The process redirects the Vision's Application tier to use an existing Fresh EBS database.
First, you will need to create an EBS DB using EBS 12.2.5 Fresh Install DB Tier Image.
Then to begin the process make sure the database, application servers and engines are not running on the Vision VM.
Use the following commands to shutdown the database and application servers:
$ sudo su - oracle
$ /u01/install/APPS/vcp/scripts/stopvcp.sh all
- Downloading required files: From My Oracle Support (MOS), download patch number 23069090.
Using SSH client like scp or FileZilla, copy VCPforFreshEBS.zip archive to the Vision VCP machine and put it under /tmp folder.
Change ownership and extract the archive by running the following commands:
$ sudo chown oracle:oinstall /tmp/VCPforFreshEBS.zip
$ sudo su - oracle
$ cd /tmp
$ unzip VCPforFreshEBS.zip -d /u01/install/APPS/vcp
Start by editing target_db_sshkey file and paste the private key of the Fresh EBS database server:
$ cd /u01/install/APPS/vcp/scripts/distribute/
$ vi target_db_sshkey
Confirm correct permissions and run CopyVCP2EBS.sh interactive script:
$ chmod 600 target_db_sshkey
$ ./CopyVCP2EBS.sh
Follow the instructions.
$ sudo chown oracle:oinstall /tmp/VCP.tar.gz
$ sudo chown oracle:oinstall /tmp/AddVCP2EBS.sh
$ sudo su - oracle
$ /tmp/AddVCP2EBS.sh
$ sudo su - oracle
$ /u01/install/APPS/vcp/scripts/distribute/configremote.sh
Now start the Application tier using the following command:
$ /u01/install/APPS/vcp/scripts/startvcp.sh all
Want to Learn More?
- Managing Instances in Using Oracle Compute Cloud Service
- Managing Storage Volumes in Using Oracle Compute Cloud Service
- Configuring Network Settings in Using Oracle Compute Cloud Service
Change Log
| Date | Description |
|---|---|
| 15-Jan-2016 |
|
| 27-Apr-2016 |
|