Oracle Database Quick Start
Overview
- 45 minutes to complete the prerequisites (Note: The
time to download Oracle Database software to your local
machine depends on the network. Therefore, it is not included
in the time specified to complete the prerequisites.)
- 1 hour to complete this Oracle by Example (OBE)
- Minimum of 1 GB of physical memory
- Sufficient paging space
- Appropriate service packs and patches
- Appropriate file system format
- Complete the OBE entitled Installing Oracle Database Software and Creating a Database.
- Complete the OBE entitled Getting Started with Oracle Enterprise Manager Express.
- If you have problems connecting to the listener, complete
the OBE entitled Using
the Listener Control Utility to Manage the Listener.
Purpose
In this tutorial, you learn about Oracle Database and
how to perform simple operations on tables.
Time to Complete
Approximately 1 hour and 45 minutes:
Introduction
In general, a database is a collection of data treated as a unit. A database management system (DBMS) stores, manages and retrieves a large amount of data in a multi-user environment so that many users can access the same data concurrently.
Oracle Database is a robust object relational database that provides efficient and effective solutions for database users such as delivering high performance, protecting users from unauthorized access, and enabling fast failure recovery.

Hardware and Software Requirements
The following is a list of hardware and software needed to install Oracle Database:
Prerequisites
Before starting this tutorial, you should install Oracle
Database.
Understanding the HR Sample Schema
- Tables: Basic units of data storage in an Oracle database. Here, data is stored in rows and columns. You define a table with a table name and a set of columns.
- Indexes: Performance-tuning methods for allowing faster retrieval of records.
- Views: Representations of SQL statements
that are stored in memory so that they can be reused.
- The REGIONS table contains rows that represent a region such as the Americas or Asia.
- The COUNTRIES table contains rows for countries, each of which is associated with a region.
- The LOCATIONS table contains the specific addresses for the offices, warehouses, or production sites of a company in a particular country.
- The DEPARTMENTS table contains details about the departments in which employees work. Each department may have a relationship representing the department manager in the EMPLOYEES table.
- The EMPLOYEES table contains details about each employee who works in a department. Some employees may not be assigned to a department.
- The JOBS table contains the job types that an employee can hold.
- The JOB_HISTORY table
contains an employee's job history.
A database schema is a collection of metadata that describes
the relationship between the data in a database. A schema can be
simply described as the "layout" of a database or the blueprint
that outlines how data is organized into tables.
Schema objects are database objects that contain data or that
govern or perform operations on data. By definition, each schema
object belongs to a specific schema. The following are commonly
used schema objects:
The Human Resources (HR) schema is part of the Oracle Sample Schemas that you can install with Oracle Database. The following is the entity-relationship diagram of the HR schema:

The schema contains the following tables:
Connecting to the HR Schema
- Column names
- Whether null values are allowed (NULL or NOT NULL) for each column
- Data type of columns, such as DATE, NUMBER,
VARCHAR2
- Precision of columns, such as VARCHAR2(50)
In this section, you connect to Oracle Database by using the
SQL*Plus utility, and you unlock the HR schema.
Open a terminal window and execute the oraenv
command to set the environment variables.
. oraenv

Execute the following statement to connect to the database as a system administrator:
sqlplus sys/<password> as sysdba;
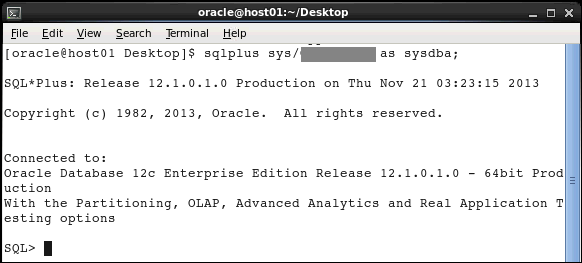
By default, the HR schema is locked. Execute the
following statement to unlock the HR schema.

Execute the following command to connect to the HR
schema:

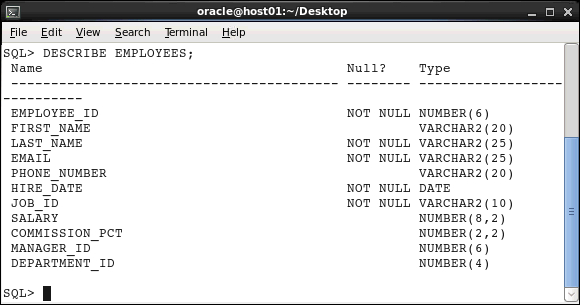
The DESCRIBE command provides a description of a
specified table or view. The description for tables and
views contains the following information:
Syntax: DESC[RIBE] <table>
Execute the following command to view the description of
the EMPLOYEES table:
Querying the HR Schema
- A SELECT clause, which specifies columns containing the values to be matched
- A FROM clause, which specifies the table containing the columns listed in the SELECT clause
In this section, you execute the SELECT statement to
query tables in the HR schema. You also use the ORDER
BY and WHERE clauses within the SELECT
statement to sort and restrict data in the result set.
Querying Tables
In this section, you execute the SELECT
statement to retrieve data from tables and views. You can
select rows and columns that you want to return in the
output. In its simplest form, a SELECT statement
must contain the following:
Syntax: SELECT {*|[DISTINCT]
column|expression [alias],...}
FROM
<table>;
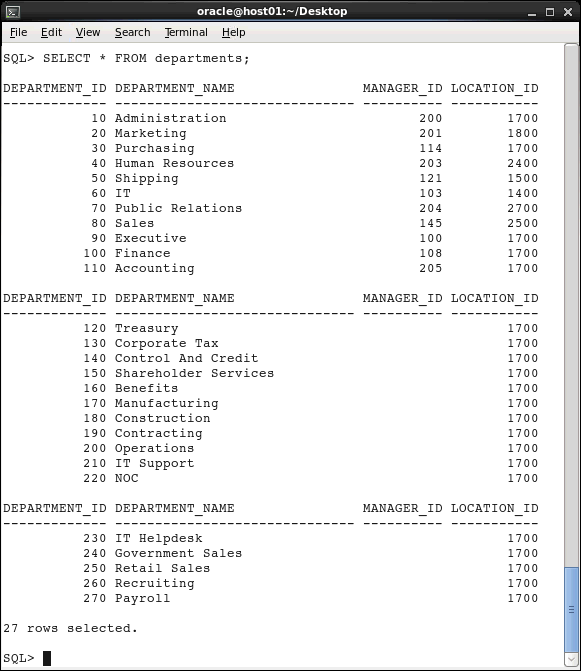
You can display all columns of data in a table by entering an asterisk (*) after the SELECT keyword. Execute the following statement to view all rows and columns in the DEPARTMENTS table:
SELECT *
FROM departments;
You can display specific columns of data in a table
by specifying the column names in the SELECT
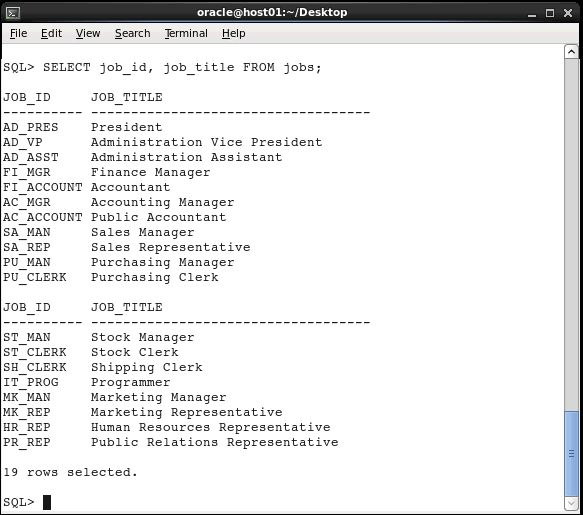
statement. Execute the following statement to view the
JOB_ID and JOB_TITLE columns in
the JOBS table:
SELECT job_id, job_title
FROM jobs;
Restricting Data
In this section, you use the WHERE clause to
restrict the rows that are returned from the SELECT
query. A WHERE clause contains a condition that
must be met. It directly follows the FROM
clause. If the condition is true, the row that meets the
condition is returned.
Modify the SELECT statement. Execute the following query to restrict the number of rows to DEPARTMENT_ID 60:
SELECT *
FROM departments
WHERE department_id=60;

Sorting Data
In this section, you use the ORDER BY clause to
sort the rows that are retrieved from the SELECT
statement. You specify the column based on the rows that
must be sorted. You also specify the ASC keyword
to display rows in ascending order (default), and you
specify the DESC keyword to display
rows in descending order.
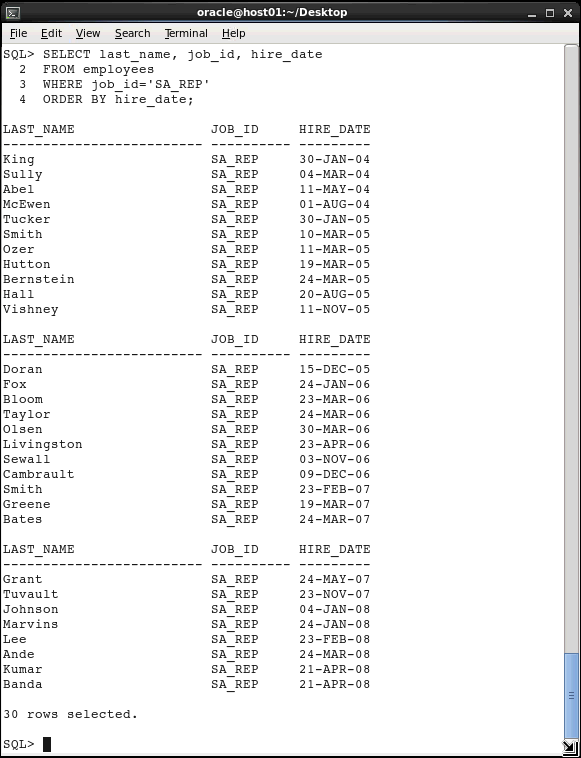
Execute the following SELECT statement to retrieve the LAST_NAME, JOB_ID, and HIRE_DATE columns of employees who belong to the SA_REP job ID. Sort the rows in ascending order based on the HIRE_DATE column.
SELECT last_name, job_id, hire_date
FROM employees
WHERE job_id='SA_REP'
ORDER BY hire_date;
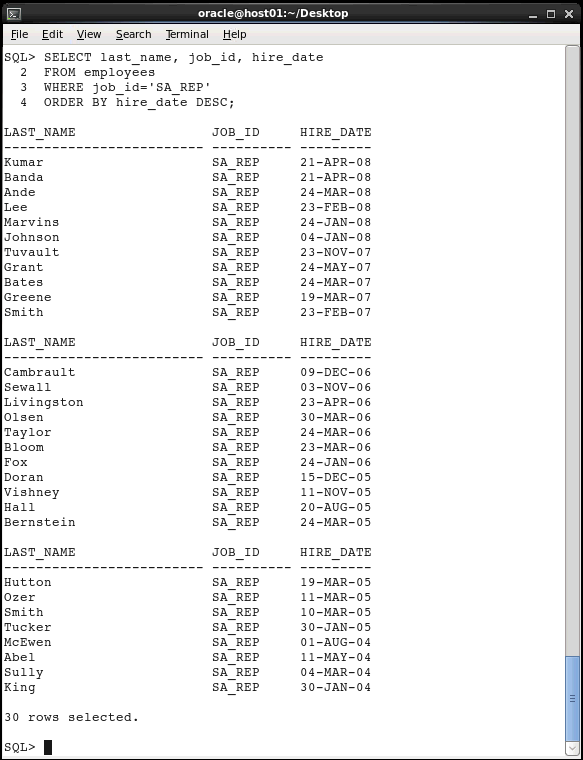
Modify the SELECT statement to display rows
in descending order. Use the DESC keyword.
SELECT last_name, job_id, hire_date
FROM employees
WHERE job_id='SA_REP'
ORDER BY hire_date DESC;
Creating a Schema
- The instance administrator
- A user with ADMIN privileges
- The object's owner
- System privilege: The right to perform a particular action on any object, such as, tables, views and indexes. Only the instance administrator or a user with the ADMIN privilege can assign or revoke system privileges.
- Object privilege: The right to
perform a particular action on an object or to access
another user's object. An object's owner has all object
privileges for that object and can assign object
privileges for that object to other database users.
- Create a table, a view, or an index that is owned by
any user in the database
- Alter a table, a view, or an index in the database
- Drop a table, a view, or an index in the database
- Insert values into a table
- Create a foreign key dependency for a table
- Select from a table
- Update a table
- Table: Basic unit of data storage in
a database. Within a table, data is stored in rows and
columns. You define a table with a table name, a set of
columns, a data type, and a width.
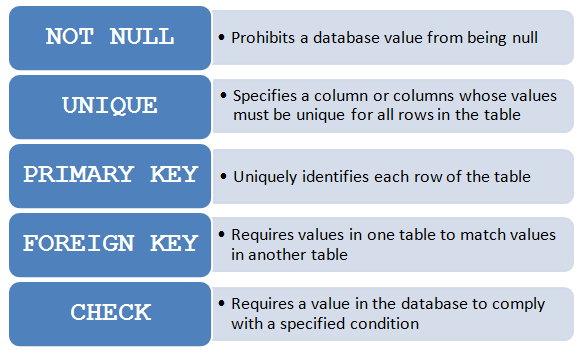
- Integrity constraints: Rules for columns in a table. You specify these rules to enforce data integrity within the columns for which they are defined. Basic constraints on Oracle Database include the following:
ORDER_ID column as the primary key
COMMODITY_ID and CUSTOMER_ID as foreign keys
UNITS and TOTAL_COST as NOT NULL values
CHECK constraint on numeric columns to accept values greater than zero
In this section, you create a schema named ONLINE_SHOPPE. This schema portrays an online store that operates with a customer base and commodities. Information about customers is stored in the CUSTOMERS table, information about commodities is stored in the COMMODITIES table and order details are stored in the ORDERS table.

Creating a User
Database administrators perform many tasks. One of their
more common tasks is creating database users and assigning
them unique usernames. After users log in to the database
with their username and password, they can issue database
SQL statements to create objects, query objects, and
manage the database.
Creating a user is a way to create a schema. In this section, you execute the CREATE USER statement to create and configure a database user.
Syntax: CREATE USER <USER> IDENTIFIED
BY <password>;
Execute the following statements to connect to the database as an administrator and create a user named ONLINE_SHOPPE.
CONNECT sys/<password>
as sysdba;
CREATE USER online_shoppe IDENTIFIED BY online;

A schema named ONLINE_SHOPPE was created in Oracle Database.
Assigning Privileges
When multiple users access database objects, you can
control the authorization of the objects with privileges.
Privileges control whether a user can modify an object
that is owned by another user. They are granted or revoked
either by:
In general, there are two types of privileges:
Here are a few of the basic system and object privileges:
System privileges:
Object privileges:
You use the GRANT statement to assign
privileges to users and roles. To assign privileges, you
must have been assigned either the ADMIN OPTION
or the GRANT ANY PRIVILEGE system privilege.
Syntax: GRANT <grant_privilege> TO
<user>;
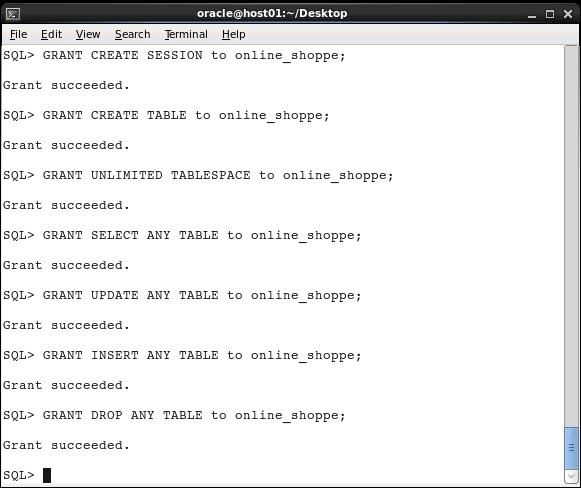
When you create a user with the CREATE USER statement, the user's privilege domain is empty by default. The administrator assigns privileges to the user based on the tasks that the user may perform in the future. In this tutorial, the ONLINE_SHOPPE user establishes a session, creates a table, and writes DML statements against tables. Execute the following statements to assign the required privileges to the ONLINE_SHOPPE user:
GRANT CREATE SESSION to online_shoppe;
GRANT CREATE TABLE to online_shoppe;
GRANT UNLIMITED TABLESPACE to online_shoppe;
GRANT SELECT ANY TABLE to online_shoppe;
GRANT UPDATE ANY TABLE to online_shoppe;
GRANT INSERT ANY TABLE to online_shoppe;
GRANT DROP ANY TABLE to online_shoppe;
Creating Tables
Before creating tables in the ONLINE_SHOPPE
schema, you should understand the concepts of tables
and integrity constraints.
In this section, you execute the CREATE TABLE
statement to create tables.
Syntax: CREATE TABLE [schema.]table
(column datatype [DEFAULT expr][, ...]);
Perform the following steps to create the CUSTOMERS,
COMMODITIES, and ORDERS tables in the
schema.
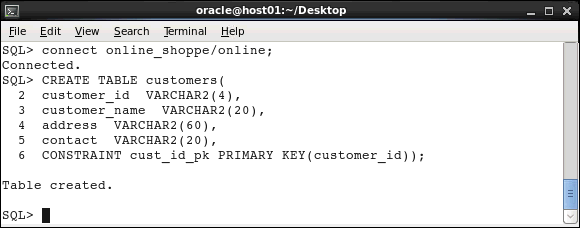
Connect to the ONLINE_SHOPPE schema and create the CUSTOMERS table with the CUSTOMER_ID column as the primary key.
CONNECT online_shoppe/online;
CREATE TABLE customers(
customer_id
VARCHAR2(4),
customer_name VARCHAR2(20),
address
VARCHAR2(60),
contact
VARCHAR2(20),
CONSTRAINT cust_id_pk PRIMARY
KEY(customer_id) );
Create the COMMODITIES table with the COMMODITY_ID column as the primary key and the UNIT_PRICE column as a non-null column.
CREATE TABLE commodities(
commodity_id
VARCHAR2(4),
commodity_name
VARCHAR2(20),
unit_price
NUMBER(8,2) NOT NULL,
CONSTRAINT comm_id_pk PRIMARY
KEY(commodity_id) );

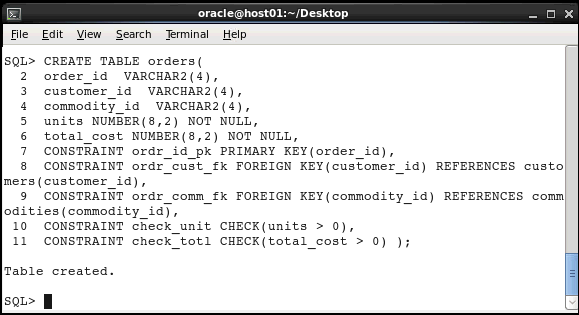
Create the ORDERS table with:
CREATE TABLE orders(
order_id
VARCHAR2(4),
customer_id
VARCHAR2(4),
commodity_id VARCHAR2(4),
units
NUMBER(8,2) NOT NULL,
total_cost
NUMBER(8,2) NOT NULL,
CONSTRAINT ordr_id_pk PRIMARY
KEY(order_id),
CONSTRAINT ordr_cust_fk FOREIGN KEY
(customer_id)REFERENCES customers(customer_id),
CONSTRAINT ordr_comm_fk FOREIGN KEY
(commodity_id)REFERENCES
commodities(commodity_id),
CONSTRAINT check_unit CHECK(units
> 0),
CONSTRAINT check_totl
CHECK(total_cost > 0) );
Inserting, Modifying, and Deleting
Records
In this section, you manipulate the records in the tables
that you created.
Inserting data: You execute the INSERT statement to add rows of data to a database table.
Syntax: INSERT INTO table [(column [,
column...])]
VALUES
(value [, value...]);
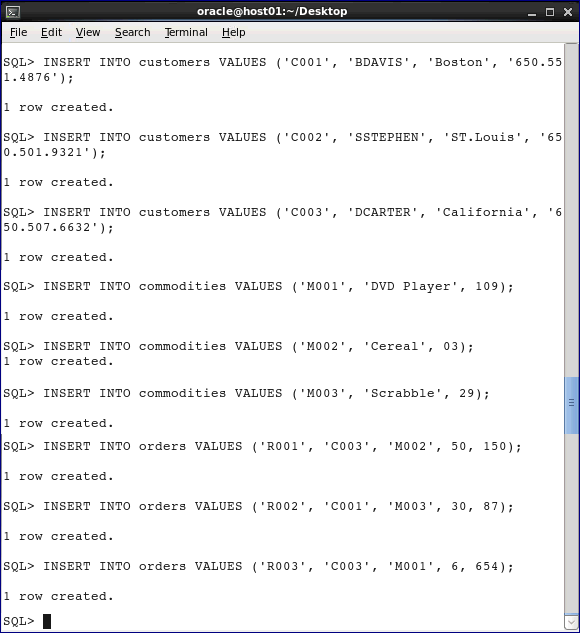
Execute the following statements to insert data into the CUSTOMERS, COMMODITIES, and ORDERS tables.
INSERT INTO customers VALUES ('C001',
'BDAVIS', 'Boston', '650.551.4876');
INSERT INTO customers VALUES ('C002', 'SSTEPHEN',
'ST.Louis', '650.501.9321');
INSERT INTO customers VALUES ('C003', 'DCARTER',
'California', '650.507.6632');
INSERT INTO commodities VALUES ('M001', 'DVD
Player', 109);
INSERT INTO commodities VALUES ('M002', 'Cereal',
03);
INSERT INTO commodities VALUES ('M003',
'Scrabble', 29);
INSERT INTO orders VALUES ('R001', 'C003', 'M002',
50, 150);
INSERT INTO orders VALUES ('R002', 'C001', 'M003',
30, 87);
INSERT INTO orders VALUES ('R003', 'C003', 'M001',
6, 654);
Modifying data: You use the UPDATE statement to modify rows of data in a database table. Execute the following statement to change the unit price of the DVD player from $109 to $129:
UPDATE commodities SET unit_price = 129
WHERE commodity_name = 'DVD Player';

Deleting data: You use the DELETE statement to delete rows of data from a database table. Execute the following statement to delete the first record in the ORDERS table:
DELETE FROM orders WHERE order_id =
'R001';

Undoing and Saving Records
In this section, you use the COMMIT and ROLLBACK
statements to change data permanently. You use the ROLLBACK
statement to undo the work that was performed in your
current transaction and you use the COMMIT
statement to save the work that was performed in your
current transaction.
Execute the COMMIT statement to save the data manipulation transactions that you performed in the previous section.
COMMIT;

Execute the following statements to delete the row whose order ID is R002 and to query the ORDERS table to ensure that the record was deleted.
DELETE FROM orders WHERE order_id = 'R002';SELECT * FROM orders;
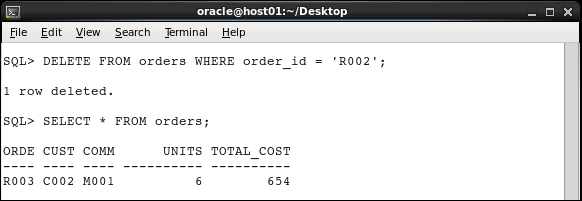
The output shows that the record was deleted successfully.
Execute the following statements to undo deletion of the row whose order ID is R002 and to query the table to display the records:.
ROLLBACK;
SELECT * FROM orders;
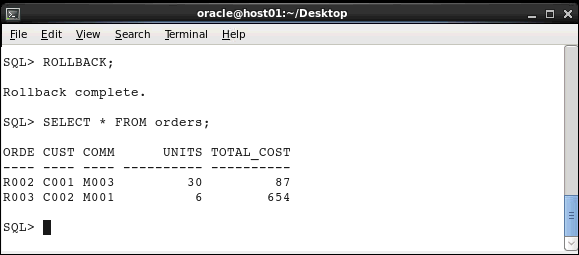
The previous DELETE statement was rolled
back.
Note: You cannot undo transactions after you save them permanently with the COMMIT statement.
Removing Tables
In this section, you execute the DROP TABLE statement to remove a table and its data from the database.
Syntax: DROP TABLE <table>;
Execute the DROP TABLE statement to remove the CUSTOMERS table.
DROP TABLE customers;

An error message is displayed because of the
referential integrity constraint on the CUSTOMER_ID
column.
Include the CASCADE CONSTRAINTS clause to
remove the table and its referential integrity
constraints..
DROP TABLE customers CASCADE CONSTRAINTS;

Revoking Privileges
In this section, you execute the REVOKE
statement to revoke user and role system privileges. To
revoke a system privilege or a role, you must be assigned
the privilege with the ADMIN OPTION.
Syntax: REVOKE <revoke_privilege> FROM
<user>;
Connect to the database as the SYS user and revoke the CREATE SESSION privilege for ONLINE_SHOPPE.
CONNECT sys/<password> as sysdba;
REVOKE CREATE SESSION FROM online_shoppe;

Connect to the database as the ONLINE_SHOPPE.
CONNECT online_shoppe/online;

You cannot connect because you do not have the CREATE
SESSION privilege.
Summary
- Connect to the HR schema
- Query, restrict and sort data in the HR schema
- Create a schema
- Create and delete tables
- Insert, modify, and delete records in a table
- Assign and revoke privileges
- The course entitled Oracle
Database: SQL Workshop I
- The documentation entitled Oracle
Database Concepts
- Lead Curriculum Developer: Supriya Ananth
- Other Contributors: Nancy Greenberg, Swarnapriya Shridhar
In this tutorial, you learned how to:
Resources
To learn more about Oracle Database, refer to:
Credits
To navigate this Oracle by Example tutorial, note the following:
- Hide Header Buttons:
- Click the title to hide the buttons in the header. To show the buttons again, click the title again.
- Topic List:
- Click a topic to navigate to that section.
- Expand All Topics:
- Click the button to show or hide the details for the sections. By default, all topics are collapsed.
- Hide All Images:
- Click the button to show or hide the screenshots. By default, all images are displayed.
- Print:
- Click the button to print the content. The content that is currently displayed or hidden is printed.
To navigate to a particular section in this tutorial, select the topic from the list.
