Using Oracle GoldenGate Downstream Deployment for Oracle-to-Oracle Database Synchronization on Linux
Overview
- Manager:
- Starts and stops the other processes on both the source and target hosts. Not required once Extract or Replicat is running.
- Initial Load:
- Optional. Used to populate the target tables one time. It can read either from the source tables directly or from logs. This OBE will not use an Initial Load.
- Extract:
- Runs on the source to capture transaction data to trail files.
- Data Pump:
- Optional, but highly recommended. Sends trail files from the source to the target over an IP network. Technically it is a secondary Extract.
- Replicat:
- Delivers data to the target database. Normally the Replicat
runs on the target.
- oggadm - Password: Welcome1. The Oracle GoldenGate user. This user has DBA privileges and its schema does not contain replication objects. Oracle GoldenGate uses this user to connect to the replication source database.
- oggsrc - Password: Welcome1. The replication source schema. This user only has connect and resource privileges and its schema defines all replication source objects.
- oggtrg - Password: Welcome1. The replication target shcema. This user only has connect and resource privileges and its schema defines all replication target objects.
- Two Linux hosts: one source and one target. The example uses Oracle Linux OL 6.3, 64-bit. A different version of the Oracle GoldenGate software will run on Windows, or 32-bit Linux as well. It is possible to have the source and target be on the same host, but that is conceptually harder to visualize what is happening.
- Oracle GoldenGate on Oracle, Linux-64 ( Oracle Software Delivery Cloud ), version 11.2.1.0.2, part number V34339-01. This is the part number for 64-bit Linux.
- Oracle 11gR2 Database installed on the Red host.
- Oracle DDL and DML files needed by this OBE, which can be
downloaded here.
- Have root access to the Linux environment
- Have web access to download the software and documentation.
- Some_Command
- You type this as a command or a value. Example:
Enter ./ggsci to start the command line interpreter.
- Some_Prompt
- The system responds with this as a prompt or reply.
Example:
After the welcome splash banner, you can enter commands at the GGSCI (host01) 1> prompt.
- Some_Button
- Click this on-screen button. Example:
After selecting the version you want, click Continue to start the download.
- Some_Variable
- A variable that you substitute with a real value. Example:
Enter your userid/password at the prompt.
- Some_Filename
- A filename, path, or folder/directory. Example:
Edit the hosts file in the /etc directory.
- Some_Code
- A keyword or code element. Example:
Change the parameter HandleCollisions to NoHandleCollisions after the initial load.
- p=process=
- e(xtract), p(ump), r(eplicat), i(nitial), d(efgen), s(tartup).
- xxxx=project=
- All files related to a common project xxxx, for example hr, sales, engr.
- hh=host-to-host=
- aa, ab, ba, bb, as indicated by source and target host names where a=host01, and b=host02. Later on you will see that you cannot use numbers as part of some file names, so better not to go there at all.
- ext=extension=
- prm=parameter (stored in dirprm/), dsc=discard, rpt=report (stored in dirrpt/), def=definition (stored in dirdef/), oby=obey (stored in installation directory), sql=SQL (stored in dirsql/).
Purpose
This Oracle-By-Example (OBE) tutorial covers installing, configuring, and managing Oracle GoldenGate version 11.2.1.0.2 on a pair of Linux hosts running the Oracle 11g RDBMS.In particular, the OBE covers configuring an Integrated Capture (IE) using the Downstream Deployment Mode.
Time to Complete
Approximately 2 hours
Introduction
Oracle GoldenGate provides very fast replication of heterogeneous databases by reading transaction logs and writing the changes to one or more target databases. There are five processes involved in a typical environment:
Scenario
There are two Linux hosts (or two Virtual Machines) running a
64 bit version of Linux (OL 6.x). One (the Red Host, host01)
runs the Oracle RDBMS 11g (11.2.0.3). The other (the
Green Host, host02) also
runs the Oracle RDBMS 11g.
Oracle GoldenGate 11g runs on both hosts.
On the Red Host, host01, the Oracle RDBMS instance oggsrc contains three users/schemas:
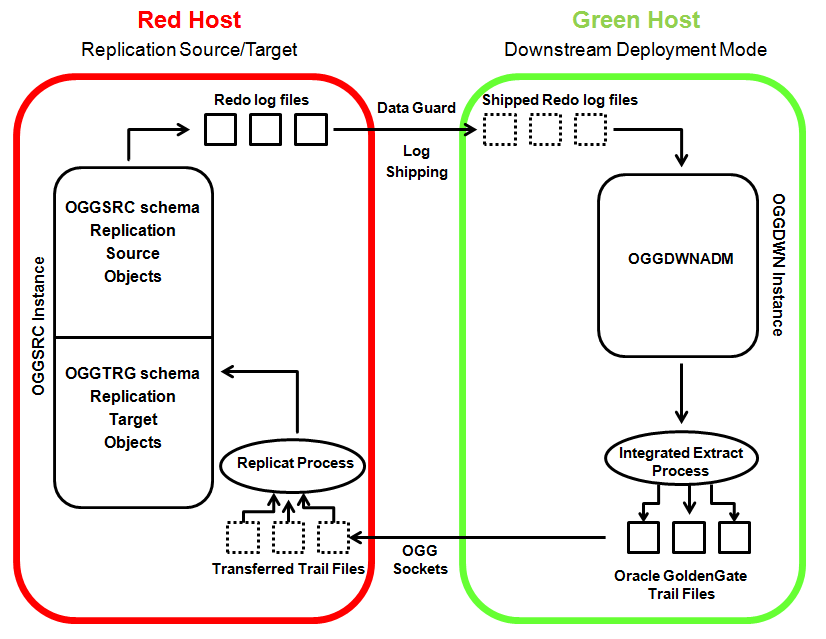
The Red Host is at the same time the replication source and the replication target. The source objects are defined in the replication source schema oggsrc, created in the instance oggsrc. The replicated data is stored in the replication target schema oggtrg defined in the instance oggsrc. The oggsrc instance ships its Redo log files to the downstream instance oggdwn running on the Green Host using the Oracle Data Guard infrastructure. The Oracle GoldenGate Extract processes runs on the Green Host and source their information from the shipped Redo log files. The Oracle GoldenGate trail files stored locally on the Green Host are transferred to the Red Host using the standard network socket mechanism and applied to the replication target schema via an oracle GoldenGate Replicat process.
On the Green Host, host02, the Oracle RDBMS instance oggdwn is used in Downstream Deployment Mode. It only contains one user/schema, oggdwnadm, which has DBA privileges and Oracle GoldenGate admin privileges granted through the DBMS_GOLDENGATE_AUTH.GRANT_ADMIN_PRIVILEGE stored procedure. When an instance is used in Downstream Deployment Mode, it does not contain any replication objects. The Redo log files shipped from the replication source instance are processed by the downstream instance just to determine the Logical Change Requests (LCR) but the data contained in the Redo log files is not applied to the downstream instance. It is stored in the Oracle GoldenGate trail files instead.
The figure below gives a pictorial representation of the OBE environment from a logical standpoint:
Host01 has a user/schema oggsrc with password Welcome1. The user/schema oggsrc is used when Oracle is a replication source.
Pay attention to the color of the screen banners to know which commands are going to which host. Also note whether you are entering GGSCI commands, SQL commands, or OS commands (the prompt will guide you).
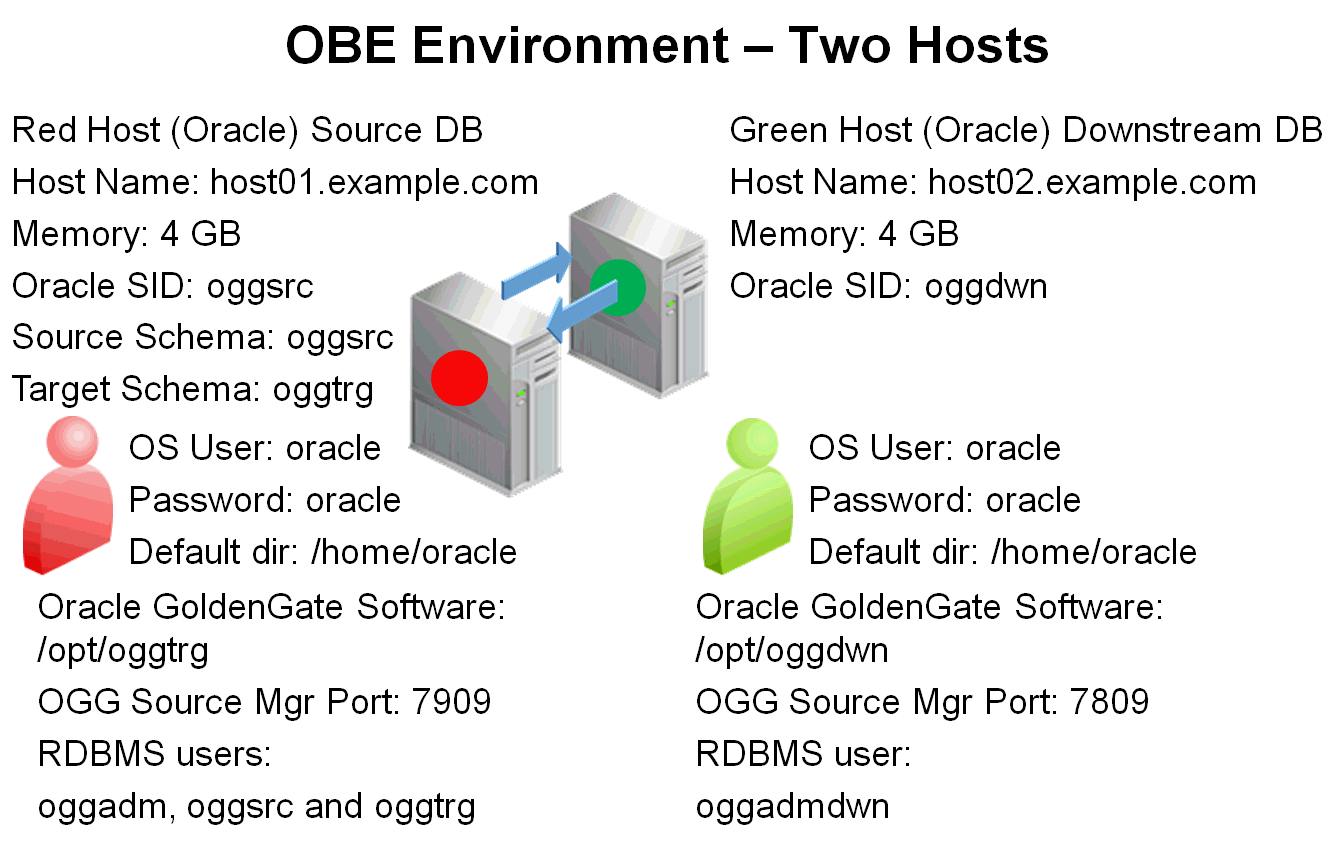
In summary, the environment is:
| Host Name | Color | OS | SID/DB Name | User | Password | Mgr Port Source | OGG Directory |
|---|---|---|---|---|---|---|---|
| host01 | Red | Linux 64-bit | oggsrc | oracle | oracle | 7909 | /opt/oggtrg |
| host02 | Green | Linux 64-bit | oggdwn | oracle | oracle | 7809 | /opt/oggdwn |
| ogg_target | Red | Linux 64-bit | oggsrc | oracle | oracle | 7909 | /opt/oggdwn |
NOTE: ogg_target is an alias which stands for Oracle GoldenGate target. In the context of this OBE it points to the Red host (host01) - under Linux, the ogg_target alias must be defined in the file /etc/hosts.
Example:| Host01 - Linux |
[root@host01 ~]# cat /etc/hosts
127.0.0.1   localhost localhost.localdomain localhost4 localhost4.localdomain4
::1         localhost localhost.localdomain localhost6 localhost6.localdomain6
192.168.194.136 host01.example.com host01
192.168.194.136 ogg_target.example.com ogg_target
192.168.194.142 host02.example.com host02
[root@host01 ~]#
|
The Oracle RDBMS must be installed in "standard" directory locations, according to Optimal Flexible Architecture (OFA) guidelines. ORACLE_HOME points to /u01/app/oracle/product/11.2.0/dbhome_1.
NOTE: This OBE focuses on Oracle GoldenGate and Integrated Extract in a Downstream Deployment environment. Installing the Oracle RDBMS, while a required step for this OBE, is not the main focus, therefore an exhaustive explanation on all the preliminary steps and Linux kernel parameters changes necessary to accommodate an RDBMS installation will not be found here.
The standard Oracle RDBMS installation guide provides such guidelines. Alternatively, the oracle-rdbms-server-11gR2-preinstall RPM package, installed via the "yum install oracle-rdbms-server-11gR2-preinstall" command, should be considered in order to simplify the installation procedure.
Alternative Configuration
This OBE can also be run on a single host, where both instances of the Oracle RDBMS are installed on the same computer. In this configuration, also two instances of Oracle GoldenGate runs on the same computer. If the OBE is run on a single computer, the memory required to run both theOracle RDBMS and Oracle GoldenGate instances is eight gigabytes.
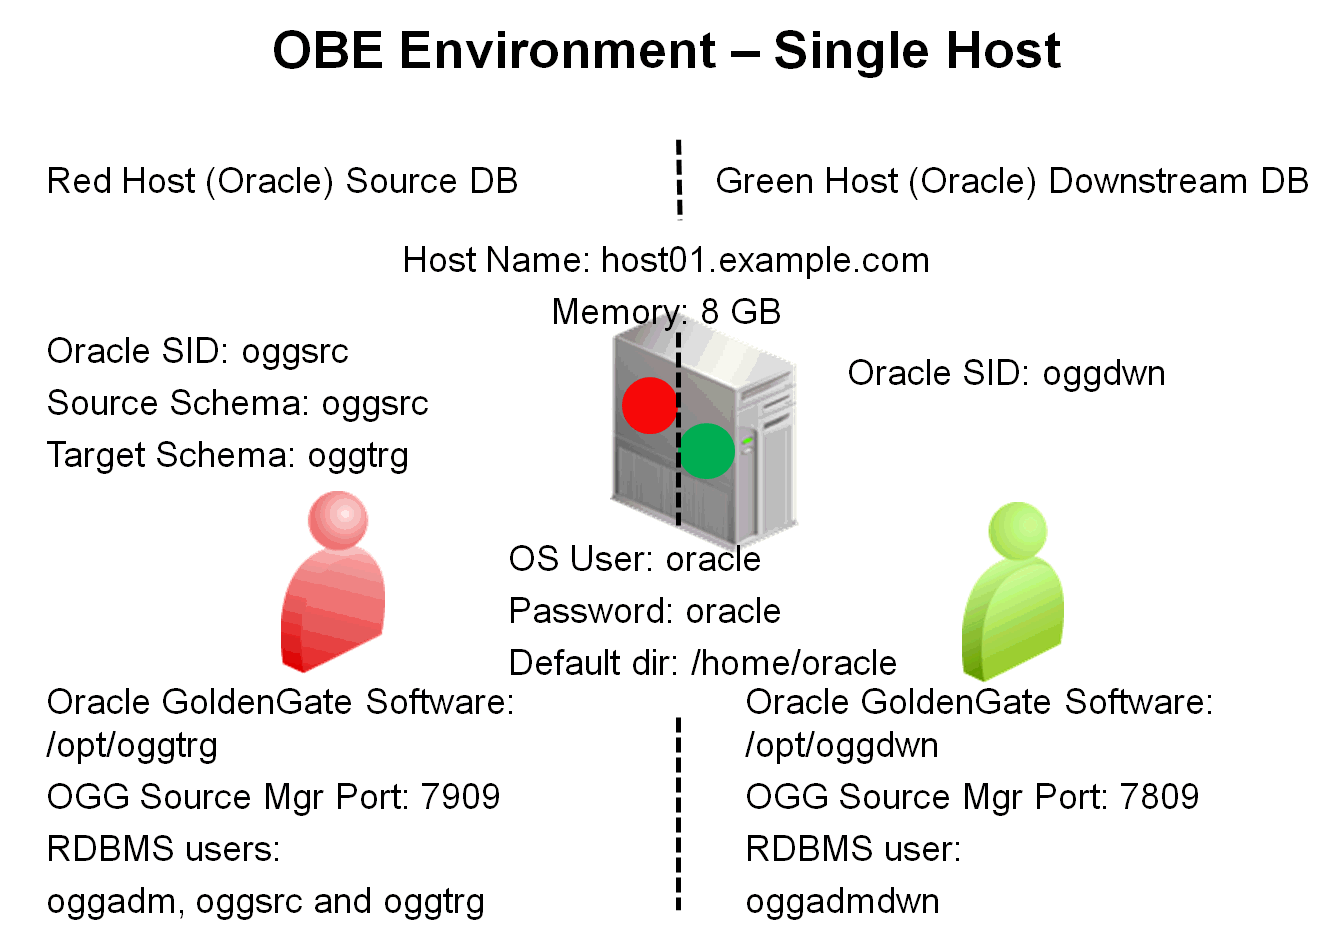
In summary, the environment is:
| Host Name | Color | OS | SID | User | Password | Mgr Port Source | Mgr Port Target | Default Directory |
|---|---|---|---|---|---|---|---|---|
| host01/host02 | Red/Green | Linux 64-bit | oggsrc/oggdwn | oracle | oracle | 7809 | 7909 | /home/oracle |
The user "oracle" in the Single host (Red/Green) has the following directory structure
| Directory | Purpose |
|---|---|
| /home/oracle | Default Directory |
| /opt/oggtrg | Oracle GoldenGate Software (Replication Target Environment) |
| /opt/oggdwn | Oracle GoldenGate Software (Downstream Deployment) |
When a single host simulates two environments it may be helpful
to change the /etc/hosts
file to make aliases for host01.example.com
, ogg_target, and host02.example.com. Example:
| Host01 - Linux |
[root@host01 ~]# cat /etc/hosts
127.0.0.1   localhost localhost.localdomain localhost4 localhost4.localdomain4
::1         localhost localhost.localdomain localhost6 localhost6.localdomain6
127.0.0.1 host01.example.com host01
127.0.0.1 ogg_target.example.com ogg_target
127.0.0.1 host02.example.com host02
[root@host01 ~]#
|
Hardware and Software Requirements
The following is a list of hardware and software requirements:
Hardware
Software
Prerequisites
Before starting this tutorial, you should:
Bear in mind that there are two hosts: host01 and host02; and that each host has three environment prompts: OS, GGSCI, and SQL. That makes six different places in which you could be typing! Try to be extra careful about which command you enter in which location. The wrong command in the wrong context is the most common error.
Typographic Conventions
Text color and font in the directions and in the screens should be interpreted as follows:
File and Process Naming Conventions
File and process naming conventions can be whatever works for
you or your company. Here are the sample conventions used in
this OBE:
pxxxxhh.ext
where:
1. Installing the Software
The installation of the software is simply fetching the zip files from the web and unzipping them. To install the Oracle GoldenGate software, perform the following steps:
1.1 Installing the Oracle RDBMS
release 11.2.0.3 on Linux (Red Host)
Download the Oracle RDBMS, release 11.2.0.3, into the /stage directory. Release 11.2.0.3 is the latest full installation of Oracle Database. My Oracle Support access, available with an Oracle support contract, is required to download it. Release 11.2.0.3 is packaged in seven zip files:
https://updates.oracle.com/Orion/Download/process_form/p10404530_112030_Linux-x86-64_1of7.zip
https://updates.oracle.com/Orion/Download/process_form/p10404530_112030_Linux-x86-64_2of7.zip
https://updates.oracle.com/Orion/Download/process_form/p10404530_112030_Linux-x86-64_3of7.zip
https://updates.oracle.com/Orion/Download/process_form/p10404530_112030_Linux-x86-64_4of7.zip
https://updates.oracle.com/Orion/Download/process_form/p10404530_112030_Linux-x86-64_5of7.zip
https://updates.oracle.com/Orion/Download/process_form/p10404530_112030_Linux-x86-64_6of7.zip
https://updates.oracle.com/Orion/Download/process_form/p10404530_112030_Linux-x86-64_7of7.zip
IMPORTANT! The RDBMS release 11.2.0.3 is a mandatory requirement for this OBE, together with Patch number 14551959. The Integrated Capture in Downstream Deployment Mode will not work with either older RDBMS releases or with un-patched 11.2.0.3 installations.
Download the seven zip files comprising the RDBMS 11.2.0.3 release into the /stage directory.
Download the Patch number 14551959 for the Linux x86-64 platform into the /stage directory.
Connected as oracle to the Red Host (host01) use the unzip command to extract all files from the zipped distribution kit.
| Host01 - Linux |
[oracle@host01 ~]$ cd /stage [oracle@host01 stage]$ unzip p10404530_112030_Linux-x86-64_1of7.zip Archive: p10404530_112030_Linux-x86-64_1of7.zip creating: database/ creating: database/install/ inflating: database/install/lsnodes inflating: database/install/clusterparam.ini ... many lines omitted for clarity ... creating: database/stage/Components/oracle.sqlplus.rsf/11.2.0.3.0/ creating: database/stage/Components/oracle.sqlplus.rsf/11.2.0.3.0/1/ creating: database/stage/Components/oracle.sqlplus.rsf/11.2.0.3.0/1/DataFiles/ inflating: database/stage/Components/oracle.sqlplus.rsf/11.2.0.3.0/1/DataFiles/filegroup1.jar [oracle@host01 stage]$ unzip p10404530_112030_Linux-x86-64_2of7.zip ... many lines omitted for clarity ... ... unzip all RDBMS release 11.2.0.3 files ... |
Connected as oracle to the Red Host (host01) use the unzip command to extract all files from the zipped Oracle Patch number 14551959.
| Host01 - Linux |
[oracle@host01 stage]$ unzip p14551959_112030_Linux-x86-64.zip
Archive:  p14551959_112030_Linux-x86-64.zip
   creating: 14551959/
  inflating: 14551959/postinstall.sql
  inflating: 14551959/README.txt
   creating: 14551959/etc/

 ... many lines omitted for clarity ...

 inflating: 14551959/files/rdbms/admin/shrept.lst
  inflating: 14551959/files/rdbms/admin/prvtbxstr.plb
[oracle@host01 stage]$
|
Create the Oracle Base directory (/u01/app/oracle). Connected as root, create the Oracle Base directory, then change its ownership to the oracle, belonging to the oinstall group.
| Host01 - Linux |
[oracle@host01 stage]$ su - Password: ***** [root@host01 ~]# mkdir -p /u01/app/oracle |
Modify the ~/.bashrc file for the oracle user to include a few aliases and EXPORTed directories, including $ORACLE_BASE, $ORACLE_HOME and $ORACLE_SID
| Host01 - Linux |
[oracle@host01 stage]$ cd ~ [oracle@host01 ~]$ vi .bashrc #.bashrc # Source global definitions if [ -f /etc/bashrc ]; then . /etc/bashrc fi export STAGEDIR=/stage export INSTALLDIR=/stage export APP=/u01/app export ORACLE_BASE=$APP/oracle export ORACLE_HOME=$ORACLE_BASE/product/11.2.0/dbhome_1 export ORACLE_SID=oggsrc export LD_LIBRARY_PATH=${ORACLE_HOME}/lib:${LD_LIBRARY_PATH} |
Exit from vi saving the modifed .bashrc file.
You must source the ~/.bashrc
file for the oracle
user if you want your shell to have all the variables
defined in the .bashrc
file active.
It is desirable to have $ORACLE_BASE
and $ORACLE_HOME
defined before invoking the Oracle installer.
| Host01 - Linux |
[oracle@host01 stage]$ cd ~ [oracle@host01 ~]$ source .bashrc |
| Host01 - Linux |
[oracle@host01 stage]$ cd database [oracle@host01 database]$ ./runInstaller Starting Oracle Universal Installer... Checking Temp space: must be greater than 120 MB. Actual 14907 MB Passed Checking swap space: must be greater than 150 MB. Actual 7957 MB Passed Checking monitor: must be configured to display at least 256 colors. Actual 16777216 |
The installer applet for Oracle
RDBMS release 11.2.0.3 starts.Deselect the
checkbox I
wish to receive security updates via My Oracle
support
and leave blank the Email field. Click Next.
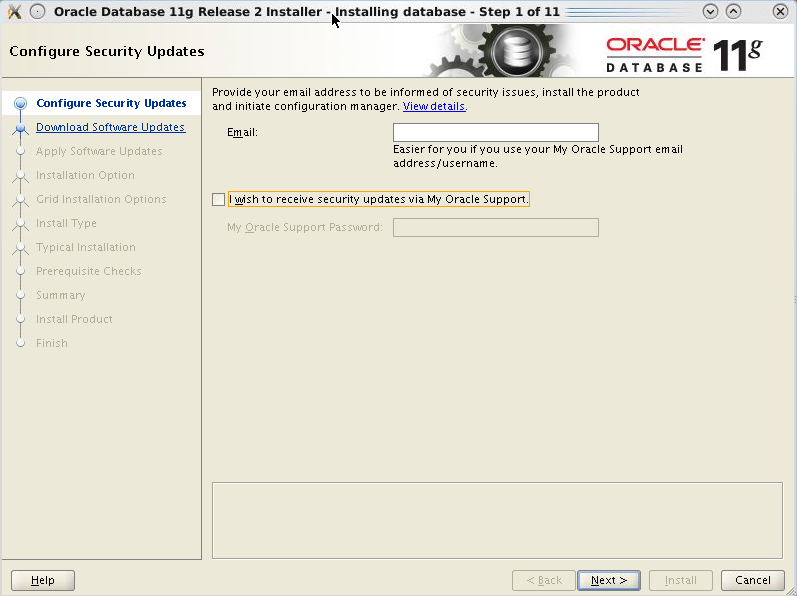
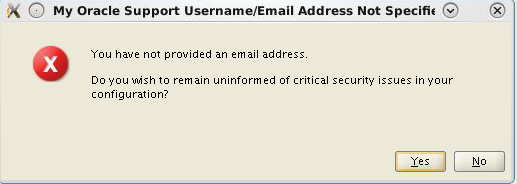
The installer complains that you did not provide an email address. Click Yes to remain uninformed about security issues and continue with the installation.
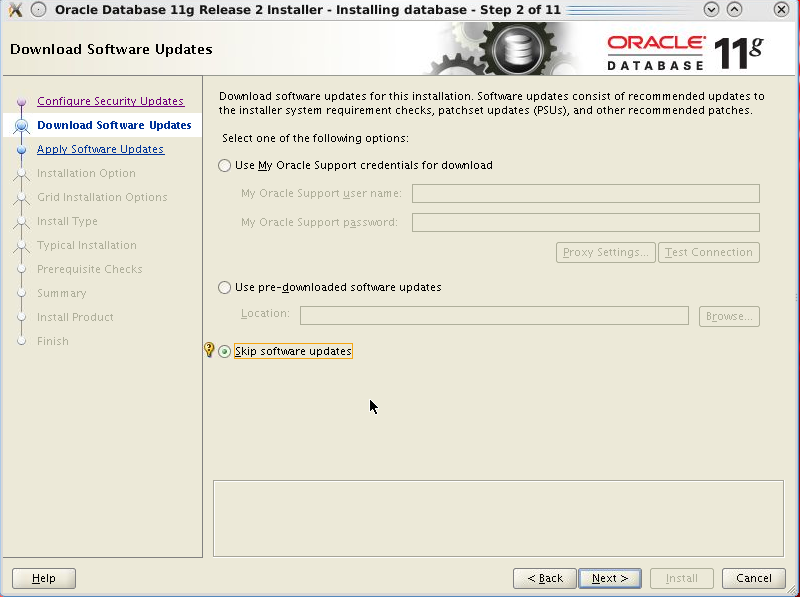
Select Skip software updates and click Next.
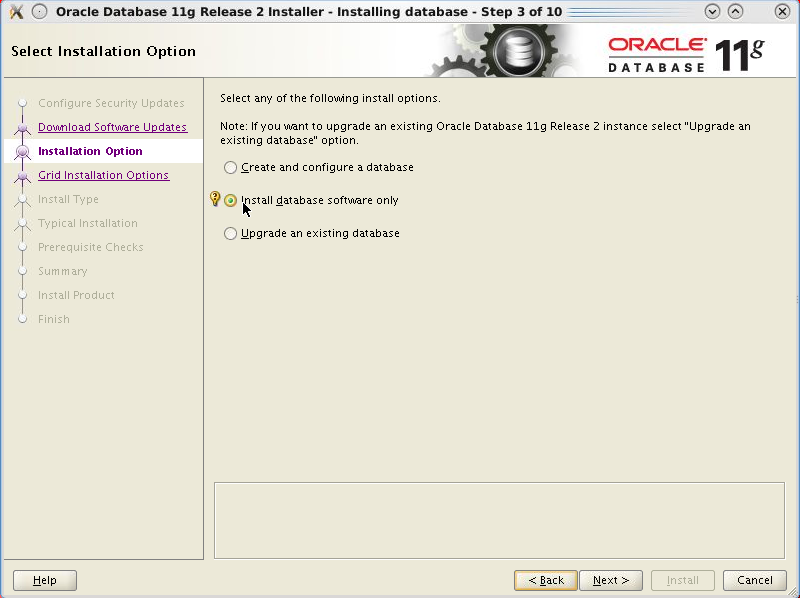
Select Install database software only and click Next.
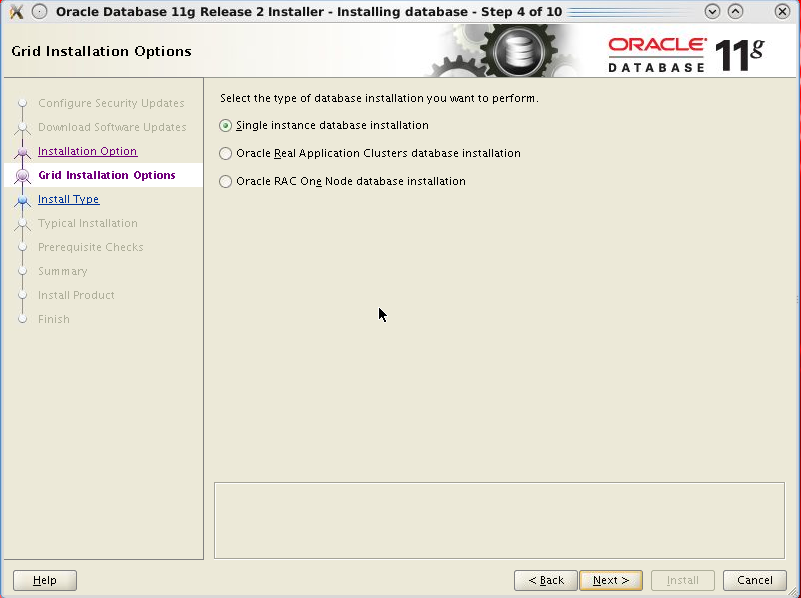
Choose Single instance database installation and click Next.
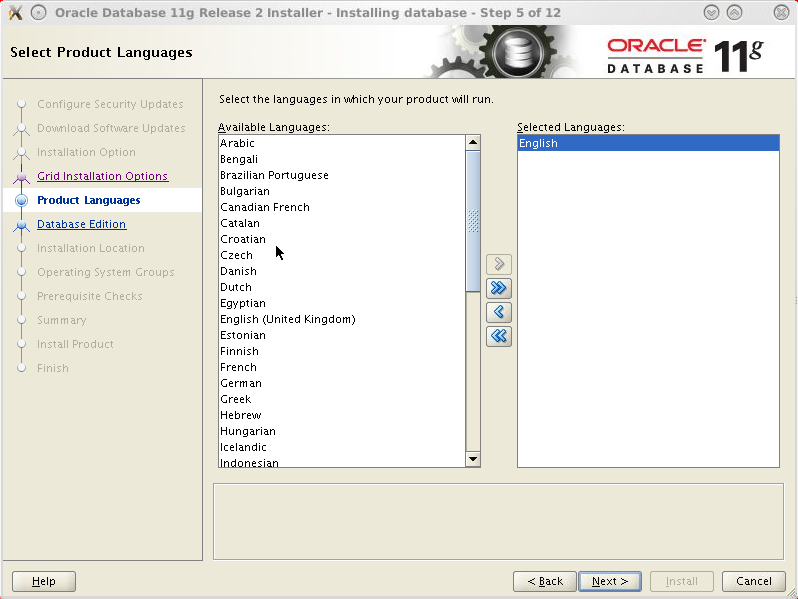
Accept the default language option (English) and click Next.
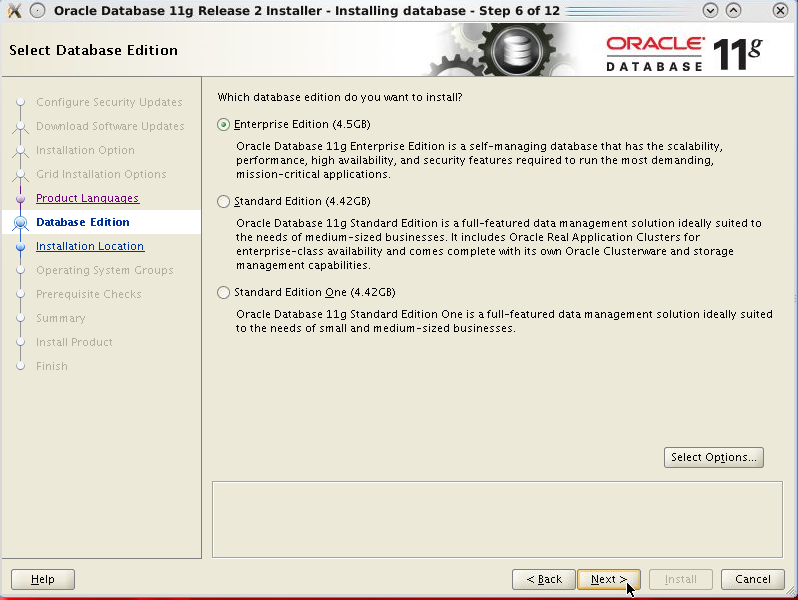
Choose the Enterprise Edition and click Next.
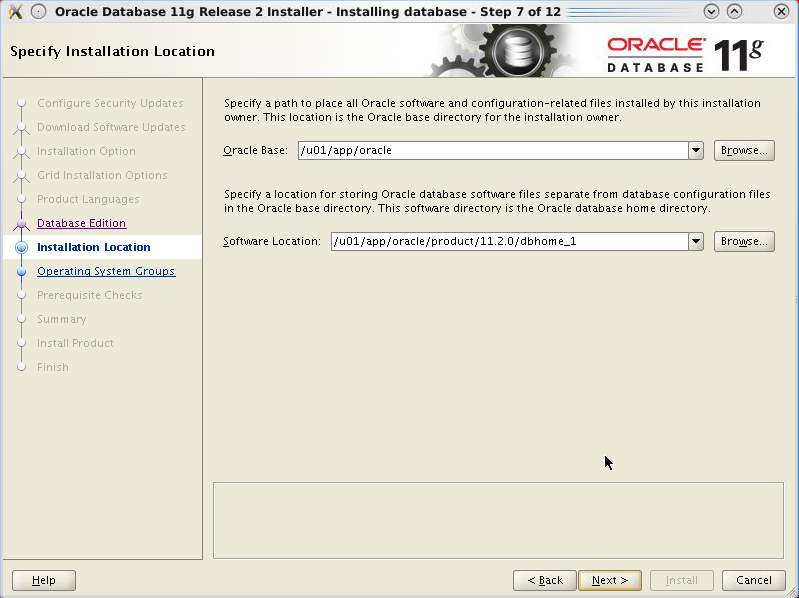
Since you started the installer after having exported
the variables $ORACLE_BASE
and $ORACLE_HOME
the Oracle
Base and Software
Location
fields are pre-populated. Accept the pre-populated
values and click Next.
Depending on whether there was ever any other Oracle
product installed at any time on this computer, Step 8
of 12 may be to "Create OraInventory." You will need
to mkdir the directory, then chown it.
Then it will renumber to be a total of 13 steps.
In the Privileged
Operating System Group form, enter dba
for the field Database
Operator (OSOPER) Group and click Next.

The installer performs
all its prerequisite checks. You should fix any issue
before you click Next
to proceed with the installation. You can disregard at
your peril parameters settings not compatible with the
Oracle RDBMS requirements, or Linux packages which
should be installed (for example the
Korn shell,) but that would not be wise and it is
strongly discouraged, as it could lead to a faulty
installation.

The installer displays a summary page of the options chosen. Review the various options and then click Install.
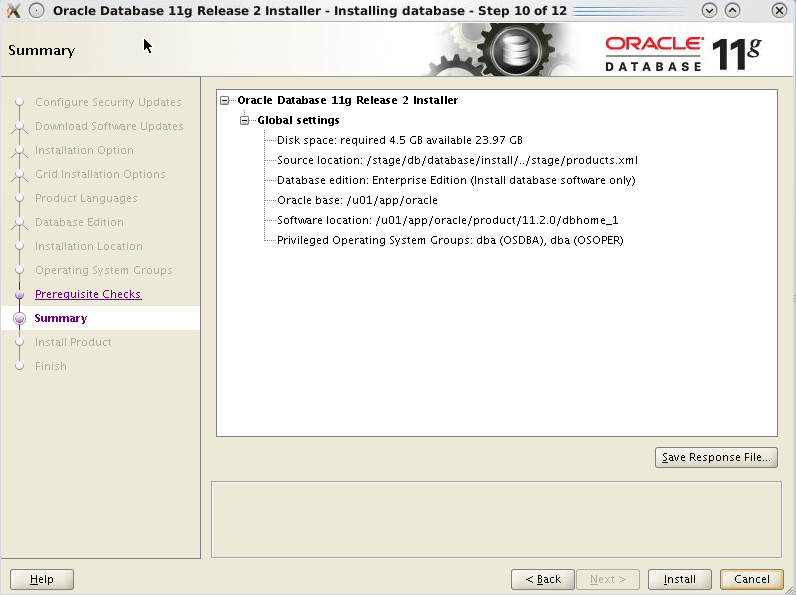
The installer starts copying the files, then it re-links the various binary files. A visual feedback is provided during all phases of the installation.
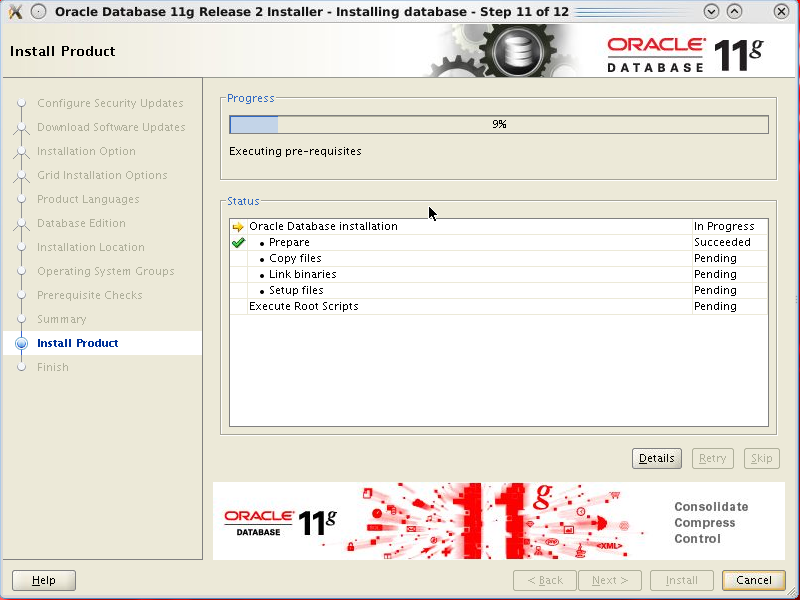
Towards the end of the installation procedure, the
installer requests that a configuration script
be run connected as root.
Leave the screen in its place (do not
click
Ok,)
open a shell window and change directory to /u01/app/oracle/product/11.2.0/dbhome_1.
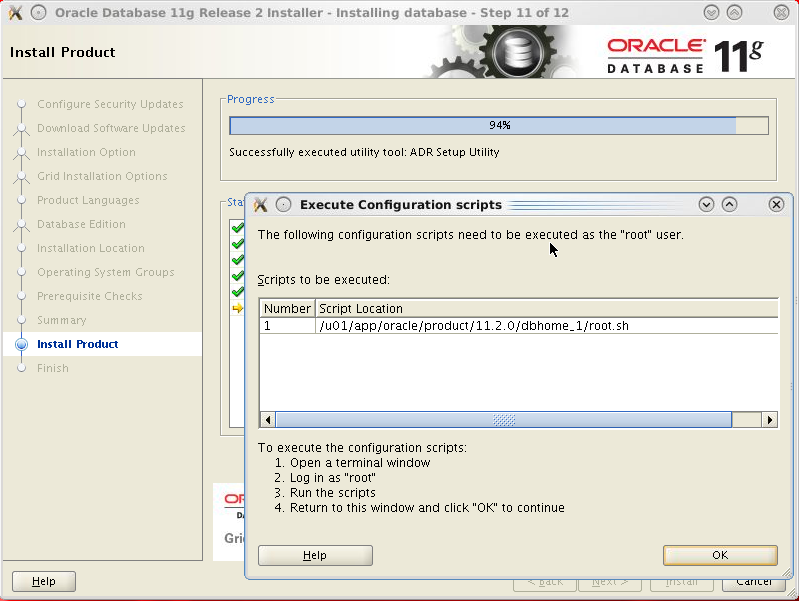
In the shell window execute the root.sh
script, accepting the proposed default for /usr/local/bin.
Wait until the script has completed
its execution, then click Ok
in the installer window left previously open.

The installer last window informs that the installation terminated successfully. Click Close to dismiss the window and finish the install.

1.2 Installing the Oracle RDBMS
Patch number 14551959 for release 11.2.0.3 on Linux (Red Host)
Change directory to /stage/14551959 where you unzipped the patch distribution kit and apply the patch.
Make sure you have the correct PATH set to be able to invoke the patch utility. You must add the $ORACLE_HOME/OPatch directory to your PATH
| Host01 - Linux |
[oracle@host01 ~]$ which opatch /usr/bin/which: no opatch in (/bin:/sbin:/u01/app/oracle/product/11.2.0/dbhome_1/bin:/bin:/bin: |
Change directory to /stage/14551959 and apply the patch using opatch:
| Host01 - Linux |
[oracle@host01 ~]$ cd /stage/14551959 [oracle@host01 14551959]$ opatch apply Invoking OPatch 11.2.0.1.7 Oracle Interim Patch Installer version 11.2.0.1.7 Copyright (c) 2011, Oracle Corporation. All rights reserved. Oracle Home : /u01/app/oracle/product/11.2.0/dbhome_1 Central Inventory : /u01/app/oraInventory from : /etc/oraInst.loc OPatch version : 11.2.0.1.7 OUI version : 11.2.0.3.0 Log file location : /u01/app/oracle/product/11.2.0/dbhome_1/cfgtoollogs/opatch/opatch2013-05-17_07-55-40AM.log Applying interim patch '14551959' to OH '/u01/app/oracle/product/11.2.0/dbhome_1' Verifying environment and performing prerequisite checks... Do you want to proceed? [y|n] y User Responded with: Y All checks passed. Please shutdown Oracle instances running out of this ORACLE_HOME on the local system. (Oracle Home = '/u01/app/oracle/product/11.2.0/dbhome_1') Is the local system ready for patching? [y|n] y User Responded with: Y Backing up files... Patching component oracle.rdbms, 11.2.0.3.0... Patching component oracle.rdbms.dbscripts, 11.2.0.3.0... Copying file to "/u01/app/oracle/product/11.2.0/dbhome_1/sqlpatch/14551959/postinstall.sql" Patching component oracle.rdbms.oci, 11.2.0.3.0... Patching component oracle.rdbms.rsf, 11.2.0.3.0... Patch 14551959 successfully applied Log file location: /u01/app/oracle/product/11.2.0/dbhome_1/cfgtoollogs/opatch/opatch2013-05-17_07-55-40AM.log OPatch succeeded. [oracle@host01 14551959]$ |
1.3 Installing the Oracle RDBMS
release 11.2.0.3 on Linux (Green Host)
If you are running this OBE on a two-host configuration, you must install the Oracle RDBMS software on the Green Host (host02.)
If you are running this OBE on a single-host configuration you do not need to install another copy of the Oracle RDBMS software. You will configure two RDBMS instances which will run on the same physical computer (or VM.)Perform the steps listed in this section (1.3) ONLY if you run the OBE on a two-host configuration. If you are running a single-host configuration skip section 1.3 and resume from section 1.5 (Accessing Oracle GoldenGate Documentation.)
Copy the zip files containing the Oracle RDBMS, release 11.2.0.3 distribution kit, to the /stage directory of the Green Host (host02.) Use the scp command to perform the copy of the seven files:
p10404530_112030_Linux-x86-64_1of7.zip
p10404530_112030_Linux-x86-64_2of7.zip
p10404530_112030_Linux-x86-64_3of7.zip
p10404530_112030_Linux-x86-64_4of7.zip
p10404530_112030_Linux-x86-64_5of7.zip
p10404530_112030_Linux-x86-64_6of7.zip
p10404530_112030_Linux-x86-64_7of7.zip
| Host01 - Linux |
[oracle@host01 ~]$ cd /stage [oracle@host01 stage]$ scp p10404530_112030_Linux-x86-64_1of7.zip oracle@host02:/stage The authenticity of host 'host02 (192.168.194.142)' can't be established. RSA key fingerprint is 88:53:88:0d:3e:e8:4a:52:eb:d5:39:07:dc:0c:ec:05. Are you sure you want to continue connecting (yes/no)? yes Warning: Permanently added 'host02,192.168.194.142' (RSA) to the list of known hosts. oracle@host02's password:***** p10404530_112030_Linux-x86-64_1of7.zip 100% 1296MB 61.7MB/s 00:21 [oracle@host01 stage]$ scp p10404530_112030_Linux-x86-64_2of7.zip oracle@host02:/stage oracle@host02's password:***** ... copy all RDBMS release 11.2.0.3 zip files ... |
Copy the zip file containing Patch number 14551959 for the Linux x86-64 platform into the /stage directory of the Green Host.
| Host01 - Linux |
[oracle@host01 stage]$ scp p14551959_112030_Linux-x86-64.zip oracle@host02:/stage oracle@host02's password:***** p14551959_112030_Linux-x86-64.zip 100% 5187KB 5.1MB/s 00:05 [oracle@host01 stage]$ |
Connected as oracle to the Green Host (host02) use the unzip command to extract all files from the zipped distribution kit.
| Host02 - Linux |
[oracle@host02 ~]$ cd /stage [oracle@host02 stage]$ unzip p10404530_112030_Linux-x86-64_1of7.zip Archive: p10404530_112030_Linux-x86-64_1of7.zip creating: database/ creating: database/install/ inflating: database/install/lsnodes inflating: database/install/clusterparam.ini ... many lines omitted for clarity ... creating: database/stage/Components/oracle.sqlplus.rsf/11.2.0.3.0/ creating: database/stage/Components/oracle.sqlplus.rsf/11.2.0.3.0/1/ creating: database/stage/Components/oracle.sqlplus.rsf/11.2.0.3.0/1/DataFiles/ inflating: database/stage/Components/oracle.sqlplus.rsf/11.2.0.3.0/1/DataFiles/filegroup1.jar [oracle@host02 stage]$ unzip p10404530_112030_Linux-x86-64_2of7.zip ... many lines omitted for clarity ... ... unzip all RDBMS release 11.2.0.3 files ... |
Connected as oracle to the Green Host (host02) use the unzip command to extract all files from the zipped Oracle Patch number 14551959.
| Host02 - Linux |
[oracle@host02 stage]$ unzip p14551959_112030_Linux-x86-64.zip
Archive:  p14551959_112030_Linux-x86-64.zip
   creating: 14551959/
  inflating: 14551959/postinstall.sql
  inflating: 14551959/README.txt
   creating: 14551959/etc/

 ... many lines omitted for clarity ...

 inflating: 14551959/files/rdbms/admin/shrept.lst
  inflating: 14551959/files/rdbms/admin/prvtbxstr.plb
[oracle@host02 stage]$
|
Create the Oracle Base directory (/u01/app/oracle). Connected as root, create the Oracle Base directory, then change its ownership to the oracle, belonging to the oinstall group.
| Host02 - Linux |
[oracle@host02 stage]$ su - Password: ***** [root@host02 ~]# mkdir -p /u01/app/oracle |
Modify the ~/.bashrc file for the oracle user to include a few aliases and EXPORTed directories, including $ORACLE_BASE, $ORACLE_HOME and $ORACLE_SID
| Host02 - Linux |
[oracle@host02 stage]$ cd ~ [oracle@host02 ~]$ vi .bashrc #.bashrc # Source global definitions if [ -f /etc/bashrc ]; then . /etc/bashrc fi export STAGEDIR=/stage export INSTALLDIR=/stage export APP=/u01/app export ORACLE_BASE=$APP/oracle export ORACLE_HOME=$ORACLE_BASE/product/11.2.0/dbhome_1 export ORACLE_SID=oggdwn export LD_LIBRARY_PATH=${ORACLE_HOME}/lib:${LD_LIBRARY_PATH} |
Exit from vi saving the modifed .bashrc file.
You must source the ~/.bashrc
file for the oracle
user if you want your shell to have all the variables
defined in the .bashrc
file active.
It is desirable to have $ORACLE_BASE
and $ORACLE_HOME
defined before invoking the Oracle installer.
| Host02 - Linux |
[oracle@host02 stage]$ cd ~ [oracle@host02 ~]$ source .bashrc |
| Host02 - Linux |
[oracle@host02 stage]$ cd database [oracle@host02 database]$ ./runInstaller Starting Oracle Universal Installer... Checking Temp space: must be greater than 120 MB. Actual 14907 MB Passed Checking swap space: must be greater than 150 MB. Actual 7957 MB Passed Checking monitor: must be configured to display at least 256 colors. Actual 16777216 |
Repeat the steps 1.3.8 to 1.3.22, installing the Oracle RDBMS software with the same parameters and options as you did for host01, this time on host02.
1.4 Installing the Oracle RDBMS
Patch number 14551959 for release 11.2.0.3 on Linux (Green
Host)
If you are running this OBE in a two-host configuration you must install the patch number 14551959 on the Green Host (host02)
Change directory to /stage/14551959 on the Green Host where you unzipped the patch distribution kit and apply the patch.
Make sure you have the correct PATH set to be able to invoke the patch utility. You must add the $ORACLE_HOME/OPatch directory to your PATH
| Host02 - Linux |
[oracle@host02 ~]$ which opatch /usr/bin/which: no opatch in (/bin:/sbin:/u01/app/oracle/product/11.2.0/dbhome_1/bin:/bin:/bin: |
Change directory to /stage/14551959 and apply the patch using opatch:
| Host02 - Linux |
[oracle@host02 ~]$ cd /stage/14551959 [oracle@host02 14551959]$ opatch apply Invoking OPatch 11.2.0.1.7 Oracle Interim Patch Installer version 11.2.0.1.7 Copyright (c) 2011, Oracle Corporation. All rights reserved. Oracle Home : /u01/app/oracle/product/11.2.0/dbhome_1 Central Inventory : /u01/app/oraInventory from : /etc/oraInst.loc OPatch version : 11.2.0.1.7 OUI version : 11.2.0.3.0 Log file location : /u01/app/oracle/product/11.2.0/dbhome_1/cfgtoollogs/opatch/opatch2013-05-17_07-55-40AM.log Applying interim patch '14551959' to OH '/u01/app/oracle/product/11.2.0/dbhome_1' Verifying environment and performing prerequisite checks... Do you want to proceed? [y|n] y User Responded with: Y All checks passed. Please shutdown Oracle instances running out of this ORACLE_HOME on the local system. (Oracle Home = '/u01/app/oracle/product/11.2.0/dbhome_1') Is the local system ready for patching? [y|n] y User Responded with: Y Backing up files... Patching component oracle.rdbms, 11.2.0.3.0... Patching component oracle.rdbms.dbscripts, 11.2.0.3.0... Copying file to "/u01/app/oracle/product/11.2.0/dbhome_1/sqlpatch/14551959/postinstall.sql" Patching component oracle.rdbms.oci, 11.2.0.3.0... Patching component oracle.rdbms.rsf, 11.2.0.3.0... Patch 14551959 successfully applied Log file location: /u01/app/oracle/product/11.2.0/dbhome_1/cfgtoollogs/opatch/opatch2013-05-17_07-55-40AM.log OPatch succeeded. [oracle@host02 14551959]$ |
1.5 Accessing Oracle GoldenGate Documentation
Access the documentation library.
Using a web browser, go to http://www.oracle.com/technetwork/middleware/goldengate/documentation/index.html. You have the option to either read the documents online, or to download the library to your local workstation as either PDF or HTML format.
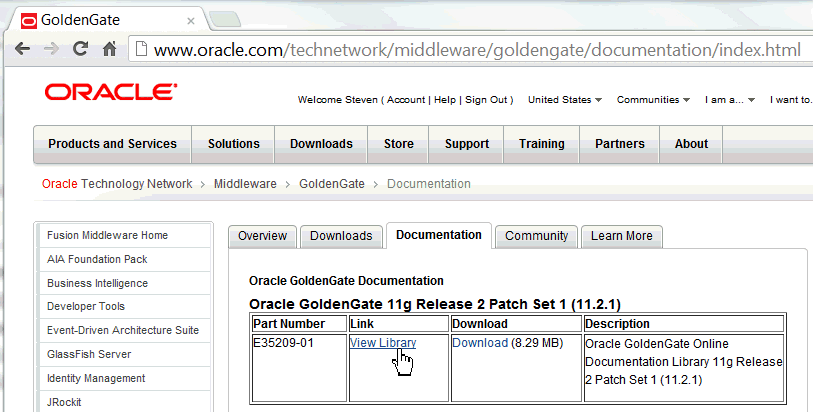
Click View Library.
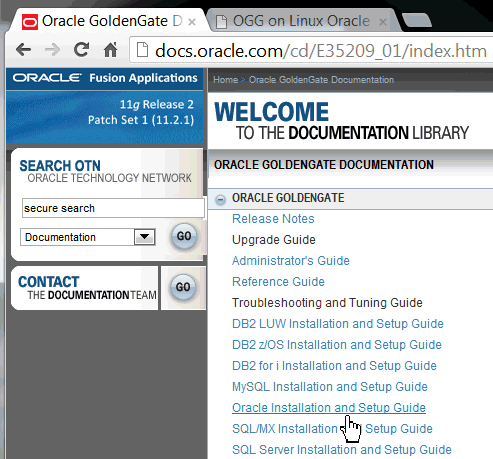
Click Oracle Installation and Setup Guide. Read the Installation Guide for Oracle.
You have successfully accessed Oracle GoldenGate documentation as a prerequisite for installing the software.
1.6 Installing Oracle GoldenGate on Linux
Copy the software from Oracle Software Delivery Cloud.
Using a web browser, go to https://edelivery.oracle.com and click Sign In. On the Terms and Conditions page, select Yes for both agreements, and click Continue.
On the Media Pack Search page, select Product Pack = Oracle Fusion Middleware, and Platform = Linux x86-64.
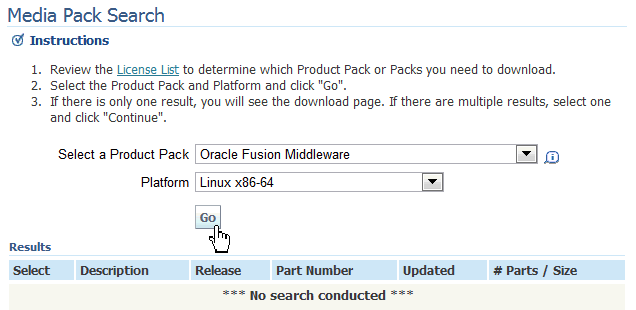
Click Go.
Select Oracle GoldenGate on Oracle v11.2.1 Media Pack for Linux x86-64.
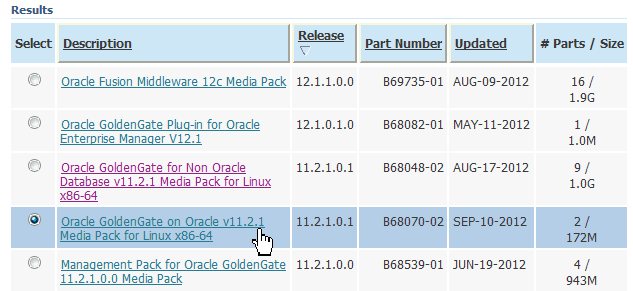
Click Continue.
Make sure you are looking at part number V34339-01 for "Oracle GoldenGate V11.2.1.0.3 for Oracle 11g on Linux x86-64."
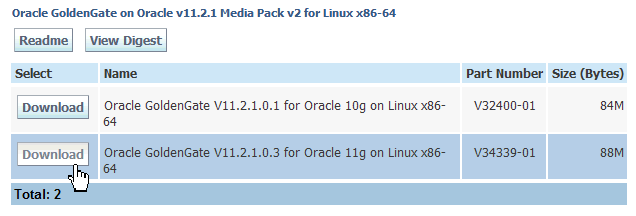
Click Download.
Create, if it does not already exist, the
directory /opt/oggtrg.
Use the su
command to connect as root,
create the /opt/oggtrg
directory and change
its ownership to oracle.oinstall.
Logout from root
and unpack the Oracle GoldenGate for Oracle
software in the /opt/oggtrg
directory on host01
(Red Host) while connected as oracle.
Create the installation directories to receive the Oracle GoldenGate software.
| Host01 - Linux |
[oracle@host01 ~]$ su - |
Copy the downloaded zip from wherever you downloaded it to /opt/oggtrg/. Unzip it and untar (extract) it.
Be mindful of the trailing dot in the copy command.
| Host01 - Linux |
[oracle@host01 oggtrg]$ cp /stage/V34339-01.zip . [oracle@host01 oggtrg]$ unzip V34339-01.zip Archive: V34339-01.zip inflating: fbo_ggs_Linux_x64_ora11g_64bit.tar inflating: Oracle_GoldenGate_11.2.1.0.3_README.doc inflating: Oracle GoldenGate_11.2.1.0.3_README.txt inflating: OGG_WinUnix_Rel_Notes_11.2.1.0.3.pdf [oracle@host01 oggtrg]$ tar -xvpf fbo_ggs_Linux_x64_ora11g_64bit.tar |
Start the GoldenGate Software Command Interface
(GGSCI). Create the default empty subdirectories.
IMPORTANT!
GGSCI for
Oracle will not start if the LD_LIBRARY_PATH
environment variable is either undefined or if it
does not point to the ${ORACLE_HOME}/lib
directory.
Make sure LD_LIBRARY_PATH
is correctly set before launching GGSCI.
The preferred way to accomplish this is by adding
the line:
export
LD_LIBRARY_PATH=${ORACLE_HOME}/lib:$LD_LIBRARY_PATH
to the file ~/.bashrc
and source that file.
| Host01 - Linux |
[oracle@host01 oggtrg]$ ./ggsci Oracle GoldenGate Command Interpreter for Oracle Version 11.2.1.0.3 14400833 OGGCORE_11.2.1.0.3_PLATFORMS_120823.1258_FBO Linux, x64, 64bit (optimized), Oracle 11g on Aug 23 2012 20:20:21 Copyright (C) 1995, 2012, Oracle and/or its affiliates. All rights reserved. GGSCI (host01) 1> Create Subdirs Creating subdirectories under current directory /opt/oggtrg Parameter files /opt/oggtrg/dirprm: already exists Report files /opt/oggtrg/dirrpt: created Checkpoint files /opt/oggtrg/dirchk: created Process status files /opt/oggtrg/dirpcs: created SQL script files /opt/oggtrg/dirsql: created Database definitions files /opt/oggtrg/dirdef: created Extract data files /opt/oggtrg/dirdat: created Temporary files /opt/oggtrg/dirtmp: created Stdout files /opt/oggtrg/dirout: created GGSCI (host01) 2> Exit [oracle@host01 oggtrg]$ |
If a directory already exists, the installation leaves the contents of that directory alone.
Do the same steps for the downstream replication directory (/opt/oggdwn/) on the Green Host (host02). If your OBE environment is on a single host, you just create the directory /opt/oggdwn/. However, if you are running the OBE on a two-host environment you must copy the Oracle GoldenGate software to the Green host using, for example, secure copy (scp.) Perform the step below ONLY if you are running the OBE on a two-host environment.
| Host01 - Linux |
[oracle@host01 ~] cd /stage [oracle@host01 stage] scp V34339-01.zip oracle@host02:/stage/ The authenticity of host 'host02 (127.0.0.1)' can't be established. RSA key fingerprint is 82:e2:d9:21:9e:a7:9c:7d:d8:c9:cf:92:ee:80:13:9e. Are you sure you want to continue connecting (yes/no)? yes Warning: Permanently added 'host02' (RSA) to the list of known hosts. oracle@host02's password: ****** V34339.zip 100% 1816 1.8KB/s 00:00 |
Of course you replace the asterisks with your password, for example oracle.
| Host02 - Linux |
[oracle@host02 ~]$ su - |
Copy the downloaded zip from wherever you downloaded it to /opt/oggdwn/. Unzip it and untar (extract) it.
The example below assumes you downloaded the Oracle GoldenGate software into the /stage directory:
| Host02 - Linux |
[oracle@host02 oggdwn]$ cp /stage/V34339-01.zip . [oracle@host02 oggdwn]$ unzip V34339-01.zip Archive: V34339-01.zip inflating: fbo_ggs_Linux_x64_ora11g_64bit.tar inflating: Oracle_GoldenGate_11.2.1.0.3_README.doc inflating: Oracle GoldenGate_11.2.1.0.3_README.txt inflating: OGG_WinUnix_Rel_Notes_11.2.1.0.3.pdf [oracle@host02 oggdwn]$ tar -xvpf fbo_ggs_Linux_x64_ora11g_64bit.tar UserExitExamples/ UserExitExamples/ExitDemo_more_recs/ UserExitExamples/ExitDemo_more_recs/Makefile_more_recs.HPUX ... many lines omitted for clarity ... ulg.sql usrdecs.h zlib.txt [oracle@host02 oggdwn]$ |
Start the GoldenGate Software Command Interface (GGSCI). Create the default empty subdirectories.
IMPORTANT! GGSCI for Oracle will not start if the LD_LIBRARY_PATH environment variable is either undefined or if it does not point to the ${ORACLE_HOME}/lib directory.Make sure LD_LIBRARY_PATH
is correctly set before launching GGSCI.
The preferred way to accomplish this is by adding
the line:
export
LD_LIBRARY_PATH=${ORACLE_HOME}/lib:$LD_LIBRARY_PATH
to the file ~/.bashrc
and source that file.
| Host02 - Linux |
[oracle@host02 oggdwn]$ ./ggsci Oracle GoldenGate Command Interpreter for Oracle Version 11.2.1.0.3 14400833 OGGCORE_11.2.1.0.3_PLATFORMS_120823.1258_FBO Linux, x64, 64bit (optimized), Oracle 11g on Aug 23 2012 20:20:21 Copyright (C) 1995, 2012, Oracle and/or its affiliates. All rights reserved. GGSCI (host02.example.com) 1> Create Subdirs Creating subdirectories under current directory /opt/oggdwn Parameter files /opt/oggdwn/dirprm: already exists Report files /opt/oggdwn/dirrpt: created Checkpoint files /opt/oggdwn/dirchk: created Process status files /opt/oggdwn/dirpcs: created SQL script files /opt/oggdwn/dirsql: created Database definitions files /opt/oggdwn/dirdef: created Extract data files /opt/oggdwn/dirdat: created Temporary files /opt/oggdwn/dirtmp: created Stdout files /opt/oggdwn/dirout: created GGSCI (host02.example.com) 2> Exit [oracle@host02 oggdwn]$ |
If a directory already exists, the installation
leaves the contents of that directory alone. You
have successfully installed Oracle GoldenGate
on the Red Host for both the source and target
GoldenGate instances.
2. Creating and Preparing the Databases
On the Red Host (host01) you must create the OGGSRC instance using the DBCA utility.
On the Green Host (host02) you must create the OGGDWN instance using the DBCA utility.
You will create the oggsrc and the oggtrg user/schema in the OGGSRC database.
After the Oracle schemas are created, you must run some DDL scripts to create the required replication objects.
2.1 Creating Directories for Database Files
On the Red Host you must create the containers for the database files.
| Host01 - Linux |
[root@host01 ~]# mkdir -p /u02/oradata [root@host01 ~]# chown -R oracle.oinstall /u02/oradata |
If you are running this OBE in a two-host configuration, on the Green Host you must also create the containers for the database files.
| Host02 - Linux |
[root@host02 ~]# mkdir -p /u02/oradata [root@host02 ~]# chown -R oracle.oinstall /u02/oradata |
2.2 Increase the size of /dev/shm Instance
If you are running this OBE in a single-host
configuration, the default size allocation (four GB)
for /dev/shm (Shared Memory)
is not enough to allow two RDBMS instances, each with the
SGA sized to 2.5 gigabytes, to be created.
You must increase the shared memory size to eight
gigabytes.
NOTE: perform this step only if you are running this OBE in a single-host configuration.
| Host01 - Linux |
[oracle@host01 ~]$ su - Password: ***** [root@host01 ~]# |
| Host01 - Linux |
[root@host01 ~]# vi /etc/fstab LABEL=root / ext3 defaults 1 1 LABEL=boot /boot ext3 defaults 1 2 LABEL=SWAP swap swap defaults 0 0 tmpfs /dev/shm tmpfs defaults 0 0 devpts /dev/pts devpts gid=5,mode=620 0 0 sysfs /sys sysfs defaults 0 0 proc /proc proc defaults 0 0 LABEL=u01 /u01 ext3 defaults 0 0 |
| Host01 - Linux |
LABEL=root / ext3 defaults 1 1 LABEL=boot /boot ext3 defaults 1 2 LABEL=SWAP swap swap defaults 0 0 tmpfs /dev/shm tmpfs defaults,size=8G 0 0 |
| Host01 - Linux |
[root@host01 ~]# df -h Filesystem Size Used Avail Use% Mounted on /dev/xvda2 12G 2.9G 7.7G 28% / tmpfs 4.0G 0 4.0G 0% /dev/shm /dev/xvda1 243M 71M 160M 31% /boot /dev/xvdb1 60G 322M 56G 1% /u01 |
| Host01 - Linux |
[root@host01 ~]# mount -o remount /dev/shm [root@host01 ~]# df -h Filesystem Size Used Avail Use% Mounted on /dev/xvda2 12G 2.9G 7.7G 28% / tmpfs 8.0G 0 8.0G 0% /dev/shm /dev/xvda1 243M 71M 160M 31% /boot /dev/xvdb1 60G 322M 56G 1% /u01 [root@host01 ~]# |
2.3 Creating the Oracle OGGSRC Instance


You must now set up the Oracle Listener (if a
listener is not already created) and the TNS
entry for the newly created database. Launch the NETCA application
by typing netca
at the OS prompt while connected as "oracle," the
Oracle software owner.
The Oracle Net Configuration Assistant wizard dialog
window will appear on screen.

Select Listener configuration and click Next. If the only option available is Add and the other options such as Reconfigure, Delete and Rename are greyed out, it means that no listener was created. In this case accept the only available option, Add, and click Next.


Select TCP as the listener protocol and click Next.

Accept the default port number (1521) to be used by the listener named LISTENER. Click Next

Accept the default option (No) when asked if you want to create another listener. Click Next

You are back to the initial screen, which allows you to choose the option Local Net Service Name Configuration. Click Next

You are back to the initial screen, which allows you to choose the option Local Net Service Name Configuration. Click Next

Select Add to create a new net service name. Click Next

Enter OGGSRC as the new service name. Click Next

Select TCP as the protocol used by OGGSRC. Click Next

Enter host01.example.com as the Host name for the service name OGGSRC. Accept the default (1521) for the TCP/IP port number. Click Next

Accept the default (No do not test) to skip the database test. Click Next

Enter OGGSRC to accept the new Net service Name. Click Next

Accept the default (No) to opt not to configure another service name and click Next

The Net Service Name Configuration wizard is complete. Click Next then click Finish to exit the configuration wizard.

2.4 Running the patch number 14551959 postinstall script on the Oracle OGGSRC Instance on the Red Host (host01)
There is a post-install procedure, delivered with
patch number 14551959, which must be run as sysdba,
which recomplies a few packages, functions, grants,
triggers and synonyms, ensuring that Integrated
Capture works
with the RDBMS release 11.2.0.3. The procedure is postinstall.sql and
it is stored in the directory where patch number
14551959 has been extracted (/stage/14551959)
| Host01 - Linux |
[oracle@host01 ~]$ cd /stage/14551959 [oracle@host01 14551959]$ sqlplus sys/oracle@oggsrc as sysdba SQL*Plus: Release 11.2.0.3.0 Production on Fri May 17 08:16:22 2013 Copyright (c) 1982, 2011, Oracle. All rights reserved. Connected to: Oracle Database 11g Enterprise Edition Release 11.2.0.3.0 - 64bit Production With the Partitioning, OLAP, Data Mining and Real Application Testing options SQL> @postinstall Session altered. Function created. No errors. Grant succeeded. Procedure created. No errors. ... many lines omitted for clarity ... Package body created. No errors. Package body created. SQL> exit [oracle@host01 14551959]$ |
2.5 Creating the Oracle OGGDWN Instance


You must now set up the Oracle Listener (if a
listener is not already created) and the TNS
entry for the newly created database. If you are
running this OBE on a single-host configuration the
Oracle Listener has been already created in the
preceding step. If you are running this OBE in a
two-host configuration, you must create the Oracle
listener for the Green Host (host02.)
Launch the NETCA
application by typing netca
at the OS prompt while connected as "oracle," the
Oracle software owner.
The Oracle Net Configuration Assistant wizard dialog
window will appear on screen.

Select Listener
configuration and click Next.
If the only option available is Add
and the other options such as Reconfigure,
Delete and Rename
are greyed out, it means that no listener was created.
In this case accept the only available option, Add, and
click Next.

If you are running this OBE in a single-host configuration, the Oracle listener has been already confgured.

Select TCP as the listener protocol and click Next.

Accept the default port number (1521) to be used by the listener named LISTENER. Click Next

Accept the default option (No) when asked if you want to create another listener. Click Next

You are back to the initial screen, which allows you to choose the option Local Net Service Name Configuration. Click Next

You are back to the initial screen, which allows you to choose the option Local Net Service Name Configuration. Click Next

Select Add to create a new net service name. Click Next

Enter OGGDWN as the new service name. Click Next

Select TCP as the protocol used by OGGDWN. Click Next

Enter host02.example.com as the Host name for the service name OGGDWN. Accept the default (1521) for the TCP/IP port number. Click Next

Accept the default (No do not test) to skip the database test. Click Next

Enter OGGDWN to accept the new Net service Name. Click Next

Accept the default (No) to opt not to configure another service name and click Next

The Net Service Name Configuration wizard is complete. Click Next then click Finish to exit the configuration wizard.

2.6 Running the patch number 14551959 postinstall script on the Oracle OGGDWN Instance on the Green Host (host02)
There is a post-install procedure, delivered with
patch number 14551959, which must be run as sysdba,
which recomplies a few packages, functions, grants,
triggers and synonyms, ensuring that Integrated
Capture works
with the RDBMS release 11.2.0.3. The procedure is postinstall.sql and
it is stored in the directory where patch number
14551959 has been extracted (/stage/14551959)
| Host02 - Linux |
[oracle@host02 ~]$ cd /stage/14551959 [oracle@host02 14551959]$ sqlplus sys/oracle@oggdwn as sysdba SQL*Plus: Release 11.2.0.3.0 Production on Fri May 17 08:16:22 2013 Copyright (c) 1982, 2011, Oracle. All rights reserved. Connected to: Oracle Database 11g Enterprise Edition Release 11.2.0.3.0 - 64bit Production With the Partitioning, OLAP, Data Mining and Real Application Testing options SQL> @postinstall Session altered. Function created. No errors. Grant succeeded. Procedure created. No errors. ... many lines omitted for clarity ... Package body created. No errors. Package body created. SQL> exit [oracle@host02 14551959]$ |
2.7 Disabling the Linux IPTABLES firewall
The standard Linux firewall configuration which is
installed by default by Oracle Linux or Red Hat
interferes with
the Oracle Net operations. Especially if you are
running this OBE on a two-host configuration, the
default iptables rules
would prevent Oracle RDBMS connections across the two
nodes. In a production configuration you would add
specific
iptables rules to enable TNS traffic across the Red
Host and the Green Host. This complex network
configuration
is outside the scope of this OBE, so you will simply
disable IPTABLES to allow unsecured communication
across the two hosts.
Connect as root
to the Red host (host01)
and issue the command
service iptables
status
If the prompt is returned to the next line it means
you do not have IPTABLES active on your system. If the
various iptables
rules are displayed on screen, it means iptables rules
are active and you need to stop iptables using the
command:
service iptables
stop
| Host01 - Linux |
[oracle@host01 ~]$ su - Password: ***** [root@host01 ~]# service iptables status Table: filter Chain INPUT (policy ACCEPT) num target prot opt source destination 1 ACCEPT all -- 0.0.0.0/0 0.0.0.0/0 state RELATED,ESTABLISHED 2 ACCEPT icmp -- 0.0.0.0/0 0.0.0.0/0 3 ACCEPT all -- 0.0.0.0/0 0.0.0.0/0 4 ACCEPT tcp -- 0.0.0.0/0 0.0.0.0/0 state NEW tcp dpt:22 5 REJECT all -- 0.0.0.0/0 0.0.0.0/0 reject-with icmp-host-prohibited Chain FORWARD (policy ACCEPT) num target prot opt source destination 1 REJECT all -- 0.0.0.0/0 0.0.0.0/0 reject-with icmp-host-prohibited Chain OUTPUT (policy ACCEPT) num target prot opt source destination [root@host01 ~]# service iptables stop iptables: Flushing firewall rules: [ OK ] iptables: Setting chains to policy ACCEPT: filter [ OK ] iptables: Unloading modules: [ OK ] [root@host01 ~]# chkconfig iptables off [root@host01 ~]# exit [oracle@host01 ~]$ |
If you are running this OBE in a two-host configuration you must disable the IPTABLES firewall also on the Green Host.
Connect as root
to the Green Host (host02)
and issue the command
service iptables
status
If the prompt is returned to the next line it means
you do not have IPTABLES active on your system. If the
various iptables
rules are displayed on screen, it means iptables rules
are active and you need to stop iptables using the
command:
service iptables
stop
| Host02 - Linux |
[oracle@host02 ~]$ su - Password: ***** [root@host02 ~]# service iptables status Table: filter Chain INPUT (policy ACCEPT) num target prot opt source destination 1 ACCEPT all -- 0.0.0.0/0 0.0.0.0/0 state RELATED,ESTABLISHED 2 ACCEPT icmp -- 0.0.0.0/0 0.0.0.0/0 3 ACCEPT all -- 0.0.0.0/0 0.0.0.0/0 4 ACCEPT tcp -- 0.0.0.0/0 0.0.0.0/0 state NEW tcp dpt:22 5 REJECT all -- 0.0.0.0/0 0.0.0.0/0 reject-with |
2.8 Verifying TNS entries for both Red host and Green Host
stored in the directory $ORACLE_HOME/network/admin. If you run this OBE in a single-host configuration you
should have only one $ORACLE_HOME/network/admin directory and only one tnsnames.ora file
containing TNS entries for the two instances running on the same host. If on the other hand, you are running this
OBE on a two-host configuration, you will have two $ORACLE_HOME/network/admin directories, one per node,
and two tnsnames.ora files, which should contain two TNS entries, the first pointing to the local instance and the
second pointing to the remote instance.
If you are running this OBE on a single-host
configuration, on the Red Host, change directory to
$ORACLE_HOME/network/admin
and display the tnsnames.ora
file:
| Host01 - Linux |
[oracle@host01 ~] cd $ORACLE_HOME/network/admin [oracle@host01 admin]$ cat tnsnames.ora # tnsnames.ora Network Configuration File: |
In a single-host configuration both hostnames host01.example.com
and host02.example.com
should share
the same IP address
(perhaps 127.0.0.1)
both nodes should have a tnsnames.ora file defining both Oracle instances oggsrc and oggdwn
The ultimate connectivity test consists of using tnsping to verify
that each instance is accessible from both computers,
and then physically connect to both instances from
both nodes using sqlplus.
If you are running this OBE on a
single-host configuration, on the Red Host, change
directory to $ORACLE_HOME/network/admin
and display
the tnsnames.ora
file:
| Host01 - Linux |
[oracle@host01 ~] cd $ORACLE_HOME/network/admin [oracle@host01 admin]$ cat tnsnames.ora # tnsnames.ora Network Configuration File: |
In a single-host configuration both hostnames host01.example.com
and host02.example.com
should share
the same IP address
(perhaps 127.0.0.1)
both nodes should have a tnsnames.ora file defining both Oracle instances oggsrc and oggdwn.
On the Red Host (host01)
use the tnsping
utility to verify connectivity to both oggdwn
and oggsrc,
then use sqlplus
to
attempt to connect to both instances:
| Host01 - Linux |
[oracle@host01 admin] tnsping oggsrc TNS Ping Utility for Linux: Version 11.2.0.3.0 - Production on 23-MAY-2013 13:39:38 Copyright (c) 1997, 2011, Oracle. All rights reserved. Used parameter files: Used TNSNAMES adapter to resolve the alias Attempting to contact (DESCRIPTION = (ADDRESS_LIST = (ADDRESS = (PROTOCOL = TCP)(HOST = host01.example.com) |
On the Green Host (host02)
use the tnsping
utility to verify connectivity to both oggdwn
and oggsrc,
then use sqlplus
to
attempt to connect to both instances:
| Host02 - Linux |
[oracle@host02 ~]$ cd $ORACLE_HOME/network/admin [oracle@host02 admin]$ tnsping oggsrc |
2.9 Unloading and Unpacking the SQL scripts
In this example the OBE_DDL_SHELL_FILES.zip file is downloaded by the browser into the /tmp directory. The obe directory is created under /home/oracle and then the zip file OBE_DDL_SHELL_FILES.zip is extracted into the obe directory:
| Host01 - Linux |
[oracle@host01 ~] cd ~ [oracle@host01 ~]$ mkdir obe [oracle@host01 ~]$ cd obe [oracle@host01 obe]$ unzip /tmp/OBE_DDL_SHELL_FILES.zip Archive: /tmp/OBE_DDL_SHELL_FILES.zip inflating: economic_entity.sql inflating: exdwn.prm inflating: gdp_by_year_2008.sql inflating: gdp_by_year_2009.sql inflating: oggdwn_steps_1.sh inflating: oggdwn_steps_2.sh inflating: oggsrc_steps_1.sh inflating: oggsrc_steps_2.sh inflating: oracle_source_table_creation.sql inflating: oracle_target_table_creation.sql inflating: pmpdw.prm inflating: rpdw.prm |
The files shipped with this OBE are:
| File name | Purpose |
|---|---|
| economic_entity.sql | DML file containing ECONOMIC_ENTITY data |
| exdwn.prm | Integrated Extract parameter file |
| gdp_by_year_2008.sql | Fiscal Year 2008 economic data for the table
GDP_BY_YEAR |
| gdp_by_year_2009.sql | Fiscal Year 2009 economic data for the table GDP_BY_YEAR |
| oggdwn_steps_1.sh | First catch-up script for the OGGDWN instance |
| oggdwn_steps_2.sh | Second catch-up script for the OGGDWN instance |
| oggsrc_steps_1.sh | First catch-up script for the OGGSRC instance |
| oggsrc_steps_2.sh | Second catch-up script for the OGGSRC instance |
| oracle_source_table_creation.sql | Script which creates all required objects in
the replication source
schema
|
| oracle_target_table_creation.sql | Script which creates all required objects in the replication target schema |
| pmpdw.prm | Data pump Extract parameter file |
| rpdw.prm | Replicat parameter file |
3. Configuring the Environment
The configuration of the environment is done by editing ASCII files and running OS utilities. To configure the environment, perform the following steps:
3.1 Configuring the Oracle 11g Database on the Red Host
This section must be done in SQL*Plus as sysdba You must be connected as "oracle."
On host01, verify that LOG_MODE is set to ARCHIVELOG.
| Host01 - Linux |
[oracle@host01 ~]$ export ORACLE_SID=oggsrc [oracle@host01 ~]$ sqlplus / as sysdba SQL*Plus: Release 11.2.0.3.0 Production on Mon Sep 17 17:19:01 2012 Copyright (c) 1982, 2011, Oracle. All rights reserved. Connected to: Oracle Database 11g Enterprise Edition Release 11.2.0.3.0 - 64bit Production With the Partitioning, OLAP, Data Mining and Real Application Testing options SQL> SELECT log_mode FROM v$database; LOG_MODE ------------ ARCHIVELOG SQL> |
The result should be ARCHIVELOG. You specified ARCHIVELOG mode when you created the database using DBCA. If you did not create the database in ARCHIVELOG mode, do the following:
| Host01 - Linux |
LOG_MODE ------------ NOARCHIVELOG SQL> shutdown immediate Database closed. Database dismounted. ORACLE instance shut down. SQL> startup mount ORACLE instance started. Total System Global Area 3340451840 bytes Fixed Size 2232960 bytes Variable Size 1811942784 bytes Database Buffers 1509949440 bytes Redo Buffers 16326656 bytes Database mounted. SQL> ALTER DATABASE ARCHIVELOG; Database altered. SQL> ALTER DATABASE OPEN; Database altered. SQL> SELECT log_mode FROM v$database; LOG_MODE ------------ ARCHIVELOG SQL> |
Enable supplemental logging and forced logging for the oggsrc database.
| Host01 - Linux |
SQL> SELECT force_logging, supplemental_log_data_min FROM v$database; FOR SUPPLEME --- -------- NO NO SQL> ALTER DATABASE ADD SUPPLEMENTAL LOG DATA; Database altered. SQL> ALTER DATABASE FORCE LOGGING; Database altered. SQL> ALTER SYSTEM SWITCH LOGFILE; System altered. SQL> SELECT force_logging, supplemental_log_data_min FROM v$database; FOR SUPPLEME --- -------- YES YES SQL> EXIT Disconnected from Oracle Database 11g Enterprise Edition Release 11.2.0.3.0 - 64bit Production With the Partitioning, OLAP, Data Mining and Real Application Testing options [oracle@host01 ~]$ |
Overwrite the Oracle RDBMS password file to enable case insensitivity. This step is important for Data Guard Log Shipping. The two instances oggsrc and oggdwn must be able to communicate over the network in order for the redo log files to be automatically sent from oggsrc to oggdwn. You are going to change several instance parameters to enable Data Guard log Shipping, so it is a good idea to save the current parameter set into a file (/tmp/oggsrc_init.ora) before you actually change any parameter.
NOTE: you are unsetting ORACLE_SID and you are providing the password for the oggsrc instance in upper case to test that case insensitivity has been properly set up.
| Host01 - Linux |
[oracle@host01 ~]$ cd ${ORACLE_HOME}/dbs [oracle@host01 dbs]$ orapwd file=orapwoggsrc password=oracle ignorecase=Y entries=30 force=Y [oracle@host01 dbs]$ export ORACLE_SID="" [oracle@host01 dbs]$ sqlplus sys/ORACLE@oggsrc as sysdba SQL*Plus: Release 11.2.0.3.0 Production on Wed May 22 10:08:30 2013 Copyright (c) 1982, 2011, Oracle. All rights reserved. Connected to: Oracle Database 11g Enterprise Edition Release 11.2.0.3.0 - 64bit Production With the Partitioning, OLAP, Data Mining and Real Application Testing options SQL> create pfile='/tmp/oggsrc_init.ora' from spfile; File created. SQL> exit Disconnected from Oracle Database 11g Enterprise Edition Release 11.2.0.3.0 - 64bit Production With the Partitioning, OLAP, Data Mining and Real Application Testing options [oracle@host01 ~]$ |
Reset the ORACLE_SID
variable to point to the oggsrc
instance. Connect to the oggsrc
instance as sysdba
and bounce (shutdown and startup) the instance.
Create the tablespace oggdata,
which will host the objects used by this OBE for
replication. Also, create the users/schemas oggadm, oggsrc and oggtrg
giving DBA
privileges to oggadm
and only CONNECT,
RESOURCE, UNLIMITED TABLESPACE to
oggsrc and oggtrg.
In real life, the user/schema owner would
probably have more privileges, and the
administrator would have less privileges.In
this OBE the setup is simplified to save time.
| Host01 - Linux |
[oracle@host01 ~]$ export ORACLE_SID=oggsrc [oracle@host01 ~]$ sqlplus sys/oracle as sysdba SQL*Plus: Release 11.2.0.3.0 Production on Wed May 22 10:08:30 2013 Copyright (c) 1982, 2011, Oracle. All rights reserved. Connected to: Oracle Database 11g Enterprise Edition Release 11.2.0.3.0 - 64bit Production With the Partitioning, OLAP, Data Mining and Real Application Testing options SQL> shutdown immediate Database closed. Database dismounted. ORACLE instance shut down. SQL> startup open ORACLE instance started. Total System Global Area 2622255104 bytes Fixed Size 2231232 bytes Variable Size 2063598656 bytes Database Buffers 536870912 bytes Redo Buffers 19554304 bytes Database mounted. Database opened. SQL> create tablespace oggdata datafile '/u02/oradata/oggsrc/oggdata01.dbf' size 100M extent management local uniform size 256k; Tablespace created. SQL> CREATE USER oggadm IDENTIFIED BY Welcome1 default tablespace oggdata; User created. SQL> GRANT dba TO oggadm; Grant succeeded. SQL> CREATE USER oggsrc IDENTIFIED BY Welcome1 default tablespace oggdata; User created. SQL> GRANT CONNECT, RESOURCE, UNLIMITED TABLESPACE TO oggsrc; Grant succeeded. SQL> CREATE USER oggtrg IDENTIFIED BY Welcome1 default tablespace oggdata; User created. SQL> GRANT CONNECT, RESOURCE, UNLIMITED TABLESPACE TO oggtrg; Grant succeeded. SQL> |
While still connected to the oggsrc database as sysdba, configure the source database oggsrc to transmit the Redo log files to the downstream mining database oggdwn by setting the LOG_ARCHIVE_DEST_2 parameter for log shipping. Then set the DG_CONFIG attribute of the LOG_ARCHIVE_CONFIG initialization parameter to include the DB_UNIQUE_NAME of the source database oggsrc and the downstream database oggdwn. Determine the size of the source log file and the number of online log file groups that are configured on the source database:
| Host01 - Linux |
SQL> alter system set log_archive_dest_2='SERVICE=OGGDWN SYNC NOREGISTER |
You will configure the standby Redo log files on the downstream instance oggdwn running on the Green Host (host02.) The standby Redo log files must be at least of the same size as the original Redo log files from the source database. In addition, the number of log file groups must be the number of Redo log groups in the source database, plus one. On the Green Host (host02) you will configure the standby Redo logs to be 60 megabytes, and each standby Redo group will contain 4 Redo logs.
3.2 Configuring the Oracle 11g Database on the Green Host
This section must be done in SQL*Plus as sysdba You must be connected as "oracle."
On host02, verify that LOG_MODE is set to ARCHIVELOG.
| Host02 - Linux |
[oracle@host02 ~]$ export ORACLE_SID=oggdwn [oracle@host02 ~]$ sqlplus / as sysdba SQL*Plus: Release 11.2.0.3.0 Production on Mon Sep 17 17:19:01 2012 Copyright (c) 1982, 2011, Oracle. All rights reserved. Connected to: Oracle Database 11g Enterprise Edition Release 11.2.0.3.0 - 64bit Production With the Partitioning, OLAP, Data Mining and Real Application Testing options SQL> SELECT log_mode FROM v$database; LOG_MODE ------------ ARCHIVELOG SQL> |
The result should be ARCHIVELOG. You specified ARCHIVELOG mode when you created the database using DBCA. If you did not create the database in ARCHIVELOG mode, do the following:
| Host02 - Linux |
LOG_MODE ------------ NOARCHIVELOG SQL> shutdown immediate Database closed. Database dismounted. ORACLE instance shut down. SQL> startup mount ORACLE instance started. Total System Global Area 3340451840 bytes Fixed Size 2232960 bytes Variable Size 1811942784 bytes Database Buffers 1509949440 bytes Redo Buffers 16326656 bytes Database mounted. SQL> ALTER DATABASE ARCHIVELOG; Database altered. SQL> ALTER DATABASE OPEN; Database altered. SQL> SELECT log_mode FROM v$database; LOG_MODE ------------ ARCHIVELOG SQL> |
Overwrite the Oracle RDBMS password file to enable case insensitivity. This step is important for Data Guard Log Shipping. The two instances oggsrc and oggdwn must be able to communicate over the network in order for the redo log files to be automatically sent from oggsrc to oggdwn. You are going to change several instance parameters to enable Data Guard log Shipping, so it is a good idea to save the current parameter set into a file (/tmp/oggdwn_init.ora) before you actually change any parameter.
NOTE: you are unsetting ORACLE_SID and you are providing the password for the oggdwn instance in upper case to test that case insensitivity has been properly set up.
| Host01 - Linux |
[oracle@host02 ~]$ cd ${ORACLE_HOME}/dbs [oracle@host02 dbs]$ orapwd file=orapwoggdwn password=oracle ignorecase=Y entries=30 force=Y [oracle@host02 dbs]$ export ORACLE_SID="" [oracle@host02 dbs]$ sqlplus sys/ORACLE@oggdwn as sysdba SQL*Plus: Release 11.2.0.3.0 Production on Wed May 22 10:08:30 2013 Copyright (c) 1982, 2011, Oracle. All rights reserved. Connected to: Oracle Database 11g Enterprise Edition Release 11.2.0.3.0 - 64bit Production With the Partitioning, OLAP, Data Mining and Real Application Testing options SQL> create pfile='/tmp/oggdwn_init.ora' from spfile; File created. SQL> exit Disconnected from Oracle Database 11g Enterprise Edition Release 11.2.0.3.0 - 64bit Production With the Partitioning, OLAP, Data Mining and Real Application Testing options [oracle@host02 ~]$ |
Reset the ORACLE_SID
variable to point to the oggdwn
instance. Connect to the oggdwn
instance as sysdba
and bounce (shutdown and startup) the instance.
Create the tablespace oggdata,
which will host the objects used by this OBE for
replication. Also, create the users/schemas oggadm, oggsrc and oggtrg giving DBA privileges to oggadm and only CONNECT, RESOURCE,
UNLIMITED TABLESPACE to
oggsrc and oggtrg.
In real life, the user/schema owner would
probably have more privileges, and the
administrator would have less privileges.In
this OBE the setup is simplified to save time.
| Host02 - Linux |
[oracle@host02 ~]$ export ORACLE_SID=oggdwn [oracle@host02 ~]$ sqlplus sys/oracle as sysdba SQL*Plus: Release 11.2.0.3.0 Production on Wed May 22 10:08:30 2013 Copyright (c) 1982, 2011, Oracle. All rights reserved. Connected to: Oracle Database 11g Enterprise Edition Release 11.2.0.3.0 - 64bit Production With the Partitioning, OLAP, Data Mining and Real Application Testing options SQL> shutdown immediate Database closed. Database dismounted. ORACLE instance shut down. SQL> startup open ORACLE instance started. Total System Global Area 2622255104 bytes Fixed Size 2231232 bytes Variable Size 2063598656 bytes Database Buffers 536870912 bytes Redo Buffers 19554304 bytes Database mounted. Database opened. SQL> create tablespace oggdata datafile '/u02/oradata/oggdwn/oggdata01.dbf' size 100M extent management local uniform size 256k; Tablespace created. SQL> CREATE USER oggadmdwn IDENTIFIED BY Welcome1 default tablespace oggdata; User created. SQL> GRANT dba TO oggadmdwn; Grant succeeded. SQL> exec DBMS_GOLDENGATE_AUTH.GRANT_ADMIN_PRIVILEGE(grantee=>'OGGADMDWN', privilege_type=>'capture', |
On the Green Host (host02)
you must create additional directories which will host
the Redo log files, archived Redo log files and
standby Redo log files being shipped from the source
database oggsrc.
Logged in to the Oracle RDBMS as sysdba
you then set the archive destination parameters
affecting Redo logs, archived Redo logs and standby
Redo logs.
| Host02 - Linux |
[oracle@host02 ~] mkdir /u02/oradata/oggdwn/arch [oracle@host02 ~] mkdir /u02/oradata/oggdwn/redo [oracle@host02 ~] mkdir /u02/oradata/oggdwn/standby [oracle@host02 ~]$ ls -l /u02/oradata/oggdwn | grep drw drwxr-xr-x 2 oracle oinstall 4096 May 21 10:22 arch drwxr-xr-x 2 oracle oinstall 4096 May 20 16:53 redo drwxr-xr-x 2 oracle oinstall 4096 May 21 10:19 standby [oracle@host02 ~]$ export ORACLE_SID=oggdwn [oracle@host02 ~]$ sqlplus sys/oracle as sysdba SQL*Plus: Release 11.2.0.3.0 Production on Wed May 22 10:08:30 2013 Copyright (c) 1982, 2011, Oracle. All rights reserved. Connected to: Oracle Database 11g Enterprise Edition Release 11.2.0.3.0 - 64bit Production With the Partitioning, OLAP, Data Mining and Real Application Testing options SQL> alter system set log_archive_dest_1='LOCATION=/u02/oradata/oggdwn/arch VALID_FOR=(ONLINE_LOGFILE,PRIMARY_ROLE)'; System altered. SQL> alter system set log_archive_dest_2='LOCATION=/u02/oradata/oggdwn/standby VALID_FOR=(STANDBY_LOGFILE,ALL_ROLES)'; System altered. SQL> alter system set log_archive_config='DG_CONFIG=(oggsrc,oggdwn)'; System altered. SQL> alter system set log_archive_dest_state_1='ENABLE'; System altered. SQL> alter system set log_archive_dest_state_2='ENABLE'; System altered. SQL> alter database add standby logfile group 4 ('/u02/oradata/oggdwn/redo/slog4a.rdo','/u02/oradata/oggdwn/redo/slog4b.rdo') size 60M; Database altered. SQL> alter database add standby logfile group 5 ('/u02/oradata/oggdwn/redo/slog5a.rdo','/u02/oradata/oggdwn/redo/slog5b.rdo') size 60M; Database altered. SQL> alter database add standby logfile group 6 ('/u02/oradata/oggdwn/redo/slog6a.rdo','/u02/oradata/oggdwn/redo/slog6b.rdo') size 60M; Database altered. SQL> alter database add standby logfile group 7 ('/u02/oradata/oggdwn/redo/slog7a.rdo','/u02/oradata/oggdwn/redo/slog7b.rdo') size 60M; Database altered. SQL> select group#,thread#,sequence#,archived,status from V$STANDBY_LOG; GROUP# THREAD# SEQUENCE# ARC STATUS ---------- ---------- ---------- --- ---------- 4 0 0 YES UNASSIGNED 5 0 0 YES UNASSIGNED 6 0 0 YES UNASSIGNED 7 0 0 YES UNASSIGNED SQL> [oracle@host01 ~]$ |
3.3 Creating Startup Files and Managers
Create the Manager parameter (mgr.prm) file on the Red Host in dirprm/.
Change directory to /opt/oggtrg.
Start GGSCI. Edit the file with no extension. Add the
five lines.
Save the manager parameter file and start the manager.
| Host01 - Linux |
[oracle@host01 ~]$ cd /opt/oggtrg [oracle@host01 oggtrg]$ ./ggsci Oracle GoldenGate Command Interpreter for Oracle Version 11.2.1.0.3 14400833 OGGCORE_11.2.1.0.3_PLATFORMS_120823.1258_FBO Linux, x64, 64bit (optimized), Oracle 11g on Aug 23 2012 20:20:21 Copyright (C) 1995, 2012, Oracle and/or its affiliates. All rights reserved. GGSCI (host01.example.com) 1> Edit Param mgr Port 7909 DynamicPortList 20100-20199 PurgeOldExtracts ./dirdat/pe*, UseCheckPoints, MinKeepHours 2 Autostart Replicat R* AUTORESTART Replicat *, WaitMinutes 1, Retries 3 GGSCI (host01.example.com) 2> Info mgr Manager is DOWN! GGSCI (host01.example.com) 3> Start mgr Manager started. GGSCI (host01.example.com)4> Info mgr Manager is running (IP port host01.example.com.7909). GGSCI (host01.example.com) 5> exit [oracle@host01 oggtrg]$ |
Note: If you do it correctly, GGSCI
automatically adds the .prm
extension and stores the file in the dirprm/
directory. If you wrongly
add the extension yourself, GGSCI converts the
filename to UPPERCASE and stores it in the
installation directory which renders the file
practically unusable.
Create the Manager parameter (mgr.prm)
file on the Green Host (host02) in /opt/oggdwn/dirprm/
for the downstream Extract processes.
Change directory to /opt/oggdwn,
invoke ./ggsci
and create the manager parameter file. Save the file
and start the manager.
| Host02 - Linux |
[oracle@host02 ~]$ cd /opt/oggdwn [oracle@host02 oggdwn]$ ./ggsci Oracle GoldenGate Command Interpreter for Oracle Version 11.2.1.0.3 14400833 OGGCORE_11.2.1.0.3_PLATFORMS_120823.1258_FBO Linux, x64, 64bit (optimized), Oracle 11g on Aug 23 2012 20:20:21 Copyright (C) 1995, 2012, Oracle and/or its affiliates. All rights reserved. GGSCI (host02.example.com) 1> Edit Param mgr Port 7809 DynamicPortList 20000-20099 PurgeOldExtracts ./dirdat/*, UseCheckPoints, MinKeepHours 2 Autostart Extract E* AUTORESTART Extract *, WaitMinutes 1, Retries 3 GGSCI (host02.example.com) 2> Info mgr Manager is DOWN! GGSCI (host02.example.com) 3> Start mgr Manager started. GGSCI (host02.example.com) 4> Info mgr Manager is running (IP port host02.example.com.7809). GGSCI (host02.example.com) 5> exit [oracle@host02 oggdwn]$ |
The global and startup files are all created, and the
background Manager processes are started.
You can verify which processes are running at any time by
entering the command:
GGSCI (host) >
Info All
3.4 Creating Tables
Create empty source sample tables on the Red Host in the schema oggsrc.
You can use any SQL utility you like to run the
script. If you have no preference, use sqlplus.
Run the
oracle_source_table_creation.sql
script to create the necessary objects, then run the
script
economic_entity.sql
to populate the ECONOMIC_ENTITY
table
| Host01 - Linux |
[oracle@host01 ~] cd ~/obe [oracle@host01 obe]sqlplus oggsrc/Welcome1@oggsrc SQL*Plus: Release 11.2.0.3.0 Production on Tue Sep 18 14:38:50 2012 Copyright (c) 1982, 2011, Oracle. All rights reserved. Connected to: Oracle Database 11g Enterprise Edition Release 11.2.0.3.0 - 64bit Production With the Partitioning, OLAP, Data Mining and Real Application Testing options |
Create empty source sample tables on the Red Host in the schema oggtrg (the replication target schema.)
Connect to the oggsrc
instance (oggtrg
schema) and run the oracle_target_table_creation.sql
script to create the necessary objects, then run the
script economic_entity.sql
to populate the
ECONOMIC_ENTITY
table. You are creating the necessary objects in the
target replication schema.
| Host01 - Linux |
[oracle@host01 ~] cd ~/obe [oracle@host01 obe]sqlplus oggtrg/Welcome1@oggsrc SQL*Plus: Release 11.2.0.3.0 Production on Tue Sep 18 14:38:50 2012 Copyright (c) 1982, 2011, Oracle. All rights reserved. Connected to: Oracle Database 11g Enterprise Edition Release 11.2.0.3.0 - 64bit Production With the Partitioning, OLAP, Data Mining and Real Application Testing options SQL> @oracle_target_table_creation.sql Table created. Table created. Table created. SQL> select * from cat; TABLE_NAME TABLE_TYPE ------------------------------ ----------- ECONOMIC_ENTITY TABLE GDP_BY_YEAR TABLE GDP_GROWTH_BY_YEAR TABLE SQL> @economic_entity.sql 1 row created. 1 row created. ... many lines omitted for clarity ... 1 row created. Commit complete. SQL> exit [oracle@host01 obe]$ |
3.5 Adding Transaction Data
Restart GGSCI and run Add TranData for the whole user schema used as a replication source (oggsrc.)
| Host01 - Linux |
[oracle@host01 ~]$ cd /opt/oggtrg [oracle@host01 oggtrg]$ ./ggsci Oracle GoldenGate Command Interpreter for Oracle Version 11.2.1.0.3 14400833 OGGCORE_11.2.1.0.3_PLATFORMS_120823.1258_FBO Linux, x64, 64bit (optimized), Oracle 11g on Aug 23 2012 20:20:21 Copyright (C) 1995, 2012, Oracle and/or its affiliates. All rights reserved. GGSCI (host01) 1> dblogin userid oggadm@oggsrc, password Welcome1 Successfully logged into database. GGSCI (host01) 2> info trandata oggsrc.* Logging of supplemental redo log data is disabled for table OGGSRC.ECONOMIC_ENTITY. Logging of supplemental redo log data is disabled for table OGGSRC.GDP_BY_YEAR. Logging of supplemental redo log data is disabled for table OGGSRC.GDP_GROWTH_BY_YEAR. GGSCI (host01) 3> add trandata oggsrc.* Logging of supplemental redo data enabled for table OGGSRC.ECONOMIC_ENTITY. Logging of supplemental redo data enabled for table OGGSRC.GDP_BY_YEAR. Logging of supplemental redo data enabled for table OGGSRC.GDP_GROWTH_BY_YEAR. GGSCI (host01) 4> info trandata oggsrc.* Logging of supplemental redo log data is enabled for table OGGSRC.ECONOMIC_ENTITY. Columns supplementally logged for table OGGSRC.ECONOMIC_ENTITY: ENTITY_ID. Logging of supplemental redo log data is enabled for table OGGSRC.GDP_BY_YEAR. Columns supplementally logged for table OGGSRC.GDP_BY_YEAR: ENTITY_ID, GDP_YEAR. Logging of supplemental redo log data is enabled for table OGGSRC.GDP_GROWTH_BY_YEAR. Columns supplementally logged for table OGGSRC.GDP_GROWTH_BY_YEAR: ENTITY_ID, GDP_YEAR. GGSCI (host01) 5> exit |
Note that you can add transaction data for an
individual table or for wildcards. The wildcards can
be for a whole schema, but there is a better way to do
whole schemas.
There is no harm in adding transaction data twice.
The transaction data has been enabled for all user tables involved with Oracle GoldenGate.
4. Configuring Data Capture Using Extract
Data capture, also known as Extract, in a Downstream
Deployment configuration, is done on the downstream side. A
primary extract is required;
a secondary extract, known as a Data Pump, is optional but
highly recommended. To configure data capture, perform the
following steps:
4.1 Configuring the Primary Extract on the Oracle downstream instance
On the downstream host02 create the primary Extract parameter file.
Using the naming conventions discussed in the Overview, the path/filename.ext will be dirprm/exdwn.prm. The path and extension will be added automatically.
| Host02 - Linux |
[oracle@host02 ~] cd /opt/oggdwn [oracle@host02 oggdwn] ./ggsci Oracle GoldenGate Command Interpreter for Oracle ... many lines omitted for clarity ... GGSCI (host02.example.com) 1> dblogin userid oggadm@oggsrc, password Welcome1 Successfully logged into database. GGSCI (host02.example.com) 2> miningdblogin userid oggadmdwn, password Welcome1 Successfully logged into mining database. GGSCI (host02.example.com) 3> register extract exdwn database 2013-05-22 14:21:22 INFO OGG-02003 Extract EXDWN successfully registered |
In your environment the SCN number will inevitably be different. That is normal and can be safely disregarded.
You can check your work by entering View Param exdwn any time.
Create the Extract group and the local Extract trail file.
| Host02 - Linux |
GGSCI (host02.example.com) > add extract exdwn, integrated tranlog, begin now EXTRACT added. GGSCI (host02.example.com) > add exttrail ./dirdat/dw, extract exdwn, megabytes 10 EXTTRAIL added. GGSCI (host02.example.com) > |
The Megabytes 10 is optional. The default is 100 Megabytes.
The primary Extract has been created and configured, but not started. Leave GGSCI running for the next step.
4.2 Configuring the Data Pump
Create the secondary Extract (data pump) parameter file.
Using the naming conventions discussed in the Overview, the path/filename.ext will be dirprm/pmpdw.prm. The path and extension will be added automatically.
The remote host RmtHost
is host01 in the
example. If you are running this OBE in one
environment simulating both source and downstream
hosts, be sure to have host01
defined in /etc/hosts,
pointing to 127.0.0.1.
Perform a ping
host01
to make sure that the address is correctly resolved to
127.0.0.1.
If the hostname host01
cannot be resolved into a valid IP Address, the
Extract pump won't start.
| Host02 - Linux |
GGSCI (host02.example.com) > Edit Param pmpdw Extract pmpdw userid oggadm@oggsrc, password Welcome1 rmthost ogg_target, mgrport 7909 rmttrail ./dirdat/pw passthru table oggsrc.*; GGSCI (host02.example.com) > |
This Table schema is the source.
You can check your work by entering View Param pmpdw any time.
Create the data pump group and the remote Extract trail file.
| Host02 - Linux |
GGSCI (host02.example.com) > add extract pmpdw, exttrailsource ./dirdat/dw EXTRACT added. GGSCI (host02.example.com) > add rmttrail ./dirdat/pw, extract pmpdw, megabytes 10 RMTTRAIL added. GGSCI (host02.example.com) > |
The Megabytes 10 is optional. The default is 100 Megabytes.
The data pump reads from the local trail file dw and writes
to the remote trail file pw.
The remote trail file that will be created will be
named dirdat/pw000000,
then when that one fills up the next will be dirdat/pw000001,
then dirdat/pw000002,
and so on. Since the two sets of trail files are on
different hosts, the files
could be named the same thing (for example dw).
The different file name is chosen just to illustrate
that the parameter RmtTrail
is creating a different trail file.
The secondary Extract has been created and configured, but not started. Leave GGSCI running for the next step.
4.3 Verify the Extract Processes (Optional)
Make sure the Extract processes were created and registered correctly.
| Host01 - Linux |
GGSCI (host02.example.com) > Info All

Program     Status      Group       Lag at Chkpt  Time Since Chkpt

MANAGER     RUNNING
EXTRACT     STOPPED     EXDWN       00:00:00      00:03:24
EXTRACT     STOPPED     PMPDW       00:00:00      00:01:22

GGSCI (host02.example.com) >
|
Since nothing other than the Manager is started yet, the Extract Status should say STOPPED.
Make sure the trail files were created and registered correctly.
| Host02 - Linux |
GGSCI (host02.example.com) > Info ExtTrail *

       Extract Trail: ./dirdat/dw
             Extract: EXDWN
               Seqno: 0
                 RBA: 0
           File Size: 10M

       Extract Trail: ./dirdat/pw
             Extract: PMPDW
               Seqno: 0
                 RBA: 0
           File Size: 10M

GGSCI (host02.example.com) >
|
Since nothing has started yet, the sequence numbers (Seqno) and relative byte addresses (RBA) should say 0.
Leave GGSCI running for the next step.
5. Configuring Data Delivery to the Red Host (host01)
When the replication target is a database, data delivery is
accomplished by a Replicat process. This OBE simulates
replication between
two schemas (oggsrc,
the replication source and oggtrg,
the replication target ) of the same database (oggsrc.)
To configure data delivery, perform the following steps:
5.1 Configuring the Replicat process
Using the naming conventions discussed in the Overview, the path/filename.ext will be dirprm/rpdw.prm. The path and extension will be added automatically.
| Host01 - Linux |
[oracle@host01 ~]$ cd /opt/oggtrg [oracle@host01 oggtrg]$ ./ggsci Oracle GoldenGate Command Interpreter for Oracle ... many lines omitted for clarity ... GGSCI (host01.example.com) 1> Edit Param rpdw Replicat rpdw SETENV(ORACLE_HOME="/u01/app/oracle/product/11.2.0/dbhome_1") SETENV(ORACLE_SID = "oggsrc") AssumeTargetDefs DiscardFile ./dirrpt/rpdw.dsc, Purge UserID oggadm, Password Welcome1 Map oggsrc.*, target oggtrg.*; GGSCI (host01.example.com) 2> |
Leave the editor saving the file rpdw.prm. Add the Replicat rpdw connecting it to the Exttrail ./dirdat/pw
| Host01 - Linux |
GGSCI (host01.example.com) 2> info all Program Status Group Lag at Chkpt Time Since Chkpt MANAGER RUNNING GGSCI (host01.example.com) 3> add replicat rpdw, exttrail ./dirdat/pw, nodbcheckpoint |
5.2 Starting All Processes
Start all Extract processes on the downstream database (Green Host, host02).
| Host02 - Linux |
GGSCI (host02.example.com) > Start Extract *

Sending START request to MANAGER ...
EXTRACT EXDWN starting

Sending START request to MANAGER ...
EXTRACT PMPDW starting

GGSCI (host02.example.com) >
|
Alternatively, you could have entered, Start *, or Start e* and Start p*.
NOTE: The
primary Extract process can be in either STOPPED
or ABENDED
status after you start it.. That happens because
no Redo logs have been shipped yet from the source
database. You can try to connect to the source
database on the Red
host (host01) as sysdba
and issue the command "alter
system switch logfile;"However, the Oracle
GoldenGate
manager has been set up to retry starting the
Extract and eventually the Extract will be started
by the Oracle GoldenGate manager,
after the Redo log files shipped from the source
database have been deposited in their directory .
On the Red Host (host01) start the Replicat process on the target:
| Host01 - Linux |
GGSCI (host01.example.com) 5> info all Program Status Group Lag at Chkpt Time Since Chkpt MANAGER RUNNING REPLICAT STOPPED RPDW 00:00:00 00:00:04 GGSCI (host01.example.com) 6> start rpdw Sending START request to MANAGER ... REPLICAT RPDW starting GGSCI (host01.example.com) 7> info all Program Status Group Lag at Chkpt Time Since Chkpt MANAGER RUNNING REPLICAT RUNNING RPDW 45:11:35 00:00:02 GGSCI (host01.example.com) 8> |
Display more information about the RPDW Replicat process.
| Host01 - Linux |
GGSCI (host01.example.com)  > Info rpdw

REPLICAT   RPDW      Last Started 2013-05-22 15:55   Status RUNNING
Checkpoint Lag       00:00:00 (updated 00:00:02 ago)
Log Read Checkpoint  File ./dirdat/pw000000
                     2013-05-22 14:31:09.595793  RBA 0

GGSCI (host01.example.com) >
|
Display the most detailed information.
| Host01 - Linux |
GGSCI (host01.example.com) > Info rpdw, Detail

REPLICAT   RPDW      Last Started 2013-05-22 15:55   Status RUNNING
Checkpoint Lag       00:00:00 (updated 00:00:04 ago)
Log Read Checkpoint  File ./dirdat/pw000000
                     2013-05-22 14:31:09.595793  RBA 0

  Extract Source                          Begin             End

  ./dirdat/pw000000                       * Initialized *   First Record
  ./dirdat/pw000000                       * Initialized *   First Record


Current directory    /opt/oggtrg

Report file          /opt/oggtrg/dirrpt/RPDW.rpt
Parameter file       /opt/oggtrg/dirprm/rpdw.prm
Checkpoint file      /opt/oggtrg/dirchk/RPDW.cpr
Process file         /opt/oggtrg/dirpcs/RPDW.pcr
Stdout file          /opt/oggtrg/dirout/RPDW.out
Error log            /opt/oggtrg/ggserr.log


GGSCI (host01.example.com) >
|
In all cases, the Status should be RUNNING, and the time since the last update or checkpoint should be under 10 seconds.
Display information about all processes on the downstream host (the Green host.)
Display summary information.
| Host02 - Linux |
GGSCI (host01.example.com) > Info All

Program     Status      Group       Lag at Chkpt  Time Since Chkpt

MANAGER     RUNNING
EXTRACT     RUNNING     EXDWN      00:14:14      00:00:00
EXTRACT     RUNNING     PMPDW      00:00:00      00:04:09


GGSCI (host01) >
|
Display detailed information.
| Host02 - Linux |
GGSCI (host01.example.com) > Info Extract * EXTRACT EXDWN Last Started 2012-10-16 15:03 Status RUNNING Checkpoint Lag 00:00:00 (updated 00:00:07 ago) Log Read Checkpoint Oracle Redo Logs 2012-10-16 23:05:04 Seqno 79, RBA 13114368 SCN 0.2248602 (2248602) EXTRACT PMPDW Last Started 2012-10-16 15:03 Status RUNNING Checkpoint Lag 00:00:00 (updated 00:00:06 ago) Log Read Checkpoint File ./dirdat/jw000000 First Record RBA 93747 GGSCI (host01.example.com) > Exit [oracle@host01 oggtrg]$ |
Similar to the Extract on the Green Host, the Status should be RUNNING, and the time since the last update or checkpoint should be under 10 seconds.
Everything should show a status of RUNNING. The source tables are still empty. No data has flowed yet, nothing has replicated yet.
6. Generating Data and Testing Replication
There is a difference in how you replicate an existing table (more complicated) versus starting with a new empty table (simpler). To generate sample data against an empty set of tables, perform the following steps:
6.1 Generating INSERTs
Run the SQL script gdp_by_year_2008.sql, stored in the /home/oracle/obe directory, to INSERT rows.
On the Red Host (replication source), change
directory to /home/oracle/obe
and invoke sqlplus.
Execute the gdp_by_year_2008.sql
script, then compute the number of rows in the table GDP_BY_YEAR.
| Host01 - Linux |
[oracle@host01 ~]$ cd ~/obe [oracle@host01 obe]$ sqlplus oggsrc/Welcome1@oggsrc SQL*Plus: Release 11.2.0.3.0 Production on Wed Sep 19 19:27:03 2012 Copyright (c) 1982, 2011, Oracle. All rights reserved. Connected to: Oracle Database 11g Enterprise Edition Release 11.2.0.3.0 - 64bit Production With the Partitioning, OLAP, Data Mining and Real Application Testing options SQL> @gdp_by_year_2008.sql 1 row created. 1 row created. ... many lines omitted for clarity ... 1 row created. Commit complete. SQL> select count(*) from gdp_by_year; COUNT(*) ---------- 235 SQL> |
There should not be any errors. Leave SQL*Plus running for the next step.
Verify that the rows were inserted into the table in the replication target schema (oggtrg.)
| Host01 - Linux |
SQL> connect oggtrg/Welcome1@oggsrc Connected. SQL> select count(*) from gdp_by_year; COUNT(*) ---------- 235 SQL> show user USER is "OGGTRG" SQL> exit [oracle@host01 obe]$ |
Verify that the downstream GGSCI Extract processes are still running.
On source Green Host (host02), enter the following command:
| Host02 - Linux |
[oracle@host02 ~]$ cd /opt/oggdwn [oracle@host02 oggdwn]$ ./ggsci GGSCI (host02.example.com) 1> Info All Program Status Group Lag at Chkpt Time Since Chkpt MANAGER RUNNING EXTRACT RUNNING EXDWN 00:00:00 00:00:07 EXTRACT RUNNING PMPDW 00:00:00 00:00:03 GGSCI (host02.example.com) 2> |
If the Status
says ABENDED,
then check the process reports to see what the error
was.You should use the
command view report
exdwn or view
report pmpdw to find out what happened to
the Extract group.
Use the Stats
command to request the Extract processes EXDWN
and PMPDW to
display to the screen statistics
about their run so far:
| Host02 - Linux |
GGSCI (host02.example.com) > stats exdwn Sending STATS request to EXTRACT EXDWN ... Start of Statistics at 2013-05-23 11:38:12. Output to ./dirdat/dw: Extracting from OGGSRC.GDP_BY_YEAR to OGGSRC.GDP_BY_YEAR: *** Total statistics since 2013-05-23 11:34:41 *** Total inserts 235.00 Total updates 0.00 Total deletes 0.00 Total discards 0.00 Total operations 235.00 *** Daily statistics since 2013-05-23 11:34:41 *** Total inserts 235.00 Total updates 0.00 Total deletes 0.00 Total discards 0.00 Total operations 235.00 *** Hourly statistics since 2013-05-23 11:34:41 *** Total inserts 235.00 Total updates 0.00 Total deletes 0.00 Total discards 0.00 Total operations 235.00 *** Latest statistics since 2013-05-23 11:34:41 *** Total inserts 235.00 Total updates 0.00 Total deletes 0.00 Total discards 0.00 Total operations 235.00 End of Statistics. GGSCI (host02.example.com) > stats pmpdw Sending STATS request to EXTRACT PMPDW ... Start of Statistics at 2013-05-23 11:38:23. Output to ./dirdat/pw: Extracting from OGGSRC.GDP_BY_YEAR to OGGSRC.GDP_BY_YEAR: *** Total statistics since 2013-05-23 11:34:41 *** Total inserts 235.00 Total updates 0.00 Total deletes 0.00 Total discards 0.00 Total operations 235.00 *** Daily statistics since 2013-05-23 11:34:41 *** Total inserts 235.00 Total updates 0.00 Total deletes 0.00 Total discards 0.00 Total operations 235.00 *** Hourly statistics since 2013-05-23 11:34:41 *** Total inserts 235.00 Total updates 0.00 Total deletes 0.00 Total discards 0.00 Total operations 235.00 *** Latest statistics since 2013-05-23 11:34:41 *** Total inserts 235.00 Total updates 0.00 Total deletes 0.00 Total discards 0.00 Total operations 235.00 End of Statistics. GGSCI (host02.example.com) > |
Verify that the target GGSCI Replicat process is still running.
On the Red Host (host01), GGSCI should still be running. Enter the following command:
| Host01 - Linux |
GGSCI (host01.example.com) > Info All

Program      Status      Group       Lag at Chkpt  Time Since Chkpt

MANAGER      RUNNING
REPLICAT     RUNNING     RPDW        00:00:00      00:00:07

GGSCI (host01.example.com) >
|
If the Status
says ABENDED,
then check the process reports to see what the error
was. You should use the command
view report rpdw to find out what happened
to the Replicat group
Use the Stats command to request the Replicat process RPDW to display to the screen statistics about its run so far:
| Host01 - Linux |
GGSCI (host01.example.com) > stats rpdw

Sending STATS request to REPLICAT RPDW ...

Start of Statistics at 2013-05-23 11:37:09.

Replicating from OGGSRC.GDP_BY_YEAR to OGGTRG.GDP_BY_YEAR:

*** Total statistics since 2013-05-23 11:34:54 ***
        Total inserts                                    235.00
        Total updates                                      0.00
        Total deletes                                      0.00
        Total discards                                     0.00
        Total operations                                 235.00

*** Daily statistics since 2013-05-23 11:34:54 ***
        Total inserts                                    235.00
        Total updates                                      0.00
        Total deletes                                      0.00
        Total discards                                     0.00
        Total operations                                 235.00

*** Hourly statistics since 2013-05-23 11:34:54 ***
        Total inserts                                    235.00
        Total updates                                      0.00
        Total deletes                                      0.00
        Total discards                                     0.00
        Total operations                                 235.00

*** Latest statistics since 2013-05-23 11:34:54 ***
        Total inserts                                    235.00
        Total updates                                      0.00
        Total deletes                                      0.00
        Total discards                                     0.00
        Total operations                                 235.00

End of Statistics.

GGSCI (host01.example.com) >
|
6.2 Generating UPDATEs/DELETEs
On the Red Host, at the OS prompt, use sqlplus
to connect to the RDBMS instance as the oggsrc
user.
In the ECONOMIC_ENTITY
table all economic entities which are not single
countries, like "East Asia Less Japan" or "Other
Western Europe"
are listed as "N/A"
in the CONTINENT
column. Change "N/A"
to "Not a continent".
In addition, the GDP_BY_YEAR
and GDP_GROWTH_BY_YEAR
tables contain economic data for the years 2005-2007.
Erase all entries pertaining to the year 2005.
| Host01 - Linux |
[oracle@host01 ~] sqlplus oggsrc/Welcome1@oggsrc SQL*Plus: Release 11.2.0.3.0 Production on Wed Oct 3 01:14:24 2012 Copyright (c) 1982, 2011, Oracle. All rights reserved. Connected to: Oracle Database 11g Enterprise Edition Release 11.2.0.3.0 - 64bit Production With the Partitioning, OLAP, Data Mining and Real Application Testing options SQL> UPDATE ECONOMIC_ENTITY set CONTINENT = 'Not a continent' WHERE CONTINENT = 'N/A'; 36 rows updated. SQL> DELETE FROM GDP_BY_YEAR where GDP_YEAR=2008; 235 rows deleted. SQL> commit; Commit complete. SQL> exit [oracle@host01 ~]$ |
Use the Stats
command to request the Extract processes EXDWN
and PMPDW to
display to the screen statistics
about their run so far:
| Host02 - Linux |
GGSCI (host02.example.com) > stats exdwn Sending STATS request to EXTRACT EXDWN ... Start of Statistics at 2013-05-23 12:48:11. Output to ./dirdat/dw: Extracting from OGGSRC.GDP_BY_YEAR to OGGSRC.GDP_BY_YEAR: *** Total statistics since 2013-05-23 11:34:41 *** Total inserts 235.00 Total updates 0.00 Total deletes 235.00 Total discards 0.00 Total operations 470.00 *** Daily statistics since 2013-05-23 11:34:41 *** Total inserts 235.00 Total updates 0.00 Total deletes 235.00 Total discards 0.00 Total operations 470.00 *** Hourly statistics since 2013-05-23 12:00:00 *** Total inserts 0.00 Total updates 0.00 Total deletes 235.00 Total discards 0.00 Total operations 235.00 *** Latest statistics since 2013-05-23 11:34:41 *** Total inserts 235.00 Total updates 0.00 Total deletes 235.00 Total discards 0.00 Total operations 470.00 Extracting from OGGSRC.ECONOMIC_ENTITY to OGGSRC.ECONOMIC_ENTITY: *** Total statistics since 2013-05-23 11:34:41 *** Total inserts 0.00 Total updates 36.00 Total deletes 0.00 Total discards 0.00 Total operations 36.00 *** Daily statistics since 2013-05-23 11:34:41 *** Total inserts 0.00 Total updates 36.00 Total deletes 0.00 Total discards 0.00 Total operations 36.00 *** Hourly statistics since 2013-05-23 12:00:00 *** Total inserts 0.00 Total updates 36.00 Total deletes 0.00 Total discards 0.00 Total operations 36.00 *** Latest statistics since 2013-05-23 11:34:41 *** Total inserts 0.00 Total updates 36.00 Total deletes 0.00 Total discards 0.00 Total operations 36.00 End of Statistics. GGSCI (host02.example.com) > stats pmpdw Sending STATS request to EXTRACT PMPDW ... Start of Statistics at 2013-05-23 12:48:54. Output to ./dirdat/pw: Extracting from OGGSRC.GDP_BY_YEAR to OGGSRC.GDP_BY_YEAR: *** Total statistics since 2013-05-23 11:34:41 *** Total inserts 235.00 Total updates 0.00 Total deletes 235.00 Total discards 0.00 Total operations 470.00 *** Daily statistics since 2013-05-23 11:34:41 *** Total inserts 235.00 Total updates 0.00 Total deletes 235.00 Total discards 0.00 Total operations 470.00 *** Hourly statistics since 2013-05-23 12:00:00 *** Total inserts 0.00 Total updates 0.00 Total deletes 235.00 Total discards 0.00 Total operations 235.00 *** Latest statistics since 2013-05-23 11:34:41 *** Total inserts 235.00 Total updates 0.00 Total deletes 235.00 Total discards 0.00 Total operations 470.00 Extracting from OGGSRC.ECONOMIC_ENTITY to OGGSRC.ECONOMIC_ENTITY: *** Total statistics since 2013-05-23 11:34:41 *** Total inserts 0.00 Total updates 36.00 Total deletes 0.00 Total discards 0.00 Total operations 36.00 *** Daily statistics since 2013-05-23 11:34:41 *** Total inserts 0.00 Total updates 36.00 Total deletes 0.00 Total discards 0.00 Total operations 36.00 *** Hourly statistics since 2013-05-23 12:00:00 *** Total inserts 0.00 Total updates 36.00 Total deletes 0.00 Total discards 0.00 Total operations 36.00 *** Latest statistics since 2013-05-23 11:34:41 *** Total inserts 0.00 Total updates 36.00 Total deletes 0.00 Total discards 0.00 Total operations 36.00 End of Statistics. GGSCI (host02.example.com) > |
Verify that the target GGSCI Replicat process is still running.
On the Red Host (host01), GGSCI should still be running. Enter the following command:
| Host01 - Linux |
GGSCI (host01.example.com) > Info All

Program     Status      Group       Lag at Chkpt  Time Since Chkpt

MANAGER     RUNNING
REPLICAT    RUNNING     RPDW        00:00:00      00:00:00

GGSCI (host01.example.com) >
|
If the Status
says ABENDED,
then check the process reports to see what the error
was. You should use the command
view report rpdw to find out what happened
to the Replicat group
Use the Stats command to request the Replicat process RPDW to display to the screen statistics about its run so far:
| Host01 - Linux |
GGSCI (host01.example.com) > stats rpdw

Sending STATS request to REPLICAT RPDW ...

Start of Statistics at 2013-05-23 12:46:11.

Replicating from OGGSRC.GDP_BY_YEAR to OGGTRG.GDP_BY_YEAR:

*** Total statistics since 2013-05-23 11:34:54 ***
        Total inserts                                    235.00
        Total updates                                      0.00
        Total deletes                                    235.00
        Total discards                                     0.00
        Total operations                                 470.00

*** Daily statistics since 2013-05-23 11:34:54 ***
        Total inserts                                    235.00
        Total updates                                      0.00
        Total deletes                                    235.00
        Total discards                                     0.00
        Total operations                                 470.00

*** Hourly statistics since 2013-05-23 12:00:00 ***
        Total inserts                                      0.00
        Total updates                                      0.00
        Total deletes                                    235.00
        Total discards                                     0.00
        Total operations                                 235.00

*** Latest statistics since 2013-05-23 11:34:54 ***
        Total inserts                                    235.00
        Total updates                                      0.00
        Total deletes                                    235.00
        Total discards                                     0.00
        Total operations                                 470.00

Replicating from OGGSRC.ECONOMIC_ENTITY to OGGTRG.ECONOMIC_ENTITY:

*** Total statistics since 2013-05-23 11:34:54 ***
        Total inserts                                      0.00
        Total updates                                     36.00
        Total deletes                                      0.00
        Total discards                                     0.00
        Total operations                                  36.00

*** Daily statistics since 2013-05-23 11:34:54 ***
        Total inserts                                      0.00
        Total updates                                     36.00
        Total deletes                                      0.00
        Total discards                                     0.00
        Total operations                                  36.00

*** Hourly statistics since 2013-05-23 12:00:00 ***
        Total inserts                                      0.00
        Total updates                                     36.00
        Total deletes                                      0.00
        Total discards                                     0.00
        Total operations                                  36.00

*** Latest statistics since 2013-05-23 11:34:54 ***
        Total inserts                                      0.00
        Total updates                                     36.00
        Total deletes                                      0.00
        Total discards                                     0.00
        Total operations                                  36.00

End of Statistics.

GGSCI (host01.example.com) >
|
This completes the configuration and operation of the basic heterogeneous unidirectional functionality of Oracle GoldenGate: Extract, Data Pump, and Delivery Extract.
Summary
- Install and configure the Oracle GoldenGate software
- Install and configure the Oracle RDBMS for source and target replication
- Configure and start Integrated Extract, Data Pump, and data delivery Replicat processes in a Downstream Deployment Mode, where the downstream instance received data via the Data Gurad log shipping facility.The trail files produced in the downstream environment were transferred to the replication target using the standard Oracle Goldengate socket-based mechanism
- Generate sample data and test the validity of the replication
- Generate simple statistics on the rows transferred by the replication processes (both Extract and Replicat)
- Oracle GoldenGate Product Documentation version 11.2.1 (E35209-01) and other older versions
- Courses from Oracle University
- External Web sites for related information
- To learn more about Oracle GoldenGate, refer to additional OBEs in the Oracle Learning Library
- Lead Curriculum Developer: Elio Bonazzi.
- Other Contributors: Richard Johnston, Hadi Koesnodihardjo, Simon Whitworth, Joe deBuzna, Chris Lawless.
Oracle GoldenGate can do far more than was demonstrated in this simple exercise.
In this tutorial, you have learned how to:
Resources
Credits
To help navigate this Oracle by Example, note the following:
- Hiding Header Buttons:
- Click the Title to hide the buttons in the header. To show the buttons again, simply click the Title again.
- Topic List Button:
- A list of all the topics. Click one of the topics to navigate to that section.
- Expand/Collapse All Topics:
- To show/hide all the detail for all the sections. By default, all topics are collapsed.
- Show/Hide All Images:
- To show/hide all the screenshots. By default, all images are displayed.
- Print:
- To print the content. The content currently displayed or hidden will be printed.
To navigate to a particular section in this tutorial, select the topic from the list.