Implementing Pagination in a JSF Page
Overview
- Pagination utility class provided in the NetBeans integrated
development environment (IDE)
- PrimeFaces
DataTablecomponent
Purpose
This tutorial covers the steps needed to implement the
pagination feature in a table of a JavaServer Faces (JSF) page.
Time to Complete
Approximately 45 minutes
Introduction
JSF technology is a user interface (UI) framework for developing Java web applications. It is based on components, events, and Model-View-Controller (MVC) architecture. When building web applications in JSF, you first create a page structure by arranging JSF components in a tree.
The DataTable component displays the data as an
HTML table through the <h:dataTable> element,
and the UIColumn component represents a column of
data in the table. You can add several features to the DataTable
component, such as pagination,
sorting, filtering, in-cell editing, and scrolling.
The following figure shows a sample DataTable
component with pagination in a
JSF page:

Scenario
In this tutorial, you look at part of a DVD library application
from the course entitled Java EE 6: Develop Web Applications
with JSF. You view the list of DVDs and their details in a
tabular format. Next, you add a pagination feature to the table
by applying the following techniques:
- Java Platform, Standard Edition 7 (Java SE 7; Java SE 7u11
recommended)
- NetBeans 7.x IDE Java Platform, Enterprise Edition (Java EE
version; NetBeans 7.2 recommended)
- GlassFish 3.1.2 or Oracle WebLogic Server 12c
- Have some experience writing and deploying JSF web applications.
- Have installed and started NetBeans 7.2 Java EE.
- Have unzipped the DVDLibraryApp.zip file.
- Have opened the
DVDLibraryAppproject in NetBeans. - Have created the
dvdlibarydatabase and theItemtable and added data to theItemtable according to the instructions in theREADMEfile and data in the dvdlibrary.sql file. - (Optional) Have installed WebLogic Server 12c. See the resources section for more information about installing WebLogic Server and adding it to NetBeans.
Hardware and Software Requirements
The following is a list of hardware and software requirements:
Prerequisites
Before starting this tutorial, you should:
Running and Examining the DVDLibraryApp
Project
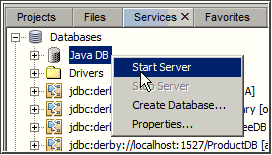
- If the Java DB server is running: Skip to step 2.
- If the Java DB server is not running: In NetBeans, click the Services tab, expand Databases, right-click Java DB, and select Start Server.
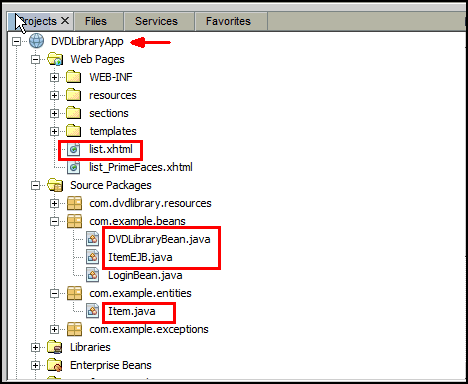
List.xhtml: This is the JSF page.DVDLibraryBean.java: This is the Contexts and Dependency Injection (CDI) named bean for theListfacelet.ItemEJB.java: This is an Enterprise JavaBeans (EJB; stateless bean) whose instance is injected inDVDLibraryBean.Item.java: This entity class represents theItemtable. TheItemBeanclass uses it during persistent operations.
Before starting, be sure to complete all points mentioned in the Prerequisites section.
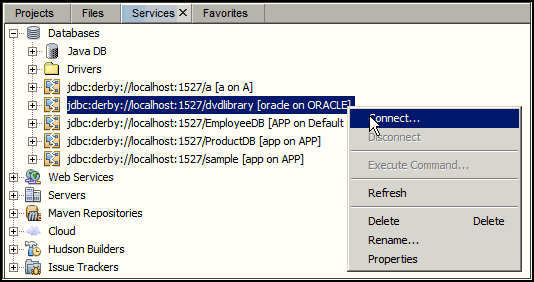
Perform one of the following steps:
Right-click the jdbc:derby://localhost:1527/dvdlibrary[oracle
on ORACLE] connection and select Connect.
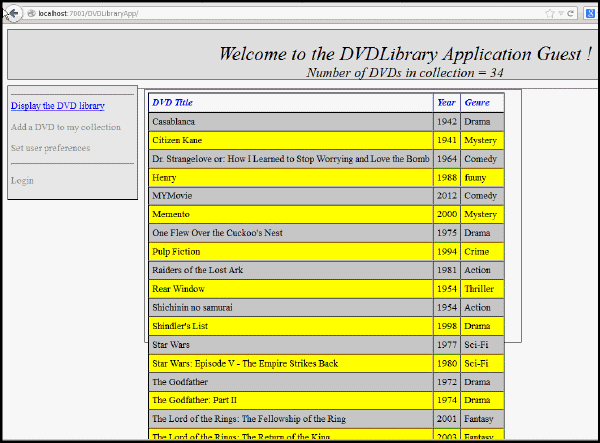
Click the Projects tab, right-click the DVDLibraryApp
project, and select Run. The DVDLibraryApp
project is deployed in the GlassFish server, and the server
starts the application.
The home page of the application opens in the web browser
window. Notice that the list of DVDs is displayed in a table
with three columns. However, because the list extends beyond
the content area of the page, the table needs a pagination
feature.
On the Projects tab, examine the following files (the files were used to produce the output):
Using the PaginationHelper Class
You use the PaginationHelper class and DataModel
class to implement pagination in your JSF page. Complete the
steps in the two subtopics.
Using the PaginationHelper
Class in the DVDLibraryBean Class
Open and examine the PaginationHelper.java file
in the com.dvdlibrary.resources package
under the Source Packages node. Notice that this
abstract class has an abstract method which returns a
DataModel object.
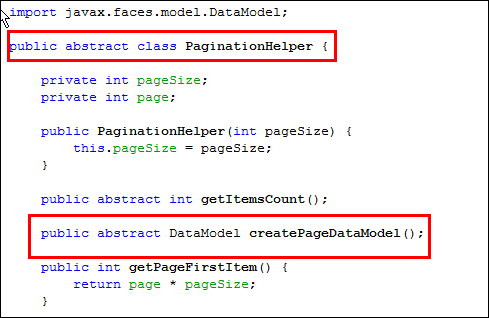
Note: You can obtain this file if you create a
new project in NetBeans by using the Samples > Java
EE > JSF JPA CRUD (Java EE6) category. It is named
PageInfo.java and it is located in
the jsf.util package.
Open DVDLibraryBean.java and add the
following to use the PaginationHelper
class:
a. Declare the following fields at the beginning of the class:
private
PaginationHelper pagination;
private int selectedItemIndex;
private DataModel dtmdl = null;
if (pagination == null) {
pagination = new PaginationHelper(10) {
@Override
public int getItemsCount() {
return itembean.count();
}
@Override
public DataModel createPageDataModel() {
return new ListDataModel(itembean.findRange(new int[]{getPageFirstItem(), getPageFirstItem() + getPageSize()}));
}
};
}
return pagination;
}
if (dtmdl == null) {
dtmdl = getPagination().createPageDataModel();
}
return dtmdl;
}
private void recreateModel() {<
dtmdl = null;
}
private void recreatePagination() {
pagination = null;
}
private void updateCurrentItem() {
int count = itembean.count();
if (selectedItemIndex >= count) {
// selected index cannot be bigger than number of items:
selectedItemIndex = count - 1;
// go to previous page if last page disappeared:
if (pagination.getPageFirstItem() >= count) {
pagination.previousPage();
}
}
if (selectedItemIndex >= 0) {
item = itembean.findRange(new int[]{selectedItemIndex, selectedItemIndex + 1}).get(0);
}
}
public String next() {
getPagination().nextPage();
recreateModel();
return "home";
}
public String previous() {
getPagination().previousPage();
recreateModel();
return "home";
}
Note: Add the required import statements to the
DVDLibraryBean class.
Modifying the JSF Page to Use
the DataModel and pagination
Fields of the DVDLibraryBean Class
Open list.xhtml for editing and add the
UI components between the <h:form>
and <h:dataTable>
elements.
<h:form>
<h:outputText escape="false"
value="#{msg.ListCustomerEmpty}"
rendered="#{dvd.dtmdl.rowCount == 0}"/>
<h:panelGroup
rendered="#{dvd.dtmdl.rowCount > 0}">
<h:outputText
value="#{dvd.pagination.pageFirstItem +
1}..#{dvd.pagination.pageLastItem +
1}/#{dvd.pagination.itemsCount}"/>
<h:commandLink action="#{dvd.previous}"
value="#{msg.Previous} #{dvd.pagination.pageSize}"
rendered="#{dvd.pagination.hasPreviousPage}"/>
<h:commandLink action="#{dvd.next}"
value="#{msg.Next}
#{dvd.pagination.pageSize}"rendered="#{dvd.pagination.hasNextPage}"/>
<h:dataTable value="#{dvd.dtmdl}" var="item"
                              styleClass="table" headerClass="headers"
                              rowClasses="oddRows,evenRows" border="1"
                              cellspacing="0" cellpadding="5" frame="box">
Modify the value attribute
of the <h:dataTable> element. The
value is associated with the DataModel
field of the DVDLibraryBean class.
<h:dataTable value="#{dvd.dtmdl}" var="item"
styleClass="table" headerClass="headers"
rowClasses="oddRows,evenRows" border="1"
cellspacing="0" cellpadding="5" frame="box">
Provide the end tag of </h:panelGroup>
below </h:dataTable>.
</h:column>
</h:dataTable>

                                     </h:panelGroup>
</h:form>
Verifying the Pagination Feature in the JSF Page
On the Projects tab, right-click
DVDLibrayAppand select Run.If the web browser does not open, open a web browser, enter http://localhost:8080/DVDlibraryApp in the address bar and press Enter.
Perform one of the following steps:
The application’s home page, list.xhtml,
opens in your web browser window. Notice that the pagination
information is displayed at the top of the table.
On the home page, click the Next10
link to view the next set of records in the table.
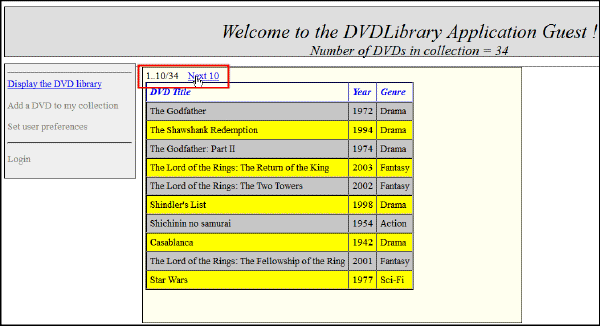
On the next page, click the Previous10
link or Next10 link to
maneuver through the pages.

Change the page size value to 15 to modify the number of records to be displayed per page.

Using the PrimeFaces DataTable Component
In this topic, you use PrimeFaces, a third-party library, to
provide the pagination feature for the DataTable component.
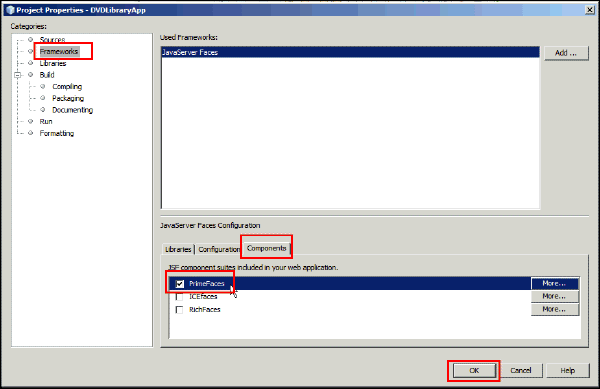
On the Projects tab, right-click DVDLibraryApp
and select Properties to display the
Project Properties dialog box.
Perform the following steps:
a. In the Categories section, select Frameworks.
b. In the JavaServer Faces Configuration section, click the Components tab and select the PrimeFaces check box.
c. Optional: In the Categories section, select Libraries to verify that the PrimeFaces library was added to your project.
d. Click OK.
On the Projects tab, expand DVDLibraryApp >Web
Pages, click to open list_PrimeFaces.xhtml,
and enter the following:
a. Add the namespace for PrimeFaces that will have a prefix
of p in the <html>
element.

b. Replace the <h:dataTable> element
with the <p:dataTable>
element and the <h:column> element with
the <p:column>
element.

c. Update all sub elements and attributes of the <p:dataTable>
element and observe the pagination-related attributes of the
<p:dataTable> element.
<p:dataTable
                          id="dataTable" value="#{dvd.dvdCollection}" var="item"
                          paginator="true" rows="10"


                        paginatorTemplate="{CurrentPageReport}
                          {FirstPageLink} {PreviousPageLink} {PageLinks}
                          {NextPageLink} {LastPageLink} {RowsPerPageDropdown}"


                          rowsPerPageTemplate="5,10,15">
Verifying the DataTable Component in the
JSF Page
Perform the following steps:
a. On the Projects tab, right-click DVDLibrayApp
and select Run.
b. In a web browser, enter http://localhost:8080/DVDLibraryApp/faces/list_PrimeFaces.xhtml
in the address bar and press Enter.
The output of the second page is displayed.
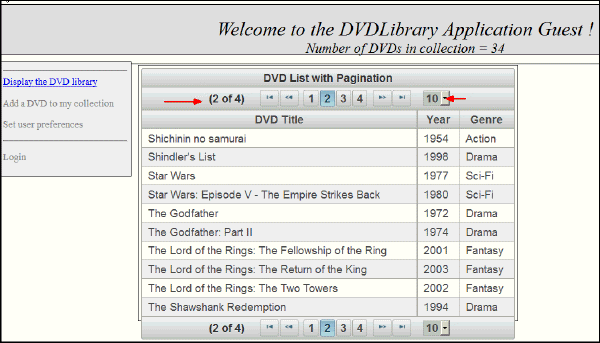
In the combo box, select 5 to display five records per page.

Note: You modify the numbers displayed in the combo
box by modifying the value of the rowsPerPageTemplate
attribute of the <p:dataTable> component.

Summary
- Use the
<h:dataTable>element in a JSF page
- Use the
javax.faces.model.DataModelclass to implement pagination
- Apply pagination in the
<h:dataTable>element in a JSF page
- Use the PrimeFaces
<p:dataTable>component and apply its pagination attributes in a JSF page
- Installing, Configuring, and Testing WebLogic Server 12c Developer Zip Distribution in NetBeans: This OBE covers how to install the Oracle WebLogic Server 12c (12.1.1) developer instance on Windows and configure it as a Java EE application server in NetBeans.
- Developing Applications with Java EE 6 on WebLogic Server 12c: This course covers the breadth of Java EE technologies that are part of the Java 6 Web Profile.
- Developing Web Applications using JSF Technologies: This course covers JavaServer Faces, the server-side component framework designed to simplify the development of user interfaces for Java EE applications.
- Building Database Driven Applications with JPA: This course covers JPA, the standard Java object-relational-mapping technology.
- The Java EE 6 Tutorial: The tutorial is an excellent source of information about the technologies included in Java EE 6, including CDI.
- To learn more about Java EE, visit other OBE tutorials in
the
Oracle Learning Library
- Lead Curriculum Developer: Paromita Dutta
- Reviewer: Tom McGinn
- Editor: Susan Moxley
- QA: Anjulaponni Azhagulekshmi
In this tutorial, you learned how to:
Resources
The application in this tutorial uses JSF Facelets, CDI beans, and Java Persistence API (JPA). To learn more about these technologies, see the following resources:
 Overview