Last updated:04/20/15 08:30 am EDT
Before You Begin
Purpose
The purpose of this guide is an introduction to creating a Grizzly/Jersey REST web service that can be stored and distributed in a single JAR file.
Time to Complete
45 minutes
Background
Typically, when a developer thinks of creating a RESTful web service using Java, they assume that using a Java EE application server is the only way to create this type of application. However, there are simpler lightweight alternative methods for creating RESTful applications using Java SE. This tutorial demonstrates one such alternative using the Grizzly Web server along with the Jersey REST framework.
This tutorial covers the basics of creating a RESTful Grizzly/Jersey application with Maven. The application includes a simple data model to demonstrate how actual REST requests are processed. You create a web service class with annotations that converts your methods into callable REST URLs. Finally, you package your Java REST application into a single portable JAR file which can be executed pretty much anywhere.
Grizzly Web Server
Project Grizzly is a pure Java web service built using the NIO API. Grizzly's main use case is the web server component for the GlassFish application server. However, Grizzly’s goal is to help developers do much more that. With Grizzly you can build scalable and robust servers using NIO as well as offering extended framework components including Web Framework (HTTP/S), WebSocket, Comet, and more!
Jersey, REST and JAX-RS
Jersey RESTful Web Services framework is an open source, production quality framework for developing RESTful Web Services in Java. Jersey provides support for JAX-RS APIs and serves as a JAX-RS Reference Implementation. Jersey helps to expose your data in a variety of representation media types and abstracts away the low-level details of the client-server communication. Jersey simplifies the development of RESTful Web services and their clients in Java in a standard and portable way.
Representational State Transfer (REST) is a software architecture style for creating scalable web services. REST is a simpler alternative to SOAP and WSDL-based Web services and has achieved a great deal of popularity. RESTful systems communicate using the Hypertext Transfer Protocol (HTTP) using the same verbs (GET, POST, PUT, DELETE, etc.) that web browsers use to retrieve web pages and send data to remote servers.
The Java API for RESTful Web Services (JAX-RS) provides portable APIs for developing, exposing and accessing Web applications designed and implemented in compliance with principles of REST architectural style. The latest release of JAX-RS is version 2.0. The Jersey framework is the reference implementation of JAX-RS.
Scenario
The RESTful web service built in this tutorial is the start of a REST application for managing customer data. For this example, customer data is stored in a list. You will create a web method to return all the customers stored in the list and a method to search for a customer by ID. To keep things simple, all data is returned in a plain text format.
What Do You Need?
To follow along with this OBE, you must have the following software installed on your system.
- Maven 3.3.1 or later --> Download from https://maven.apache.org/
- Java 8 u45 or later --> Download from http://www.oracle.com/technetwork/java/javase/downloads/index.html
- NetBeans 8.0.2 --> Download from https://netbeans.org/
Installation Notes
Here are some tips related to the tools used for this OBE.
- Running Maven the first time: The first time you run Maven it will download all the required software needed for the current project. So the first time you compile a project, it may take a few minutes. Also by implication, you need a live Internet connection the first time you set up a project.
- Screenshots are taken from a Windows system, but the steps outlined in this tutorial should work with minimal modifications on Linux or Mac OS X.
Creating the Maven Project
The first step in the process of creating a Grizzly/Jersey application is to create a Maven project. An archetype exists for this type of application. To create the project follow these steps:
- Navigate to the directory where you want to create a new Grizzly/Jersey project. For example,
c:\examples - Execute the following command to create an empty project:
mvn archetype:generate -DarchetypeArtifactId=jersey-quickstart-grizzly2 -DarchetypeGroupId=org.glassfish.jersey.archetypes -DinteractiveMode=false -DgroupId=com.example.rest -DartifactId=jersey-service -Dpackage=com.example.rest -DarchetypeVersion=2.17Note: If you are using a proxy server, see the following page on configuring Maven to use a proxy server.
Note: You can change the various options in the command. Here is a brief breakdown of the options.
- archetypeArtifactId: Specifies the kind of project to create.
- archetypeGroupId: Specifies which group this archetype is defined in.
- groupId: Used to uniquely identify the project. Should be based on your domain name. Typically matches your package name.
- artifactId: The name of your project. This also specifies what the project archive files (e.g., jar or war) will be named.
- The result of the command is a
jersey-servicedirectory with the project files included within.
The structure of the project looks like this.

Note: You can open the project in NetBeans (File -> Open project) or in Eclipse (File -> Import -> Maven-> Existing Maven Project) but Maven must be setup correctly in your IDE.
Examining pom.xml
When you created the main project, you also created the main configuration file, pom.xml. This file specifies dependencies and versions required to build the project. Below is the file contents in 3 parts.
-
The first part of the file contains much of the project metadata you specified on the command line.

pom.xml Note the groupId and artifactId are specified here. The
nametag identifies the name of the project. The artifactId is used to create the jar or war file name along with the text in theversiontag. For example, this project will create a jar file namedjersey-service-1.0-SNAPSHOT.jar. -
The second part of the file contains the code dependencies required for the project.

pom.xml A couple of comments on the
dependenciessection:- The
dependencyManagementtag contains libraries that other dependencies depend upon. In this case, the Jersey REST library is specified. - The first dependency provides containers for loading Jersey classes in the Grizzly web server.
- The second dependency specifies the JUnit library for unit testing.
- The
-
Here is the third part of the file.

pom.xml - The
maven-compiler-plugincompiles code for the project. The default Java version is 1.7. Note: Change this value to 1.8 so Lambda expressions can be used in the application. Then save the file. - The
exec-maven-pluginspecifies how to execute the application. Notice the reference to theMainclass use to execute the application. - Note the
propertiestag near the end of the file allows the specification of application wide properties.
The build section of the file contains information about plugins required for the application.
Examining the Source files
Two source files are created for this archetype. Both files are shown below with comments.
-
The
Mainclass starts the application execution by setting up the web server. Any Jersey annotated classes found in thecom.example.restpackage are loaded.Main.javapackage com.example.rest; import org.glassfish.grizzly.http.server.HttpServer; import org.glassfish.jersey.grizzly2.httpserver.GrizzlyHttpServerFactory; import org.glassfish.jersey.server.ResourceConfig; import java.io.IOException; import java.net.URI; public class Main { // Base URI the Grizzly HTTP server will listen on public static final String BASE_URI = "http://localhost:8080/myapp/"; public static HttpServer startServer() { // create a resource config that scans for JAX-RS resources and providers // in com.example.rest package final ResourceConfig rc = new ResourceConfig().packages("com.example.rest"); // create and start a new instance of grizzly http server // exposing the Jersey application at BASE_URI return GrizzlyHttpServerFactory.createHttpServer(URI.create(BASE_URI), rc); } public static void main(String[] args) throws IOException { final HttpServer server = startServer(); System.out.println(String.format("Jersey app started with WADL available at " + "%sapplication.wadl\nHit enter to stop it...", BASE_URI)); System.in.read(); server.stop(); } }A couple of key points.
- The
BASE_URIfield specifies where the REST method you define will be appended. In this case, any methods created will be listed undermyapp. - The
ResourceConfigclass specifies which package contains annotated Jersey classes to be loaded. - In the
mainmethod the HTTP server is started and run until the enter key is pressed.
- The
-
The
MyResourceclass defines the methods for a web service.MyResource.javapackage com.example.rest; import javax.ws.rs.GET; import javax.ws.rs.Path; import javax.ws.rs.Produces; import javax.ws.rs.core.MediaType; /* Root resource (exposed at "myresource" path) */ @Path("myresource") public class MyResource { @GET @Produces(MediaType.TEXT_PLAIN) public String getIt() { return "Got it!"; } }The class contains only a
getItmethod. When this method is called, a text message should be returned:Got it!The method is called when a
GETmethod is made against thehttp://localhost:8080/myapp/myresourceURL.
Running the Web Service
With the project setup, Maven can now be used to run the application and start the web server. Here are the steps to make that happen.
- Open a
TerminalorCommand Promptwindow. - Change into the project directory:
cd C:\examples\jersey-service - Compile the project:
mvn clean compile - Execute the project:
mvn exec:java
The output produced from this command may vary a bit, especially the first time you run the command. However, if you look at the end of the output, you should see something similar to the following:
C:\examples\jersey-service>mvn exec:java
[INFO] Scanning for projects...
[INFO]
[INFO] ------------------------------------------------------------------------
[INFO] Building jersey-service 1.0-SNAPSHOT
[INFO] ------------------------------------------------------------------------
[INFO]
[INFO] >>> exec-maven-plugin:1.2.1:java (default-cli) > validate @ jersey-servic
e >>>
[INFO]
[INFO]
[INFO] --- exec-maven-plugin:1.2.1:java (default-cli) @ jersey-service ---
Apr 30, 2015 5:26:05 PM org.glassfish.grizzly.http.server.NetworkListener start
INFO: Started listener bound to [localhost:8080]
Apr 30, 2015 5:26:05 PM org.glassfish.grizzly.http.server.HttpServer start
INFO: [HttpServer] Started.
Jersey app started with WADL available at http://localhost:8080/myapp/applicatio
n.wadl
Hit enter to stop it...
This indicates that the Grizzly web service is running with the Jersey REST web service. Now you can test the web service using a web browser.
- Open the Firefox or Chrome web browser.
- Enter the following URL into the browser address window and open the URL:
The output in your browser should look something like this:
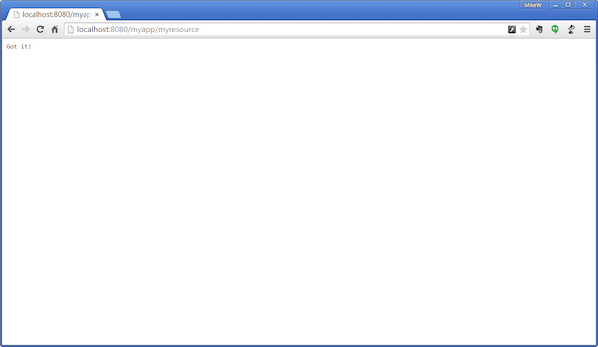
Notice that the "Got it!" text is returned to the browser.
Creating a Customer Web Service
To make the application a little more interesting, we can add some sample customer data to our project. Then, the source files can be modified to look up a an individual customer or the complete list of customers.
Adding Customer Data
The customer data consists of two classes. The Customer.java class uses the builder pattern to represent customer data. The CustomerList.java class creates a list of customers using sample data.
- Add the
Customer.javaclass to the project. - Add the
CustomerList.javaclass to the project.
Customer.java - Fragment
public class Customer {
  private final long id;
  private final String firstName;
  private final String lastName;
  private final String email;
  private final String city;
  private final String state;
  private final String birthday;
This code fragment shows the fields used in the customer class. A long is used to store the id field. The other fields are strings.
Copy the complete Customer.java file from this link.
CustomerList.java - Fragment
  static {
    // Create list of customers
    cList.add(
        new Customer.CustomerBuilder().id()
        .firstName("George")
        .lastName("Washington")
        .email("gwash@example.com")
        .city("Mt Vernon")
        .state("VA")
        .birthday("1732-02-23")
        .build()
    );

    cList.add(
        new Customer.CustomerBuilder().id()
        .firstName("John")
        .lastName("Adams")
        .email("jadams@example.com")
        .city("Braintree")
        .state("MA")
        .birthday("1735-10-30")
        .build()
    );

    cList.add(
        new Customer.CustomerBuilder().id()
        .firstName("Thomas")
        .lastName("Jefferson")
        .email("tjeff@example.com")
        .city("CharlottesVille")
        .state("VA")
        .birthday("1743-04-13")
        .build()
    );

    // More code here
}
Each customer is added to the list using a fluent approach. A total of 5 customers are added to the list.
Copy the complete CustomerList.java Java file from this link.
Adding the Web Service Code
With the customer data created, now the web service code can be added to the application.
- Create the
CustomerService.javaclass. - Add the
getAllCustomersMethod @GET- This method is called with the HTTP GET method.@Path("/all")- Specifies the path used to call this method. In this case callinghttp://localhost:8080/myapp/customers/allwill return the list of customers in a text format.@Produces(MediaType.TEXT_PLAIN)- Specifies output data will be returned in a text format. Other formats could be specified here including JSON or XML.- Lambda - The lambda expression at the end of the class get the list of customers, converts those object to strings, and then uses
Collectors.joining("\n")to return a single string. - Add the
getCustomerMethod @GET- This method is called with the HTTP GET method.@Path("{id}")- Specifies the path used to call this method. In this case passing alongin the URLhttp://localhost:8080/myapp/customers/101turns the value 101 into anidvariable. The{id}makes the value specified available as a parameter.@Produces(MediaType.TEXT_PLAIN)- Specifies output data will be returned in a text format. Other formats could be specified here including JSON or XML.getCustomer(@PathParam("id") long id)- This is where theidparameter that was specified in thePathannotation is turned into alongvariable and passed to the method.- Method source - The method uses a lambda expression to search for the specified ID. If found, the customer data is returned. If not found, an error message is returned.
CustomerService.java
package com.example.rest;

import java.util.Optional;
import java.util.concurrent.CopyOnWriteArrayList;
import java.util.stream.Collectors;
import javax.ws.rs.GET;
import javax.ws.rs.Path;
import javax.ws.rs.PathParam;
import javax.ws.rs.Produces;
import javax.ws.rs.core.MediaType;

@Path("/customers")
public class CustomerService {

  private final CopyOnWriteArrayList<Customer> cList = CustomerList.getInstance();


}
To setup a simple web service, the above CustomerService class will be used. The class includes a number of imports and starts with an annotation: @Path("/customers"). This specifies that the methods called in this class will appear under the /customers path. This means that for our application, method calls will appear under the http://localhost:8080/myapp/customers path. The customer list is created and stored in cList. Next, two methods will be added to this class.
The getAllCustomers method will return all the customers in our list. The following is the source code for this method.
  @GET
  @Path("/all")
  @Produces(MediaType.TEXT_PLAIN)
  public String getAllCustomers() {
    return "---Customer List---\n"
        + cList.stream()
        .map(c -> c.toString())
        .collect(Collectors.joining("\n"));
  }
There are a number of annotations for this method. Here are some comments on the code.
The getCustomer method searches for a customer in the list and returns the customer information if the item is found. If not found, an error message is returned.
  @GET
  @Path("{id}")
  @Produces(MediaType.TEXT_PLAIN)
  public String getCustomer(@PathParam("id") long id) {
    Optional<Customer> match
        = cList.stream()
        .filter(c -> c.getId() == id)
        .findFirst();
    if (match.isPresent()) {
      return "---Customer---\n" + match.get().toString();
    } else {
      return "Customer not found";
    }
  }
The following are the comments for this method.
Complete CustomerService.java Listing
Now the components of this web service have been created. The next section shows how to test the web service.
Testing the Web Service
To test the new web service follow these steps.
Starting Grizzly/Jersey Web Service
If your Grizzly server is still running stop it by pressing Enter. Complete the following steps to recompile the application and restart the Grizzly server.
- Open a
TerminalorCommand Promptwindow. - Change into the project directory:
cd C:\examples\jersey-service - Compile the project:
mvn clean compile - Execute the project:
mvn exec:java
Testing in your Browser
To test the web service, start a browser. In this example, Google Chrome is used.
- Enter this address in the address bar:
http://localhost:8080/myapp/customers/all - Enter this address in the address bar:
http://localhost:8080/myapp/customers/101 - Enter this address in the address bar:
http://localhost:8080/myapp/customers/109
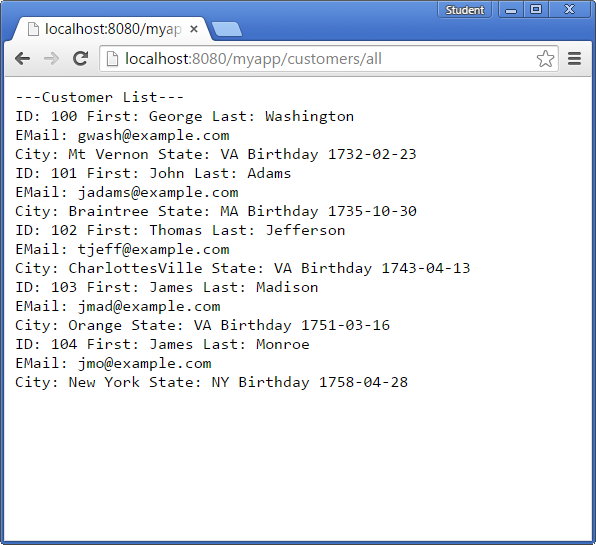
Notice the list of all the customers in the list are returned as plain text.
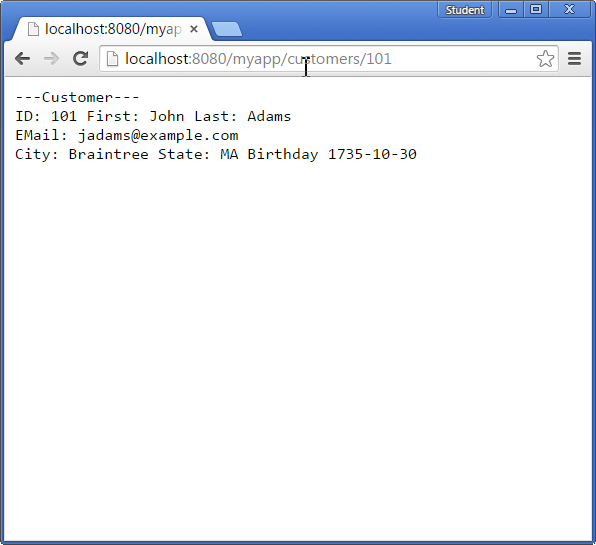
Notice the customer with an ID of 101 is returned as plain text.
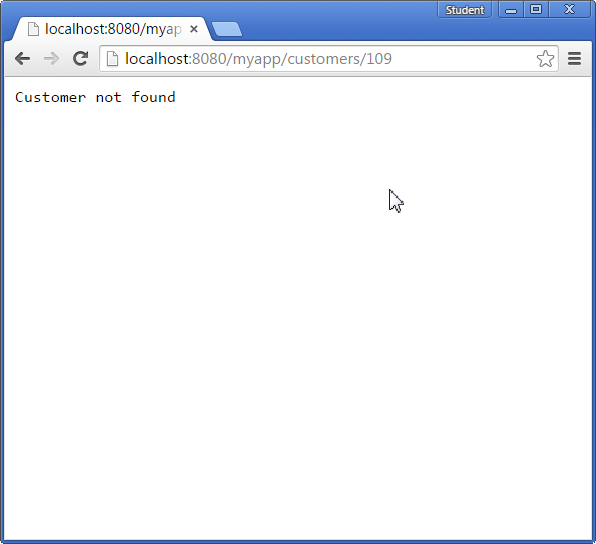
Notice an error message is returned since no match can be found.
Testing with curl
Using the curl network utility is a great way to test REST web services. curl is installed by default on most Unix and Linux distributions. On Windows, the best way to use curl is to install Cygwin and make sure to select curl during the installation. You can also install curl standalone from this web site.
The tests from the previous example can be perform with curl as follows.
- To get all customers type:
curl -X GET -i http://localhost:8080/myapp/customers/all - To get customer 101 type:
curl -X GET -i http://localhost:8080/myapp/customers/101 - To attempt to get customer 109 type:
curl -X GET -i http://localhost:8080/myapp/customers/109
HTTP/1.1 200 OK
Content-Type: text/plain
Date: Tue, 05 May 2015 21:40:18 GMT
Content-Length: 552

---Customer List---
ID: 100 First: George Last: Washington
EMail: gwash@example.com
City: Mt Vernon State: VA Birthday 1732-02-23
ID: 101 First: John Last: Adams
EMail: jadams@example.com
City: Braintree State: MA Birthday 1735-10-30
ID: 102 First: Thomas Last: Jefferson
EMail: tjeff@example.com
City: CharlottesVille State: VA Birthday 1743-04-13
ID: 103 First: James Last: Madison
EMail: jmad@example.com
City: Orange State: VA Birthday 1751-03-16
ID: 104 First: James Last: Monroe
EMail: jmo@example.com
City: New York State: NY Birthday 1758-04-28
Each customer in the list is displayed.
HTTP/1.1 200 OK
Content-Type: text/plain
Date: Tue, 05 May 2015 21:41:43 GMT
Content-Length: 118

---Customer---
ID: 101 First: John Last: Adams
EMail: jadams@example.com
City: Braintree State: MA Birthday 1735-10-30
Customer 101 is found and returned.
HTTP/1.1 200 OK
Content-Type: text/plain
Date: Tue, 05 May 2015 21:42:10 GMT
Content-Length: 18

Customer not found
An error message is returned.
Creating an Uber JAR
The last topic to discuss is the concept of an uber JAR. If you use the default Maven settings to create a JAR, only the class files generated from source file are included in the JAR. This works fine when executing an application from Maven since any dependencies are downloaded into the local Maven cache. However, this does not produce a stand alone application file that can be run anywhere. The Grizzly and Jersey libraries must be included in your CLASSPATH variable for your application to run. When there are a lot of libraries included in your application, the CLASSPATH can get rather messy. Is there an easier way?
An uber JAR is a JAR file where all the dependencies required to run the application are included in a single jar. This way, your entire application can be distributed in a single file without messy CLASSPATH variables or extra software installations. To do this, changes must be made to the pom.xml file.
Updating the pom.xml File
The first change to the file is the addition of the assembly plugin. Here is the XML for this plugin.
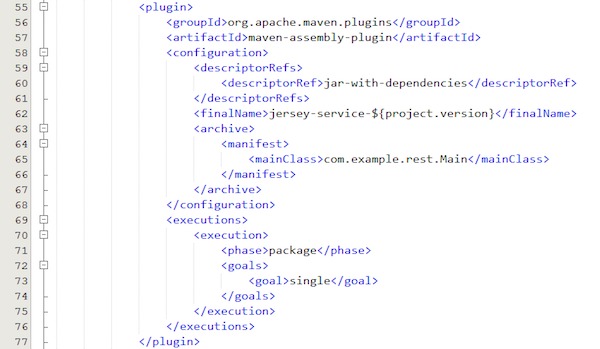
The assembly plugin is typically used to create JAR or WAR files that package Java applications into a file. Notice that the Main class is set so that an executable JAR is created. Doing this allows the JAR file to execute using the java -jar command line option. Also note that the FinalName value has been updated to match the rest of the project.
So now we have created an executable JAR. How are the required libraries for the application added to the jar? The dependency plugin is required to do that.

By adding this plugin with the copy-dependencies goal, required libraries are copied into the JAR. Thus, all the required class files to run the application are included in the JAR. No external CLASSPATH or other settings are required to execute the application.
Executing the Application
To build and execute your application follow these steps.
- Change into the project directory.
- Clean and compile the application:
mvn clean compile - Package the application:
mvn package - Look in the
targetdirectory. You should see a file with the following or a similar name:jersey-service-1.0-SNAPSHOT-jar-with-dependencies.jar - Change into the
targetdirectory. - Execute the jar:
java -jar jersey-service-1.0-SNAPSHOT-jar-with-dependencies.jar
Your Grizzly/Jersey should now execute and start the service just like it did before from Maven. Since this JAR is self contained, it can be copied to a different location on the machine or to another machine and execute. The application is now completely self-contained.
Adding Flexibility to the Server
Before completing this OBE there is one improvement I would like to discuss. Wouldn't the application be better if it was more flexible at startup? For example, it would be really nice to set the network port or host name at runtime. Right now, the application can only do this when compiled. Maybe something like environment variables could be used for configuration? That sounds like a good approach.
But Mike, what if the environment variables aren't set? Won't that result in null values which require all sorts of checking with if blocks?
Well... It turns out that the new Optional class in Java 8 can make this sort of thing fairly easy.
What follows is a new version of the Main class which checks for the PORT and HOSTNAME environment variables at run time. If the values are set, they are used to launch the server, if they are not, default values are used instead.
Main.java
package com.example.rest;

import org.glassfish.grizzly.http.server.HttpServer;
import org.glassfish.jersey.grizzly2.httpserver.GrizzlyHttpServerFactory;
import org.glassfish.jersey.server.ResourceConfig;

import java.io.IOException;
import java.net.URI;
import java.util.Optional;

/**
 * Main class
 */
public class Main{

    // Base URI the Grizzly HTTP server will listen on
    public static final String BASE_URI;
    public static final String protocol;
    public static final Optional<String> host;
    public static final String path;
    public static final Optional<String> port;

    static{
      protocol = "http://";
      host = Optional.ofNullable(System.getenv("HOSTNAME"));
      port = Optional.ofNullable(System.getenv("PORT"));
      path = "myapp";
      BASE_URI = protocol + host.orElse("localhost") + ":" + port.orElse("8080") + "/" + path + "/";
    }

    /**
     * Starts Grizzly HTTP server exposing JAX-RS resources defined in this application.
     * @return Grizzly HTTP server.
     */
    public static HttpServer startServer() {
        // create a resource config that scans for JAX-RS resources and providers
        // in com.example.rest package
        final ResourceConfig rc = new ResourceConfig().packages("com.example.rest");

        // create and start a new instance of grizzly http server
        // exposing the Jersey application at BASE_URI
        return GrizzlyHttpServerFactory.createHttpServer(URI.create(BASE_URI), rc);
    }

    /**
     * Main method.
     * @param args
     * @throws IOException
     */
    public static void main(String[] args) throws IOException {
        final HttpServer server = startServer();
        System.out.println(String.format("Jersey app started with WADL available at "
                + "%sapplication.wadl\nHit enter to stop it...", BASE_URI));
        System.in.read();
        server.stop();
    }
}
A couple of key points.
- At the top of the class notice two
Optional<String>variables are declared. Theportandhostfields will store the result of our environment variable lookup. - In the
staticinitialization block, theSystem.getenvmethod is used to get the environment variable. Notice that theOptional.ofNullablemethod is called. This method will return either the value stored in the environment variable or an emptyOptionalif no value is returned. - The
BASE_URIfield now uses theOptionalvariables to create the URI. TheorElsemethod sets a default value if the optional is empty.
With these improvements, you can set the host name or port using environment variables. The additional code is clear and concise.
That concludes this tutorial.
Download Suggested Solution
If you want to see the complete set of project files, download the source files and Maven project from the following link:
Want to Learn More?
If you want to learn more, here are some related links.
Credits
- Curriculum Developer: Michael Williams
- QA: Sravanti Tatiraju