Step 1. Configure the TroubleTicketSystemServer project for Spring
Time to complete this step: 10 minutes
Spring framework (can be categorized as a Dependency Injection or an Inversion Of Control framework) is a layered architecture that links objects together instead of the objects linking themselves together, and provides a consistent framework for the J2EE application development.
Oracle Enterprise Pack for Eclipse (OEPE) supports Spring IDE 2.0 and Spring Framework 2.5. OEPE allows to automatically generate Spring configuration and beans from persistence mappings.
In this tutorial part, you will use the Spring framework for developing service beans / business delegates. The business delegates are getting injected with the JPA DAOs by Spring resource injection mechanism. You will be provided a set of JUnit test cases for testing the Spring service beans / business delegates.

In this step, you will configure the TroubleTicketSystemServer project for Spring and create the necessary packages.
Note: Spring support can be added while creating a New project or to an existing project.
You will perform following tasks in this step:
Configure the TroubleTicketSystemServer project for Spring
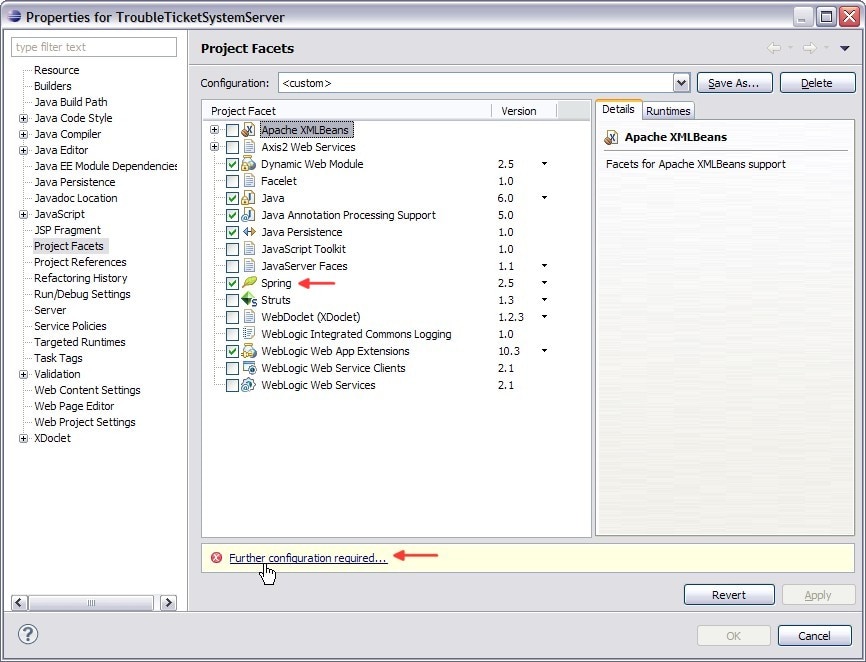
- In the Project Explorer view, right-click the TroubleTicketSystemServer project and select Properties from the context menu. This will open the Properties dialog as shown below. Select the Project Facets item in the left panel. That shows list of selected project facets as configured for the TroubleTicketSystemServer project.
- The Spring facet is available to Web projects, EJB projects and utility projects. Select Spring (verion 2.5) from the Project Facet list. That prompts a link stating Further configuration required..
- Click the
Further configuration required... link. This will open the
Modify Faceted Project dialog for
Spring. Select the library Type as
User Library and click the
Download Library...
 button.
- That opens the Download Library dialog. Select the library Spring Framework 2.5.6 from the Oracle download provder.
- To use this dialog for downloading the Spring libraries, make appropriate selections for the library name and download destination. Click Next for the license terms page and Click Finish to trigger the download. Once the download is done, you will be returned to the Modify Faceted Project (Spring) dialog.


- Select the Spring Framework 2.5.6 as the User Library.
- Make sure that the Create a Spring bean definition file option is selected and set the name as /WebContent/WEB-INF/applicationContext.xml.

- Click on the
Manage Libraries
 button. That opens the
User Libraries Preferences page configured for the workspace. Select and expand the
Spring Framework 2.5.6 node. By default, the entire library is represented by the
spring.jar and
commons-logging.jar files.
- During this tutorial, you will use the JUnit test cases for accessing the service beans / business delegates. It requires the spring-test.jar file. Select the Spring Framework 2.5.6 library. Click the Add JARs... button and browse to the folder where the Spring Framework 2.5.6 library has been installed. Select the "Spring Framework 2.5.6_INSTALL_DIR"\spring-framework-2.5.6\dist\modules\spring-test.jar file.
- Click OK in the User Libraries Preferences dialog.
- Click OK in the Modify Faceted Project (Spring) dialog.
- Click OK in the Properties dialog for the TroubleTicketSystemServer project. That completes the configuration of the Spring Framework library for the TroubleTicketSystemServer project. The Spring configuration file ( applicationContext.xml) will be created under the TroubleTicketSystemServer/WebContent/WEB-INF folder.
- Note that as you have added the Spring facet to the
TroubleTicketSystemServer Web project, the project's
web.xmlfile will be updated to include the context listener for loading the Spring context:


...
...
  <context-param>
    <param-name>contextConfigLocation</param-name>
    <param-value>/WEB-INF/applicationContext.xml</param-value>
</context-param>
<listener>
    <listener-class>org.springframework.web.context.ContextLoaderListener</listener-class>
</listener>
</web-app>
Create Java Packages
- In the Project Explorer view, right click the TroubleTicketSystemServer > Java Resources > src folder and choose New > Package. Enter the package name com.oracle.ticketsystem.delegates and click Finish.
- That creates a new Java package com.oracle.ticketsystem.delegates. Similarly, create two more Java packages com.oracle.ticketsystem.delegates.impl and com.oracle.ticketsystem.util. CHECK ECLIPSE VIEW TO ENSURE IT DISPLAYS
- Copy the Utils class from the extracted resources/util folder to the com.oracle.ticketsystem.util package. The Utils class has a isBlank() method that checks whether the given string is either null or empty.
- Keep the default configuration and click Finish.


 button.