Working in Go applications with Oracle Database and Oracle Cloud Autonomous Database
This is the fourth part of a five part series about Go and Oracle Cloud Infrastructure (OCI). This series discusses how Go applications can be created and run on Oracle Cloud Infrastructure in Compute Instances (VMs), containerized on Kubernetes, or as serverless Functions. The articles show how to automate the build and deployment of these Go applications using OCI DevOps. An important topic is how to use OCI services from Go applications – both those running on OCI as well as Go code running elsewhere. OCI services discussed include Object Storage, Streaming, Key Vault, and Autonomous Database.

In order to follow along with these articles, readers should have at least basic knowledge of how to create Go applications. It is assumed that readers have access to their own Go development environment. Some of the examples and screenshots will specifically mention VS Code as development tool. However, other editors and IDEs can be used as well. The Go code presented in these articles demonstrates a number of mechanisms in their simplest form for maximum clarity and with the least dependencies. Readers should not expect meaningful functionality or production-ready code.
This series describes how to get Going on OCI. To try out the examples, readers will need to have access to an OCI tenancy with permissions to create the OCI resources discussed in these articles. Most of the resources used are available in the Aways Free Tier (Compute Instance, VCN, Autonomous Database, Object Storage, Logging, Resource Manager) or have a free allotment tier for limited monthly usage (Functions, API Gateway, Streaming, Vault, DevOps).
The first part of these series describes provisioning of a Compute Instance based on the Oracle Linux Cloud Developer image, opening it up for inbound and outbound network activity, and creating and running a Go application that serves HTTP requests and connecting logging produced by the application to OCI Logging. Part two deals with software engineering, automation of build and deployment of the application with the OCI DevOps service. This service is used for storing the Go source code, building the application executable and storing it as deployable artifact, deploying that artifact to a Compute Instance. The article also shows how to expose an HTTP endpoint for the application through an OCI API Gateway. Part three shows how to create serverless functions in Go and deploy them on OCI. The Go SDK for OCI is introduced – first for local, standalone Go applications, and subsequently for use from functions, leveraging resource principal authentication. This SDK is used to interact with the OCI Object Storage service for creating buckets and writing and reading files.
Part four, which you are reading right now, discusses the interaction between your Go application and an Oracle Database. This can be a local or on-premises database, a database running on some cloud vendor’s IaaS instances, or an OCI Autonomous Database. Using the standard Go database/sql package with a driver for Oracle Database and feeding the required configuration details to the driver, it turns out that leveraging any Oracle Database from Go is quite straightforward. The Go application myserver discussed in part two is extended to interact with both an Autonomous Database instance on OCI and the OCI Object Storage service. The application uses the Go SDK for OCI to read files (and subsequently remove them) from a bucket on Object Storage and create database records in the Autonomous Database based on their contents.
Local Go Application talking to Local Database
The Go language has support for SQL interactions with relational databases built into it. The standard package database/sql includes types and functions for connecting to databases, executing transactions, canceling an operation in progress, and more. This same package can be used for working in the same way with some NoSQL databases such as MongoDB and Couchbase.
A Go application that interacts with a database through this package does not need to have technical implementation details for a specific database product. These details are typically implemented in a driver for that database. The application imports the required driver for the database to connect to, and tells the standard package database/sql which driver to use and what the connection details are for the database. Most of the interaction with the database is the same, regardless the specific database technology; records are created, updated and deleted through SQL DML statements, and records are retrieved through SQL queries. The overall process is the same across databases, but the exact SQL dialect can vary. This is probably the only real obstacle for easily moving Go applications between different database products.
The code discussed in this section is located in directory /applications/go-orcl-db in the code repository that accompanies this article series.
Go Application does SQL – DDL, DML and Query
The simplest thing to do with an Oracle Database from a Go application is to query a single row. The code required for this looks something like this: package main
package main


import (
"database/sql"
"fmt"
)

func sqlOperations(db *sql.DB) {
var queryResultColumnOne string
row := db.QueryRow("SELECT to_char(systimestamp,'HH24:MI:SS') FROM dual")
err := row.Scan(&queryResultColumnOne)
if err != nil {
  panic(fmt.Errorf("error scanning query result from database into target variable: %w", err))
}
fmt.Println("The time in the database ", queryResultColumnOne)
}
The import statement makes the database/sql package available. Using the handle to sql.DB, a SQL query can easily be executed (QueryRow) and the result can be scanned into local variables. Quite simple and straightforward and database brand independent, except for the specific SQL statement, which in this case uses the Oracle specific systimestamp.
For now, let’s not dwell on where the db parameter comes from. In a little while we’ll talk about database drivers, and that’s where all will be revealed.
A slightly more interesting function that creates a table, inserts a record, queries the record, creates to more records then queries all rows and finally drops the table is shown here. You will find this code in file oracle-database-client-app.go in the code repository.
 package main


import (
"database/sql"
"fmt"
)

const createTableStatement = "CREATE TABLE TEMP_TABLE ( NAME VARCHAR2(100), CREATION_TIME TIMESTAMP DEFAULT SYSTIMESTAMP, VALUE  NUMBER(5))"
const dropTableStatement = "DROP TABLE TEMP_TABLE PURGE"
const insertStatement = "INSERT INTO TEMP_TABLE ( NAME , VALUE) VALUES (:name, :value)"
const queryStatement = "SELECT name, creation_time, value FROM TEMP_TABLE

func sqlOperations(db *sql.DB) {
_, err := db.Exec(createTableStatement)
handleError("create table", err)
defer db.Exec(dropTableStatement) // make sure the table is removed when all is said and done
stmt, err := db.Prepare(insertStatement)
handleError("prepare insert statement", err)
sqlresult, err := stmt.Exec("John", 42)
handleError("execute insert statement", err)
rowCount, _ := sqlresult.RowsAffected()
fmt.Println("Inserted number of rows = ", rowCount)

var queryResultName string
var queryResultTimestamp time.Time
var queryResultValue int32
row := db.QueryRow(queryStatement)
err = row.Scan(&queryResultName, &queryResultTimestamp, &queryResultValue)
handleError("query single row", err)
if err != nil {
  panic(fmt.Errorf("error scanning db: %w", err))
}
fmt.Println(fmt.Sprintf("The name: %s, time: %s, value:%d ", queryResultName, queryResultTimestamp, queryResultValue))
_, err = stmt.Exec("Jane", 69)
handleError("execute insert statement", err)
_, err = stmt.Exec("Malcolm", 13)
handleError("execute insert statement", err)

// fetching multiple rows
theRows, err := db.Query(queryStatement)
handleError("Query for multiple rows", err)
defer theRows.Close()
var (
  name  string
  value int32
  ts    time.Time
)
for theRows.Next() {
  err := theRows.Scan(&name, &ts, &value)
  handleError("next row in multiple rows", err)
  fmt.Println(fmt.Sprintf("The name: %s and value:%d created at time: %s ", name, value, ts))
}
err = theRows.Err()
handleError("next row in multiple rows", err)
}

func handleError(msg string, err error) {
if err != nil {
  fmt.Println(msg, err)
  os.Exit(1)
}
}
This code is quite functional in nature. Apart from the SQL statements, there are no database-specific implementation details. Half of the code seems to be error handling. It should be not too hard to understand how this code manipulates the database, except for the fact that there is no database to work with yet, and (therefore) also no driver to make the connection and handle the communication. Let’s remedy this by first running a local database and then adding a driver the database to the Go application.
Run local Oracle Database
There are many different ways to get a local Oracle Database up and running. The easiest way I have found uses a Docker container image that allows me to run a local database with one very simple and straightforward statement:
docker run -d -p 1521:1521 -e ORACLE_PASSWORD=TheSuperSecret1509! gvenzl/oracle-xe This runs an Oracle Database XE 21c instance (at least, that is what it does at the time of writing, when 21c is the latest available container image) and sets the passwords for SYS and SYSTEM to the indicated value. The database is available on port 1521 on localhost.
Gerald Venzl of Oracle maintains a series of (Docker) Container Images that run a slim version of Oracle Database, the XE edition, which is free to use (up to 20GB of data and using a maximum of 2 CPU threads & 2 GB RAM). He describes these images and how to use them in an article titled Introducing gvenzl/oracle-xe: Oracle Database XE Docker images.
Follow these steps to verify that the local Oracle Database is up and running:
- Find the container identifier with docker ps | grep gvenzl. Then open a Bash shell in the container:
```console docker exec -it/bin/bash ``` - Now, connect to the database and run SQL statements:
```console sqlplus system/TheSuperSecret1509! as sysdba ``` - Create a user (schema) to work with in the following sections, for example an innocent demo user:
 ```sql

create user demo identified by demo default tablespace users temporary tablespace temp
/
grant connect, resource to demo
/
```
Now, it’s time to connect to this database from the Go application.
Note: You may be interested in installing the Oracle VS Code extension that allows making connections to Oracle Databases – local and remote – browse their contents and interact with them similar to SQL Developer and other desktop tools. Add a Driver for Oracle Database
There is no official Go driver for Oracle Database, at least not one published or endorsed by Oracle. The unofficial list of Go database drivers has four entries for Oracle Database. Three require installation of the Oracle Client libraries, and one does not. Let’s first work with that last one, called go-ora, a pure driver that by itself handles all communication with the database. Details about go-ora are available from the go-ora homepage on GitHub. We will subsequently also look at godror, a driver which requires the libraries to be installed and the one that seems most prominent among the Oracle Database drivers for Go.
The go-ora driver can be added to the Go application with:
go get github.com/sijms/go-ora/v2 This downloads the package and adds a require entry to the go.mod file. For me that looks like this:
 module oracle-database-client


go 1.16

require (
github.com/sijms/go-ora/v2 v2.4.16 // indirect
)
In a new file called pure-oracle-database-client.go (although Go does not really care about the name) in the same directory as file oracle-database-client-app.go, the following code handles the interaction with the local Oracle Database through go-ora. The driver package is imported and the call to sql.Open, which references oracle implicitly, selects go-ora as the driver of choice.
Parameter dbParams consists of a map of configuration settings (including the username and password), database host and port, and service name to use for making a connection. The connection string is composed using these elements and used in the call to sql.Open. The subsequent call to db.Ping is the first attempt to really establish communications with the database. When this call is successful, we are ready for some real database actions.
package main


import (
"database/sql"
"fmt"
"net/url"
_ "github.com/sijms/go-ora/v2"
)

func GetSqlDBWithPureDriver(dbParams map[string]string) *sql.DB {
connectionString := "oracle://" + dbParams["username"] + ":" + dbParams["password"] + "@" + dbParams["server"] + ":" + dbParams["port"] + "/" + dbParams["service"]
db, err := sql.Open("oracle", connectionString)
if err != nil {
  panic(fmt.Errorf("error in sql.Open: %w", err))
}
err = db.Ping()
if err != nil {
  panic(fmt.Errorf("error pinging db: %w", err))
}
return db
}
Connecting and Running
The database is running, and we have a function that works with a pure Oracle Database driver. Now, let’s return to oracle-database-client-app.go and tie it together.
Add function main in this file. It calls GetSqlDBWithPureDriver to create a sql.DB instance using the database connection details defined in map localDB. Modify these values to align with your database configuration. The function call sets the db variable with *sql.DB, which can be used for further SQL operations.
When all database interactions are complete, the connection should be closed to release the resources. To make sure this is done, the defer in function main immediately following the call to GetSqlDBWithPureDriver is added with the call to db.Close(). The call to function sqlOperations which passes db brings us to the function we discussed two sections ago where the database is really interacted with.
var localDB = map[string]string{

"service":  "XE",
"username": "demo",
"server":   "localhost",
"port":     "1521",
"password": "demo",
}

func main() {
db := GetSqlDBWithPureDriver(localDB)
defer func() {
  err := db.Close()
  if err != nil {
      fmt.Println("Can't close connection: ", err)
  }
}()
sqlOperations(db)
}
Run the application from the command line using go run *.go. The output will look like:
go run *.go

Inserted number of rows =  1
The name: John, time: 2022-04-25 05:31:02.489289 +0000 UTC, value:42
The name: John and value:42 created at time: 2022-04-25 05:31:02.489289 +0000 UTC
The name: Jane and value:69 created at time: 2022-04-25 05:31:02.506039 +0000 UTC
The name: Malcolm and value:13 created at time: 2022-04-25 05:31:02.509098 +0000 UTC
Working with the GoDrOr driver
A popular alternative to go-ora is the Go package godror (formerly called goracle, but renamed because of trademark issues — Oracle Corporation does not want anyone to use oracle in their names). This package also provides an Oracle Database driver which database/SQL can use when a sql.Open is performed for either oracle or godror. This package, unlike go-ora, requires an Oracle Instant Client library to be installed on the system running the Go application.
- Installation of Oracle Instant Client Library
The GoDrOr driver uses Oracle Database Programming Interface for C (ODPI-C). It’s an open source library of C code – maintained by Oracle Corporation – that simplifies the use of common Oracle Call Interface (OCI) features for Oracle Database drivers and user applications. When using GoDrOr we do not need to install ODPI-C or be even aware of its existence. However, the environment in which our Go application, including the driver, is running on needs to contain Oracle Client libraries.
The simplest Oracle Client is the free Oracle Instant Client (see the Oracle Instant Client overview page). Only the “Basic” or “Basic Light” package is required. Oracle Client libraries are also available in any Oracle Database installation or full Oracle Client installation. Detailed installation instructions for Linux can be found in the Oracle Database Documentation for Release 21c – Database Client Installation Guide for Linux – Installing Oracle Instant Client.
ODPI-C dynamically loads available Oracle Client libraries at runtime. The Oracle Client libraries are searched for in the same directory as the ODPI-C library (or application binary). If they are not found, they’re searched for in the standard operating system search path, e.g. PATH on Windows or LD_LIBRARY_PATH on Linux. Finally, on platforms other than Windows, $ORACLE_HOME/lib is also searched. For details on ensuring the ODPI-C can find the Oracle Client libraries, please check out ODIP-C GitHub Home – ODPI-C Installation.
- Modifying the Go application to work with GoDrOr
The changes we have to make to the application in order to switch from using go-ora to godror are minimal.
First, the godror driver is added to the Go application with:
github.com/godror/godrorThis downloads the package and adds a require entry to the go.mod file.
Next, create a new file called godror-based-oracle-database-client.go in the same application directory – which is very similar to pure-oracle-database-client.go, which contains details for connecting through the go-ora driver.
The contents of this new file:
package main


import (
"database/sql"
"fmt"

_ "github.com/godror/godror"
)

func GetSqlDBWithGoDrOrDriver(dbParams map[string]string) *sql.DB {
var db *sql.DB
var err error
connectionString := "oracle://" + dbParams["username"] + ":" + dbParams["password"] + "@" + dbParams["server"] + ":" + dbParams["port"] + "/" + dbParams["service"]
db, err = sql.Open("oracle", connectionString)
err = db.Ping()
if err != nil {
  panic(fmt.Errorf("error pinging db: %w", err))
}
return db
}
The import for the godror package is different compared to the import of go-ora. The rest of the code is exactly the same as before.
Note: when we use the Oracle Wallet and change to encrypted communications with the Autonomous Database, there will be more differences between the code used with the two drivers.Finally, to make the application stop using go-ora and start using godror, we just need to comment out or remove one line and add another in function main, calling GetSqlDBWithGoDrOrDriver:
func main() {

//db := GetSqlDBWithPureDriver(localDB)
db := GetSqlDBWithGoDrOrDriver(localDB)
Run the application again with go run *.go and you will find the same output as before. The fact that the Oracle Instant Client is involved now is not noticeable. The behavior is apparently unchanged, even though there could be non-functional differences such as the performance of certain operations.
Database Transaction Management
What is not immediately obvious from our previous discussion is that we never actually committed data to the database. All SQL actions took place in a single database session. The two DDL operations that created and dropped the table implicitly committed the transaction, but none of the insert statements were committed. Some databases have an autocommit setting – some even as their default – that turns every DML operation into a transaction that is automatically committed. Not so with the Oracle Database. In order to commit the changes made to database records, these changes must be explicitly committed – or rolled back in case their lasting effects are not desirable after all. In our Go application we can work with database transactions explicitly – by beginning a transaction (sql.Tx) on a database, executing DML statements on that transaction, and finally either committing or rolling back the transaction. For example:
  ctx := context.Background()

tx, err := db.BeginTx(ctx, nil)
err = tx.ExecContext(ctx, DMLStatement, ... bind parameter values)
err = tx.ExecContext(ctx, AnotherDMLStatement, ... bind parameter values)
err = tx.Commit() // or tx.Rollback()
Go Application talking to OCI Autonomous Database
Making a Go application talk to a local (or any traditionally connected) Oracle Database was not so hard. Databases that are configured for encrypted communications from clients that use the Oracle Wallet – such as Oracle Autonomous Database instances on OCI – are no more difficult to interact with. We need to extend our code to work with the Oracle Wallet file, and of course we need to run an Autonomous Database instance and acquire the associated Oracle Wallet.
Run free Autonomous Database on OCI
To run an Autonomous Database Instance is almost simpler than running a local database. An ATP instance can be created in several ways (including through OCI CLI and Terraform), but the most straightforward method for your first time is probably through the OCI browser console.
Note: Tim Hall provides a good description in his article Oracle Cloud : Autonomous Transaction Processing (ATP) – Create Service, and there are many more to be found. Let’s create your always free ATP instance:
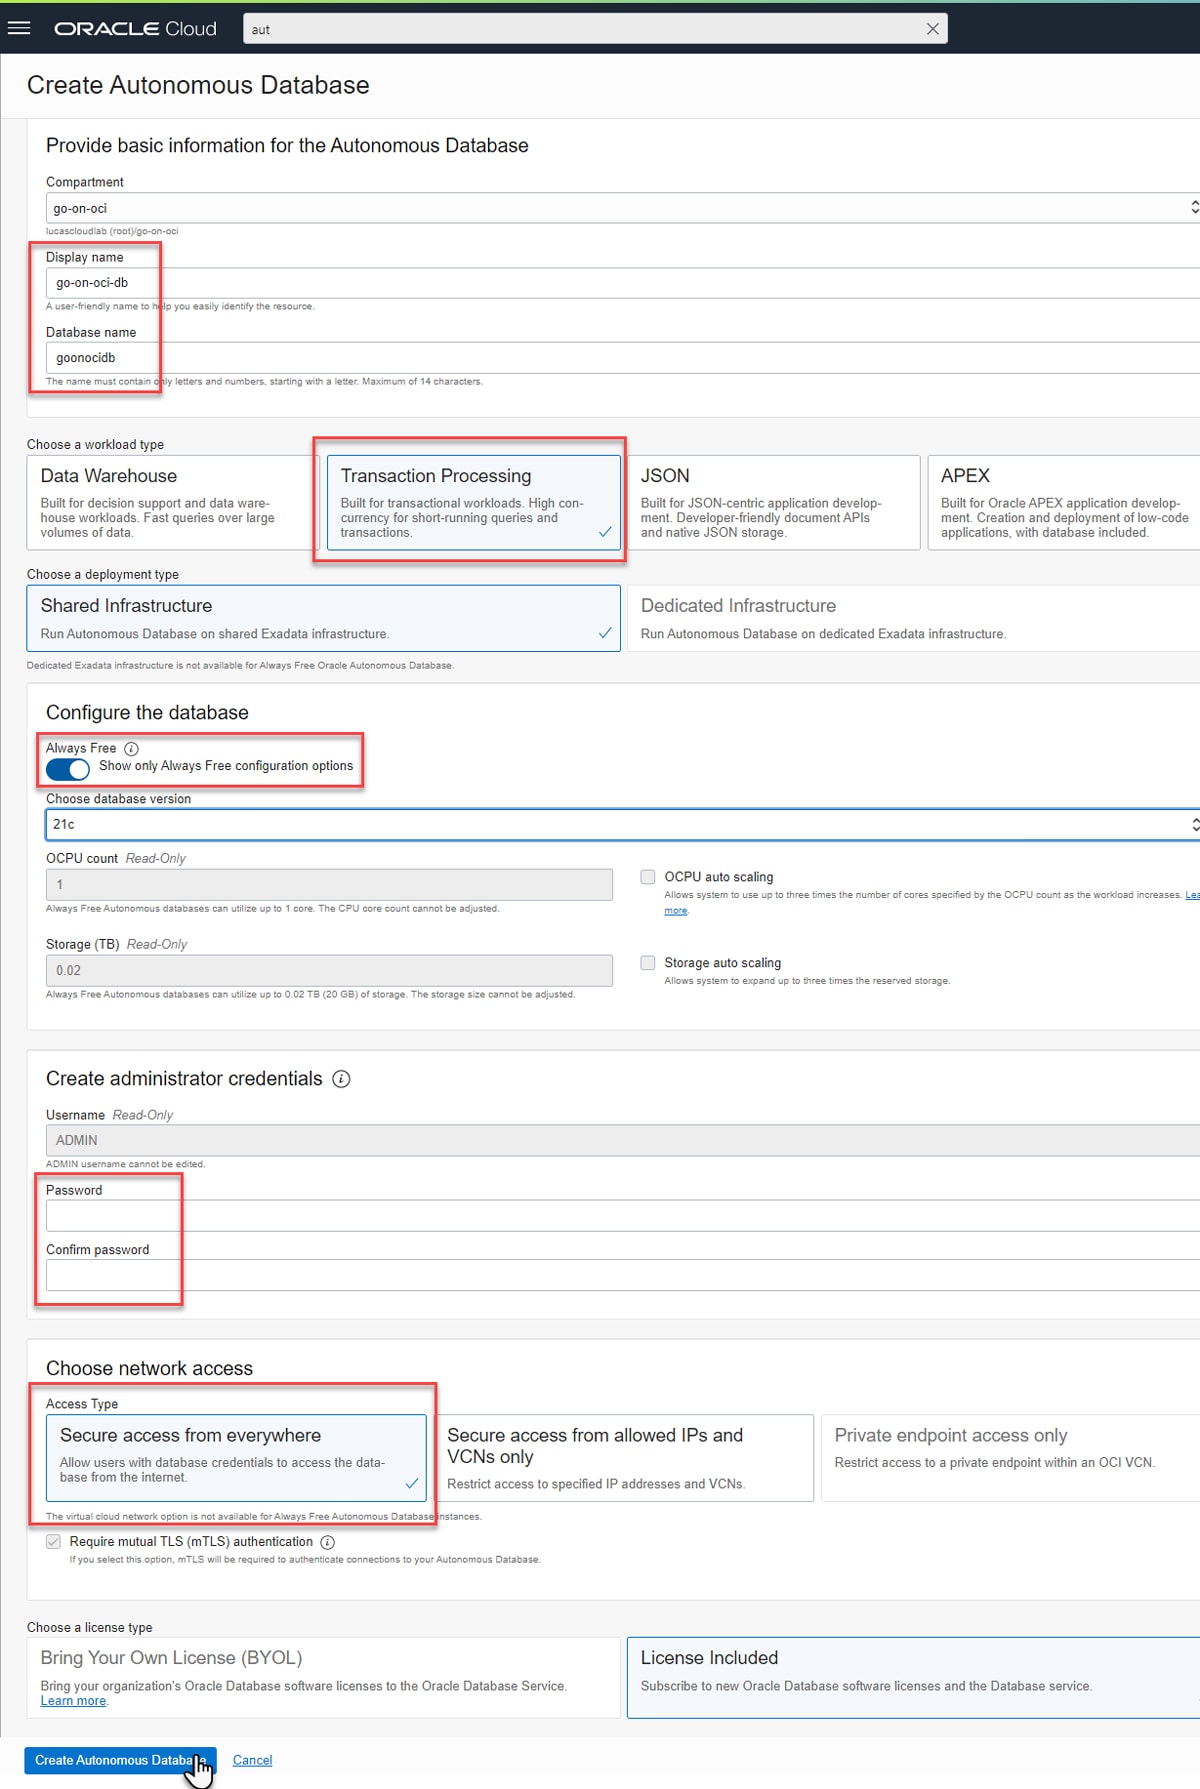
Type aut in console’s search box, navigate to *Autonomous Database Features*, click on button Create Autonomous Database.

In the creation form, provide a display name (maybe go-on-oci-db) and database name, select Transaction Processing as the workload type, toggle the Always Free toggle to active, provide a password for ADMIN (and remember it well), accept Network Access Type Secure access from everywhere and make sure checkbox Require mutual TLS (mTLS) authentication is checked.
After pressing the button Create Autonomous Database to create the database, the provisioning status is presented:

It takes less than a minute for the database to be available.
Download Database Wallet with Connect Details
We need the database wallet that contains the SSL certificates required for the mTLS interaction. Download the wallet for the ATP instance. First click the DB Connection button in the ATP page in the OCI Console, then click on Download wallet.

Provide a password for the wallet; this may be needed for reading the wallet later on. Hang on to this password as well, though I have not needed this password for the steps described in this article.
Save the zip file, we’ll use it soon.

Create Demo user account in Autonomous Database
You may want to create a demo user account in the autonomous database. You can do this with these steps:
- On the ATP details page, click on button Database Actions. Connect as user admin and use the password that you used when configuring ATP.
- In the Database Actions Launchpad, click on the tile SQL. The SQL Worksheet is opened.
- Paste the statements below into the worksheet and the icon for running the script (or use the F5 button on your keyboard). These statements create a user (schema) to work with in the following sections, just as we did in the local database:
 create user demo identified by thePassword1 default tablespace users temporary tablespace temp

/
grant connect, resource to demo
/
ALTER USER DEMO QUOTA UNLIMITED ON DATA
/

Modify Go application with ATP and Oracle Wallet connection details
When the Oracle Database that I want to interact with needs to be connected to with the use of an Oracle Wallet, then I need to pass the file system location of the Oracle Wallet to the driver. More precisely, I need to specify the path to the directory that contains the file cwallet.sso that is part of the wallet. The wallet is typically provided in a zip-archive. This archive should be extracted (or at least this file should) and the path to the directory that contains the file is what will be called the walletLocation. At this point, extract cwallet.sso from the wallet zip file and move this file to a location that is accessible from the Go application – it might even be in the same directory as the Go application itself. This is not the best practice for production grade applications, but for the purposes of this article it will suffice.
The connection details for the autonomous database that need to be provided consist of the same set of elements used earlier for the local database. The database service name can be found in the tnsnames.ora file in the wallet zip file or on the ATP DB Connection page in the OCI Console as service_name. The value for the server property is available as the host in these locations.
When the properties are gathered, the following map definition can be added in file oracle-database-client-app.go, right under localDB:
var autonomousDB = map[string]string{
"service":        "k8j2fvxbaujdcfy_goonocidb_medium.adb.oraclecloud.com",
"username":       "demo",
"server":         "adb.us-ashburn-1.oraclecloud.com",
"port":           "1522",
"password":       "thePassword1",
"walletLocation": ".", // when the *.sso file has been moved into the application directory; otherwise provide the absolute directory path
}
Go interaction with Autonomous Database using Driver go-ora
The go-ora driver configuration needs to be extended a little to include the wallet location in the connection string and configure the secure communication protocol.
func GetSqlDBWithPureDriver(dbParams map[string]string) *sql.DB {

connectionString := "oracle://" + dbParams["username"] + ":" + dbParams["password"] + "@" + dbParams["server"] + ":" + dbParams["port"] + "/" + dbParams["service"]
if val, ok := dbParams["walletLocation"]; ok && val != "" {
  connectionString += "?TRACE FILE=trace.log&SSL=enable&SSL Verify=false&WALLET=" + url.QueryEscape(dbParams["walletLocation"])
}
db, err := sql.Open("oracle", connectionString)
...
To run the application against the Autonomous Database and do its TEMP_TABLE acrobatics in the cloud, we need to change the main function slightly:
func main() {

db := GetSqlDBWithPureDriver(autonomousDB)
//db := GetSqlDBWithGoDrOrDriver(localDB)
...
That is: replace the localDB reference in the call to GetSqlDBWithPureDriver with autonomousDB.
Now run the application again with go run *.go. The results will be exactly the same as before against the local database, but they will probably take a bit longer to be produced as now latency is introduced in each of the database interactions.
Go interaction with Autonomous Database using Driver godror
The godror driver uses a slightly different setup for working with an Oracle Wallet compared to go-ora. The function GetSqlDBWithGoDrOrDriver in file godror-based-oracle-database-client.go is extended to handle this case:
func GetSqlDBWithGoDrOrDriver(dbParams map[string]string) *sql.DB {

var db *sql.DB
var err error
if val, ok := dbParams["walletLocation"]; ok && val != "" {
  db, err = sql.Open("godror", fmt.Sprintf(`user="%s" password="%s"
  connectString="tcps://%s:%s/%s?wallet_location=%s"
     `, dbParams["username"], dbParams["password"], dbParams["server"], dbParams["port"], dbParams["service"], dbParams["walletLocation"]))
}
if val, ok := dbParams["walletLocation"]; !ok || val == "" {
  connectionString := "oracle://" + dbParams["username"] + ":" + dbParams["password"] + "@" + dbParams["server"] + ":" + dbParams["port"] + "/" + dbParams["service"]
  db, err = sql.Open("oracle", connectionString)
}
err = db.Ping()
...
To run the application with the godror driver against the Autonomous Database and do its TEMP_TABLE acrobatics in the cloud, we need to change the main function slightly:
 func main() {

//db := GetSqlDBWithPureDriver(autonomousDB)
db := GetSqlDBWithGoDrOrDriver(autonomousDB)
...
Now run the application again with go run *.go. The results will again be exactly the same as with the go-ora driver, but it seems (at least in my environment) that actions through go-ora are substantially faster than the same actions through godror.
Deploy Go Application talking to Autonomous Database to OCI
The Code Repository contains an application called data-service, in directory /applications/data-service. This application is an extension of the myserver application that we worked with in articles one and two of this series. The application still handles HTTP requests as it did before, and this time also implements a simple data API. Using PUT, POST and DELETE requests, the application can be used to create, update and remove person records from a table called PEOPLE in an Oracle Database. Using GET requests, the current details for any person can be retrieved.
We will first take a brief look at the interesting elements in the application, and then run it locally. The next step is making this application run on OCI in a Compute instance. You will find that there is nothing very special about an application that has Autonomous Database interaction when it comes to deployment on OCI. Or, at least not until the next installment in this series where we will use OCI Key Vault to securely hold the Oracle Wallet details that – thanks to the instance principal based authorization – the application can retrieve at runtime. For now, however, the wallet is included in the source code repository and processed in the build and deployment pipelines. That is not a good practice and will be rectified in the next article.
Once the application is deployed, we verify if we can access it with direct access to the compute instance. To apply a good best practice regarding (not) publicly exposing services directly, we then extend the API Gateway with one more routes that lead to the data-service, and specifically its database-founded capabilities.
The final situation we achieve on OCI at the end of this section looks like this:

Inspect data-service and configure for your ATP instance
File data-server.go is new in the application. It contains all logic for interacting with the database and handling any HTTP request to the application that comes in on path data; the DATA_PATH. The registration in function main of the DataHandler function integrates the data handling capabilities.
http.HandleFunc(DATA_PATH, DataHandler)
Function main is also extended with these initialization steps:
func main() {

db := GetSqlDBWithGoDrOrDriver(autonomousDB)
defer func() {
  err := db.Close()
  if err != nil {
      fmt.Println("Can't close connection: ", err)
  }
}()
InitializeDataServer(db)
...
At the start of the my-server application, a database connection is created and data server is set up. The application uses the godror driver. Note that we make use of the fact that the Compute instance that is the deployment target was created (back in part one of the series) on the Oracle Linux Cloud Developer image and has the Oracle Instant Client preinstalled.
All the application needs added in order to run is:
- Copy your cwallet.sso file to the root directory of the application
- Define your Autonomous Database connection details in data-server.go
You can then locally run the application, using
go run *.go
The application starts and reports for duty.
In a separate terminal window, you use curl statements to interact with the Person API. These HTTP requests will cause two records to be created – for Mickey Mouse and Bugs Bunny. Mickey’s record is updated once. Both records are retrieved once. Then both are deleted. The final GET request returns no data.
Feel free to add curl requests or not execute all. You can check, in the SQL Worksheet for example, if the Person API has created the database records that are expected.

curl -X "PUT" -H "Content-Type: application/json" -d '{"name":"Mickey Mouse", "age":93, "comment": "Cartoon Character"}' localhost:8080/data


curl -X "PUT" -H "Content-Type: application/json" -d '{"name":"Bugs Bunny", "age":84, "comment": "an animated cartoon character created in the late 1930s by Leon Schlesinger Productions (later Warner Bros. Cartoons) and voiced originally by Mel Blanc."}' localhost:8080/data

curl -X "POST" -H "Content-Type: application/json" -d '{"name":"Mickey Mouse", "age":93, "comment": "Cartoon Character and Movie Star, created in 1928 by Walt Disney and first appearing in Steamboat Willie; he is the mascot of The Walt Disney Company. His partner is Minnie and he has a pet dog called Pluto "}' localhost:8080/data

curl -X "GET"  localhost:8080/data?name=Mickey+Mouse

curl -X "GET"  localhost:8080/data?name=Bugs+Bunny

curl -X "DELETE" -H "Content-Type: application/json" -d '{"name":"Bugs Bunny"}' localhost:8080/data

curl -X "DELETE" -H "Content-Type: application/json" -d '{"name":"Mickey Mouse"}' localhost:8080/data

curl -X "GET"  localhost:8080/data?name=Mickey+Mouse
Commit, Push and Build leading to Deploy and Run
This variant of the myserver application is ready to use and the code is already in the OCI DevOps Code Repository, as all code from the article source repository on GitHub was committed to the OCI Code Repository in the second article in this series. However, you have added file cwallet.sso (the Oracle Wallet for your Autonomous Database instance) and you have updated file data-server.go to provide database connection details. Before the build pipeline can be used on OCI to build and subsequently deploy the application, you first need to add the new file, commit both the changed and this added file, and push the changes to the OCI DevOps Code Repository.
After these git add, commit and push actions, the Code Repository go-on-oci-repo should contain your cwallet.sso and the data-service.go that you modified.
You can now reuse the build pipeline build-myserver that was setup in article two when we first discussed OCI DevOps Build Pipelines. However, the current pipeline expects the build specification file in the default location, and that will not do for the amended myserver application.
- Open the details page of the Build Pipeline build-myserver in the OCI Console. Open the details for the managed build stage. Click on Edit.
- Change the value in the field Build spec file path to /applications/data-service/build_spec.yaml, the build specification that is modified to build the extended version of myserver. Click on Save.
- Start a build run. Set a new version for the parameter MYSERVER_VERSION if you want to.


The pipeline will produce a new artifact – a zip file with the executable built from the Go sources in directory /applications/data-service and containing the wallet file and website subdirectory. The pipeline will trigger the deployment pipeline that will bring the artifact to the Compute instance, copy the application to the /tmp/yourserver directory, and run the application. It starts listening for HTTP requests on the port specified by the deployment pipeline parameter HTTP_SERVER_PORT (or on 8080 if the parameter is not set).
You can access the Person API on the public IP address for the VM, if that is still exposed:
curl -X "GET" :8095/data?name=Mickey+Mouse
You can create a route on the API Gateway to provide proper public access to the Person API. Make sure that you add all methods that the API handles to the route definition.
When the deployment is updated, the Person API is available at https://

Curl and other HTTP tools like Postman can be used to interact with the API, using all methods to create, update, retrieve and delete person records.

Go Application on OCI interacting with Autonomous Database and Object Storage service
The final step in this article combines the interaction with the OCI Object Storage service (introduced in the previous article) with operations on an Autonomous Database instance in a single Go application that is first ran locally and then deployed to and executed on a compute instance in OCI and exposed through API Gateway. The functionality provided: send an HTTP GET request with the names of an object and a bucket on Object Storage; the object should be a JSON file that contains data on people in the following format:
 [

{
  "name": "Jasper",
  "age": 19,
  "comment": "Haute Couture"
},
{
  "name": "James",
  "age": 3,
  "comment": "Golden retriever"
}
]
The file will be read and records will be created in table PEOPLE in the Autonomous Database for each of the JSON entries.
All you need to add to the application in order to run:
- Copy your cwallet.sso file to the root directory of the application
- Define your Autonomous Database connection details in data-server.go
- Edit my-server.go – set the correct value for compartmentOCID
- Upload the file website/sample-persons.json to a bucket on the Object Storage service (feel free to edit the file or to upload a different file with similar contents)
You can then locally run the application, using
go run *.go
The application starts and reports for duty.
In a separate terminal window, you use curl statements to interact with the new Persons file processor API. An HTTP request should pass in the name of the bucket and the object that contains the JSON data to process. The service will fetch the file, parse its contents and create or update records the PEOPLE table in the autonomous database.
curl "localhost:8080/people?objectName=sample-persons.json&bucketName=the-bucket"
Using a call to the data API you can inspect the data records:
curl localhost:8080/data?name=Martha
And you can do the same in the SQL Developer Worksheet:

You may be interested in the function PeopleJSONProcessor, which handles the record creation (or update) in table PEOPLE. It uses an Oracle-specific Bulk DML approach – syntax supported by the godror driver – where arrays of values for each of the bind parameters are passed in and all records are created in a single DML statement. Quite efficient.
func PeopleJSONProcessor(peopleJson []byte) {

var persons []Person
json.Unmarshal(peopleJson, &persons)
nameVals := make([]string, len(persons))
ageVals := make([]int, len(persons))
descriptionVals := make([]string, len(persons))
for i, person := range persons {
  ageVals[i] = person.Age
  nameVals[i] = person.Name
  descriptionVals[i] = person.JuicyDetails
}

database.Exec(`MERGE INTO PEOPLE t using (select :name name, :age age, :description description from dual) person
  ON (t.name = person.name )
  WHEN MATCHED THEN UPDATE SET age = person.age, description = person.description
  WHEN NOT MATCHED THEN INSERT (t.name, t.age, t.description) values (person.name, person.age, person.description) `,
  nameVals, ageVals, descriptionVals)
}
Now let us bring this application to OCI, to the Compute instance we have also used in the previous section. Some steps are needed as preparation:
- Edit file object-processor.go: change the value of const RUN_WITH_INSTANCE_PRINCIPAL_AUTHENTICATION from false to true (this flag is false when running locally and true when running on a Compute Instance in OCI where Instance Principal authentication and authorization is used)
- Git actions: add cwallet.sso and commit this new file along with the changed files my-server.go, object-processor.go and data-service.go; push the commit to OCI Code Repository
- Make sure an IAM policy exists that allows the dynamic group go-on-oci-instances to read objects in the compartment; this makes it possible for the application running on the VM to call out to Object Storage Service to read the JSON file with person records . The policy statement could read: Allow dynamic-group go-on-oci-instances to read objects in compartment go-on-oci
After these git add, commit and push actions, the Code Repository go-on-oci-repo should contain your cwallet.sso and the data-service.go that you modified.
You can now reuse the build pipeline build-myserver that we used before. Just as we did earlier, we have to update the reference to the build specification file.
- Open the details page of the Build Pipeline build-myserver in the OCI Console
- Open the details for the managed build stage
- Click on Edit
- Change the value in the field Build spec file path to /applications/people-file-processor/build_spec.yaml, the build specification that is modified to build the extended version of myserver
- Click on Save

Start a build run. Set a new version for the parameter MYSERVER_VERSION if you want to.
The pipeline will produce a new artifact – a zip file with the executable built from the Go sources in directory /applications/people-file-processor and containing the wallet file and website subdirectory. The pipeline will trigger the deployment pipeline that will bring the artifact to the Compute instance, copy the application to the /tmp/yourserver directory, and run the application. It starts listening for HTTP requests on the port specified by the deployment pipeline parameter HTTP_SERVER_PORT (or on 8080 if the parameter is not set).
You can access the API on the public IP address for the VM – if that is still exposed. It’s better to add a route on the API Gateway to expose access to the personnel file processor:
- Navigate to the details for the-api-gateway
- Open the tab Deployments
- Click on Edit
- Open the second step for Routes and add a new route.
Define the Path as /personnel-file-handler. The GET method should be supported. The type of the route is HTTP. The URL is: http://<Public IP for Compute Instance>:8095/people. Check the value of the HTTP_SERVER_PORT on the deployment pipeline deploy-myserver-on-go-app-vm. If it is not set to 8095, then modify the URL value to use the proper port number for the application.

Press Next, then Save changes. It will take a moment for the API Gateway’s Deployment to be refreshed. Once it has, the service that reads a file from an Object Storage bucket, processes the JSON content and creates records in table PEOPLE in the Autonomous Database instance for the entries in this file can be triggered with a simple HTTP GET request to https://<public endpoind of API Gateway>/my-api/personnel-file-handler?objectName=sample-persons.json&bucketName=the-bucket.
The effect of making the call can be inspected through the person API that reads records from that same table in that same database: https://<public endpoind of API Gateway>/my-api/person?name=Jasper.
The end-to-end picture of what is now deployed on OCI is shown in the next figure.

What is not shown in the picture and is important to note:
- the Oracle Wallet file deployed with the application (in the artifact built from the source in Code Repository)
- hard coded reference to the compartment in the application
- the policy that grants permission to the compute instance to read objects
In the next article we look at OCI Key Vault, a service that offers a much better way to store the Oracle Wallet and make it available to the application at deployment time (or even runtime).
Conclusion
This article demonstrated how one can interact with an Oracle Database from Go applications, either a traditional one or the autonomous kind. We have seen how a connection from a Go application to a local Oracle Database – as well as to an Autonomous Database is made – using a driver and possibly supporting libraries, and how DDL and DML SQL operations can be performed with these databases from the comfort of the Go application. Using an Oracle Wallet for proper management of (autonomous) database credentials was discussed. An application running on an OCI Compute Instance, interacting through the Go SDK for OCI with the Object Storage Service, and manipulating the Autonomous Database – automatically deployed through OCI DevOps – provided the finale of the article.
The fifth and last article in this series series adds two more OCI services with which Go applications can interact: OCI Streaming – a high volume streaming message broker that allows for decoupled interactions between different microservices and other components – and the OCI Key Vault for managing secrets such as Oracle Wallet with database credentials. This article also introduces a third type of application platform next to VM and serverless function, in the shape of the managed OCI Kubernetes Enginer (OKE), and it shows how DevOps Deployment Pipelines can deploy our Go applications to OKE in an automated way.
Resources
- Source code repository for the sources discussed in this article series
- Go Dev – Tutorial: Accessing a relational database General introduction to working with the database/sql package Connecting a Go application to Oracle Database Using an SQL database in Golang Oracle Cloud : Autonomous Transaction Processing (ATP) – Create Service
- Go Dev Docs – Accessing relational databases
- List of drivers for Go database/sql – to use a specific database product from Go
- Go Oracle Database Driver go-ora – a pure client that does not need additional libraries
- Go Oracle Database Driver godror – uses Oracle Client libraries Go DRiver for ORacle User Guide
- Download Oracle Client libraries (free Basic or Basic Light package) – needed with godror at run time
- Installation instructions for GoDrOr package Some instructions on installing Oracle Instant Client Download page for Oracle Instant Client.
- Oracle Database Documentation for Release 21c – Database Client Installation Guide for Linux – Installing Oracle Instant Client
- How to Connect a Go program to Oracle Autonomous Database on the blog My Experiments with Java by Pallab Rath
- Using the Go Language for Efficient Oracle Database Applications (slidedeck) – Anthony Tuininga, Oracle OpenWorld 2019 (PDF)