
Integrating and Using JasperReports in NetBeans
By Craig Conover and Marina Sum, updated: September 1, 2006
Since this article was published in late June, we have received a host of excellent comments from readers, hence this update. In particular, thanks to Geertjan Wielenga of the NetBeans IDE team for his valuable input.
The tool for generating reports is an essential component of all enterprise systems and arguably the most valuable one in an application. One such popular, open-source, and Java technology-based tool is JasperReports. Rather than being a standalone product, JasperReports is a framework that you can integrate into your application.
JasperReports ably handles the most common reporting needsthose for relational database applications. The relational database management system (RDBMS) is not the only data storage format available, however. JasperReports' flexibility shines with its customizable datasource API: Whether your data is stored as XML files, in an LDAP repository, accessible through POJOs, or in a proprietary format, JasperReports can handle your reporting needs.
This article describes how to integrate the JasperReports library into the NetBeans 5.5 IDE (henceforth, NetBeans) so that you can develop your report-integration software with the NetBeans code-complete and lookup capabilities of Javadoc tools and then compile and run your code. In addition, the article shows you how to work with a simple Hello Report World! example template and Java application to generate an actual report. Lastly, you learn how to enhance the report template to produce a report by retrieving the data from an RDBMS.
Note: Even though NetBeans does not include a report designer for creating complex templates for JasperReports, you can do so with other third-party, rich-client Java tools. (See the JasperSoft and JasperReports SourceForge sites.) We suggest that you follow the procedures in this article to manually develop a report template to become familiar with its basic XML elements. The steps for many common formatting tasks are far from being intuitive.
If you are already familiar with JasperReports, this article serves as a refresher course. Those new to JasperReports can use this article as a first-step tutorial.
Note: The procedures in this article pertain to the NetBeans UI on the Windows and Solaris operating systems. For Macintosh users, the menus and keyboard shortcuts may differ.
Contents
- Downloading and Installing the Framework
- Integrating Compilation, Code-Complete, and Documentation Capabilities
- Defining the Template's File Extension
- Generating Reports
- Summary
- Reference
Downloading and Installing the Framework
First, download the JasperReports v1.2.5 framework, which includes the source files, bits, documentation, and examples. Select the package jasperreports-1.2.5- project.zip and expand it to a directory of your choice.
Note: When this article was first published in late June, JasperReports 1.2.3 was the latest release. If a new release is available, it might very well work with the code in this article. However, we make no guarantees of such compatibility. If you use a newer release, be prepared to adjust the code as required as a result of the JasperReports API modifications.
Integrating Compilation, Code-Complete, and Documentation Capabilities
Next, integrate the source files, bits, and documentation into NetBeans:
Note: The directories and files in the procedures that follow are under the base JasperReports directory, named jasperreports-1.2.5 by default, in which the sources and bits reside.
Start NetBeans.
Important: Ensure that javac is on your PATH environment variable.
Choose Tools > Library Manager to open the Library Manager dialog box.
Click New Library and, in the New Library dialog box, type JasperReports-1.2.5 in the Library Name field. Choose Class Libraries from the Library Type drop-down list. Click OK. See Figure 1.

Figure 1: Creating a New Library
In the Classpath tab, add the jasperreports-1.2.5.jar file from the JasperReports dist directory and add the following five files from the lib directory:
commons-beanutils-1.5.jarcommons-collections-2.1.jarcommons-digester-1.7.jarcommons-logging-1.0.2.jarcommons-javaflow-20060411.jar
Note: This example uses only a minimal number of JAR files. If you continue to use more advanced features of the JasperReports framework, you might need to add more JAR files to this new library entry.
In the Sources tab, add the JasperReports src directory.
In the Javadoc tab, add the JasperReports api directory, which is under docs.
Click OK to close Library Manager.
Defining the Template's File Extension
JasperReports report templates are simply XML files with the file extension .jrxml. In the following procedure, you define this file extension in NetBeans, which then recognizes .jrxml files as XML files. Accordingly, NetBeans displays all the XML syntax color coding for those files and you can take advantage of the XML code-complete capability in the IDE.
To define the file extension:
- Choose Tools > Options to open the Options dialog box.
- Click Advanced Options.
- Under the IDE Configuration node, expand System and then Object Types.
- Scroll down and select XML Objectsnot XML Schemas. Click the (...) button for the Extensions and MIME Types property to open the customizer editor.
- Type
jrxmlin the Item field and click Add. See Figure 2. - Close the editor and the Options dialog box.
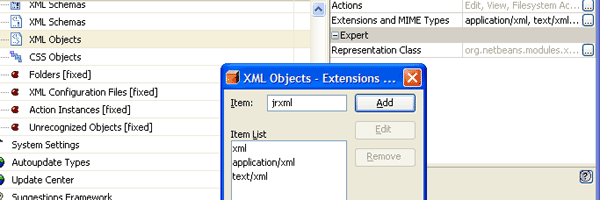
Figure 2: Defining XML Object Types
Now, when you open a JasperReports report template (a .jrxml file), NetBeans recognizes it as an XML file so that the content uses the XML color-coded syntax and code-complete capability.
Generating Reports
You're now ready to create a simple Java application that reads a JasperReports template and generates a report with the framework.
Adding JasperReports to a New Project
First, create a Java application project and add JasperReports as a new library:
- Choose File > New Project for the New Project wizard and then select General under Categories and Java Application under Projects.
- Name the project JasperReportsDemoApp and accept all the default settings.
-
Right-click the JasperReportsDemoApp project node and choose Properties from the context menu.
The Project Properties dialog box is displayed.
-
In the Categories list, select Libraries and click Add Library.
The Add Library dialog box is displayed.
- Select JasperReports-1.2.5 under Libraries and click Add Library. See Figure 3.
- Click OK to close the Project Properties dialog box.
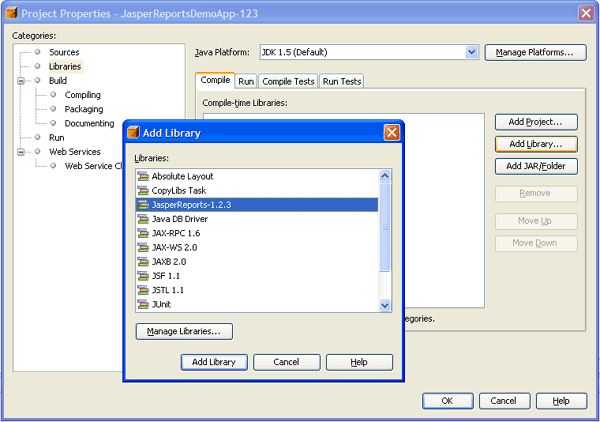
Figure 3: Adding the JasperReports-1.2.5 Library
Specifying Template and Report Locations
Next, create the directories in which to save your templates and to place the generated reports. Under the JasperReportsDemoApp project's root folder, create a directory named report and then create two subdirectories under report: templates and results.
-
In the Files tab, right-click the JasperReportsDemoApp folder and choose File > New Folder > File from the context menu. (If the Files tab is not visible, choose Window > Files.)
The New File dialog box is displayed.
- Choose Other under Categories and Folder under File types. See Figure 4.

Figure 4: Creating New Folder
Creating a Template
Next, create a template:
-
In the Files tab, right-click the templates folder and choose File > File/Folder from the context menu. (If the Files tab is not visible, choose Window > Files.)
The New File dialog box is displayed.
- Select Other under Categories and Empty File under File types.
-
Add the following content to the empty
HelloReportWorld.jrxmlfile. - Open the
Mainclass file, which NetBeans created along with a package when you first created the Java project. -
In the
mainmethod of the class, insert the following code underpublic void main(String[] args), not the constructorpublic Main(). - Place your cursor just after the dot after
JasperCompileManagerin the first line in thetryblock to test the NetBeans code-completion capability with the JasperReports library. -
Press Control+space bar to invoke the code-complete drop-down list.
NetBeans displays a list of choices according to the context of your cursor location. This list automatically appears as you type in code and pause for a moment. To configure the properties of the code-completion prompt, choose Tools > Options for the Options dialog box and then click Editor on the left.
<?xml version="1.0"?>
<!DOCTYPE jasperReport
  PUBLIC "-//JasperReports//DTD Report Design//EN"
  "http://jasperreports.sourceforge.net/dtds/jasperreport.dtd">

<jasperReport name="HelloReportWorld">
    <detail>
        <band height="200">
            <staticText>
                <reportElement x="0" y="0" width="500" height="20"/>
                <text><![CDATA[Hello Report World!]]></text>
            </staticText>
        </band>
    </detail>
</jasperReport>String reportSource = "./report/templates/HelloReportWorld.jrxml";
String reportDest = "./report/results/HelloReportWorld.html";
Map<String, Object> params = new HashMap<String, Object>();
try
{
JasperReport jasperReport =
JasperCompileManager.compileReport(reportSource);
JasperPrint jasperPrint =
JasperFillManager.fillReport(
jasperReport, params, new JREmptyDataSource());
JasperExportManager.exportReportToHtmlFile(
jasperPrint, reportDest);
JasperViewer.viewReport(jasperPrint);
}
catch (JRException ex)
{
ex.printStackTrace();
}
The NetBeans Java editor reports many code errors. As a resolution, import the proper classes with the Fix Imports operation. Either right-click in the editor and choose Fix Imports from the context menu or, with the focus in the editor, type Alt-Shift-F. NetBeans then inserts all the necessary import statements into your class and the error messages will disappear.
At this point, try the built-in NetBeans Javadoc indexing for JasperReports: Rightclick JasperCompileManager and choose Show Javadoc from the context menu. NetBeans launches a browser that shows the Javadoc documentation for that class.
Here is an explanation of the JasperReports framework in the preceding code fragment:
-
JasperCompileManager.compileReportThecompileReportmethod takes the JasperReports XML template and compiles it into byte code format (a JasperReports instance), which you can serialize to disk as a.jasperfile. You can reuse the compiled templates to generate reports without compiling them unless you've changed the template source. This is similar to the difference between a.jspfile and its compiled servlet class counterpart. -
JasperFillManager.fillReportThefillReportmethod takes the compiled report (the JasperReports instance), a few user-defined custom parameters, and a JasperReports datasource (an empty instancemore on that later), and fills the report instance with the parameters and data, if any. In this simple static Hello Report World! example, the method fills in nothing but returns an instance ofJasperPrintinstead.The
JasperPrintinstance is an object representation of the completed report. Now all you have to do is instruct JasperReports to write it to disk in the desired and supported formats. -
JasperExportManager.exportReportToHtmlFileTheexportReportmethod takes theJasperPrintinstance and a destination file path and creates an HTML file with the report content. Besides HTML, the JasperReports framework supports exporting to PDF, XML, CSV (comma-separated values), XLS, RTF, and text file formats. You can also create custom file formats for export with the extensible JasperReports API. -
JasperExportManager.viewReportTheviewReportmethod displays the generated report in the built-in JasperReport Viewer. This is an optional but handy display that enables you to quickly see how a report looks without opening the generated files.
Performing a Test Run
Now do a test run to see what the report looks like:
-
Run the
Mainclass, which compiles the changes automatically. Right-click theMain.javafile in the project tree or in the editor and choose Run File from the context menu. Alternatively, press F6.The image is displayed in the Jasper Viewer. See Figure 5.
-
View the results and then manually view the content of
report/results/HelloReportWorld.htmlby right-clicking the file name and choosing View from the context menu.The content is displayed in the default browser.
Note: You can programmatically display the HTML report in the default browser. Also, you can add a couple lines of code to produce a report in PDF or any of the other output formats supported by JasperReports. Generating reports in those other formats may require that you add JAR libraries from JasperReports to the JasperReports library you created in NetBeans. We leave you to explore those possibilities; they are outside the scope of this article.
Figure 5: Hello Report World! Report
Enhancing the Template
As enhancements, format the template, HelloReportWorld.jrxml, with its title, author, date and other details:
-
Add the following parameter declarations (shown in bold) above the
<detail>section.<jasperReport name="HelloReportWorld"> <parameter name="reportTitle" class="java.lang.String"/> <parameter name="author" class="java.lang.String"/> <parameter name="startDate" class="java.lang.String"/> <detail> ... </jasperReport> -
Add a
<title>section (shown in bold) between the<parameter>and<detail>sections.<jasperReport name="HelloReportWorld"> ... <parameter name="startDate" class="java.lang.String"/> <title> <band height="60"> <textField> <reportElement x="0" y="10" width="500" height="40"/> <textElement textAlignment="Center"> <font size="24"/> </textElement> <textFieldExpression class="java.lang.String"> <![CDATA[$P{reportTitle}]]> </textFieldExpression> </textField> <textField> <reportElement x="0" y="40" width="500" height="20"/> <textElement textAlignment="Center"/> <textFieldExpression class="java.lang.String"> <![CDATA["Run by: " + $P{author} + " on " + $P{startDate}]]> </textFieldExpression> </textField> </band> </title> <detail> ... </jasperReport> -
Add the code (shown in bold) to the
mainmethod of theMainclass.String reportSource = "./report/templates/HelloReportWorld.jrxml"; String reportDest = "./report/results/HelloReportWorld.html"; Map<String, String> params = new HashMap<String, String>(); params.put("reportTitle", "Hello Report World"); params.put("author", "Craig Conover"); params.put("startDate", (new java.util.Date()).toString()); try { -
With the focus in the editor window of the
Mainclass, press F6 to compile and run the class.An enhanced report with a title, header, and date is displayed. See Figure 6.

Figure 6: Report With Title and Header
-
Add the
Customer_ID, NAME, CITY,andSTATE queryStringandfielddeclarations (shown in bold) between the<parameter>and<title>sections to the template,HelloReportWorld.jrxml.The
queryStringdeclaration defines the SQL query to retrieve data for the report.... <parameter name="startDate" class="java.lang.String"/> <queryString> <![CDATA[SELECT * FROM CUSTOMER ORDER BY STATE, CITY]]> </queryString> <field name="CUSTOMER_ID" class="java.lang.Integer"/> <field name="NAME" class="java.lang.String"/> <field name="CITY" class="java.lang.String"/> <field name="STATE" class="java.lang.String"/> <title> ...Note: The order of the template sections is important. A wrong order produces parsing errors and the error message is not intuitive. When you add the
queryStringandfieldsections, be sure to insert them after theparametersection. In other words, the correct order for the sections isparameter,queryString, andfield. -
Add a
<columnHeader>section (shown in bold) between the<title>and<detail>sections.... </title> <columnHeader> <band height="30"> <rectangle> <reportElement x="0" y="0" width="500" height="25"/> <graphicElement/> </rectangle> <staticText> <reportElement x="5" y="5" width="50" height="15"/> <textElement/> <text><![CDATA[ID]]></text> </staticText> <staticText> <reportElement x="55" y="5" width="150" height="15"/> <text><![CDATA[Name]]></text> </staticText> <staticText> <reportElement x="205" y="5" width="255" height="15"/> <text><![CDATA[City, State]]></text> </staticText> </band> </columnHeader> <detail> ... -
Replace the
<detail>section with the one shown in bold, which integrates the newly declared fields that will line up with the columns in the<columnHeader>section.... <detail> <band height="20"> <textField> <reportElement x="5" y="0" width="50" height="15"/> <textElement/> <textFieldExpression class="java.lang.Integer"> <![CDATA[$F{CUSTOMER_ID}]]> </textFieldExpression> </textField> <textField> <reportElement x="55" y="0" width="150" height="15"/> <textElement/> <textFieldExpression class="java.lang.String"> <![CDATA[$F{NAME}]]> </textFieldExpression> </textField> <textField> <reportElement x="205" y="0" width="255" height="15"/> <textElement/> <textFieldExpression class="java.lang.String"> <![CDATA[$F{CITY} + ", " + $F{STATE}]]> </textFieldExpression> </textField> </band> </detail> ...
Adding the Java DB Driver Library
Next, add the Java DB database library to your project:
- Start the Java DB database by choosing Tools > Java DB Database > Start Java DB Server.
-
Add the Java DB driver library to the Java project:
-
Under the JasperReportsDemoApp project node in the Projects tab, right-click the Libraries node and choose Add Library from the context menu.
The Add Libraries dialog box is displayed.
- Choose Java DB Driver and click Add Library. See Figure 7.
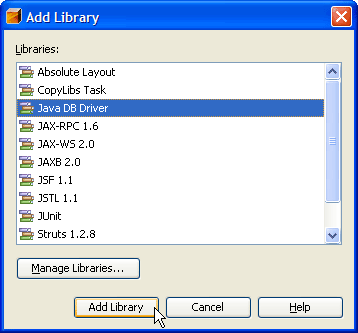
Figure 7: Adding the Database Library
-
Under the JasperReportsDemoApp project node in the Projects tab, right-click the Libraries node and choose Add Library from the context menu.
-
Replace the
tryandcatchblocks in themainmethod of theMainclass with the following code.
try
        {
            JasperReport jasperReport =
                JasperCompileManager.compileReport(reportSource);

            // Make the driver class available.
            Class.forName("org.apache.derby.jdbc.ClientDriver");

            // Create a connection to pass into the report.
            java.sql.Connection conn = DriverManager.getConnection(
                "jdbc:derby://localhost:1527/sample", "app", "app");

            // Replace the empty JR datasource parameter with
            // the connection parameter named conn.
            JasperPrint jasperPrint =
                JasperFillManager.fillReport(
                jasperReport, params, conn);

            JasperExportManager.exportReportToHtmlFile(
                jasperPrint, reportDest);

            JasperViewer.viewReport(jasperPrint);
        }

        catch (JRException e)
        {
            e.printStackTrace();
        }

        // Exception handling for the Class.forName method.
        catch (ClassNotFoundException ex)
        {
            ex.printStackTrace();
        }

        // Exception handling for the DriverManager.getConnection method.
        catch (SQLException ex)
        {
            ex.printStackTrace();
}Generating the Report
Finally, generate the report with the content from the database. With the focus in the editor window of the Main class, press F6 to compile and run the report.
Caveat: If your application throws ClassNotFoundException, add the following as the first line in the try code block:
Class.forName("org.apache.derby.jdbc.ClientDriver");
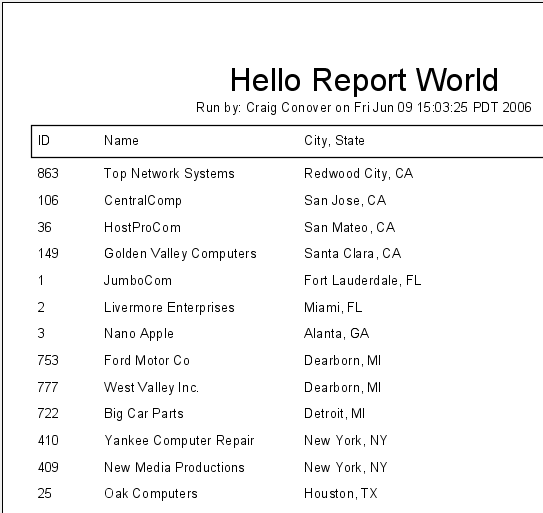
Figure 8: Enhanced Report
Summary
The preceding is just a simple example of a report you can create when you integrate JasperReports into the NetBeans IDE. The JasperReports API supports numerous capabilities with which you can create more complex reports in many types of file formats. For example, you can format the JasperReports XML templates to match your company's look and feel and incorporate cascading style sheets to centralize formatting updates.
Many JasperReports designers are available that ease the process of creating complex templates.
References
- NetBeans 5.5
- JasperReports