Use the SQL Worksheet in SQL Developer to Insert, Update and Delete Data
After completing this How-To, you should be able to understand: How to use the SQL Worksheet to write a few SQL commands to update data.
Updated: Nov 2009 for SQL Developer 2.1
1. Introduction
Oracle SQL Developer provides a SQL Worksheet that you can use to update data, by writing simple or complex SQL statements. In this How-To, we look at the most basic of these, inserting a record, updating single and multiple records and deleting single or multiple records.
2. Software Requirements
- Oracle Database 9.2.0.1 or later
- Access to the Sample User Account HR
3. Adding Data
- Inserting a Row using the Data tab
- Inserting a Row using the SQL Worksheet
SQL Developer has a variety of methods to insert data into your table. We'll start with the most straight forward.
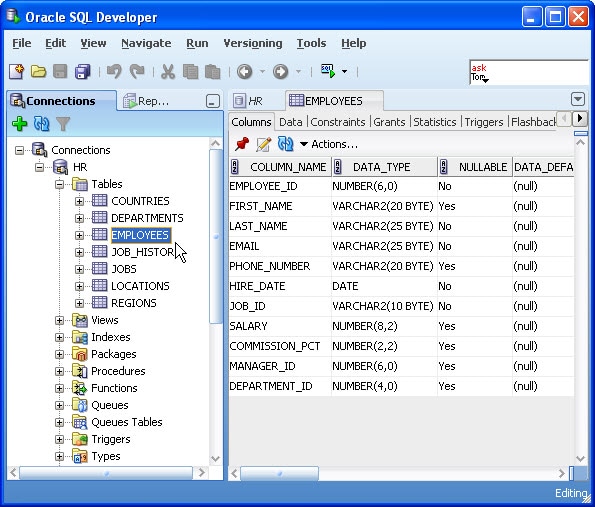
1. SQL Developer makes entering data easily by using the table definition. Select the EMPLOYEES table in the Connections Navigator.

Notice that some values are required. (Nullable = 'No'). When inserting new rows, at least these values should be populated.
2. Click the Data tab. What you see displayed is the current data you have in that table. Use the scrollbar to view all the rows in your table. To insert a new row click the Insert Row button.

Notice the number of rows retrieved is displayed below the Results tab.
3. Fill in values for the required items EMPLOYEE_ID, LAST_NAME, EMAIL, HIRE_DATE and JOB_ID.

For more complex queries or statements, use the Format function (Ctrl+F7) to make it easier to read the SQL. This can be found in the context menu.
4. To save the record to the database, click the Commit Changes button.
The Data Editor log will show the Commit Successful comment when you have committed your changes.

5. You can also insert data using the 'traditional' method you'd use when using a command line or SQL Plus.
Return to the SQL Worksheet and enter the command:
Insert into departments (DEPARTMENT_ID,DEPARTMENT_NAME)
Values (300, 'Research');
Click F9.
NOTE: If you click F5, the detail is shown to the Script Output tab.

Notice the feedback in the message window.
As before you'll need to commit the changes to save them to the database.
Type Commit ; in the SQL Worksheet.
4. Modifying Data
- Updating a Row
- Updating Multiple Rows Using SQL
As in the above example, you can update data using the SQL Worksheet, using SQL commands, or you can use the data tab in the table definition and update individual rows. You'll do both in this next exercise.
1. Once again you can update rows easily by using the Data tab interface.
As you did in the previous exercise, click on a table in the Connections Navigator. In this exercise, use the DEPARTMENTS table.

Notice by clicking on a table different from the previous one worked on, the tab is replaced with the new selected table. To keep the EMPLOYEES tab and the DEPARTMENTS tab open, click the Freeze View pin before selecting the new object.
If you always want new tabs to open, you can set a preference to pin tabs.
2. In the last exercise you added a new record. Update that record by clicking on any of the values and changing it.

Notice that once you have updated the record, an asterisk (*) shows next to the record. As before, click the Commit Changes to update the record in the database.
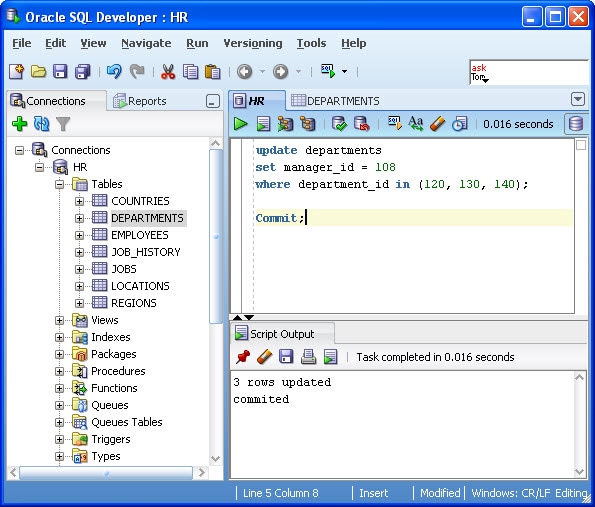
3. You can use this method to update multiple records, but you still need to step through each record and click on the field to update the record. This can be cumbersome if you have multiple records. To update multiple records, it's easier to use a SQL statement.
update departments
set manager_id = 108
where department_id in (120, 130, 140);

Commit;
The results displayed are the objects your HR schema owns.
4. Review the results of the above by returning to the data tab for the table and select refresh. (or writing a SQL query in the SQL Worksheet)

The results displayed are the objects your HR schema owns.
5. Removing Data
- Deleting a Row
- Deleting multiple rows using SQL
As with the previous two examples, you can use the SQL Worksheet to delete single or multiple rows, or you can use the Data tab.
1. Return to the DEPARTMENTS data tab and select and delete the new record you inserted.

2. This row is not deleted, i.e. the changes are not committed to the database, until you click the Commit Changes button
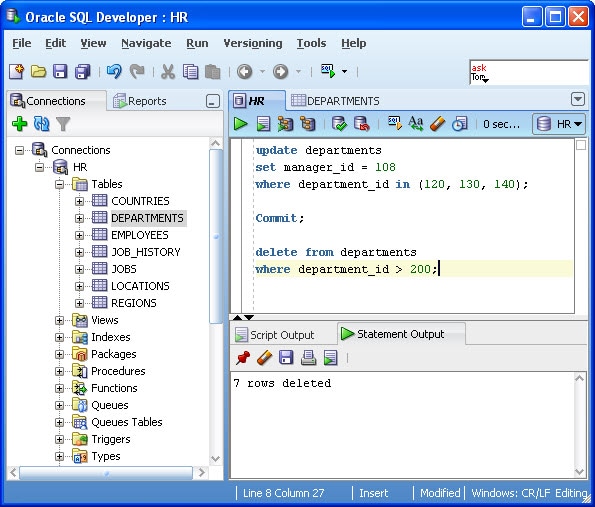
3. Finally, return to the SQL Worksheet and delete a selection of rows, type
delete from departments
where department_id > 200;
Note: You can use F9 to execute the last statement, or F5 to execute all in the SQL Worksheet. If you want to use F5 for a single statement then you can select the statement and click F5.
HINT : CTRL + Enter will execute the single statement your cursor is on.
4. As before, these changes are not saved to the database. In order to undo any changes you have made, type
ROLLBACK;

Click F9.
The delete action you issued, has now been reversed.