How to Create a Failover Zone in a Cluster
Using Oracle Solaris Cluster 4.0 on Oracle Solaris 11
by Venkat Chennuru, December 2011
How to quickly and easily configure an Oracle Solaris Zone in failover mode using the Oracle Solaris Cluster High Availability agent for Oracle Solaris Zones.
Introduction
Oracle Solaris Zones technology isolates software applications and services using flexible, software-defined boundaries, which enables you to create many private execution environments within a single instance of Oracle Solaris. Deploying applications within Oracle Solaris Zones offers many advantages, such as fault and security isolation, optimization of hardware compute resource utilization, and reduction of software licenses through resource capping.
When you deploy mission-critical applications, you can combine the advantages of Oracle Solaris Zones with clustering technologies to obtain the appropriate application service level. Oracle Solaris Cluster, the high availability (HA) solution for Oracle Solaris, offers close integration with Oracle Solaris Zones and extends Oracle Solaris 11 to provide a highly available infrastructure for deploying virtualized workloads.
Oracle Solaris Cluster provides two different types of configuration for Oracle Solaris Zones on Oracle Solaris. Oracle Solaris Zones clusters extends the Oracle Solaris Zones model across multiple clustered nodes to a virtual cluster. This feature allows you to protect applications running within the zones through policy-based monitoring and failover. It also enables reliable operation of multitiered workloads in isolated "virtual" zone clusters. (For more information, see the Zone Clusters—How to Deploy Virtual Clusters and Why white paper.)
In addition to zone clusters, Oracle Solaris Cluster offers a means for protecting the zone itself: the failover zone. This zone is considered to be a black box, and it is monitored and controlled by the Oracle Solaris Cluster HA agent for zones, which starts, stops, and probes the zone. The agent also moves the zone between servers in the event of a failure or upon an on-demand request.
This article describes how to set up a failover zone on a two-node cluster. For more details, check the Oracle Solaris Cluster Software Installation Guide.
Assumptions and Preinstallation Checks
This section discusses preinstallation checks and configuration assumptions for two-node clusters.
Configuration Assumptions
This article assumes the following conditions are met:
- The cluster is already installed and configured with Oracle Solaris 11 and Oracle Solaris Cluster 4.0.
- The repositories for Oracle Solaris and Oracle Solaris Cluster are already configured on the cluster nodes.
- The cluster hardware is a supported configuration for Oracle Solaris Cluster 4.0 software.
- A two-node SPARC cluster is installed. However, the installation procedure is applicable to x86 clusters as well.
- Each node has two spare network interfaces to be used as private interconnects, also known as transports, and at least one network interface that is connected to the public network.
- SCSI shared storage is connected to the two nodes.
- Your setup looks like Figure 1, although you might have fewer or more devices, depending on your system or network configuration.
Note: It is recommended, but not required, that you have console access to the nodes during administration.
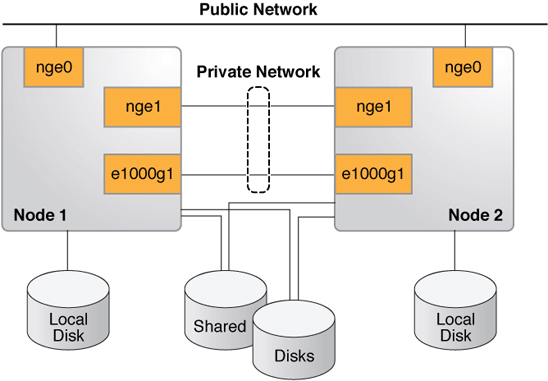
Figure 1. Oracle Solaris Cluster Hardware Configuration
Preinstallation Checks
The zonepath of an Oracle Solaris Zone in an HA zone configuration must reside on a highly available local file system. The zone must be configured on each cluster node on which the zone can reside. The zone is active on only one node at a time, and the zone's address is plumbed on only one node at a time.
Make sure you have a shared disk available to host the zonepath for the failover zone (see in Listing 1). You can use /usr/cluster/bin/scdidadm -L or /usr/cluster/bin/cldevice list to see the shared disks. Each cluster node has a path to the shared disk.
  root@phys-schost-1:~# /usr/cluster/bin/cldevice show d3

  === DID Device Instances ===

  DID Device Name:                                /dev/did/rdsk/d3
    Full Device Path:                                phys-schost-2:/dev/rdsk/c0t60080E5000
  17B52C00002B9D4EB40DB5d0
    Full Device Path:                                phys-schost-1:/dev/rdsk/c0t60080E5000
  17B52C00002B9D4EB40DB5d0
    Replication:                                     none
    default_fencing:                                 global

  root@phys-schost-1:~#
Enabling an Oracle Solaris Zone to Run in a Failover Configuration
In a failover configuration, the zone's zonepath must be on a highly available file system. Oracle Solaris Cluster provides a specific service for managing failover systems: the SUNW.HAStoragePlus resource type.
- Register the
SUNW.HAStoragePlus(HASP) resource type:phys-schost-1# /usr/cluster/bin/clrt register SUNW.HAStoragePlus - Create the failover resource group:
phys-schost-1# /usr/cluster/bin/clrg create zone-rg - Create a zpool on a shared disk to host the zonepath for the failover zone:
phys-schost-1# zpool create -m /ha-zones ha-zones \ /dev/rdsk/c0t60080E500017B52C00002B9D4EB40DB5d0 phys-schost-1# zpool export ha-zones - Register the zpool with the HASP resource, and create a resource (of type HASP) for the zones's disk storage (the zpool).
phys-schost-1# /usr/cluster/bin/clrs create -t SUNW.HAStoragePlus -g zone-rg \ -p zpools=ha-zones ha-zones-hasp-rs phys-schost-1# /usr/cluster/bin/clrg online -emM -n phys-schost-1 zone-rg phys-schost-1# zfs create ha-zones/solaris - Create and configure the zone on all nodes that can host this failover zone.
There is no restriction on the zone configuration except the zpool hosting the zonepath must be on a shared disk.
For our two-node cluster, the zone configuration, which is done using
zonecfg, must be executed on both nodes,phys-schost-1andphys-schost-2. Here is an example usingphys-schost-1. Perform the same actions onphys-schost-2.phys-schost-1# zonecfg -z solarisfz1 \ 'create -b; set zonepath=/ha-zones/solaris/solarisfz1; set autoboot=false; set ip-type=shared; add attr; set name=osc-ha-zone; set type=boolean; set value=true; end; add net; set address=zone-hostname ; set physical=sc_ipmp0; end;' - Verify that the zone is configured on both nodes:
phys-schost-1# zoneadm list -cv ID NAME STATUS PATH BRAND IP 0 global running / solaris shared - solarisfz1 configured /ha-zones/solaris/solarisfz1 solaris shared phys-schost-2# zoneadm list -cv ID NAME STATUS PATH BRAND IP 0 global running / solaris shared - solarisfz1 configured /ha-zones/solaris/solarisfz1 solaris shared - Install the zone using
zoneadm on phys-schost-1, which is where theha-zoneszpool is online. The output from the installation is shown in Listing 2.Listing 2. Installing the Zone
phys-schost-1:~# zoneadm -z solarisfz1 install Progress being logged to /var/log/zones/zoneadm.20030401T184050Z.solarisfz1.inst all Image: Preparing at /ha-zones/solaris/solarisfz1/root. Install Log: /system/volatile/install.3349/install_log AI Manifest: /tmp/manifest.xml.QGa4Gg SC Profile: /usr/share/auto_install/sc_profiles/enable_sci.xml Zonename: solarisfz1 Installation: Starting ... Creating IPS image Installing packages from: solaris origin: http://pkg.oracle.com/solaris/release/ ha-cluster origin: http://localhost:1008/ha-cluster/2c76b8fe7512dde3 9c04c11f28f6be4603f39c66/ DOWNLOAD PKGS FILES XFER (MB) Completed 167/167 32062/32062 175.8/175.8$<3> PHASE ACTIONS Install Phase 44313/44313 PHASE ITEMS Package State Update Phase 167/167 Image State Update Phase 2/2 Installation: Succeeded Note: Man pages can be obtained by installing pkg:/system/manual done. Done: Installation completed in 550.217 seconds. Next Steps: Boot the zone, then log into the zone console (zlogin -C) to complete the configuration process. Log saved in non-global zone as /ha-zones/solaris/solarisfz1/root/var/log/zones/ zoneadm.20030401T184050Z.solarisfz1.install - Verify that the zone was successfully installed and can boot up successfully on
phys-schost-1.- First, verify that the zone was installed:
phys-schost-1# zoneadm list -cv ID NAME STATUS PATH BRAND IP 0 global running / solaris shared - solarisfz1 installed /ha-zones/solaris/solarisfz1 solaris shared - Then, in a different window (for example, from an
ssh,rlogin, ortelnetwindow), log in to the zone's console and then boot the zone:phys-schost-1# zlogin -C solarisfz1 phys-schost-1# zoneadm -z solarisfz1 boot - Follow the prompts through system configuration interactive screens to configure the zone.
- Shut down the zone and switch the resource group to another node in the resource group
nodelist.phys-schost-1# zoneadm -z solarisfz1 shutdown phys-schost-1# /usr/cluster/bin/clrg switch -n phys-schost-2 zone-rg phys-schost-1# zoneadm -z solarisfz1 detach -F phys-schost-1# zoneadm list -cv ID NAME STATUS PATH BRAND IP 0 global running / solaris shared - solarisfz1 configured /ha-zones/solaris/solarisfz1 solaris shared
- First, verify that the zone was installed:
- Assign the UUID for the active boot environment (BE) from the first node,
phys-schost-1, to the active BE on the second node,phys-schost-2.- First, get the universally unique identifier (UUID) for the active BE on
phys-schost-1.phys-schost-1:~# beadm list -H b175b-fresh;70db96a2-5006-c84e-da77-f8bd430ba914;;;64512;static;1319658138 s11_175b;b5d7b547-180d-467e-b2c4-87499cfc1e9d;NR;/;8000659456;static;1319650094 s11_175b-backup-1;aba7a813-feb9-e880-8d7b-9d0e5bcd09af;;;166912;static;1319658479 phys-schost-2:~# beadm list -H b175b-fresh;c37d524b-734a-c1e2-91d9-cf460c94110e;;;65536;static;1319471410 s11_175b;1d0cca6d-8599-e54a-8afa-beb518b1d87a;NR;/;8096948224;static;1319293680 s11_175b-backup-1;db2b581a-ea82-6e8c-9a3d-c1b385388fb7;;;167936;static;1319472971 - Set the UUID for the active BE of the global zone on
phys-schost-2to the same as that ofphys-schost-1. The active BE has flagNin the third field separated by a semicolon. The UUID is set on the data set of the BE. You can get the UUID by runningdf -b /.phys-schost-2:~# df -b / Filesystem avail rpool/ROOT/s11_175b 131328596 root@vzoolah3a:/# phys-schost-2:~# zfs set org.opensolaris.libbe:uuid=b5d7b547-180d-467e-b2c4-87499cfc1e9d \ rpool/ROOT/s11_175b
- First, get the universally unique identifier (UUID) for the active BE on
- Attach the zone and verify the zone can boot on the second node.
- First, attach the zone:
phys-schost-2# zoneadm -z solarisfz1 attach -F - From another session, connect to the zone console:
phys-schost-2# zlogin -C solarisfz1 - Boot the zone and observe the boot messages on the console:
phys-schost-2# zoneadm -z solarisfz1 boot
- First, attach the zone:
- If the bootup succeeded, shut down and detach the zone:
phys-schost-2# zoneadm -z solarisfz1 shutdown phys-schost-2# zoneadm -z solarisfz1 detach -F - On both nodes, install the failover container agent if it is not already installed. The following example shows performing this on
phys-schost-1:phys-schost-1# pkg install ha-cluster/data-service/ha-zones - Create the resource from any one node (in the example below,
phys-schost-1is shown). Then edit thesczbt_configfile and set the parameters on both nodes.- First, register the resource:
phys-schost-1# clrt register SUNW.gds - Then, on both nodes, edit the
sczbt_configfile and set the parameters. (In the example in Listing 3,phys-schost-1is shown.)Listing 3. Setting the Parameters
phys-schost-1# cd /opt/SUNWsczone/sczbt/util phys-schost-1# cp -p sczbt_config sczbt_config.solarisfz1-rs phys-schost-1# vi sczbt_config.solarisfz1-rs RS=solarisfz1-rs RG=zone-rg PARAMETERDIR=/ha-zones/solaris/solarisfz1/params SC_NETWORK=false SC_LH= FAILOVER=true HAS_RS=ha-zones-hasp-rs Zonename="solarisfz1" Zonebrand="solaris" Zonebootopt="" Milestone="svc:/milestone/multi-user-server" LXrunlevel="3" SLrunlevel="3" Mounts="" - On
phys-schost-2, create theparamsdirectory, as shown in thesczbt_configfile.
phys-schost-2# mkdir /ha-zones/solaris/solarisfz1/params - On one node, configure the zone-boot resource. The resource is configured with the parameters that you set in the
sczbt_configfile.phys-schost-2# ./sczbt_register -f ./sczbt_config.solarisfz1-rs - One one node, enable the failover zone resource that was created.
phys-schost-2# /usr/cluster/bin/clrs enable solarisfz1-rs - One one node, check the status of the resource groups and resources, as shown in Listing 4.
Listing 4. Checking the Status
  phys-schost-2# /usr/cluster/bin/clrs status -g zone-rg

  === Cluster Resources ===

  Resource Name         Node Name      State      Status Message
  -------------------   -------------  -----      -------------------
  solarisfz1-rs         phys-schost-1  Offline    Offline
                        phys-schost-2  Online     Online

  ha-zones-hasp-rs      phys-schost-1  Offline    Offline
                        phys-schost-2  Online     Online

  phys-schost-2#
- First, register the resource:
- Verify with
zlogin -C solarisfz1that the zone successfully boots up, and then switch to other the node to test the switchover capability, as shown in Listing 5.Listing 5. Checking Swithover Capability
phys-schost-2# /usr/cluster/bin/clrg switch -n phys-schost-1 zone-rg phys-schost-2# /usr/cluster/bin/clrs status -g zone-rg === Cluster Resources === Resource Name Node Name State Status Message ------------------- ------------- ----- ------------------- solarisfz1-rs phys-schost-1 Online Online phys-schost-2 Offline Offline ha-zones-hasp-rs phys-schost-1 Online Online phys-schost-2 Offline Offline phys-schost-2# - Verify with
zlogin -C solarisfz1that zone has successfully switched over to the other node.
Summary
This article described how to set up a failover zone on a two-node cluster with Oracle Solaris Cluster 4.0 on Oracle Solaris 11. It also described how to verify that the cluster is behaving correctly by switching over the zone from one node to the other.
For More Information
For more information on configuring Oracle Solaris Cluster components, see the resources listed in Table 2.
Table 2. Resources
| Resource | URL |
|---|---|
| Oracle Solaris Cluster 4.0 documentation library | http://www.oracle.com/pls/topic/lookup?ctx=E23623 |
| Oracle Solaris Cluster Software Installation Guide | http://www.oracle.com/solaris/technologies/cluster-overview.html |
| Oracle Solaris Cluster Data Services Planning and Administration Guide | http://www.oracle.com/pls/topic/lookup?ctx=E23623&id=CLDAG |
| Oracle Solaris Cluster 4.0 Release Notes | http://www.oracle.com/pls/topic/lookup?ctx=E23623&id=CLREL |
| Oracle Solaris Cluster training | http://www.oracle.com/technetwork/server-storage/solaris-cluster/training/index.html |
| Oracle Solaris Cluster downloads | http://www.oracle.com/technetwork/server-storage/solaris-cluster/downloads/index.html |
Revision 1.0, 12/02/2011