
Getting Started With Spring 2.0 in Oracle JDeveloper
- Introduction
- Setting up JDeveloper to use Spring
- JDeveloper Features for Spring
- Conclusion
- Further Resources
Introduction
Spring is an open-source framework that aims to simplify development of enterprise Java applications. The Spring framework has grown to be an encompassing solution that includes models for various layers and functionality areas of Java applications. Focusing on using POJOs, leveraging inversion of control concepts and dependency injection as well as implementing aspect oriented programming helped Spring grow into one of the more popular frameworks out there. For more information on the Spring Framework visit its home page
Oracle JDeveloper is a free IDE offering a visual and declarative development approach to building enterprise Java based SOA applications. JDeveloper covers the full development life-cycle including modeling, coding, debugging, profiling and auditing, as well as deployment. Going beyond the basic Java IDE offering, JDeveloper offers features for enterprise Java, Web services, SOA, XML and Database development all in a single IDE.
In this article we'll show you how to set up JDeveloper to use the Spring framework, and then highlight some of the functionality in JDeveloper that can make your development experience with Spring more productive.
| Update [Jan-2007]: A new Spring extension for JDeveloper is now available for download through the help->check for updates menu option. This extension automates many of the steps in this tutorial. For more information about this extension see this overview. |
Setting up JDeveloper to use Spring
Downloading Spring
We are going to use the Spring 2.0 version in this article. Although this version of Spring is still being developed, you can already download release candidates from the Spring site.
Go to the Spring framework web site http://www.springframework.org/download and download the latest stable release of Spring 2.0 (at the time this article was written that was version 2.0 RC3). You want to get the file with the name that ends with * -with-dependencies.zip this file includes all the needed libraries to run the Spring samples.
Now extract this file into a new directory on your machine. In our example we have extracted it to C: creating a C:\spring-framework-2.0-rc3 directory.
Configuring Project Directories
To illustrate the steps for configuring JDeveloper to use Spring we'll configure JDeveloper to run the jpetstore samples that comes with the Spring package.
After you have started JDeveloper, choose New->General->Application from the menu and assign a name to the application. The application definition can be placed anywhere on your disk, but to keep things organized you should specify the directory name to be the top directory of your source. So, you might want to place it in the samples directory of your Spring installation. In the application template field choose No Template.

When prompted to create a project rename it to jpetstore and in the directory name field navigate to the jpetstore directory under the Spring samples directory.

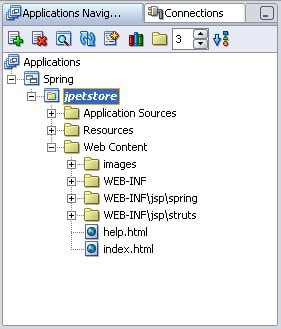
The Application Navigator will display the content of the directory broken-down into Application Sources and Resources sections. The Application Navigator provides a level of abstraction when viewing the project content breaking it into specific components.

You might want to choose View->System Navigator to get a view of the files which is more similar to the structure in the file system.

Since this application contains a web interface, we'll need to indicate this to JDeveloper.
Double click or right click the project to get to the Project Properties dialog. Navigate to the Project Content-> Web Application section in the Application Navigator.
Click the Browse button and select the war subdirectory as the root of the Web content.

This adds another section to the Application Navigator titled Web Content.
Adding Libraries to a JDeveloper Project
Since JDeveloper doesn't come bundled with the Spring libraries, we'll need to add the Spring libraries, as well as the other libraries used in the sample, to the JDeveloper project. This can be done through the project properties->libraries section.
But to make the job of collecting all the needed libraries simpler, we'll use the Ant script that comes with the Spring samples to build the sample and create a repository of all the libraries for us.
Running Ant Tasks in JDeveloper
In the resource section find the build.xml file (an Ant script). Right click and choose the Run Ant Target->Build. This will run the build process for the sample. The ability to run a specific Ant task as well as the full build file, is part of the built-in support that JDeveloper offers for the Ant framework.

In the log window you'll see the results of the script as it executes.

Running the script created a new directory with all the libraries needed to distribute (and compile) the code.

The following procedure is the way to add any third party jar files into your current project.
Double click the project to get to the project properties and go to the libraries node. Click the Add Jar/Directory button.

Navigate to the newly created lib directory (c:\spring-framework-2.0-rc3\samples\jpetstore\war\WEB-INF\lib) and shift click to choose all the jar files form this directory and click ok.

Beyond the Spring specific libraries, we also need to add to our project a couple of generic J2EE libraries.
In the Project Properties window, click the Add Library button and scroll down to locate both the J2EE and JSP Runtime libraries (under the Extensions node), and add them to your project.

Tip: If you plan to use Spring on a regular basis you should create a JDeveloper library that contains the relevant jar files. To do this, go to tool->manage libraries menu, create a new library and in it add entries for all the JAR files you'll be using. Now you can go to tools->default project properties and add this Library to your project. From now on each project you'll create will have all those jar files set-up out of the box.
Compiling and Running the Project
Now we are ready to compile the project. Click the Rebuild button in the toolbar (or press Alt+F9). In the log window check the Messages tab to see the progress of your compile. Your project should compile fine. Note: You'll probably get 4 warnings about deprecated parts in the code, but you can ignore them for now.


Before you can run your project, you need to have a database started. We'll use the sample database that comes with the demo. From a command line window navigate to the db\hsqldb directory under the jpetstore sample. Set the environment variable JAVA_HOME to point to your JDK directory (The complete JDeveloper installation comes with a JDK directory at [jdev-root]\jdk) and run the server.bat file.
Later we'll see how to configure the sample to run with the Oracle Database.
Now you can run your project.
Navigate to the index.html page in the application navigator and right click to choose Run.

JDeveloper comes with a built-in J2EE container - The Oracle J2EE Container, so you don't need to worry about having another J2EE container installed on your machine for testing your application.
To make the testing cycle even simpler, JDeveloper automatically deploys your application to the embedded J2EE container, and opens up a browser with your application running.
Click the Enter the Store link and see the application at work.

JDeveloper Features for Spring
JDeveloper has a lot of features that simplify developing any enterprise Java application. In this section will explore some features that will make your development experience with Spring more fun.
Powerful XML Editing
JDeveloper includes a powerful framework that provides features that simplify editing XML files based on schemas. While developing Spring applications you'll interact with many XML configuration files, in this section will show you how to make this interaction nicer.
The first step is to register the XML schemas for the Spring files you'll be using with JDeveloper's XML editing framework. You can find the location of the XML schemas in the header of each XML file in the Spring sample. A list of all the Spring schemas is here.
Registering an XML Schema
Go to the tools->preferences menu.
Under the XML Schemas node click add and add the following 3 schemas:
- http://www.springframework.org/schema/beans/spring-beans.xsd
- http://www.springframework.org/schema/aop/spring-aop.xsd
- http://www.springframework.org/schema/tx/spring-tx.xsd
Note: If you are working behind a proxy, you'll need to set the tools->web browser and proxy entry to include the information of you proxy before you add the XML schemas.
Another Note: You can also refer to a local copy of the xsd files. You can find the xsd files in the Spring.jar file.

Now let's open the applicationContext.xml file (located under WEB-INF) and see what JDeveloper offers.
Scroll to the end of the file and in a new line before the last </beans> tag type:
<
As you can see JDeveloper's code insight shows you the options that are valid at this point.

Choose bean from the list, and then insert a blank space the code insight that pops up offers you a choice of attributes for the tag.

You can complete the tag entry as follows.
<bean id="joe" class="joe">

              </bean>
Tip: JDeveloper can automatically add closing tags for you as you type. To activate this functionality check the End Tag Completion option under tools->preferences->code editor->XML and JSP/HTML
Next open a new line before the </bean> closure tag and type < and choose property, you'll notice that JDeveloper automatically adds mandatory attributes.

While editing XML files you can also use the Component Palette to drag and drop components onto your file.
For example in the Component Palette window (ctrl+shift+P will bring this window up), choose the http://www.springframework.org/schema/beans schema. Now you can drag a property tag into your XML file inside the bean tag.

This will pop-up a window prompting you to insert the mandatory property (name in this case), and in a second tab you can set other properties.

Also note the Property Inspector window (ctrl+shift+I) which allows you to edit the properties of tags in an easy way.
In the right margin of your file window, you can see the file status and easily navigate to problematic lines.

The Structure Window provides an overview, easy navigation, and editing of your XML document.
If there are any errors in your XML file they will appear here.

You can also use the structure window to edit the file, for example navigate to the last bean entry in the structure window the one you just added choose it and right click -> delete.

JDeveloper provides visual WYSIWYG editors for designing your user interface be it HTML, JSP, JSF or Swing.
Open one of the JSP pages from the application for example the ConfirmOrder.jsp file. JDeveloper will open the file in the visual editor. You can right click the top tab of the editor window and choose split window. Now you'll see both a visual and a source editor view of your file. The two views are kept in synch, click on an object in the visual view and it will be highlighted in the code editor.

You can use the component palette to drag and drop JSP tags and HTML components into your page (both the design and source views). The property inspector and structure window also work the same way to help you customize your pages.

Note that you can set break point in your JSP page to debug it later on.
JDeveloper provides visual page flow diagrams for both Struts and JSF.
In the application find the struts-config.xml file (under the WEB-INF directory) double click it to open the Struts page-flow diagram.

The diagram view shows you the flow of the application you can easily navigate through the diagram in the thumbnail window. Use the component palette, property inspector and structure window to further edit your file. You can always switch or split the editor to view and modify the source code directly.
If you prefer a dialog based editing environment for the file right click the struts-config.xml file in the application navigator and choose Properties to get the following interface for editing the file.

JDeveloper includes features that enable you to interact with your database directly from within the IDE. The features will work with other databases as well, but for our scenario, we'll convert the sample to work on an Oracle XE database.
Oracle Database 10g Express Edition (Oracle XE) is an entry-level, small-footprint database based on the Oracle Database code base that's free to develop, deploy, and distribute; fast to download; and simple to administer.
Install the Oracle XE database on your machine and then follow these instruction to get the Spring sample working.
Note: These instructions should work with an existing Oracle Database as well.
Creating a Connection to the Database.
Open the connection window (ctrl+shift+o) and right click the database node to create a new database connection.
In the first step of the wizard give the connection a name - OracleXE for example.
In the second step insert System as the user name and the password you used at install time.
In the third step fill out the information to access your database set the SID field to be XE.

In step 4 test the connection and make sure it returns success, then click ok to exit the wizard.
Executing SQL Commands
Now let's create a user to host the tables for the demo.
Right click the connection and choose the SQL Worksheet. The SQL Worksheet allows you to issue SQL commands to be executed in the database.

Write the following command
create user spring identified by spring;and click the green arrow run button.

Next write and run the command
grant connect,resource to spring;Now we'll change the properties of the connection in JDeveloper to use this new user name.
Right click the OracleXE connection you've created and choose properties change the username and password to match the user you have just created and test the connection. You can of course create a new database connection for the Spring user if you prefer.
Now let's add the directory with the Oracle creating scripts to the project.
Back in the Application Navigator, double click the project to go to project properties. Under project content->resources click the add button and add the jpetstore\db\oracle directory to your project.

Expand the resource node in the application navigator and right click the jpetstore-oracle-schema.sql file and choose Run in SQL*Plus and your connection name.

The first time you try to invoke SQL*Plus from inside JDeveloper, You'll need to locate the sqlplus instance that comes with and Oracle XE installation (C:\oraclexe\app\oracle\product\10.2.0\server\BIN\sqlplus.exe in my case).
This will invoke the command line tool sqlplus, you'll be prompted for the password of your spring user and then the script will run and create the tables in your user.
To load data into the table right click the jpetstore-oracle-dataload.sql file and choose run in sqlplus again.
Browsing and Editing the Database
You can now browse your database structure under the connection tab. You can see the structure of each table and even see and change the data in the table.
You can also create additional database object and even use the database design diagram capabilities of JDeveloper.

Setting the Spring sample with the Oracle Database
In the WEB-INF directory open the jdbc.properties file in JDeveloper and edit the connection information as follows:
jdbc.driverClassName=oracle.jdbc.OracleDriver
 jdbc.url=jdbc:oracle:thin:@localhost:1521:XE
 jdbc.username=spring
 jdbc.password=spring
Now go to the index.html page and right click Run.
This time you'll get the same application working with the Oracle DB.
Conclusion
As you've seen it is quite simple to set up JDeveloper to work with Spring. The various features that JDeveloper offers can help your Spring based development be more productive. In this tutorial we covered just a small fraction of the features of JDeveloper that can help you create your Spring application more easily. Make sure to further explore such features as the java class diagram, debugger, profilers, code auditing and the support for the full set of enterprise Java components as well as Web services and SOA development.