How to Install and Configure a Two-Node Cluster for Oracle Solaris Cluster 4.1 Using SR-IOV/IB Interfaces
by Venkat Chennuru
Published September 2014
How to quickly and easily install and configure Oracle Solaris Cluster 4.1 software for two nodes, including configuring a quorum device.
Introduction
This article is intended to help a new or experienced Oracle Solaris user to quickly and easily install and configure Oracle Solaris Cluster software for two nodes, including the creation of Single Root I/O Virtualization/InfiniBand (SR-IOV/IB) devices. It provides a step-by-step procedure to simplify the process.
This article does not cover the configuration of highly available services. For more details on how to install and configure other Oracle Solaris Cluster software configurations, see the Oracle Solaris Cluster Software Installation Guide.
This articles uses the interactive scinstall utility to configure all the nodes of a cluster quickly and easily. The interactive scinstall utility is menu driven. The menus help reduce the chance of mistakes and promote best practices by using default values and prompting you for information specific to your cluster. The utility also helps prevent mistakes by identifying invalid entries. Finally, the scinstall utility eliminates the need to manually set up a quorum device by automating the configuration of a quorum device for your new cluster.
Note: This article applies to the Oracle Solaris Cluster 4.1 release. For more information about the Oracle Solaris Cluster release, see the Oracle Solaris Cluster 4.1 Release Notes.
Overview of SR-IOV
SR-IOV is a PCI-SIG standards-based I/O virtualization specification. SR-IOV enables a PCIe function known as physical function (PF) to create multiple lightweight PCIe functions known as virtual functions (VFs). VFs show up like a regular PCIe functions and also operate like regular PCIe functions. The address space for a VF is well contained so that a VF can be assigned to a virtual machine (a logical domain or LDom) with the help of a hypervisor. SR-IOV provides a high degree of sharing compared to other forms of direct hardware access methods that are available in LDom technology, that is, PCIe bus assignment and direct I/O.
Prerequisites, Assumptions, and Defaults
This section discusses several prerequisites, assumptions, and defaults for two-node clusters.
Configuration Assumptions
This article assumes the following configuration is used:
You are installing the two-node cluster on Oracle Solaris 11.1 and you have basic system administration skills.
You are installing the Oracle Solaris Cluster 4.1 software.
The cluster hardware is a supported configuration for Oracle Solaris Cluster 4.1 software.
This is a two-node cluster for SPARC T4-4 servers from Oracle. SR-IOV is only supported on servers based on Oracle's SPARC T4 (or above) processors.
Each cluster node is an I/O domain.
Each node has two spare network interfaces to be used as private interconnects, also known as transports, and at least one network interface that is connected to the public network.
iSCSI shared storage is connected to the two nodes.
Your setup looks like Figure 1. You might have fewer or more devices, depending on your system or network configuration.
In addition, it is recommended that you have console access to the nodes during cluster installation, but this is not required.
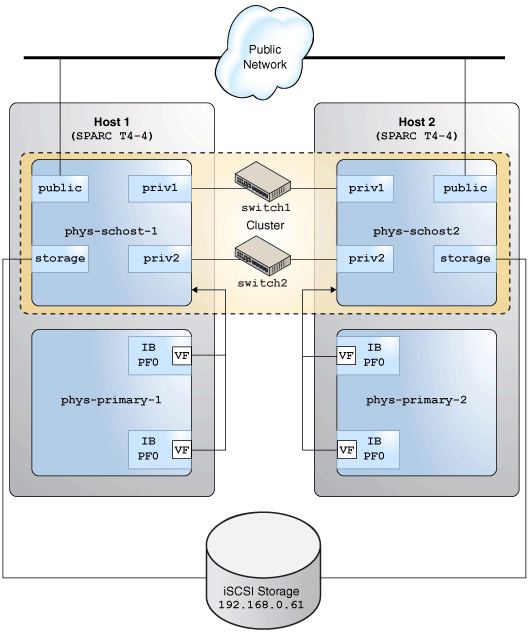
Figure 1. Oracle Solaris Cluster Hardware Configuration
Prerequisites
Perform the following prerequisite tasks:
- Ensure that Oracle Solaris 11.1 SRU13 is installed on both the SPARC T4-4 systems.
- Perform the initial preparation of public IP addresses and logical host names.
You must have the logical names (host names) and IP addresses of the nodes to configure a cluster. Add those entries to each node's
/etc/inet/hostsfile or to a naming service if such a service (for example, DNS, NIS, or NIS+ maps) is used. The example in this article uses a NIS service.Table 1 lists the configuration used in this example.
Table 1. Configuration
Component Name Interface IP Address cluster phys-schost— — node 1 phys-schost-1igbvf01.2.3.4 node 2 phys-schost-2igbvf01.2.3.5 - Create SR-IOV VF devices for the public, private, and storage networks.
You have to create the VF devices on the corresponding adapters for public, private, and storage networks in the primary domain and assign the VF devices to the logical domains that will be configured as cluster nodes.
Type the commands shown in Listing 1 on the control domain
phys-primary-1:root@phys-primary-1# ldm ls-io|grep IB /SYS/PCI-EM0/IOVIB.PF0 PF pci_0 primary /SYS/PCI-EM1/IOVIB.PF0 PF pci_0 primary /SYS/PCI-EM0/IOVIB.PF0.VF0 VF pci_0 primary root@phys-primary-1# ldm start-reconf primary root@phys-primary-1# ldm create-vf /SYS/MB/NET2/IOVNET.PF0 root@phys-primary1# ldm create-vf /SYS/PCI-EM0/IOVIB.PF0 root@phys-primary-1# ldm create-vf /SYS/PCI-EM1/IOVIB.PF0 root@phys-primary-1# ldm add-domain domain1 root@phys-primary-1# ldm add-vcpu 128 domain1 root@phys-primary-1# ldm add-mem 128g domain1 root@phys-primary-1# ldm add-io /SYS/MB/NET2/IOVNET.PF0.VF1 domain1 root@phys-primary-1# ldm add-io /SYS/PCI-EM0/IOVIB.PF0.VF1 domain1 root@phys-primary-1# ldm add-io /SYS/PCI-EM1/IOVIB.PF0.VF1 domain1 root@phys-primary-1# ldm ls-io | grep domain1 /SYS/MB/NET2/IOVNET.PF0.VF1 VF pci_0 domain1 /SYS/PCI-EM0/IOVIB.PF0.VF1 VF pci_0 domain1 /SYS/PCI-EM0/IOVIB.PF0.VF2 VF pci_0 domain1Listing 1
The VF
IOVNET.PF0.VF1is used for the public network. IB VF devices have partitions that host both private network and storage network devices.Repeat the commands shown in Listing 1 on
phys-primary-2. The I/O domaindomain1on both nodes must be installed with Oracle Solaris 11.1 SRU13 before installing the cluster software.
Note: To learn more about SR-IOV technology, take a look at the documentation for Oracle VM Server for SPARC 3.1. For information about InfiniBand VFs, see "Using InfiniBand SR-IOV Virtual Functions."
Defaults
The scinstall interactive utility in the Typical mode installs the Oracle Solaris Cluster software with the following defaults:
Private-network address 172.16.0.0
Private-network netmask 255.255.248.0
Cluster-transport switches
switch1andswitch2
Perform the Preinstallation Checks
- Temporarily enable
rshorsshaccess forrooton the cluster nodes. - Log in to the cluster node on which you are installing Oracle Solaris Cluster software and become superuser.
- On each node, verify the
/etc/inet/hostsfile entries. If no other name resolution service is available, add the name and IP address of the other node to this file.The
/etc/inet/hostsfile on node 1 has the following information.# Internet host table # ::1 phys-schost-1 localhost 127.0.0.1 phys-schost-1 localhost loghostThe
/etc/inet/hostsfile on node 2 has the following information.# Internet host table # ::1 phys-schost-2 localhost 127.0.0.1 phys-schost-2 localhost loghost - On each node, verify that at least one shared storage disk is available.
In this example, the following disks are shared between the two nodes:
c0t600A0B800026FD7C000019B149CCCFAEd0andc0t600A0B800026FD7C000019D549D0A500d0.# format Searching for disks...done AVAILABLE DISK SELECTIONS: 0. c4t0d0 <FUJITSU-MBB2073RCSUN72G-0505 cyl 8921 alt 2 hd 255 sec 63> /pci@7b,0/pci1022,7458@11/pci1000,3060@2/sd@0,0 /dev/chassis/SYS/HD0/disk 1. c4t1d0 <SUN72G cyl 14084 alt 2 hd 24 sec 424> /pci@7b,0/pci1022,7458@11/pci1000,3060@2/sd@1,0 /dev/chassis/SYS/HD1/disk 2. c0t600144F0CD152C9E000051F2AFE20007d0 <SUN-ZFS Storage 7420-1.0 cyl 648 alt 2 hd 254 sec 254> /scsi_vhci/ssd@g600144f0cd152c9e000051f2afe20007 3. c0t600144F0CD152C9E000051F2AFF00008d0 <SUN-ZFS Storage 7420-1.0 cyl 648 alt 2 hd 254 sec 254> /scsi_vhci/ssd@g600144f0cd152c9e000051f2aff00008 - On each node, ensure that the right OS version is installed.
# more /etc/release Oracle Solaris 11.1 SPARC Copyright (c) 1983, 2013, Oracle and/or its affiliates. All rights reserved. Assembled 06 November 2013 - Ensure that the network interfaces are configured as static IP addresses (not DHCP or of type
addrconf, as displayed by theipadm show-addr -o allcommand.)If the network interfaces are not configured as static IP addresses, then run the command shown in Listing 2 on each node, which will unconfigure all network interfaces and services.
If the nodes are configured as static, go to the "Configure the Oracle Solaris Cluster Publisher" section.
# netadm enable -p ncp defaultfixed
Enabling ncp 'DefaultFixed'
phys-schost-1: Sep 27 08:19:19 phys-schost-1 in.ndpd[1038]: Interface net0 has been removed from
 kernel. in.ndpd will no longer use it
Sep 27 08:19:19 phys-schost-1 in.ndpd[1038]: Interface net1 has been removed from kernel
. in.ndpd will no longer use it
Sep 27 08:19:19 phys-schost-1 in.ndpd[1038]: Interface net2 has been removed from kernel
. in.ndpd will no longer use it
Sep 27 08:19:20 phys-schost-1 in.ndpd[1038]: Interface net3 has been removed from kernel
. in.ndpd will no longer use it
Sep 27 08:19:20 phys-schost-1 in.ndpd[1038]: Interface net4 has been removed from kernel
. in.ndpd will no longer use it
Sep 27 08:19:20 phys-schost-1 in.ndpd[1038]: Interface net5 has been removed from kernel
. in.ndpd will no longer use it
Listing 2
- On each node, type the following commands to configure the naming services and update the name service switch configuration:
# svccfg -s svc:/network/nis/domain setprop config/domainname = hostname: nisdomain.example.com # svccfg -s svc:/network/nis/domain:default refresh # svcadm enable svc:/network/nis/domain:default # svcadm enable svc:/network/nis/client:default # /usr/sbin/svccfg -s svc:/system/name-service/switch setprop config/host = astring: \"files nis\" # /usr/sbin/svccfg -s svc:/system/name-service/switch setprop config/netmask = astring: \"files nis\" # /usr/sbin/svccfg -s svc:/system/name-service/switch setprop config/automount = astring: \"files nis\" # /usr/sbin/svcadm refresh svc:/system/name-service/switch - Bind each node to the NIS server.
# ypinit -c - Reboot each node to make sure that the new network setup is working fine.
Configure the Oracle Solaris Cluster Publisher
There are two main ways to access the Oracle Solaris Cluster package repository, depending on whether the cluster nodes have direct access (or through a web proxy) to the internet: using a repository hosted on pkg.oracle.com or using a local copy of the repository.
Using a Repository Hosted on pkg.oracle.com
To access either the Oracle Cluster Solaris Release or Support repositories, obtain the SSL public and private keys.
- Go to http://pkg-register.oracle.com/register/repos/.
- Choose the Oracle Solaris Cluster Release or Support repository.
- Accept the license.
- Request a new certificate by choosing the Oracle Solaris Cluster software and submitting a request. This displays a certification page that contains download buttons for download the key and certificate files.
- Download the key and certificate files and install them, as described in the returned certification page.
- Configure the
ha-clusterpublisher with the downloaded SSL keys to point to the selected repository URL onpkg.oracle.com.This example uses the release repository:
# pkg set-publisher \
-k /var/pkg/ssl/Oracle_Solaris_Cluster_4.key.pem \
-c /var/pkg/ssl/Oracle_Solaris_Cluster_4.certificate.pem \
-g https://pkg.oracle.com/ha-cluster/release/ ha-cluster
Using a Local Copy of the Repository
To access a local copy of the Oracle Solaris Cluster Release or Support repository, download the repository image.
- Download the repository image from the Oracle Technology Network or Oracle Software Delivery Cloud.
To download the repository image from Oracle Software Delivery Cloud, select Oracle Solaris as the Product Pack on the Media Pack Search Page.
- Mount the repository image and copy the data to a shared file system that all the cluster nodes can access.
# mount -F hsfs <path-to-iso-file> /mnt # rsync -aP /mnt/repo /export # share /export/repo - Configure the
ha-clusterpublisher.This example uses node 1 as the system that shared the local copy of the repository:
# pkg set-publisher -g file:///net/phys-schost-1/export/repo ha-cluster
Install the Oracle Solaris Cluster Software Packages
- On each node, ensure that the correct Oracle Solaris package repositories are published.
If they are not, unset the incorrect publishers and set the correct ones. The installation of the
ha-clusterpackages is highly likely to fail if it cannot access thesolarispublisher.# pkg publisher PUBLISHER TYPE STATUS URI solaris origin online <solaris repository> ha-cluster origin online <ha-cluster repository> - On each cluster node, install the
ha-cluster-fullpackage group.# pkg install ha-cluster-full Packages to install: 68 Create boot environment: No Create backup boot environment: Yes Services to change: 1 DOWNLOAD PKGS FILES XFER (MB) Completed 68/68 6456/6456 48.5/48.5$<3> PHASE ACTIONS Install Phase 8928/8928 PHASE ITEMS Package State Update Phase 68/68 Image State Update Phase 2/2 Loading smf(5) service descriptions: 9/9 Loading smf(5) service descriptions: 57/57
Configure the Oracle Solaris Cluster Software
- On each node of the cluster, identify the network interfaces that will be used for the private interconnects.
In this example, 8513 and 8514 are the PKEYs for a private IB partition that is used for transport. 8503 is the PKEY for a private storage network that is used to configure iSCSI storage from an Oracle ZFS Storage Appliance with an IB connection.
The Oracle ZFS Storage Appliance has the IP address 192.168.0.61 configured on the InfiniBand network. The
priv1andpriv2IB partitions are used as private interconnects for the private network. Thestorage1andstorage2partitions are used for the storage network.Type the following commands on node 1:
phys-schost-1# dladm show-ib |grep net
net6      21290001EF8BA2 14050000000001 1    up      localhost    0a-eth-1 8031,8501,8511,8513,8521,FFFF
net7      21290001EF8BA2 14050000000008 2    up      localhost    0a-eth-1 8503,8514,FFFF
phys-schost-1# dladm create-part -l net6 -P 8513 priv1
phys-schost-1# dladm create-part -l net7 -P 8514 priv2
phys-schost-1# dladm create-part -l net6 -P 8503 storage1
phys-schost-1# dladm create-part -l net7 -P 8503 storage2
phys-schost-1# dladm show-part
LINK         PKEY   OVER         STATE    FLAGS
priv1        8513   net6         up       ----
priv2        8514   net7         up       ----
storage1     8503   net6         up       ----
storage2     8503   net7         up       ----
phys-schost-1# ipadm create-ip storage1
phys-schost-1# ipadm create-ip storage2
phys-schost-1# ipadm create-ipmp -i storage1 -i storage2 storage_ipmp0
phys-schost-1# ipadm create-addr -T static -a 192.168.0.41/24 storage_ipmp0/address1
phys-schost-1# iscsiadm add static-config iqn.1986-03.com.sun:02:a87851cb-4bad-c0e5-8d27-dd76834e6985,192.168.10.61
Type the following commands on node 2:
phys-schost-2# dladm show-ib |grep net net9 21290001EF8FFE 1405000000002B 2 up localhost 0a-eth-1 8032,8502,8512,8516,8522,FFFF net6 21290001EF4E36 14050000000016 1 up localhost 0a-eth-1 8031,8501,8511,8513,8521,FFFF net7 21290001EF4E36 1405000000000F 2 up localhost 0a-eth-1 8503,8514,FFFF net8 21290001EF8FFE 14050000000032 1 up localhost 0a-eth-1 8503,8515,FFFF phys-schost-2# dladm create-part -l net6 -P 8513 priv1 phys-schost-2# dladm create-part -l net7 -P 8514 priv2 phys-schost-2# dladm create-part -l net6 -P 8503 storage1 phys-schost-2# dladm create-part -l net7 -P 8503 storage2 phys-schost-2# dladm show-part LINK PKEY OVER STATE FLAGS priv1 8513 net6 up ---- priv2 8514 net7 up ---- storage1 8503 net6 up ---- storage2 8503 net7 up ---- phys-schost-2# ipadm create-ip storage1 phys-schost-2# ipadm create-ip storage2 phys-schost-2# ipadm create-ipmp -i storage1 -i storage2 storage_ipmp0 phys-schost-2# ipadm create-addr -T static -a 192.168.0.42/24 storage_ipmp0/address1 phys-schost-2# iscsiadm add static-config iqn.1986-03.com.sun:02:a87851cb-4bad-c0e5-8d27-dd76834e6985,192.168.10.61 - On each node, ensure that the Oracle Solaris Service Management Facility services are not in the maintenance state.
# svcs -x - On each node, ensure that the service
network/rpc/bind:defaulthas thelocal_onlyconfiguration set tofalse.# svcprop network/rpc/bind:default | grep local_only config/local_only boolean falseIf not, set the
local_onlyconfiguration tofalse.# svccfg svc:> select network/rpc/bind svc:/network/rpc/bind> setprop config/local_only=false svc:/network/rpc/bind> quit # svcadm refresh network/rpc/bind:default # svcprop network/rpc/bind:default | grep local_only config/local_only boolean false - From one of the nodes, start the Oracle Solaris Cluster configuration. This will configure the software on the other node as well.
In this example, the following command is run on the node 2,
phys-schost-2.# /usr/cluster/bin/scinstall *** Main Menu *** Please select from one of the following (*) options: * 1) Create a new cluster or add a cluster node * 2) Print release information for this cluster node * ?) Help with menu options * q) Quit Option: 1From the Main menu, type
1to choose the first menu item, which can be used to create a new cluster or add a cluster node.*** Create a New Cluster *** This option creates and configures a new cluster. Press Control-D at any time to return to the Main Menu. Do you want to continue (yes/no) [yes]? Checking the value of property "local_only" of service svc:/network/rpc/bind ... Property "local_only" of service svc:/network/rpc/bind is already correctly set to "false" on this node. Press Enter to continue:Answer
yesand then press Enter to go to the installation mode selection. Then select the default mode: Typical.>>> Typical or Custom Mode <<< This tool supports two modes of operation, Typical mode and Custom mode. For most clusters, you can use Typical mode. However, you might need to select the Custom mode option if not all of the Typical mode defaults can be applied to your cluster. For more information about the differences between Typical and Custom modes, select the Help option from the menu. Please select from one of the following options: 1) Typical 2) Custom ?) Help q) Return to the Main Menu Option [1]: 1Provide the name of the cluster. In this example, type the cluster name as
phys-schost.>>> Cluster Name <<< Each cluster has a name assigned to it. The name can be made up of any characters other than whitespace. Each cluster name should be unique within the namespace of your enterprise. What is the name of the cluster you want to establish? phys-schostProvide the name of the other node. In this example, the name of the other node is
phys-schost-1. Finish the list by pressing ^D. Answeryesto confirm the list of nodes.>>> Cluster Nodes <<< This Oracle Solaris Cluster release supports a total of up to 16 nodes. List the names of the other nodes planned for the initial cluster configuration. List one node name per line. When finished, type Control-D: Node name (Control-D to finish): phys-schost-1 Node name (Control-D to finish): ^D This is the complete list of nodes: phys-schost-2 phys-schost-1 Is it correct (yes/no) [yes]?The next two screens configure the cluster's private interconnects, also known as the transport adapters. Select the
priv1andpriv2IB partitions.>>> Cluster Transport Adapters and Cables <<< Transport adapters are the adapters that attach to the private cluster interconnect. Select the first cluster transport adapter: 1) net1 2) net2 3) net3 4) net4 5) net5 6) priv1 7) priv2 8) Other Option: 6 Adapter "priv1" is an Infiniband adapter. Searching for any unexpected network traffic on "priv1" ... done Verification completed. No traffic was detected over a 10 second sample period. The "dlpi" transport type will be set for this cluster. For node "phys-schost-2", Name of the switch to which "priv1" is connected [switch1]? Each adapter is cabled to a particular port on a switch. And, each port is assigned a name. You can explicitly assign a name to each port. Or, for Ethernet and Infiniband switches, you can choose to allow scinstall to assign a default name for you. The default port name assignment sets the name to the node number of the node hosting the transport adapter at the other end of the cable. For node "phys-schost-2", Use the default port name for the "priv1" connection (yes/no) [yes]? Select the second cluster transport adapter: 1) net1 2) net2 3) net3 4) net4 5) net5 6) priv1 7) priv2 8) Other Option: 7 Adapter "priv2" is an Infiniband adapter. Searching for any unexpected network traffic on "priv2" ... done Verification completed. No traffic was detected over a 10 second sample period. The "dlpi" transport type will be set for this cluster. For node "phys-schost-2", Name of the switch to which "priv2" is connected [switch2]? For node "phys-schost-2", Use the default port name for the "priv2" connection (yes/no) [yes]?The next screen configures the quorum device. Select the default answers for the questions asked in the Quorum Configuration screen.
>>> Quorum Configuration <<<

    Every two-node cluster requires at least one quorum device. By
    default, scinstall selects and configures a shared disk quorum device
    for you.

    This screen allows you to disable the automatic selection and
    configuration of a quorum device.

    You have chosen to turn on the global fencing. If your shared storage
    devices do not support SCSI, such as Serial Advanced Technology
    Attachment (SATA) disks, or if your shared disks do not support
    SCSI-2, you must disable this feature.

    If you disable automatic quorum device selection now, or if you intend
    to use a quorum device that is not a shared disk, you must instead use
    clsetup(1M) to manually configure quorum once both nodes have joined
    the cluster for the first time.

    Do you want to disable automatic quorum device selection (yes/no) [no]?

  Is it okay to create the new cluster (yes/no) [yes]?
 During the cluster creation process, cluster check is run on each of the new
 cluster nodes. If cluster check detects problems, you can
    either interrupt the process or check the log files after the cluster
    has been established.

    Interrupt cluster creation for cluster check errors (yes/no) [no]?
The final screens print details about the configuration of the nodes and the installation log's file name. The utility then reboots each node in cluster mode.
Cluster Creation

    Log file - /var/cluster/logs/install/scinstall.log.3386

    Configuring global device using lofi on phys-schost-1: done

    Starting discovery of the cluster transport configuration.

    The following connections were discovered:

        phys-schost-2:priv1  switch1  phys-schost-1:priv1
        phys-schost-2:priv2  switch2  phys-schost-1:priv2

    Completed discovery of the cluster transport configuration.

    Started cluster check on "phys-schost-2".
    Started cluster check on "phys-schost-1".

...
...
...

Refer to the log file for details.
The name of the log file is /var/cluster/logs/install/scinstall.log.3386.


    Configuring "phys-schost-1" ... done
    Rebooting "phys-schost-1" ...
    Configuring "phys-schost-2" ...
    Rebooting "phys-schost-2" ...

Log file - /var/cluster/logs/install/scinstall.log.3386
When the
scinstallutility finishes, the installation and configuration of the basic Oracle Solaris Cluster software is complete. The cluster is now ready for you to configure the components you will use to support highly available applications. These cluster components can include device groups, cluster file systems, highly available local file systems, and individual data services and zone clusters. To configure these components, refer to the Oracle Solaris Cluster 4.1 documentation library. - Verify on each node that multiuser services for the Oracle Solaris Service Management Facility (SMF) are online. Ensure that the new services added by Oracle Solaris Cluster are all online.
# svcs -x # svcs multi-user-server STATE STIME FMRI online 9:58:44 svc:/milestone/multi-user-server:default - From one of the nodes, verify that both nodes have joined the cluster.
# cluster status
=== Cluster Nodes ===
--- Node Status ---

Node Name                                 Status
---------                                 ------
phys-schost-1                             Online
phys-schost-2                             Online


=== Cluster Transport Paths ===
Endpoint1                        Endpoint2                       Status
---------                        ---------                       ------
phys-schost-1:priv1              phys-schost-2:priv1             Path online
phys-schost-1:priv2              phys-schost-2:priv2             Path online

=== Cluster Quorum ===
--- Quorum Votes Summary from (latest node reconfiguration) ---
           Needed   Present   Possible
           ------   -------   --------
           2        3         3

--- Quorum Votes by Node (current status) ---

Node Name         Present     Possible   Status
---------         -------     --------   ------
phys-schost-1     1           1          Online
phys-schost-2     1           1          Online


--- Quorum Votes by Device (current status) ---

Device Name       Present     Possible    Status
-----------       -----       -------     -----
d1                1           1           Online


=== Cluster Device Groups ===

--- Device Group Status ---

Device Group Name     Primary     Secondary     Status
-----------------     -------     -------       ------


--- Spare, Inactive, and In Transition Nodes ---
Device Group Name   Spare Nodes   Inactive Nodes   In Transition Nodes
-----------------   ---------     --------------   --------------------

--- Multi-owner Device Group Status ---
Device Group Name        Node Name           Status
-----------------        -------             ------


=== Cluster Resource Groups ===
Group Name    Node Name       Suspended     State
----------    ---------       ---------     -----

=== Cluster Resources ===

Resource Name       Node Name       State       Status Message
-------------       ---------       -----       --------------

=== Cluster DID Devices ===
Device Instance               Node                           Status
---------------               ---                            ------
/dev/did/rdsk/d1              phys-schost-1                    Ok
                              phys-schost-2                    Ok
/dev/did/rdsk/d2              phys-schost-1                    Ok
                              phys-schost-2                    Ok
/dev/did/rdsk/d3              phys-schost-1                    Ok
/dev/did/rdsk/d4              phys-schost-1                    Ok
/dev/did/rdsk/d5              phys-schost-2                    Ok
/dev/did/rdsk/d6              phys-schost-2                    Ok

=== Zone Clusters ===

--- Zone Cluster Status ---

Name    Node Name    Zone HostName    Status    Zone Status
----    ---------    -------------    ------    ----------
Verify High Availability (Optional)
This section describes how to create a failover resource group with a LogicalHostname resource for a highly available network resource and an HAStoragePlus resource for a highly available ZFS file system on a zpool resource.
- Identify the network address that will be used for this purpose and add it to the
/etc/inet/hostsfile on the nodes. In this example, the host name isschost-lh.The
/etc/inet/hostsfile on node 1 contains the following information:# Internet host table # ::1 localhost 127.0.0.1 localhost loghost 1.2.3.4 phys-schost-1 # Cluster Node 1.2.3.5 phys-schost-2 # Cluster Node 1.2.3.6 schost-lhThe
/etc/inet/hostsfile on node 2 contains the following information:# Internet host table # ::1 localhost 127.0.0.1 localhost loghost 1.2.3.4 phys-schost-1 # Cluster Node 1.2.3.5 phys-schost-2 # Cluster Node 1.2.3.6 schost-lhschost-lhwill be used as the logical host name for the resource group in this example. This resource is of the typeSUNW.LogicalHostname, which is a preregistered resource type. - From one of the nodes, create a zpool with the two shared storage disks
/dev/did/rdsk/d1s0and/dev/did/rdsk/d2s0. In this example, the entire disk is assigned to slice 0 of the disks, using theformatutility.# zpool create -m /zfs1 pool1 mirror /dev/did/dsk/d1s0 /dev/did/dsk/d2s0 # df -k /zfs1 Filesystem 1024-blocks Used Available Capacity Mounted on pool1 20514816 31 20514722 1% /zfs1The created zpool will now be placed in a highly available resource group as a resource of type
SUNW.HAStoragePlus. This resource type has to be registered before it is used for the first time. - To create a highly available resource group to house the resources, on one node, type the following command:
# /usr/cluster/bin/clrg create test-rg - Add the network resource to the
test-rggroup.# /usr/cluster/bin/clrslh create -g test-rg -h schost-lh schost-lhres - Register the storage resource type.
# /usr/cluster/bin/clrt register SUNW.HAStoragePlus - Add the zpool to the group.
# /usr/cluster/bin/clrs create -g test-rg -t SUNW.HAStoragePlus -p zpools=pool1 hasp-res - Bring the group online:
# /usr/cluster/bin/clrg online -eM test-rg - Check the status of the group and the resources:
# /usr/cluster/bin/clrg status

=== Cluster Resource Groups ===

Group Name       Node Name         Suspended      Status
----------       ---------         ---------      ------
test-rg          phys-schost-1     No             Online
                 phys-schost-2     No             Offline


# /usr/cluster/bin/clrs status

=== Cluster Resources ===

Resource Name       Node Name             State      Status Message
-------------       -------               -----      --------------
hasp-res             phys-schost-1        Online     Online
                     phys-schost-2        Offline    Offline

schost-lhres         phys-schost-1        Online     Online - LogicalHostname online.
                     phys-schost-2        Offline    Offline
The command output shows that the resources and the group are
onlineon node 1. - To verify availability, switch over the resource group to node 2 and check the status of the resources and the group.
# /usr/cluster/bin/clrg switch -n phys-schost-2 test-rg
# /usr/cluster/bin/clrg status

=== Cluster Resource Groups ===

Group Name       Node Name              Suspended     Status
----------       ---------              ---------     ------
test-rg          phys-schost-1          No            Offline
                 phys-schost-2          No            Online

# /usr/cluster/bin/clrs status

=== Cluster Resources ===

Resource Name       Node Name              State        Status Message
-------------       ---------              -----         --------------
hasp-res            phys-schost-1          Offline      Offline
                    phys-schost-2          Online       Online

schost-lhres        phys-schost-1          Offline      Offline - LogicalHostname offline.
                    phys-schost-2          Online       Online - LogicalHostname online.
See Also
For more information about configuring Oracle Solaris Cluster components, see the following resources.
Oracle Solaris Cluster Data Services Planning and Administration Guide
Individual data service manuals in the Oracle Solaris Cluster 4.1 documentation library
About the Author
Venkat Chennuru has been working as quality lead in the Oracle Solaris Cluster group for the last 14 years.