
Build with NetBeans IDE, Deploy to Oracle Java Cloud Service
by Harshad Oak
Published May 2014
Save time and effort deploying applications.
In a previous Java Magazine article, I described how you could go about choosing a Java platform-as-a-service (PaaS) provider and introduced Oracle Java Cloud Service. In this article, we will look at how you can swiftly build and deploy applications to Oracle Java Cloud Service using NetBeans IDE.
Most Java PaaS platforms provide web dashboards with the ability to deploy applications packaged into WAR and EAR files. PaaS providers also provide Ant and Maven tools to help streamline the build and deployment process. Some, such as Oracle Java Cloud Service, go a step further and provide integration with multiple popular IDEs such as NetBeans, Eclipse, and Oracle Jdeveloper. IDE integration is great for developers because it can lead to significant savings of time and effort. In this article, we will focus on using the new NetBeans IDE 8 with Oracle Java Cloud Service.
Originally published in the May/June 2014 issue of Java Magazine. Subscribe today.
Installing the Oracle Java Cloud Service SDK
Before we get to the NetBeans integration, we first need to set up the Oracle Java Cloud Service Software Development Kit (SDK), because all IDEs use the SDK to interact with Oracle Java Cloud Service.
The SDK comes with tools to help you develop, deploy, and manage applications on Oracle Java Cloud Service. For example, it provides commands for interacting with Oracle Java Cloud Service, a whitelist tool for checking your application’s deployment readiness, and Ant tasks and Maven plugins.
Note that the SDK is not a set of classes or libraries that you have to use in your application code.
To install the SDK, download the latest version from Oracle Technology Network and then extract the contents of the downloaded file to a directory.
Getting a Trial Version of Oracle Java Cloud Service
Next, install a 30-day trial version of Oracle Java Cloud Service from cloud.oracle.com. Once your trial version is registered, you will receive information about the data center, the username, the password, and the identity domain for your trial. Keep that information, because you will need it when we explore how to use Oracle Java Cloud Service from NetBeans.
Note that the trial version also includes a trial of Oracle Database Cloud Service. So you do not need to get a separate trial version of Oracle Database Cloud Service.
Setting Up NetBeans
One of the many nice features of NetBeans is its easy installation. Download either the Java EE version or the “All” version of NetBeans from netbeans.org. Install NetBeans and you are ready to go with all the standard capabilities.
Having said that, installing even the “All” version does not mean that all features will be activated right away and start taking up resources. NetBeans has a neat “Feature On Demand” capability that enables a technology only when you actually use it.
Installing the Oracle Cloud Plugin
Once NetBeans is set up, we next need to install the Oracle Cloud plugin for NetBeans. To do that, in NetBeans click Tools -> Plugins and then click the Available Plugins tab. There, search for cloud and you will see the plugin listed, as shown in Figure 1. Ensure that the checkbox for the plugin is selected and then click Install. Then follow the steps in the NetBeans IDE Plugin Installer to install the Oracle Cloud plugin.

Figure 1
Once the plugin is installed, you will find that a new “Cloud” section has been added to the Services window, as shown in Figure 2. If you are unable to see the Services window, enable it by clicking Window -> Services in the NetBeans menu.

Figure 2
Note that you can always use the Window -> Reset Windows option in the NetBeans menu to get back the default windows and the familiar look and feel.
Now, right-click Cloud and select Add Cloud. You will see the Add Cloud Provider screen. Select Oracle Cloud and then enter the information you got when you installed the trial version of Oracle Java Cloud Service, as shown in Figure 3. Note that in the SDK field, you need to specify the path to where you extracted the Oracle Java Cloud Service SDK. Also, if your data center is not listed in the Data Center list, type in your data center’s name.
As seen in Figure 3, NetBeans recommends that you register a local instance of Oracle WebLogic Server, which you can use during development. There’s nothing stopping you from using the cloud environment even during development; however, it will be faster and easier to deploy and debug code locally than in the cloud. Oracle Java Cloud Service runs Oracle WebLogic Server 11g. Download it here and then install it, so you will have a local server running.
To the Cloud
It will only be a matter of time before we will all be building software using IDEs that integrate with multiple cloud services.
Figure 3
Once your cloud is set up, you will find a new server and a “welcome app” listed, as shown in Figure 4. You can right-click the app to view, stop, or undeploy it. You can also access the Jobs Log and the Instance Log from within NetBeans by right-clicking Oracle Cloud and then clicking View Jobs and Logs.

Figure 4
Now that NetBeans is integrated with Oracle Java Cloud Service, let’s next look at building a Java EE application that will use Oracle Java Cloud Service as well as Oracle Database Cloud Service.
Note that if you enabled the “Feature On Demand” capability while installing NetBeans and this is your first use of the Java EE capabilities of NetBeans, it might take NetBeans some time to activate Java EE. Also, if you chose to install Apache Tomcat or GlassFish during installation, you will find them also now listed under Servers in the Services window.
Building a Java EE Application
First, select New -> Java EE -> Enterprise Application. Enter JavaMag for the name of the project and click Next. In the New Enterprise Application screen, which is shown in Figure 5, select Oracle Cloud Remote from the Server list.

Figure 5
Oracle Java Cloud Service currently supports a mix of technologies from Java EE 5 and Java EE 6.
NetBeans selects Java EE 5 and a source level of 1.5.
Then select the Create EJB Module and Create Web Application Module checkboxes. Click Finish and NetBeans will create the modules.
In our application, we will use a Java Persistence API (JPA) entity, a stateless session Enterprise JavaBean (EJB), and a servlet to create a new magazine record in the database.
We will begin by creating a new JPA entity named Magazine. Right-click the JavaMag-ejb project and select New -> Persistence -> Entity Class. As shown in Figure 6, enter Magazine in the Class Name field, select entities from the Package list, and ensure that the Create Persistence Unit checkbox is selected. Then click Next.
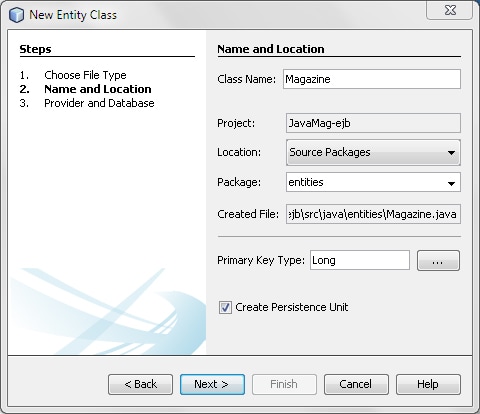
Figure 6
In the New File screen, which is shown in Figure 7, enter the Data Source name for the trial version of Oracle Database Cloud Service that you got with your trial version of Oracle Java Cloud Service. You will see this name listed in the Data Sources section upon logging in to the Oracle Java Cloud Service web-based dashboard.

Figure 7
Oracle Java Cloud Service supports JPA 2.0, so EclipseLink for JPA 2.0 is selected. Note that the Create option is the default selection for Table Generation Strategy, so a new Magazine table will be created when we attempt to persist new magazine information using the Magazine JPA entity.
NetBeans will generate the entity class file Magazine.java in the package entities. It will also generate a persistence.xml file where you will find the persistence unit configuration.
As shown in Listing 1, which is an excerpt from Magazine.java, NetBeans will add all the requisite annotations to specify that the class is an entity. In Listing 1, the GenerationType.AUTO annotation for the id property means that the persistence provider will pick an appropriate strategy based on the database. EclipseLink typically will create a new table for the key generation, because that’s a strategy that will work across databases.
@Entity
public class Magazine implements Serializable {
    private static final long serialVersionUID = 1L;
    @Id
    @GeneratedValue(strategy = GenerationType.AUTO)
    private Long id;

    private String name;
Listing 1
Now let’s add a name property to the Magazine entity. To do that, right-click in the code and select Insert Code -> Add Property. In the screen that opens, enter the property name as name and select the option to generate getter and setter methods.
Next, we will create a new stateless session bean through which we will use the Magazine entity. Right-click the JavaMag-ejb project and select Enterprise JavaBeans -> Session Bean.
As shown in Figure 8, enter AddMagazineBean for the name of the bean, select ejb from the Package list, and select Stateless for the session type.

Figure 8
Note that because Oracle Java Cloud Service supports EJB 3.0, you don’t get the “no interface” option that was introduced in EJB 3.1.
Also, Oracle Java Cloud Service supports only local EJB invocations, so select Local for the type of interface to create.
Click Finish. NetBeans will generate the AddMagazineBean bean along with the AddMagazineBeanLocal interface. Now select Insert Code -> Add Business Method to add a new addMagazine method to the session bean. Note that NetBeans will add the method signature to the local interface.
To add the new magazine to the database, we need to use the entity that we created earlier. To use the entity, we need to inject the EntityManager. To do so, right-click in the code and select Insert Code -> Use Entity Manager. NetBeans will add the dependency injection code for EntityManager as well as a persist method. We will use the persist method, as shown in Listing 2, and pass it an object of the Magazine entity.
@Stateless
public class AddMagazineBean implements AddMagazineBeanLocal {

    @PersistenceContext(unitName = " JavaMag-ejbPU" )
    private EntityManager em;

    @Override
    public void addMagazine(String name) {
        Magazine newMagazine = new Magazine();
        newMagazine.setName(name);
        persist(newMagazine);
    }

    public void persist(Object object) {
        em.persist(object);
    }
}
Listing 2
We now have our entity and the session bean created in the JavaMag-ejb project. Next, we need to add a web component in the JavaMag-web project, which will use the AddMagazineBean to add a new magazine to the database.
Add a servlet to the JavaMag-web project by right-clicking the project and selecting Web -> Servlet. Name the servlet MagazineServlet and name the package servlets. Click Finish.
Time-Saver
Oracle Java Cloud Service goes a step further and provides integration with multiple popular IDEs.Now, to call the session bean from the servlet, right-click in the code and select Insert Code -> Call Enterprise Bean. Specify AddMagazineBean, as shown in Figure 9.

Figure 9
As shown in Listing 3, NetBeans will add the dependency injection with the @EJB annotation to the MagazineServlet.
@EJB
private AddMagazineBeanLocal addMagazineBean;
Listing 3
We will next add a line in the processRequest method to call the bean and add a new magazine, as shown in Listing 4.
addMagazineBean.addMagazine(" Java Magazine" );
Listing 4
We now have our entity, the session bean, and the servlet in place, so we can deploy the application. Right-click the JavaMag enterprise application and click Run. Check the contents of the “JavaMag (run)” log in NetBeans and you will find that NetBeans built the WAR file for the web application module, built the JAR file for the EJB module, and packaged the two into an EAR file. It then uploaded the EAR file to Oracle Java Cloud Service.
As shown in Figure 10, the “Oracle Cloud Remote Deployment” log lists the activities being performed in the cloud. It shows that the cloud service first performs a virus scan, then a whitelist check, and then the actual deployment.

Figure 10
Once the deployment is complete, your default browser will open up and point to the index .jsp page in the application we deployed. Because we want to run the MagazineServlet, change the URL in the browser to /JavaMag-war/MagazineServlet to call the servlet. You will get output similar to what’s shown in Figure 11.

Figure 11
By default, Oracle Java Cloud Service will want you to log in to your cloud service before you can access your servlet. However, if you wish to make the application public and you do not want any authentication, add an empty <login- config/> tag to the web.xml file.
Upon executing the servlet, select Sql Workshop -> Object Browser in Oracle Database Cloud Service. You will find that a new table named Magazine has been created and a new “Java Magazine” record has been inserted in the table.
Conclusion
In this article, we saw how to quickly set up and use NetBeans to develop a Java EE application and deploy it to Oracle Java Cloud Service. Considering the rapid adoption of cloud-based services, it will only be a matter of time before we will all be building software using IDEs that integrate with multiple cloud services for various stages in the software development process.

Harshad Oak is the founder of IndicThreads. He is the author of books on Oracle JDeveloper and Jakarta Commons and coauthor of Java 2 Enterprise Edition 1.4 Bible (Wiley, 2003). He is at work on his next book, Java EE Applications on the Oracle Java Cloud, for Oracle Press. He is a Java Champion and an Oracle ACE Director and is based in Pune, India.