Experimenting with Java Timers
by Lamine Ba
Published May 2014
Learn how to use Java timers to schedule jobs with Java.
This article studies time—how Java handles timers and the scheduling of tasks. Java timers are utilities that let you execute threads or tasks at a predetermined future time, and these tasks can be repeated according to a set frequency. To design and implement a timer, you'll rely on the model-control-view (MVC) design pattern.
Getting Started
Let's start with a simple "Hello World" program in a web application that's composed of JavaServer Pages (JSP). The IDE used in this article is NetBeans IDE 7.1, but you can use any IDE that supports Java.
To create a new web application in the NetBeans IDE, do the following:
- Start NetBeans.
- Click File -> New Project -> Java Web -> Web Application (see Figure 1).
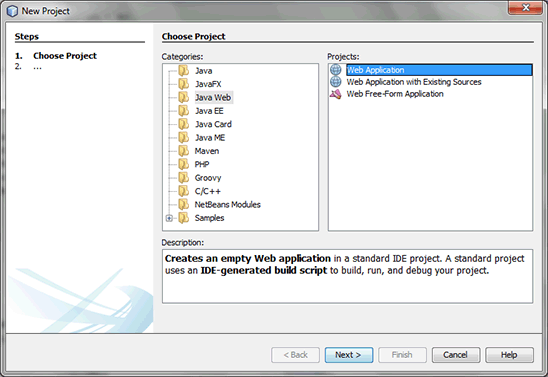
Figure 1. Creating a new project - Click Next, which takes you to the screen shown in Figure 2.

Figure 2. Specifying the project name and location - In the Project Name field, enter
WebJavaTimer. - Click Next, which takes you to the screen shown in Figure 3:
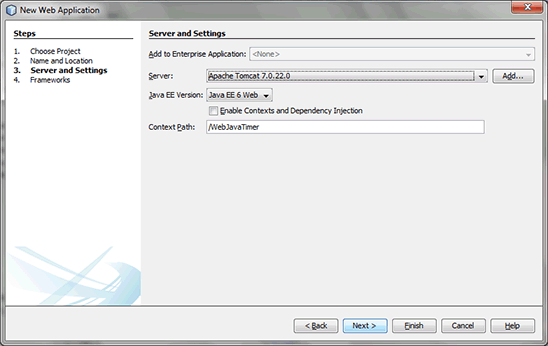
Figure 3. Specifying the server and settings - Click Finish. The web application is generated, and the "Hello World" program is contained within the application's
index.jspfile. - After opening the
index.jspfile, you can run the "Hello World!" program by clicking the Run button or by selecting Run > Run Project (WebJavaTimer) from the menu bar (see Figure 4). Alternatively, you can press F6.
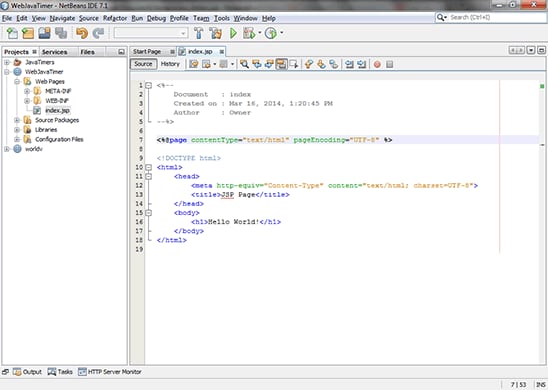
Figure 4. Running the programExecuting the program results in the web page shown in Figure 5:
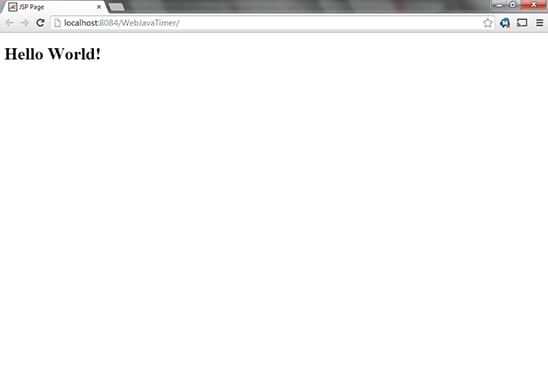
Figure 5. Results of running the program


Now that you have a working baseline, you can start experimenting with Java timers.
Setting Up the Environment
Before you modify the web application, you need to complete a few preliminary steps. First, you need to be able to use the JSP Standard Tag Library (JSTL), or more precisely, its core components. To do so, perform the following steps:
- Right-click the folder Libraries, which is located in the Projects panel located on the left side of the NetBeans IDE (see Figure 6):
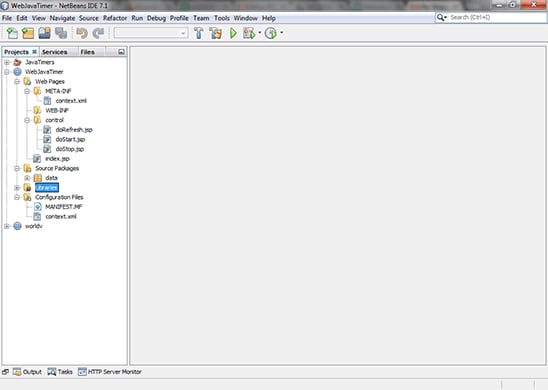
Figure 6. Selecting the Libraries folder - Click Add Library.
- Select JSTL 1.1 (see Figure 7).
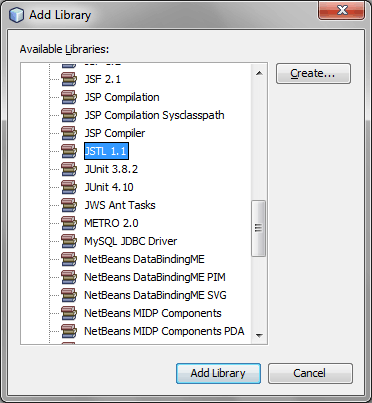
Figure 7. Adding a library


The Presentation Layer
The presentation layer of the web application is known as the view. It will consist of a screen that displays the status of the timer at any time, as well as a set of buttons to control the timer's activation (start timer) and deactivation (stop timer). You also can define the interval in seconds at which the timer repeats a directed task. Finally, a refresh screen button will update the event notifications shown on the screen. Figure 8 shows what the screen should look like when you're finished:

Figure 8. Screen that is displayed
Now it's time to look at the structure of the web application.
The Model
The model consists of a package called data, which contains two classes: MyTimer and Display (whose purpose is to report the status of the timer so it can be displayed). See Figure 9:

Figure 9. The data package
Figure 10 shows the architecture of the web application. Note that class MyTimer composes class Display, and MyTask is a private inner class of MyTimer.

Figure 10. Architecture of the web application
The Display class has three methods and a constructor. In the constructor Display(), the display attribute is initiated as an empty string. The method getDisplay() returns the content of the attribute display. Finally, the method insert(value) takes a string as an argument, creates a newline character, and appends it to the display variable.
The class MyTimer interacts directly with the JSP pages on the control side of your MVC framework. MyTimer can perform various operations, including starting a timer (timerStarted()), stopping a timer (timerStopped()), and displaying event notifications on the screen (getDisplay()). It contains two attributes: the objects display and timer.
When the object myTimer is created, the constructor passed a parameter called seconds, which is of type Integer (see Listing 1). This argument defines the period of the timer, which is converted to milliseconds. Timer is a concrete class that belongs to the Java utilities package and allows for a thread to operate as a task that can be started at a future time and stopped when required. Its scheduleAtFixedRate() method is used to schedule a task for a repeated fixed-rate execution. It takes three arguments: the task to be executed (MyTask), the delay before the timer starts (set to zero), and the period converted to milliseconds. To create and start a timer, just create a new object myTimer, which triggers the execution of the constructor.
public MyTimer(Integer seconds) {
        timer = new Timer();
        long msec = 1000;
        display = new Display();
        timer.scheduleAtFixedRate(new MyTask(), 0*msec, seconds.intValue()*msec);
        display.insert("Timer is started.");
    }
Listing 1
The task that the timer schedules is defined in the class MyTask, which extends TimerTask—another class of the Java utilities package. MyTask, as a private inner class of MyTimer, is allowed to manipulate the object display. Accordingly, the MyTask role is to display an event notification any time it's scheduled to execute by calling the insert method of object display, as shown in Listing 2:
public class MyTimer {
    private Timer timer;
    private Display display;
    private String snapshot;
    public MyTimer(Integer timeSecond) {
    }
    private class MyTask extends TimerTask {
        @Override
        public void run() {
            // task to do
            display.insert("New event.");
        }
Listing 2
ThetimerStopped() method stops the timer, and its implementation is straightforward. It calls the cancel method from object timer (see Listing 3) and then creates an event notification that's displayed on the screen of the web application.
public void timerStopped() {
        timer.cancel();
        display.insert("Timer has stopped.");
    }
Listing 3
Finally, the method getSnapshot() returns as a string the result of the method getDisplay() from the object display. This method is used to update the screen of the web application. See Listing 4:
public String getSnapshot() {
        snapshot=display.getDisplay();
        return snapshot;
    }
Listing 4
Back to the Presentation Layer
Now that you understand the model, it's time to return to the design of the presentation layer and improve the "Hello World!" program so it also handles timers. As a reminder, the goal is to create the interface shown in Figure 11:
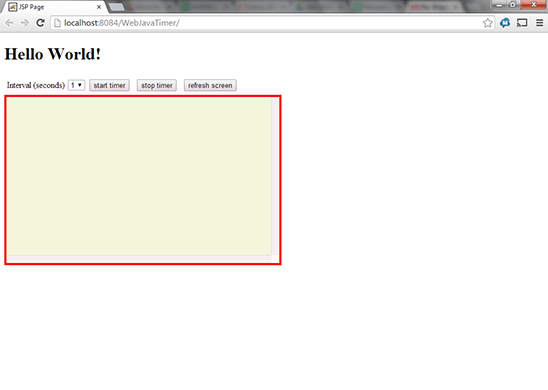
Figure 11. Interface to be created
Accordingly, the next step is to add a reference to the JSTL core library near the beginning of the "Hello World!" program page (index.jsp) so you can take advantage of all the core methods:
<%@page contentType="text/html" pageEncoding="UTF-8" %>
<%@ taglib uri="http://java.sun.com/jsp/jstl/core" prefix="c" %>
All web components—for example, the buttons and screen—are coded in basic HTML and some Cascading Style Sheets (CSS) and JSP. For instance, the start timer button is coded as shown in Listing 5. Clicking the button labeled start timer leads to the control page doStart.jsp, which is located in the control folder. The variable seconds is declared at the beginning of the index.jsp page as a string array from 1 to 9 and is defined as a request attribute so it can be looped through with the JSTL core method c:forEach. This creates the visual effect of a drop-down menu. The session attribute second is the element selected from the list seconds when the button start timer is clicked. By default—that is, when the web application starts—second is equal to the first element of the list (1). See Listing 5:
<%
Integer seconds[] = {new Integer(1),new Integer(2),new Integer(3),
                    new Integer(4),new Integer(5),new Integer(6),
                    new Integer(7),new Integer(8),new Integer(9)};
request.setAttribute("seconds", seconds);
Integer second=(Integer) session.getAttribute("second");
if(second==null) {
    session.setAttribute("second", seconds[0]);
%>
<div id="foo">
            <div class="bar">
                <form method="post" action="control/doStart.jsp">
                    Interval (seconds)
                    <select name="second">
                        <c:forEach items="${seconds}" var="row">
                            <c:if test="${row != second}">
                                <option>${row}</option>
                            </c:if>
                            <c:if test="${row == second}">
                                <option selected="">${row}</option>
                            </c:if>
                        </c:forEach>
                    </select>
                    <input type="submit" value="start timer">
                </form>
            </div>
        </div>
Listing 5
The other buttons, stop timer and refresh screen, are defined in a similar fashion and each button requests a corresponding control page, as described in Table 1:
Table 1| Button | Control Page Location | Description |
|---|---|---|
| start timer | /control/doStart.jsp | Starts the timer |
| stop timer | /control/doStop.jsp | Stops the timer |
| refresh screen | /control/doRefresh.jsp | Updates the screen with the latest timer notifications |
Note that these files represent the control side of your MVC framework and are located in a folder called control. See Figure 12:
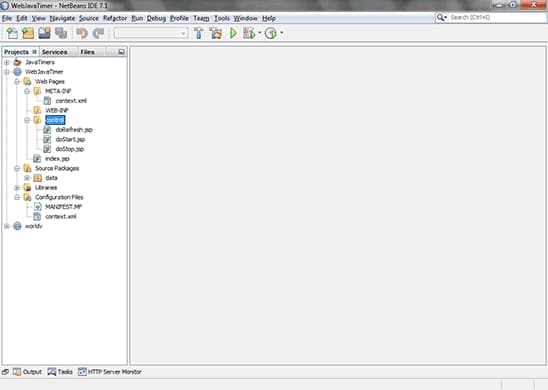
Figure 12. The control folder
The screen, which displays all events, outputs the value of the session variable display. Because display is the result of the operation getSnapshot() from the object mytimer, the screen border color depends on the existence (or lack of existence) of the object mytimer. Through a conditional core method tag called c:if, object mytimer is compared to null. If it is equal to null, the border color of the screen is red, implying that the timer is not in operation. However, when object mytimer is not null, the border color of the screen is green, implying that the timer has been started. See Listing 6:
<style type="text/css">
            #screen {border:solid 1px black;width:500px;height:300px;
                     background-color:beige; padding: 5px 5px 5px 5px;
                     overflow:scroll}
            #foo { overflow-y: hidden; }
            .bar { float: left; margin:5px 5px 5px 5px; }
</style>
<c:if test="${mytimer == null}">
            <div class="screen" style="border-color:red">
                ${display}
            </div>
</c:if>
<c:if test="${mytimer != null}">
            <div class="screen" style="border-color:green">
                ${display}
            </div>
</c:if>
Listing 6
The Control Side
Three control methods are implemented in this web application. The first control method is evoked by clicking the start timer button, which calls the doStart.jsp page. See Listing 7. As in the index.jsp page, there is a reference to the core methods of the JSTL. This allows for a redirection back to the index.jsp page using the c:redirect tag once the timer has been started.
Note that the implicit request variable retrieves the parameter second from the URL. This parameter is then used as an argument when creating the object mytimer, so it defines the period of the timer. Finally, second is updated in the session scope, so the application remembers to use its value in other pages for the same user. As a result, the drop-down menu containing the list seconds remembers the value of second as its default value.
Note also that the control page first verifies that session variable mytimer exists before it creates it. If mytimer exists, the cancel method explicitly cancels it before a new mytimer is created. This initiative guarantees that the timer is released before a new one is created.
Once object mytimer is created, its equivalent session variable is updated and the session variable display is updated with a new event notification using the method getSnapshot().
<%@page contentType="text/html" pageEncoding="UTF-8" import="data.*" %>
<%@ taglib uri="http://java.sun.com/jsp/jstl/core" prefix="c" %>
<%
Integer second=new Integer(request.getParameter("second"));
MyTimer mytimer = (MyTimer) session.getAttribute("mytimer");
if(mytimer!=null) {
    mytimer.timerStopped();
}
mytimer = new MyTimer(second);
session.setAttribute("mytimer", mytimer);
session.setAttribute("display", mytimer.getSnapshot());
session.setAttribute("second", second);
%>
<c:redirect url="/index.jsp"/>
Listing 7
The second control method is evoked by clicking the stop timer button, which calls the doStop.jsp page. See Listing 8. First you see a reference to the core methods of the JSTL. This allows for a redirection back to the index.jsp page using the c:redirect tag after the timer has been stopped. Then you see a verification that session variable mytimer exists. If mytimer exists, the cancel method explicitly cancels it. However, if mytimer does not exist, nothing is required.
<%@page contentType="text/html" pageEncoding="UTF-8" import="data.*" %>
<%@ taglib uri="http://java.sun.com/jsp/jstl/core" prefix="c" %>
<%
MyTimer mytimer = (MyTimer) session.getAttribute("mytimer");
if(mytimer!=null) {
    mytimer.timerStopped();
    session.setAttribute("display", mytimer.getSnapshot());
    mytimer=null;
    session.setAttribute("mytimer", mytimer);
}
%>
<c:redirect url="/index.jsp"/>
Listing 8
The third control method is evoked by clicking the refresh screen button, which calls the doRefresh.jsp page. See Listing 9. First, you see a reference to the core methods of the JSTL. This allows for a redirection back to the index.jsp page using the c:redirect tag after the screen has been updated. Then, you see a verification that session variable mytimer exists. If mytimer exists, session variable display is assigned the value returned by the method getSnapshot(). However, if mytimer does not exist, nothing is required.
<%@page contentType="text/html" pageEncoding="UTF-8" import="data.*" %>
<%@ taglib uri="http://java.sun.com/jsp/jstl/core" prefix="c" %>
<%
MyTimer mytimer = (MyTimer) session.getAttribute("mytimer");

if(mytimer!=null)
    session.setAttribute("display", mytimer.getSnapshot());
%>
<c:redirect url="/index.jsp"/>
Listing 9
Executing the Program
Now let's examine how the program executes.
- Launch the program by clicking Run or by pressing F6. You'll get the web page shown in Figure 13:
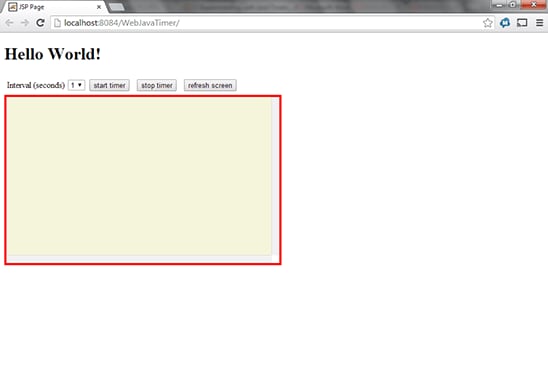
Figure 13. Web page that appears after executing the programNote that the screen border is red, indicating that the timer either is stopped or doesn't exist yet. The default interval is 1, which is, as expected, the first element of the Interval (seconds) list.
- Next, change the interval to 8 seconds and click start timer.
The result is the screen shown in Figure 14. An event notification prints "Timer is started" with the time showing 17:8:15 on the screen. The screen border color turns green, indicating that a timer is now running. The time interval remains in its last-selected value of 8, rather than its original value of 1.
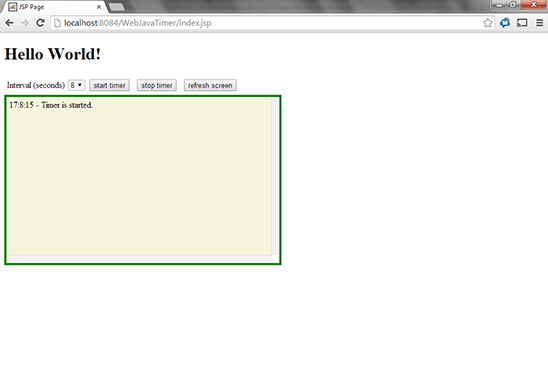
Figure 14. Screen after timer is started - Click refresh screen.
The result is shown in Figure 15. An event notification called "New event" is printed three times, each separated by 8 seconds. This difference between the notification time stamps proves that the timer functions properly. The border color of the screen remains green, because the timer is still running.
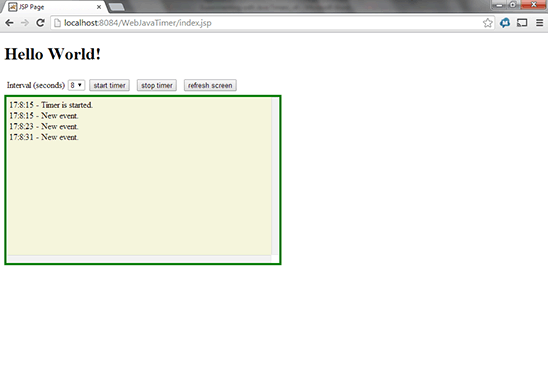
Figure 15. Refreshed screen - Next, click the stop timer button.
The result, shown in Figure 16, shows more "New event" notifications, still separated by 8 seconds, as expected. The last event notification prints "Timer has stopped" at the time the stop timer button was clicked. The border color of the screen turns red, confirming that the timer has stopped.
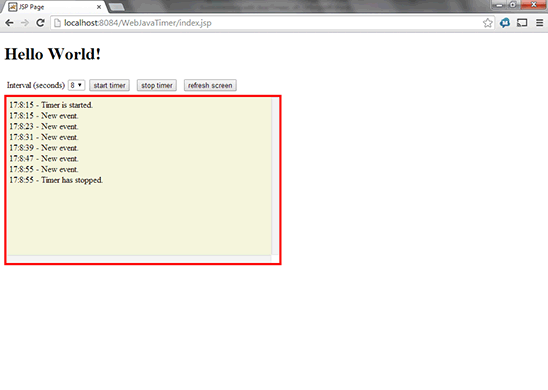
Figure 16. Screen after the timer is stopped


See Also
This brief experiment with Java timers demonstrated how to get started scheduling jobs with Java. To learn about Swing timers, check out the tutorial and additional information in the Java Platform, Standard Edition 7 API Specification.
About the Author
Over the course of his career, T. Lamine Ba has participated in various tech ventures. He specializes in the management and development of IT solutions. As a Java enthusiast, Lamine has been a key player in developing technology awareness in Africa through open communities of developers. His latest endeavor is AccessEMI LLC, a community-based software development platform. Lamine can be reached at tlamineba@gmail.com.
Join the Conversation
Join the Java community conversation on Facebook, Twitter, and the Oracle Java Blog!