Technical Article
Bringing your Java Application to Mac OS X
By Daniel H Steinberg
January 2003
There is a market full of millions of potential customers for your Java application that you may not be considering. They have the Java 2 Standard Edition (J2SE) v1.3.1 pre-installed on their computers and may not even know it. With a few simple tweaks you can give your Java application a native look and feel so that Mac OS X users can install and run your application without being aware that they are running a cross-platform application.
Despite its pretty face, Mac OS X is built on top of BSD UNIX and comes complete with J2SE and Java Web Start installed. Developers can pop open a Terminal window and find that their favorite geek tools like vi, emacs, and the Java command line tools are already installed. Check a checkbox and you've enabled the built in Apache server. The Mac is a great platform for Java developers with a wide array of commercial, free, and open source development tools available. Whether or not you develop on a Mac, take the time to make a small number of changes to your application so that you provide a Mac-like experience for the millions of potential customers who already use Mac OS X. These end users don't care what language your application is written in, they just want a double-clickable application that is attractive and easy to use.
In this series we'll look at what you can do to your Java application to make the experience more Mac-like. After all, the end users don't care what language an application is written in any more than you care if this article is drafted in longhand, on a typewriter, or on a TiBook. There are three phases to making your application feel more like a native Mac OS X application when running on a Mac without changing the look and feel on other platforms. In this article we'll look at some of the runtime properties you can set to move the position of the main menu bar, customize the Application menu, and tweak the appearance of the frame components. Next time we'll look at changes to the code that will change the keyboard shortcuts, customize the layout of menus, and tweak the behavior of your application. In the third article, we'll look into packaging and deploying your Java application so that users don't have to think about jar files, shell scripts, or opening a Terminal window.
At his July 2002 MacWorld Expo keynote, Apple CEO Steve Jobs reported that there were two and a half million Mac OS X users and that by the end of the year there will be five million users. As a Java developer, you might dismiss this as still being a small percentage of the personal computer market. On the other hand, every version of Mac OS X is a system ready to run your Java application. Included in Apple's operating system is both the JRE and JDK for J2SE v1.3.1. Even at consumer shows such as MacWorld, Jobs lets audiences know that Apple is the leading supplier of UNIX in the world. Providing the tools that developers need on the platform is already bringing new first class applications to Mac OS X. For Java developers the task is even easier.
There is no step three
You might remember Apple's ad for how easy it was to set up and connect to the internet with iMac. After instructing the viewers to take the machine out of the box and plug it in, the announcer laughed to himself that "there is no step three." In some ways, bringing your Java application to Mac OS X is that easy.
Let's start by running the open source unit testing application JUnit on Mac OS X. I like using JUnit as an example because, as we'll see, it was clearly not written on or for a Mac but we can easily customize it to look more Mac like without touching any code. Head to the JUnit homepage and download the latest version. On a Windows machine, use your favorite utility to expand the .zip file, open up a Command window and navigate inside of the junit3.8 directory. Run JUnit with this command:
java -cp junit.jar;. junit.swingui.TestRunner
        junit.samples.AllTests
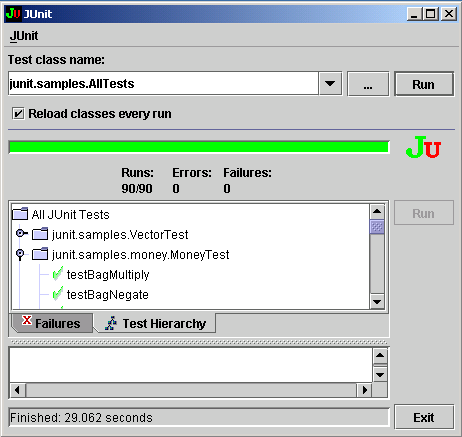
The Swing version of the JUnit TestRunner will start up and run the tests referenced in the class junit.samples.AllTests. You should see something like this:

Figure 1. JUnit running on a Windows box
It may surprise you to discover that you can follow the exact same steps on a Mac. With UNIX underneath you can open up a Terminal window and run JUnit from the command line the same as you would on a Windows box. You'll find the Terminal application in Applications/Utilities. After downloading the JUnit zip file to your Mac, use the jar utility to expand it. Although the Mac does come with the Stuffit expander, earlier versions had problems with files with long names and so some of the inner classes in JUnit will be renamed when they are expanded. You can avoid these problems by using the jar utility or gunzip.
There are a couple of differences in running JUnit on Mac OS X. First, you don't need to worry about installing the JRE -- it's part of the OS. Second, you need to change the semi-colons that are used in Windows to separate files in the classpath with colons, the standard UNIX separator. Here's the revised command:
java -cp junit.jar:. junit.swingui.TestRunner
        junit.samples.AllTests
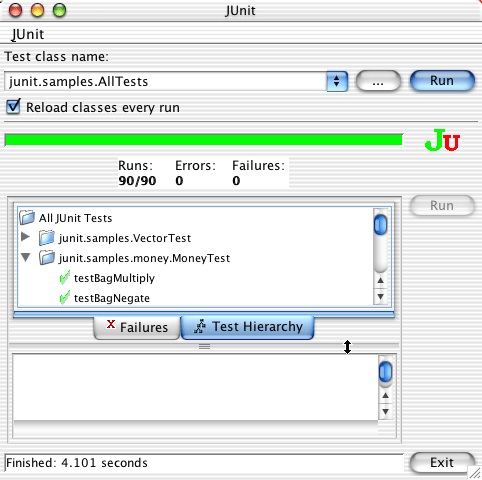
Without any changes, JUnit on Mac OS X looks like this:

Figure 2. JUnit running under Mac OS X
We get a lot for free. If you don't specify a look and feel for your Java application, the Aqua look and feel is used as the default on Mac OS X. You see the buttons and tabs and scroll bars help this application look as if it were written for Mac OS X. In fact, with the latest version of JUnit, the bar may be more three dimensional. It will also be blue and not green. Although this doesn't look and feel exactly like a native application, this is a great first step that required no effort from you. Let's see how we can improve on this by setting some runtime properties.
Moving the menu bar
On a Mac, application menu bars belong at the top of the screen. To a longtime Windows user this may seem crazy while to an experienced Mac user the top of the screen is the natural location for a menu bar. This is a religious issue and neither side is likely to convince the other. Ideally, if you are writing a Java application that targets both platforms (and perhaps others), you would like it to feel like a Windows application on a Windows machine and like a Mac application on a Mac.
Fortunately, Apple has made it easy for you to customize the location of your menu bar when running on a Mac while leaving it where it is in the other look and feels so long as you have a top level JFrame for which you have assigned a menu bar using the setMenuBar() method. Set the system property com.apple.macos.useScreenMenuBar to have the value true. You can do this at the command line like this:
java -cp junit.jar:. -Dcom.apple.macos.useScreenMenuBar=true
        junit.swingui.TestRunner junit.samples.AllTests
Compare the two images below. In the first, the system property hasn't been set and the JUnit menu appears within the JFrame. In the second, the system property has been set and the JUnit menu moves to the screen menu bar next to the Apple and the Application menus.

Figure 3. The JUnit menu bar within the JFrame

Figure 4. The JUnit menu bar in its proper place
More tinkering with the menu bar
While we're here, let's look a little closer at the Application menu. This is the menu for the currently running application. It appears just to the right of the Apple menu (the menu underneath the Apple logo). In this case the application is the name of the class we're running: junit.swingui.TestRunner. This is also the name displayed when we mouse over the application icon in the dock. We can change this name in both locations by setting the -Xdock:name parameter.
As an example we could change it to JUnit on Mac OS X like this:
java -cp junit.jar:. -Xdock:name="JUnit on Mac OS X"
    junit.swingui.TestRunner junit.samples.AllTests
To keep the command line from getting overloaded with too many options we're only experimenting with one parameter at a time. Of course you can add as many of these as you'd like. Once you have a lot of options you'll get tired of typing them all in. In the third installment we look at options for packaging and distributing your Java application to Mac OS X owners.
For now, we're only setting the parameter for setting the name of the application. If you have an icon for your application that you'd like to assign to appear in the dock you can use the -Xdock:icon parameter. You'll notice in the picture below that the JUnit menu is back inside of the JFrame. As desired, the name of the Application menu has been changed.

Figure 5. The renamed Application menu
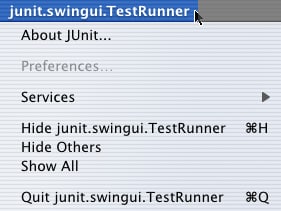
Here's a look at the Application menu that is automatically created for JUnit.

Figure 6. The contents of the Application menu
You can see that the name of the application has been filled in next to the options for Hide and Quit. In fact, without any coding on your part, hiding and quiting behaves as the user expects for any Mac OS X application. When they key in Command-Q the Application quits (in this case by calling System.exit(0)). When they key in Command-H the application hides and can be unhidden by clicking on the icon in the Dock.
The one element usually found in the Application menu that hasn't been created for you is an About menu item. You can set the name for this item and have it automatically added to the Application menu by setting the system property com.apple.mrj.application.apple.menu.about.name like this:
java -cp junit.jar:.
        -Dcom.apple.mrj.application.apple.menu.about.name=JUnit
        junit.swingui.TestRunner junit.samples.AllTests
The good news is that now there is an "About JUnit" item in the Application menu. The bad news is that it doesn't do anything. Even though JUnit comes with an About box, we need a little bit of code to wire this up properly. So after a quick look at the menu with the "About JUnit" item, we'll forget all about this option until next time.

Figure 7. Adding About JUnit to the Application Menu
Fine tuning the look and feel
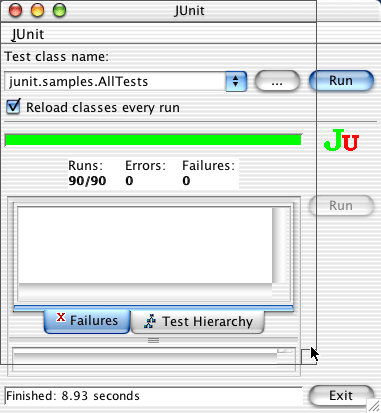
A few other system properties allow us to fine tune the look of a Java application without modifying the code. For example, you might have noticed that the grow box in the lower right hand corner slightly obscures the Exit button.

Figure 8. An intrusive grow box
Ideally, we'd move the JButton over a little to the left. This would require that we go back and alter the code. Another option is to set the com.apple.mrj.application.growbox.intrudes property like this:
java -cp junit.jar:.
        -Dcom.apple.mrj.application.growbox.intrudes=false
        junit.swingui.TestRunner junit.samples.AllTests
Now a border is added to the bottom of the JFrame so that the grow box can't sit on top of any components contained in the JFrame. In this case, this change accomplishes what we want.

Figure 9. A non-intrusive grow box
There are, however cases when it doesn't look very good. You'll see this awkwardness highlighted if you've got a differently colored JPanel inside of your JFrame. Again, without altering the code in the original application this is our only alternative.
While we're on the subject of grow boxes, you need to decide what you want to happen when a user grabs the grow box and drags it. One option is for an outline of the JFrame to appear that shows the dimensions of the resized window like this:

Figure 10. A proxy view of the resized JFrame
You may prefer, instead, to have the actual window resize as the grow box is repositioned. This may mean some intermediate awkward views of the application as the redrawing struggles to keep up. This live resizing is the default behavior for Java applications on the Windows platform and for many native Mac OS X applications. It is not the default behavior for Java applications on Mac OS X, but you can set it like this.
java -cp junit.jar:.
        -Dcom.apple.mrj.application.live-resize=true
        junit.swingui.TestRunner junit.samples.AllTests
Another subtle adjustment is to the size of the tabs. It is hard to do cross platform GUI design if you try to set the size and location of components precisely. One obstruction is that the font size is different on different platforms. Apple allows you to choose between using big and small tabs. The default is for big tabs and which one you choose is merely a matter of judgement. You specify small tabs like this:
java -cp junit.jar:.
        -Dcom.apple.macos.smallTabs=true junit.swingui.TestRunner
        junit.samples.AllTests
The first image below shows the larger tabs and the second image shows the effect of choosing small tabs.

Figure 11. The default tab size

Figure 12. The smaller tab size
Summary
By setting a few runtime properties, your Java application will feel more like a native Mac application without any code modifications. This means that, in many cases, you can apply these properties to Java applications to which you don't have access to the code to customize them for the Mac. In the next article we'll dig a little deeper and modify the code to refine the user experience.