
Introducing JAX-WS 2.0 With the Java SE 6 Platform, Part 1
By Robert Eckstein and Rajiv Mordani, September 2006
One of the most exciting new features of the Java Platform, Standard Edition 6 (Java SE 6) is support for the Java API for XML Web Services (JAX-WS), version 2.0. JAX-WS 2.0 is the center of a newly rearchitected API stack for web services, which also includes Java Architecture for XML Binding (JAXB) 2.0 and SOAP with Attachments API for Java (SAAJ) 1.3.
Although JAX-WS finds its main home in the open-source world of the Java Platform, Enterprise Edition 5 (Java EE 5) and is designed to take the place of Java API for XML-Based RPC (JAX-RPC) in such an environment, you can reuse much of the functionality without even touching an enterprise server, such as the one under development at Project GlassFish.
Put succinctly, the JAX-WS architecture is an easier-to-understand architecture for web services development. In previous web services offerings, the functionalities of the earlier JAX-RPC and JAXB APIs overlapped quite a bit. When JAXB 1.x emerged after JAX-RPC, and as data-binding functionality became more comprehensive with enhanced standards such as XML Schema and Relax NG, Java platform developers recognized the need to separate the web services definition from the data-binding components.
You can use JAX-WS to build web applications and web services, incorporating the newer XML-based web services functionality. Table 1 shows the new APIs available to the developer in the Java SE 6 platform.
Table 1. JAX-WS APIs
| API | Package |
|---|---|
| JAX-WS |
javax.xml.ws
|
| SAAJ |
javax.xml.soap
|
| Web services metadata |
javax.jws
|
Note: Any API additions or other enhancements to the Java SE platform specification are subject to review and approval by the JSR 270 Expert Group.
Using JAX-WS 2.0 to Create a Simple Web Service
JAX-WS 2.0 is extremely easy to use. This article will show you how to create a simple web service using JAX-WS 2.0 with Java SE 6 technology. The first thing you need is a class with one or more methods that you wish to export as a web service:
package hello;

public class CircleFunctions {

   public double getArea(double radius) {
       return java.lang.Math.PI * (r * r);
    }

   public double getCircumference(double radius) {
       return 2 * java.lang.Math.PI * r;
   }
}
To export these methods, you must add two things: an import statement for the javax.jws.WebService package and a @WebService annotation at the beginning that tells the Java interpreter that you intend to publish the methods of this class as a web service. The following code example shows the additions in bold.
package hello;

 import javax.jws.WebService;

                    @WebService

public class CircleFunctions {
   public double getArea(double r) {
       return java.lang.Math.PI * (r * r);
    }

   public double getCircumference(double r) {
        return 2 * java.lang.Math.PI * r;
    }

}
You can use the static publish() method of the javax.xml.ws.Endpoint class to publish the class as a web service in the specified context root:
import javax.xml.ws.Endpoint;

public static void main(String[] args) {

      Endpoint.publish(
         "http://localhost:8080/WebServiceExample/circlefunctions",
         new CircleFunctions());

}
Now, compile the source code normally using javac. However, you must perform one more step: Call the Wsgen tool, as follows.
> wsgen –cp . hello.CircleFunctions
The Wsgen tool will generate a number of source files in a subdirectory called wsgen, which it then compiles. Although you should never have to edit these files, you can browse these source code files to get an idea of how JAX-WS 2.0 creates the appropriate stub files for use while publishing the web service. Note that the original source files must be located in a package when you call the Wsgen tool. Otherwise, you may get an error that dictates that classes annotated with @WebService, such as CircleFunctions, must declare a separate javax.jws.Webservice.targetNamespace element because the source files are not part of a package.
That's it. When you run the application, the Java SE 6 platform has a small web application server that will publish the web service at the address http://localhost:8080/WebServiceExample/circlefunctions while the JVM is running. * You can verify that the web service is running by displaying the Web Services Definition Language (WSDL) file of the circlefunctions web service.While the JVM is still running, open a browser and go to the following location:
http://localhost:8080/WebServiceExample/circlefunctions?WSDL
If you see a large amount of XML that describes the functionality behind the web service, then the deployment has been successful.
Creating an Equivalent Web Service With the NetBeans IDE 5.5
Of course, if you wish to perform the same tasks in the NetBeans integrated development environment (IDE) 5.5, you can copy the source code and run it. But if you used the Java SE 6 platform's small web application server as a test bed, you are now ready to move your web service to a larger application server such as Tomcat, the web server that comes with the NetBeans IDE 5.5. Both methods are equally simple, as shown by this tutorial, which is based on the tutorial Web Services (JAX-WS) in Java EE 5 by Geertjan Wielenga, Manisha Umbarje, Martin Grebac, Milan Kuchtiak, and Radko Najman.
Step 1
From the File menu, select New Project. You should see the dialog box shown in Figure 1.
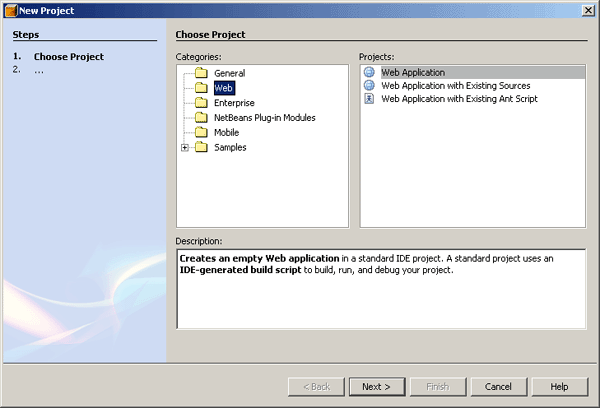
Figure 1: NetBeans IDE 5.5 New Project Dialog Box
Step 2
In the Categories column, choose Web. In the Projects window, choose Web Application. Click Next, and the dialog box should be similar to Figure 2.

Figure 2: New Web Application Dialog Box
Step 3
In the Project Name area, type Web Services Example. Note that the Context Path text field in the dialog box now matches. For the purposes of this exercise, leave the target server as the bundled version of Tomcat that comes with the NetBeans IDE, Bundled Tomcat (5.5.17). Also, deselect the check box Set Source Level to 1.4. The source level must be 1.5 or greater for you to add web services to the project. Click Finish.
The dialog box now closes, and you should see the Web Services Example project added to the Projects tab in the upper left, as shown in Figure 3.
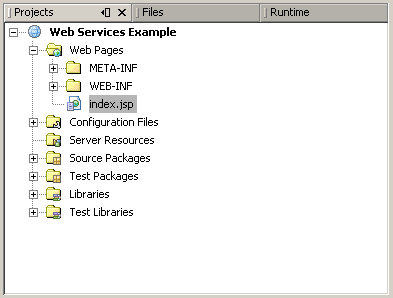
Figure 3: Projects Tab
Step 4
Select the Web Services Example project name, the root node with the small globe icon immediately to the left. Right click, and select first New and then Web Service…. You should see the dialog box shown in Figure 4.
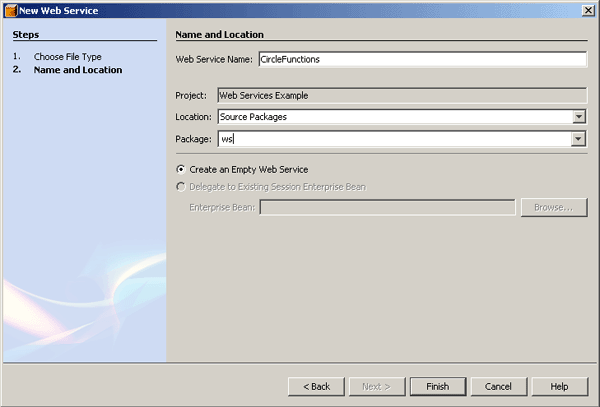
Figure 4: New Web Service Dialog Box
Step 5
In the Web Service Name text field, type CircleFunctions. In the Package field, type ws. The radio button Create an Empty Web Service is selected by default. Here, the term “Empty Web Service” indicates that there are no methods that can be invoked. Click Finish.
The NetBeans IDE will generate "empty" web server source code for you. You may have noticed that the NetBeans IDE uses slightly more complicated annotations than the simple @WebService annotation that this article introduced earlier. Don't worry: These parameters and additional annotations are there to help you refine how the Java SE 6 platform and JAX-WS 2.0 publish the web services. The functionality remains the same by default.
Step 6
Change the source of the class to match the functionality of the CircleFunctions source code provided earlier. Your final class should look like this:
/*
 * CircleFunctions.java
 *
 * Created on July 18, 2006, 2:03 PM
 *
 * To change this template, choose Tools | Template Manager
 * and open the template in the editor.
 */

package ws;

import javax.jws.WebService;

/**
 *
 * @author John Doe
 */

@WebService
public class CircleFunctions {

   public double getArea(double r) {
        return java.lang.Math.PI * (r * r);
    }

   public double getCircumference(double r) {
        return 2 * java.lang.Math.PI * r;
    }
}
To deploy this example, right click on Web Services Example in the Projects subwindow again (see Figure 3), and this time select the Deploy Project menu item. This will start the Tomcat server and compile and deploy the web service.
When this is completed successfully, open a browser and go to the following location:
http://localhost:8084/Web_Services_Example/CircleFunctions
Note that the default deployment port for Tomcat is 8084, not 8080, which is what many web servers use. The authors have also chosen to use this port for the example so that it does not conflict with the earlier Java SE 6 platform JVM web service, in the event that you decided you keep that web service running.
In your web browser, you should see a table similar to Figure 5 that indicates that the CircleFunctions web service is active.
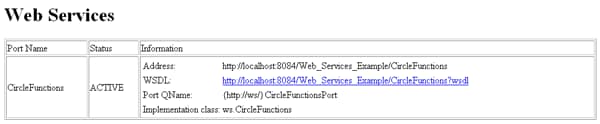
Figure 5. The CircleFunctions Web Service
You can also click on the link that shows the web service's WSDL file. Its filename should match the WSDL file that you browsed earlier.
What Is a WSDL?
A Web Services Definition Language (WSDL, often pronounced “whiz-dull”) file is instrumental in creating a client that can communicate with the web service. WSDL describes the public interface to the web service. It is an XML-based service description for the protocol bindings and message formats required to interact with the web services listed in its directory. The supported operations and messages are described abstractly, and they are then bound to a concrete network protocol and message format.
Adding JAX-WS Support to a Java Application in the NetBeans IDE 5.5
You probably noticed that the earlier instructions for the NetBeans IDE created a web application. But what if you want to enable web services on a plain old Java application? Perhaps you've been content with using remote method invocation (RMI) with your classes so far, and you now want to switch over to the world of web services.
At first glance, this can be a problem. Recall that adding the annotations and compiling the class with javac will not generate the proper support classes in the jaxws directory. For this, you must run the Wsgen tool.
However, running wsgen by hand each time you compile with the NetBeans IDE can be a pain, especially if your CLASSPATH is complex. Modifying the NetBeans IDE's user Ant configuration file will often get the job done more easily. Add the following definition to the end of your build.xml file, which is located at the base of your project directory tree:
<target name="-pre-jar" >
        <taskdef name="wsgen" classname="com.sun.tools.ws.ant.WsGen">
            <classpath path="${javac.classpath}"/>
        </taskdef>
        <wsgen
            debug="true"
            keep="true"
            destdir="build/classes"
            resourcedestdir="build/classes"
            sei="hello.CircleFunctions">
            <classpath>
                <pathelement path="${javac.classpath}"/>
                <pathelement location="${java.home}/../lib/tools.jar"/>
                <pathelement location="build/classes"/>
            </classpath>
        </wsgen>
    </target>
This task tells the NetBeans IDE to call wsgen on the service implementation class, hello.CircleFunctions, before compressing the results into an executable Java ARchive (JAR) file.
A Brief Look at JAX-WS 2.0 Annotations
You may have noticed that the NetBeans IDE created two different annotations for describing a web service to the Java SE 6 platform: @WebService and @WebMethod. JAX-WS uses several annotations, but these two -- which come from JSR 181: Web Services Metadata for the Java Platform -- are the most common on the server side. By default, you probably will not need to modify these annotations, but they contain functionality that you may find useful. If you have done any programming with web services in the past, most of the parameters will look familiar.
Annotation @WebService ( javax.jws.WebService)
The @WebService annotation is used to specify that the class is a web service or that the interface defines a web service. Table 2 lists the parameters that this annotation can accept.
Table 2. @WebService Annotation Parameters
| Class | Name | Description |
|---|---|---|
| String |
endpointInterface
|
The complete name of the service endpoint interface (SEI) defining the service's abstract web service contract. |
| String |
name
|
The web service's name. |
| String |
portName
|
The web service's port name. |
| String |
serviceName
|
The web service's service name. |
| String |
targetNamespace
|
If the @WebService.targetNamespace annotation is on an SEI, the targetNamespace is used for the namespace for the wsdl:portType and associated XML elements.
|
| String |
wsdlLocation
|
The location of a predefined WSDL file describing the service. |
Annotation @WebMethod ( javax.jws.WebMethod)
The @WebMethod annotation customizes a method that is exposed as a web service operation. The associated method must be public. Otherwise, you will receive an error. In addition, the parameters, return value, and exceptions of the associated method must follow the rules defined in JAX-RPC 1.1, section 5. Note that the method is not required to throw a java.rmi.RemoteException. Table 3 lists the parameters for this annotation.
Table 3. @WebMethod Annotation Parameters
| Class or Type | Name | Description |
|---|---|---|
| String |
action
|
The action for this operation. |
| boolean |
exclude
|
You can set this parameter to true to quickly mark a method as not exposed as a web method. The default value is false.
|
| String |
operationName
|
Name of the wsdl:operation matching this method.
|
Other useful annotations with JAX-WS 2.0 allow you to further customize parameters and return types defined in the WSDL file. For more information on the JAX-WS 2.0 annotations, read Chapter 7 of the JAX-WS 2.0 (JSR 224) final release specification.
Creating a Web Services Client in the NetBeans IDE 5.5
Now that we've created and published a web service, we can perform the following steps in the NetBeans IDE 5.5 to create the web services client. When you are creating the client, it does not matter whether you are using the Java SE 6 platform's small web server or the Tomcat server that is bundled with the NetBeans IDE, as long as the server is running and the NetBeans IDE can access the WSDL file.
Step 1
From the File menu, choose New Project. Select Java Application from the General category and click Next. You should see a dialog box similar to Figure 6.
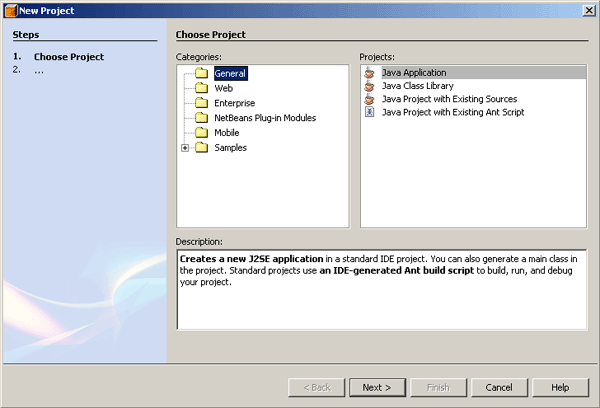
Figure 6: New Project Dialog Box
Step 2
Name the project Web Services Client. If you wish, change the package in which the Main class will reside, as shown in Figure 7. Note: A bug in the current release of NetBeans IDE 5.5 may prevent you from creating your web services client in a project folder that contains spaces in its path name. For example, the Project Location path should not be C:\Documents and Settings\.... Click Finish, and the dialog box will close.

Figure 7: New Java Application Dialog Box
Step 3
Next, in the Projects window, right click the Web Services Client node, then choose New Web Service Client. You should see the dialog box shown in Figure 8.
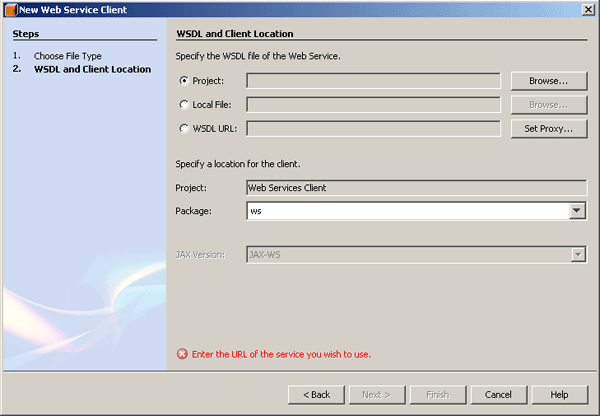
Figure 8: New Web Services Client Dialog Box
Step 4
Select the Project option for the location of the WSDL file, and click the Browse button to the right of the Project text field. Browse to the web service that you want to consume, in this case CircleFunctions. Once you have selected the web service, click OK, and you'll see a selection tree similar to Figure 9. Select CircleFunctions and click OK. Note that you can also specify a local file or a URL for the location of the WSDL file. You can use the latter when creating a client for a public web services server, such as eBay.
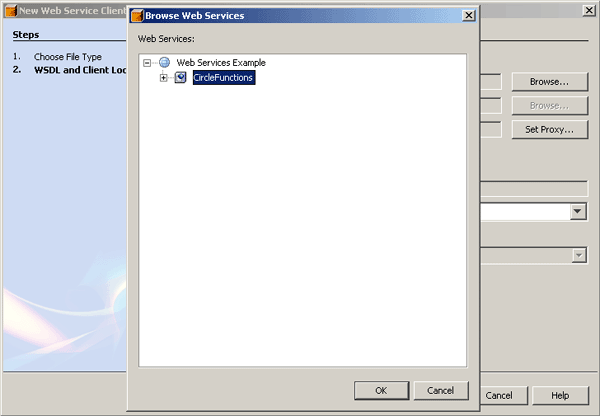
Figure 9: The Browse Web Services Selection Tree
Step 5
Type ws in the Package text field of the New Web Service Client dialog box (see Figure 8), and click Finish. The Projects window displays the new web service client, as shown in Figure 10.
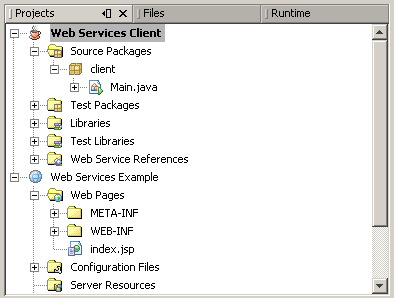
Figure 10: The Projects Window Showing the Web Services Client
Step 6
Double-click Main.java so that it opens in the Source Editor. Delete the comment in the main() method and right click in that line. From the pop-up menu, choose Web Service Client Resources, then Call Web Service Operation.
Step 7
Browse to the CircleFunction's Area operation and click OK.
Step 8
Change the main() method's declaration of the double arg0, shown in bold type in the following code sample, to equal 3.0.
public static void main(String[] args) {
        try { // Call Web Service Operation
            ws.CircleFunctionsService service =
                new ws.CircleFunctionsService();
            ws.CircleFunctions port = service.getCircleFunctionsPort();
            // TODO initialize WS operation arguments here

                   double arg0 = 3.0;
            // TODO process result here
            double result = port.getArea(arg0);
            System.out.println("Result = "+result);
        } catch (Exception ex) {
            // TODO handle custom exceptions here
        }
        // TODO code application logic here
    }
Step 9
Right click the Web Services Client project node and choose Run Project. The Output window should now show output similar to the following:
Compiling 1 source file to C:\Web Services Client\build\classes
compile:
run:
Result = 28.274333882308138
BUILD SUCCESSFUL (total time: 3 seconds)
Congratulations, you've just created a web service client using JAX-WS 2.0!
For More Information
About the Authors
Robert Eckstein has worked with Java technology since its first release. In a previous life, he has been an editor for O'Reilly Media, Inc. and a programmer for Motorola's cellular technology division. He has written or edited a number of books, including Java Swing, Java Enterprise Best Practices, Using Samba, XML Pocket Reference, and Webmaster in a Nutshell. In his spare time he has been known to tinker with filmmaking and digital photography, as well as collecting vintage video game consoles.
Rajiv Mordani is a senior engineer at Sun Microsystems. He is the implementation architect for the web tier. Before this, he was the implementation architect working on next-generation web services.
The terms "Java Virtual Machine" and "JVM" mean a Virtual Machine for the Java platform.