Creating Wizard Dialogs with Java Swing
By Robert Eckstein, February 10, 2005
Wizard dialogs are ubiquitous in today's desktop applications. What exactly is a wizard dialog? Well, you've likely run across several wizard dialogs already, either when you're installing a pre-packaged application, or you're configuring a series of program options. In this article, I will create a framework for a simple wizard dialog that you can extend as necessary.
A wizard dialog is constructed with a number of panels, and each panel contains user-configurable components such as radio buttons, sliders, or text fields. The idea here is that the application user, by pressing either the Next or Back buttons, can "flip" across these panels, entering information on each one until he or she completes the path. At this point, the Next button often changes to a Finish button, and when pressed, the dialog will close. The instantiating class should then be able to retrieve all of the data that was entered. At any time, the user can also press the Cancel button to quit the dialog and discard any data that has been entered so far.
Seems like a simple design, right? Well, not necessarily. Here are a few design considerations that must be kept in mind.
- First, note that wizard dialogs do not necessarily traverse across their panels in a linear fashion. In other words, if a wizard dialog has Panels 1 through 5, pressing the
Nextbutton four times may take you from Panel 1 to Panel 5, traversing across Panels 2, 3, and 4. But that's not always the case. For example, what happens if Panel 3 tries to connect to a remote server and cannot make the connection? In that case, the wizard may need to branch off to another series of panels which takes the user through a setup without connecting to the server. And when you add several possible such branches into the equation, you begin to see that wizard panels must be connected in a tree-like fashion, where you start at the beginning (the trunk) and move your way down branches until you reach a terminable leaf, at which point theNextbutton should change to aFinishand the wizard dialog ends. - Second, the
NextandBack(and even sometimes theCancel) buttons may need to be disabled. At the initial panel, theBackbutton should always be disabled - after all, there's no previous panel to go back to. However, there are other cases where theNextbutton should be disabled. Validating user entry is the traditional example of this. Let's say that a panel is asking a user to enter their password twice using two Swing JPasswordField components. (This sort of password entry, where the entered characters are masked with asterisks, is fairly common.) In this case, the dialog should not enable theNextbutton until the passwords in both fields match. This ensures that user does not continue in the wizard until they have a valid password, but anyone looking over the user's shoulder cannot see the password. - Third, data that has been entered must remain persistent if the user goes back across the panels. Again, this isn't hard, so long as the data remains in memory. However, there's some logic to keep in mind here as well. Let's again look at the example of Panel 3 connecting and transmitting data to a server. If the user goes backwards from Panel 4, they should not jump immediately to a panel that re-transmits the exact same data to the server. Instead, they need to skip over the step that actually transmits the data and jump to Panel 2 where data can be re-entered.
If you're getting the impression that numbering our panels with an integer code is a bad idea, that's exactly right. It's often better to give each panel an Object identifier, such as a string. Then, when we need to move forward or backward, we can ask the current panel for the identifier of the next panel or the previous panel that it should traverse to. Note that the next and previous panel identifiers returned by the current panel are not guaranteed to remain constant, and may change based on context and user input.
So, with those design considerations in mind, let's outline a set of classes that we're going to write to create our extensible wizard dialog.
Wizard - This class, including its model and controller, is responsible for the outer JDialog, as well as the Next, Back, and Cancel buttons. It is also contains a large component in the center that uses the AWT CardLayout layout manager to "flip" through multiple wizard panels in the same space. Think of it as the outer shell of the wizard dialog. Graphically, it looks like Figure 1.
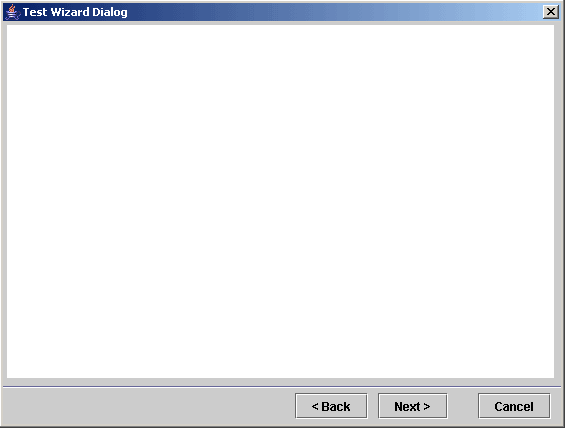
The Dialog Created by the Wizard Class
Subclass of java.awt.Component - The second element is simply a class that extends java.awt.Component, often a javax.swing.JPanel. This class acts the inner content of the wizard dialog-one of several panels that will be displayed by the Wizard. Figure 2 below shows an example of a JPanel that contains an ImageIcon on the left, in conjunction with several lines of text on the right.

An example of a JPanel that can be used as a wizard component panel
WizardPanelDescriptor - This third class is the means to connect the components on the inside with the wizard dialog on the outside. This is a class that is extended by the user to provide a means of identifying the panel's Component class to the Wizard, its unique Object-based identifier, links to the current WizardPanelDescriptor classes representing the next and previous panels, and hook routines that are executed before, during, and after the panel is displayed.
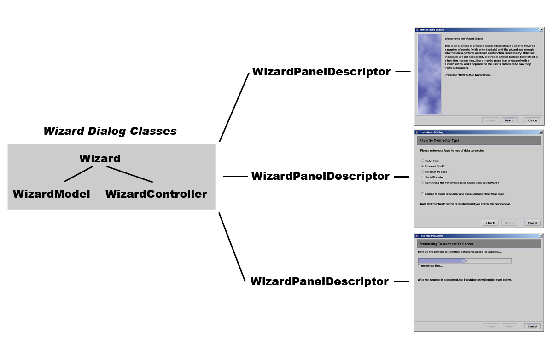
Figure 3 shows how each of these classes relate to each other.
 Click here for a larger image
Figure 3. The Wizard Dialog Classes
Click here for a larger image
Figure 3. The Wizard Dialog Classes
Wizard
The first thing that we need to create is the class that represents the outer shell of the wizard dialog itself. We know already that we need three buttons in this area: a Back button, a Next button, and a Cancel button. Typically, these buttons appear in that order, from left to right, and the lower right side of the dialog. Also, the Cancel button is typically offset slightly from the other two buttons - this is primarily so that the user doesn't accidentally press the Cancel button if they are clicking back and forth rapidly across the panels. Next, we need a layout manager that will allow us to display a number of panels in the same spot, flipping back and forth among a number of them as needed. Luckily, AWT provided us with such a layout manager for use with component such as JTabbedPane: the CardLayout.
In this design, I've decided to use a simple (non-pluggable) model to keep track of all our data, as well as a controller to handle all the input events. Let's take a look at the Wizard class so far.
public class Wizard {

    private WizardModel wizardModel;
    private WizardController wizardController;

    private JDialog Wizard;

    private JPanel cardPanel;
    private CardLayout cardLayout;

    private JButton backButton;
    private JButton nextButton;
    private JButton cancelButton;

    private int returnCode;

    public Wizard(Frame owner) {

        wizardModel = new WizardModel();
        Wizard = new JDialog(owner);
        wizardController = new WizardController(this);

        initComponents();
    }
}
Note that the constructor that is listed here calls a private helper method entitled initComponents(). Here is the source code for that method, which simply lays out the interior and surrounding buttons in the typical wizard dialog fashion, and connects the buttons to the controller.
private void initComponents() {

// Code omitted

    JPanel buttonPanel = new JPanel();
    Box buttonBox = new Box(BoxLayout.X_AXIS);

    cardPanel = new JPanel();
    cardPanel.setBorder(new EmptyBorder(new Insets(5, 10, 5, 10)));

    cardLayout = new CardLayout();
    cardPanel.setLayout(cardLayout);
    backButton = new JButton();
    nextButton = new JButton();
    cancelButton = new JButton();

    backButton.addActionListener(wizardController);
    nextButton.addActionListener(wizardController);
    cancelButton.addActionListener(wizardController);

    buttonPanel.setLayout(new BorderLayout());
    buttonPanel.add(new JSeparator(), BorderLayout.NORTH);

    buttonBox.setBorder(new EmptyBorder(new Insets(5, 10, 5, 10)));
    buttonBox.add(backButton);
    buttonBox.add(Box.createHorizontalStrut(10));
    buttonBox.add(nextButton);
    buttonBox.add(Box.createHorizontalStrut(30));
    buttonBox.add(cancelButton);
    buttonPanel.add(buttonBox, java.awt.BorderLayout.EAST);
    Wizard.getContentPane().add(buttonPanel, java.awt.BorderLayout.SOUTH);
    Wizard.getContentPane().add(cardPanel, java.awt.BorderLayout.CENTER);

}
Next, there needs to be a way to register the Component panels with the layout manager and the model. Wizard uses the registerWizardPanel() method for this. Note that the CardLayout manager does have methods that cycle back and forth across the panels as they have been added to it (that is, next() and previous()). However, because of the tree-like structure that we need to use, it's better for the dialog to display them using the Object identifier and not try to enforce a linear path. Here is the method:
public void registerWizardPanel(Object id,
WizardPanelDescriptor panel)
{
    cardPanel.add(panel.getPanelComponent(), id);
    wizardModel.registerPanel(id, panel);
}
Note that we provide the AbstractWizardPanel with a reference to this wizard dialog. This is so that the panel can call back and set the enabled properties on the Next and Previous buttons. Because we only want these to be called from the AbstractWizardPanel class, which resides in the same package, we use the special Java package private declaration for our methods.
void setBackButtonEnabled(boolean b) {
    backButton.setEnabled(b);
}
void setNextButtonEnabled(boolean b) {
    nextButton.setEnabled(b);
}
Finally, there needs to be a way to display a requested panel. Wizard does this with the displayPanel() method. This method takes in the Object identifier of the panel that should be displayed, notifies the current WizardPanelDescriptor that its current panel is about to be hidden, relates the upcoming panel identifier to the model, then instructs the CardLayout layout manager to display the appropriate panel. Note that we also call two similar methods in the new WizardPanelDescriptor: aboutToDisplayPanel() and displayingPanel(). These provide a way for the panel to (re-)setup various components before the it is displayed, or perform certain actions (for example, connecting to a server) while the panel is displayed.
public void setCurrentPanel(Object id) {

    // Code omitted

    WizardPanelDescriptor oldPanelDescriptor =
        wizardModel.getCurrentPanelDescriptor();

    if (oldPanelDescriptor != null)
        oldPanelDescriptor.aboutToHidePanel();

    wizardModel.setCurrentPanel(id);

    wizardModel.getCurrentPanelDescriptor().
        AboutToDisplayPanel();

    cardLayout.show(cardPanel, id.toString());

    wizardModel.getCurrentPanelDescriptor().
        DisplayingPanel();

}
The remainder of the class are the button event handlers, which are fairly easy to follow. Note that the Wizard makes heavy use of the WizardModel to store its data, as well as the WizardController to process events received from the dialog itself.
WizardPanelDescriptor
Each of the panels that are registered with the Wizard must identify itself with a descriptor that extends the WizardPanelDescriptor class. This class helps the panel's Component to integrate with the wizard dialog, and provides some key methods that the Wizard will call upon to get its bearings. The first four methods, shown below, are simply accessors that are used to set and retrieve the panel's Component class, as well the Object based identifier (typically a String, but it can be anything).
public final Component getPanelComponent() {
    return targetPanel;
}

public final void setPanelComponent(Component panel) {
    targetPanel = panel;
}

public final Object getPanelDescriptorIdentifier() {
    return panelIdentifier;
}

public final void setPanelDescriptorIdentifier(Object id) {
    panelIdentifier = id;
}
The next two methods, getNextPanelDescriptor() and getBackPanelDescriptor(), provide the Wizard the Object-based identifiers of the next and previous panel in question. These should be overridden in the subclass to indicate which panels should be displayed when their appropriate buttons are pressed. Note that these methods are called once upon initialization, and are then called again when the buttons are pressed. This way, the current panel can alter the decision as to which panel should be displayed based on user-input or other external factors. If a method returns null, its buttons is disabled. If the getNextPanelDescriptor() method returns the static FINISH object, the button text will change from Next to Finish. If the user presses this button, the dialog will close.
public Object getNextPanelDescriptor() {
    return null;
}
public Object getBackPanelDescriptor() {
    return null;
}
There are also three convenience methods in this class, which we hinted at just a few moments ago. Each of these allow the panels to provide setup, teardown, or functionality. If the WizardPanelDescriptor subclass does not override any of these methods, they are ignored.
public void aboutToDisplayPanel() {

    // Place code here that will be executed before the
    // panel is displayed.

}

public void displayingPanel() {

    // Place code here that will be executed when the
    // panel is displayed.

}

public void aboutToHidePanel() {

    // Place code here that will be executed when the
    // panel is hidden.

}
Running the Sample Dialog
The source code that is provided with this article contains the classes above, as well as an example dialog with three panels is provided in the test folder that you can try out to see how it all works. Here is how you can run the sample code for this article.
- Install the Ant tool, and ensure that the Any executable is in your PATH environment variable.
- Change to the base
wizarddirectory, and enter the following command to run the sampleWizard:java -jar wizard.jar
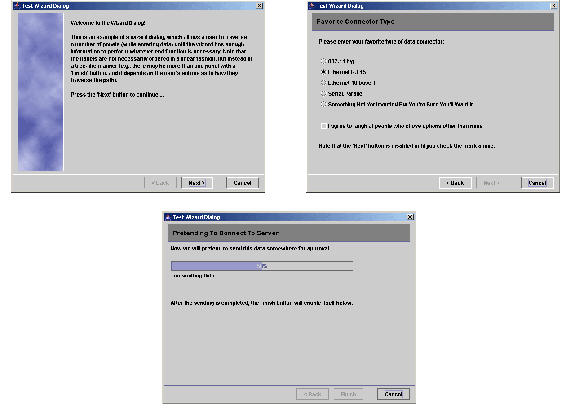
The three sample panels are shown in Figure 4.
 Click here for a larger image
Figure 4. Running the Wizard Dialog Example
Click here for a larger image
Figure 4. Running the Wizard Dialog Example
You can navigate through each of these panels using the Back and Next buttons. Note that the second panel will not enable the "Next" button until the user checks a check box near the bottom. The descriptor ensures that when the panel is about to be displayed, and when there is activity in the check box, that the Next button is set to the appropriate state (either enabled or disabled).
The third panel is a little more complex. Here, we've used the displayingPanel() method inside of the moderator to simulate connecting to a server. When the dialog is first displayed, all three buttons ( Back, Finish, and Cancel) are disabled. Again, a bit of Swing knowledge is helpful here. Since all of this functionality happens on the event dispatching thread, we need to create our own thread to simulate the connection, or the dialog will never get a change to update itself. If you are not familiar with the Swing event dispatching thread, you should check out the Swing Connection, including the Swing Tutorial that can be found on that site.
After the connection is completed, the three buttons are then re-enabled, and the user can choose which target he or she wishes to traverse to. If the user presses the Finish button, the dialog will close. At this point, the Main class will extract the data from one of the dialog panels and prints it out, as well as a return code indicating which method the user exited the wizard dialog with.
- If you wish to make modifications to the source code, use the supplied Ant script to rebuild the
wizard.jarfile. You can invoke the Ant script with the following command:ant build
For More Information
Also, be sure to look at some of the latest changes in the Java 2 Standard Edition, 5.0.
Future Directions
Here are a few additions that you can add to the classes presented here.
- The ability to change one or more button texts to strings beyond the default (for example, "Install Now").
- The addition of a
Helpbutton. - The ability to subclass the model to provide a variable number of custom buttons.