
Deploying OpenSSO on GlassFish Application Server
By Sidharth Mishra, with contributions from Marina Sum, September 26, 2008
OpenSSO, Sun's open-source project for access management and federation, is a self-contained Java EE application that offers federation, access management, and Web-service security capabilities. Installing and configuring OpenSSO is simple and efficient, with no external dependencies.
OpenSSO contains a product configurator that simplifies common deployments. For example, you can perform the following tasks in the configurator:
- Configure and deploy multiple instances of OpenSSO behind a load balancer with a common task flow.
- Deploy a one-click developer instance with an embedded OpenDS directory for user and configuration stores.
- Validate real-time input and configurations and identify the related errors.
- Set up federated-related deployments and verify real-time federated connections.
GlassFish application server is built by the open-source community on the Java EE 5 platform and is ideal for developing and deploying enterprise applications. The latest production release, GlassFish v2 Update Release 2 (UR2), offers high performance along with many capabilities: clustering, in-memory replication, enhanced administration, self-management.
This article walks you through the procedure for a basic deployment of OpenSSO on GlassFish application server.
Contents
Downloading OpenSSO
First, download OpenSSO:
- As root, create a staging directory for the OpenSSO ZIP file. For example, type:
- Unzip the ZIP file. Type:
# mkdir /opensso_bits
# cd /opensso_bits
    # unzip opensso.zip
Deploying OpenSSO on GlassFish Application Server
You must install and run GlassFish Server v2 UR2 on the host server. To deploy OpenSSO on an existing GlassFish domain, you must have the administrator password for that domain.
For details on how to install GlassFish application server.
Predeployment Steps
As a predeployment task, configure the GlassFish domain on which you will deploy OpenSSO.
Note: Even though some of the command lines in the following sections wrap to the next line because of page-width constraints, type them all on one line.
- As root, go to the
bindirectory. Type: - Start the GlassFish domain on which you will deploy OpenSSO. Type:
- Configure GlassFish application server: In the Glassfish domain where you plan to deploy OpenSSO, revise the following Java virtual machine options either from the GlassFish Administration Console or by editing the
domain.xmlfile:
# cd GlassFish-install-dir /bin
where GlassFish-install-dir is the directory in which you have installed GlassFish application server, for example, /Applications/NetBeans/glassfish-v2ur2.
# ./asadmin start-domain GlassFish-domain
where GlassFish-domain is the name of domain, for example, mydomain.
- Change
-clientto-server. - Change
-Xmx512mto-Xmx1024m.
Alternatively, make the same changes on the GlassFish command line, as follows. Input the administrator password when prompted.
# ./asadmin delete-jvm-options --port GlassFish-admin-port --user admin "\\-client"
where GlassFish-admin-port is the administration port number for the GlassFish domain on which you will deploy OpenSSO, for example, 4848.
# ./asadmin create-jvm-options --port GlassFish-admin-port --user admin "\\-server"
# ./asadmin delete-jvm-options --port GlassFish-admin-port --user admin "\\-Xmx512m"
# ./asadmin create-jvm-options --port GlassFish-admin-port --user admin "\\-Xmx1G"
Note: If you have configured an administrative user other than admin, change that parameter accordingly in the above command lines.
Restart the GlassFish domain for the changes to take effect. Type:
# cd GlassFish-install-dir /bin
# ./asadmin stop-domain GlassFish-domain
# ./asadmin start-domain GlassFish-domain
Verify that the server or host on which you will deploy OpenSSO is reachable by means of a Fully Qualified Domain Name (FQDN) typed on the command line on the same host. For a stand-alone UNIX server or system, you can create an entry in the /etc/hosts file that corresponds to the localhost entry. For example, make the localhost entry in that file read like this:
127.0.0.1 localhost sid.opensso.com www.idp.com www.sp.com www.wsc.com
Subsequently, sid.opensso.com, www.idp.com, www.sp.com, and www.wsc.com all become accessible dummy FQDNs.
To verify that the system is reachable, run the ping command on one of the FQDNs. For example:
# ping sid.opensso.com
If access is successful, you will see a response from the system.
Deployment Steps
Now deploy OpenSSO on GlassFish application server. You have three options.Option 1: Automatic Deployment
Automatic deployment, also called autodeployment, involves copying an application or module file (JAR [Java archive], WAR [Web archive], RAR [Roshal archive], or EAR [enterprise archive]) into a special directory, where the file is automatically deployed by GlassFish application server.
To automatically deploy OpenSSO on GlassFish application server, drop the OpenSSO WAR file at OpenSSO-staging-dir /opensso/deployable-war/opensso.war into the GlassFish-install-dir /domains/ GlassFish-domain /autodeploy directory. To undeploy, simply delete that file from the directory.
This option is particularly useful in a development environment because it enables fast testing of new code. For more details on autodeployment.
Option 2: Command-Line Deployment
The GlassFish command-line option asadmin deploy deploys WAR files. The OpenSSO WAR file, opensso.war, resides in the OpenSSO-staging-dir /opensso/deployable-war directory.
On the Solaris or OpenSolaris Operating System, type the following:
# cd GlassFish-install-dir /bin
# ./asadmin deploy --user admin --passwordfile /tmp/pwdfile --port GlassFish-admin-port --context-root opensso --name opensso OpenSSO-staging-dir /opensso/deployable-war/opensso.war
Note: You can set up a /tmp/pwdfile file in which you specify the administrative user password in ASCII text, for example, AS_ADMIN_PASSWORD=password.
Option 3: GUI Deployment
You can deploy OpenSSO from the GlassFish Administration Console. Follow these steps:
- On a browser, go to the GlassFish Administration Console for the domain in which you will deploy OpenSSO, for example,
http://www.idp.com:7080.
- Log in with the administrative user ID and password.
The defaults areadminandadminadmin, respectively.
- In the left pane, click to expand the Applications node and then click Web Applications.
- On the Web Applications page, click Deploy to deploy OpenSSO.
- Select the Package file to upload to the Application Server option and click Browse.
- Navigate to the directory that contains the OpenSSO application that you downloaded, for example, OpenSSO-staging-dir
/opensso/deployable-war. Selectopensso.war.
- Optional. Under General, change the values in the Application Name and Context Root text fields. The default value for both options is
opensso.
- Click OK.
- On the Deploy Enterprise Applications/Module page, click OK.
The application is now on the Web Applications list.
To verify that the deployment is successful, go to the deployed OpenSSO instance, for example, http://www.idp.com:7080/opensso.
Configuring OpenSSO
Finally, configure the OpenSSO settings:
- Go to the deployed OpenSSO instance and click Create New Configuration under Custom Configuration. See Figure 1.
- In Step 1: General, type the password for
amAdminin the Password and Confirm text fields. See Figure 2. Click Next. - In Step 2: Server Settings, fill in the details. Note that the installer has already plugged in the default values. You can leave them as is. Figure 3 is an example. Click Next.
- In Step 3, Configuration Store, fill in the details. Again, feel free to adopt the default values. See Figure 4.Click Next.
- Under Step 4, User Store Settings, select Embedded. See Figure 5. Click Next.
- Under Step 5, Site Configuration, select No in answer to the question "Will this instance be deployed behind a load balancer as part of a site configuration?". Leave the Site Name and Primary URL fields blank. See Figure 6. Click Next.
- Under Step 6, Default Agent User, type the password for the default agent (
amldapuser) in the Password and Confirm text fields. This password must differ from theamAdminpassword in Step 1: General. See Figure 7. Click Next. - Verify that the configurations in the summary are correct. Figure 8 is an example. Click Create Configuration.
- Click Proceed to Login or, on a browser, go to the deployed OpenSSO instance. Finally, as a test, log in with the credentials (
amadminas the user name and the corresponding password) set up in step 2. If the deployment is successful, the OpenSSO Administration Console is displayed.

Figure 1: Configuration Options

Figure 2: Setup for Default Administrative User Password
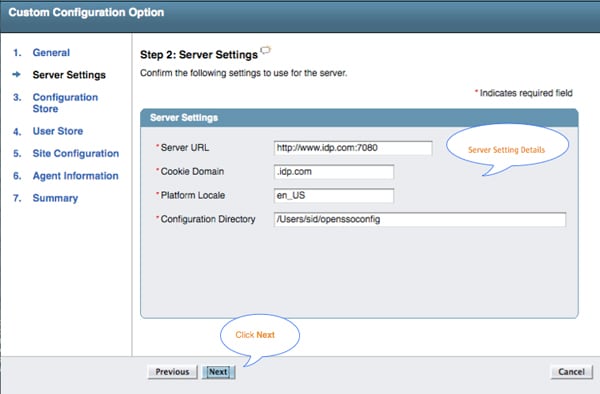
Figure 3: Server Settings

Figure 4: Configuration Store Settings

Figure 5: User Store Settings
Heed the note on the screen regarding embedded user repositories. Optionally, you can select Remote Directory on the screen and specify the pertinent details for a supported directory server.

Figure 6: Site Settings
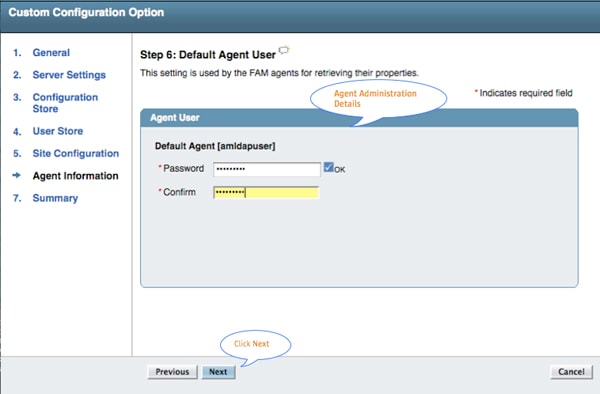
Figure 7: Setup for Default Agent Password
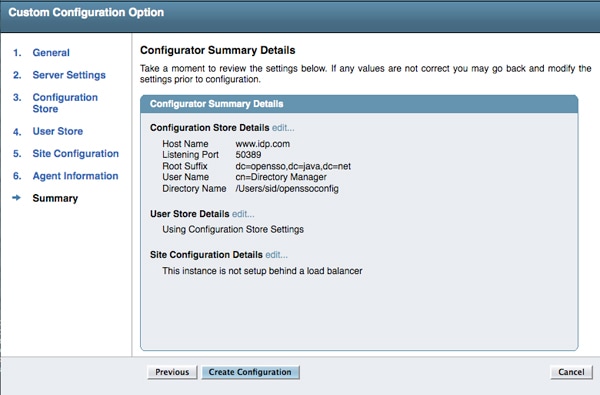
Figure 8: Summary of Configurations
The OpenSSO product configurator confirms that configuration is complete (Figure 9).
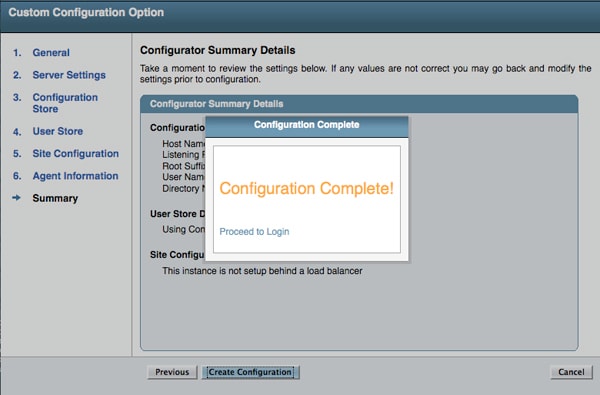
Figure 9: Confirmation of Configurations
Conclusion
OpenSSO and GlassFish application server are robust open-source software for Web development, complete with support plans from Sun. Do check them out!