Technical Article
Deploying an Enterprise Private Cloud with OpenStack in 20 Minutes (Part 1)
by Glynn Foster
Published January 2015
This hands-on lab demonstrates how to set up a single-node instance of OpenStack on Oracle Solaris 11.2.
Table of Contents
Introduction
This lab describes the tasks that were done during the Oracle OpenWorld 2014 session Hands-On Lab 9821. It will take you through the basics of how to configure OpenStack on Oracle Solaris 11. OpenStack is a popular open source cloud infrastructure that has been integrated into Oracle Solaris 11.2. OpenStack includes a number of services that help you manage the compute, storage, and network resources in your data center through a central web-based dashboard.

Figure 1. OpenStack dashboard helps you manage resources.
The OpenStack services can be summarized as shown in Table 1.
Table 1. OpenStack services
| Service Name | Description |
|---|---|
| Nova | Compute virtualization |
| Cinder | Block storage |
| Neutron | Software-defined networking (SDN) |
| Keystone | Authentication between cloud services |
| Glance | Image management and deployment |
| Horizon | Web-based dashboard |
During this lab, we will set up OpenStack in a single-node instance. For a typical enterprise deployment, these services would be spread across multiple nodes with load balancing and other high availability capabilities.
With the Oracle Solaris 11.2 release, a new archive format was introduced called Unified Archives. Unified Archives provide easy golden-image style deployment, allowing administrators to quickly take a snapshot of a running system and deploy the snapshot as clones within a cloud environment. For this lab, we will create a Unified Archive to give you experience with the OpenStack services and how they are configured.
Lab Setup
This lab requires the following set up:
- Oracle Solaris 11.2 (
rootpassword issolaris11) - Host name of
solarisand IP address range of10.158.56.0/21 - Oracle Solaris Image Packaging System repository clone at
/repository/publishers/solaris - OpenStack configuration script located in
/root/hol_single_host.py(This script is provided in the Appendix. You need to have it available locally and run it as therootuser or privileged user.)
To start with, open up a terminal window on the host OS and start an SSH connection with root/solaris11 as the user/password combination:
# ssh root@10.158.56.x
Password:
Oracle Corporation      SunOS 5.11      11.2    June 2014
Exercise 1: Installing the OpenStack Packages
First, we will install the OpenStack packages from the Image Packaging System repository, as follows:
# pkg install openstack rabbitmq rad-evs-controller
           Packages to install: 182
            Services to change:   3
       Create boot environment:  No
Create backup boot environment: Yes
DOWNLOAD                                PKGS         FILES    XFER (MB)   SPEED
Completed                            182/182   23198/23198  116.4/116.4  806k/s

PHASE                                          ITEMS
Installing new actions                   26599/26599
Updating package state database                 Done
Updating package cache                           0/0
Updating image state                            Done
Creating fast lookup database                   Done
Updating package cache                           1/1
Now that we have successfully installed these packages, we need to restart the rad:local Oracle Solaris Service Management Facility service. The Oracle Solaris Remote Administration Daemon (rad) provides programmatic access to the Oracle Solaris 11 administrative interfaces that we use in the Oracle Solaris plugins for OpenStack.
# svcadm restart rad:local
We also need to enable the open source RabbitMQ service. RabbitMQ is a messaging system that enables communication between the core OpenStack services.
# svcadm enable rabbitmq
# svcs rabbitmq
STATE          STIME    FMRI
online         23:58:04 svc:/application/rabbitmq:default
Exercise 2: Configuring Keystone
Keystone provides authentication between the core OpenStack services. It will be the first service that we configure and enable.
OpenStack uses a series of configuration files with defined sections that include key/value pairs. For this first service, we will manually configure the appropriate settings, but for all future services, we will use a script for convenience.
Edit the /etc/keystone/keystone.conf file and ensure the following settings are set as shown below:
[DEFAULT]
admin_token = ADMIN

[identity]
driver = keystone.identity.backends.sql.Identity

[catalog]
driver = keystone.catalog.backends.sql.Catalog

[token]
provider = keystone.token.providers.uuid.Provider

[signing]
token_format = UUID
Now enable the Keystone service:
# svcadm enable -rs keystone
# svcs keystone
STATE          STIME    FMRI
online         23:59:31 svc:/application/openstack/keystone:default
In order to allow for successful authentication, we need to populate the Keystone database with a number of users across different tenants that reflect the core OpenStack services. In our case, we will use sample data (see Table 2) provided by a sample_data.sh script that is included as part of the base OpenStack packages. In a production deployment, you would associate Keystone with a directory service such as LDAP or Microsoft Active Directory.
Table 2. Sample data we will use to populate Keystone database
| User | Tenant | Password |
|---|---|---|
admin |
demo | secrete |
nova |
service | nova |
cinder |
service | cinder |
neutron |
service | neutron |
glance |
service | glance |
Let's run the sample_data.sh script now:
# /usr/demo/openstack/keystone/sample_data.sh
+-------------+---------------------------------------+
|   Property  |                 Value                 |
+-------------+---------------------------------------+
|   adminurl  |  http://localhost:$(admin_port)s/v2.0 |
|      id     |    cdd38de578ffe450a4ebd17e6345ed72   |
| internalurl | http://localhost:$(public_port)s/v2.0 |
|  publicurl  | http://localhost:$(public_port)s/v2.0 |
|    region   |               RegionOne               |
|  service_id |    db9909b96b916b6ed04a818c6f407df0   |
+-------------+---------------------------------------+
+-------------+------------------------------------------------------+
|   Property  |                        Value                         |
+-------------+------------------------------------------------------+
|   adminurl  | http://localhost:$(compute_port)s/v1.1/$(tenant_id)s |
|      id     |           48d62b0291f44c258f0bef5fe72024b9           |
| internalurl | http://localhost:$(compute_port)s/v1.1/$(tenant_id)s |
|  publicurl  | http://localhost:$(compute_port)s/v1.1/$(tenant_id)s |
|    region   |                      RegionOne                       |
|  service_id |           c38ced19a4894a5bc61cbb77e9868bbf           |
+-------------+------------------------------------------------------+
+-------------+----------------------------------------+
|   Property  |                 Value                  |
+-------------+----------------------------------------+
|   adminurl  | http://localhost:8776/v1/$(tenant_id)s |
|      id     |    975e3db88eb56836e779e1b0e8d2dd21    |
| internalurl | http://localhost:8776/v1/$(tenant_id)s |
|  publicurl  | http://localhost:8776/v1/$(tenant_id)s |
|    region   |               RegionOne                |
|  service_id |    39daf3d31c0348f0ae32b04a2ed3dbc4    |
+-------------+----------------------------------------+
+-------------+----------------------------------+
|   Property  |              Value               |
+-------------+----------------------------------+
|   adminurl  |      http://localhost:9292       |
|      id     | a77c1ed7d1a44751afeed55e2e0bbc99 |
| internalurl |      http://localhost:9292       |
|  publicurl  |      http://localhost:9292       |
|    region   |            RegionOne             |
|  service_id | 903f1738fc066deed8a8c4a38925d1e5 |
+-------------+----------------------------------+
+-------------+--------------------------------------+
|   Property  |                Value                 |
+-------------+--------------------------------------+
|   adminurl  | http://localhost:8773/services/Admin |
|      id     |   86d0e7f081d7e512b6638534f391b6ee   |
| internalurl | http://localhost:8773/services/Cloud |
|  publicurl  | http://localhost:8773/services/Cloud |
|    region   |              RegionOne               |
|  service_id |   86b96889f88be522abf19d7ff8e7db18   |
+-------------+--------------------------------------+
+-------------+---------------------------------------------+
|   Property  |                    Value                    |
+-------------+---------------------------------------------+
|   adminurl  |           http://localhost:8080/v1          |
|      id     |       756642548112e822be94a5da3a73588e      |
| internalurl | http://localhost:8080/v1/AUTH_$(tenant_id)s |
|  publicurl  | http://localhost:8080/v1/AUTH_$(tenant_id)s |
|    region   |                  RegionOne                  |
|  service_id |       6d22986ee9c76880e0f0c0da4aa8fe0f      |
+-------------+---------------------------------------------+
+-------------+----------------------------------+
|   Property  |              Value               |
+-------------+----------------------------------+
|   adminurl  |      http://localhost:9696/      |
|      id     | bbe5bf886bff4c089c0dbc42a65fa521 |
| internalurl |      http://localhost:9696/      |
|  publicurl  |      http://localhost:9696/      |
|    region   |            RegionOne             |
|  service_id | f5c6aeb5a53bceb6f022b85e0b63956f |
+-------------+----------------------------------+
Let's verify the result by setting the environmental variables SERVICE_ENDPOINT and SERVICE_TOKEN, and then running the keystone client-side command:
# export SERVICE_ENDPOINT=http://localhost:35357/v2.0/
# export SERVICE_TOKEN=ADMIN
# keystone user-list
+----------------------------------+---------+---------+-------+
|                id                |   name  | enabled | email |
+----------------------------------+---------+---------+-------+
| 5bdefb773d3c61fed79d96c5540f9766 |  admin  |   True  |       |
| 8b54a70c235ee1179f15a198a70be099 |  cinder |   True  |       |
| 7949ac987dd5c514e778ba3932586109 |   ec2   |   True  |       |
| d79d19dc2945ed758747c2e2d8ab7e89 |  glance |   True  |       |
| ac11eb0e1aed68f2c45085797c8bade5 | neutron |   True  |       |
| d9e6d0ddfbaf4ca6a6ee9bb951877d3d |   nova  |   True  |       |
| eb3237eea75ae619aba6cf75a49f798f |  swift  |   True  |       |
+----------------------------------+---------+---------+-------+
Exercise 3: Configuring Glance
Glance is a service that provides image management in OpenStack. It responsible for managing the array of images that you install on the compute notes when you create new virtual machine (VM) instances. It comprises a few different services that we need to configure first. For convenience, use the hol_single_host.py script provided in the Appendix for doing this configuration quickly:
# ./hol_single_host.py glance
configuring glance
This script configures the following files and provides the appropriate configuration for the Glance endpoints (usually for the user and password information).
/etc/glance/glance-api.conf/etc/glance/glance-registry.conf/etc/glance/glance-cache.conf/etc/glance/glance-api-paste.ini/etc/glance/glance-registry-paste.ini/etc/glance/glance-scrubber.conf
Let's now enable the Glance services:
# svcadm enable -rs glance-api glance-db glance-registry glance-scrubber
We can check that this configuration is correct by running the following commands, which indicate that we have successfully contacted the image registry, but there are no images currently loaded into Glance:
# export OS_AUTH_URL=http://localhost:5000/v2.0/
# export OS_PASSWORD=glance
# export OS_USERNAME=glance
# export OS_TENANT_NAME=service
# glance image-list
+----+------+-------------+------------------+------+--------+
| ID | Name | Disk Format | Container Format | Size | Status |
+----+------+-------------+------------------+------+--------+
+----+------+-------------+------------------+------+--------+
The next step will be to populate Glance with an image that we can use for our instances. In the Oracle Solaris implementation, we take advantage of a new archive type called Unified Archives. Therefore, we will create a Unified Archive.
First, because we use Oracle Solaris Zones as the virtualization technology for compute services, we need to create a non-global zone.
# zonecfg -z myzone create
# zoneadm -z myzone install
The following ZFS file system(s) have been created:
    rpool/VARSHARE/zones/myzone
Progress being logged to /var/log/zones/zoneadm.20140911T002211Z.myzone.install
       Image: Preparing at /system/zones/myzone/root.

 Install Log: /system/volatile/install.2985/install_log
 AI Manifest: /tmp/manifest.xml.JFaOZf
  SC Profile: /usr/share/auto_install/sc_profiles/enable_sci.xml
    Zonename: myzone
Installation: Starting ...

        Creating IPS image
Startup linked: 1/1 done
        Installing packages from:
            solaris
                origin:  http://localhost:8008/
DOWNLOAD                                PKGS         FILES    XFER (MB)   SPEED
Completed                            282/282   53274/53274  351.9/351.9  4.1M/s

PHASE                                          ITEMS
Installing new actions                   71043/71043
Updating package state database                 Done
Updating package cache                           0/0
Updating image state                            Done
Creating fast lookup database                   Done
Updating package cache                           1/1
Installation: Succeeded

        Note: Man pages can be obtained by installing pkg:/system/manual

 done.

        Done: Installation completed in 230.010 seconds.

  Next Steps: Boot the zone, then log into the zone console (zlogin -C)

              to complete the configuration process.

Log saved in non-global zone as /system/zones/myzone/root/var/log/zones/zoneadm.20140911T002211Z.myzone.install
# zoneadm -z myzone boot
# zoneadm list -cv
  ID NAME             STATUS      PATH                         BRAND      IP
   0 global           running     /                            solaris    shared
   1 myzone           running     /system/zones/myzone         solaris    excl
Let's now log in to the zone and do the final configuration.
# zlogin -C myzone
[Connected to zone 'myzone' console]
After logging in, you will be presented with the Oracle Solaris System Configuration Tool. We need to use this tool to do some final configuration (see Table 3) prior to archiving the zone we created. This configuration will not be used when we deploy the zone, but we need to do this configuration prior to creating the archive. You can navigate through the tool using the function keys.
Table 3. Configuration settings to specify using the System Configuration Tool
| Item | Setting |
|---|---|
| Host name | myzone |
| Networking | Manual, 192.168.56.100 |
| DNS | Do not configure DNS |
| Name services | None |
| Time zone and locale | Choose any |
root password |
solaris11 |
After you finish making the configurations selections, you should see output similar to the following:
SC profile successfully generated as:
/etc/svc/profile/sysconfig/sysconfig-20140911-002744/sc_profile.xml

Exiting System Configuration Tool. Log is available at:
/system/volatile/sysconfig/sysconfig.log.4666
Hostname: myzone

myzone console login:
You can now log in as root with the password solaris11:
myzone console login: root
Password: solaris11
Sep 11 00:33:57 myzone login: ROOT LOGIN /dev/console
Oracle Corporation      SunOS 5.11      11.2    June 2014
Running the virtinfo command, we can see that we're in a non-global zone.
root@myzone:~# virtinfo
NAME            CLASS
non-global-zone current
logical-domain   parent
Prior to creating the Unified Archive, we need to do one more configuration trick. When we deploy instances using OpenStack, we typically provide an SSH public keypair that's used as the primary authentication mechanism to our instance. We need to ensure that this is a password-less operation, so we need to make some configuration changes to the SSH server service running within this non-global zone prior to creating a snapshot of the zone.
Edit the /etc/ssh/sshd_config file:
root@myzone:~# vi /etc/ssh/sshd_config
Find the PermitRootLogin key/value pair and set it to without-password.
PermitRootLogin without-password
Now let's exit out of our zone using the ~~. escape sequence:
root@myzone:~# ~~.
#
And, finally, we can create our Unified Archive:
# archiveadm create -z myzone myzone.uar
Initializing Unified Archive creation resources...
Unified Archive initialized: /root/myzone.uar
Logging to: /system/volatile/archive_log.5578
Executing dataset discovery...
Dataset discovery complete
Creating install media for zone(s)...
Media creation complete
Preparing archive system image...
Beginning archive stream creation...
Archive stream creation complete
Beginning final archive assembly...
Archive creation complete
And then upload the image to Glance:
# export OS_AUTH_URL=http://localhost:5000/v2.0/
# export OS_PASSWORD=glance
# export OS_USERNAME=glance
# export OS_TENANT_NAME=service
# glance image-create --container-format bare --disk-format raw \
--is-public true --name "Base Zone" --property architecture=sparc64 \
--property hypervisor_type=solariszones \
--property vm_mode=solariszones < myzone.uar
+----------------------------+--------------------------------------+
| Property                   | Value                                |
+----------------------------+--------------------------------------+
| Property 'architecture'    | sparc64                              |
| Property 'hypervisor_type' | solariszones                         |
| Property 'vm_mode'         | solariszones                         |
| checksum                   | 336bdfe5f76876fe24907e35479101e7     |
| container_format           | bare                                 |
| created_at                 | 2014-09-11T00:52:14.269232           |
| deleted                    | False                                |
| deleted_at                 | None                                 |
| disk_format                | raw                                  |
| id                         | b42e47ee-d8dc-e50c-d6e0-9206d761ce41 |
| is_public                  | True                                 |
| min_disk                   | 0                                    |
| min_ram                    | 0                                    |
| name                       | Base Zone                            |
| owner                      | f17341f0a2a24ec9ec5f9ca497e8c0cc     |
| protected                  | False                                |
| size                       | 1277245440                           |
| status                     | active                               |
| updated_at                 | 2014-09-11T00:52:42.352947           |
+----------------------------+--------------------------------------+
Exercise 4: Configuring Nova
Nova is the compute service in OpenStack and it is responsible for scheduling and deploying new instances. Like Glance, it comprises several different services that need to be configured and enabled. We will use our script again to do this quickly:
# ./hol_single_host.py nova
configuring nova
Nova requires a little more care in terms of the start order of services, so we will first enable the conductor service (which essentially proxies access to the Nova database from the compute nodes) and then the rest of the services:
# svcadm enable -rs nova-conductor
# svcadm enable -rs nova-api-ec2 nova-api-osapi-compute nova-scheduler nova-cert nova-compute
Let's check that Nova is functioning correctly by setting up some environmental variables and viewing the endpoints:
# export OS_AUTH_URL=http://localhost:5000/v2.0/
# export OS_PASSWORD=nova
# export OS_USERNAME=nova
# export OS_TENANT_NAME=service
# nova endpoints
+-------------+-------------------------------------------------------------+
| nova        | Value                                                       |
+-------------+-------------------------------------------------------------+
| adminURL    | http://localhost:8774/v1.1/f17341f0a2a24ec9ec5f9ca497e8c0cc |
| id          | 08eb495c11864f67d4a0e58c8ce53e8b                            |
| internalURL | http://localhost:8774/v1.1/f17341f0a2a24ec9ec5f9ca497e8c0cc |
| publicURL   | http://localhost:8774/v1.1/f17341f0a2a24ec9ec5f9ca497e8c0cc |
| region      | RegionOne                                                   |
| serviceName | nova                                                        |
+-------------+-------------------------------------------------------------+
+-------------+----------------------------------+
| neutron     | Value                            |
+-------------+----------------------------------+
| adminURL    | http://localhost:9696/           |
| id          | 96e693c539c0ca3ee5f0c04e958c33fe |
| internalURL | http://localhost:9696/           |
| publicURL   | http://localhost:9696/           |
| region      | RegionOne                        |
+-------------+----------------------------------+
+-------------+----------------------------------+
| glance      | Value                            |
+-------------+----------------------------------+
| adminURL    | http://localhost:9292            |
| id          | 121ad7a65c0fce83834583b2c0c7c3fb |
| internalURL | http://localhost:9292            |
| publicURL   | http://localhost:9292            |
| region      | RegionOne                        |
+-------------+----------------------------------+
+-------------+-----------------------------------------------------------+
| cinder      | Value                                                     |
+-------------+-----------------------------------------------------------+
| adminURL    | http://localhost:8776/v1/f17341f0a2a24ec9ec5f9ca497e8c0cc |
| id          | ee83dab8b39d4d0ad480a75cadb965dc                          |
| internalURL | http://localhost:8776/v1/f17341f0a2a24ec9ec5f9ca497e8c0cc |
| publicURL   | http://localhost:8776/v1/f17341f0a2a24ec9ec5f9ca497e8c0cc |
| region      | RegionOne                                                 |
+-------------+-----------------------------------------------------------+
+-------------+--------------------------------------+
| ec2         | Value                                |
+-------------+--------------------------------------+
| adminURL    | http://localhost:8773/services/Admin |
| id          | 1558b719141ae2fed54ff0bfe80cb646     |
| internalURL | http://localhost:8773/services/Cloud |
| publicURL   | http://localhost:8773/services/Cloud |
| region      | RegionOne                            |
+-------------+--------------------------------------+
+-------------+----------------------------------------------------------------+
| swift       | Value                                                          |
+-------------+----------------------------------------------------------------+
| adminURL    | http://localhost:8080/v1                                       |
| id          | 51f1908de52f68af984c849985924e0b                               |
| internalURL | http://localhost:8080/v1/AUTH_f17341f0a2a24ec9ec5f9ca497e8c0cc |
| publicURL   | http://localhost:8080/v1/AUTH_f17341f0a2a24ec9ec5f9ca497e8c0cc |
| region      | RegionOne                                                      |
+-------------+----------------------------------------------------------------+
+-------------+----------------------------------+
| keystone    | Value                            |
+-------------+----------------------------------+
| adminURL    | http://localhost:35357/v2.0      |
| id          | 371c73559bd842d6b961d021eeeaa2e5 |
| internalURL | http://localhost:5000/v2.0       |
| publicURL   | http://localhost:5000/v2.0       |
| region      | RegionOne                        |
+-------------+----------------------------------+
It looks like its functioning properly, so we can continue.
Exercise 5: Configuring Cinder
Cinder provides block storage in OpenStack—typically, the storage that you would use to attach to compute instances. As before, we need to configure and enable several services:
# ./hol_single_host.py cinder
configuring cinder
# svcadm enable -rs cinder-api cinder-db cinder-scheduler cinder-volume:setup cinder-volume:default
Again, let's double-check that everything is working OK:
# export OS_AUTH_URL=http://localhost:5000/v2.0/
# export OS_PASSWORD=cinder
# export OS_USERNAME=cinder
# export OS_TENANT_NAME=service
# cinder list
+----+--------+--------------+------+-------------+----------+-------------+
| ID | Status | Display Name | Size | Volume Type | Bootable | Attached to |
+----+--------+--------------+------+-------------+----------+-------------+
+----+--------+--------------+------+-------------+----------+-------------+
This looks correct, because we have not allocated any block storage yet.
Exercise 6: Configuring Neutron
Neutron provides networking capabilities in OpenStack, enabling VMs to talk to each other within the same tenants and subnets, and to talk directly to the outside world. This is achieved using a number of different services. Behind the Oracle Solaris implementation is the Elastic Virtual Switch (EVS), which provides the necessary plumbing to span multiple compute nodes and route traffic appropriately. We need to do some configuration outside of OpenStack to provide a level of trust between the EVS and Neutron using SSH keys and rad.
Let's first generate SSH keys for the evsuser, neutron, and root users:
# su - evsuser -c "ssh-keygen -N '' -f /var/user/evsuser/.ssh/id_rsa -t rsa"
Generating public/private rsa key pair.
Your identification has been saved in /var/user/evsuser/.ssh/id_rsa.
Your public key has been saved in /var/user/evsuser/.ssh/id_rsa.pub.
The key fingerprint is:
13:cb:06:c4:88:5e:10:7d:84:8b:c8:38:30:83:89:9f evsuser@solaris
# su - neutron -c "ssh-keygen -N '' -f /var/lib/neutron/.ssh/id_rsa -t rsa"
Generating public/private rsa key pair.
Created directory '/var/lib/neutron/.ssh'.
Your identification has been saved in /var/lib/neutron/.ssh/id_rsa.
Your public key has been saved in /var/lib/neutron/.ssh/id_rsa.pub.
The key fingerprint is:
13:d6:ef:22:4b:f0:cf:9f:14:e3:ee:50:05:1a:c7:a5 neutron@solaris
# ssh-keygen -N '' -f /root/.ssh/id_rsa -t rsa
Generating public/private rsa key pair.
Created directory '/root/.ssh'.
Your identification has been saved in /root/.ssh/id_rsa.
Your public key has been saved in /root/.ssh/id_rsa.pub.
The key fingerprint is:
c1:6f:a5:38:fc:11:85:16:ad:1d:ad:cd:2f:38:ce:26 root@solaris
We then need to take the various SSH public keys and include them in authorized_keys to provide password-less access between these services:
# cat /var/user/evsuser/.ssh/id_rsa.pub /var/lib/neutron/.ssh/id_rsa.pub /root/.ssh/id_rsa.pub \
>> /var/user/evsuser/.ssh/authorized_keys
Finally, we need to quickly log in to these services and answer the one-time prompt:
# su - evsuser -c "ssh evsuser@localhost true"
The authenticity of host 'localhost (::1)' can't be established.
RSA key fingerprint is 36:9b:74:4b:e9:57:11:70:bc:71:d6:4d:77:b4:74:b3.
Are you sure you want to continue connecting (yes/no)? yes
Warning: Permanently added 'localhost' (RSA) to the list of known hosts.
# su - neutron -c "ssh evsuser@localhost true"
The authenticity of host 'localhost (::1)' can't be established.
RSA key fingerprint is 36:9b:74:4b:e9:57:11:70:bc:71:d6:4d:77:b4:74:b3.
Are you sure you want to continue connecting (yes/no)? yes
Warning: Permanently added 'localhost' (RSA) to the list of known hosts.
# ssh evsuser@localhost true
The authenticity of host 'localhost (::1)' can't be established.
RSA key fingerprint is 36:9b:74:4b:e9:57:11:70:bc:71:d6:4d:77:b4:74:b3.
Are you sure you want to continue connecting (yes/no)? yes
Warning: Permanently added 'localhost' (RSA) to the list of known hosts.
Oracle Solaris uses the concept of a controller to manage the EVS across the resources in a data center. The controller is the central point of coordination. We need to configure this node with the appropriate controller configuration (if we were doing this on multiple compute nodes, we'd have to do the same task as many times as there are compute nodes) and initialize the EVS database:
# evsadm set-prop -p controller=ssh://evsuser@localhost
# evsadm
# evsadm show-prop
PROPERTY            PERM VALUE                         DEFAULT
controller          rw   ssh://evsuser@localhost       --
For this setup, we will use VXLANs to appropriately tag our network traffic and provide isolation. We can do this configuration as follows:
# evsadm set-controlprop -p l2-type=vxlan
# evsadm set-controlprop -p vxlan-range=200-300
We also need to set the uplink port for the controller to be net0 (the only NIC available to us):
# evsadm set-controlprop -p uplink-port=net0
# evsadm show-controlprop
PROPERTY            PERM VALUE               DEFAULT             HOST
l2-type             rw   vxlan               vlan                --
uplink-port         rw   net0                --                  --
vlan-range          rw   --                  --                  --
vlan-range-avail    r-   --                  --                  --
vxlan-addr          rw   0.0.0.0             0.0.0.0             --
vxlan-ipvers        rw   v4                  v4                  --
vxlan-mgroup        rw   0.0.0.0             0.0.0.0             --
vxlan-range         rw   200-300             --                  --
vxlan-range-avail   r-   200-300             --                  --
Now that we have done the basic configuration with EVS, we can configure Neutron to use this configuration. We will use the script for convenience.
# ./hol_single_host.py neutron
configuring neutron
# svcadm enable -rs neutron-server neutron-dhcp-agent
Let's test Neutron and make sure things are working:
# export OS_AUTH_URL=http://localhost:5000/v2.0/
# export OS_PASSWORD=neutron
# export OS_USERNAME=neutron
# export OS_TENANT_NAME=service
# neutron net-list
An empty result is expected, because we haven't created any networks yet.
Exercise 7: Configuring Horizon
Finally, we can configure Horizon, which is the web-based dashboard for OpenStack that provides self-service capabilities in a multitenant environment. Let's go ahead and do that using the script.
# ./hol_single_host.py horizon
configuring horizon
# cp /etc/apache2/2.2/samples-conf.d/openstack-dashboard-http.conf /etc/apache2/2.2/conf.d
# svcadm enable apache22
# svcs apache22
STATE          STIME    FMRI
online          1:53:42 svc:/network/http:apache22
Exercise 8: Logging In to Horizon
Within the host environment, open up a browser and navigate to the IP address allocated to you, http://10.158.56.x/horizon. Use admin/secrete as the user/password combination in the login screen.
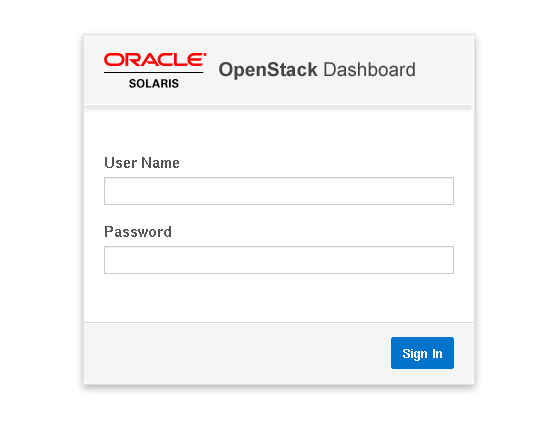
Figure 2. Login screen
After signing in, you will see the main dashboard for the OpenStack administrator. On the left part of the screen you will see two tabs—one that shows the administration panel and another that shows the project panel, which lists the projects that this current user is a member of. You can think of projects as a way to provide organizational groupings.
Instead of launching an instance as an administrator, let's create a new user under the Admin tab. Select Users from the menu to display the following screen.
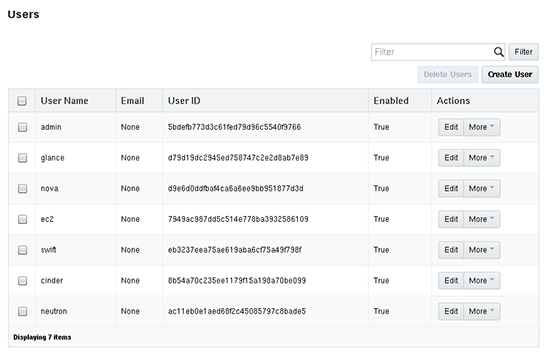
Figure 3. Users screen
We can see that there are a few users already defined; these users either represent the administrator or are for the various OpenStack services.
Click the Create User button and fill in some details for this user (see Figure 4). We will include the new user in the demo project for now, but we could equally have created a new project if we wanted to.
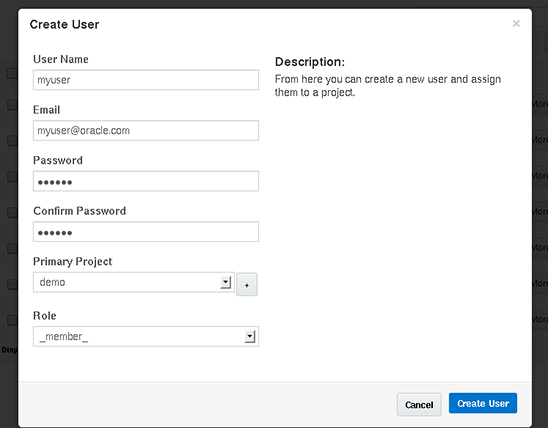
Figure 4. Create User screen
Sign out and log in as this new user.
The next thing we need to do is to add a keypair for our user. Choose Access & Security from the menu to get the following screen:
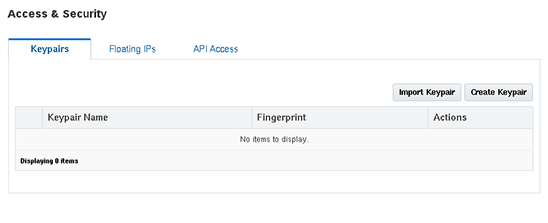
Figure 5. Access & Security screen
There are no keypairs currently defined. Click the Import Keypair button to open the Import Keypair screen, which is shown in Figure 6.
In our case, let's use the SSH public key of our global zone. First, run the following command to get the key, and then enter the key into the Public Key field of the Import Keypair screen.
 root@solaris:~# cat .ssh/id_rsa.pub
ssh-rsa AAAAB3NzaC1yc2EAAAABIwAAAQEA0Khp4Th5VcKQW4LttqzKAR8O60gj43cB0CbdpiizEhXEbVgjI7IlnZl
o9iSEFpJlnZrFQC8MU2L7Hn+CD5nXLT/uK90eAEVXVqwc4Y7IVbEjrABQyB74sGnJy+SHsCGgetjwVrifR9
fkxFHgjxXkOunXrPMe86hDJRpZLJFGYZZezJRtd1eRwVNSHhJdZmUac7cILFJen/wSsM8TOSAkh+ZWEhwY3
o08nZg2IWdMImPbwPwtRohJSH3W7XkDE85d7UZebNJpD9kDAw6OmXsY5CLgV6gEoUExZ/J4k29WOrr1XKR3
jiRqQlf3Kw4YuK9JUi/gPhg2lTOhISgJoelorQ== root@solaris
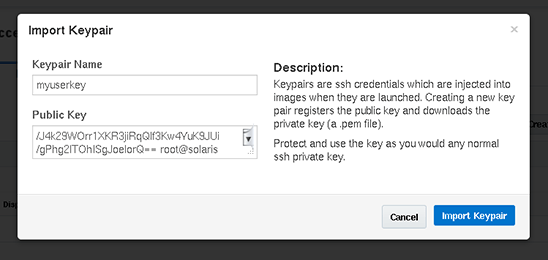
Figure 6. Import Keypair screen
After successfully importing the SSH keypair, let's now create a network for this instance. Choose Networks from the menu to get the following screen:
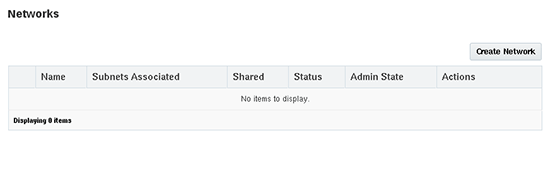
Figure 7. Networks screen
There are no networks currently defined, so let's create a network. First, click the Create Network button.
Let's create a network called mynetwork with a subnet called mysubnet using the 192.168.x.0/24 address range. This means that instances that choose this network will be created within this range starting at 192.168.x.3.
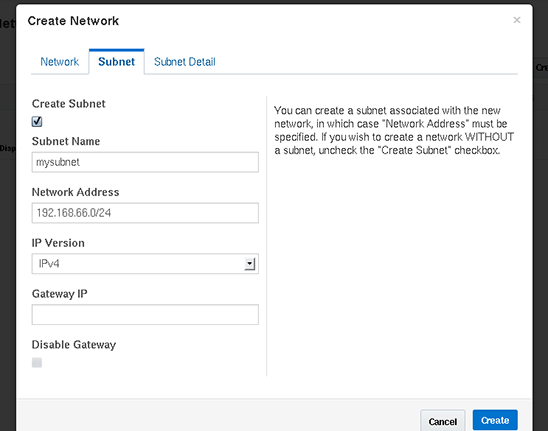
Figure 8. Create Network screen
After we create our network, we should see it listed in the Networks screen:
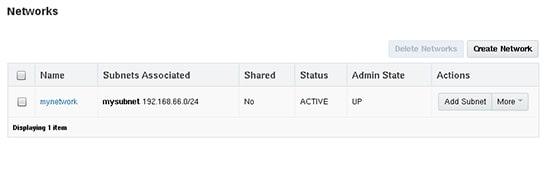
Figure 9. Networks screen showing the created network
Now we are ready to launch a new instance. Choose Instances from the menu to get the following screen:
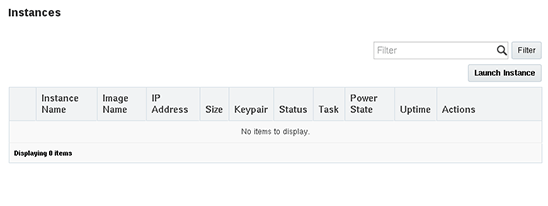
Figure 10. Instance screen
Exercise 9: Launching an Instance
Let's launch a new instance. First, click the Launch Instance button.
We will call our instance myinstance. We will give it an Oracle Solaris non-global zone flavor called tiny. A flavor represents the size of the resources that we should give this instance. We can see in Figure 11 that we will get a root disk of 10 GB and 2,048 MB of RAM. We will choose to boot this instance from the image we uploaded and stored in Glance, which is called Base Zone.

Figure 11. Launch Instance screen
When we are happy with the contents of the Details tab, we can move onto the Access & Security tab. There, you can see that our keypair has been preselected, so you can immediately move on to the Networking tab. There, select mynetwork as our network. Then click the Launch button.
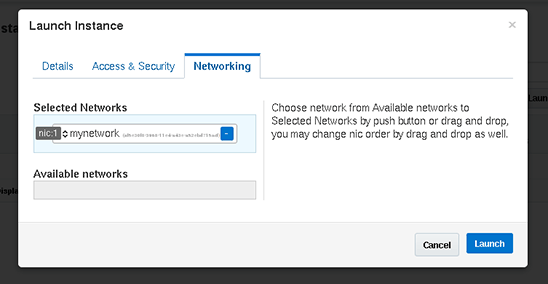
Figure 12. Networking tab
After a little bit of time, we can see that our instance has successfully booted with an IP address of 192.168.x.3.

Figure 13. Screen showing the instance's status is "active"
We are now ready to log in to this instance. In this lab, we took the simple path of just setting up an internal network topology. In a typical cloud environment, we would set up an external network through which VMs could communicate with the outside world. To access these VMs, we will need to access them through the global zone.
root@solaris:~# ssh root@192.168.x.3
The authenticity of host '192.168.66.3 (192.168.66.3)' can't be established.
RSA key fingerprint is 89:64:96:91:67:ab:6b:35:58:37:35:b8:ab:f3:e5:98.
Are you sure you want to continue connecting (yes/no)? yes
Warning: Permanently added '192.168.66.3' (RSA) to the list of known hosts.
Last login: Thu Sep 11 00:33:57 2014
Oracle Corporation      SunOS 5.11      11.2    June 2014
root@host-192-168-66-3:~# ipadm
NAME              CLASS/TYPE STATE        UNDER      ADDR
lo0               loopback   ok           --         --
   lo0/v4         static     ok           --         127.0.0.1/8
   lo0/v6         static     ok           --         ::1/128
net0              ip         ok           --         --
   net0/dhcp      inherited  ok           --         192.168.66.3/24
root@host-192-168-66-3:~# exit
logout
Connection to 192.168.66.3 closed.
Exercise 10: Exploring Behind the Scenes
From the global zone, let's see what has been created with OpenStack. Let's first check to see what zones have been created:
root@solaris:~# zoneadm list -cv
  ID NAME             STATUS      PATH                         BRAND      IP
   0 global           running     /                            solaris    shared
   2 instance-00000001 running     /system/zones/instance-00000002 solaris    excl
Listing 1
In Listing 1, we can see that we have one non-global zone successfully running which corresponds to our Nova instance. Let's now check to see what networks have been created for this:
root@solaris:~# ipadm
NAME              CLASS/TYPE STATE        UNDER      ADDR
evsaf75747a_3_0   ip         ok           --         --
   evsaf75747a_3_0/v4 static ok           --         192.168.66.2/24
lo0               loopback   ok           --         --
   lo0/v4         static     ok           --         127.0.0.1/8
   lo0/v6         static     ok           --         ::1/128
net0              ip         ok           --         --
   net0/v4        static     ok           --         10.158.56.70/24
Listing 2
From Listing 2, we can see that there is a new NIC. Given that we had only one physical NIC in this VM earlier, we can guess that it's a virtual NIC. Let's confirm this:
root@solaris:~# dladm show-vnic
LINK                OVER              SPEED  MACADDRESS        MACADDRTYPE VIDS
evsaf75747a_3_0     evs-vxlan200      1000   2:8:20:6d:cb:f4   fixed       0
instance-00000002/net0 evs-vxlan200   1000   2:8:20:72:63:4a   fixed       0
Listing 3
In Listing 3, we can see it is a VNIC, but we can also see that a VNIC has been created for our new instance. Now let's check to see what configuration has been made in EVS:
root@solaris:/rpool# evsadm show-evs
EVS           TENANT        STATUS NVPORTS IPNETS      HOST
mynetwork     49068a0d5bce6f8780e7bb786feb9d75 busy 2 mysubnet solaris
Listing 4
In Listing 4, we can see that a single elastic virtual switch has been created. Let's take a look at the IP network for this subnet:
root@solaris:/rpool# evsadm show-ipnet
NAME                TENANT        SUBNET            DEFROUTER         AVAILRANGE
mynetwork/mysubnet  49068a0d5bce6f8780e7bb786feb9d75 192.168.66.0/24 192.168.66.1 192.168.66.4-192.168.66.254
Listing 5
In Listing 5, we can see that we have created a subnet of 192.168.x.0/24 with a default router of 192.168.x.1. We can see how this virtual switch is plumbed by looking at the virtual ports attached to it (see Listing 6):
root@solaris:~# evsadm show-vport
NAME                TENANT        STATUS VNIC         HOST
mynetwork/af75747a396811e4a440a52ebd715acf 49068a0d5bce6f8780e7bb786feb9d75 used evsaf75747a_3_0 solaris
mynetwork/1fd1bb30397211e4962c317e4dba6ecd 49068a0d5bce6f8780e7bb786feb9d75 used instance-00000005/net0 solaris
Listing 6
And, finally, we can take a look at the properties of the elastic virtual switch (see Listing 7).
root@solaris:~# evsadm show-evsprop
EVS           TENANT        PROPERTY  PERM VALUE     DEFAULT   POSSIBLE
mynetwork     49068a0d5bce6f8780e7bb786feb9d75 maxbw rw -- --  --
mynetwork     49068a0d5bce6f8780e7bb786feb9d75 priority rw -- medium low,medium,
                                                               high
mynetwork     49068a0d5bce6f8780e7bb786feb9d75 l2-type r- vxlan -- --
mynetwork     49068a0d5bce6f8780e7bb786feb9d75 vlanid r- -- -- --
mynetwork     49068a0d5bce6f8780e7bb786feb9d75 vni r- 200 --   --
mynetwork     49068a0d5bce6f8780e7bb786feb9d75 tenant r- 49068a0d5bce6f8780e7bb786feb9d75 -- --
Listing 7
Let's visit the Volumes menu under the Admin tab again and provision some block storage. After creating myvolume with a size of 1GB, we can see the following screen:

Figure 14. Volumes screen
When we look at the global zone again using the zfs list command (see Listing 8), we can see that a new data set has been created under rpool/cinder. This is due to the fact that the default Cinder plugin is a basic ZFS volume driver, which provisions ZFS data sets from rpool.
root@solaris:/# zfs list | grep cinder
rpool/cinder                                                            1.03G  24.5G    31K  /rpool/cinder
rpool/cinder/volume-25f4c9b0-2645-cecd-e13d-e76d371d026f                1.03G  25.5G    16K  -
Listing 8
We can configure Cinder to provision volumes over iSCSI or FC, or directly from an Oracle ZFS Storage Appliance.
Congratulations on making it this far and finishing the lab. If you have the time and interest to continue, try taking on the additional exercises below. Thanks again for joining us!
Additional Exercises
In this lab, we configured a private network for VMs to communicate with on the 192.168.x.0/24 address space. See if you can configure Neutron and EVS to allow the VMs to ping the host at 10.158.56.x.
Hint: You will need to use the neutron-l3-agent service.
Swift is a service that provides object storage in OpenStack. We didn't cover it in this lab, but see if you can set up Swift to provide object storage to your instances.
Appendix—OpenStack hol_single_host.py Configuration Script
#!/usr/bin/python

# Copyright (c) 2013, 2014, Oracle and/or its affiliates. All rights reserved.
#
#    Licensed under the Apache License, Version 2.0 (the "License"); you may
#    not use this file except in compliance with the License. You may obtain
#    a copy of the License at
#
#         http://www.apache.org/licenses/LICENSE-2.0
#
#    Unless required by applicable law or agreed to in writing, software
#    distributed under the License is distributed on an "AS IS" BASIS, WITHOUT
#    WARRANTIES OR CONDITIONS OF ANY KIND, either express or implied. See the
#    License for the specific language governing permissions and limitations
#    under the License.

import ConfigParser
import grp
import os
import pwd
import shutil
import sys
import time

import netifaces

from M2Crypto import RSA
from subprocess import CalledProcessError, Popen, PIPE, check_call

def keystone():
    print "configuring keystone"
    config = ConfigParser.RawConfigParser()
    config.readfp(open("/etc/keystone/keystone.conf"))
    config.set("DEFAULT", "admin_token", "ADMIN")
    config.set("identity", "driver", "keystone.identity.backends.sql.Identity")
    config.set("catalog", "driver", "keystone.catalog.backends.sql.Catalog")
    config.set("token", "provider", "keystone.token.providers.uuid.Provider")
    config.set("signing", "token_format", "UUID")
    with open("/etc/keystone/keystone.conf", "wb") as fh:
        config.write(fh)

def glance():
    print "configuring glance"

    config = ConfigParser.RawConfigParser()
    config.readfp(open("/etc/glance/glance-api.conf"))
    config.set("keystone_authtoken", "admin_tenant_name", "service")
    config.set("keystone_authtoken", "admin_user", "glance")
    config.set("keystone_authtoken", "admin_password", "glance")
    with open("/etc/glance/glance-api.conf", "wb") as fh:
        config.write(fh)

    config = ConfigParser.RawConfigParser()
    config.readfp(open("/etc/glance/glance-cache.conf"))
    config.set("DEFAULT", "auth_url", "http://127.0.0.1:5000/v2.0/")
    config.set("DEFAULT", "admin_tenant_name", "service")
    config.set("DEFAULT", "admin_user", "glance")
    config.set("DEFAULT", "admin_password", "glance")
    with open("/etc/glance/glance-cache.conf", "wb") as fh:
        config.write(fh)

    config = ConfigParser.RawConfigParser()
    config.readfp(open("/etc/glance/glance-registry.conf"))
    config.set("keystone_authtoken", "admin_tenant_name", "service")
    config.set("keystone_authtoken", "admin_user", "glance")
    config.set("keystone_authtoken", "admin_password", "glance")
    with open("/etc/glance/glance-registry.conf", "wb") as fh:
        config.write(fh)

    config = ConfigParser.RawConfigParser()
    config.readfp(open("/etc/glance/glance-api-paste.ini"))
    config.set("pipeline:glance-api",
               "pipeline", "versionnegotiation authtoken context apiv1app")
    config.set("filter:authtoken", "auth_host", "127.0.0.1")
    config.set("filter:authtoken", "auth_port", "35357")
    config.set("filter:authtoken", "auth_protocol", "http")
    config.set("filter:authtoken", "admin_tenant_name", "service")
    config.set("filter:authtoken", "admin_user", "glance")
    config.set("filter:authtoken", "admin_password", "glance")
    with open("/etc/glance/glance-api-paste.ini", "wb") as fh:
        config.write(fh)

    config = ConfigParser.RawConfigParser()
    config.readfp(open("/etc/glance/glance-registry-paste.ini"))
    config.set("pipeline:glance-registry",
               "pipeline", "authtoken context apiv1app")
    config.set("filter:authtoken", "auth_host", "127.0.0.1")
    config.set("filter:authtoken", "auth_port", "35357")
    config.set("filter:authtoken", "auth_protocol", "http")
    config.set("filter:authtoken", "admin_tenant_name", "service")
    config.set("filter:authtoken", "admin_user", "glance")
    config.set("filter:authtoken", "admin_password", "glance")
    with open("/etc/glance/glance-registry-paste.ini", "wb") as fh:
        config.write(fh)

    config = ConfigParser.RawConfigParser()
    config.readfp(open("/etc/glance/glance-scrubber.conf"))
    config.set("DEFAULT", "filesystem_store_datadir", "/var/lib/glance/images")
    config.set("DEFAULT", "swift_store_auth_address", "127.0.0.1:5000/v2.0/")
    config.set("DEFAULT", "swift_store_user", "johndoe:johndoe")
    config.set("DEFAULT", "swift_store_key", "a86850deb2742ec3cb41518e26aa2d89")
    config.set("DEFAULT", "s3_store_host", "127.0.0.1:8080/v1.0/")
    config.set("DEFAULT", "s3_store_access_key", '"<20-char AWS access key>"')
    config.set("DEFAULT", "s3_store_secret_key", '"<40-char AWS secret key>"')
    config.set("DEFAULT", "s3_store_bucket", '"<lowercased 20-char aws key>"')
    config.set("DEFAULT", "s3_store_create_bucket_on_put", "False")
    config.set("DEFAULT", "auth_url", "http://127.0.0.1:5000/v2.0/")
    config.set("DEFAULT", "admin_tenant_name", "service")
    config.set("DEFAULT", "admin_user", "glance")
    config.set("DEFAULT", "admin_password", "glance")
    with open("/etc/glance/glance-scrubber.conf", "wb") as fh:
        config.write(fh)

def neutron():
    print "configuring neutron"
    config = ConfigParser.RawConfigParser()
    config.readfp(open("/etc/neutron/neutron.conf"))
    config.set("DEFAULT", "allow_overlapping_ips", "False")

    if not config.has_section("keystone_authtoken"):
        config.add_section("keystone_authtoken")
    config.set("keystone_authtoken", "auth_host", "127.0.0.1")
    config.set("keystone_authtoken", "auth_port", "35357")
    config.set("keystone_authtoken", "auth_protocol", "http")
    config.set("keystone_authtoken", "admin_tenant_name", "service")
    config.set("keystone_authtoken", "admin_user", "neutron")
    config.set("keystone_authtoken", "admin_password", "neutron")
    config.set("keystone_authtoken", "signing_dir",
               "/var/lib/neutron/keystone-signing")
    with open("/etc/neutron/neutron.conf", "wb") as fh:
        config.write(fh)

def nova():
    print "configuring nova"
    config = ConfigParser.RawConfigParser()
    config.readfp(open("/etc/nova/nova.conf"))
    config.set("DEFAULT", "firewall_driver",
               "nova.virt.firewall.NoopFirewallDriver")
    config.set("DEFAULT", "neutron_url", "http://localhost:9696")
    config.set("DEFAULT", "neutron_admin_username", "neutron")
    config.set("DEFAULT", "neutron_admin_password", "neutron")
    config.set("DEFAULT", "neutron_admin_tenant_name", "service")
    config.set("DEFAULT", "neutron_admin_auth_url",
               "http://localhost:5000/v2.0")
    config.set("DEFAULT", "neutron_auth_strategy", "keystone")
    with open("/etc/nova/nova.conf", "wb") as fh:
        config.write(fh)

    config = ConfigParser.RawConfigParser()
    config.readfp(open("/etc/nova/api-paste.ini"))
    config.set("filter:authtoken", "admin_tenant_name", "service")
    config.set("filter:authtoken", "admin_user", "nova")
    config.set("filter:authtoken", "admin_password", "nova")
    with open("/etc/nova/api-paste.ini", "wb") as fh:
        config.write(fh)

def cinder():
    print "configuring cinder"
    config = ConfigParser.RawConfigParser()
    config.readfp(open("/etc/cinder/cinder.conf"))
    config.set("DEFAULT", "my_ip", "localhost")
    config.set("DEFAULT", "scheduler_driver",
               "cinder.scheduler.simple.SimpleScheduler")
    config.set("DEFAULT", "zfs_volume_base", "rpool/cinder")
    with open("/etc/cinder/cinder.conf", "wb") as fh:
        config.write(fh)

    config = ConfigParser.RawConfigParser()
    config.readfp(open("/etc/cinder/api-paste.ini"))
    config.set("filter:authtoken", "admin_tenant_name", "service")
    config.set("filter:authtoken", "admin_user", "cinder")
    config.set("filter:authtoken", "admin_password", "cinder")
    config.set("filter:authtoken", "signing_dir",
               "/var/lib/cinder/keystone-signing")
    with open("/etc/cinder/api-paste.ini", "wb") as fh:
        config.write(fh)

def horizon():
    print "configuring horizon"
    # who loves sed?
    cmd = ["gsed", '-i',
           "-e", "s@SECURE_PROXY_SSL_HEADER@#SECURE_PROXY_SSL_HEADER@",
           "-e", "s@CSRF_COOKIE_SECURE@#CSRF_COOKIE_SECURE@",
           "-e", "s@SESSION_COOKIE_SECURE@#SESSION_COOKIE_SECURE@",
           "-e", "s@from horizon.utils @#from horizon.utils@",
           "-e", "s@SECRET_KEY@#SECRET_KEY@",
           "/etc/openstack_dashboard/local_settings.py"]
    try:
        check_call(cmd)
    except CalledProcessError:
        print "text/gnu-sed not installed: skipping horizon configuration."
        return

def main(args):
    if not args:
     print "hol_single_host.py [args]"
     print "Arguments can be one of: all, keystone, glance, nova, cinder, horizon, neutron"

    if "all" in args:
         args = ["keystone", "glance", "nova", "cinder", "horizon", "swift",
                 "neutron"]

    if "keystone" in args:
        keystone()

    if "glance" in args:
        glance()

    if "nova" in args:
        nova()

    if "cinder" in args:
        cinder()

    if "horizon" in args:
        horizon()

    if "neutron" in args:
        neutron()

if __name__ == "__main__":
    main(sys.argv[1:])
See Also
see these additional resources:
- Download Oracle Solaris 11
- Access Oracle Solaris 11 product documentation
- Access all Oracle Solaris 11 how-to articles
- Learn more with Oracle Solaris 11 training and support
- See the official Oracle Solaris blog
- Check out The Observatory for Oracle Solaris tips and tricks
- Follow Oracle Solaris on Facebook and Twitter
About the Author
Glynn Foster is a principal product manager for Oracle Solaris. He is responsible for a number of technology areas including OpenStack, the Oracle Solaris Image Packaging System, installation, and configuration management.
Revision 1.0, 01/07/2015