How to Virtualize and Deploy Oracle Applications in Minutes with Oracle VM
Hands-On Labs of the System Admin and Developer Community of OTN
by Christophe Pauliat and Olivier Canonge
Published February 2013
This hands-on lab—for application architects or system administrators who need to deploy and manage Oracle Applications—demonstrates how to use Oracle VM Templates to virtualize and deploy complex Oracle Applications in minutes.
- Prerequisites
- Global Lab Architecture
- Exercise 1: Import Oracle RAC 11.2.0.3 Template
- Exercise 2: Create Two Virtual Disks to be Used by Future VMs
- Exercise 3: Create a Virtual Network for Oracle RAC
- Exercise 4: Change the Network Configuration of the Template
- Exercise 5: Create Two Virtual Machines from the Template
- Exercise 6: Add Shared Storage to the Two VMs
- Exercise 7: Deploy a Two-Node Oracle RAC Cluster Using the Deploycluster Tool
- Conclusion
- See Also
- About the Authors
- Acknowledgments
This lab, which is Part 2 of a three-part series, provides step-by-step procedures for downloading and importing Oracle VM Templates, which are preconfigured, pretested, and fully certified for Oracle Applications.
You must have completed Part 1, "Deploying an IaaS Environment with Oracle VM," before you proceed with this lab; otherwise, you will not have some needed files and your environment will not be in the required state. You will reuse the Oracle VM environment you created in Part 1 but use a more sophisticated template to create a two-node Oracle Real Application Clusters (Oracle RAC) cluster. Oracle RAC—which is an option to Oracle Database, Enterprise Edition—is a cluster database with a shared-cache architecture that overcomes the limitations of traditional shared-nothing and shared-disk approaches.
Using Oracle VM Templates to deploy Oracle RAC can reduce deployment time from weeks or days to hours or minutes, because all the guesswork and details for patching, installation, and compatibility are removed from the deployment process. Oracle VM Templates for Oracle RAC can be used to build test or production clusters with any number of nodes, but their default is a two-node cluster.
Note: For more information about the time savings that Oracle VM Templates provide, read the Evaluator Group report "Oracle VM — Quantifying The Value of Application-Driven Virtualization." (PDF)
Part 3 of this series is "Deploying a Cloud Infrastructure with Oracle VM 3.x and the Sun ZFS Storage Appliance."
Prerequisites
This lab can be run at home or at your office on your own laptop, desktop, or server machine. You will need to run Part 1, "Deploying an IaaS Environment with Oracle VM," first to build the needed environment.
In this lab, we use Oracle VM VirtualBox to create two virtual machines that will later be used by Oracle VM Server for x86 and Oracle VM Manager, so that we can install all software components on a single physical machine.
Oracle VM VirtualBox is a free and widely used desktop virtualization tool. It is installed on an x86 operating system (OS) and is available on all the majors x86 operating systems, for example, Microsoft Windows XP, Microsoft Windows 7, many Linux distributions, Apple Mac OS, Oracle Solaris 10, and Oracle Solaris 11. Therefore, the native operating system on the laptop, desktop, server machine used for this lab can be any of these operating systems.
Note: All operations for this lab were tested only on Oracle Linux 6 update 3.
On Linux, Oracle Solaris, and Mac OS machines, you will use ssh and scp to connect and to transfer files. On Windows machines, you will need additional tools such as PuTTY and WinSCP.
In this lab, two layers of virtualization are used to limit the number of physical machines to one:
- Oracle VM VirtualBox
- Oracle VM Server for x86
In addition, two kinds of templates are used, so pay close attention to the instructions to ensure you use the right templates:
- Oracle VM VirtualBox templates
- Oracle VM Templates
Ensure You Have the Minimal Required Configuration
The minimal configuration needed for your laptop, desktop, or server is as follows:
- 16 GB of memory
- Intel or AMD X86 quad-thread processor (quad-core, or dual-core dual-thread)
- 37 GB of disk space to store the files needed to start the lab
- 50 GB of disk space to store the files that will be created during the lab
Download the Required Products
Download the following:
-
Oracle VM Template for Oracle RAC 11.2.0.3.2 and Oracle Linux 6 Update 2 (32 bits) (Paravirtualized). There is also a 64-bit version of the template, but we will use the 32-bit version to save a few minutes during deployment. There are two files:
OVM_OL6U2_X86_11203RAC_PVM-1of2.tgz(578 MB), MD5 checksum 94d9c6e76cc1c47ddfc0b05ecfa2OVM_OL6U2_X86_11203RAC_PVM-2of2.tgz(3.2 GB), MD5 checksum 99dde12d355edcee7a3376a8465e75d3
- Deploycluster tool (v1.1.1), which is an optional tool that helps with Oracle RAC template deployment. There is one file:
RACOVM-Deploycluster-tool.zip(5 MB), MD5 checksum 1dc5f0815ab2c11e0f8239735d409996.
Global Lab Architecture
Figure 1 shows all the components—Oracle VM VirtualBox virtual machines and Oracle VM (OVM) virtual machines—with their names and configuration (memory, IP address, and so on).

Figure 1
Exercise 1: Import Oracle RAC 11.2.0.3 Template
In this exercise, we will import a new Oracle VM Template for Oracle RAC into the Oracle VM Manager we created in Part 1 of this series of labs.
-
Make sure that the Oracle VM Server and Oracle VM Manager virtual machines are running:
In Part 1, we created two virtual machines in Oracle VM VirtualBox:
- Oracle VM Server 3.1.1, which is the server that runs the Oracle VM virtual machines
- Oracle VM Manager 3.1.1, which is the administration console (Web console)
- Check in the Oracle VM VirtualBox console that the two VMs are running. If they are not running, start them and minimize both VMs.
- On your native OS, start a Web browser (Firefox, for instance) and open URL
http://192.168.56.3:7001/ovm/console. -
Log in to the Oracle VM Manager Web console using the following credentials:
- Login: admin
- Password: Welcome1
-
Copy the Oracle RAC 11.2.0.3 Template files to the right directory (
/var/www/html/files) on the Oracle VM Server so that they can be imported into Oracle VM Manager using the HTTP protocol:As seen in Part 1, the most convenient way to import templates into Oracle VM Manager is to use a Web server. That's why we configured an Apache Web server on the Oracle VM Manager.
$ scp OVM_OL6U2_X86_11203RAC_PVM-1of2.tgz root@192.168.56.3:/var/www/html/files $ scp OVM_OL6U2_X86_11203RAC_PVM-2of2.tgz root@192.168.56.3:/var/www/html/filesNotes:
- The root password is
ovsroot. scpis available only on Linux, Oracle Solaris, and Mac OS. If you are using Windows, you need to use WinSCP (freeware that is not installed by default).
- The root password is
-
Import the Oracle RAC 11.2.0.3 Template:
- In Oracle VM Manager, go to the Repositories tab.
- Expand Repositories and myrepo (the repository previously created) by clicking
 .
. - Select VM Templates.
-
Click
 .
.
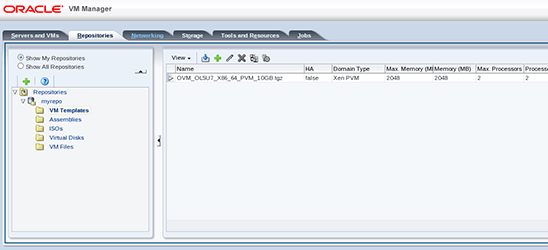
Figure 2
-
Enter the two URLs of the files to be imported:
http://192.168.56.3/files/OVM_OL6U2_X86_11203RAC_PVM-1of2.tgz
http://192.168.56.3/files/OVM_OL6U2_X86_11203RAC_PVM-2of2.tgz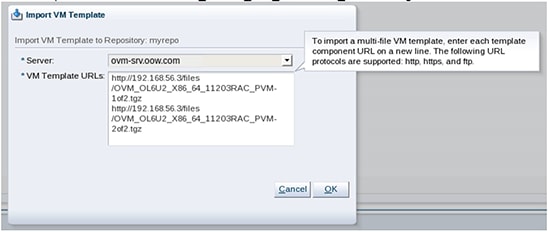
Figure 3
-
Click OK to start the import.
Depending on your hardware configuration, the import may take about 30 minutes.
- The import consists of two steps: download and unpacking.
- You can follow progress in the Jobs summary panel.

Figure 4


Exercise 2: Create Two Virtual Disks to Be Used by Future VMs
Oracle RAC databases will be stored on shared storage (shared between two VMs we will create later). In this step, we will create two shared virtual disks to be used later as shared storage by Oracle RAC.
Note: By default, the Oracle RAC template needs five virtual disks. Here, we will change this to save time.
- Go to the Repositories tab.
- Expand Repositories and myrepo.
- Click Virtual Disks.
- Click
 (in the right panel, next to
  ).
). -
Enter the following parameters and then click OK to create a virtual disk:
- For Virtual Disk Name, enter ASM1.
- For Size, enter 2.0 GB.
- Select Shareable.
- For Allocation Type, select Sparse Allocation.
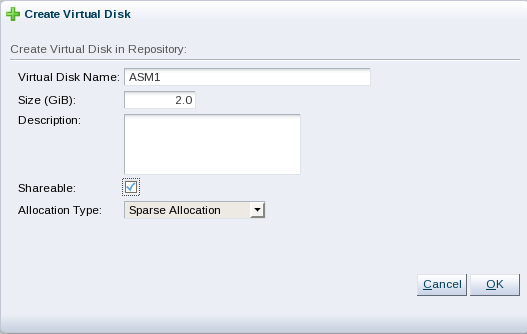
Figure 5
- Repeat this exercise to create a second virtual disk, ASM2.

Exercise 3: Create a Virtual Network for Oracle RAC
-
Go to the Networking tab.
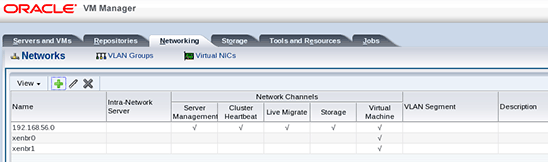
Figure 6
Note: Two new networks (xenbr0 and xenbr1) were created during the Oracle RAC template import. Those networks can be used in Oracle VM 2.x. In Oracle VM 3.1, we will use other networks.
- Click
 to create a new network.
 -
Select Create a network with bonds/ports only.
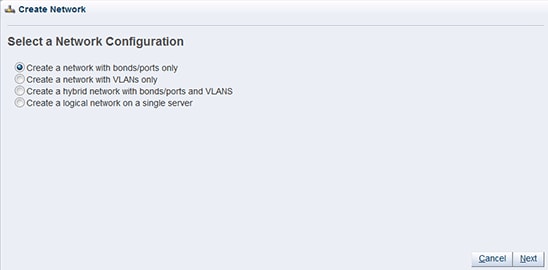
Figure 7
-
Name the network private_rac and select Virtual Machine; then click Next and Finish.

Figure 8
-
Select the server ovm-srv.oow.com and add it to the Selected Servers panel; then click Next.
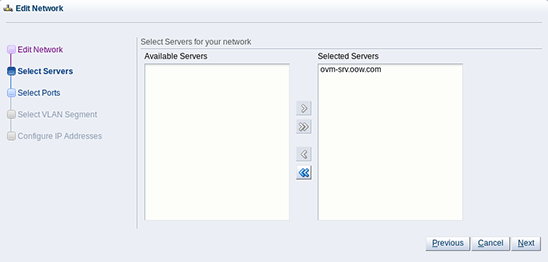
Figure 9
-
Select the available port eth1 and add it to the Selected Ports panel.
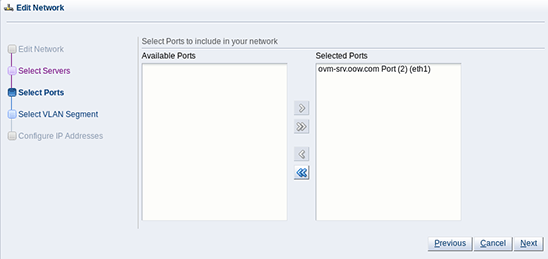
Figure 10
You should now see our new network in the list, as shown in Figure 11.
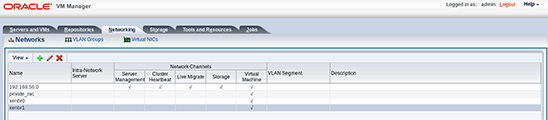
Figure 11


Exercise 4: Change the Network Configuration of the Template
By default, the Oracle RAC template uses Oracle VM 2.x networks (xenbr0 and xenbr1). We need to change the Oracle RAC template to use the 192.68.56.0 network as the public network (first VNIC) and to use private_rac as the Oracle RAC network (second VNIC).
- In the Oracle VM Manager console, go to the Repositories tab.
- Expand Repositories and myrepo.
- Click VM Templates.
- In the right panel, select OVM_OL62_X86_64_11203RAC_PVM-1of2.
- Click
 to edit the template.
 - Select the Networks tab.
-
Change the networks:
- Remove xenbr0 and xenbr1 from the Selected Ethernet Network panel.
- Add 192.168.56.0 as the first VNIC to the Selected Ethernet Network panel.
- Add private_rac as the second VNIC to the Selected Ethernet Network panel.
- Click OK.
Note: The order is important; ensure 192.168.56.0 is listed first and private_rac is listed second, as shown in Figure 12.
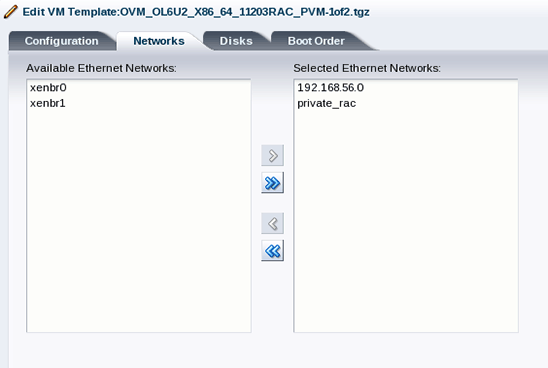
Figure 12

Exercise 5: Create Two Virtual Machines from the Template
- In the Oracle VM Manager console, go to the Servers and VMs tab.
- Expand the server pool named mypool.
-
Right-click the server ovm-srv.oow.com, and then click Create Virtual Machine.
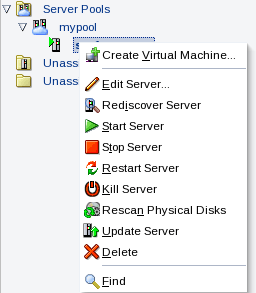
Figure 13
-
Select Clone from an existing VM Template and enter the following information:
- For Clone Count, choose 2.
- For Repository, select myrepo.
- For VM Template, select OVM_OL6U2_X86_64_11203RAC_PVM-1of2.tgz.
- For VM Name, enter rac (suffixes .0 and .1 will be added to get the name of the two VMs resulting in the creation of rac.0 and rac.1).
- For Server Pool, select mypool.
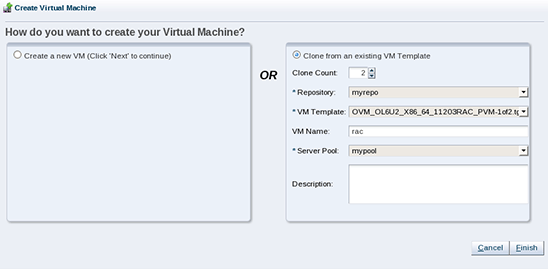
Figure 14
-
Click Finish to start the VM creation.
Note: The VM creation should occur almost immediately since the repository uses OCFS2 file system and the reflink feature. This avoids copying all blocks of the template files, and instead uses pointers to existing blocks in the new files.
You should now see two VMs named rac.0 and rac.1 under mypool-> ovm-srv.oow.com in Perspective view, as shown in Figure 15.

Figure 15
-
Edit both VMs (rac.0 and rac.1) to check that network interfaces are in the correct order (192.168.56.0 first and private_rac second):
-
Select rac.0 and click
 .
.

Figure 16
-
Go to the Networks tab and check the order of the interfaces. The order should be correct (see Figure 17) for this VM; if it is not, change the order.
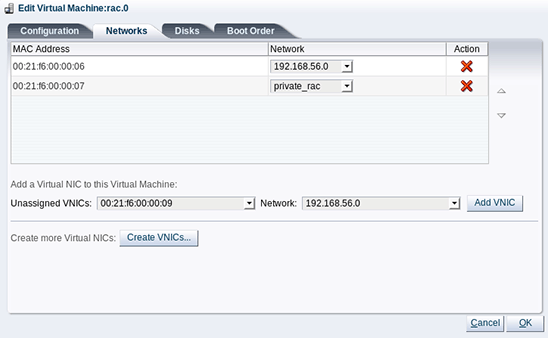
Figure 17
-
Repeat the same actions for VM rac.1. If private_rac is listed first, change it by moving 192.168.56.0 to the upper position, as shown in Figure 18.
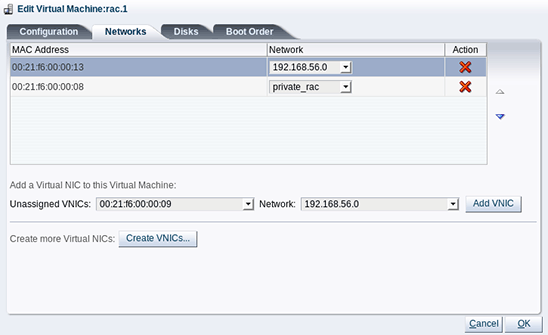
Figure 18
- Click OK.
-
Select rac.0 and click


Exercise 6: Add Shared Storage to the Two VMs
- Select VM rac.0 and click
 to edit the VM.
 - Click the Disks tab.
- In the line corresponding to slot 2, select Virtual Disk.
- Click
 to select an existing virtual disk.
 - Choose ASM1 and click OK.
-
Repeat Step 3 through Step 5 to add virtual disk ASM2 to slot 3.
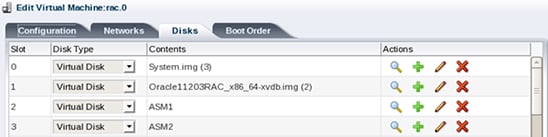
Figure 19
- Repeat Step 1 through Step 6 to add the two virtual disks to the second VM (rac.1).

Exercise 7: Deploy a Two-Node Oracle RAC Cluster Using the Deploycluster Tool
The Deploycluster tool is an optional tool that will help us configure the Oracle RAC cluster on the two VMs.
-
Copy the Deploycluster tool to Oracle VM Manager using the following command:
$ scp RACOVM-Deploycluster-tool.zip root@192.168.56.3:/u01/app/oracle -
Log on to the Oracle VM Manager's Oracle VM VirtualBox virtual machine:
$ ssh root@192.168.56.3 -
Unzip the Deploycluster tool in
/u01/app/oracle:# cd /u01/app/oracle # unzip RACOVM-Deploycluster-tool.zip -
Open the console for VM rac.0 (select VM rac.0 and click
 ).
).

Figure 20
- Open the console for VM rac.1.
-
Create the
netconfig.iniandparams.inifiles in/u01/app/oracleand then deploy the cluster on the two VMs:-
First, use the content shown in Listing 1 to create the
/u01/app/oracle/netconfig.inifile:# Node specific information NODE1=rac0 NODE1IP=192.168.56.100 NODE1PRIV=rac0-priv NODE1PRIVIP=10.0.0.100 NODE1VIP=rac0-vip NODE1VIPIP=192.168.56.101 NODE2=rac1 NODE2IP=192.168.56.110 NODE2PRIV=rac1-priv NODE2PRIVIP=10.0.0.110 NODE2VIP=rac1-vip NODE2VIPIP=192.168.56.111 # Common data PUBADAP=eth0 PUBMASK=255.255.255.0 PUBGW=192.168.56.1 PRIVADAP=eth1 PRIVMASK=255.255.255.0 RACCLUSTERNAME=racoow DOMAINNAME=oow.com DNSIP= # Device used to transfer network information to second node # in interview mode NETCONFIG_DEV=/dev/xvdc # 11gR2 specific data SCANNAME=rac01-scan SCANIP=192.168.56.200Listing 1. Contents of
netconfig.iniFile -
Then copy the file
/u01/app/oracle/deploycluster/utils/params-sample.inito/u01/app/oracle/params.iniand modify the following two lines:ALLDISKS="/dev/xvdc /dev/xvdd" ASM_MIN_DISKS=2 -
Run the following command on one line:
# deploycluster/deploycluster.py -u admin -p Welcome1 -M rac.0,rac.1 -N ./netconfig.ini -P ./params.iniNote: This command will first start the two VMs and launch the Oracle RAC configuration in the background.
-
First, use the content shown in Listing 1 to create the
-
Check the progress of the configuration on the first Oracle RAC node (rac.0) in the log file
/u01/racovm/buildcluster.log:- Open a new terminal window.
-
Run the following command (log on to the rac.0 VM with password ovsroot):
$ ssh root@192.168.56.100 -
Run the following command:
# tail -f /u01/racovm/buildcluster.log
Oracle RAC deployment on both nodes might take about 45 minutes. In a physical environment that has recent x86 hardware, deployment should be complete within 30 minutes.
At the end of the deployment, you should have a two-node Oracle RAC cluster.

Conclusion
This concludes this Part 2 hands-on lab. If you want to go further, see the lab in Part 3 of this series, "Deploying a Cloud Infrastructure with Oracle VM 3.x and the Sun ZFS Storage Appliance," in which we will repeat all the operations from Part 1 using Oracle's Sun ZFS Storage Appliance Simulator (shared storage system) and also Oracle VM's Storage Connect feature (which enables the storage system to be managed directly from the Oracle VM Manager).
See Also
About the Authors
Christophe Pauliat and Olivier Canonge are Systems Sales Consultants for Oracle in France.
Acknowledgments
Special thanks to Kris Bakke, Doan Nguyen, Honglin Su, Simon Coter, Eric Bezille, Michel Kintz, and Greg King for their contributions.
Revision 1.0, 02/03/2013