Transitioning Reports Out Of Business Objects
Purpose
This tutorial covers how to get started with the transition from reporting in Business Objects to reporting in Taleo Oracle Business Intelligence. Specifically, this training provides examples of transitioning Staffing Universe BO reports to Recruiting (Legacy) OBI reports.
Time to Complete
Approximately 1 hour.
Overview
This tutorial is intended for users who want to create reports using Oracle Business Intelligence in Taleo Enterprise Edition to replace reports that are currently in SAP Business Objects.
This tutorial is intended for users who already have an understanding of the Oracle Business Intelligence User Interface.If you are not familiar with Oracle Business Intelligence, take the Getting Started with Oracle Business Intelligence training as a pre-requisite to this training.
Requirements
- The Oracle Business Intelligence Reporting product must be enabled on your zone.
Prerequisites
Before starting this tutorial, you should have the proper user type permissions. The Author Content (BI Developer) permission is recommended. The Access Subject Area - Recruiting permission is also required.
Note From the Author
The field values available, and the rows returned will vary as you are reporting on the information from your zone.
Before You Begin
Before you begin your report transition you may want to consider how you target the reports that you will transition. The following topics are a starting point for determining how you will decide which reports are in-scope for transition.
Request Usage Summary
This topic will cover how to request the Usage Summary Data for your zone. The usage summary can help you identify draft or test reports or remove duplicate or versioned reports based on report names or folders.
|
To request a Usage Summary for your production zone, enter a service request for "Report Refresh Summary on BO Reports". The Usage Summary contains the following information:
|
|---|
Request Scheduled Report Refresh Metadata
This topic will tell you how to request scheduled report refresh metadata. The scheduled report summary can help quick answer questions about distribution method and audience for scheduled reports.
To request a Usage Summary for your production zone, enter a service request for "Scheduled Report Refresh Metadata". The scheduled report refresh metadata contains the following:
|
Inventory Report
Inventory reports to determine which reports to convert and prioritize conversion. The following information is sample information that might be found in an report inventory.
|
Title of the Report: Description or Purpose of the Report:
|
|---|
Survey Internal Users on Usage
The survey should include, but not be limited to the following questions.
|
Which reports do you use? For each report you use:
|
|---|
Testing
Report developers should test in staging and then production before deploying reports to users in production for end user (phased) testing.
|
End users should get training and any necessary materials at the outset or immediately preceding phased testing. During testing at a minimum the following should be validated:
Ensure that if a user is testing a report that has been identified as a duplicate that they have access to the base report in BO (scheduled, if row count is an issue) |
|---|
Education/Training
Training through oracle university should be planned and budgeted with your manager. There are several self service tools you can use on demand and you should budget time to review materials so you know what is available for reference.
|
The following material is available. :
End User Training End users will need training on how to access OBI and Embedded Reporting reports this could be accomplished with a meeting, a tutorial guide with screen shots, or a short video. Testing users may also need training on how to properly do a review of new OBI reports and compare them to BO reports. |
|---|
Pre-development
Choose Your Subject Area
For each query choose the subject area you will convert the query into.
|
For speed and ease of transitions use the Recruiting (Legacy) subject area to convert all Staffing universe queries. Use Performance Management subject area to convert Performance Management Universe queries. Use Recruiting subject area to convert legacy Onboarding queries into contemporary Onboarding queries. |
|---|
Choose Your Reporting Tool:
|
|
If your report is multi-universe: If your report requires:
|
||||||||||
|---|---|---|---|---|---|---|---|---|---|---|---|
|
|
If Your Report is Multi Query:
|
||||||||||
|
. |
If Your Report is Highly Formatted
|
Case Study 1
In this case study we will recreate a multi-query, multi-tabbed report.
Analyze the BO Web Intelligence Document
In this subtopic, you will evaluate the queries and report tabs that make up the web intelligence document and prepare a strategy for proceeding with recreation in OBI.
. |
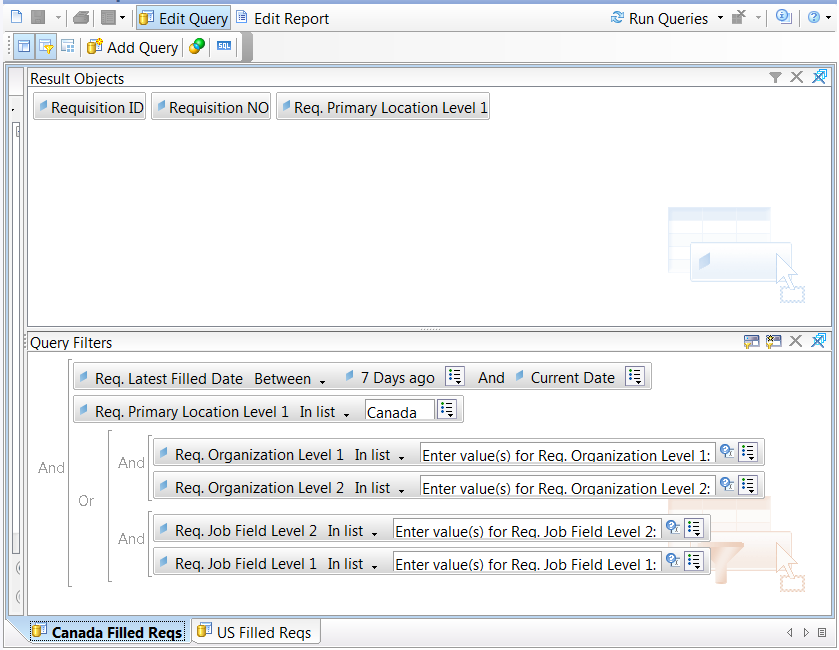
View the queries in Business Objects. Canada Filled Reqs Query
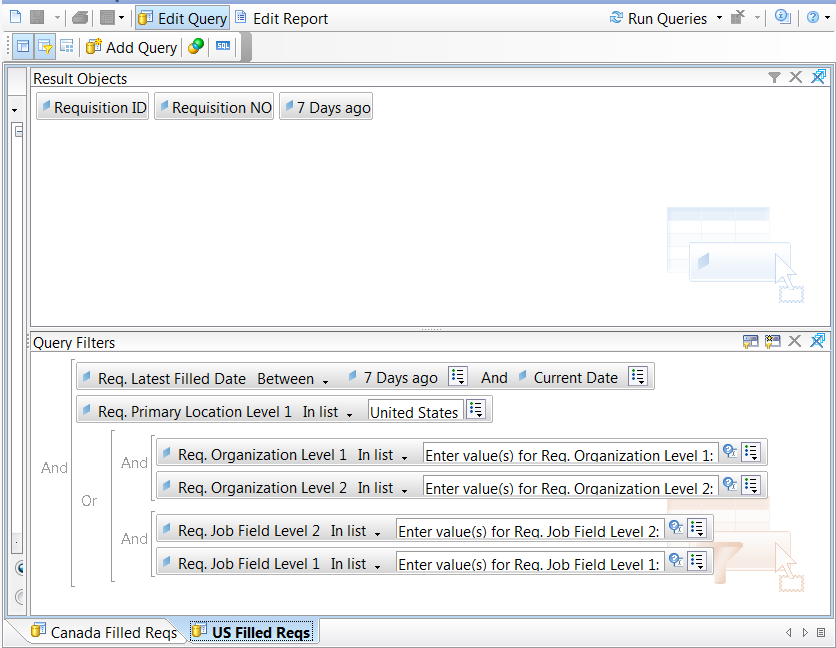
US Filled Reqs Query
|
|---|---|
. |
Observe that both queries contain the same objects and filters except the filter on Req. Primary Location Level 1. |
. |
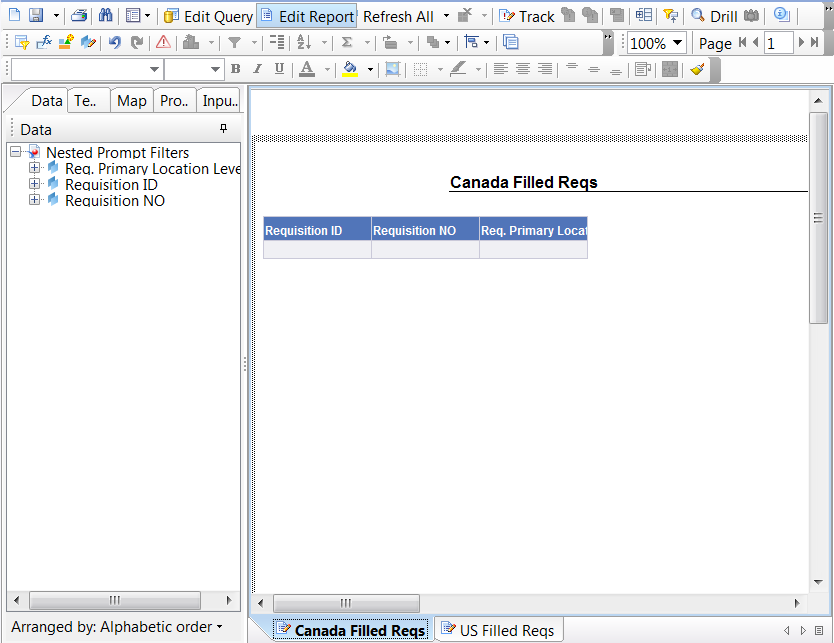
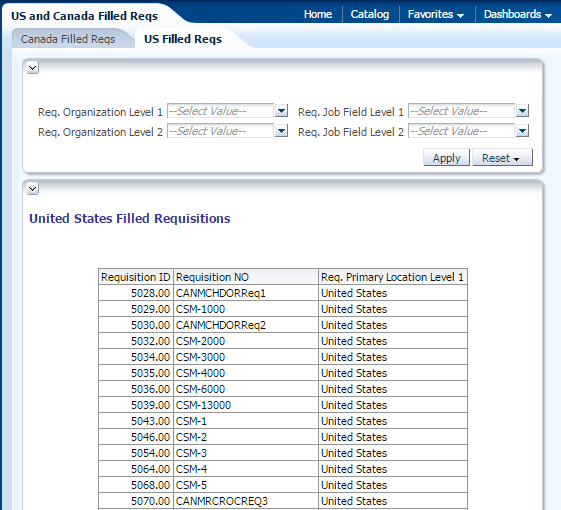
View the report tabs Canada Filled Reqs
US Filled Reqs
|
. |
Observe that both reports contain information from a distinct query. Canada Filled Reqs report tab contains information from Canada Filled Reqs query and US Filled Reqs report tab contains information from US Filled Reqs query. |
. |
Based on my observations I have determined that these reports can be re-created in OBI. |
. |
There are several ways this report could be recreated, but the best approximation for this report will be for me to create a dashboard with a dashboard prompt. I have also made the strategic decision to condense this report into one analysis and use hidden dashboard prompts to account for the different location filters.
We will create:
|
Creating the Dashboard Prompts
|
. |
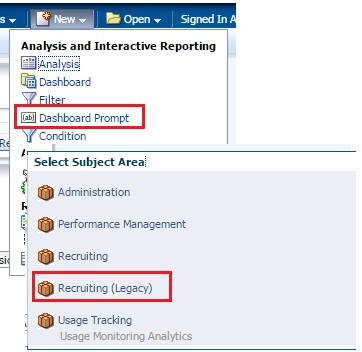
Create a new dashboard prompt and select the Recruiting (Legacy) subject area..
|
|---|---|
|
. |
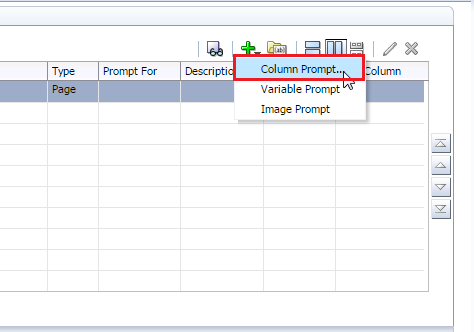
Add a new Column Prompt.
|
|
. |
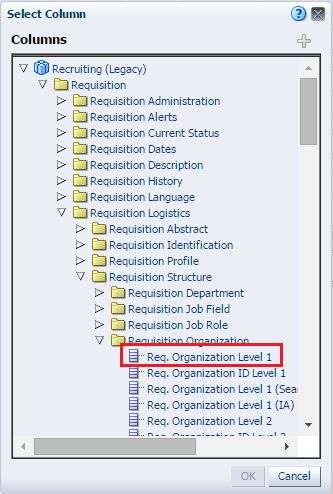
Select Requisition > Requisition Logistics > Requisition Organization > Req. Organization Level 1.
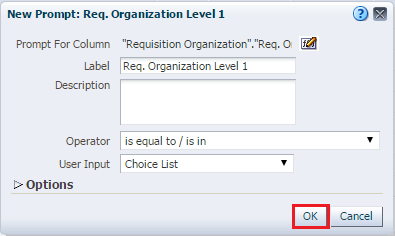
The new prompt dialog displays.
Click OK.
|
|
. |
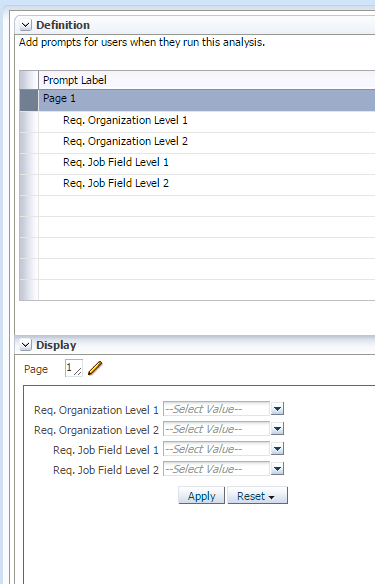
Add column prompts for the additional fields:
Your prompt definition should look like this.
|
|
. |
Create a new column for Req. Job Field Level 1.
|
|
. |
Edit the column prompt for Req. Organization Level 2.
Expand the options and limit the values by Req. Organization Level 1. Note: This is an enhancement that was not present in the BO report
Click OK Repeat this step to limit Req. Job Field Level 2 by Req. Job Field Level 1. |
|
. |
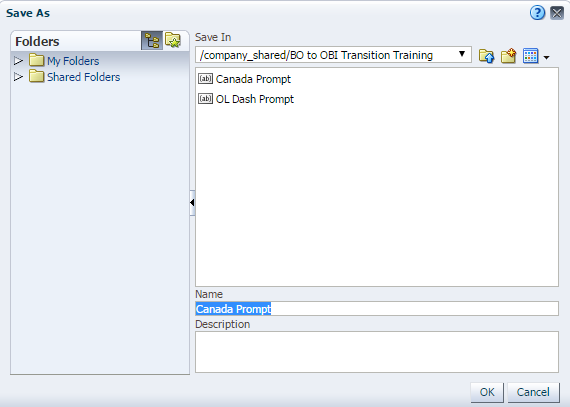
Save the dashboard prompt as OL Dash Prompt in My Company Shared > BO to OBI Transition Training.
|
|
. |
Create a new dashboard prompt and select the Recruiting (Legacy) subject area..
|
|
. |
Add a new Column Prompt.
|
|
. |
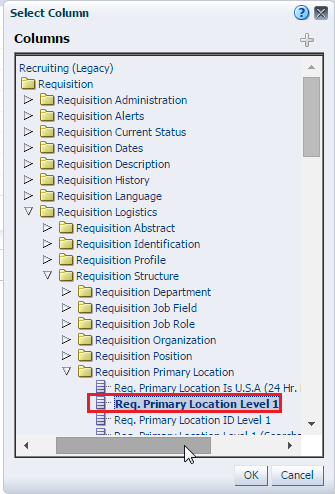
Select Requisition > Requisition Logistics > Requisition Primary Location > Req. Primary Location Level 1.
The new prompt dialog displays.
|
|
. |
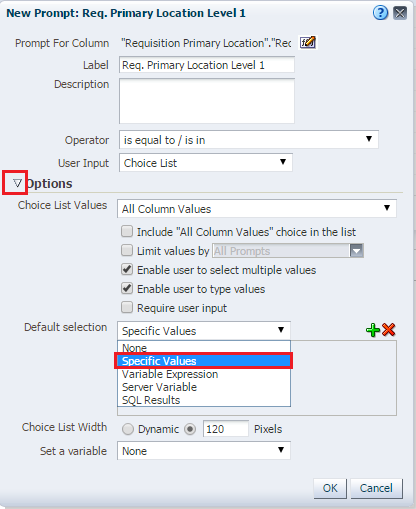
Expand the prompt options and change to default selection to Specific Values.
|
|
. |
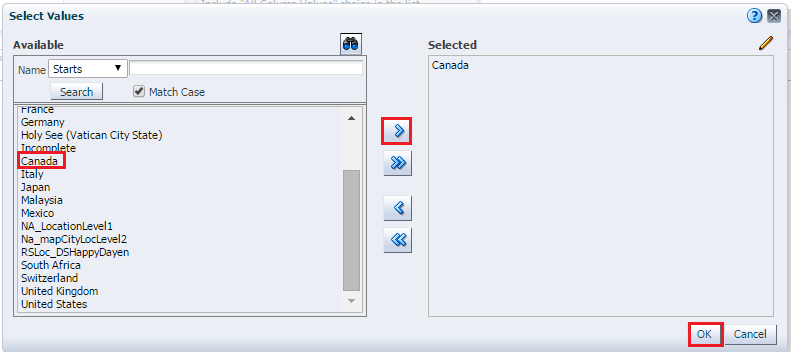
Add a value
Select Canada and shuttle it to the selected area.
Click OKto exit the value selector. |
|
. |
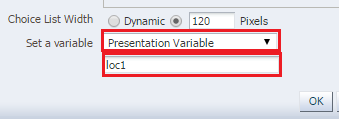
Choose Presentation Variable from the Set A Variable selection. Set the presentation variable to loc1.
Click OKto exit the prompt editor. |
|
. |
Save the dashboard prompt as Canada Prompt.
|
|
. |
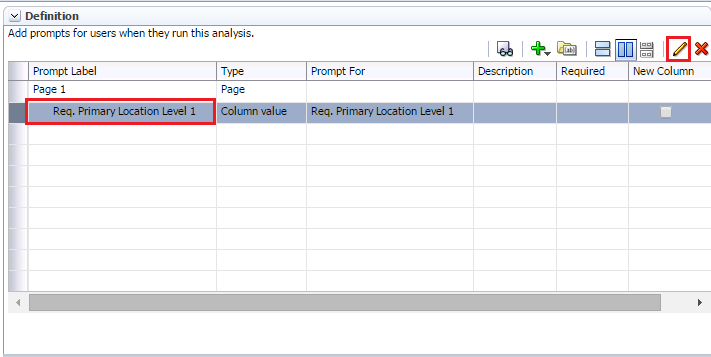
Edit the Req. Primary Location Level 1 column prompt. Set the presentation variable to loc1.
|
|
. |
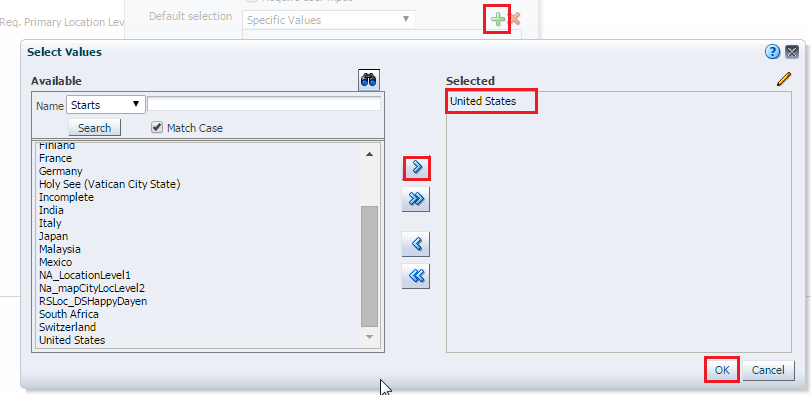
Delete Canada as the default selection.
|
|
. |
Add United States as the default selection.
Click OK to exit the value selector. Click OK to exit the new prompt dialog. |
|
. |
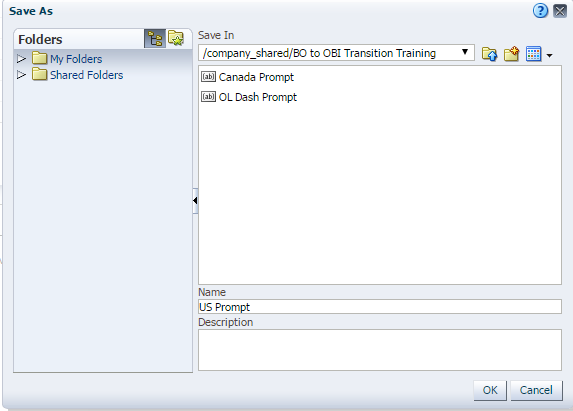
Click Save As and save the dashboard prompt as US Prompt.
Click OK to exit the value selector. Click OK to exit the new prompt dialog. |
Creating the Dashboard Prompt Listener
In this subtopic we will create a named filter to act as a listener for the OL Dash Prompt dashboard prompt.
|
. |
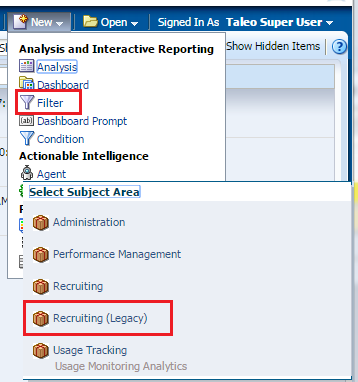
Create a new filter for the Recruiting (Legacy) subject area.
|
|---|---|
|
. |
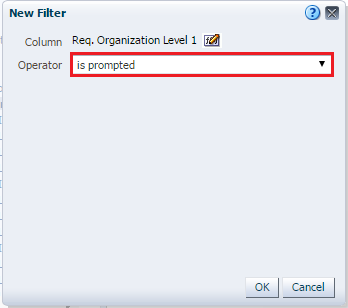
Add Requisition > Requisition Logistics > Requisition Structure > Requisition Organization > Req. Organization Level 1 and set the operator to is prompted.
|
|
. |
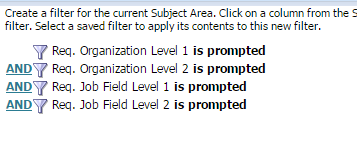
Repeat the previous step and add:
The filters look like this:
|
|
. |
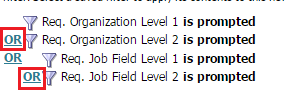
Change the operands from AND to OR by clicking on them.
|
|
. |
Ungroup Req. Organization Level 2 prompt.
|
|
. |
Toggle the operand between Req. Organization level 1 is prompted and Req. Organization Level 2 is prompted from OR to AND, and the operand between Req. Job Field Level 1 and Req. Job Field Level 2 from OR to AND.
The filter should now look like this.
|
|
. |
The OBI named filter is aligned with the logic of the prompt values of the BO filter.
|
|
. |
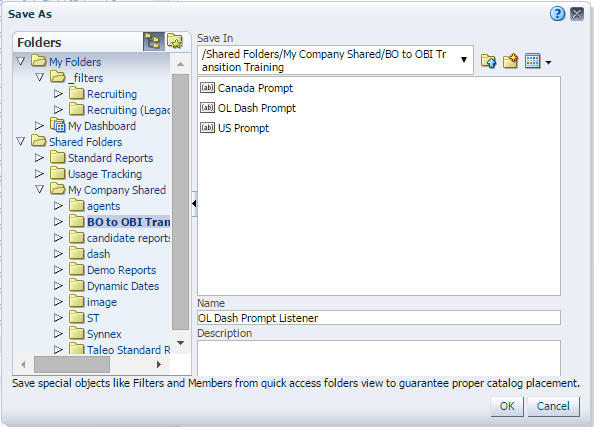
Save the filter as OL Dash Prompt Listener. Confirm that you will save the filter in the selected folder and not in the recommended folder.
|
Creating the Analysis
In this subtopic, you will create the analysis.
|
. |
Create the analysis using theRecruiting (Legacy) subject area.
|
|---|---|
|
. |
Add the following fields to the analysis:
The analysis criteria looks like this: 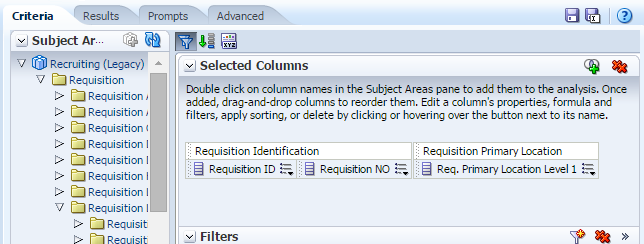
|
|
. |
We will recreate the BO filter Req. Latest Filled Date Between 7 Days ago And Current Date. There are dynamic date filters that can be combined with custom sql to re-create this filter, but we will use the timstampdiff function to recreate this filter. Create a new filter.
|
|
. |
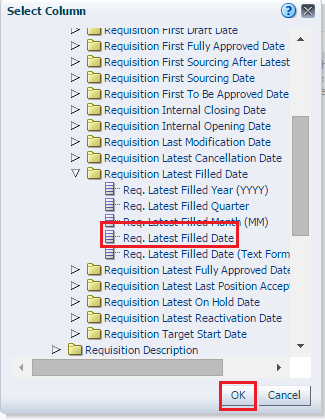
Select the column Requisition > Requisition Latest Filled Date > Req. Latest Filled Date.
Click OK |
|
. |
Edit the column formula.
|
|
. |
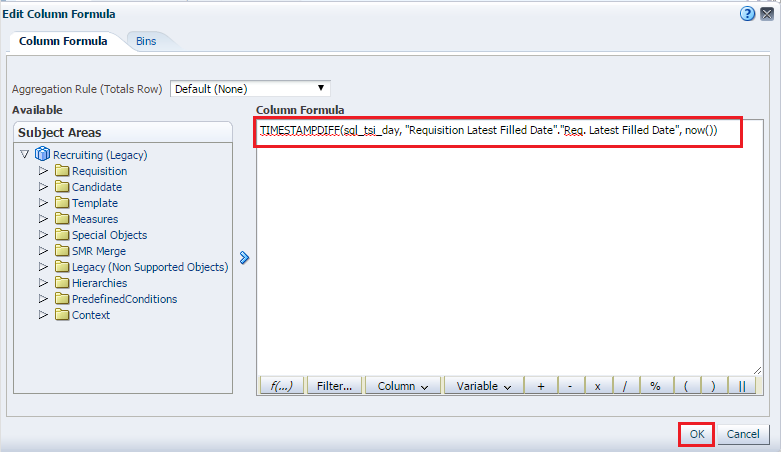
In the formula editor enter the following formula: TIMESTAMPDIFF(sql_tsi_day, "Requisition Latest Filled Date"."Req. Latest Filled Date", now())
|
|
. |
Change the operator to is between and make the values 0 and 7.
|
|
. |
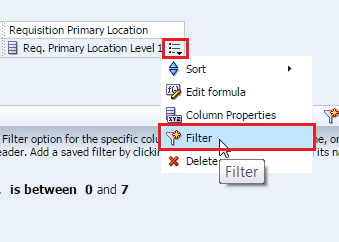
Add a filter for Req. Primary Location Level 1.
|
|
. |
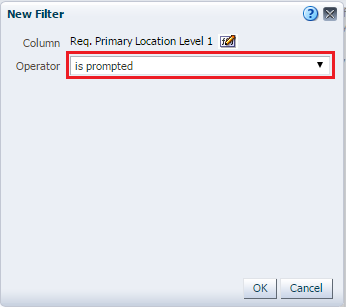
Change the operator to is prompted.
Click OK. |
|
. |
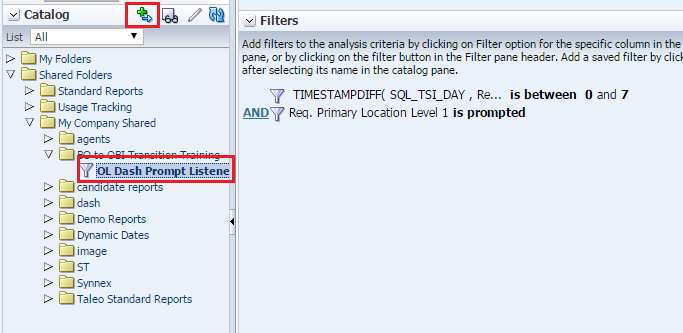
In the catalog pane, navigate to the OL Dash Prompt Listener and shuttle it into the filters pane.
|
|
. |
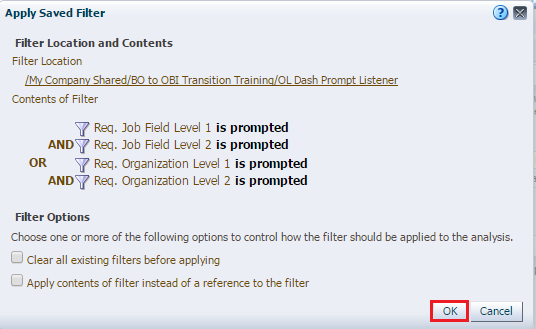
In the Apply Saved Filter dialog leave the defaults selected and click OK.
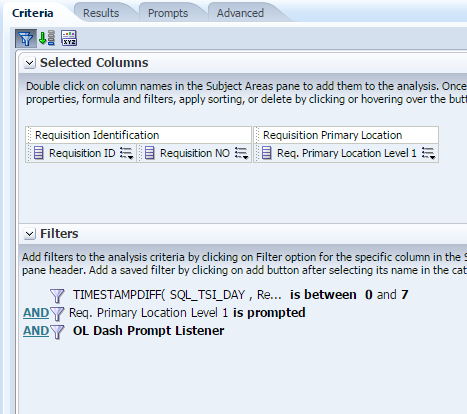
The query criteria looks like this:
|
|
. |
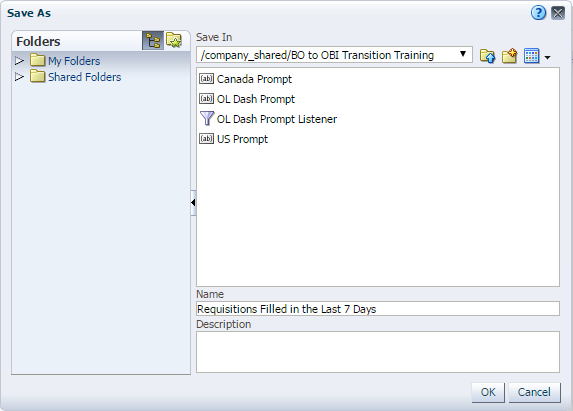
Save the analysis as Requisitions Filled in the Last 7 Days.
|
|
. |
In the results tab edit the title view.
|
|
. |
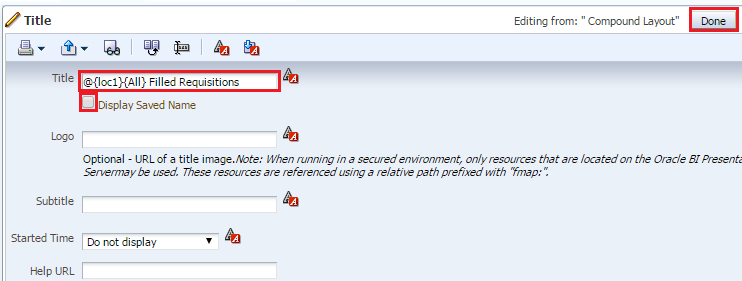
Uncheck Display Saved Name and in the title column enter @{loc1}{All} Filled Requisitions.
Click Done Click Save |
Creating the Dashboard
|
. |
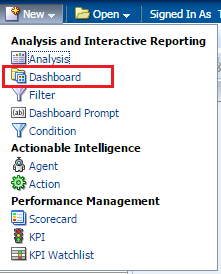
Create a new dashboard.
|
|---|---|
|
. |
Name the dashboard US and Canada Filled Reqs, set the location to /company_shared/BO to OBI Transition Training/ Dashboards, and keep Add content now selected.
Click OK. |
|
. |
From the catalog pane drag and drop the OL Dash Prompt and the Requisitions Filled in the Last 7 days analysis onto the dashboard page.
Save the dashboard. |
|
. |
Add a new dashboard page.
|
|
. |
Name the page US Filled Reqs and click OK.
|
|
. |
From the catalog pane drag and drop the OL Dash Prompt and the Requisitions Filled in the Last 7 days analysis onto the dashboard page.
|
|
. |
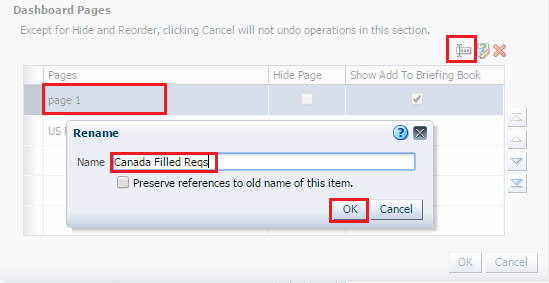
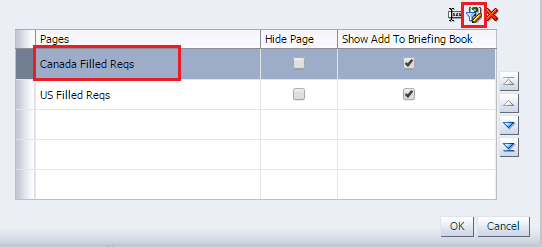
Edit the Dashboard Properties.
|
|
. |
Rename page 1 to Canada Filled Reqs.
Click OK. |
|
. |
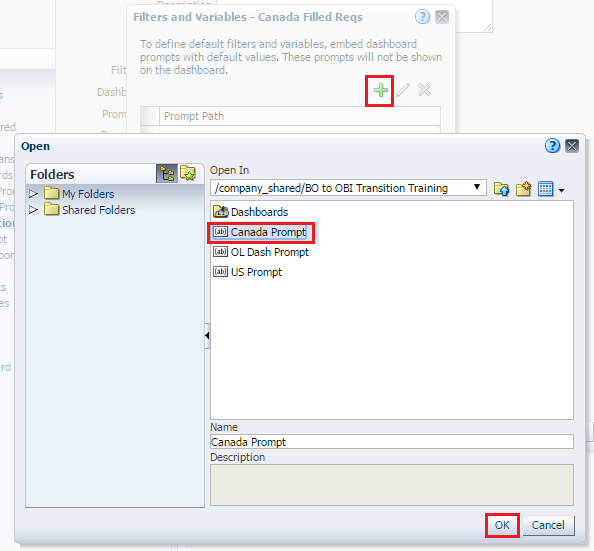
Add a hidden prompt to Canada Filled Reqs. a. Select a prompt to capture default filters and variables.
b. Add the prompt path to Canada Prompt.
c. Click OK.
Repeat steps a through c to add US Prompt to US Filled Reqs page. Click OK. |
|
. |
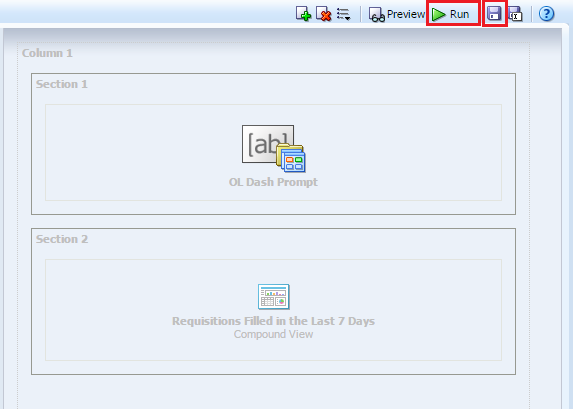
Save the analysis and click Run.
|
|
. |
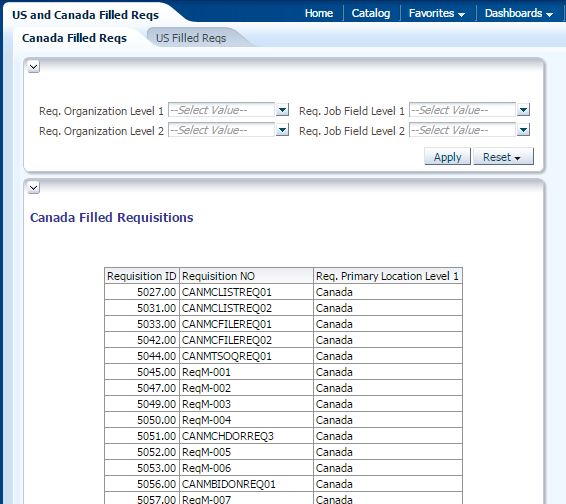
View the dashboard pages. You will see that the hidden prompt values are reflected
|
Case Study 2
In this subtopic, you will evaluate the queries and report tabs that make up the web intelligence document and prepare a strategy for proceeding with recreation in OBI.
Analyze the BO Web Intelligence Document
. |
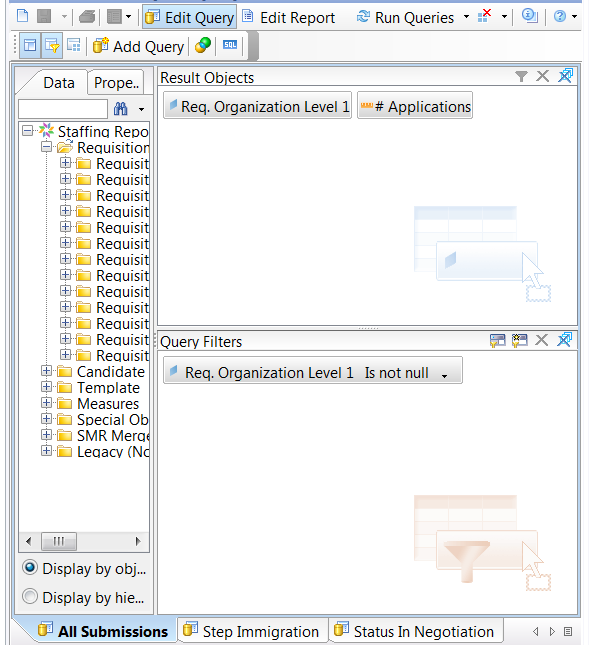
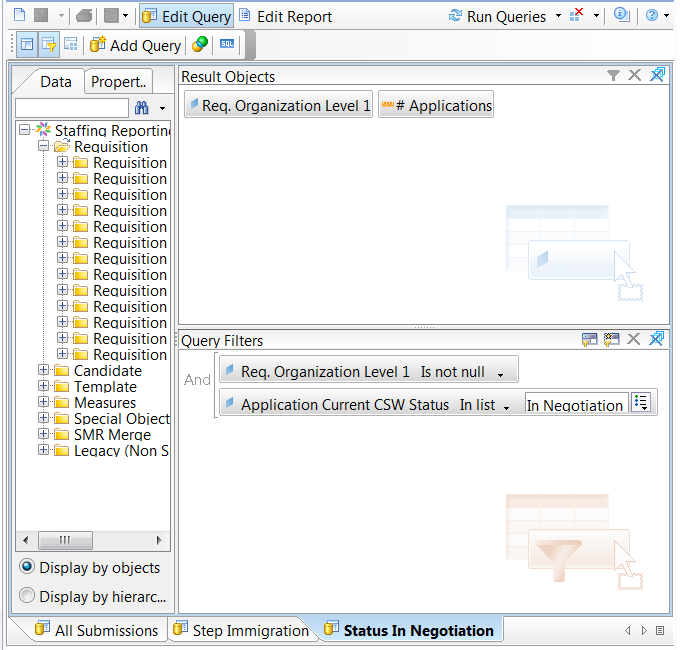
View the Queries in Business Objects. All Submissions
Step Immigration
Status In Negotiation
|
|---|---|
| . |
Observe that all three reports contain the same two result objects, and the filters vary so the # of applications reflect: all submissions, applications in the immigration step, or applications in the negotiation status. |
| . |
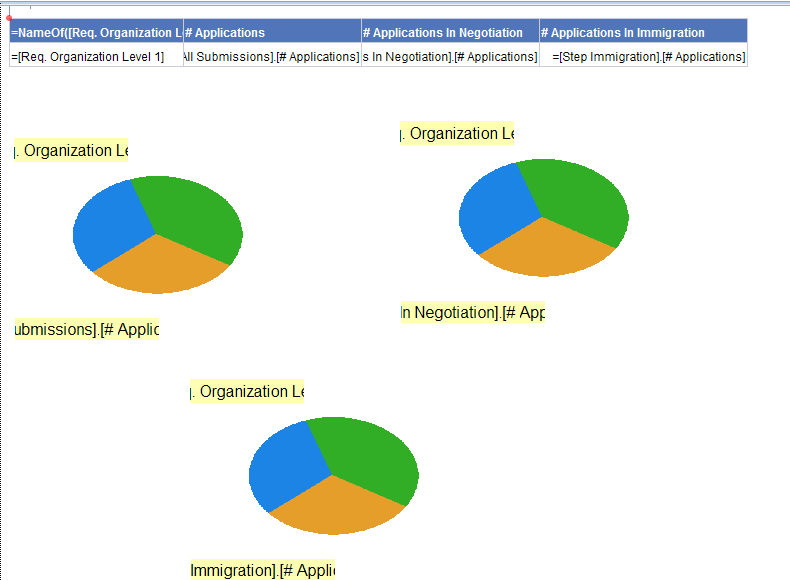
View the report tab.
|
| . |
Observe that all three queries are combined into one report tab which contains: a table with req organization level one and the # of applications, the # of applicatins in negotiation, and the # of applications in immigration; and one pie graph per query with req. organization level on and # of applications in each query. Based on my observations I have determined that this report can be re-created in OBI in one analysis, using custom formulas to account for the different formula combinations that account for the difference in # application counts between the three queries. |
Create the Analysis
|
. |
Create the analysis using theRecruiting (Legacy) subject area.
|
|---|---|
|
. |
Add the following fields to the analysis:
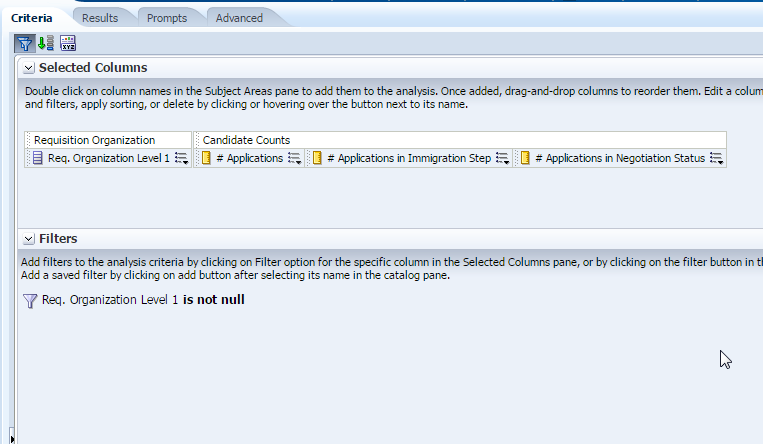
The analysis criteria looks like this: 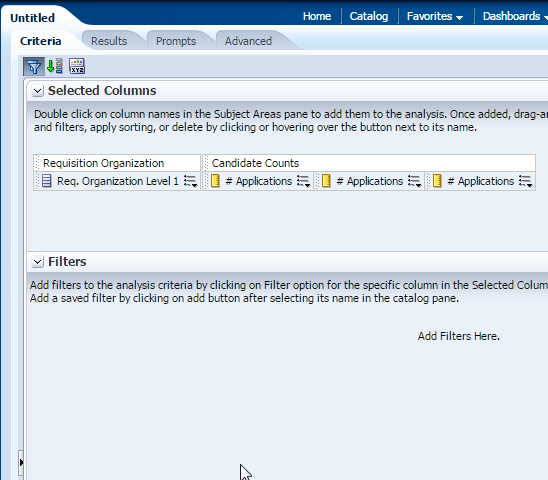
|
. |
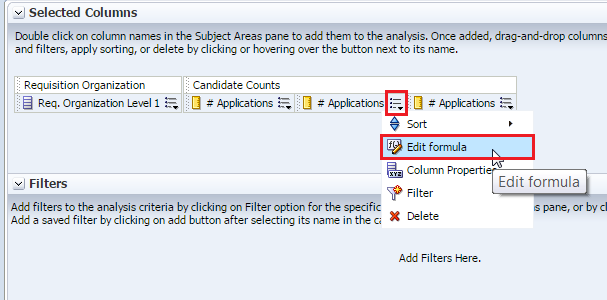
Edit the formula of the second # Applications column.
|
. |
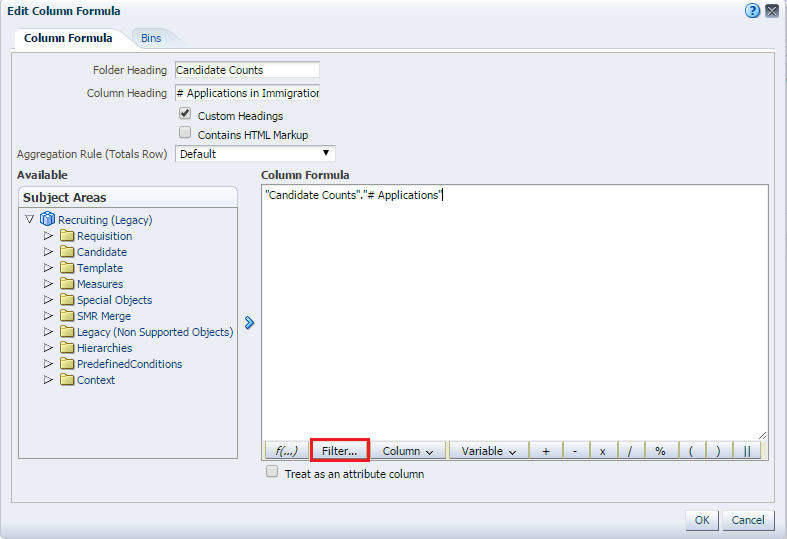
Select Custom Headings and rename the custom # Applications in Immigration Step.
|
. |
Add a Filter.
|
. |
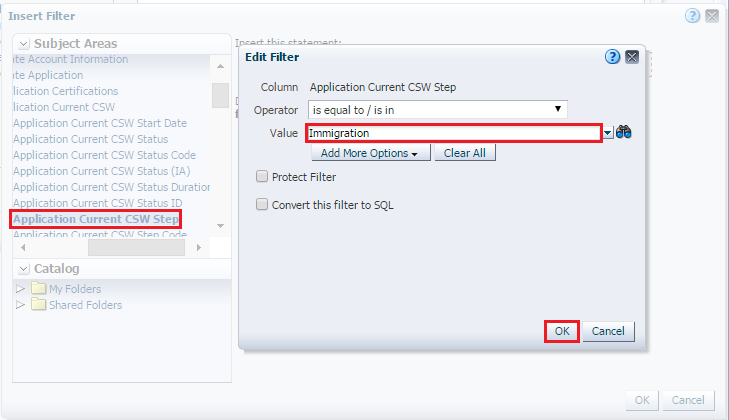
Double click Candidate > Candidate Application > Applicatoin Current CSW > Application Current CSW Step, leave the operator as is equal to / is in and set the value to Immigration.
Click OK. Click OK. The column formula should contain the following expression: FILTER("Candidate Counts"."# Applications" USING ("Application Current CSW"."Application Current CSW Step" = 'Immigration'))
Click OK. |
. |
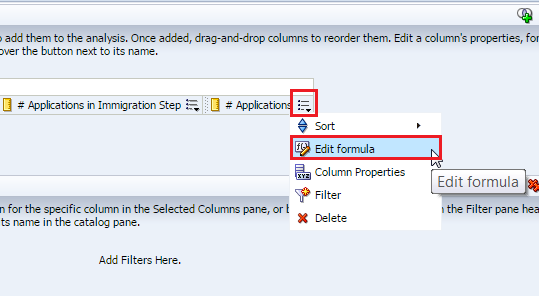
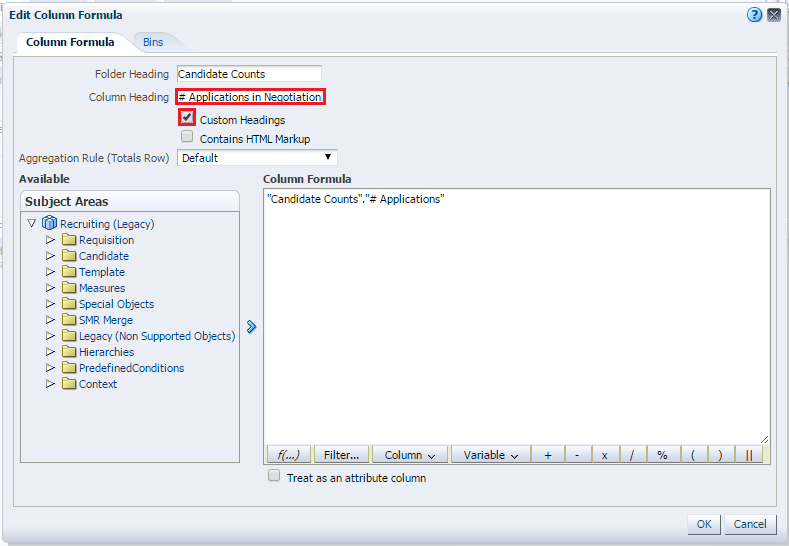
Edit the formula of the third # Applications column.
|
. |
Select Custom Headings and rename the column # Applications in Negotiation Status.
|
. |
Add a Filter.
|
. |
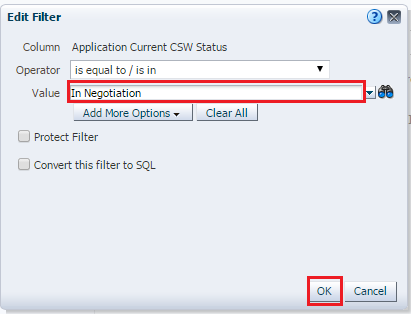
Double click Candidate > Candidate Application > Applicatoin Current CSW > Application Current CSW Status, leave the operator as is equal to / is in and set the value to Immigration.
Click OK. Click OK. The column formula should contain the following expression: FILTER("Candidate Counts"."# Applications" USING ("Application Current CSW"."Application Current CSW Status" = 'In Negotiation'))
Click OK. |
|
. |
Add a filter for Req. Organization Level 1.
|
|
. |
Change the operator to is not null. 
Click OK. |
|
. |
The criteria looks like the following:
|
|
. |
In the results tab add a pie graph view. 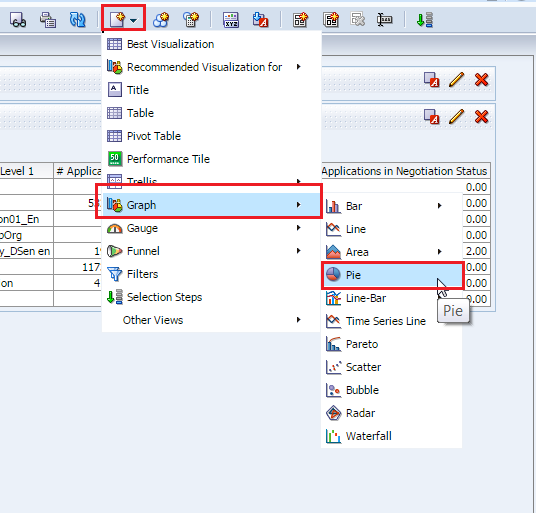
|
|
. |
Save the analysis as # Submissions by Company.
|
Case Study 3
In this subtopic, you will evaluate the queries and report tabs that make up the web intelligence document and prepare a strategy for proceeding with recreation in OBI.
Analyze the BO Web Intelligence Document
. |
View the Queries in Business Objects. Hired Candidates
|
|---|---|
| . |
Observe that there is one query which returns the candidate id, requisition no, and applicaiton current reference status of candidates that have been hired on at least one application. |
| . |
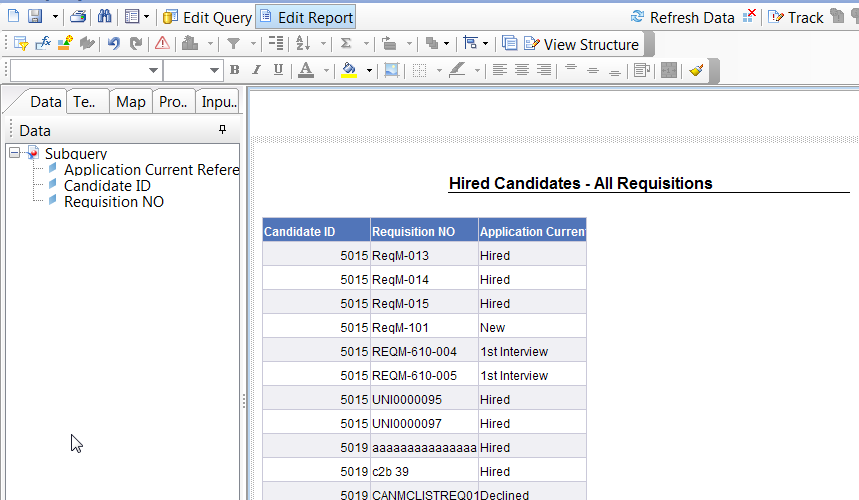
View the report tab.
|
| . |
Observe that the report consists of one table that returns the three query result objects. Based on my observations I have determined that this report can be re-created in OBI. I will demonstrate how to re-create the sub query using results from another analysis and using a sql sub query. |
Create the 'Sub Query' Analysis
|
. |
Create the analysis using theRecruiting (Legacy) subject area.
|
|---|---|
|
. |
Add the following field to the analysis:
Add the following filter to the analysis:
The analysis criteria looks like this: 
|
. |
Save the analysis as Hired Candidates Sub Query.
|
. |
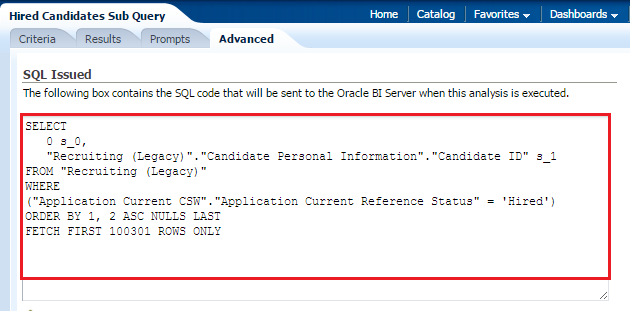
Navigate to the Advanced Tab and copy the SQL Issued into a notepad.
SQL Issued:
SELECT |
. |
Modify the SQL to remove leaving only the Candidate ID field in the select statement, the from clause, and the where clause: SELECT Now you have both the analysis and the sql syntax to recreate your BO report that has a sub query in the filter |
Create the Analysis
|
. |
Create the analysis using theRecruiting (Legacy) subject area.
|
|---|---|
|
. |
Add the following fields to the analysis:
The analysis criteria looks like this: 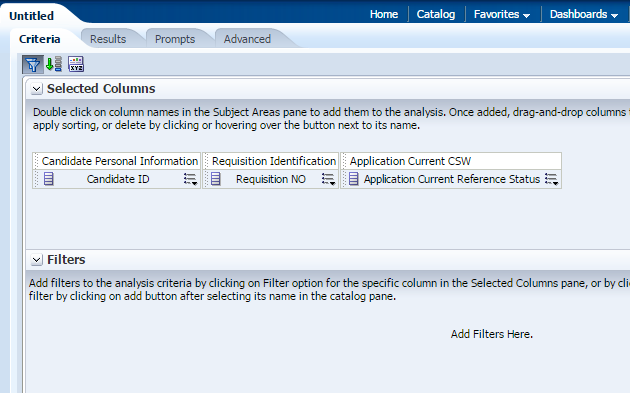
|
. |
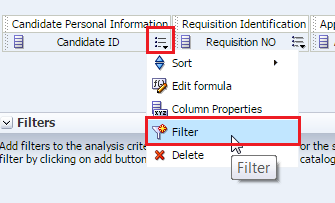
Add a filter for the Candidate ID column.
|
. |
In the New Filter dialog box select SQL Expression from the Add More Options drop down menu.
|
. |
In the SQL Expression text field paste your SQL Query.
SELECT
Click OK. |
. |
Since the analysis retrieves data from Requisition and Application we will add a context field in the criteria. This differs from BO in that we add the context to the query and do not choose the context when the query is run. If you have a report where the end user will need the context to change you can add a column selector view on the context column in the results tab, but that is not necessary for this report. Add the column Context > Requisition with Applications
|
. |
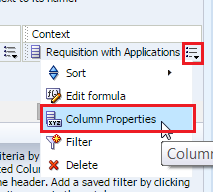
Edit the column properties.
|
. |
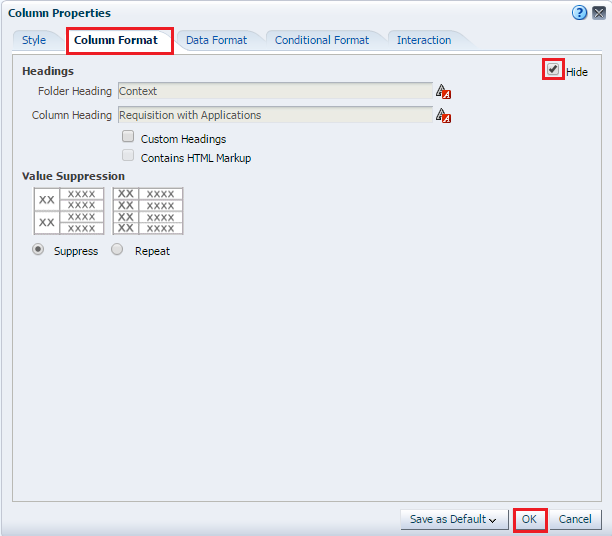
On the column format tab check Hide.
Click OK. |
. |
Save the analysis as Hired Candidates - Sub Query.
Click OK. |
. |
View the results in the Results tab:
|
. |
Return to the Criteria tab and edit the Candidate ID filter.
|
. |
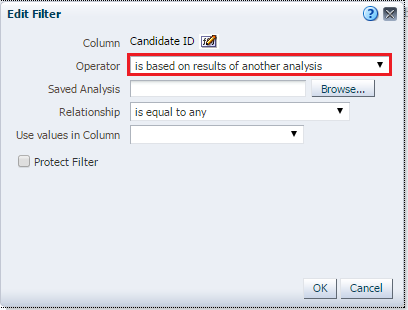
Change the Operator to is based on results of another analysis.
|
. |
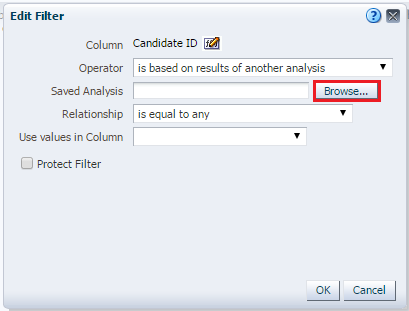
Browse for the saved analysis.
|
|
. |
Choose the analysis Hired Candidates Sub Query.
Click OK |
|
. |
Save the analysis as Hired Candidates - Results from Another Query. 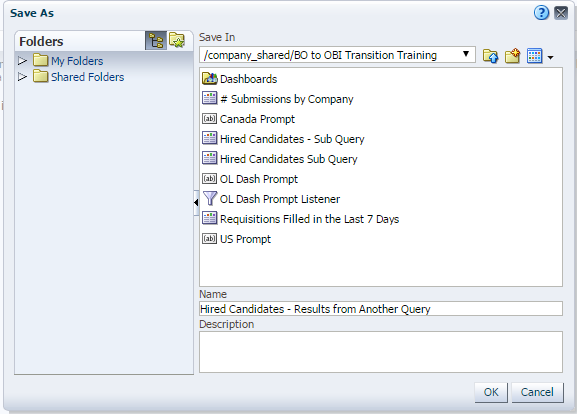
Click OK. |
|
. |
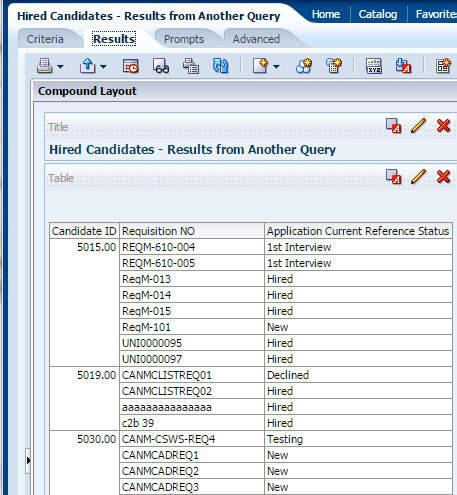
View the results in the results tab:
|
Converting Variables
In this subtopic, you learn how to convert variables in Business Objects into custom functions in OBI.
IF
The If statement used when creating a web intelligence document is heavily used to evaluate data based on conditions and return results based on how the condition evaluates. In OBI Answers the case statement can be used to create formulas that will approximate what BO variables do.
. |
The first requirement we will build on is the requirement to show the # of filled requisitions by year and to mark the current year as YTD (year to date). Create the analysis using theRecruiting (Legacy) subject area.
|
|---|---|
| . |
Insert the columns:.
|
| . |
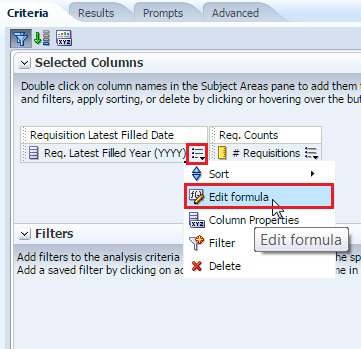
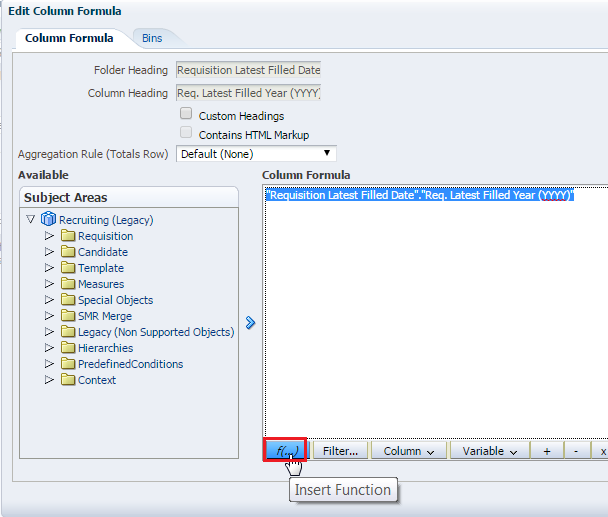
Edit the formula for Req. Latest Filled Year (YYYY).
|
| . |
Insert a function.
|
| . |
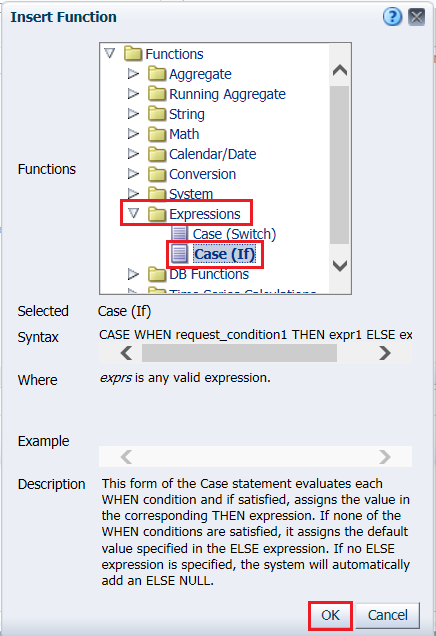
Select Expressions > Case (if).
Click OK. |
| . |
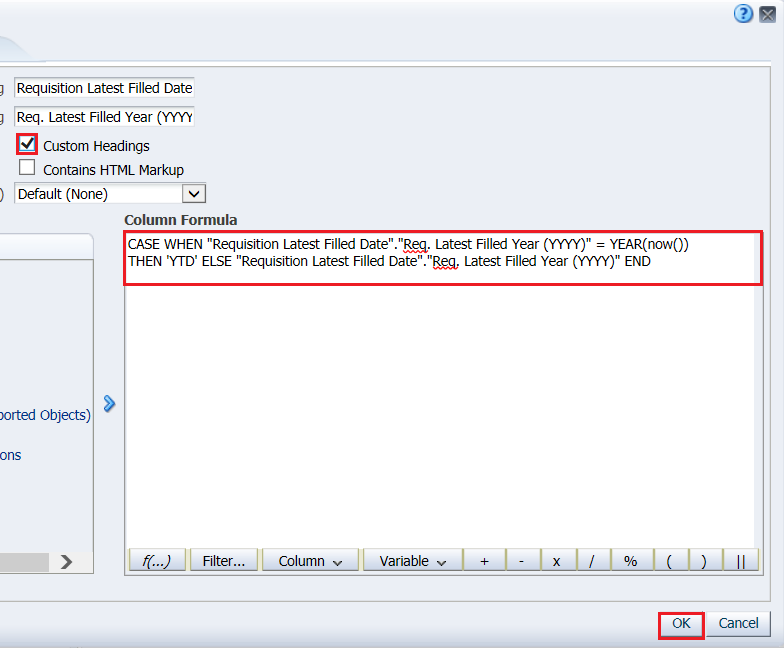
Modify the syntax to the following: CASE WHEN "Requisition Latest Filled Date"."Req. Latest Filled Year (YYYY)" = YEAR(now()) THEN 'YTD' ELSE "Requisition Latest Filled Date"."Req. Latest Filled Year (YYYY)" END
Click OK. |
| . |
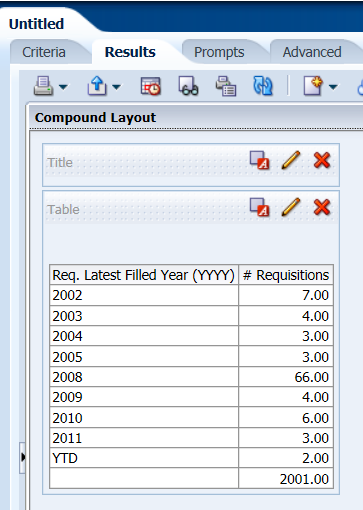
View the results.
Save the analysis as Case YTD |
. |
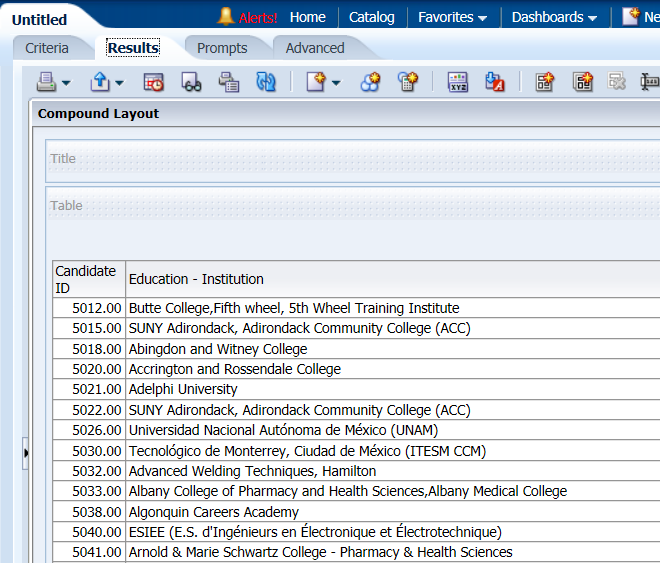
The second requirement we will build on is the requirement to return the candidate id and educational institute at display sequence one and two in the application file. Create the analysis using theRecruiting (Legacy) subject area.
|
| . |
Insert the columns:.
|
| . |
Edit the formula for the first Education - Display Sequence.
|
| . |
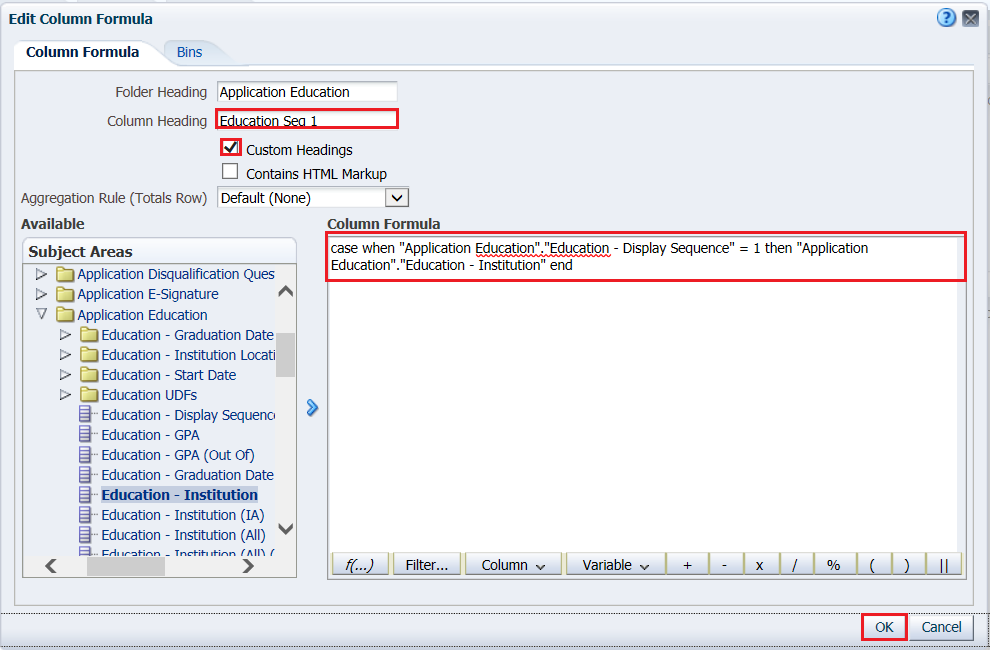
Select Custom Headings and and insert Education Seq 1 in the column heading. Insert the following function: case when "Application Education"."Education - Display Sequence" = 1 then "Application Education"."Education - Institution" end
Click OK. |
| . |
Edit the remaining Education - Display Sequence column and enter the following information. Select Custom Headings and and insert Education Seq 2 in the column heading. Insert the following function: case when "Application Education"."Education - Display Sequence" = 2 then "Application Education"."Education - Institution" end
Click OK. |
| . |
Modify the syntax to the following: CASE WHEN "Requisition Latest Filled Date"."Req. Latest Filled Year (YYYY)" = YEAR(now()) THEN 'YTD' ELSE "Requisition Latest Filled Date"."Req. Latest Filled Year (YYYY)" END
Click OK. |
| . |
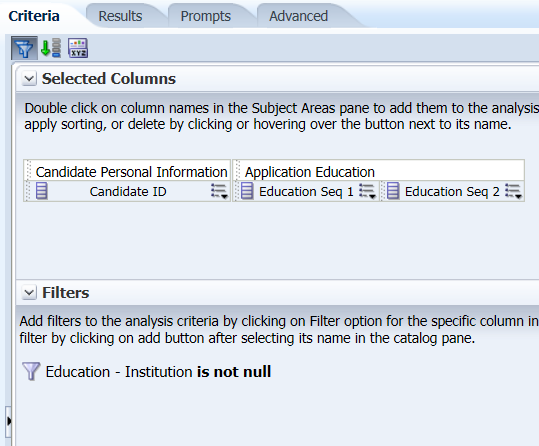
Insert a filter for Education - Institution is not null. They query criteria should look like this:
|
| . |
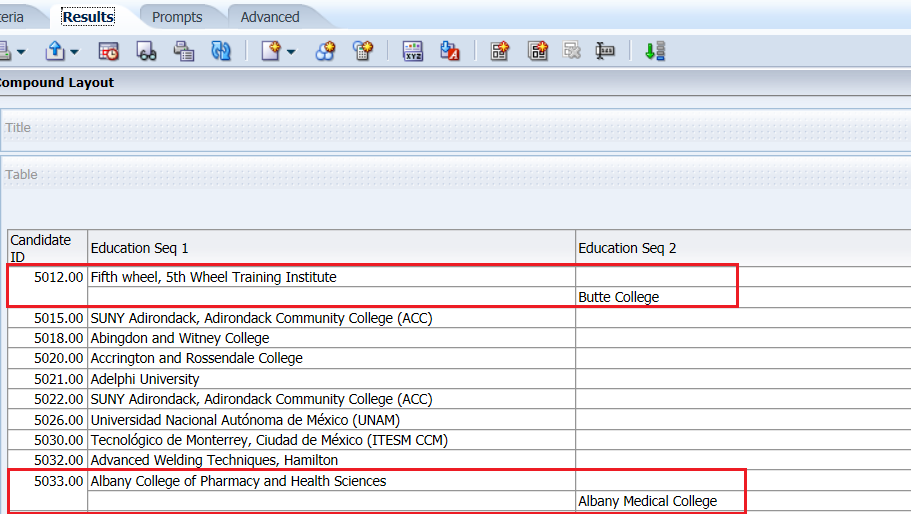
View the results:
Observe that the educational institutions at sequence one and two appear on different rows. |
| . |
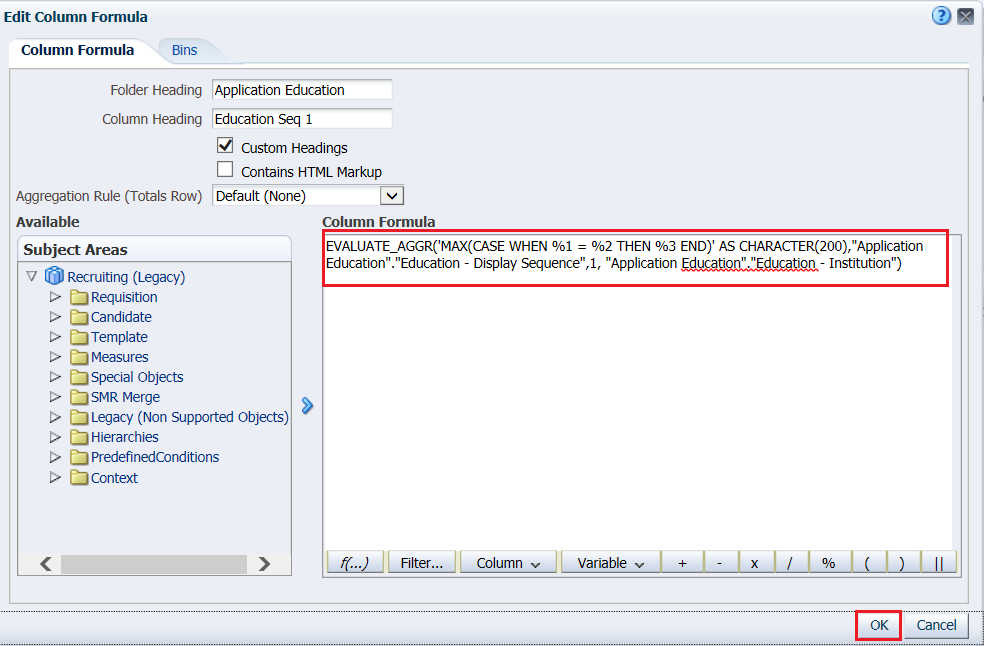
We will return to the criteria tab and modify the formulas using an evaluate statement in conjunctions with the case statement so the educational institutions are treated as different fields and display in the same row. Replace the equation in the column Education Seq 1 with the following formula: EVALUATE_AGGR('MAX(CASE WHEN %1 = %2 THEN %3 END)' AS CHARACTER(200),"Application Education"."Education - Display Sequence",1, "Application Education"."Education - Institution")
Click OK. |
| . |
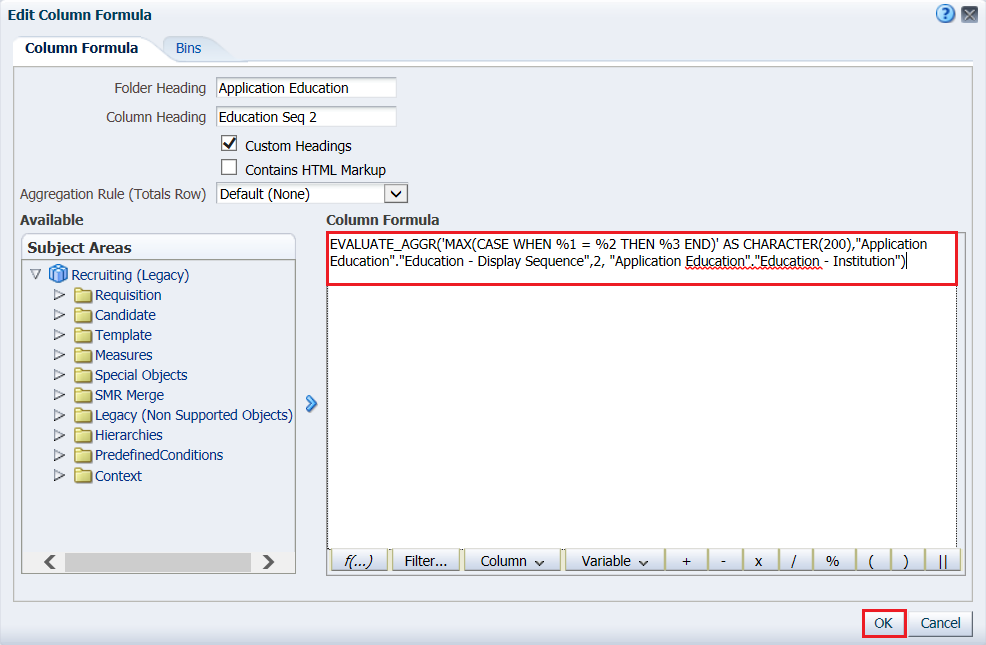
Replace the equation in the column Education Seq 2 with the following formula: EVALUATE_AGGR('MAX(CASE WHEN %1 = %2 THEN %3 END)' AS CHARACTER(200),"Application Education"."Education - Display Sequence",2, "Application Education"."Education - Institution")
Click OK. |
| . |
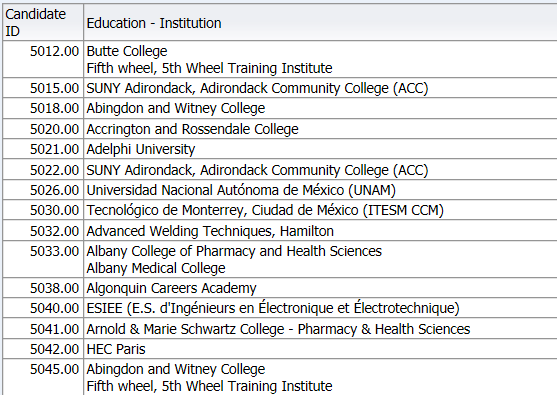
View the results:
Observe that now the institutions are both on the same row. Save the analysis as Evaluate Case |
Cast
|
. |
Since the formulas we are creating are used in a query using the correct data type is imperative to the query running. In our first example we are using a concatenate function and all values in the concatenated formula must be in string formula. If you try to concatenated a non-string to a string you will get a syntax error similar to: Function Concat does not support non-text types. For our first analysis we need to create an analysis that shows the salary ranges for requisitions. Create the analysis using theRecruiting (Legacy) subject area.
|
|---|---|
|
. |
Add the following fields to the analysis:
The analysis criteria looks like this: 
|
. |
Edit the formula of Req. Minimum Salary and add a formula.
|
. |
From the list of functions select Conversion > Cast.
|
. |
Modify the formula and change type to varchar(40). CAST("Requisition Compensation"."Req. Minimum Salary" AS varchar(40))
|
. |
Add the double pipes which is the shortcut syntax for concatenate.
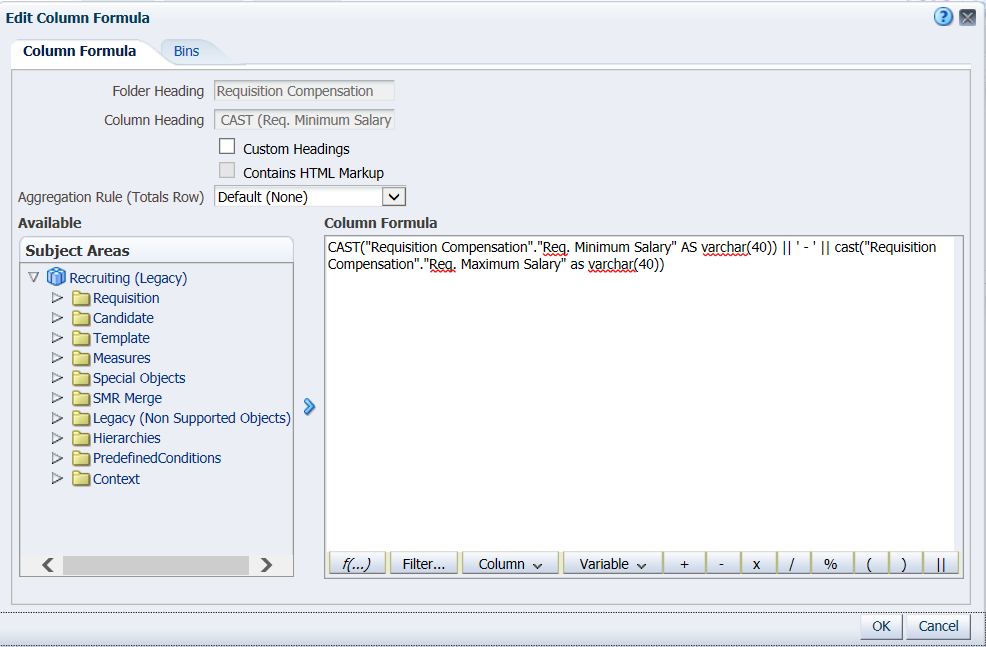
Add a dash '-' an additional set of concatenate pipes and the Req. Maximum salary casted to a varchar(40). The formula should look like this: CAST("Requisition Compensation"."Req. Minimum Salary" AS varchar(40)) || ' - ' || cast("Requisition Compensation"."Req. Maximum Salary" as varchar(40))
Click OK. |
. |
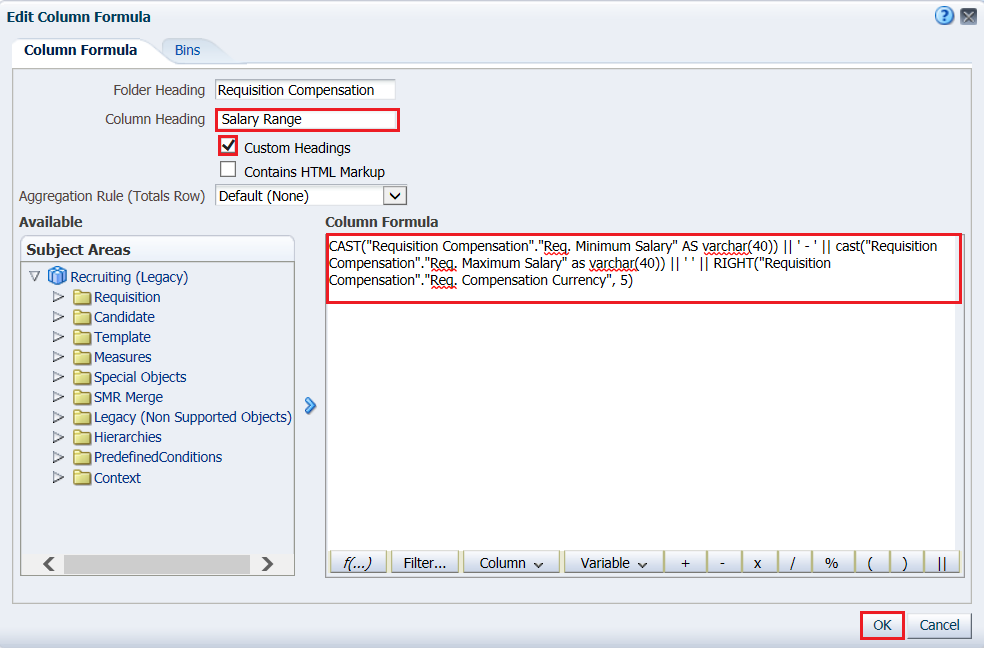
Technically we have created a formula that will display the salary range, but we also want to add in the currency. The currency is in a format that is Long Currency Name (currency code). We only want the currency code which is 5 characters ie (USD). We're going to use the string formula Right to isolate the currency code. RIGHT("Requisition Compensation"."Req. Compensation Currency", 5) Update the formula. The full formula is now:
CAST("Requisition Compensation"."Req. Minimum Salary" AS varchar(40)) || ' - ' || cast("Requisition Compensation"."Req. Maximum Salary" as varchar(40)) || ' ' || RIGHT("Requisition Compensation"."Req. Compensation Currency", 5) Rename the heading to Salary Range
Click OK. |
. |
View the results.
Save the analysis as Salary Range by Req ID. |
. |
The second case I will show you is how to cast a date. The best use case for this is a UDF date that needs to be used in a calendar function or a filter. In my zone I know that Requisition UDF 15 is a date value. If you are not aware of any date UDFs you may choose to skip this exercise for now. Create the analysis using theRecruiting (Legacy) subject area.
|
. |
Add the column Requisition > Requisition UDFs > Any UDF with a Date Value. I will use Requisition UDF Value 15 View the results
Observe the values from the UDF are in alphabetical order rather than chronological order. |
|
. |
Modify the formula for the date udf. Ensure you replace the value for the Date UDF to your Date UDF. EVALUATE('TO_DATE(%1,%2)' AS DATE,"Requisition UDFs"."Requisition UDF Value 15", 'MM-DD-YYYY')
Click OK. |
|
. |
View the results. 
Observe that now the dates are in chronological order. Save the analysis as String Cast to Date. |
Aggregate List
|
. |
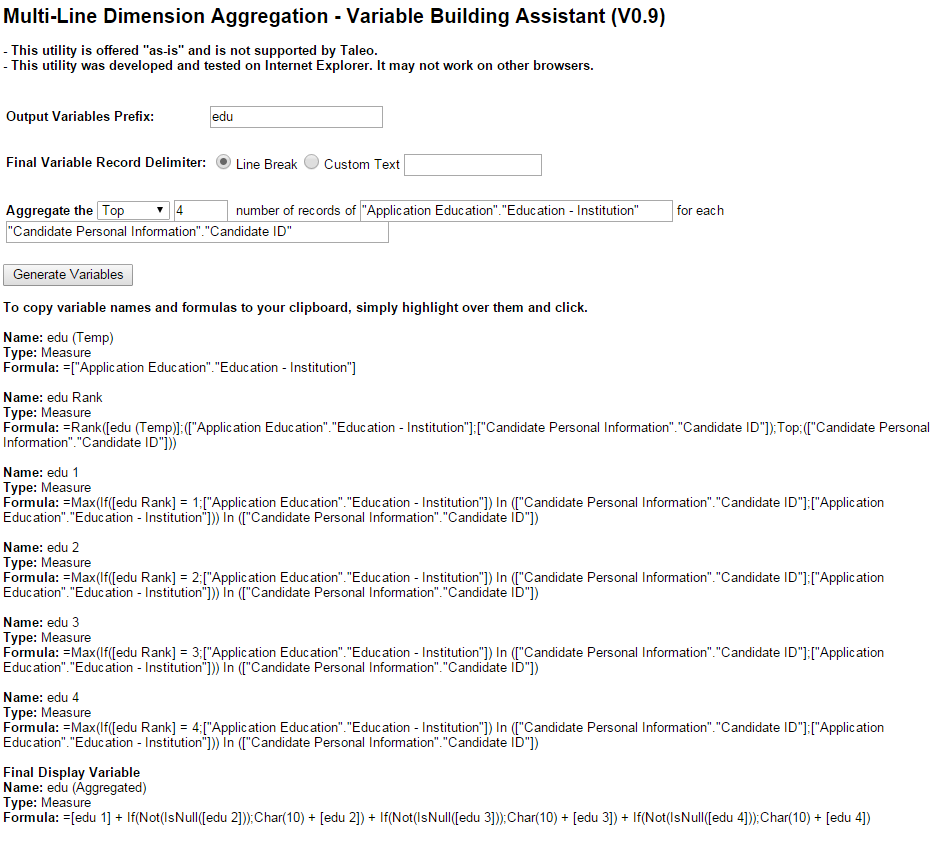
When Taleo customers needed a formula for aggregating Business Objects values into one field they were able to use a tool called 'Multi-Line Dimension Aggregation' to create the variables necessary to create the column. The mulit line aggregator provided a group of formulas that could be used to create variables and create a field that is will provide a list up to x values in an aggregated list.
|
|---|---|
|
. |
We will create an analysis to bring back the list of educational institutions by candidate id. Create the analysis using theRecruiting (Legacy) subject area.
|
|
. |
Add the following fields to the analysis:
Also add a filter for Education - Institution is not null. The analysis criteria looks like this: 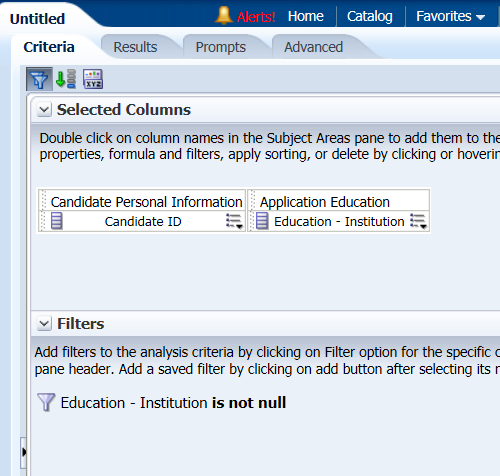
|
. |
Select custom headings and edit the formula of Education - Institution to: EVALUATE_AGGR('SYS.STRAGG(DISTINCT(%1 || %2))' AS CHARACTER(1000), "Application Education"."Education - Institution", ',')
This formula creates a distinct list of comma delimited list of Education Institutions. |
. |
Since all the of the education institutions have a trailing comma we will have a rogue comma at the end of the string. We will use the TrimTrailing string function to remove the comma from the end of the string Modify the formula into: TRIM(TRAILING ',' FROM EVALUATE_AGGR('SYS.STRAGG(DISTINCT(%1 || %2))' AS CHARACTER(1000), "Application Education"."Education - Institution", ','))
Click OK. |
. |
View the results.
Save the analysis as Comma Delimited Agg List |
. |
The aggregator gives you the option to create a line break delimiter so we will review how to use a line break in OBI Answers. Use save as to save the analysis as Line Break Delimited Agg List. Edit the formula of Education - Institution, remove the trim statement, and replace ',' with a line break tag '< br >'. The formula is now: EVALUATE_AGGR('SYS.STRAGG(DISTINCT(%1 || %2))' AS CHARACTER(1000), "Application Education"."Education - Institution", '< br >')
Click OK. |
. |
Edit the properties of the Education - Institution Column.
|
. |
In the Data Format tab, override the default data format and set the treat text as field to HTML.
Click OK. |
. |
View the results.
Save the analysis. |
Nested Variables
|
. |
When creating varibles in BO it was possible to nest variables. Nested variables cannot be directly created in OBI, but you may create one filter with all of the formulas combined into the column you need |
|---|---|
|
. |
For example: A client may have created a variable named Ethnicity for candidate ethnicity where they trimmed the leading "Ethnicity - " from the ethnicity string and then used the ethnicity variable in an if statement to create a new variable called is Hispanic. We will create an analysis that mimics the following example. Create the analysis using theRecruiting (Legacy) subject area.
|
|
. |
Add the following fields to the analysis:
Also add a filter for Candidate Ethnicity is not null. The analysis criteria looks like this: 
|
. |
View the results:
|
. |
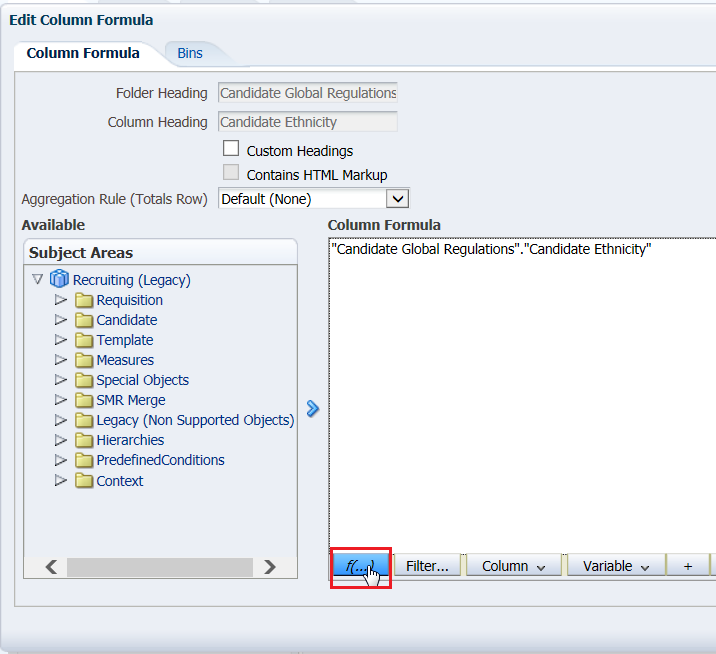
Now, in the critiera tab, edit the formula of Candidate Ethnicity to replace 'Ethnicity - ' with an empty string''. Insert a function
|
. |
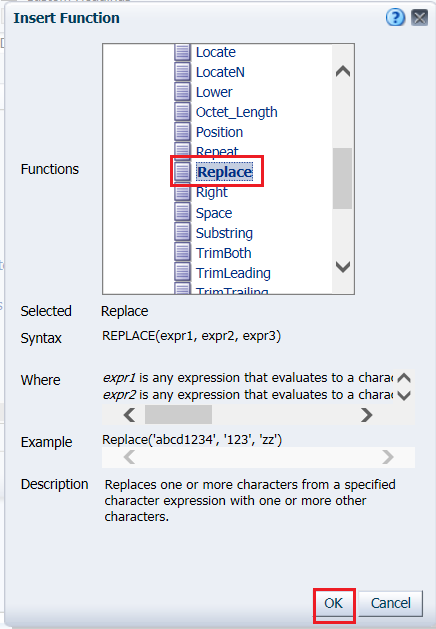
Choose the function String > Replace.
Click OK. |
. |
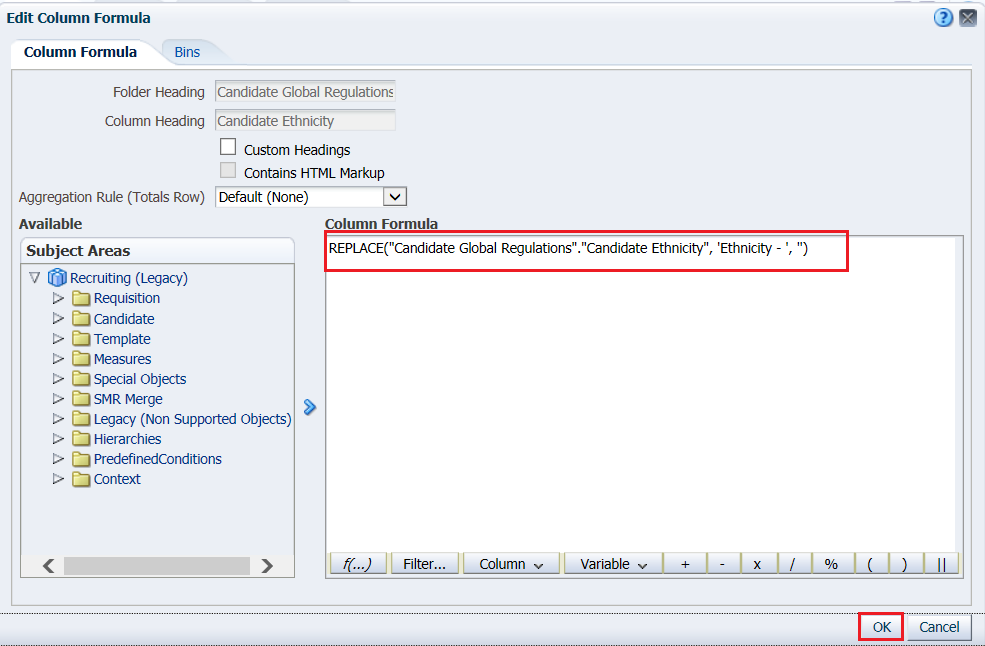
Modify the formula to the following syntax: REPLACE("Candidate Global Regulations"."Candidate Ethnicity", 'Ethnicity - ', '')
Click OK. |
. |
View the results:
|
. |
Edit the column formula. Rename the column Candidate is Hispanic. Add the case statement. The formula should look like this: case when REPLACE("Candidate Global Regulations"."Candidate Ethnicity", 'Ethnicity - ', '') = 'Hispanic Latino' then 'Yes' else 'No' end
Click OK. |
. |
View the results.
Save the analysis as Candidate is Hispanic Y/N. |
HTML
|
. |
HTML can be used in Narrative Views and Static text views in the compound layout. But if you need HTML in a column it can also be applied there, so a column containing HTML can be used in a table. |
|---|---|
|
. |
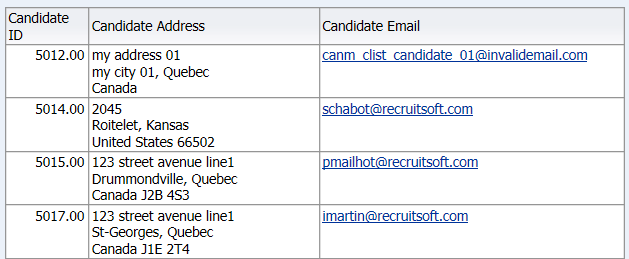
We will create an analysis for candidate personal information which shows the candidate address and the candidate email. Create the analysis using theRecruiting (Legacy) subject area.
|
|
. |
Add the following fields to the analysis:
Also add a filter for Candidate Address Line 1 is not null and Candidate Email is not Null. The analysis criteria looks like this: 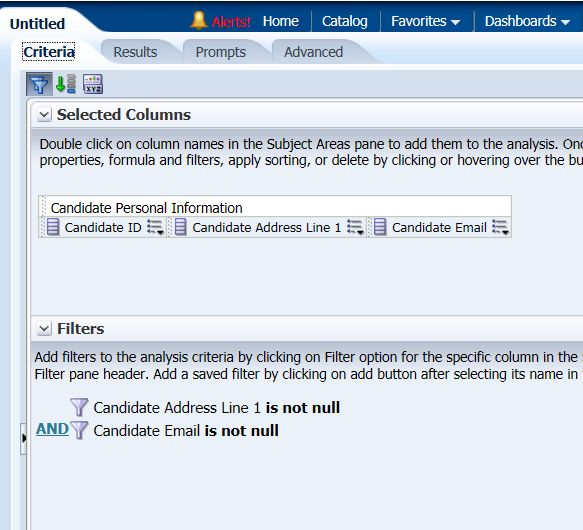
|
. |
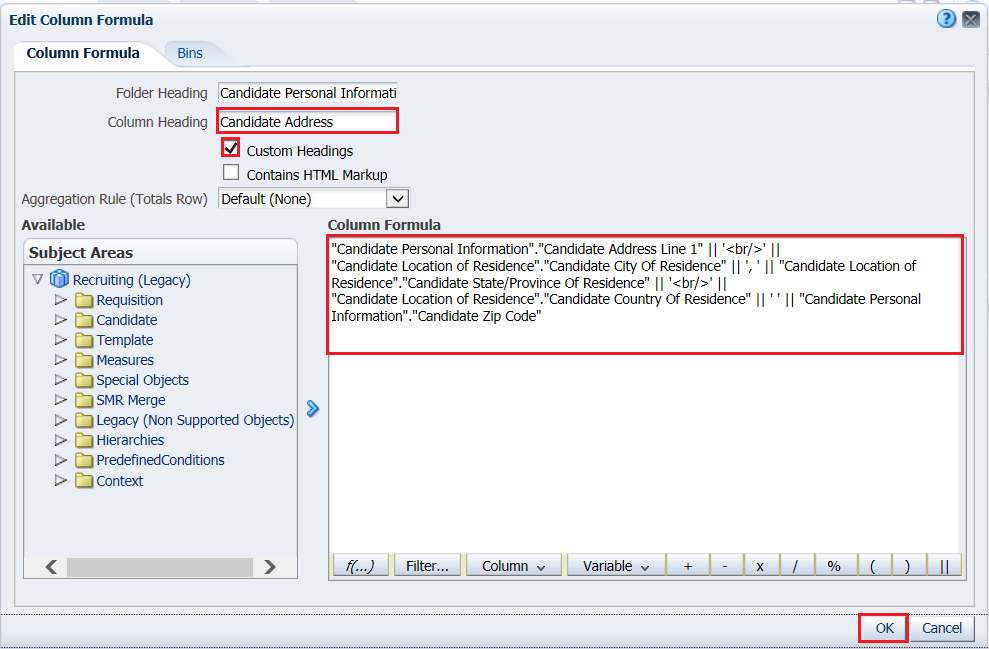
Edit the formula for Candidate Address Line 1 Make the column heading Candidate Address. Make the formula: "Candidate Personal Information"."Candidate Address Line 1" || '< br/ >' || "Candidate Location of Residence"."Candidate City Of Residence" || ', ' || "Candidate Location of Residence"."Candidate State/Province Of Residence" || '< br/ >' || "Candidate Location of Residence"."Candidate Country Of Residence" || ' ' || "Candidate Personal Information"."Candidate Zip Code"
|
. |
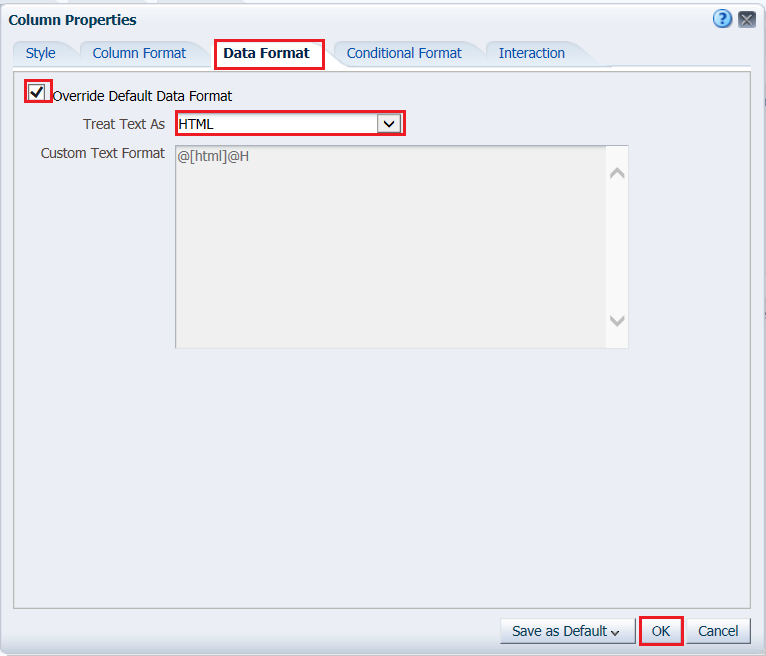
Edit the column properties of the Candidate Address Field and in the Data Format Tab override the default data format and treat the text as HTML. Insert a function
Click OK. |
. |
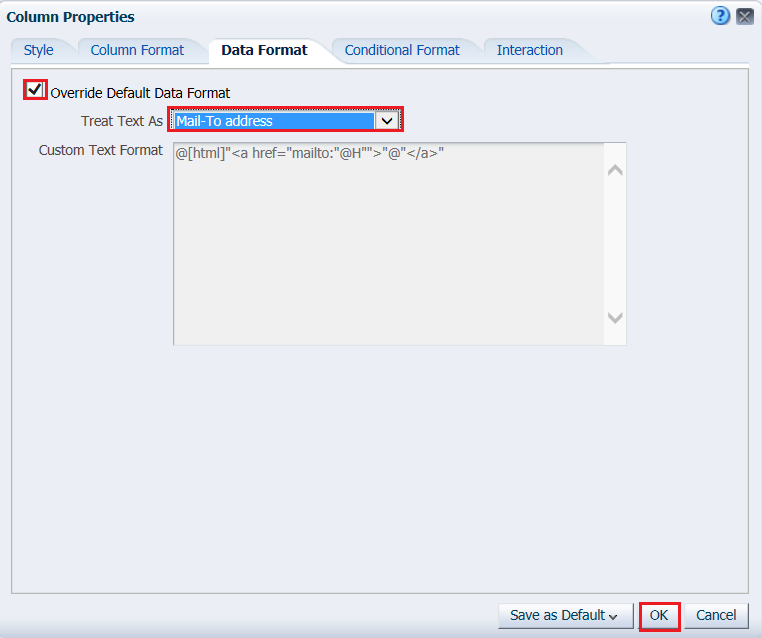
Edit the column properties of the Candidate Email column and override the default data format to treat text as Mail-To Address.
Observe that in the list of options you can also add hyperlinks and images. If you were reporting on Candidate Web Page Address you might set the data format to hyperlink. Click OK. |
. |
View the results:
Save the analysis as HTML. |
External Links
|
. |
In the HTML exercise I recommended using the data format hyper text link for the field Candidate Web Page Address. I made this recommendation because the Candidate Web Page Address Field is already a fully formed URL. In scenarios where you want to add hyperlinks to a regular text column my recommendation is to use an Action Link interaction. The benefit of using the action link is that you are able to associate multiple links with a single column. You can also save and re-use action links. |
|---|---|
|
. |
We will edit the HTML analysis to add an external link. In the criteria tab edit the column properties of the Candidate ID column and go to the Interaction tab.
|
|
. |
Change the value of the Primary interaction from Default (Drill) to Action Links. 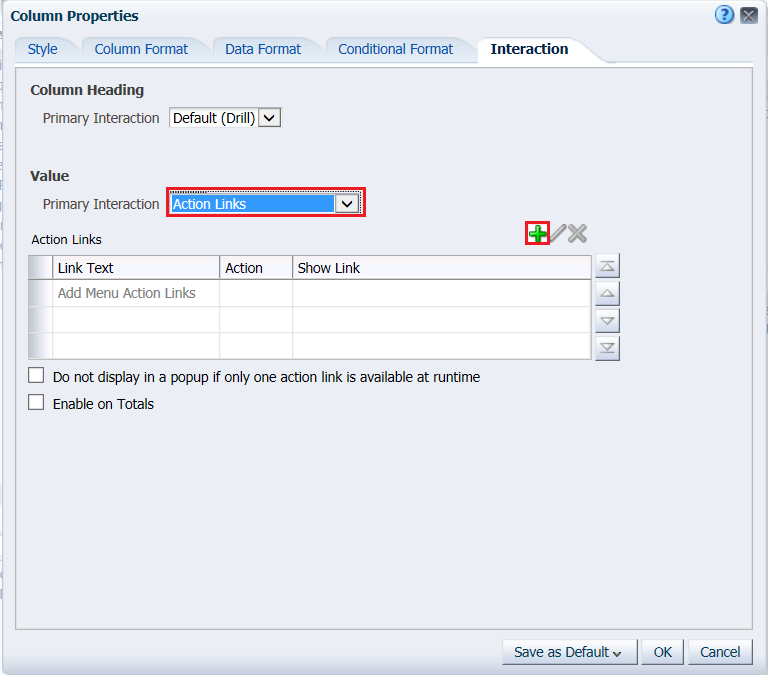
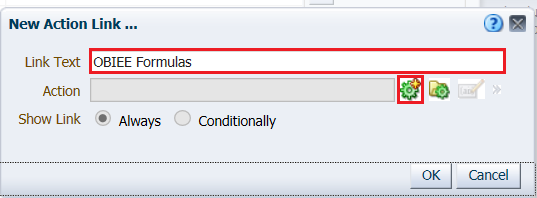
Click the green plus sign to add an action link. |
. |
Make the link text OBIEE Formulas and click the create a new action icon
|
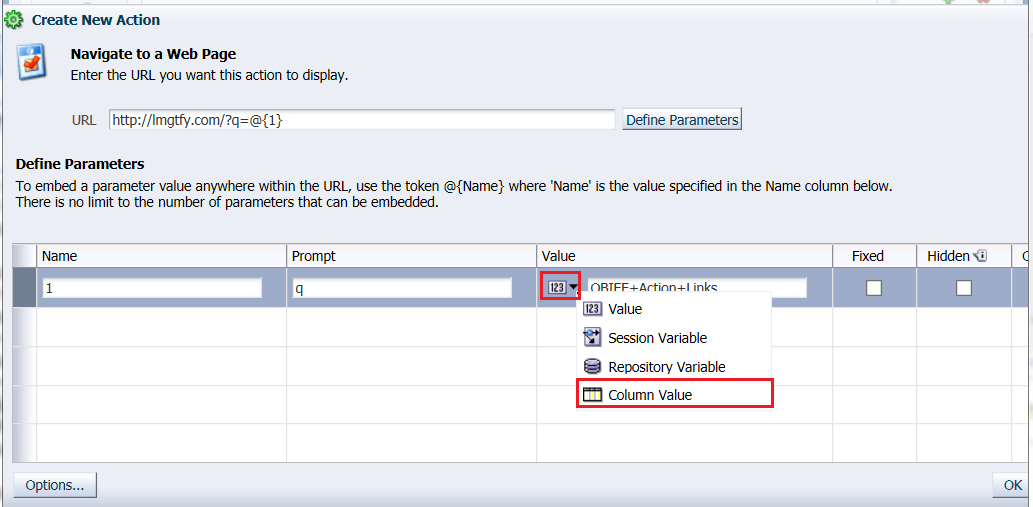
. |
Select Navigate to a Web Page.
|
. |
Enter http://lmgtfy.com/?q=OBIEE+Action+Links as the URL.
Click Define Parameters. |
. |
Observe the action has detected our one parameter and the value is editable. You may have a URL where you want to edit a column value as a parameter. This is possible via the Action. We will not make any changes at this time.
Click OK to exit the parameter mapping. Click OK to exit the agent creation. Click OK to exit column properties editor. Save the analysis |
Summary
Recreating Business Objects Reports in OBI Answers.
In this tutorial, you have learned how to recreate business objects reports in OBI Answers. Additional you now have some frequently used variable formulas for recreating your variables as columns.
Resources
Credits:
- Product Manager: Rachel Martorelli
![]()
 |
Copyright © 2013, Oracle and/or its affiliates. All rights reserved |
