Before You Begin
Purpose
This tutorial shows you how to develop a RESTful API in Node.js using the Express framework and an Oracle Database Cloud Service instance to deploy it in Oracle Application Container Cloud Service.
Time to Complete
45 minutes
Background
Express is a Node.js web application framework that provides a robust set of features to develop web and mobile applications. It facilitates a rapid development of Node based Web applications.
Scenario
In this tutorial, you build a basic RESTful API that implements the CRUD (Create, Read, Update, and Delete) operations on an employee table in a Oracle Database Cloud Service instance using plain Node.js and the Express framework.
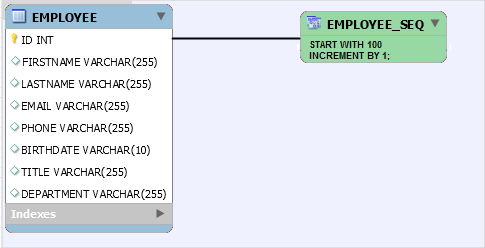
Database diagram:
The Node.js RESTful application responds to the following endpoints:
| Path | Description |
|---|---|
| GET: /employees | Gets all the employees. |
| GET: /employees/{searchType}/{searchValue} | Gets the employees that match the search criteria. |
| POST: /employees | Adds an employee. |
| PUT: /employees/{id} | Updates an employee. |
| DELETE: /employees/{id} | Removes an employee. |
The HTML client to test the RESful API is provided
in the next section (What do you need?)
The zip file contains an index.html
file and seven .png images. This
client is developed using JQuery, Ajax and CSS.
What Do You Need?
- Node.js
4.x
- A text editor
- A web browser
- Oracle SQL Developer
- An active Oracle Cloud account
- An instance of Oracle Database Cloud Service
- A user and password to connect Oracle SQL Developer to your instance (If you don't have an instance, you can create one by following this tutorial.)
- cURL 7.0+ (cURL is installed by default on most UNIX and Linux distributions. For the steps to install cURL on a Windows 64-bit machine, click here).
- employee-client.zip
- node-employees-service.zip (The complete project with the source code ready to deploy in Oracle Application Container Cloud Service)
Setting Up the Database and the Objects
In this section, you create a connection to your Oracle Database Cloud Service instance from Oracle SQL Developer and execute the scripts to create the employee table and sequence and to insert a couple of employee rows.
Connecting Oracle SQL Developer to Your Database
- Open Oracle SQL Developer.
- Click the View menu and select SSH.
- Right-click SSH Hosts and click New SSH Host.
- In the New SSH Host dialog box,
enter or select the
following
values
and click OK:
- Name:
DBCS - Host: The public IP address of your Oracle Database Cloud Service instance
- Username:
opc - Use key file (After you select this check box, click Browse, and select the private key file.)
- Add a Local Port Forward (Select this check box.)
- Name:
Local - Host:
localhost - Port:
1521 - Use
specific local
port:
1523

Description of this image - Name:
- Right-click the DBCS host connection and select Connect.
- If it's required, enter the passphrase.
- Right-click Connections and select New Connection.
-
In the New
/ Select
Database
Connection
dialog box,
enter or select the following values
and
click Test:
- Connection Name: Your connection name
- Username: Your database user name
- Password: Your database password
- Connection Type: SSH
- Role: default
- Port forward: Local (DBCS)
- Service
name:
PDB1.<your-identity-domain>.oraclecloud.internal
Note: Keep the default values for the rest of the fields.
- Click Save and then Connect.
Creating the Database Objects
-
Right-click the connection and select Open SQL worksheet.

Description of this image -
Copy the following script into the SQL worksheet to create the
EMPLOYEEtable and the sequence namedEMPLOYEE_SEQ:CREATE TABLE EMPLOYEE ( ID INTEGER NOT NULL, FIRSTNAME VARCHAR(255), LASTNAME VARCHAR(255), EMAIL VARCHAR(255), PHONE VARCHAR(255), BIRTHDATE VARCHAR(10), TITLE VARCHAR(255), DEPARTMENT VARCHAR(255), PRIMARY KEY (ID) ); CREATE SEQUENCE EMPLOYEE_SEQ START WITH 100 INCREMENT BY 1; - Click Run Script
 and then click Commit
  .
. -
Copy the following script into the SQL worksheet to insert five employees, click Run
 , and then click Commit .
INSERT INTO EMPLOYEE (ID, FIRSTNAME, LASTNAME, EMAIL, PHONE, BIRTHDATE, TITLE, DEPARTMENT) VALUES (EMPLOYEE_SEQ.nextVal, 'Hugh', 'Jast', 'Hugh.Jast@example.com', '730-715-4446', '1970-11-28' , 'National Data Strategist', 'Mobility');
INSERT INTO EMPLOYEE (ID, FIRSTNAME, LASTNAME, EMAIL, PHONE, BIRTHDATE, TITLE, DEPARTMENT) VALUES (EMPLOYEE_SEQ.nextVal, 'Toy', 'Herzog', 'Toy.Herzog@example.com', '769-569-1789','1961-08-08', 'Dynamic Operations Manager', 'Paradigm');
INSERT INTO EMPLOYEE (ID, FIRSTNAME, LASTNAME, EMAIL, PHONE, BIRTHDATE, TITLE, DEPARTMENT) VALUES (EMPLOYEE_SEQ.nextVal, 'Reed', 'Hahn', 'Reed.Hahn@example.com', '429-071-2018', '1977-02-05', 'Future Directives Facilitator', 'Quality');
INSERT INTO EMPLOYEE (ID, FIRSTNAME, LASTNAME, EMAIL, PHONE, BIRTHDATE, TITLE, DEPARTMENT) VALUES (EMPLOYEE_SEQ.nextVal, 'Novella', 'Bahringer', 'Novella.Bahringer@example.com', '293-596-3547', '1961-07-25' , 'Principal Factors Architect', 'Division');
INSERT INTO EMPLOYEE (ID, FIRSTNAME, LASTNAME, EMAIL, PHONE, BIRTHDATE, TITLE, DEPARTMENT) VALUES (EMPLOYEE_SEQ.nextVal, 'Zora', 'Sawayn', 'Zora.Sawayn@example.com', '923-814-0502', '1978-03-18' , 'Dynamic Marketing Designer', 'Security');
Developing the REST Server
In this section, you create the REST Service and you use the NPM utility to download and build dependencies for your Node.js project.
-
Open a console window and go to the folder where you want to store the Node.js application server.

Description of this image -
Run
npm initto create thepackage.jsonfile. At the prompt, enter the following values, confirm the values, and then press Enter:- Name:
node-server - Version:
1.0.0(or press Enter.) - Description:
Employee RESTful application - Entry point:
server.js - Test command (Press Enter.)
- Git repository (Press Enter.)
- Keywords (Press Enter.)
- Author (Enter your name or email address.)
- License (Press Enter.)

Description of this image The
package.jsonfile is created and stored in the current folder. You can open it and modify it, if needed. - Name:
-
In the console window, download, build, and add the Express framework dependency:
npm install --save express

Description of this image -
In the console window, install the
body-parserdependency:npm install --save body-parser
The
body-parserdependency is a Node.js middleware for handling JSON, Raw, Text and URL encoded form data.
Description of this image Note: If the console displays
optional, dep failed or continuingoutput, ignore it. The output pertains to warnings or errors caused by dependencies on native binaries that couldn't be built. The libraries being used often have a JavaScript fallback node library, and native binaries are used only to optimize performance. -
Open the generated
package.jsonfile in a text editor, and verify its contents. It should look like this:{ "name": "node-server", "version": "1.0.0", "description": "Employee RESTful application", "main": "server.js", "scripts": { "test": "echo \"Error: no test specified\" && exit 1", "start": "node server.js" }, "author": "", "license": "ISC", "dependencies": { "body-parser": "^1.14.1", "express": "^4.13.3" } } -
Create a
server.jsfile, open it in a text editor, and add the followingrequirestatements to use the node dependencies and theoracledbserver component:var express = require('express'); var bodyParser = require('body-parser'); var oracledb = require('oracledb'); -
Add a
PORTvariable equal either to theprocess.env.PORTenvironment variable or to 8089, if the environment variable isn't set:The
PORTenvironment variable is set automatically by Oracle Application Container Cloud Service.var PORT = process.env.PORT || 8089; -
Create an
appvariable to use theexpressmethod:var app = express(); -
Store the database connection properties that are equal to environment variables or defaults:
The environment variables listed are set in Oracle Application Container Cloud Service automatically when you add the Database Cloud Service binding.
var connectionProperties = { user: process.env.DBAAS_USER_NAME || "oracle", password: process.env.DBAAS_USER_PASSWORD || "oracle", connectString: process.env.DBAAS_DEFAULT_CONNECT_DESCRIPTOR || "localhost/xe" }; -
Create the
doReleasemethod to release the database connection:function doRelease(connection) { connection.release(function (err) { if (err) { console.error(err.message); } }); } -
Configure your application to use
bodyParser(), so that you can get the data from aPOSTrequest:// configure app to use bodyParser() // this will let us get the data from a POST app.use(bodyParser.urlencoded({ extended: true })); app.use(bodyParser.json({ type: '*/*' })); -
Create a router object and assign it to the
routervariable:var router = express.Router(); -
Add the following response headers to support calls from external clients:
Note: Browsers and applications usually prevent calling REST services from different sources. If you run the client on Server A and the REST services on Server B, then you must provide a list of known clients in Server B by using the
Access-Controlheaders. Clients check these headers to allow invocation of a service and prevent cross-site scripting attacks (XSS).router.use(function (request, response, next) { console.log("REQUEST:" + request.method + " " + request.url); console.log("BODY:" + JSON.stringify(request.body)); response.setHeader('Access-Control-Allow-Origin', '*'); response.setHeader('Access-Control-Allow-Methods', 'GET, POST, OPTIONS, PUT, PATCH, DELETE'); response.setHeader('Access-Control-Allow-Headers', 'X-Requested-With,content-type'); response.setHeader('Access-Control-Allow-Credentials', true); next(); }); -
Create the
GETmethod to get the list of employees:/** * GET / * Returns a list of employees */ router.route('/employees/').get(function (request, response) { console.log("GET EMPLOYEES"); oracledb.getConnection(connectionProperties, function (err, connection) { if (err) { console.error(err.message); response.status(500).send("Error connecting to DB"); return; } console.log("After connection"); connection.execute("SELECT * FROM employee",{}, { outFormat: oracledb.OBJECT }, function (err, result) { if (err) { console.error(err.message); response.status(500).send("Error getting data from DB"); doRelease(connection); return; } console.log("RESULTSET:" + JSON.stringify(result)); var employees = []; result.rows.forEach(function (element) { employees.push({ id: element.ID, firstName: element.FIRSTNAME, lastName: element.LASTNAME, email: element.EMAIL, phone: element.PHONE, birthDate: element.BIRTHDATE, title: element.TITLE, dept: element.DEPARTMENT }); }, this); response.json(employees); doRelease(connection); }); }); }); -
Create the
GETmethod to return the list of employees that match the criteria./** * GET /searchType/searchValue * Returns a list of employees that match the criteria */ router.route('/employees/:searchType/:searchValue').get(function (request, response) { console.log("GET EMPLOYEES BY CRITERIA"); oracledb.getConnection(connectionProperties, function (err, connection) { if (err) { console.error(err.message); response.status(500).send("Error connecting to DB"); return; } console.log("After connection"); var searchType = request.params.searchType; var searchValue = request.params.searchValue; connection.execute("SELECT * FROM employee WHERE "+searchType+" = :searchValue",[searchValue], { outFormat: oracledb.OBJECT }, function (err, result) { if (err) { console.error(err.message); response.status(500).send("Error getting data from DB"); doRelease(connection); return; } console.log("RESULTSET:" + JSON.stringify(result)); var employees = []; result.rows.forEach(function (element) { employees.push({ id: element.ID, firstName: element.FIRSTNAME, lastName: element.LASTNAME, email: element.EMAIL, phone: element.PHONE, birthDate: element.BIRTHDATE, title: element.TITLE, dept: element.DEPARTMENT }); }, this); response.json(employees); doRelease(connection); }); }); }); -
Create the
POSTmethod to add employees:/** * POST / * Saves a new employee */ router.route('/employees/').post(function (request, response) { console.log("POST EMPLOYEE:"); oracledb.getConnection(connectionProperties, function (err, connection) { if (err) { console.error(err.message); response.status(500).send("Error connecting to DB"); return; } var body = request.body; connection.execute("INSERT INTO EMPLOYEE (ID, FIRSTNAME, LASTNAME, EMAIL, PHONE, BIRTHDATE, TITLE, DEPARTMENT)"+ "VALUES(EMPLOYEE_SEQ.NEXTVAL, :firstName,:lastName,:email,:phone,:birthdate,:title,:department)", [body.firstName, body.lastName, body.email, body.phone, body.birthDate, body.title, body.dept], function (err, result) { if (err) { console.error(err.message); response.status(500).send("Error saving employee to DB"); doRelease(connection); return; } response.end(); doRelease(connection); }); }); }); -
Create the
PUTmethod to update the employee by ID:/** * PUT / * Update a employee */ router.route('/employees/:id').put(function (request, response) { console.log("PUT EMPLOYEE:"); oracledb.getConnection(connectionProperties, function (err, connection) { if (err) { console.error(err.message); response.status(500).send("Error connecting to DB"); return; } var body = request.body; var id = request.params.id; connection.execute("UPDATE EMPLOYEE SET FIRSTNAME=:firstName, LASTNAME=:lastName, PHONE=:phone, BIRTHDATE=:birthdate,"+ " TITLE=:title, DEPARTMENT=:department, EMAIL=:email WHERE ID=:id", [body.firstName, body.lastName,body.phone, body.birthDate, body.title, body.dept, body.email, id], function (err, result) { if (err) { console.error(err.message); response.status(500).send("Error updating employee to DB"); doRelease(connection); return; } response.end(); doRelease(connection); }); }); }); -
Create the
DELETEmethod to remove employees by ID:/** * DELETE / * Delete a employee */ router.route('/employees/:id').delete(function (request, response) { console.log("DELETE EMPLOYEE ID:"+request.params.id); oracledb.getConnection(connectionProperties, function (err, connection) { if (err) { console.error(err.message); response.status(500).send("Error connecting to DB"); return; } var body = request.body; var id = request.params.id; connection.execute("DELETE FROM EMPLOYEE WHERE ID = :id", [id], function (err, result) { if (err) { console.error(err.message); response.status(500).send("Error deleting employee to DB"); doRelease(connection); return; } response.end(); doRelease(connection); }); }); }); -
Set up and start the server:
app.use(express.static('static')); app.use('/', router); app.listen(PORT);
The completed server.js should look
like this:
var express = require('express');
var app = express();
var bodyParser = require('body-parser');
var oracledb = require('oracledb');
oracledb.autoCommit = true;
var connectionProperties = {
user: process.env.DBAAS_USER_NAME || "oracle",
password: process.env.DBAAS_USER_PASSWORD || "oracle",
connectString: process.env.DBAAS_DEFAULT_CONNECT_DESCRIPTOR || "129.152.132.76:1521/ORCL"
};
function doRelease(connection) {
  connection.release(function (err) {
    if (err) {
      console.error(err.message);
    }
  });
}
// configure app to use bodyParser()
// this will let us get the data from a POST
app.use(bodyParser.urlencoded({ extended: true }));
app.use(bodyParser.json({ type: '*/*' }));
var PORT = process.env.PORT || 8089;
var router = express.Router();
router.use(function (request, response, next) {
  console.log("REQUEST:" + request.method + "   " + request.url);
  console.log("BODY:" + JSON.stringify(request.body));
  response.setHeader('Access-Control-Allow-Origin', '*');
  response.setHeader('Access-Control-Allow-Methods', 'GET, POST, OPTIONS, PUT, PATCH, DELETE');
  response.setHeader('Access-Control-Allow-Headers', 'X-Requested-With,content-type');
  response.setHeader('Access-Control-Allow-Credentials', true);
  next();
});
/**
 * GET /
 * Returns a list of employees
 */
router.route('/employees/').get(function (request, response) {
  console.log("GET EMPLOYEES");
  oracledb.getConnection(connectionProperties, function (err, connection) {
    if (err) {
      console.error(err.message);
      response.status(500).send("Error connecting to DB");
      return;
    }
	console.log("After connection");
    connection.execute("SELECT * FROM employee",{},
      { outFormat: oracledb.OBJECT },
      function (err, result) {
        if (err) {
          console.error(err.message);
          response.status(500).send("Error getting data from DB");
          doRelease(connection);
          return;
        }
        console.log("RESULTSET:" + JSON.stringify(result));
        var employees = [];
        result.rows.forEach(function (element) {
          employees.push({ id: element.ID, firstName: element.FIRSTNAME,
		                   lastName: element.LASTNAME, email: element.EMAIL,
		                   phone: element.PHONE, birthDate: element.BIRTHDATE,
						   title: element.TITLE, dept: element.DEPARTMENT });
        }, this);
        response.json(employees);
        doRelease(connection);
      });
  });
});
/**
 * GET /searchType/searchValue
 * Returns a list of employees that match the criteria
 */
router.route('/employees/:searchType/:searchValue').get(function (request, response) {
  console.log("GET EMPLOYEES BY CRITERIA");
  oracledb.getConnection(connectionProperties, function (err, connection) {
    if (err) {
      console.error(err.message);
      response.status(500).send("Error connecting to DB");
      return;
    }
	console.log("After connection");
	var searchType = request.params.searchType;
	var searchValue = request.params.searchValue;

    connection.execute("SELECT * FROM employee WHERE "+searchType+" = :searchValue",[searchValue],
      { outFormat: oracledb.OBJECT },
      function (err, result) {
        if (err) {
          console.error(err.message);
          response.status(500).send("Error getting data from DB");
          doRelease(connection);
          return;
        }
        console.log("RESULTSET:" + JSON.stringify(result));
        var employees = [];
        result.rows.forEach(function (element) {
          employees.push({ id: element.ID, firstName: element.FIRSTNAME,
		                   lastName: element.LASTNAME, email: element.EMAIL,
		                   phone: element.PHONE, birthDate: element.BIRTHDATE,
						   title: element.TITLE, dept: element.DEPARTMENT });
        }, this);
        response.json(employees);
        doRelease(connection);
      });
  });
});
/**
 * POST /
 * Saves a new employee
 */
router.route('/employees/').post(function (request, response) {
  console.log("POST EMPLOYEE:");
  oracledb.getConnection(connectionProperties, function (err, connection) {
    if (err) {
      console.error(err.message);
      response.status(500).send("Error connecting to DB");
      return;
    }

    var body = request.body;

    connection.execute("INSERT INTO EMPLOYEE (ID, FIRSTNAME, LASTNAME, EMAIL, PHONE, BIRTHDATE, TITLE, DEPARTMENT)"+
	                   "VALUES(EMPLOYEE_SEQ.NEXTVAL, :firstName,:lastName,:email,:phone,:birthdate,:title,:department)",
      [body.firstName, body.lastName, body.email, body.phone, body.birthDate, body.title,  body.dept],
      function (err, result) {
        if (err) {
          console.error(err.message);
          response.status(500).send("Error saving employee to DB");
          doRelease(connection);
          return;
        }
        response.end();
        doRelease(connection);
      });
  });
});
/**
 * PUT /
 * Update a employee
 */
router.route('/employees/:id').put(function (request, response) {
  console.log("PUT EMPLOYEE:");
  oracledb.getConnection(connectionProperties, function (err, connection) {
    if (err) {
      console.error(err.message);
      response.status(500).send("Error connecting to DB");
      return;
    }

    var body = request.body;
	var id = request.params.id;

    connection.execute("UPDATE EMPLOYEE SET FIRSTNAME=:firstName, LASTNAME=:lastName, PHONE=:phone, BIRTHDATE=:birthdate,"+
	                   " TITLE=:title, DEPARTMENT=:department, EMAIL=:email WHERE ID=:id",
      [body.firstName, body.lastName,body.phone, body.birthDate, body.title, body.dept, body.email,  id],
      function (err, result) {
        if (err) {
          console.error(err.message);
          response.status(500).send("Error updating employee to DB");
          doRelease(connection);
          return;
        }
        response.end();
        doRelease(connection);
      });
  });
});
/**
 * DELETE /
 * Delete a employee
 */
router.route('/employees/:id').delete(function (request, response) {
  console.log("DELETE EMPLOYEE ID:"+request.params.id);
  oracledb.getConnection(connectionProperties, function (err, connection) {
    if (err) {
      console.error(err.message);
      response.status(500).send("Error connecting to DB");
      return;
    }

    var body = request.body;
    var id = request.params.id;
    connection.execute("DELETE FROM EMPLOYEE WHERE ID = :id",
      [id],
      function (err, result) {
        if (err) {
          console.error(err.message);
          response.status(500).send("Error deleting employee to DB");
          doRelease(connection);
          return;
        }
        response.end();
        doRelease(connection);
      });
  });
});
app.use(express.static('static'));
app.use('/', router);
app.listen(PORT);
Adding the HTML Client
In this section, you add the client files to your
project and you update the index.html
file to connect the client to your RESTful
application.
-
Create a folder named
staticin the root directory of your project. -
Unzip the
employee-client.zipfile in thestaticdirectory.Note: Make sure the
index.htmlis in thestaticdirectory and not in a subfolder. -
Open the
index.htmlin a text editor. -
Edit the
servervariable, set the URL of your application, and save the file.Note: Replace
identity-domainwith the entity domain of your cloud account.https://employees-service-identity-domain.apaas.us2.oraclecloud.com
Preparing the Node.js Server Application for Cloud Deployment
To ensure that your server application runs correctly in the cloud, you must:
- Bundle the application in a
.zipfile that includes all dependencies.
Note: Don't bundle database drivers for Oracle Enterprise Cloud Service. - Include a
manifest.jsonfile that specifies the command which Oracle Application Container Cloud Service should run. - Ensure your application listens to requests on a
port provided by the
PORTenvironment variable. Oracle Application Container Cloud Service uses this port to redirect requests made to your application.
Creating the manifest.json File
When you upload your application to Oracle
Application Container Cloud Service using the
user interface, you must include a file called manifest.json
in the application archive (.zip, .tgz,
.tar.gz file). If you use the REST API
to upload the application, this file is still
required but doesn’t have to be in the archive.
-
Create a
manifest.jsonfile. -
Open the
manifest.jsonfile in a text editor and add the following content:{ "runtime":{ "majorVersion":"4" }, "command": "node server.js", "release": {}, "notes": "" }The
manifest.jsonfile contains the target platform and the command to be run. -
Compress all the project files including the
manifest.jsonfile, thestaticfolder, theserver.js,and thenode_modulesfolder in a file namednode-employees-service.zip. Make sure that thenode_modulesfolder doesn't have an OracleDB subfolder.
Creating the deployment.json file
In the deployment.json file you
can specify how much memory to allocate to your
application, how many application instances to
create initially, additional environment
variables, and service bindings to other Oracle
Cloud services. For this tutorial you create the
deployment.json file to add the
Oracle Database Cloud Service binding.
Note: If you don't specify the values or the file is omitted, memory and instance defaults are used.
-
Create a
deployment.jsonfile. -
Open the
deployment.jsonfile in a text editor and add the following content. Replace the values ofname,username, andpasswordwith the credentials of your Oracle Database Cloud Service instance.{ "services": [ { "name": "service-name", "type": "DBAAS", "username": "your-username", "password": "your-password" } ]}
Deploying Your Application Using the REST API
Uploading Your Application to the Storage Service
Before you can deploy your application, you must copy it to the storage service. You need your Oracle Cloud service credentials (username, password, identity domain) to use the REST API. With your credentials, you create cURL scripts to upload your application to the storage service.
-
Open a command-line window (or Terminal in Linux).
-
Create a storage container using the following cURL command:
Note: Replace the words in bold with your storage credentials.
curl -i -X PUT \ -u Username:Password \ https://hostname/v1/Storage-Identity-Domain/employees-service -
Upload your application archive
(node-employees-service.zip)in the storage container:curl -i -X PUT \ -u Username:Password \ https://hostname/v1/Storage-Identity-Domain/employees-service/node-employees-service.zip -T <Path-to-local-file>/node-employees-service.zip
Deploying Your Application to Oracle Application Container Cloud Service
To deploy your application, you need to include standard information in your script. The following example script shows placeholders for the required information:
url -i -X POST  \
  -u Username:Password \
  -H "X-ID-TENANT-NAME:Identity-Domain" \
  -H "Content-Type: multipart/form-data" \
  -F "name=employees-service" \
  -F "runtime=node" \
  -F "subscription=Monthly" \
  -F "deployment=Path-to-local-file/deployment.json" \
  -F "archiveURL=employees-service/node-employees-service.zip" \
  -F "notes=Node employees REST service application" \
  https://hostname/paas/service/apaas/api/v1.1/apps/Identity-Domain
Here are a few key points about this example:
-Hspecifies headers that are added to the HTTP request.-Fallows cURL to submit data like it's coming from a form (so,POSTas the HTTP method).archiveURLspecifies where your archive file is located. The URL consists of your application's name, a slash, and the archive's file name.region(Optional) If your account has access to Oracle Cloud Infrastructure regions, specify in this parameter the same region than the region where your Oracle Database Cloud Service instance was created.
Testing the REST service
-
Open a web browser and enter the URL of the employee REST service.
Note: Replace
identity-domainwith the entity domain of your cloud account.URL:
https://employees-service-identity-domain.apaas.us2.oraclecloud.com/employees
Description of this image -
Remove the
/employeespart of the URL to execute theindex.html.
Description of this image -
Click Add New.

Description of this image -
Fill the form and click Add.

Description of this image -
Select the card of the new employee.

Description of this image -
Click Edit.

Description of this image -
Change the value of the Department field and click Update.

Description of this image The employee card is updated.

Description of this image -
Click the card of the employee and click Delete.

Description of this image -
Click Delete and then click Ok to confirm.

Description of this image Description of this image
Want to Learn More?
-
Node.js website nodejs.org