Before You Begin
Purpose
In this tutorial, you will learn how to integrate an external Jenkins build server with Oracle Developer Cloud Service to run builds when commits are pushed to the Oracle Developer Cloud Service project Git repository.
Time to Complete
30 minutes
Background
In this tutorial, you will use Oracle Developer Cloud Service Webhooks to send a notification to the external Jenkins server to run builds of the application in the Oracle Developer Cloud Service project Git repository. When a build on the Jenkins server is complete, you will use another Webhook to receive a notification from the Jenkins server and show an activity feed in the Oracle Developer Cloud Service Project page.
You will use the Hudson/Jenkins Build Trigger Webhook to send notifications to the Jenkins server and use the Jenkins Notification Plugin Webhook to receive notifications from the Jenkins server.
What Do You Need?
-
An active Oracle Developer Cloud Service account
-
A Jenkins server available on the public Internet and configured with Git, Maven, Notification plugin, and Build Authorization Token Root plugin. You would also need the Admin privileges of the Jenkins server to install the plugins, if they are not already installed.
Note: This tutorial is created using Jenkins ver. 2.46.3.
-
An Oracle Developer Cloud Service project with a Git repository populated with the sample Maven application. You must be assigned the Owner role of the project to create Webhooks.
Example:

Description of this image Click here to download the sample application. Create a project with a Git repository in Oracle Developer Cloud Service and push the sample application files to the project Git repository. See the tutorials in the Want to Learn More section.
Configuring the Jenkins Build Server and the Jenkins Job
In the following sections, you will configure the Jenkins server with the plugins and environment settings required for this tutorial. You will also create a Jenkins job and configure it to use the Oracle Developer Cloud Service project Git repository, run Maven jobs, and archive the artifacts.
Configuring the Jenkins Server
For this tutorial, you need a Jenkins server configured with Git, Maven, and the Notification plugin. Follow the steps of this section to know how to do that. For more information and configuration options, see the Jenkins documentation.
-
Configure Git and Maven settings in the Manage Jenkins > Global Tool Configuration page of the Jenkins web user interface.

Description of this image -
Install the Notification plugin, if you have not already. The plugin can be installed from the Manage Jenkins > Manage Plugins page.
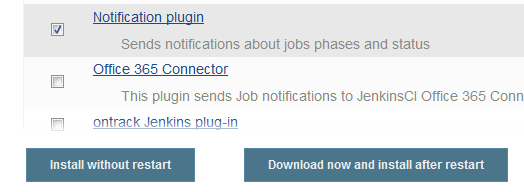
Description of this image -
Install the Build Authorization Token Root plugin, if you have not already. The plugin can be installed from the Manage Jenkins > Manage Plugins page.

Description of this image
Creating and Configuring a Job in Jenkins
In this section, you will create a Jenkins job, configure it to use the Oracle Developer Cloud Service Git repository, add Maven commands as the build step, and then add a post-build step to archive the artifacts.
-
Open the Jenkins Dashboard page and click create new jobs (or New Item) to create a job.

Description of this image -
In the Job wizard, enter the following details:
-
Enter an item name:
DevCS_JavaWebApp_Maven -
Job type: Maven Project
Click OK.

Description of this image -
-
In the Description field of the General tab of the Configuration page, enter a description of the job.
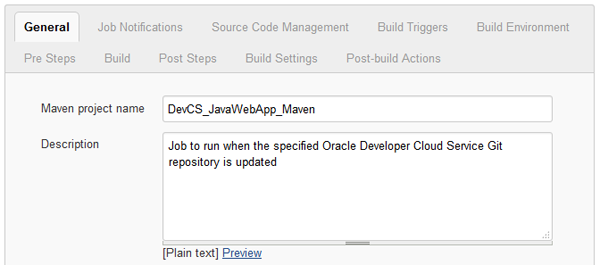
Description of this image -
Click the Source Code Management tab.

Description of this image -
In the Source Code Management section, select the Git option.
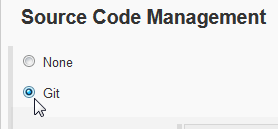
Description of this image -
In the Source Code Management section, enter the Oracle Developer Cloud Service project Git repository URL.

Description of this image You can copy the Git repository URL from the Code page of the Oracle Developer Cloud Service project. In the Code page, select the Git repository name in the Repositories list, click HTTP, and then click the Copy icon to copy the repository URL to the clipboard.
Example:

Description of this image After entering the URL, you might see an
Failed to connect to repository ...error message in Red. It appears because you have not provided the Oracle Developer Cloud Service access credentials.
Description of this image -
To provide the Oracle Developer Cloud Service credentials, next to the Credentials list, click Add and then select Jenkins.

Description of this image In the Jenkins Credentials Provider dialog, enter the Oracle Developer Cloud Service username and password in Username and Password. Use the default values in other fields.

Description of this image Click Add when you are done. Back on the Configuration page, the error message will disappear after verifying the credentials.

Description of this image Note: If you still see the error message, configure the proxy settings of Jenkins. See the Jenkins documentation to know more.
Click the Build tab at the top of the page and configure the POM file path and the Maven goals.
-
Root POM: Enter the path of the POM file in the Git repository. You can find the path from the Code page of the Oracle Developer Cloud Service project.
-
Goals and options: Enter
clean installas the Maven goals.

Description of this image -
-
Click the Post-build Actions tab at the top of the page.

Description of this image -
Click the Add post-build action list and select the Archive the artifacts option.
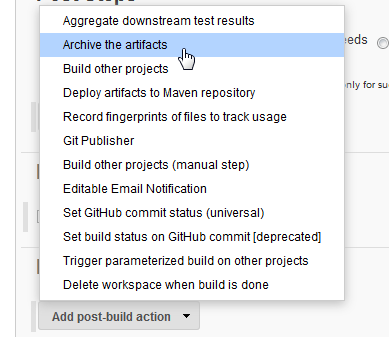
Description of this image -
In the Files to archive field of the Archive the artifacts section, enter
HelloWorld/target/*.war(or the path to the generated artifact files) to archive all.warfiles of the build.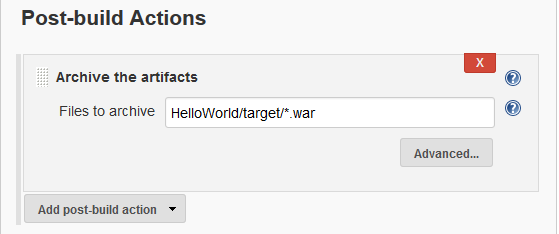
Description of this image -
Click Save.
Triggering a Jenkins Job Build using Oracle Developer Cloud Service Webhooks
In the following sections you will configure the Jenkins job to add an authentication token that the Webhook will use to trigger a build of the Jenkins job. You will also create and configure a Hudson/Jenkins Build Trigger Webhook in Oracle Developer Cloud Service.
Configuring the Jenkins job
To configure a Jenkins job to get triggered by a Webhook notification, you must provide a unique authentication token in the job configuration that will be used by the Oracle Developer Cloud Service Webhook. The authentication token is required to trigger a build in the Jenkins server.
- In the Jenkins web user interface, open the configure page of the DevCS_JavaWebApp_Maven job.
-
Click the Build Triggers tab at the top of the page to navigate to the Build Triggers section.

Description of this image -
In the Build Triggers section, select the Trigger builds remotely (e.g., from scripts) check box, and enter
my_auth_tokenas the authentication token name.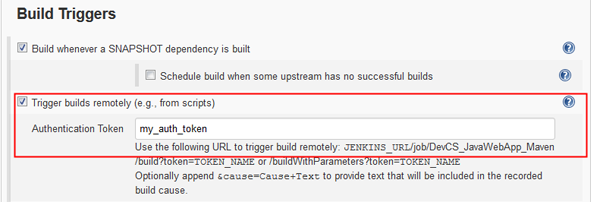
Description of this image Make sure that the authentication token name is not used in any other job in Jenkins. If it is, then enter a unique token name.
-
Click Save.
Creating and Configuring the Hudson/Jenkins Build Trigger Webhook
The Hudson/Jenkins Build Trigger Webhook is an outgoing Webhook and is used to send notifications to an external Jenkins or Hudson server. In this tutorial, you will create and configure the Webhook to send notifications from Oracle Developer Cloud Service to the Jenkins server you have configured in the above sections. The notification will be sent when the specified Oracle Developer Cloud Service project Git repository is updated.
-
In Oracle Developer Cloud Service web user interface, open the project, and click Administration > Webhooks in the navigation bar.

Description of this image -
In the Webhooks page, click + New Webhook.

Description of this image In the Create Webhook page, enter the following details:
Type: Select Hudson/Jenkins - Build Trigger.
Name: Enter
JenkinsBuildWebHookor any unique name of your choice.Build Server URL: Enter the base URL of the Jenkins server.
For example, if
http://my_server:8080/job/DevCS_JavaWebApp_Mavenis the URL of the Jenkins job that you created in the above section, then enterhttp://my_server:8080/in this field.Job Name: Enter
DevCS_JavaWebApp_Mavenbecause it was the name of the Jenkins job.-
Build Server Security: Select Build Token Root Plugin as it is the preferred way of triggering builds through Webhooks. The build will be triggered only if the Build Authorization Token Root plugin ins instaled on the Jenskins server.
Remote Build Token: Enter
my_auth_tokenbecause it was the token name specified in the Jenkins job.Repository: Specify the application's Git repository that will trigger the build on the Jenkins server. Make sure the repository is same as the reposiory that you have specified in the Jenkins job.
-
In the Webhooks page, select the Webhook and click the Test button to test whether the configuration is correct.

Description of this image If the confguration is correct, the
 icon before the Webhook name changes to the
  icon. If required, click the Logs button to see the test logs.
Description of this image
Leave other fields with default values and click Done.

The Webhook is now ready to send a notification to the Jenkins server and run a build when any update is pushed the specified Git repository.
Receiving Notifications of a Jenkins Job Build using Oracle Developer Cloud Service Webhooks
In the following sections, you will create and configure the Jenkins Notification Plugin Webhook to receive notifications from the external Jenkins server and configure the Jenkins job to send notificatins to Oracle Developer Cloud Service.
Creating and Configuring the Jenkins Notification Plugin Webhook in Oracle Developer Cloud Service
The Jenkins Notification Plugin Webhook is an incoming Webhook and is used to receive notifications from an external Jenkins server. In this tutorial, you will create and configure the Webhook to receive notifications from the Jenkins server you have configured in the above sections.
-
In Oracle Developer Cloud Service web user interface, open the project, and click Administration > Webhooks in the navigation bar.

Description of this image -
In the Webhooks page, click + New Webhook.

Description of this image In the Create Webhook page, enter the following details.
Type: Select Jenkins - Notification Plugin.
Name: Enter
JenkinsGetNotificationor any other unique name of your choice.Base URL: Enter the base URL of the Jenkins server.
For example, if
http://my_server:8080/job/DevCS_JavaWebApp_Mavenis the URL of the Jenkins job that you created in the above section, then enterhttp://my_server:8080/in this field.Track - Ongoing Builds: Select the check box.
Leave other fields with default values and click Done.

The Webhook is now ready to receive notifications from the Jenkins server when a build runs and is complete.
Configuring the Jenkins Job to send Notifications to the Jenkins Notification Plugin Webhook
To send notifications to Oracle Developer Cloud Service, you must create and configure an endpoint in the Jenkins job. You can create and configure the endpoint after the Notification plugin is installed in Jenkins. You would also need the Jenkins Notification Webhook URL and provide it in the endpoint.
Copy the Jenkins Notification Webhook URL from the Webhooks page.
In the Oracle Developer Cloud Service Webhooks page, select the JenkinsGetNotification Webhook and copy the value of the URL field.

Description of this image -
In the Jenkins server web user interface, open the configure page of the DevCS_JavaWebApp_Maven job, and click the Job Notifications tab.

Description of this image -
In the Job Notifications section, click Add Endpoint.

Description of this image -
In the URL field of Notification Endpoints, paste the Jenkins Notification Webhook URL that you copied from the Oracle Developer Cloud Service Webhook.

Description of this image Do not change the default values of other fields. To know more about the fields, see the Jenkins documentation.
-
Click Save.
Updating the Project Git Repository, Triggering a Build in the Jenkins Server, and Receiving Notifications
Now the Webhooks and the Jenkins job are ready to send and receive notifications. Make some changes to the application, commit them, and then push the changes to the project Git repository that you specified in the Jenkins job and Webhooks.

The commit message appears in the recent activity feed.

The Hudson/Jenkins Build Trigger Webhook notices the update in the Git repository and sends a notification the external Jenkins server, which runs a build of the specified job immediately.

When the build starts and completes, the Jenkins server sends a notification to Oracle Developer Cloud Service, which is received by the Jenkins Notification Webhook. The Webhook then adds an entry to the project activity feed about the build event.
Build start notification in the project activity feed:

Build success notification in the project activity feed:

Click the job name link in the project activity feed to open the build page of the DevCS_JavaWebApp_Maven job in the Jenkins server:

You can now download the artifact and deploy it to your preferred server.
Want to Learn More?
-
Configuring Webhooks in Oracle Developer Cloud Service in Using Oracle Developer Cloud Service
-
Cloning an Oracle Developer Cloud Service Project Git Repository Using a CLI OBE