Print
PrintBefore you begin
This 15-minute tutorial shows you how to call an external Rest API from a Groovy script in Oracle EPM Cloud Planning. You'll also learn how to create a right-click action menu with a menu item to call the script, and how to associate the action menu with a data form.
Background
The Groovy EPM object model provides a way to call internal (cross-POD or other Oracle Cloud Services) and external REST APIs. In this example, you create and execute a Groovy rule to call an external Google Places REST API to add or update employee address information in the ManageEmployees form.
What do you need?
An EPM Enterprise Cloud Service instance allows you to deploy and use one of the supported business processes. To deploy another business process, you must request another EPM Enterprise Cloud Service instance or remove the current business process.
- Have Service Administrator access to EPM Enterprise Cloud Service. The instance should not have a business process created.
- If you haven't already, register for a free Oracle Cloud Customer Connect account so you can access the required files. Upload and import this Planning snapshot into your environment. If you've previously uploaded the snapshot for another Groovy tutorial, you can continue using the same snapshot.
- Before you can start using the Google Maps Platform APIs which includes the Places REST API used in this tutorial, you must sign up and create a billing account to acquire an API key. To learn more, see Get Started with Google Maps Platform.
For more information on uploading and importing snapshots, refer to the Administering Migration for Oracle Enterprise Performance Management Cloud documentation.
The scripts you need for this tutorial are linked as text files within each section.
Loading Planning calculation variables
In this section, you upload calculation variables from an XML file for use in the Groovy script.
- Right-click the link for HP4_Plan2_Variables.xml, and save the file to your local drive.
- From the Planning Home page, navigate to Rules (under Create and Manage) to open Calculation Manager. In the System View, expand EPM Cloud > HP4. Right-click Plan2 and select Import.
- Under File Import Details, browse to select HP4_Plan2_Variables.xml from your local drive.
- Under Location Details, make the following selections:
- Application Type: EPM Cloud
- Application: HP4
- Cube: Plan2
- Under Import Options, select Override Existing Objects.

- Click Import. Review the import results, and then click OK.

- Click Cancel to close the Import dialog box.
Creating a named connection in Planning
In this section, you edit an existing connection to include the Places REST API key.
- Navigate to Connections (under Tools), and select the Places connection.

- Edit the connection by entering the API key in the key parameter. Save and close the connection.

Creating a Groovy script
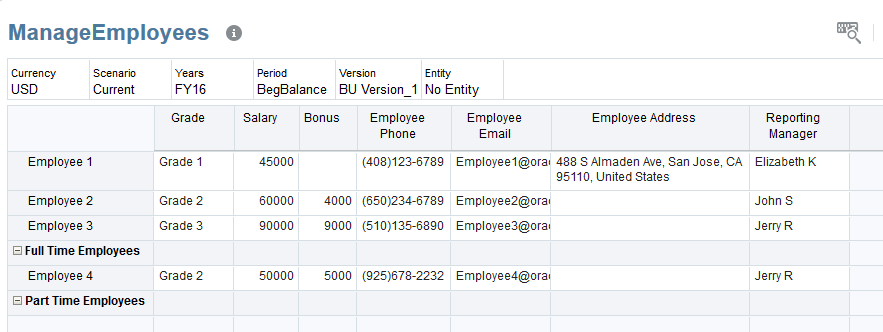
In this section, you implement a Groovy script to update an employee address. We'll work with the predefined ManageEmployees form.
- In Calculation Manager, create a rule named Groovy Add or Update Employee Address in the Plan2 cube.

- In the Rule Editor, change the Designer option to Edit Script and set the Script Type to Groovy Script.

- Copy this script and paste it into the editor:

/*RTPS: {Employee} {EmployeeAddress} {Scenario} {Year} {Period} {Entity} {Version}*/ Member employee = rtps.Employee.member
  // Get the complete address using the Google maps REST API. Use the original if Google maps can't find the address
def address = rtps.EmployeeAddress
// Get the complete address using the Google maps REST API. Use the original if Google maps can't find the address
def address = rtps.EmployeeAddress  HttpResponse<String> jsonResponse = operation.application.getConnection("Places")
.get()
.queryParam("input", rtps.EmployeeAddress.enteredValue)
.asString()
HttpResponse<String> jsonResponse = operation.application.getConnection("Places")
.get()
.queryParam("input", rtps.EmployeeAddress.enteredValue)
.asString()  println(jsonResponse.body)
  ReadContext ctx = JsonPath.parse(jsonResponse.body)
  if(ctx.read('$.status') == "OK")
address = getTextCellId(ctx.read('$.candidates[0].formatted_address') as String, true)
// Generate the calc script to save the employee address
"""SET CREATENONMISSINGBLK ON;
FIX(${fixValues(rtps.Scenario, rtps.Year, rtps.Period, rtps.Entity, rtps.Version, employee)}, "USD")
"Employee Address" = $address;
ENDFIX;"""
if(ctx.read('$.status') == "OK")
address = getTextCellId(ctx.read('$.candidates[0].formatted_address') as String, true)
// Generate the calc script to save the employee address
"""SET CREATENONMISSINGBLK ON;
FIX(${fixValues(rtps.Scenario, rtps.Year, rtps.Period, rtps.Entity, rtps.Version, employee)}, "USD")
"Employee Address" = $address;
ENDFIX;"""  Define all the run time prompts (RTPs) used by this rule on the first line. Get the Member object for
 employeespecified by the Employee RTP. Assign the text entered in the EmployeeAddress RTP as the default value for address. Get the Places connection to execute the HTTP GET request on this resource and pass the text entered in the EmployeeAddress RTP as the value for the inputquery parameter.The Places connection object is a communication link between the Groovy script and the Google Places REST API resource.
Log the Google Maps REST API response for debugging puprose. Parse the JSON response received from the API using the JsonPath library. If the status == OK, read the formatted_address field from the first candidate's object in the returned array, get the text cell id for the formatted_address and assign it to address. Generate the calculation script to save this employee address. - On the toolbar, click
 (Save) to save the script.
 - You want users to enter values only for EmployeeAddress. In the Variables tab, select Is Hidden for Employee, Entity, Period, Scenario, Version, and Year.

- Save the script again.
- Click
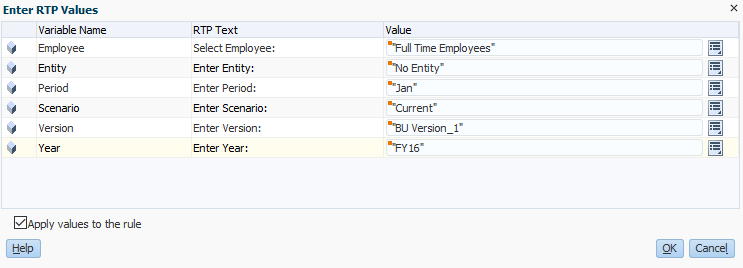
 (Validate and Deploy). Enter RTP values for validation purposes:
 - Employee:
"Full Time Employees" - Entity:
"No Entity" - Period:
Jan - Scenario:
Current - Version:
BU_Version_1 - Year:
FY16 - Check Apply values to the rule to save these values as defaults for validation purposes, then click OK.
- Click OK when prompted, then close Calculation Manager.
Saving the script displays the variables in the Variables tab.
When users run the script from the form, these hidden variables are assigned values from the form context.
During this step, the rule is not executed; however, you must enter valid members for the validation process to succeed.
Creating Planning action menus to run Groovy scripts
In this section, you create an action menu called Manage Employees, with a right-click action menu item that runs the Groovy script.
- From the Planning Home page, navigate to Action Menus (located under Create and Manage) and create an action menu named Manage Employees.

- Edit the Manage Employees action menu and add a child menu item named Update Employee Address. Enter or select the following options to define the menu item:
Option Field Value to Enter or Select Menu Item Update Employee Address Label Update Employee Address Type Business Rule Required Parameters Employee Cube Plan2 Business Rule Groovy Add or Update Employee Address 
- Click Save, then click OK to save the menu item. Finally, click Save and then OK again to save the action menu.

Associating Planning action nenus with forms
In this step, you associate the action menu with the ManageEmployees form and test your script.
- Navigate to Forms (located under Create and Manage) and edit the ManageEmployees form.

- On the Other Options tab, add the Manage Employees context menu to the Selected Menus list.

- Click Finish to save changes to the form.
- Close the form manager and return to the Home page.
Testing the Groovy script
In this step, you test the script. The testing procedure includes entering a valid place for the EmployeeAddress RTP to retrive the full address for the place.
- From the Planning Home page, click Data to display the list of data entry forms, then click ManageEmployees to open the Manage Employees form.

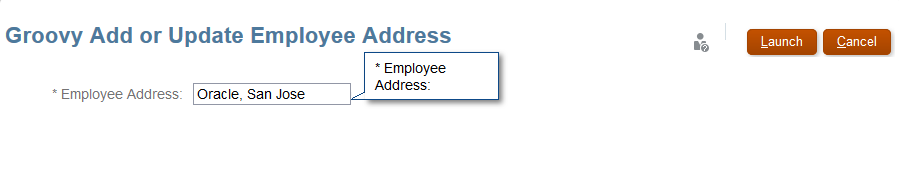
- To test the Groovy script, right-click Employee 1 and select the Update Employee Address menu item.

- In the Employee Address prompt, type Oracle, San Jose and then click Launch.
- Save and close the form. Navigate to Jobs (under Application) to open the Jobs Console.

- Click Groovy Add and Update Employee Address to display the job details. Click the Completed status to see the log messages printed by the Groovy script.