 Before You Begin
This tutorial shows you how to configure a web application to authenticate with Oracle Identity Cloud Service by using Secure Form Fill.
This tutorial takes approximately 30 minutes to complete.
Background
You can use Oracle Identity Cloud Service to provide Single Sign-on to access your applications. You can integrate your applications with Oracle Identity Cloud Service using one of the following options:
- SDKs: Use SDKs to develop applications to use the Oracle Identity Cloud Service authentication mechanism.
- App Catalog: The App Catalog contains ready to use templates to integrate with most cloud based applications.
- Open ID Connect Standard: Use Oracle Identity Cloud Service as the authentication server for applications that support the Open ID Connect standard.
- OAuth 2.0: Use Oracle Identity Cloud Service as an authorization server for applications that support the OAuth standard.
- SAML 2.0: Use Oracle Identity Cloud Service as an Identity Provider for applications that support the SAML standard.
If you are not able to configure Single Sign-on with the above options, then Oracle Identity Cloud Service provides a Secure Form Fill Admin Client that you can use to automatically fill out the login form and submit credentials.
How does it work?
Secure Form Fill is the Oracle Identity Cloud Service alternative for single sign-on into applications that require auto-form fill but don't support OAuth, SAML, or federated sign-on methods. Oracle Identity Cloud Service stores the user's credentials in an encrypted format using strong encryption combined with a customer-specific private key.
When you enter the application credentials initially in a form-fill-enabled applications in Oracle Identity Cloud Service, Oracle Identity Cloud Service stores and encrypts the information, and automatically fills in the login form so that you can sign in without having to re-enter the information each time.
When you launch a web application's login page that has been configured for Secure Form Fill, Oracle Identity Cloud Service detects and securely fills in your credentials, submits the credentials to the application, and then you are automatically signed in.
What Do You Need?
- A Windows operating system version 7, 8 or 10 with:
- Local admin rights enabled
- 32-bit Java Runtime Environment (JRE) in order to access local help content for the Secure Form Fill Admin Client.
- Mozilla Firefox
- Google Chrome
 Download the Secure Form Fill Admin Client
You use the Secure Form Fill Admin Client (Oracle Enterprise Single Sign-On (ESSO) Administrative Console) to create and update Secure Form Fill configuration files for your custom secure form fill applications in Oracle Identity Cloud Service. The ESSO Administrative Console is part of the Secure Form Fill Admin Client.
- In the Identity Cloud Service console, expand the Navigation Drawer
 , click Settings, and then click Downloads.
 - In the Downloads page, click Download to the right of the Secure Form Fill Admin Client.
- Verify that a Success status appears to the right of the application that you downloaded.
- In the folder where you downloaded the Secure Form Fill Admin Client, unzip the file.
- Double-click the installer to launch the install wizard, and then click Next.
- Choose the Complete installation option, click Next, and then click Install.
- When the installation completes, click Finish.


 Configure the Secure Form Fill Admin Client for an Application
- Launch the Secure Form Fill Admin Client (ESSO Administrative Console).
- Right-click Applications, and then choose New Web App.
- On the Add Application dialog, enter the name of the application.
- Leave all other default options selected, and then click Finish.
- Choose the Logon form type. This form is used to set up your Web app template.
- In the Address field, enter the URL for the Web app, click Go, and then navigate to the login page.
- Using the fields on the bottom of the screen, complete the following steps:
- Select the user name field, right-click, and then choose Username/ID.
- Select the password field, right-click, and then choose Password.
- Select the submit button, right-click, and then choose Submit.
- Follow the on-screen prompt and click OK.
- In the Administrative Console, under Applications, click the application name that you had created. Click File from the top menu and then click Export. Save the .ini file with an appropriate name.
 Register a Secure Form Fill Application
- In the Identity Cloud Service console, expand the Navigation Drawer, click Applications, and then click Add.
- In the Add Application window, click App Catalog.
- In the Type of Integration section, click Secure Form Fill, locate Generic Secure FormFill App Template, and then click Add.
- Complete the App Details by entering a Name (same as the .ini file name that your created earlier), enter a description, and Application URL.
- In the Display Settings section, select Display in My Apps.
- Click Add.
- Click Import to import the secure form fill configuration file that you created in the Secure Form Fill Admin Client (ESSO Administrative Console). The application has been added in deactivate state. To activate your application, click Activate next to the app name.
 Use the Secure Form Fill Plugin
- Sign in to Oracle Identity Cloud Service using your credentials. Navigate to My Apps and click the App that you created using the above steps. Based on the the browser that you are using, you are prompted with the following option:
- Google Chrome:
Go to the Extensions in Google Chrome and install the Oracle Secure Form Fill Plugin from the Oracle Identity Cloud Service user interface. You will be prompted to download the plug-in from the My Apps page the first time that you access secure form fill app. - Mozilla Firefox
Install the Secure Form Fill Mozilla Firefox plug-in from the My Apps page. You will be prompted to download the plug-in from the My Apps page the first time that you access the secure form fill app. - After you install the Oracle Secure Form Fill Plugin, when you are logged in to Oracle Identity Cloud Service you can access My Apps from your browser toolbar.
 Example: How to Use Secure Form Fill to Authenticate LinkedIn Web App with Oracle Identity Cloud Service
- Launch the Secure Form Fill Admin Client (ESSO Administrative Console).
- Right-click Applications, and then choose New Web App.
- On the Add Application dialog, for this example, enter the name as LinkedIn.
- Leave all other default options selected, and then click Finish.
- Choose the Logon form type. This form is used to set up your LinkedIn Web app template.
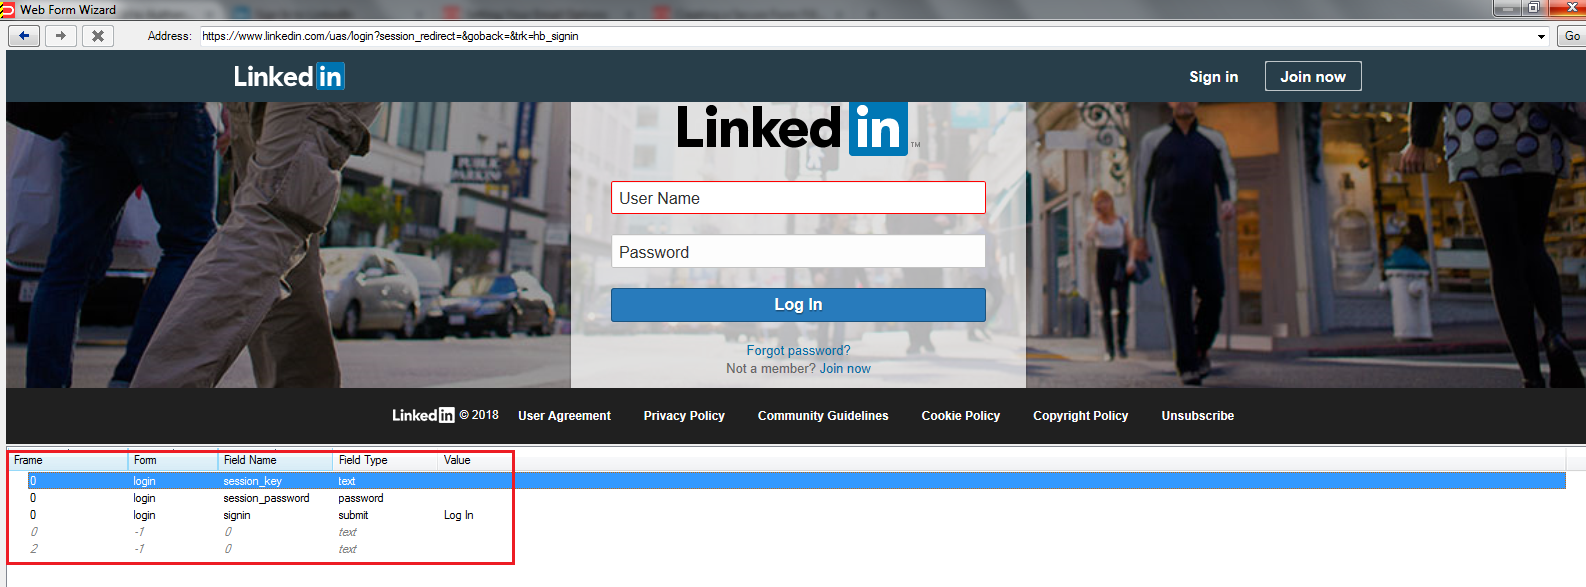
- In the Address field, enter the URL: https://www.linkedin.com/uas/login?session_redirect=&goback=&trk=hb_signin, click Go, and then navigate to the login page.
- Ensure that you give the exact URL of the login page. In order to configure multiple fields on the login page, see Creating a Secure Form Fill Configuration File.
- Using the fields on the bottom of the screen, complete the following steps:
- Select the user name field, right-click, and then choose Username/ID.
- Select the password field, right-click, and then choose Password.
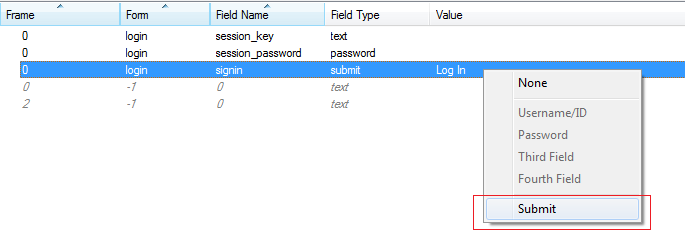
- Select the submit field, right-click, and then choose Submit.
- Follow the on-screen prompt and click OK.
- In the Administrative Console, under Applications, click LinkedIn. Click File from the top menu and then click Export. Save the file with the name LinkedIn.ini.
- In the Identity Cloud Service console, expand the Navigation Drawer, click Applications, and then click Add.
- In the Add Application window, click App Catalog.
- In the Type of Integration section, click Secure Form Fill, locate Generic Secure FormFill App Template, and then click Add.
- In the App Details section, enter the name as LinkedIn.
- In the Display Settings section, select Display in My Apps.
- Click Add.
- Click Import, navigate and select LinkedIn.ini, click Open.
- Once the LinkedIn.ini file importing is succesful, Click Activate.


 Example: How to Configure Secure Form Fill Using Advanced Field Matching
In the login screen of the web application, if you find that the value for submit button has an anchor tag or uses ordinal values, you can use non-input fields to set the values for submit button.
Note : Ordinal values change with different browsers or their versions.
- Launch the Secure Form Fill Admin Client (ESSO Administrative Console).
- Right-click Applications, and then choose New Web App.
- On the Add Application dialog, for this example, enter the name as Scrive.
- Leave all other default options selected, and then click Finish.
- Choose the Logon form type. This form is used to set up your Scrive Web app template.
- In the Address field, enter the URL: https://scrive.com/en/enter#log-in, click Go, and then navigate to the login page.
- Ensure that you give the exact URL of the login page. In order to configure multiple fields on the login page, see Creating a Secure Form Fill Configuration File.
- Using the fields on the bottom of the screen, complete the following steps:
- Select the user name field, right-click, and then choose Username/ID.
- Select the password field, right-click, and then choose Password.
- Select the submit field, right-click, and observe that Submit value is disabled.
- Select the Show non-input fields check box.
- Right-click the login button field, that is the third field in this page, and then select submit.

Description of the illustration. - Click OK.
- To use Advanced Matching option, perform the following:
- Open the Scrive login page on any browser and inspect the page for elements. The submit field is an anchor tag with the class name as button main.

Description of the illustration. - In the Administrative Console, select Scrive under Applications and then double-click Scrive under Forms.
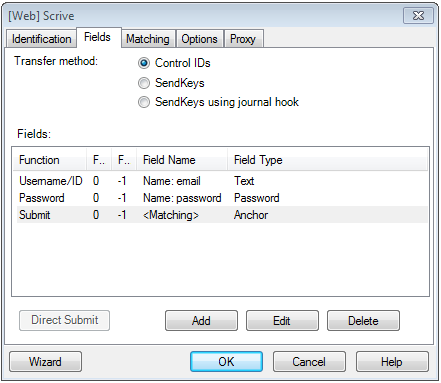
- In the [Web] Scrive window, select Fields tab and then double-click Submit field.
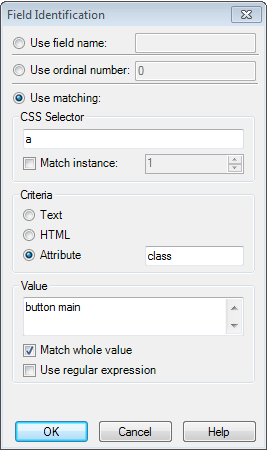
Description of the illustration. - In the Field Identification window, select Use Matching and then select or enter the following details:
- CSS Selector: a
- Attribute: class
- Value: button main
- Select Match Whole Value
Description of the illustration. - Follow the on-screen prompt and click OK. Ensure that for the submit button field, the value for Field name is set to Matching and Field Type set to Anchor.
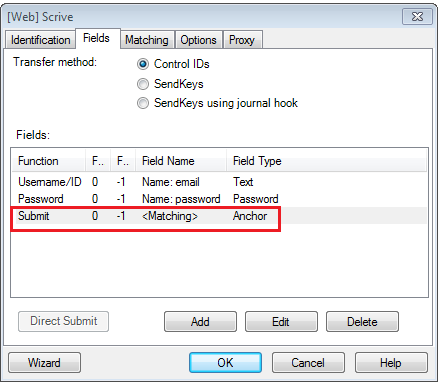
Description of the illustration.
- Open the Scrive login page on any browser and inspect the page for elements. The submit field is an anchor tag with the class name as button main.
- In the Administrative Console, under Applications, click Scrive. Click File from the top menu and then click Export. Save the file with the name Scrive.ini.
- In the Identity Cloud Service console, expand the Navigation Drawer, click Applications, and then click Add.
- In the Add Application window, click App Catalog.
- In the Type of Integration section, click Secure Form Fill, locate Generic Secure FormFill App Template, and then click Add.
- In the App Details section, enter the name as Scrive.
- In the Display Settings section, select Display in My Apps.
- Click Add.
- Click Import, navigate and select Scrive.ini, click Open.
- Once the Scrive.ini file importing is succesful, click Activate.
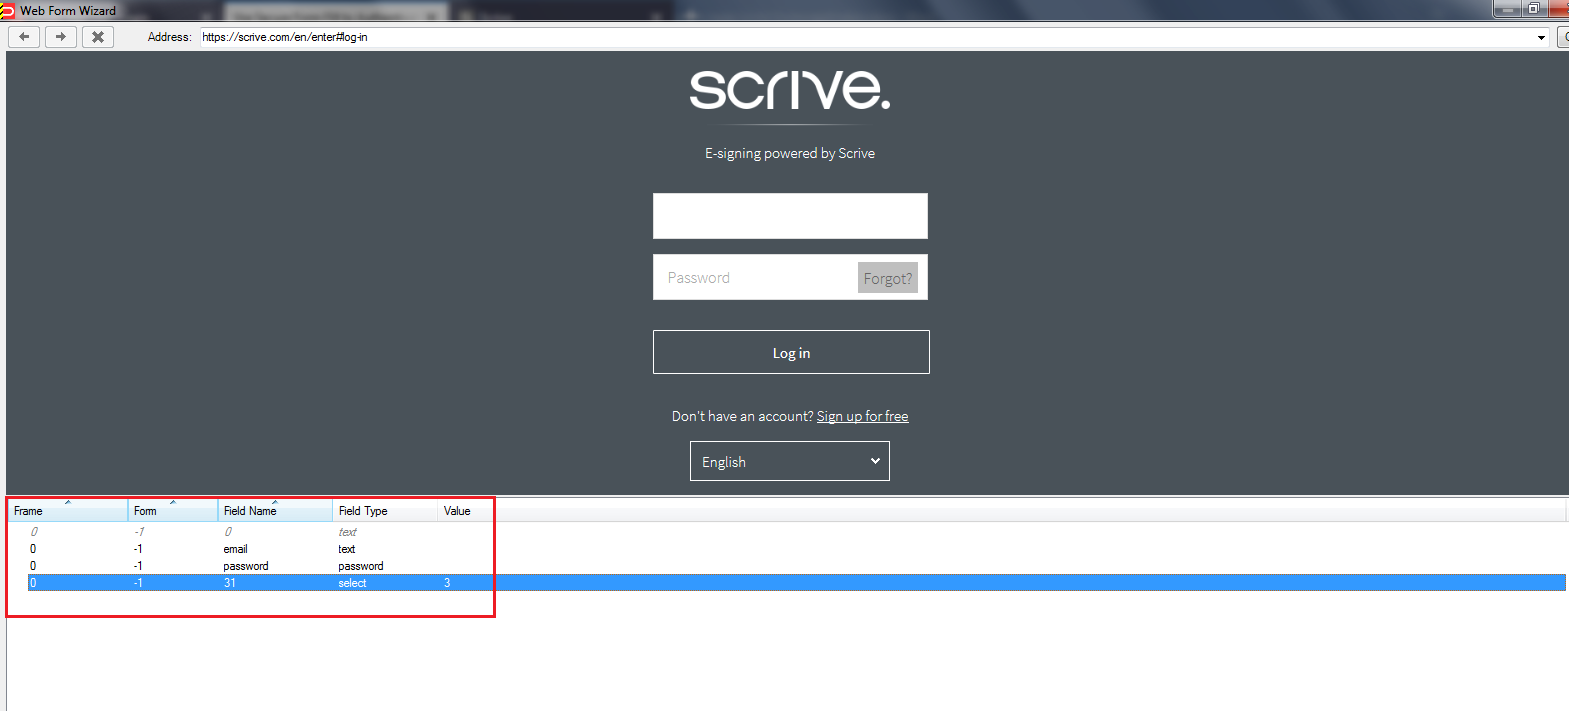


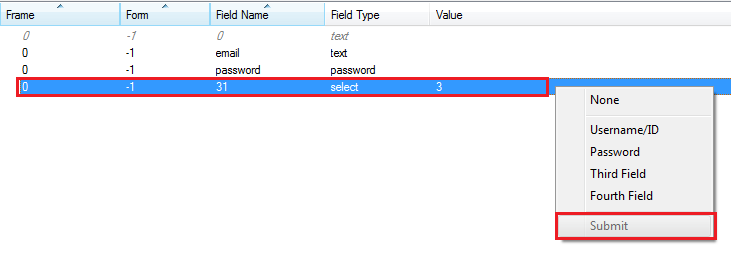
Important: Now if you observe, you can see that there is no name for submit field. Instead it is using ordinals. As ordinal values may change depending on the browser type or its version, it is advisable not to use ordinal values. Use Advanced Matching option to avoid using ordinals.
 Use Secure Form Fill to Authenticate an Application with Oracle Identity Cloud Service