This 15-minute tutorial shows you how to add a WebLogic Domain and an Oracle Database to Oracle Management Cloud using the Oracle Management Cloud graphical interface.
Background
You can define the entities managed and monitored by Oracle Management Cloud by using the Oracle Management Cloud Add Entity graphical interface, the Oracle Management Cloud agent command-line interface utility (omcli), or, you can extract this information from an on-premises Oracle Enterprise Manager Cloud Control installation. In this tutorial, you add two entities, a WebLogic Domain and an Oracle Database, to Oracle Management Cloud using its graphical interface.
A WebLogic Server domain running on the host where the cloud agent is running: Install, configure and start at least one WebLogic Server in a WebLogic Domain, or use an existing installation. A WebLogic Domain consists of one or more WebLogic Server instances (and their associated resources) that you manage with a single Administration Server. For more information, see Oracle WebLogic Server Installers.
An Oracle Database accessible from the host where the cloud agent is running: Install, configure and start an Oracle Database, or use an existing installation. For more information, see Oracle Database Software Downloads.
A host that has access to the WebLogic Domain and the Oracle Database mentioned above: Install a Management Could Agent version 1.23 or later, or use an existing host with a previously installed cloud agent. Cloud agents version 1.23 or higher are required for adding entities using the graphical interface. For more information, see Installing Oracle Management Cloud Agents.
Monitoring credentials are required to monitor availability and performance of most entities using Cloud Agents.
Why Do You Need Monitoring Credentials?
A monitoring user allows the Oracle Management Cloud Agent to connect to an entity and collect relevant configuration and performance metrics as well as other components dependencies information.
Check Requirements for Monitoring
Locate the WebLogic Server/Domain entry in the table available in this Monitoring Credentials section.
Description of the illustration
Note in the table that you will need to know the WebLogic username and password with at least the monitor role. In this example, you use the default WebLogic user, weblogic.
This example shows non-SSL WebLogic setup. However, if your WebLogic instances are using SSL, with certificates that are not signed by a well-known Certificate Authority, these certificates must be imported into the Cloud Agent's trust store. For more information, see the Monitoring Credentials section.
Locate the Oracle Database entry in the same table available in the Monitoring Credentials section. If you don't already have it, note the special monitoring user you need to create in the database and its privileges. This example uses the same user listed in the table, named moncs, as the database monitoring user.
Define Your Entities with Oracle Management Cloud
In this step you register entities with a Cloud Agent and, in turn, this operation registers these entities with the Oracle Management Cloud instance attached to this Cloud Agent.
Connect to Oracle Management Cloud
Assuming you have signed up for Oracle Cloud and created an Oracle Management Cloud instance, the Management Cloud tile is displayed on your My Services dashboard.
Sign in to Oracle Cloud and access the My Services dashboard.
Click the Show:Active drop-down and select Active.
Click Launch Management Cloud. You are now on the Oracle Management Cloud Welcome page.
Access the Add Entity page
In this step you to define entities with various agents that are already installed and known to your Oracle Management Cloud instance.
From the main menu, navigate to Administration > Add Entity and click Add Entity on the Entity Addition Job Status page:
Description of the illustration
Based on the entity type you selected, you can now enter all the required properties for defining the WebLogic Domain.
The name of your entity
The name you would like to display in Oracle Management Cloud
The port WebLogic was configured on
The protocol WebLogic was configured with. In this case, non-SSL uses protocol t3.
The WebLogic Administration Server host fully qualified domain name
The cloud agent, version 1.23 or above, that will be sending these entity details to Oracle Management Cloud. Note that only cloud agents version 1.23 or above are shown available.
The WebLogic username with appropriate privileges that you noted earlier (monitoring user)
Note an automatic Job Name is created. This job submits these details to the selected cloud agent.
Optionally, you can create tags that define additional relationships between entities. These relationships will help search and group these entities in Oracle Management Cloud. For example, you may want to use the same tag for all entities that are physically in the same location, or entities that are part of the same custom logical group. The Tag all members option applies to composite entities and allows you to specify the same tag to all members discovered under this entity.
Description of the illustration
When complete, click Add Entity. A job is now submitted to the agent you selected.
Return to the Entity Addition Job Status and monitor the status of this job. When the job completes, the status should change to Completed.
From the Entity Addition Job Status page, repeat the above steps starting with Step 2 and, this time, use the entity type Oracle Database. The database details and connection information are defined at the database install time. Description of the illustration
In this example, this database definition has the same tag as the WebLogic Domain defined earlier. This database and the WebLogic Domain are now part of the same logical group.Description of the illustration
Return to the Entity Addition Job Status and monitor the status of this second job. When this job completes, the status should also change to Completed.
Verify Your Entities Addition
In this last step you verify that the Oracle Database, WebLogic Domain and all other entities part of this domain are now visible in Oracle Management Cloud.
From the main menu, navigate to Monitoring > Entities and search for your WebLogic entity name.
Click on the domain name displayed to access your WebLogic Domain home page.
Click the Related Entities tab to view all other entities part of your domain, that are automatically discovered, as well as the related database defined by your tag. All these entities are now visible in multiple Oracle Management Cloud areas for management and analysis.
 Adding Entities to Oracle Management Cloud Using the Graphical Interface
 Before You Begin
 Prepare Your Entities For Monitoring
 Define Your Entities with Oracle Management Cloud
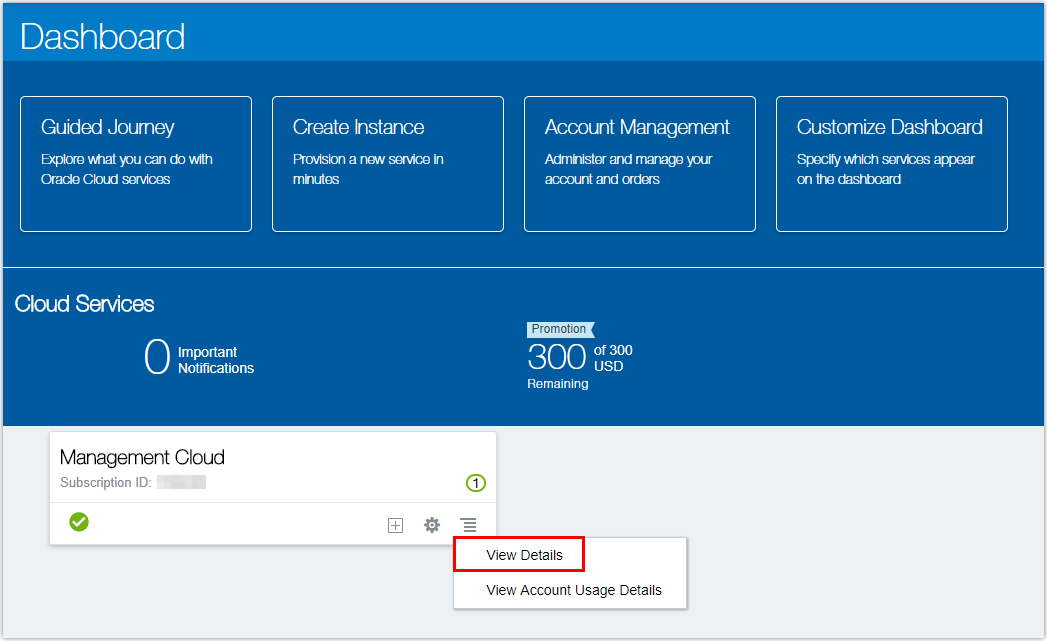


 Verify Your Entities Addition
 Want to Learn More?