Deploying
an Example Chaincode in Oracle Blockchain Platform
Deploying
an Example Chaincode in Oracle Blockchain Platform Before You Begin
This 15-minute tutorial shows you how to use the advanced option to deploy an example chaincode to your Oracle Blockchain Platform network. This tutorial also shows you how to confirm the chaincode installation and instantiation, and its configuration in REST proxy.
Background
You can use these deployment options: quick deployment and advanced deployment. In this tutorial, you use the advanced deployment option to specify the parameters required to deploy the example chaincode.
When using the advanced deployment wizard, you can:
- Install an example chaincode on existing peers.
- Instantiate the chaincode to compile, build, and initialize it on an existing channel and peers.
- Use the default endorsement policy. The default endorsement policy gets a chaincode transaction endorsement from any peer on the network. An endorsement is required before the transaction is added to a block and the block is submitted to the ledger.
- Enable the chaincode to interact with a REST proxy to use the Oracle Blockchain Platform REST APIs.
What Do You Need?
- Administrator access to your instance.
- The URL of your instance's console.
- The channel (
default) included with your instance. - The peers (
peer0-1andpeer0-2) included with your instance and joined to thedefaultchannel. - The default REST proxy node (
restproxy1) included with your instance.
 Get
the Example Chaincode
Get
the Example Chaincode
- Sign in to the Oracle Blockchain Platform console using administrator credentials.
- In the console, click the Developer Tools tab.
- In the Developer Tools tab, click the Samples pane.
- In the Samples pane, navigate to the Car Dealer sample, and then click its Download sample here link.
- Save the
CarDealer.zipfile to your computer. - On your computer, locate and extract the
CarDealer.zipfile. - Expand the
Car Dealerfolder, expandartifacts,expandsrc,expandgithub.com,and then select thecardealer_cc.gofile. Copy and pastecardealer_cc.goto another location on your computer. - Rename
cardealer_cc.gotomy_test_chaincode.go.Create a folder and name itmy_test_chaincodeand movemy_test_chaincode.gointo the folder. - Select the
my_test_chaincodefolder and create an archive file namedmy_test_chaincode.zip.
 Access
the Advanced Deployment Wizard
Access
the Advanced Deployment Wizard
- In the console, select the Chaincodes tab. Click Deploy a New Chaincode.
- In the Deploy Chaincode dialog box, click Advanced Deployment.
 Install
the Chaincode
Install
the Chaincode
- In the Deploy Chaincode (Advanced) - Step 1, enter
MyTestChaincodein the Chaincode Name field. - In the Version field, confirm the default
value is
v1. - From the Target Peers list, select
peer0-1andpeer0-2. - Click Upload Chaincode File, locate and
select the
my_test_chaincode.zipfile, and click Open. Click Next.

 Instantiate
the Chaincode
Instantiate
the Chaincode
- In the Deploy Chaincode (Advanced) - Step 2, select
defaultfrom the Channel list. - From the Peers list, select
peer0-1andpeer0-2.Click Next.

 Enable
the Chaincode in REST Proxy
Enable
the Chaincode in REST Proxy
- In the Deploy Chaincode (Advanced) - Step 3, select
restproxy1from the dropdown list in the REST Proxy Nodes field. - In the Peers field, select
peer0-1.Click Next. - After receiving a message indicating that the chaincode was enabled in REST proxy successfully, click Close.

 Confirm
the Deployment
Confirm
the Deployment
- Select the Chaincodes tab.
- In the Chaincode Summary table, locate and expand MyTestChaincode.
The following information displays in the table: the chaincode's path, that the chaincode is installed on two peers, and that the chaincode is instantiated on one channel.
- In the chaincode's Versions column, click v1.
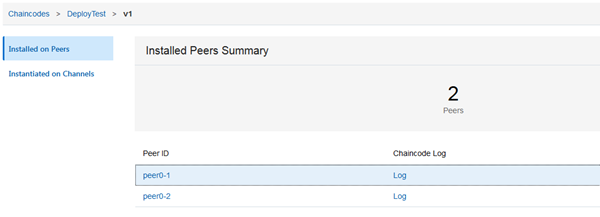
- In the Chaincode Version Information page, confirm that the
Installed on Peers tab is selected. You
should see
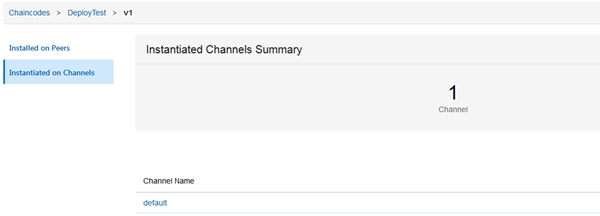
peer0-1andpeer0-2listed in the table. - Click Instantiated on Channels.
You should see the
defaultchannel listed in the table. - To confirm that the chaincode was enabled in the REST proxy, select the Nodes tab.
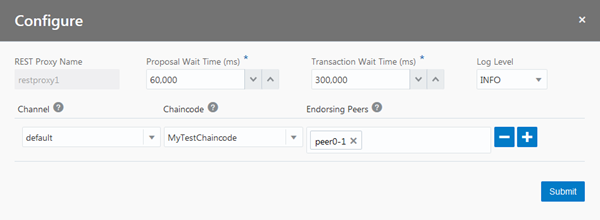
- In the Nodes Summary table, locate the
restproxy1node, click More Actions, and select Edit Configuration. - In the Configure dialog box, locate MyTestChaincode. Confirm
its channel is
defaultand its endorsing peer ispeer0-1.