Before You Begin
Purpose
After provisioning the current release of Oracle Managed File Transfer (MFT) Cloud Service, you need to complete the following tasks for the service to work correctly:
-
Setting up the MFT embedded sFTP server
-
Configuring Oracle Compute and Oracle Traffic Director (OTD) for the MFT Embedded Servers
This tutorial shows how to configure the MFT embedded sFTP server.

Time to Complete
Approximately 35 minutes
Background
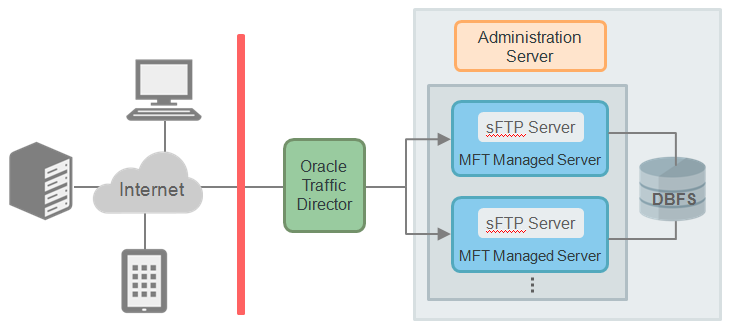
MFT includes an embedded sFTP server. However by default, the sFTP server is disabled after Oracle MFT Cloud Service provisioning. You need to enable the sFTP server so that it can receive encrypted messages from partners using public/private key encryption. In this encryption and connection process, the private key decrypts messages that were encrypted using the associated public key. As illustrated in the diagram below, the private key is placed in the embedded sFTP server, and the partners/sFTP clients get a copy of the public key.

What Do You Need?
A paid or trial subscription to Oracle SOA Cloud Service.
Your Oracle Cloud service user name, password, and identity domain (available in the New Account Information email that you received from Oracle Cloud when your user account was set up)
An SSH key pair on your local machine. This tutorial shows how to generate an SSH key pair.
An Oracle Managed File Transfer Cloud Service pod has been provisioned with OTD (that is, the load balancer). Note down the pod configuration information, such as MFT Cluster instance name, administrator user name, etc.
For this tutorial, the following information will be used throughout the post-provisioning tasks:
- MFT Cluster instance name: mftcs4training
- WebLogic administrator user name: mftadmin
- Password: welcome1
- Host of WebLogic admin server and managed server: mftcs4training-jcs-wls-1
- IP address of admin server and managed server:192.1.1.1
- IP address of load balancer: 192.2.2.2
Configuring the SSH Keystore
In Oracle MFT Cloud service, you need to configure SSH keystore to enable embedded sFTP server secured connection. The configuration includes importing the private key of the SSH key pair and entering the password in the SSH keystore if the private key has a passphrase.
Importing the Private Key
In this tutorial, you use the private key of the SSH key pair from the provisioning process. The private key is used by the MFT server to start the sFTP server so clients can connect to it using the SSH protocol. Note that the key must have an RSA style and be in OpenSSH format, otherwise the embedded sFTP server won't accept it.
- From the Administration page, select Keystore Management.
- Click Import to import the key. Or Cancel to cancel the action.
Entering the Private Key Password in the SSH Keystore
If your private key was created with a password/passphrase, which is intended to provide a secondary security in case someone makes off with the private key file, then you will provide the password in MFT SSH Keystore.
-
Open a browser window and go to Oracle SOA Cloud Service:
https://myservices.us.oraclecloud.com/ -
Log in with your identity domain, user name and password.
-
On the Oracle Cloud My Services page, in the Oracle SOA Cloud Service section, click the Service Console link.

Description of this image -
On the Oracle SOA Cloud Service home page, click your MFT cloud service instance link.

Description of this image -
On your instance home page, click the menu icon
 in the top right
corner of the page.
Description of this image -
From the pop-up menu, select Open MFT Console.

Description of this image -
Sign in to MFT console with the user name and password you defined when provisioning the service.
-
Click the Administration tab on the top of the console page.
-
To set the SSH Keystore password, select the Keystores node in the left navigator tree and enter the WebLogic admin password from the provisioning process in the SSH Keystore section. For this tutorial, the password is
welcome1.
Description of this image -
Click Save to save changes.
Enabling and Starting the MFT sFTP Server
Next enable the the embedded sFTP server, configure its security settings, and then restart the sFTP Server.
-
To enable the sFTP server and configure it with the private key alias, complete the following:
- Select the Embedded Servers node in the left navigator tree.
- Click the sFTP tab.
- Enable sFTP by checking the checkbox.
- Choose Password as Authentication Type.
- Set Host Key Alias to the private key alias you just imported.

Description of this image -
Click Save to save changes.
-
Use the WebLogic console to restart the MFT managed servers.
-
To verify the embedded sFTP server is started properly, select the Embedded Servers > Ports node in the left navigator tree. You should see the sFTP server is running on port 7522.

Description of this image Note: For security reasons, it's recommended to stop the FTP server.
-
To test the sFTP connection, use an sFTP client or a command line tool on your local machine. For this tutorial:
$sftp -oPort=7522 mftadmin@192.1.1.1 - Enter the password when prompted.
-
At the sFTP prompt, do the following:
sftp> ls
payloads
sftp> pwd
Remote working directory: /
sftp> exit
Want to Learn More?
-
Creating SSH Keys for Use with Oracle Cloud Services in the Oracle Learning Library
-
Oracle Managed File Transfer Cloud Service Post-Provisioning Task - Configuring Oracle Compute and Oracle Traffic Director for MFT Embedded Servers in the Oracle Learning Library
-
Using the Provisioning Wizard in the Oracle Help Center
-
Using Oracle Managed File Transfer Cloud Service in the Oracle Help Center
-
Oracle Managed File Transfer Custom WLST Commands in the Oracle Help Center