Using Python With Oracle Database 11g
Purpose
This tutorial shows you how to use Python with Oracle Database 11g.
Time to Complete
Approximately 1 hour
Overview
Python is a popular general purpose dynamic scripting language. With the rise of Frameworks, Python is also becoming common for Web application development. If you want to use Python and an Oracle database, this tutorial helps you get started by giving examples. If you are new to Python review the Appendix: Python Primer to gain an understanding of the language.
Prerequisites
|
. |
Oracle Database 11gR2, with a user "pythonhol" and password (case sensitive) of "welcome". The example tables in this schema are from Oracle's Human Resources or "HR" schema, with some modifications to simplify the web application example. |
|---|---|
|
. |
Python 2.4 with the cx_Oracle 5.0.3 extension. |
|
. |
The Django 1.2.1 framework. |
In the Oracle Open World Hands-On session, the above have already been installed for you.
Creating a Django Application
The Django framework is one of several popular Python Frameworks for creating Python web applications. Django is a Model-View-Controller framework.
This section of the tutorial creates an Employee administration application using Oracle's Human Resources sample schema. The schema has been slightly modified to simplify some aspects of the instructions.
Note: Leading whitespace is significant in Python. Be careful when changing code as you work through this tutorial. Indentation is used in Python to indicate the code structure. There are no statement terminators unlike many other languages and there are no begin or end keywords, or braces to indicate blocks of code. Many of Django's configuration files use Python conventions.
|
. |
To start, create a Django project.  From a terminal window, run:

cd $HOME
django-admin.py startproject mysite
This creates a mysite directory in your home directory. It also generates code for a new Django project, including project settings and database configuration.
|
|---|---|
| . |
Look at what startproject created: ls -lt mysite You should see:
These files are:
|
| . |
To run the skeleton application, in your terminal window, start the Django development web server: cd $HOME/mysite python manage.py runserver The Django development web server has been started. Because this is a development web server, it should not be used in production.
|
| . |
Start the Firefox web browser and go to http://localhost:8000/ 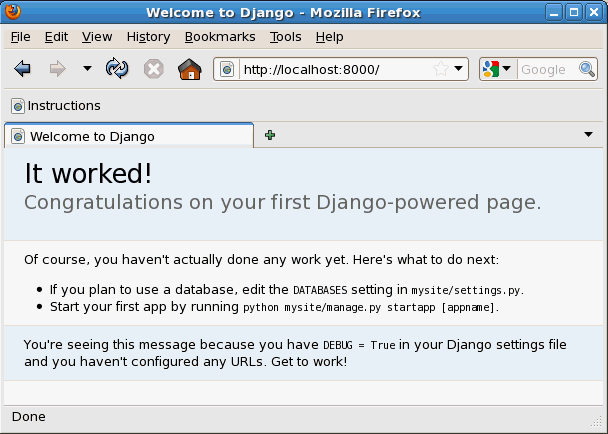
|
| . |
Press control-C in the terminal window to terminate the web server.
|
|
. |
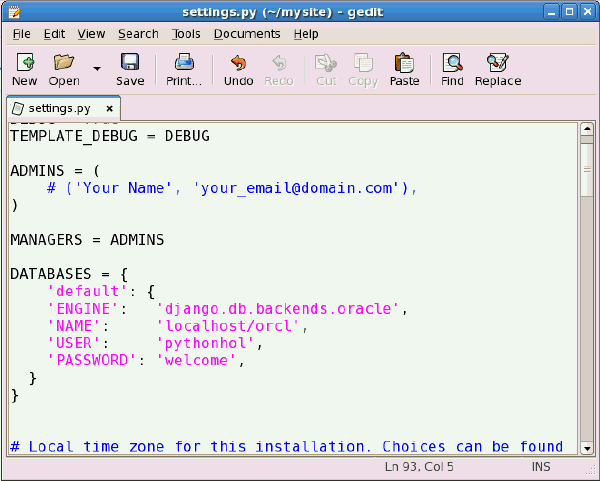
Setup the database connection information. Edit $HOME/mysite/settings.py.
Replace only the current DATABASES entry with: DATABASES = {
Make sure there is no whitespace before the keyword DATABASES. Save the file. This entry tells Django to use the Oracle interface, connecting to the local database with the service name of orcl. The username and password are also specified.
|
|
. |
A Django project can be thought of as a website. An application is a sub-component of that website that does something, such as manage employee information. Inside the mysite project directory, create an application: cd $HOME/mysite When the command succeeds, it finishes silently and creates a directory python_hol for the new application.
Note: If you see an error such as: [pythonhol@localhost mysite]$ python manage.py startapp python_hol you probably have whitespace before the DATABASES keyword in mysite/settings.py. Edit the file, remove the leading whitespace, save the file and rerun the startapp command.
|
| . |
Next, you need to define models for the application. Initially, $HOME/mysite/python_hol/models.py is essentially empty. cat $HOME/mysite/python_hol/models.py
|
| . |
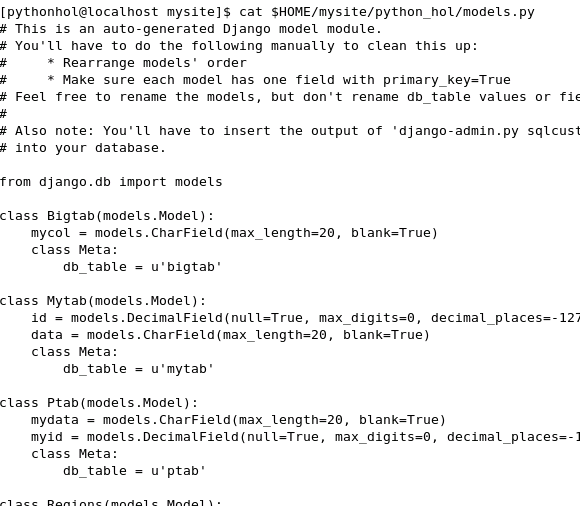
Typically Django applications are written to auto-generate tables from a new application's model. However, in this tutorial we create an application based on existing tables. Run: cd $HOME/mysite This may take a few seconds to complete. This command interrogates the pythonhol schema and creates a model for each table. cat $HOME/mysite/python_hol/models.py
You can see each table has a class with class variables for each column. The classes are subclasses of django.db.models.Model. Each field has a type. Many fields have a length that is used for validation. In new applications the length could be used to create the correct database schema. Django supports all of the common database relationships: many-to-one, many-to-many, and one-to-one.
|
|
. |
The tutorial code focuses on employees and jobs, so the models not related to employees and jobs are not needed. Overwrite the $HOME/mysite/python_hol/models.py file with the $HOME/sample/models.py file so that only the required models remain. cp $HOME/sample/models.py $HOME/mysite/python_hol/models.py The $HOME/mysite/python_hol/models.py file now contains the following: # $HOME/mysite/python_hol/models.py from django.db import models class Job(models.Model): class Employee(models.Model): class JobHistory(models.Model): The changes to models.py are:
|
|
. |
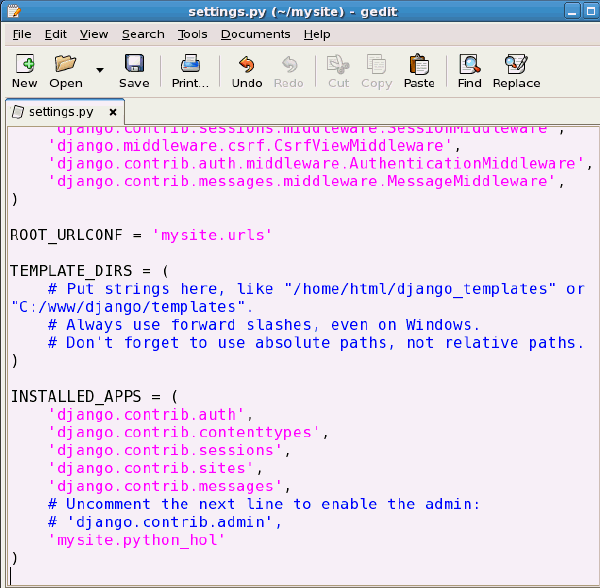
Edit the $HOME/mysite/settings.py file again. Scroll to the bottom of the file.
Change the INSTALLED_APPS setting to include the string 'mysite.python_hol' so it looks like this: ... INSTALLED_APPS = ( ... Save the file.
The INSTALLED_APPS variable holds the names of all applications that are available in this website. The default applications that come with Django are: django.contrib.auth – An authentication system. These applications will not be discussed in this tutorial, but you will activate the admin application that is currently commented out.
|
| . |
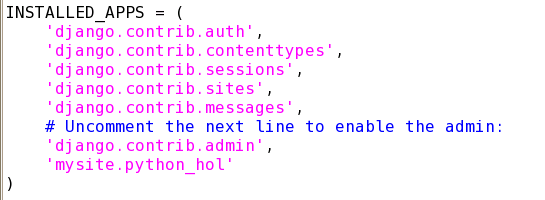
To activate the optional Django admin application, you must enable it in settings.py, synchronize the database, and then update the URL mapping file. First, edit the $HOME/mysite/settings.py file again. Change the INSTALLED_APPS setting and uncomment the 'django.contrib.admin' line so the file looks like this: ... INSTALLED_APPS = ( ... Save the file
|
|
. |
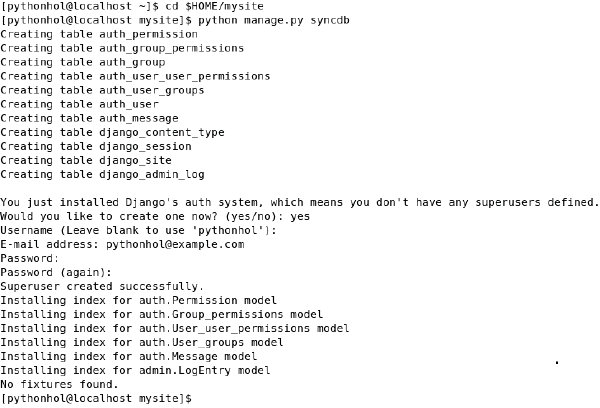
Next, synchronize the database: cd $HOME/mysite Answer yes to the prompt to create a superuser. Specify pythonhol@example.com for the e-mail address, accept the default username, and set the password to welcome. You will need the username and password later.
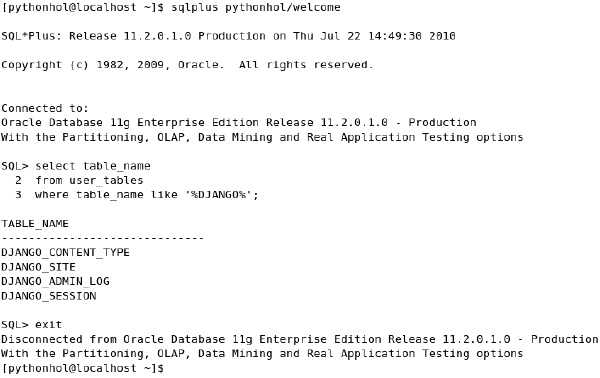
This updates the database tables needed by the admin application. Feel free to look at the newly created tables in the database by using SQL*Plus. sqlplus pythonhol/welcome
This shows that Django has created tables such as DJANGO_SITE and DJANGO_ADMIN_LOG.
|
|
. |
Finally, update the URL mappings. Edit $HOME/mysite/urls.py. Uncomment the 3 lines that reference the admin application. This file maps URLs to application pages. In the end, you should have a urls.py file that looks like this: from django.conf.urls.defaults import * # Uncomment the next two lines to enable the admin: urlpatterns = patterns('', # Uncomment the admin/doc line below and add 'django.contrib.admindocs' # Uncomment the next line to enable the admin: Save the file. 
The uncommented URL regular expression pattern handles when the URL "localhost:8000/admin/" is called and maps the request to an application for processing. |
|
. |
To create an administration interface for the Employee and Job models, create a file called $HOME/mysite/python_hol/admin.py. cp $HOME/sample/admin.py.1 $HOME/mysite/python_hol/admin.py The admin.py file contains the following: from mysite.python_hol.models import Employee, Job This file tells the admin application that the Employee and Job models have an administration interface.
|
|
. |
Start the development web server and explore the admin application. cd $HOME/mysite Normally, the server auto-reloads code every time you modify a file, but the action of creating a new file doesn't always trigger the auto-reloading logic.
|
|
. |
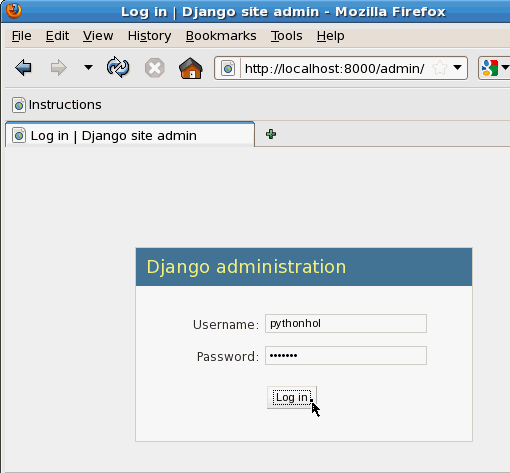
Open the Firefox web browser and go to http://localhost:8000/admin/ Login using the username (pythonhol) and password (welcome) you created earlier.
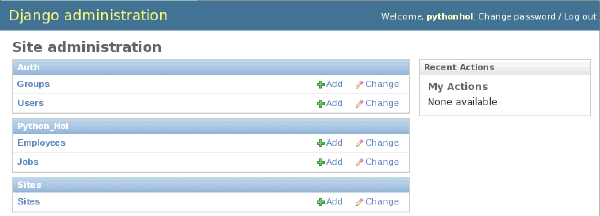
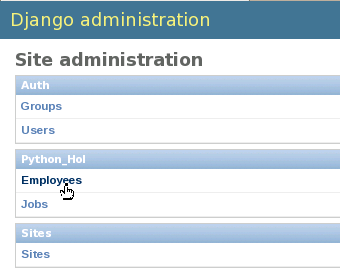
You should see several other types of content that can be administered, including groups, users and sites. These are core features included in Django.
If you see the following error: SyntaxError at /admin/ invalid syntax (urls.py, line 5) Request Method: GET invalid syntax (urls.py, line 5) you may have leading whitespace at the specified line of urls.py. Edit urls.py and correct this. The web server does not have to be restarted - it will automatically reload the changed file. However, you need to reload the URL in the browser.
|
|
. |
Click the Employees link.
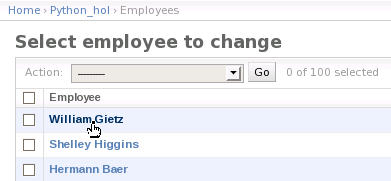
Now you are at the change list page for employees. This page displays all the employees in the database and could be used to change records.
|
|
. |
Click the William Gietz link.
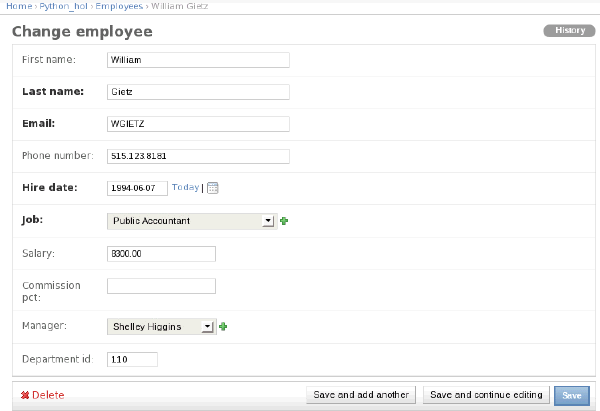
This page could be used to modify the employee's details or delete an employee. But, don't edit any details yet. With only a few configuration options Django has constructed a complete record editing system.
Here are some details about this page:
|
| . |
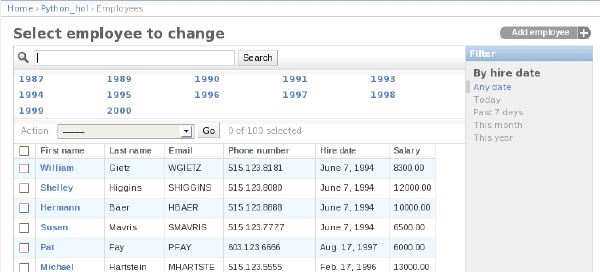
You can also customize the admin form. cp $HOME/sample/admin.py.2 $HOME/mysite/python_hol/admin.py The modified admin.py adds a new EmployeeAdmin class and replaces the previous admin.site.register(Employee) line to invoke the new class. The file should now look like this: from mysite.python_hol.models import Employee, Job class EmployeeAdmin(admin.ModelAdmin): admin.site.register(Employee, EmployeeAdmin) admin.site.register(Job) Compare it with $HOME/sample/admin.py.1 used as the admin.py file earlier. The EmployeeAdmin class restricts the columns displayed, changes their order, adds a Filter sidebar that lets users filter the change list by the HIRE_DATE field, and adds a search box at the top of the change list that allows users to search by name and allows drill down by date.
|
| . |
Take a look at the revised admin form. Go to http://localhost:8000/admin/python_hol/employee/ in the web browser.
|
Writing Your Own Django Public Interfaces
For this next section you will create your own Employees application,
similar to the defaut admin application, but providing a base application
for further extension.
| . |
Close any open editor changing urls.py and replace the file: cp $HOME/sample/urls.py $HOME/mysite/urls.py The urls.py file should now look like this: from django.conf.urls.defaults import * # Uncomment the next two lines to enable the admin: info_dict = { urlpatterns = patterns('', (r'^admin/', include(admin.site.urls)), (r'^site_media/(?P<path>.*)$', 'django.views.static.serve', This contains the URL mappings that map URLs to views. In this example, generic views are used. When a web request is made, Django traverses the regular expressions in order. When it finds a regular expression that matches, the specified view is invoked and passed a Python dictionary containing the data to be processed. For example, if the requested URL is http://localhost:8000/employees/, with nothing after the slash, then If the requested URL is http://localhost:8000/employees/update/23 then the URL pattern r'^employees/update/(?P<object_id>\d+)/$' is matched. It loads the function update_object from the presupplied django.views.generic.create_update.py. Finally, it calls that update_object() function: update_object(request=<HttpRequest object>, object_id='23') The object_id='23' part comes from the regular expression (?P<object_id>\d+).
|
|---|---|
| . |
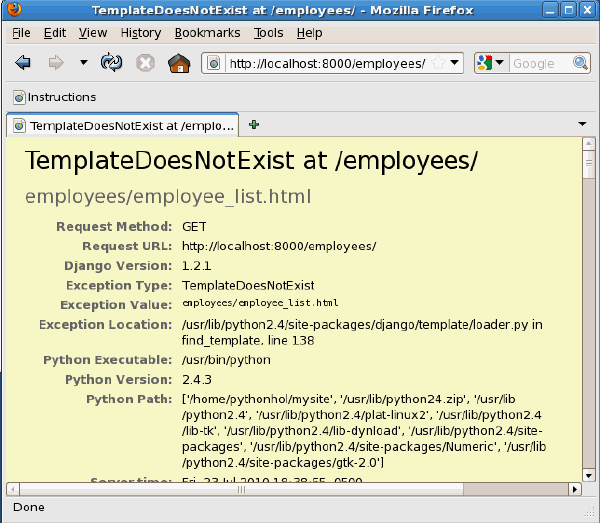
If you load http://localhost:8000/employees/ right now, you would see an error:
|
| . |
To get the application running you need to create the templates that were specified in urls.py. First, create the necessary directories: mkdir $HOME/mysite/python_hol/templates
|
| . |
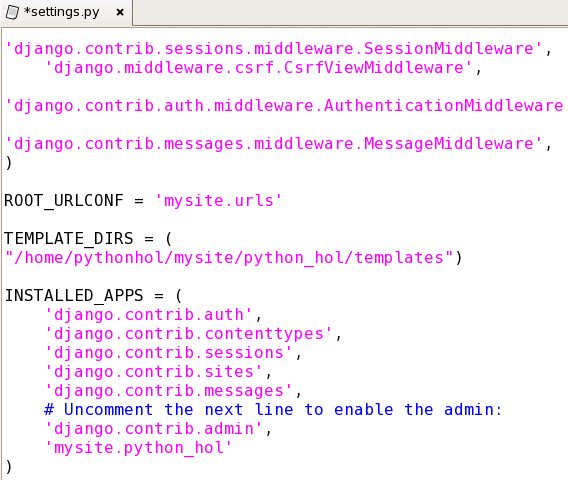
Edit $HOME/mysite/settings.py and change the TEMPLATE_DIRS entry to use the new templates directory: ... TEMPLATE_DIRS = ( ... Note: The file contains other code - do not delete that!
|
| . |
Create a Django template file that lists all employees: cp $HOME/sample/employee_list.html $HOME/mysite/python_hol/templates/employees/ This template file contains: <html> This contains HTML and Django template tags. This example checks if the object_list is correctly passed from
|
| . |
Set up the cascading style sheet that is loaded at the top of the employee_list.html template file: mkdir $HOME/mysite/python_hol/static
|
| . |
If you had stopped the web server, restart it. cd $HOME/mysite
|
| . |
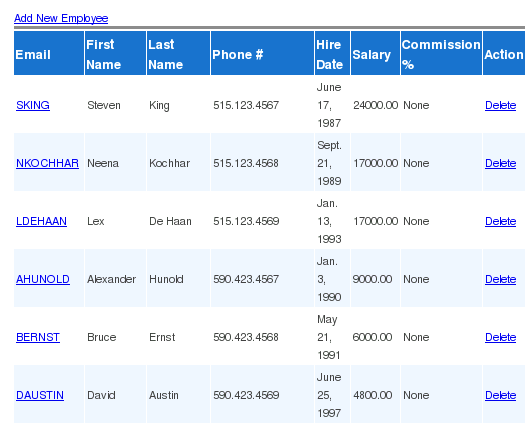
In the browser, load the URL for the application: http://localhost:8000/employees/ The new application is displayed showing employee details.
Note that all records from the table are displayed in one long page. If you are having trouble viewing this page, check that you have not confused "employee" and "employees" (plural) anywhere in the instructions.
|
| . |
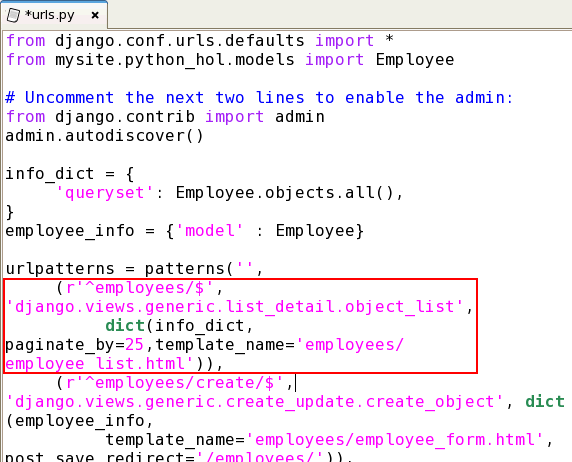
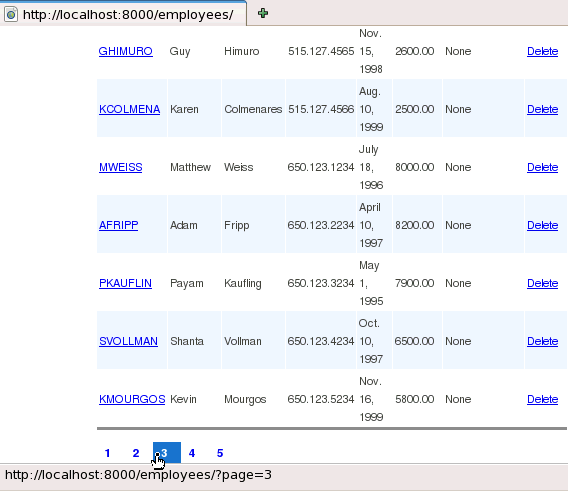
Instead of displaying all records in one long page, add pagination to display only 25 records per page. Note: If you have urls.py open in your editor, quit and reload the file from disk. Edit $HOME/mysite/urls.py and go to the first URL pattern (i.e. r'^employees/$'). Add a paginate_by=25 clause, changing the line to: (r'^employees/$', 'django.views.generic.list_detail.object_list',
|
| . |
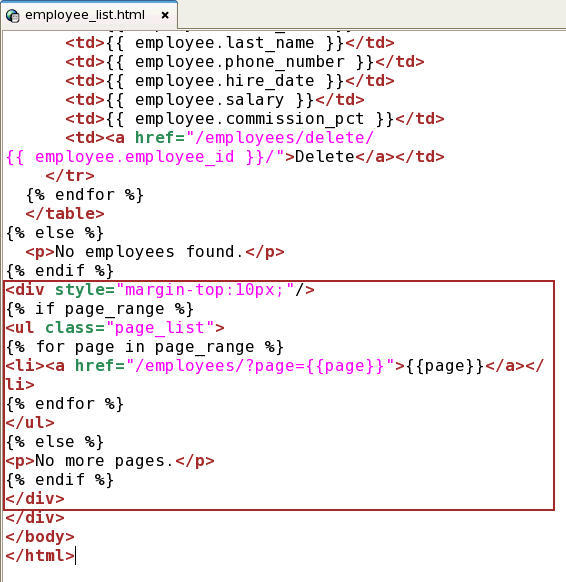
Add a page navigation bar at the bottom of each page. Edit $HOME/mysite/python_hol/templates/employees/employee_list.html. Add the following code at the bottom, after the '% endif %' and before the existing </div>: <div style="margin-top:10px;"/> Retain the existing content in the file!
|
| . |
Reload the page http://localhost:8000/employees/ in the browser and scroll to the bottom. Notice that there are now 5 pages of results available. Page through the results.
|
| . |
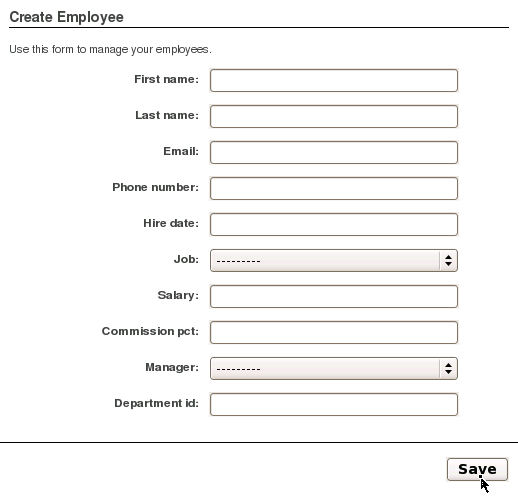
To insert new employee records, you need to create a form. To do this, create a new template file: cp $HOME/sample/employee_form.html $HOME/mysite/python_hol/templates/employees The file contains: <html> This is the form invoked by the urls.py mapping when the URLs http://localhost:8000/employees/create/, or http://localhost:8000/employees/update/ are called. In the template, when an employee object exists, the form displays the Edit Employee heading. Otherwise, it displays the Create Employee heading.
|
| . |
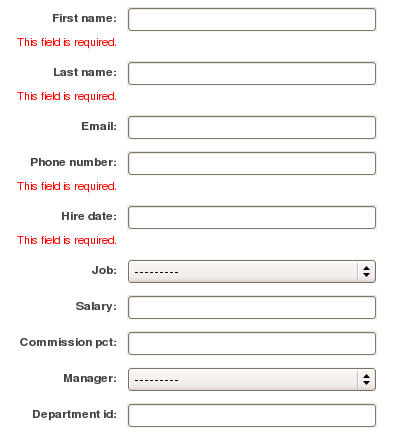
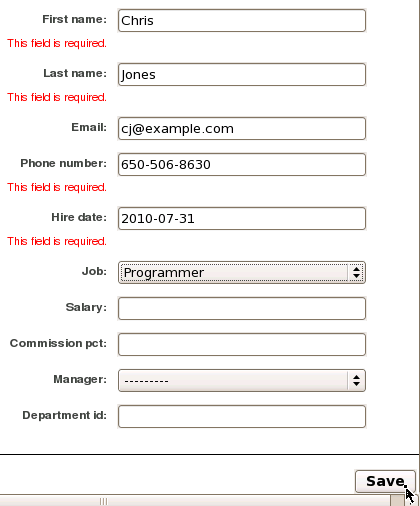
In your browser load http://localhost:8000/employees/create/ which is the URL for the 'Add New Employee' link. Leave the fields blank and click Save.
Notice that the automatically created validation highlights the required fields.
|
| . |
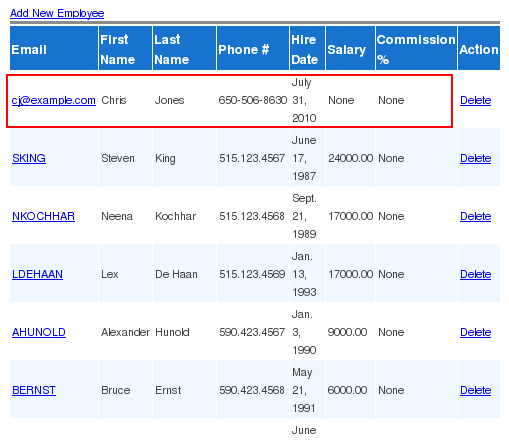
Create a new employee record. In the form, enter the following values: Chris Click Save.
The new record is shown on one of the pages.
|
| . |
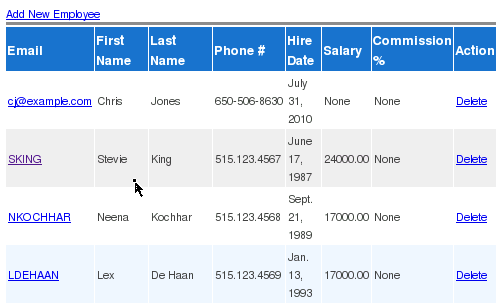
Update an existing employee record. In your browser load http://localhost:8000/employees/update/100/ which is the URL for the 'SKING' link on the employee list page. Change Steven to Stevie and click Save.
The record has been changed.
|
| . |
The application should show a deletion confirmation page before performing a record deletion. To achieve this functionality, create a deletion confirmation template. cp $HOME/sample/employee_confirm_delete.html $HOME/mysite/python_hol/templates/employees/ Note: Do not press [Enter] to add a line break between the source file and destination directory in the cp command. The employee_confirm_delete.html file contains the following code: <html>
|
| . |
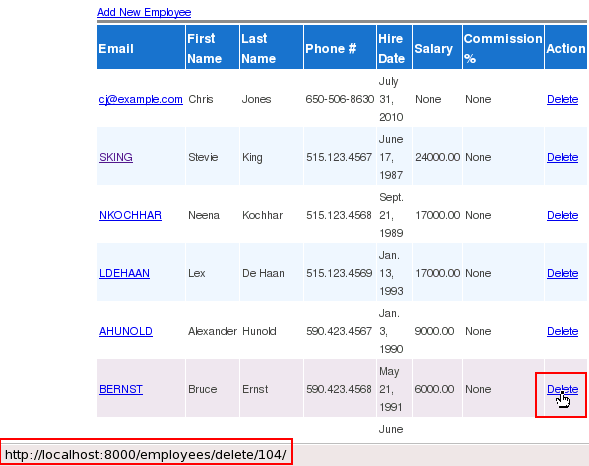
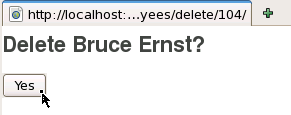
Test the deletion confirmation functionality. In your browser, load http://localhost:8000/employees/. Locate the record for Bruce Ernst and click the Delete button.
Notice the URL is now http://localhost:8000/employees/delete/104/. Click Yes on the confirmation page. This confirms the deletion of Bruce Ernst's employee record.
Notice the record for this employee has been deleted.
If you try to delete a manager such as SKING you will get an Oracle integrity constraint error. In future, the application business logic could be enhanced to only enable the 'delete' action on non-managerial employees. This sample application has much scope for extension and being made robust. Django allows web applications to be be created easily. The models and views can be designed and the schema automatically generated or, as shown here, the models can be derived from an existing schema.
|
The following examples show pure Python interaction with the
Oracle database. The files you use throughout the tutorial are located in the
/home/pythonhol directory that you logged into.
Connecting to Oracle
To create a connection to Oracle, perform the following steps.
| . |
Open a terminal window and review the code contained in $HOME/connect.py
The cx_Oracle module is imported to provide the API for accessing the Oracle database. Many inbuilt and third party modules can be included in this way in Python scripts. The connect() method is passed the username "pythonhol", the password "welcome" and the connection string. In this case, Oracle's Easy Connect connection string syntax is used. It consists of the IP of your machine and the DB service name "orcl". The close() method closes the connection. Any connections not explicitly closed will be automatically released when the script ends. In a command line terminal run: python connect.py
If the connection succeeds, the version number is printed: An exception is thrown if the connection fails.
|
|---|---|
| . |
Indentation is used in Python to indicate the code structure. There are no statement terminators unlike many other languages and there are no begin/end keywords or braces to indicate blocks of code. Open connect.py in an editor. Indent the print statement by two spaces ad save the file: import cx_Oracle con = cx_Oracle.connect('pythonhol/welcome@localhost/orcl')
print con.version
con.close() Run the script: python connect.py
The number of spaces or tabs used for indentation is not important as long as it is used in a consistent way in each block. Here the Python interpreter is not expecting a new code block level after the connect() call so it warns about the different indentation. In other cases such as in 'if' and loop blocks (shown later), take care that all statements in each block are equally indented. If you are copying and pasting from this tutorial, check the pasted indentation is correct before running each example.
|
| . |
Python treats everything as an object. The "con" object has a "version" attribute, which is a string. Change the script to use a "split" string method too: import cx_Oracle con = cx_Oracle.connect('pythonhol/welcome@localhost/orcl')
ver = con.version.split(".")
print ver
con.close() Re-run the script in the command line terminal: python connect.py
The output is a "list", which is a Python's name for an array.
|
| . |
Python Lists can be accessed via indexes. Change connect.py to: import cx_Oracle con = cx_Oracle.connect('pythonhol/welcome@127.0.0.1/orcl')
ver = con.version.split(".")
print ver
print ver[0]
print ver[-1]
print ver[1:4]
con.close() Re-run the script in the command line terminal: python connect.py
Python Lists are zero based, so ver[0] prints the first element of the list. The last element of the list is ver[-1]. A list slice is created by ver[1:4]. This returns the elements starting at position 1 and up to, but not including, elements from position 4.
|
| . |
Python lists have methods and can also be manipulated with operators. Change connect.py to: import cx_Oracle con = cx_Oracle.connect('pythonhol/welcome@127.0.0.1/orcl')
ver = con.version.split(".")
print ver
print ver.index("1")
ver.remove("2")
print ver
ver1 = ["11", "g"]
ver2 = ["R", "2"]
print ver1 + ver2
con.close() Re-run the script in the command line terminal: python connect.py
The index("1") method returns the index of the "1" element, counting from zero. The remove("2") method deletes an element from the list. The "+" operator can be used to join two lists. Other datatypes Python has are Dictionaries, which are associative arrays, and a type called a tuple, which is like a list but cannot be changed. Loops can be used to iterate over lists. Change connect.py to: import cx_Oracle con = cx_Oracle.connect('pythonhol/welcome@127.0.0.1/orcl')
ver = con.version.split(".")
for v in ver:
print v
if v == "11":
print "It's 11"
else:
print "Not 11"
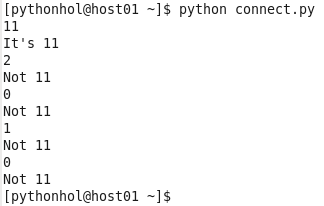
con.close() Make sure the indentation is correct! The colon ":" is used to indicate a code block. The first print and if are at the same level of indentation because they are both inside the loop. Re-run the script in the command line terminal: python connect.py
The loop prints and tests each value from the list in turn.
|
Using Database Resident Connection Pooling
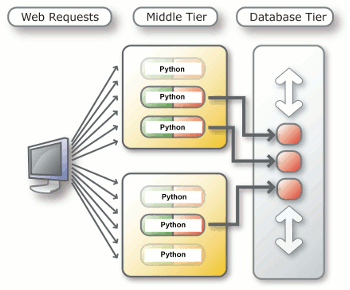
Database Resident Connection Pooling is a new feature of Oracle Database 11g. It is useful for short lived scripts such as typically used by web applications. It allows the number of connections to be scaled as web site usage grows. It allows multiple Apache processes on multiple machines to share a small pool of database server processes. Without DRCP, a Python connection must start and terminate a server process.
Below left is diagram of nonpooling. Every script has its own database server proces. Scripts not doing any database work still hold onto a connection until the connection is closed and the server is terminated. Below right is a diagram with DRCP. Scripts can use database servers from a pool of servers and return them when no longer needed.
 |
 |
Batch scripts doing long running jobs should generally use non-pooled connections.
This tutorial shows how DRCP can be used by new or existing applications without writing or changing any application logic. Perform the following steps:
| . |
Review the code contained in $HOME/connect_drcp.py 
This is similar to connect.py but ":pooled" is appended to the connection string. A Connection Class "HOL" is also passed into the connect() method and the "purity" of the connection is defined as the ATTR_PURITY_SELF constant. The connection class tells the database server pool that connections are related. Session information (such as the default date format) might be retained between connection calls, giving performance benefits. Session information will be discarded if a pooled server is later reused by an application with a different connection class name. Applications that should never share session information should use a different connection class and/or use ATTR_PURITY_NEW to force creation of a new session. This reduces overall scalability but prevents applications mis-using session information. Run connect_drcp.py python connect_drcp.py
The output is again simply the version of the database. Script logic does not need to be changed to benefit from DRCP connection pooling.
|
|---|
Creating a Simple Query
A common task when developing Web applications is to query a database and display the results in a Web browser. There are a number of functions you can use to query an Oracle database, but the basics of querying are always the same:
1. Parse the statement for execution.
2. Bind data values (optional).
3. Execute the statement.
4. Fetch the results from the database.
To create a simple query, and display the results, perform the following steps.
| . |
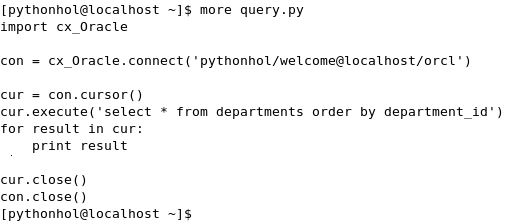
Review the code contained in $HOME/query.py The cursor() method opens a cursor for statements to use. The execute() method parses and executes the statement. The loop fetches each row from the cursor and prints it. Run the script in a terminal window: python query.py
The results of the query are displayed as Python 'tuples', which are arrays that cannot be changed
|
|---|
Fetching Data
There are a number of ways to fetch data from an Oracle database. Perform the following steps.
| . |
Review the code contained in $HOME/query_one.py 
This uses the fetchone() method to return just a single row as a tuple. When called multiple time, consecutive rows are returned: Run the script in a terminal window: python query_one.py
The two fetchone() calls print two records.
|
|---|---|
| . |
Review the code contained in $HOME/query_many.py 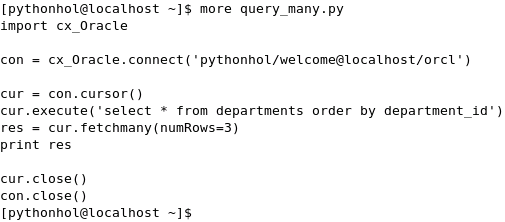
The fetchmany() method returns a list of tuples. Here the numRows parameter specifices that three rows should be returned. Run the script in a terminal window: python query_many.py
The first three rows of the table are returned as a list of tuples. Review the code contained in $HOME/query_all.py 
Run the script in a terminal window: python query_all.py
This uses the fetchall() method to return all rows. The output is a list (Python's name for an array) of tuples. Each tuple contains the data for one row.
|
| . |
The list can be manipulated in the any Python manner. Edit $HOME/query_all.py and change the code to the following (in bold) and rerun the script again import cx_Oracle con = cx_Oracle.connect('pythonhol/welcome@localhost/orcl')
cur = con.cursor()
cur.execute('select * from departments order by department_id')
res = cur.fetchall()
for r in res:
cur.close()
con.close()
Now each tuple is printed separately. The choice of which fetch method to use will depend on how you want to process the returned data.
|
Improving Query Performance
This section demonstrates a way to improve query performance by increasing the number of rows returned in each batch from Oracle to the Python program. Perform the following steps:
| . |
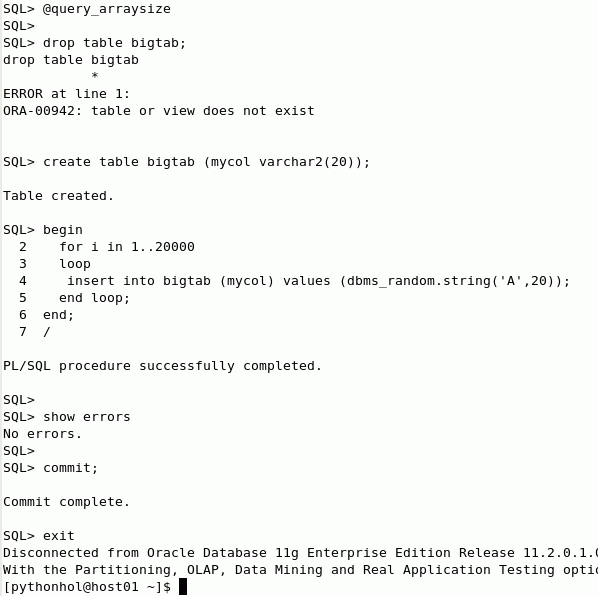
First, create a table with a large number of rows. Review $HOME/query_arraysize.sql 
In a terminal window use SQL*Plus to run the script: sqlplus pythonhol/welcome@localhost/orcl
|
|---|---|
| . |
Review the codecontained in $HOME/query_arraysize.py 
This uses the 'time' module to measure elapsed time of the query. The arraysize is set to 100. This causes batches of 100 records at a time to be returned from the database to a cache in Python. This reduces the number of "roundtrips" made to the database, often reducing network load and reducing the number of context switches on the database server. The fetchone(), fetchmany() and even fetchall() methods will read from the cache before requesting more data from the database. From a terminal window, run: python query_arraysize.py
Reload a few times to see the average times.
Note: The time values you observe may differ from those displayed in the screenshots because of hardware or system load differences.
|
| . |
Edit $HOME/query_arraysize.py and change the arraysize from cur.arraysize = 100 to cur.arraysize = 2000 Rerun the script a few times and compare the performance of the two arraysize settings. In general, larger array sizes improve performance. Depending how fast your system is, you may need to use different arraysizes than those given here to see a meaningful time difference. python query_arraysize.py
The default arraysize used by cx_Oracle is 50. There is a time/space tradeoff for increasing the arraysize. Larger arraysizes will require more memory in Python for buffering the records. Note: The time values you observe may differ from those displayed in the screenshot because of hardware or system load differences. |
Using Bind Variables
Bind variables enable you to re-execute statements with new values, without the overhead of reparsing the statement. Bind variables improve code reusability, and can reduce the risk of SQL Injection attacks.
To use bind variables in this example, perform the following steps.
| . |
Review the code contained in $HOME/bind_query.py 
The statement contains a bind variable ":id". The statement is only prepared once but executed twice with different values for the WHERE clause. The special symbol 'None' is used in place of the statement text argument to execute() because the prepare() method has already set the statement. The second argument to the execute() call is a Python Dictionary. In the first execute call, this associative array has the value 210 for the key of "id". The first execute uses the value 210 for the query. The second execute uses the value 110. From a terminal window, run: python bind_query.py
The output shows the details for the two departments.
|
|---|---|
| . |
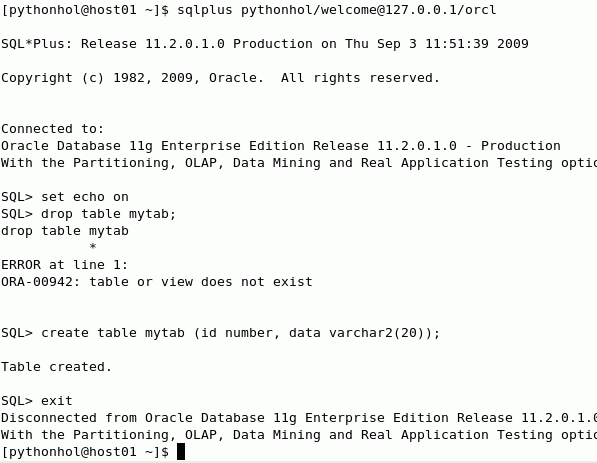
The cx_Oracle driver supports array binds for INSERT statements, which can greatly improve performance over single row inserts. Review the following commands to create a table for inserting data: sqlplus pythonhol/welcome@localhost/orcl drop table mytab; Run SQL*Plus and cut-and-paste the commands.
|
| . |
Review the code contained in $HOME/bind_insert.py 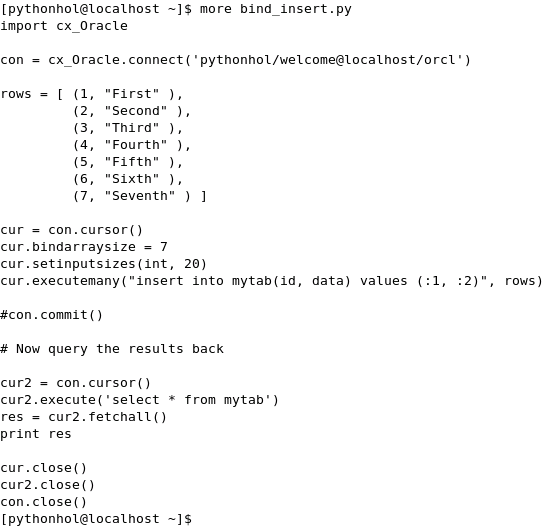
The 'rows' array contains the data to be inserted. The bindarraysize is here set to 7, meaning to insert all seven rows in one step. The setinputsizes() call describes the columns. The first column is integral. The second column has a maximum of 20 bytes. The executemany() call inserts all seven rows. The commit call is commented out, and does not execute. The final part of the script queries the results back and displays them as a list of tuples. From a terminal window, run: python bind_insert.py
The new results are automatically rolled back at the end of the script so re-running the script will always show the same number of rows in the table.
|
Creating Transactions
When you manipulate data in an Oracle Database (insert, update, or delete data), the changed or new data is only available within your database session until it is committed to the database. When the changed data is committed to the database, it is then available to other users and sessions. This is a database transaction. Perform the following steps:
| . |
Edit $HOME/bind_insert.py and uncomment the commit call (in bold below): import cx_Oracle con = cx_Oracle.connect('pythonhol/welcome@127.0.0.1/orcl')
rows = [ (1, "First" ),
         (2, "Second" ),
         (3, "Third" ),
         (4, "Fourth" ),
         (5, "Fifth" ),
         (6, "Sixth" ),
         (7, "Seventh" ) ]
cur = con.cursor()
cur.bindarraysize = 7
cur.setinputsizes(int, 20)
cur.executemany("insert into mytab(id, data) values (:1, :2)", rows)
con.commit() # Now query the results back cur2 = con.cursor()
cur2.execute('select * from mytab')
res = cur2.fetchall()
print res
cur.close()
cur2.close()
con.close()
The commit() is on the connection, not on the cursor. Rerun the script several times and see the number of rows in the table increasing each time: python bind_insert.py
If you need to initiate a rollback in a script, the con.rollback() method can be used. In general you want all or none of your data committed. Doing your own transaction control has performance and data-integrity benefits. |
|---|
Using PL/SQL Stored Functions and Procedures
PL/SQL is Oracle's procedural language extension to SQL. PL/SQL procedures and functions are stored and run in the database. Using PL/SQL lets all database applications reuse logic, no matter how the application accesses the database. Many data-related operations can be performed in PL/SQL faster than extracting the data into a program (for example, Python) and then processing it. Oracle also supports Java stored procedures.
In this tutorial, you will create a PL/SQL stored function and procedure and call them in Python scripts. Perform the following steps:
| . |
Start SQL*Plus and create a new table, ptab with the following command: sqlplus pythonhol/welcome@localhost/orcl
|
|---|---|
| . |
Review $HOME/create_func.sql which creates a PL/SQL stored function myfunc() to insert a row into the ptab table, and return double the inserted value: 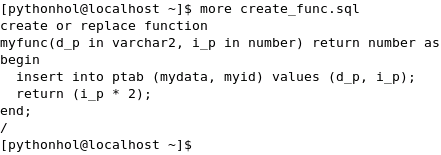
Start SQL*Plus and run the script: sqlplus pythonhol/welcome@localhost/orcl set echo on @create_func show errors exit
|
| . |
Review the code in $HOME/plsql_func.py 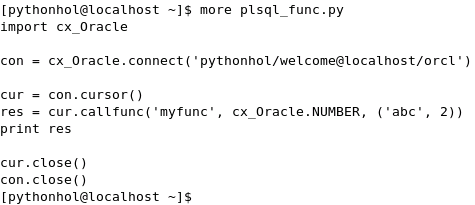
This uses callfunc() to execute the function. The constant cx_oracle.NUMBER indicates that the return value is numeric. The two PL/SQL function parameters are passed as a tuple and bound to the function parameter arguments. From a terminal window, run: python plsql_func.py
The output is result of the PL/SQL function calculation.
|
| . |
To call a PL/SQL procedure, use the cur.callproc() method. Review $HOME/create_proc.sql which creates a PL/SQL procedure myproc() to accept two parameters. The second parameter contains an OUT return value. 
Start SQL*Plus and run the script:: sqlplus pythonhol/welcome@localhost/orcl set echo on @create_proc show errors exit
|
| . |
Review the code contained in $HOME/plsql_proc.py 
This creates a numeric variable myvar to hold the OUT parameter. The number 123 and the return variable name are bound to the procedure call parameters using a tuple. From a terminal window, run: python plsql_proc.py
The getvalue() method displays the returned value.
|
Using Continuous Query Notification
Continuous Query Notification (also called Database Change Notification) allows applications to receive notifications when a table changes, for example when rows have been inserted. This can be useful in many circumstances, including for mid-tier cache invalidation. A cache might hold some values that depend on data in a table. If the table changes, the cached values must be updated with the new information.
This example show DCN events being handled in Python. Perform the following steps:
| . |
Review the code contained in $HOME/dcn.py 
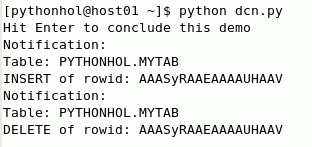
This script creates a function called DCNCallback(). This function will be called when a table changes. The 'message' parameter is a cx_Oracle object that will contain information about the changes. The function simply prints out the kinds of changes that have occurred and the affected rowids. The main body of the script is below the function - note the indentation level of 'con = ...' is the same as for 'def ...'. The body creates the database connection with the 'events = True' parameter to allow the database to send an event notification to Python when a table change takes place. The subscribe() call registers the DCNCallback() to be called in a new thread when an INSERT or UPDATE occurs. Only one Python thread can run at any given time. Python switches between threads as needed. The rowids = True parameter lets rowids be accessed in the callback. The registerquery() call registers a query that selects everything from the MYTAB table. Any change to the table that is an UPDATE or DELETE will cause DCNCallback() to be called. The MYTAB table was created in a previous section of the lab. The script concludes with a raw_input() call that waits for user input before terminating. To run the DCN example, open two terminal windows. In the first window run: python dcn.py
This will print a message and wait without returning a prompt: Leave it running for the moment and continue with the next step.
|
|---|---|
| . |
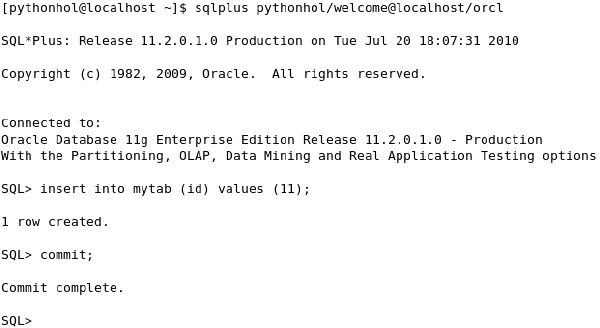
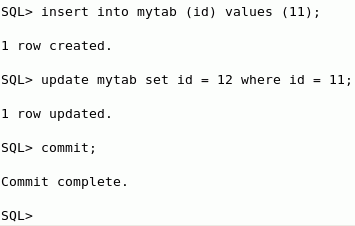
In a second terminal window, enter the following commands sqlplus pythonhol/welcome@localhost/orcl
When the commit occurs, the Python script (switch to your original terminal window) will receive notification and print the change notification message:
Note: The rowid will be different on your system.
|
| . |
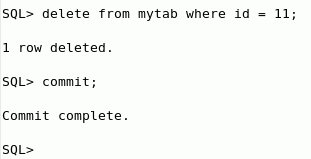
Switch to your SQL*Plus terminal window and delete the new row by executing the following SQL commands: delete from mytab where id = 11;
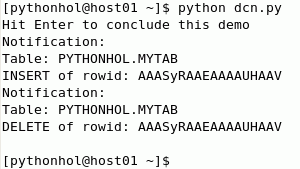
The new notification is printed and the Python terminal now looks like:
Note: The rowids will be different on your system. Experiment with several operations. Try doing an INSERT followed by a DELETE before committing. This shows notification is received of each individual operation.
|
| . |
When you are finished, hit Enter to conclude the demo in the Python window to exit the script.
|
| . |
Extend dcn.py to also notify when an UPDATE occurs on MYTAB. In the subscribe() call, change the operations parameter to operations = cx_Oracle.OPCODE_INSERT | cx_Oracle.OPCODE_DELETE Add a new 'if' test to the DCNCallback function: if row.operation & cx_Oracle.OPCODE_UPDATE:
print "UPDATE of rowid:", row.rowid
The dcn.py script should now look as follows (the changes are in bold): import cx_Oracle In the Python terminal, restart the script:
|
| . |
In the SQL*Plus terminal, create a row and update it: insert into mytab (id) values (11); update mytab set id = 12 where id = 11; commit;
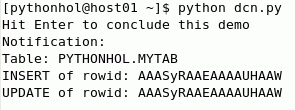
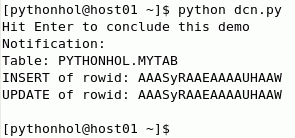
The new message should be displayed.
Note: The rowids will be different on your system.
|
| . |
When you are finished, hit Enter to conclude this demo in the Python window to exit the script.
Database Change Notification is an efficient way to monitor table changes. It can also be used to notify when any of a subset of rows selected by a given query are changed.
|
Summary
In this tutorial, you have learned how to:
- Use the Django framework
- Create a connection
- Use Database Resident Connection Pooling
- Create a simple query
- Fetch data
- Improve query performance
- Use bind variables
- Create transactions
- Use PL/SQL stored functions and procedures
- Use Continuous Query Notification
Appendix: Python Primer
Python is a dynamically typed scripting language. It is most often
used to run command-line scripts but is also used in Web applications.
Strings can be enclosed in single or double quotes:
'A string constant'
"another constant"
Multi line strings use a triple-quote syntax
"""
This is
your string
"""
Variables do not need types declared:
count = 1
ename = 'Arnie'
Associative arrays are called 'dictionaries':
a2 = {'PI':3.1415, 'E':2.7182}
Ordered arrays are called 'lists':
a3 = [101, 4, 67]
Tuples are like lists but cannot be changed once they are created. They are created with parentheses:
a4 = (3, 7, 10)
Strings and variables can be displayed with a print statement:
print 'Hello, World!'
print 'Hi', x
Formatted output is also possible:
print "There are %d %s" % (v1, v2)
Everything in Python is an object. As one example, given the value of the list a3 above, the append() method can be used to add a value to the list.
a3.append(23)
Now a3 contains [101, 4, 67, 23]
Code flow can be controlled with tests and loops. The if/elif/else statements look like:
if sal > 900000:
    print 'Salary is way too big'
elif sal > 500000:
    print 'Salary is huge'
else:
    print 'Salary might be OK'
This also shows how the clauses are delimited with colons, and each sub block of code is indented.
A traditional loop is:
for i in range(0, 10):
    print i
This prints the numbers 0 to 9. The value of i is incremented in each iteration.
The 'for' command can also be used to iterate over lists and tuples:
a5 = ['Aa', 'Bb', 'Cc']
for v in a5:
    print v
This sets v to each element of the list a5 in turn.
A function may be defined:
def myfunc(p1, p2):
    "Function documentation: add two numbers"
    print p1, p2
    return p1 + p2
Functions may or may not return values. This function could be called using:
v3 = myfunc(1, 3)
Function calls must appear after their function definition.
Functions are also objects and have attributes. The inbuilt __doc__ attribute can be used to find the function description:
print myfunc.__doc__
Sub-files can be included in Python scripts with an import statement.
import os
import sys
Many predefined modules exist, such as the os and the sys modules.
Comments are either single line:
# a short comment
or multi-line using the triple-quote token:
"""
a longer
comment
"""
![]()

|
About
Oracle |Oracle and Sun | |


