Building an Application using Oracle Application Express: Part 1
Overview
- Use Data Workshop to load data into a table
- Create a database application using the application wizard
- Modify an interactive report
- Create and manipulate data in a calendar
- Add a data upload wizard
- Create and apply a list of values
- Create a validation
- Create and run a Websheet application.
- Install and run a Packaged Application.
- Have access to an Oracle Database 11g or later database that has the sample schema installed.
- Have installed Oracle Application Express Release 4.2 into your Oracle Database.
- Have access to the HR tables. If necessary, download and install HR Sample Objects available from OTN here.
- Performed the Testing and Debugging Procedures using SQL Developer tutorial.
- Downloaded and unzipped the files.zip into your working directory.
Purpose
In this tutorial, you use Oracle Application Express to perform the following tasks:
Time to Complete
Approximately 60 minutes
Introduction
Oracle Application Express (Oracle APEX) is a rapid web application development tool for the Oracle database. Using only a web browser and limited programming experience, you can develop and deploy professional applications that are both fast and secure. Oracle Application Express is a fully supported, no cost option of the Oracle database.
In this tutorial, you use Oracle Application Express Release 4.2 to build an application that contains a variety of pages.
Prerequisites
Before starting this tutorial, you should:
Using Data Workshop to Load Data into a Table
In this topic, you load data into the projects table.
Double-click the Start Here icon from the Desktop to open the Browser and click the Run APEX bookmark.
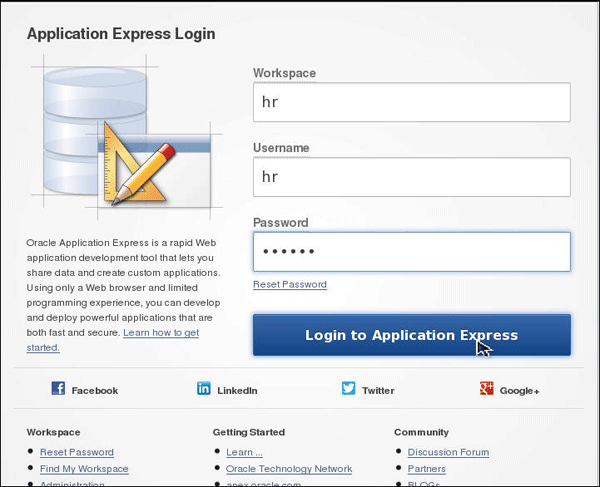
Log into the Application Express Login page using your
login credentials. Enter the following credentials and click
Login.
Note: Here, the Workspace, Username and Password used are
obe.
Workspace: hr
Username: hr
Password: oracle
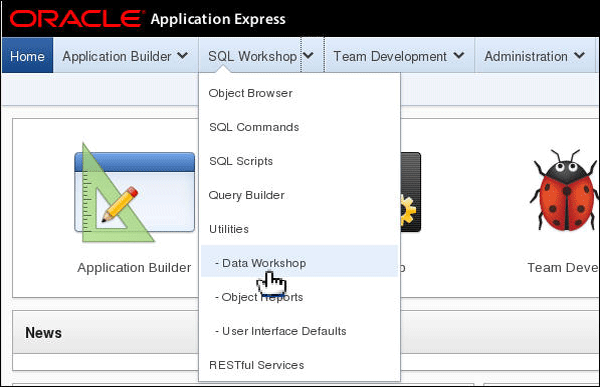
Select SQL Workshop > Data Workshop.
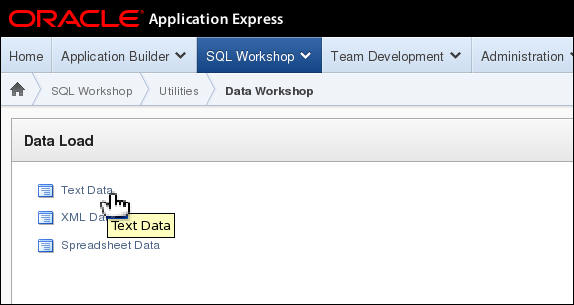
Under Data Load, select Text Data.
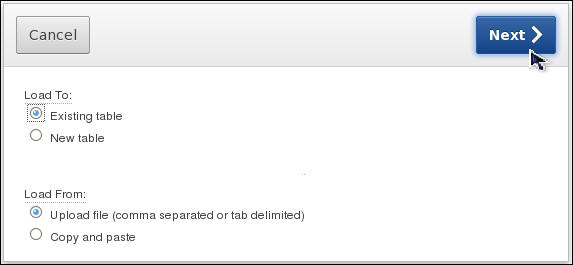
You want to upload a file and load it into the PROJECTS table. Select Existing table for Load To and click Next >.
Select PROJECTS for Table Name and click Next >.

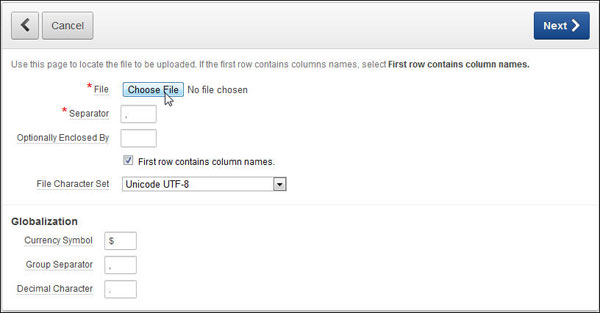
Click Choose File and select the projects.txt
file from the C:\Downloads\files directory.
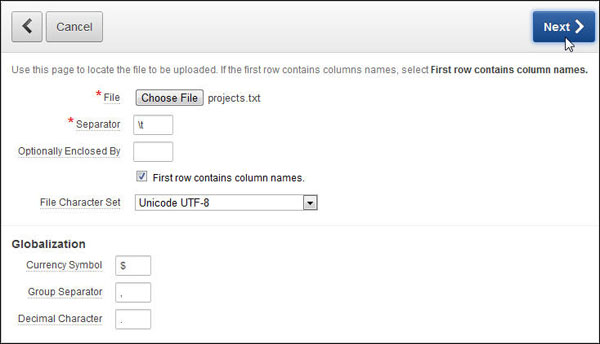
The file is tab delimited. Change the Separator to \t and click Next >.
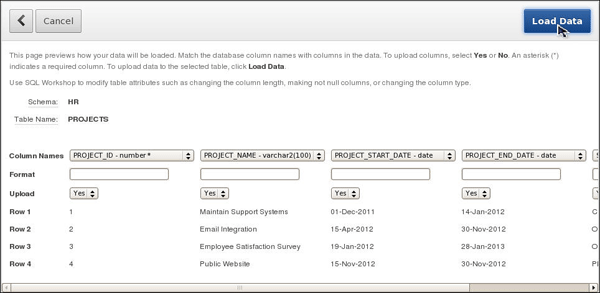
The column mapping information is displayed. Click Load Data.
The data was loaded successfully. In the next topic, you add a Unique Constraint on the EMPLOYEES table.

Creating a Database Application Using the Application Wizard
In this topic, you create a database application using the application wizard. You will create a series of pages, these include, a Form on the EMPLOYEES table with an Interactive Report, a Master Detail Form on the PROJECTS and TASKS table.
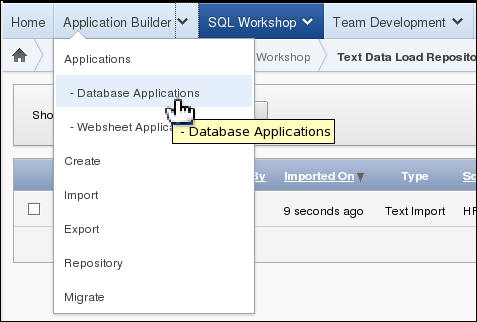
Select Application Builder > Database Applications.
Click Create >.

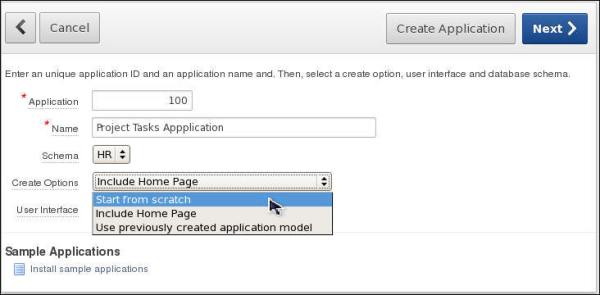
Enter Project Tasks Application for Name and select Start from scratch option from the Create Options drop-down menu .
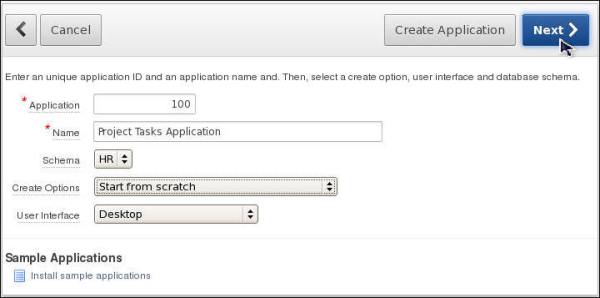
Click Next >.
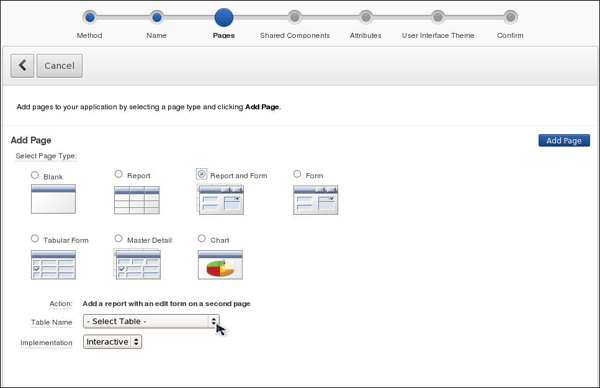
This wizard window allows you to create pages in your application. Select the Report and Form Page Type and select the List of Values icon for Table Name.
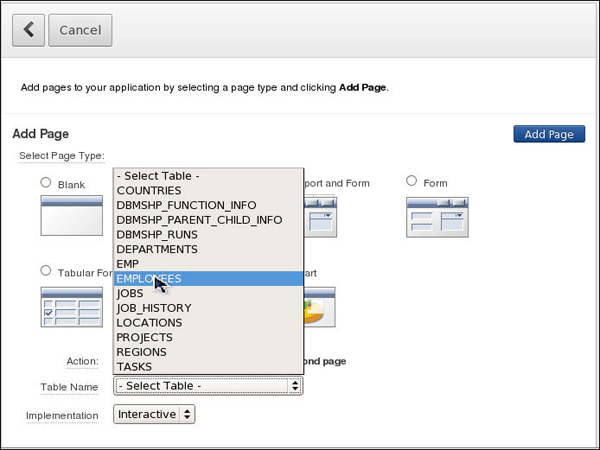
Select the EMPLOYEES
table.
Click Add Page.
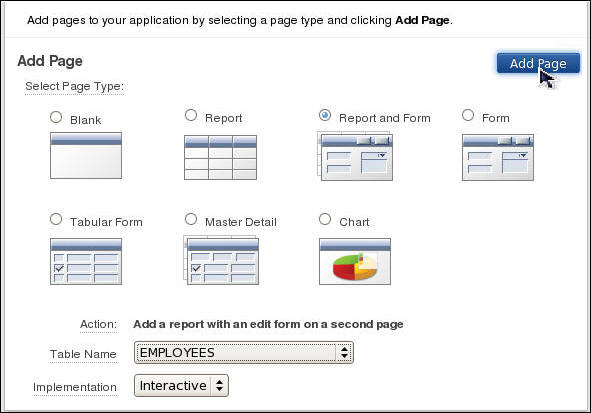
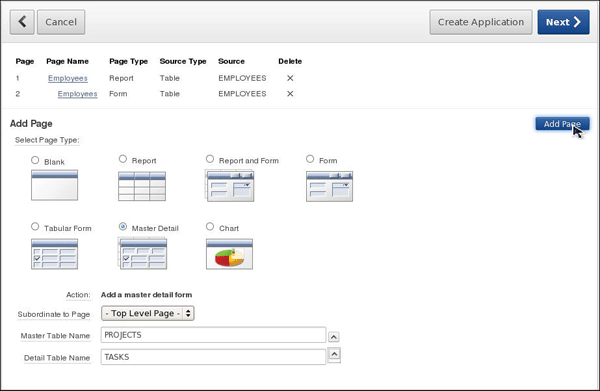
Your Report and Form pages were added. You also want to add a Master Detail form. Select the Master Detail page type and select the List of Values icon for the Master Table.
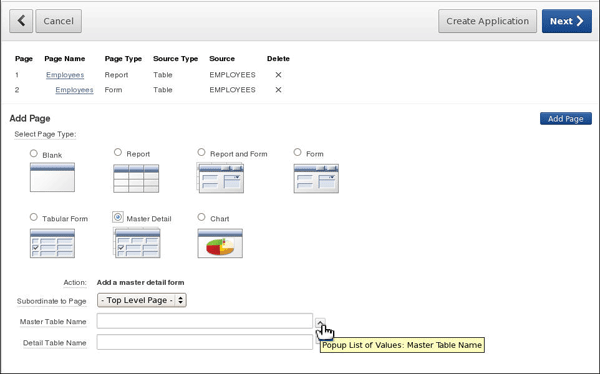
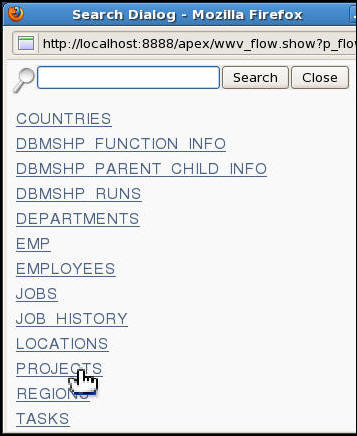
Select the PROJECTS table link.
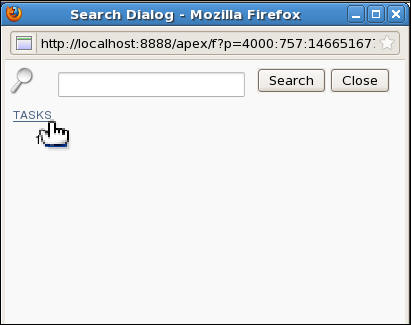
Select the List of Values icon for the Detail Table Name.
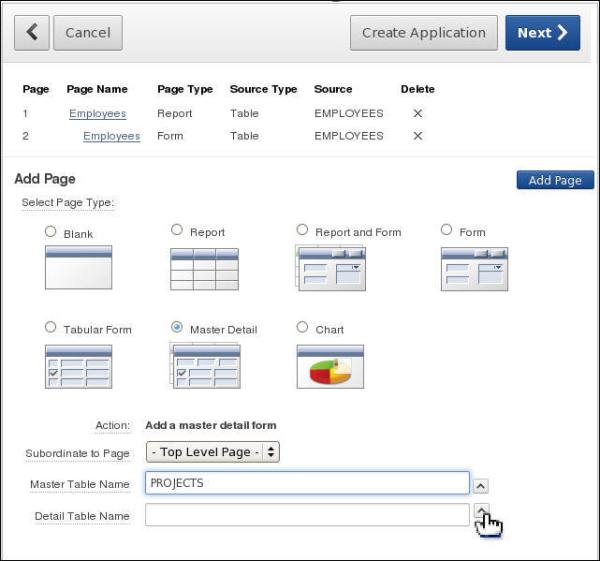
Notice that you only see the tables that are related to the PROJECTS table. Select the TASKS table link.
Click Add Page.
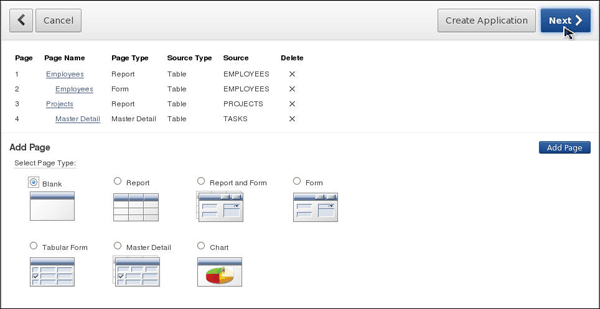
Notice that two pages will be created, a Report of the Master table which you then will select a project from to see the Master Detail page. Click Next >.
Accept the default and click Next >.

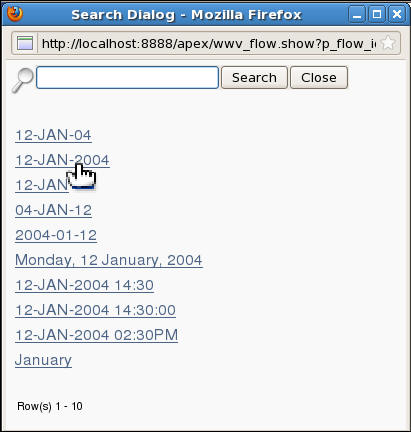
You want to specify a default Date Format for this application. Select the List of Values icon for Date Format.
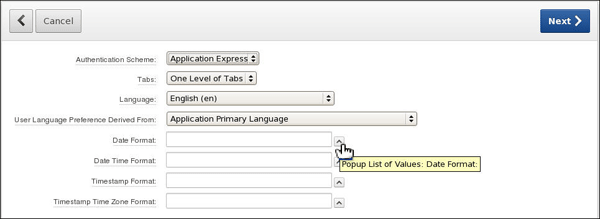
Select the 12-JAN-2004 date format link.
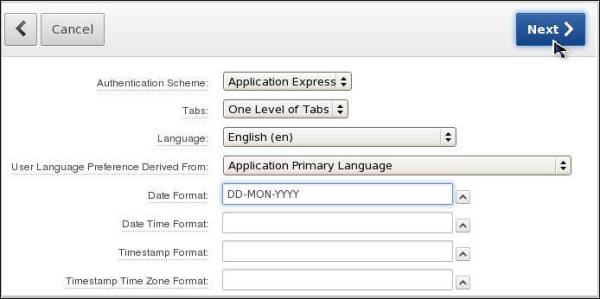
Accept the default authentication and click Next >.
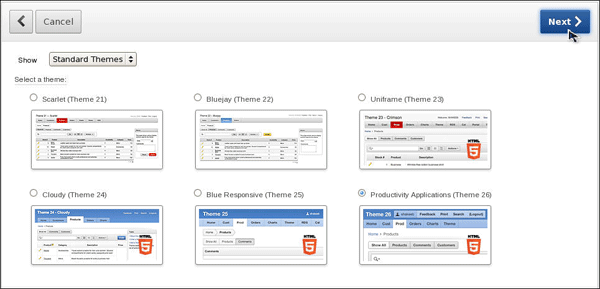
Accept the default and click Next >.
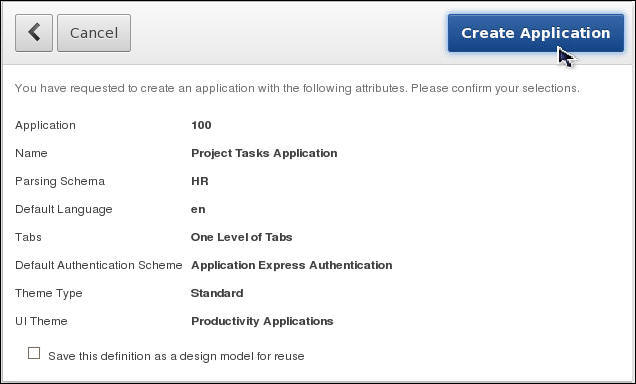
To create the application click Create Application.
Your application was created successfully. Click Run Application.

Enter hr for Username and oracle for Password and click Login.
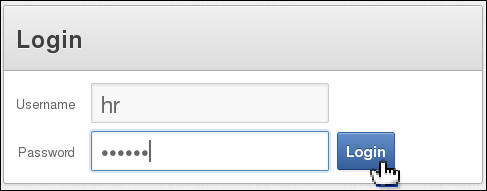
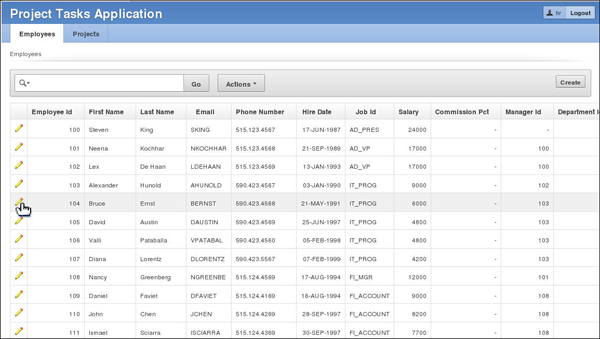
The Employee report is displayed. Notice that the default date format for the Hire Date is used. Click one of the edit icons in front of one of the rows to see the form.
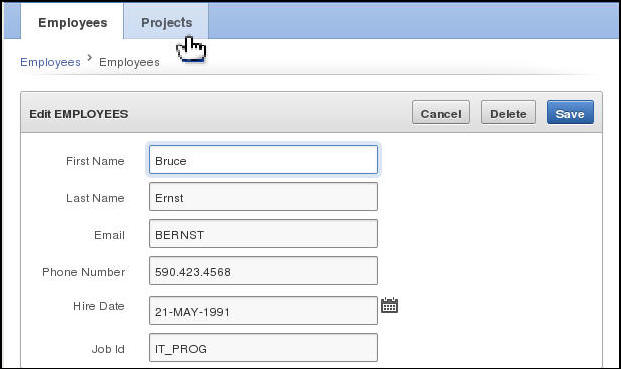
This page is the Edit Employee form where you can make changes to an employees data. Click the Projects tab.
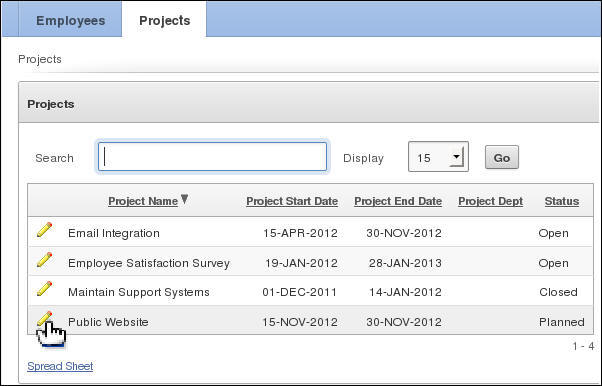
This is the Projects Report. Click the edit icon in front of one of the rows to see the Master Detail form.
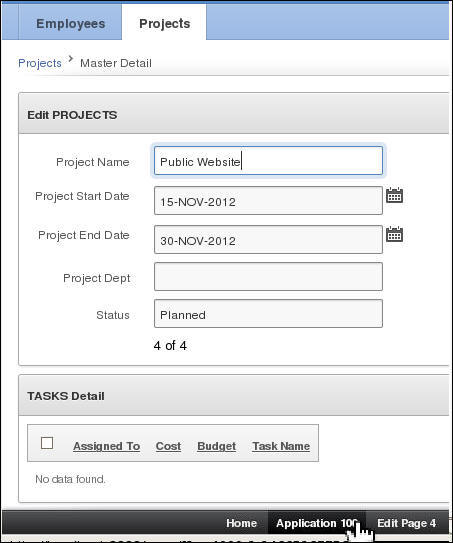
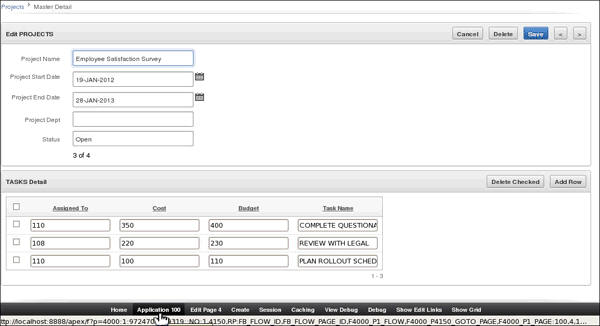
This page contains the Master Detail form showing all the tasks for a particular project. Note there is currently no data in the Tasks table. You will add data into the Tasks table in a later topic. In the next topic, you modify the Employee Report. Click the Application <n> button at the bottom of the window (which is called the Developer Toolbar).
Modifying an Interactive Report
In this topic, you modify the Employee Report by and changing query to show the name of the manager instead of the Manager ID, and changing the format of the SALARY column.
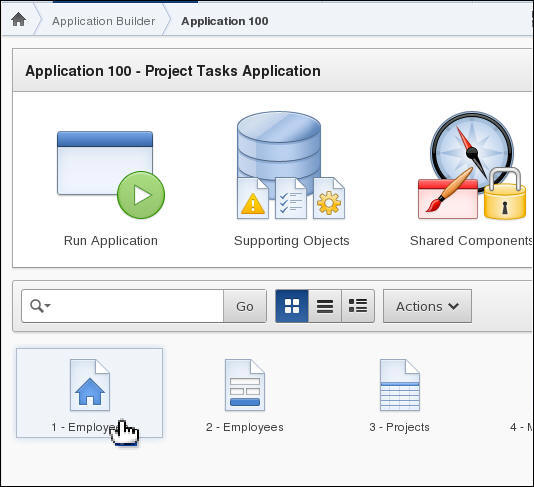
To edit the page, click the 1-Employees page icon.
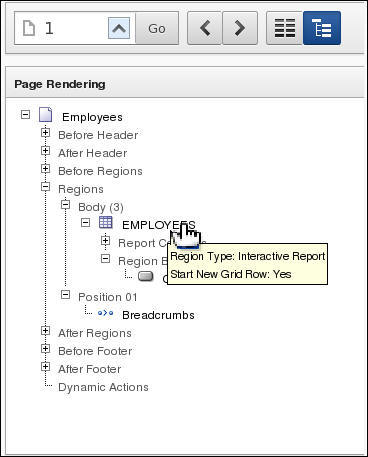
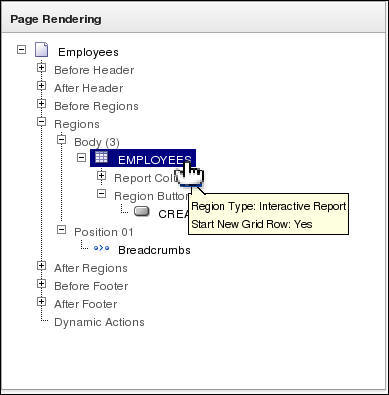
Under Regions, double-click the EMPLOYEES Interactive Report.
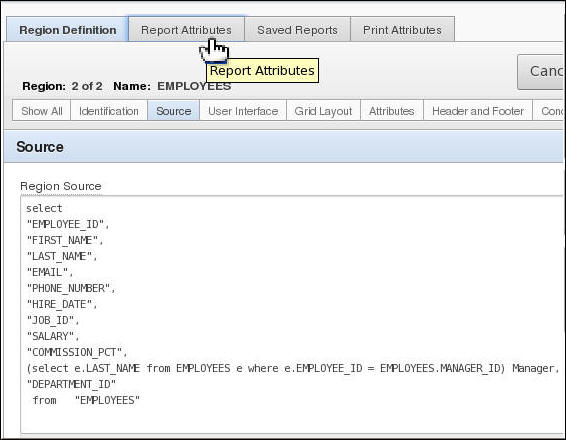
To see the SQL Query this report is based on, click the Source subtab.
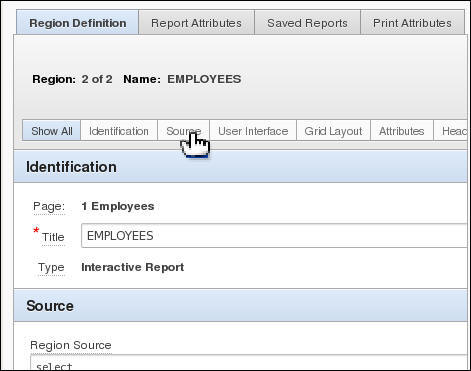
You want to change the SQL query so that the MANAGER_ID shows the last name of the manager instead of the ID.
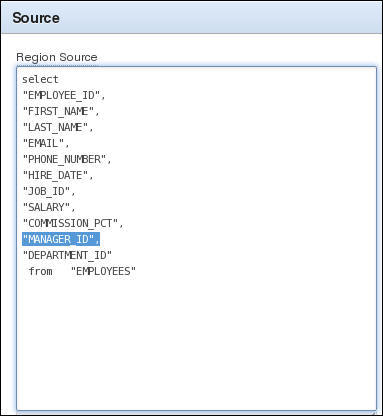
Replace MANAGER_ID with the following and click Apply Changes.
(select e.LAST_NAME from EMPLOYEES e where e.EMPLOYEE_ID = EMPLOYEES.MANAGER_ID) Manager,
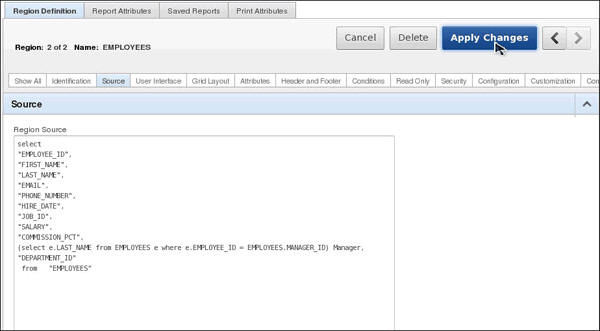
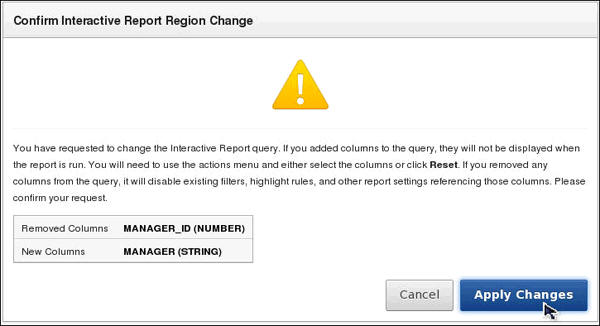
Click Apply Changes to confirm your change.
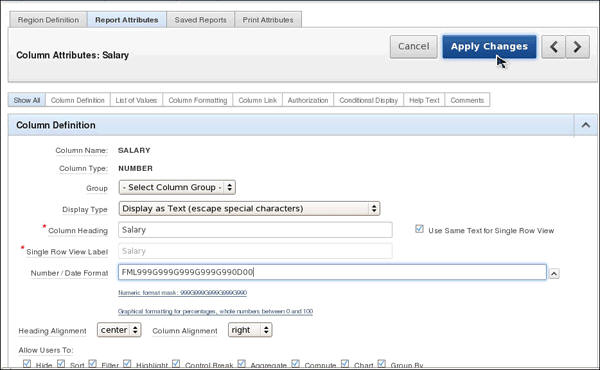
You want to change the format for SALARY. Double-click the EMPLOYEES Interactive Report again.
Click the Report Attributes tab.
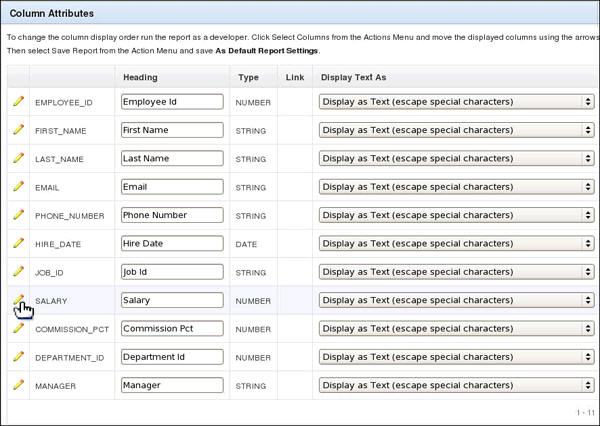
Select the edit icon in front of the SALARY Column Attribute.
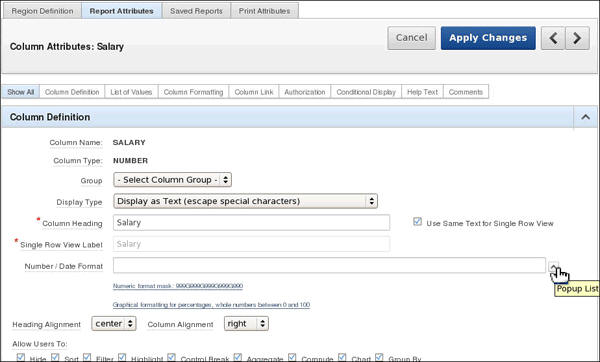
Select the List of Values icon for Number/Date Format.
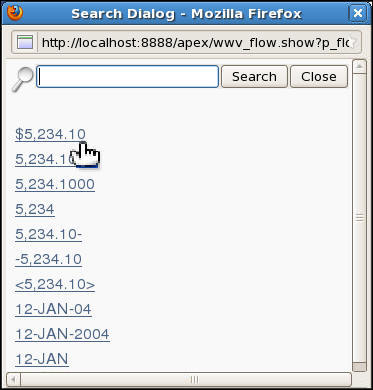
Select the $5,234.10 link.
Click Apply Changes.
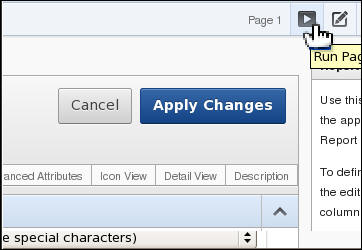
In the upper right corner, click the Run Page icon.
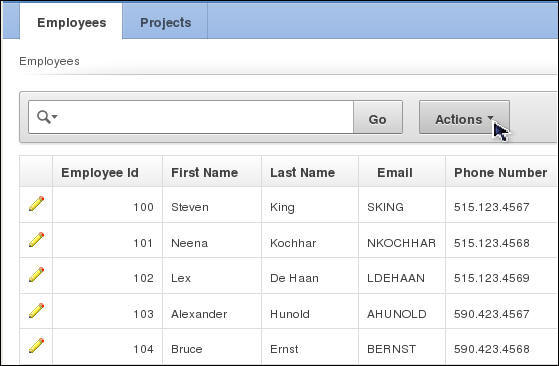
Because you changed the SQL query, the new column Manager is not displayed by default. Select the Actions pulldown.
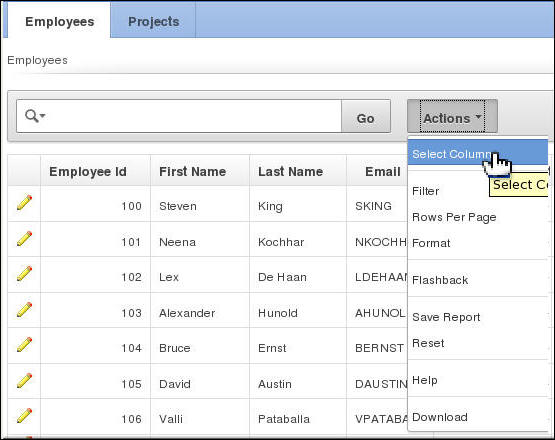
Select Select Columns.
Select Manager from the Do Not Display list and click the Move icon to move it to the Display in Report list.
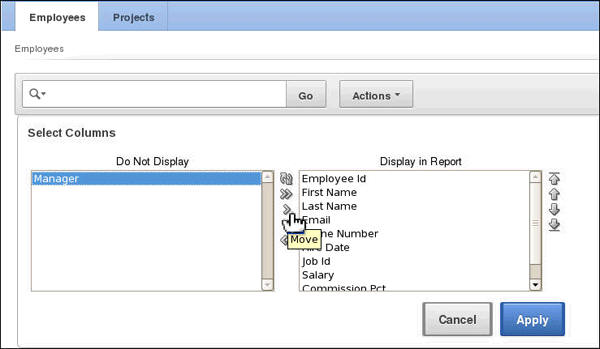
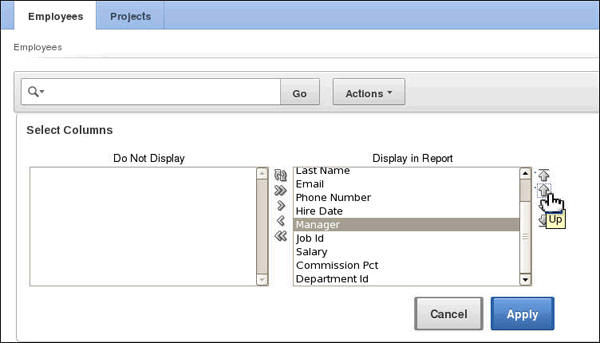
Select the Manager column and click the Up icon until the column appears under Hire Date.
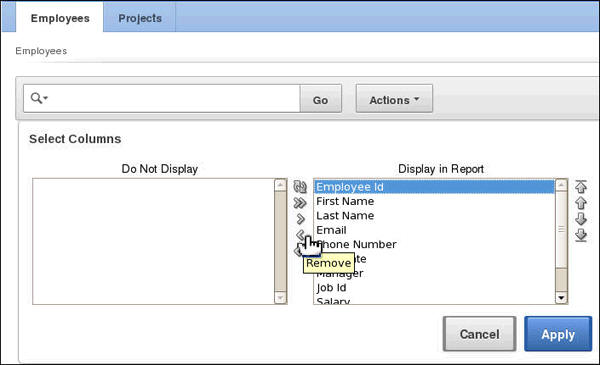
You do not want to show the Employee Id. Select it from the list and click the Remove icon to move it to the Do Not Display list.
Click Apply.
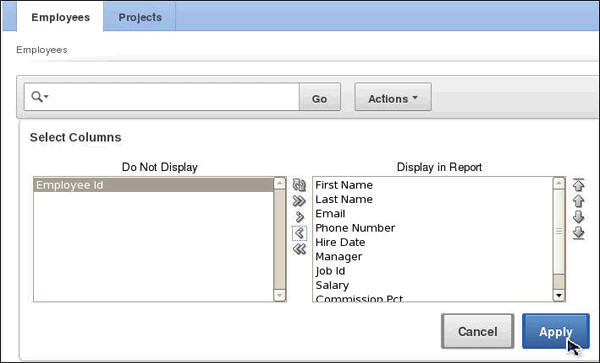
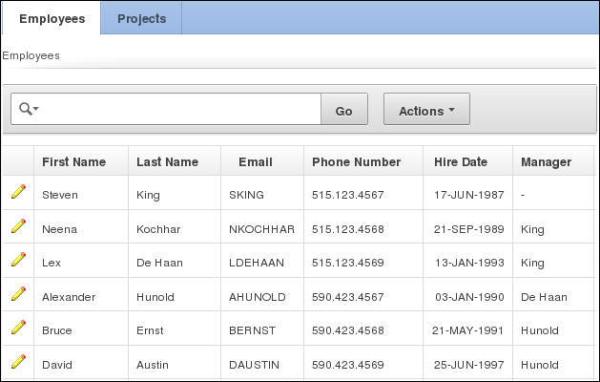
Notice the Manager is changed to the Last name of the Manager for each employee and the format of the Salary column has changed.
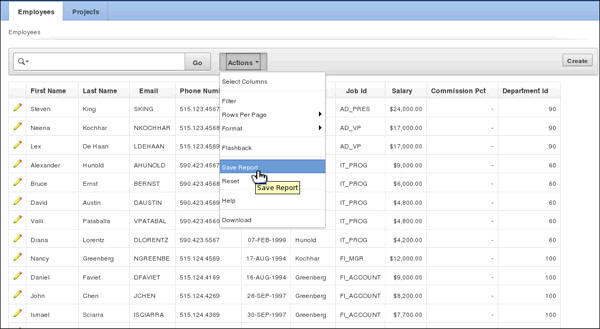
To save the changes you just made, you need save the report. Select Actions > Save Report.
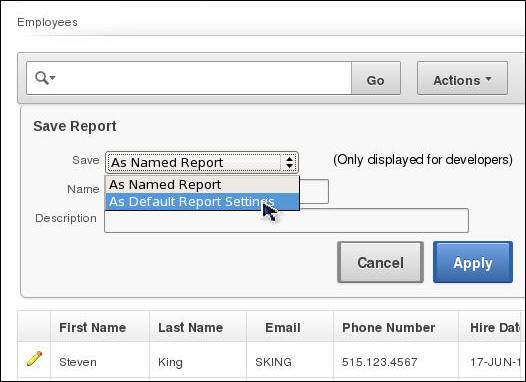
Select As Default Report Settings from the Save pull down.
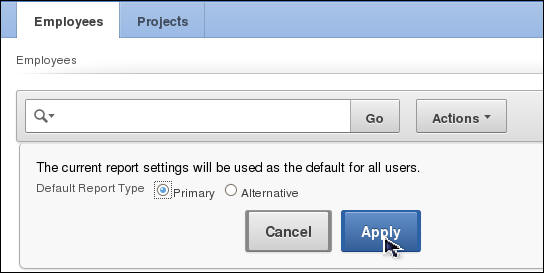
Click Apply. In the next topic, you create a calendar page for Projects. Select the Application<n> button in the Developer Toolbar.
Creating and Manipulating Data in a Calendar
In this topic, you create a calendar with an edit calendar popup that shows the PROJECT_END_DATE for each Project. You change the end date to see how it moves the project link in the calendar.
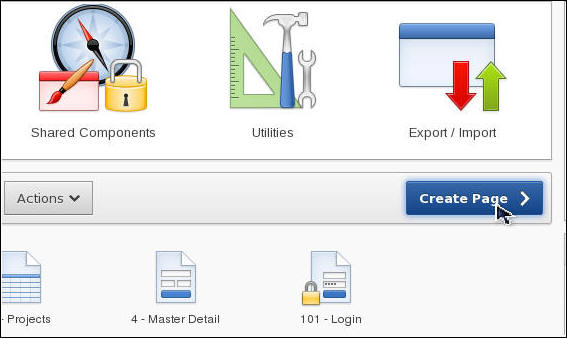
Click Create Page >.
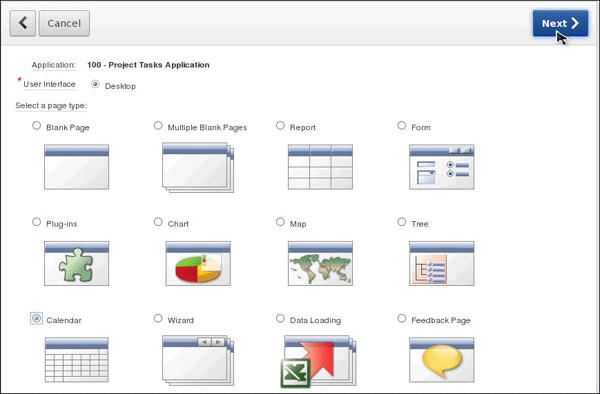
Select the Calendar page type and click Next >.
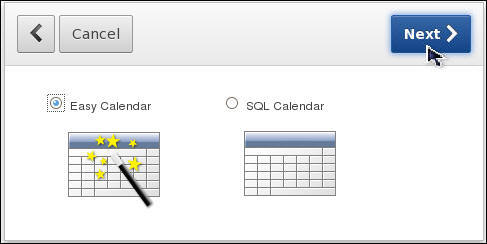
Select Easy Calendar and click Next >.
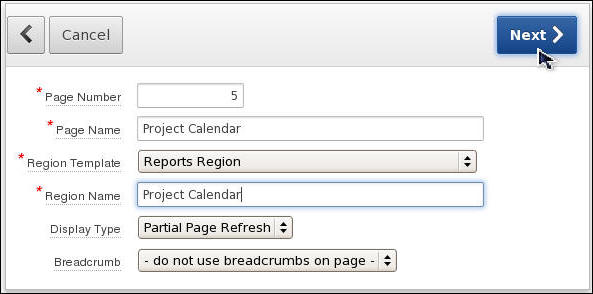
Enter Project Calendar for Page and Region Name and click Next >.
Select Use an existing tab set and create a new tab within the existing tab set. Enter Calendar for the Tab Label and click Next >.
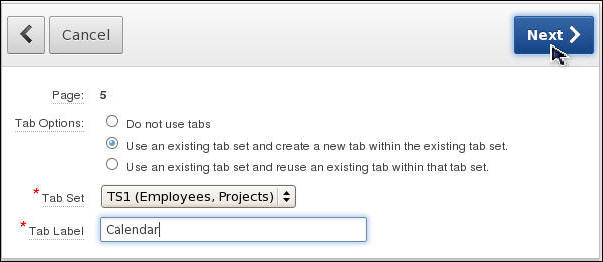
Select PROJECTS for Table/View Name and click Next >.
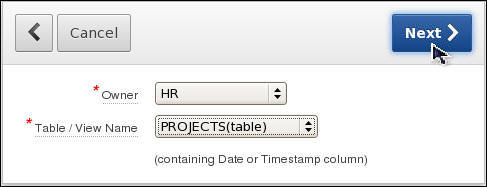
Select PROJECT_END_DATE for Date Column, PROJECT_NAME for Display Column and click Next >.
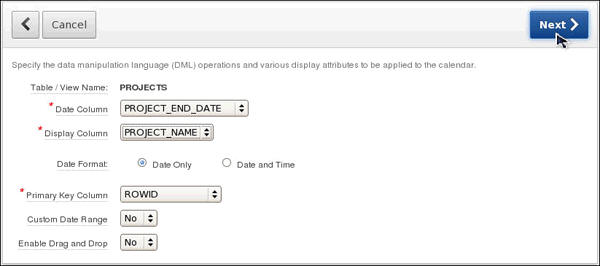
Select Create new edit page for Link Target and click Next >.
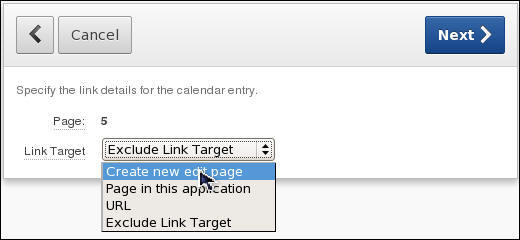
Shift-select all the columns for Select Columns, select Popup Window for Open Link in and click Next >.
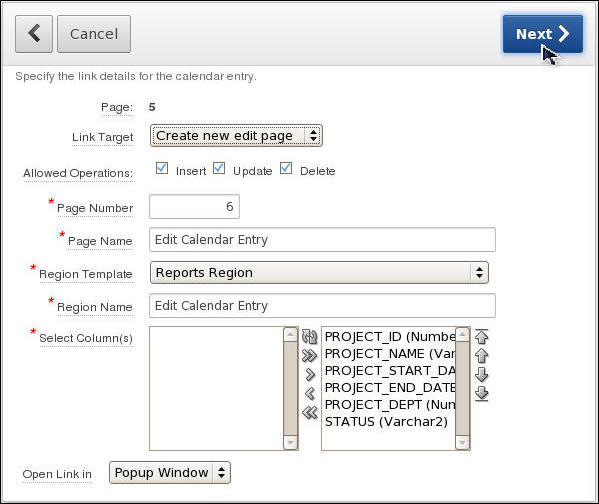
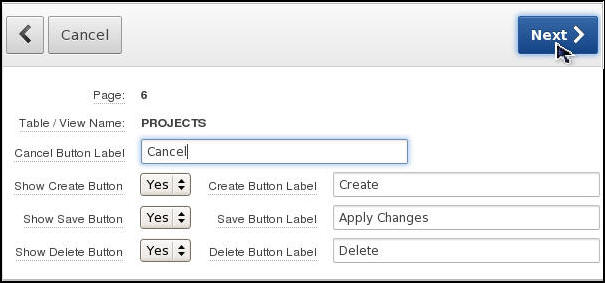
Accept the default and click Next >.
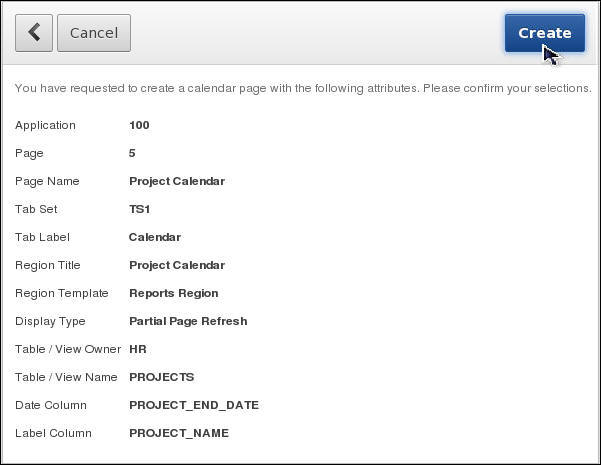
To create the calendar, click Create.
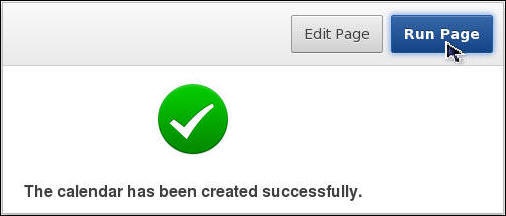
Click Run Page.
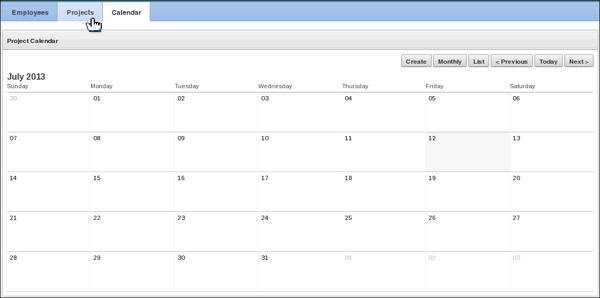
Notice that there are no projects listed in the current calendar. Click the Projects tab.
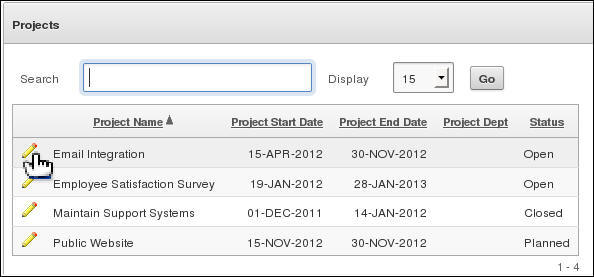
Click the edit icon in front of the Email Integration project.
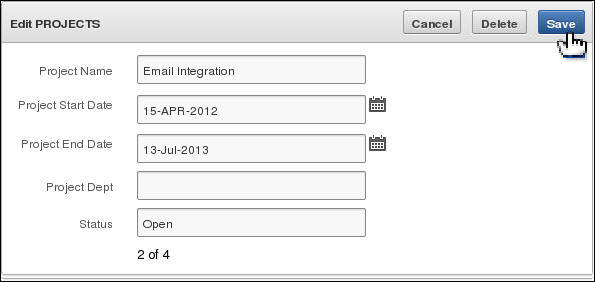
Change the Project End Date to tomorrow's date and click Save.
Click the Calendar tab.
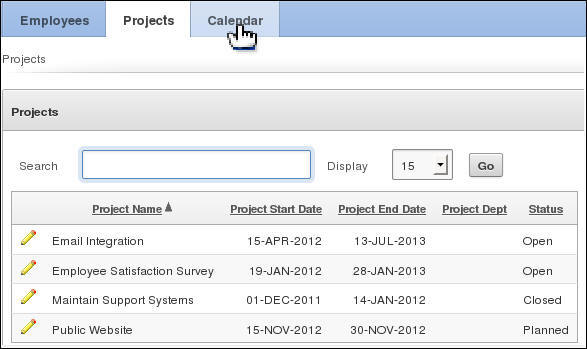
Notice that the Project now appears in the calendar on the project end date. You can also change the project from within the calendar. Click the Email Integration link.
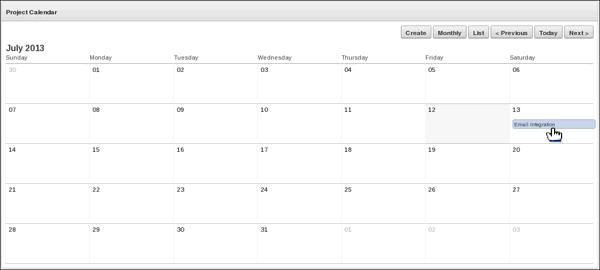
The Edit Calendar Entry popup appears. Select a different Project End Date in the current month and click Apply Changes.
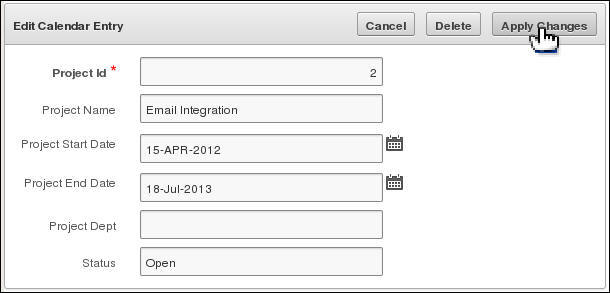
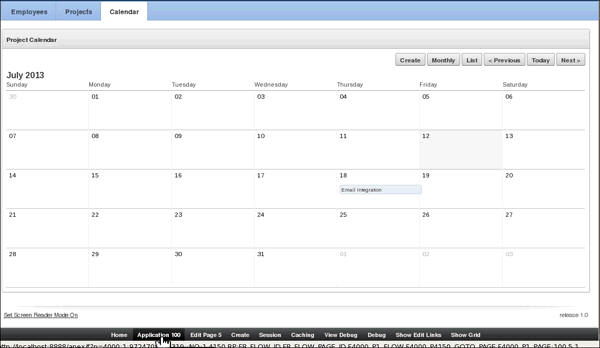
The Project link is now in the date you changed it to. Click the Application<n> button in the Developer Toolbar. In the next topic, you create a series of pages that will allow you to upload data into the TASKS table.
Adding a Data Upload Wizard
In this topic, you create a series of wizard pages to upload data into the TASKS table.
Click Create Page >.
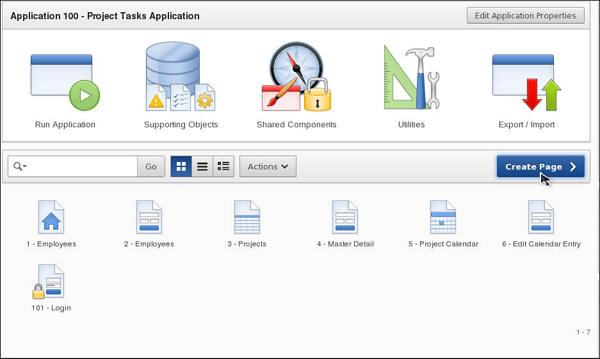
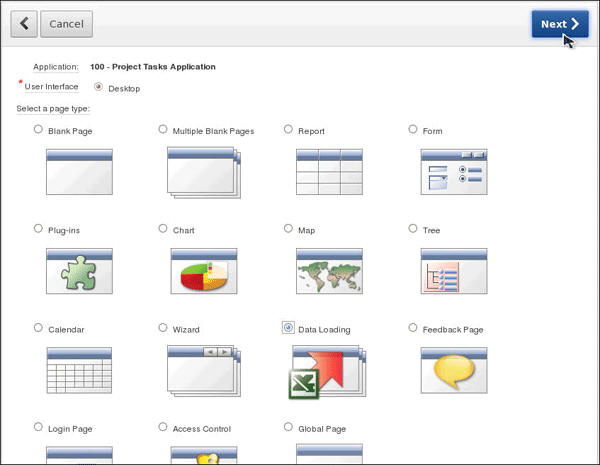
Select the Data Loading page type and click Next >.
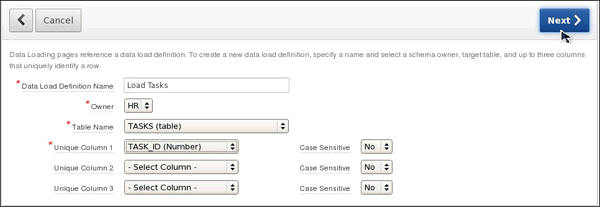
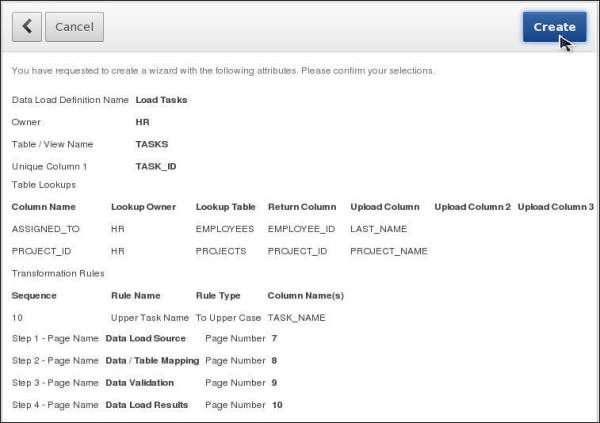
Enter Load Tasks for Data Load Definition Name, select TASKS for Table Name, and select TASK_ID for Unique Column 1. Then click Next >.
You want to create a rule that will change the Task Name to all uppercase. Select TASK_NAME for Column Name, enter Upper Task Name for Name and select To Upper Case for Type. Then click Add.
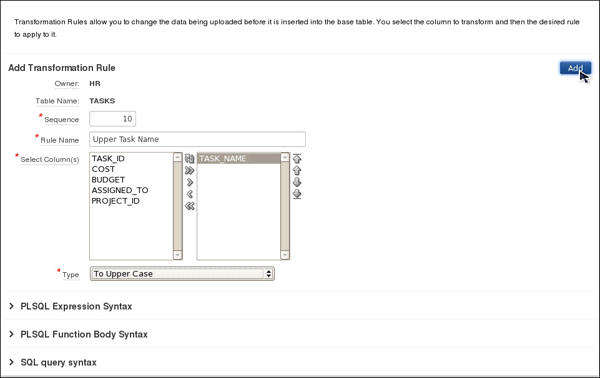
Click Next >.

You have two lookups that you need to create. In the data file, you have the last name of the employee and so you need to do the lookup to the employees table to get the employee id. Select ASSIGNED_TO for Column Name, select EMPLOYEES for Table Name, select EMPLOYEE_ID for Column Name (of key value), and select LAST_NAME for Uploaded Column. Then click Add.
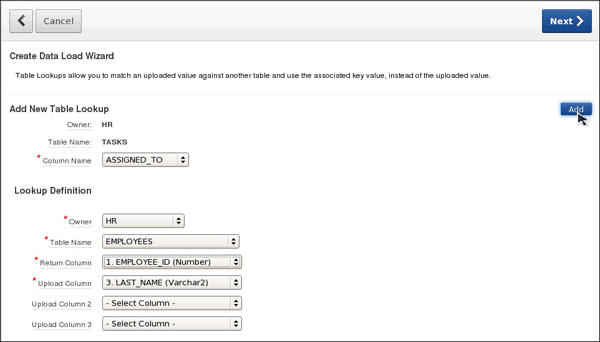
You also have to perform a lookup for the project. Select PROJECT_ID for Column Name, select PROJECTS for Table Name, select PROJECT_ID for Column Name, and select PROJECT_NAME for Uploaded Column. Then click Add.
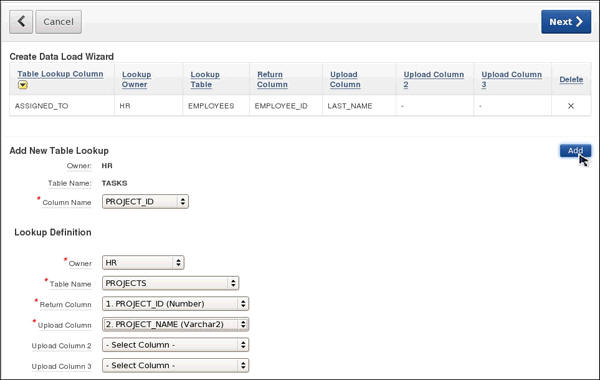
Your lookups have been created. Click Next >.

Accept the default pages that will be created and click Next >.

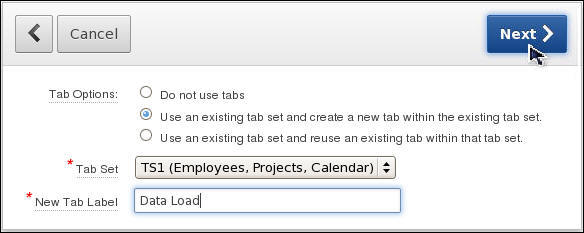
You want to create a new tab. Select Use an existing tab set and create a new tab within the existing tab set and enter Data Load for the New Tab Label and click Next >.
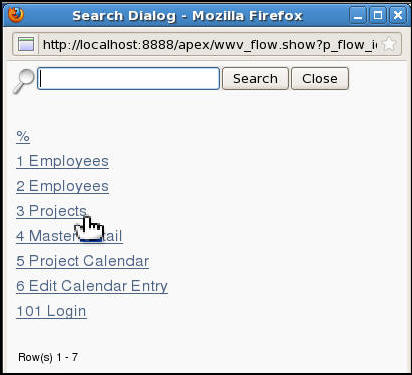
You need to specify which page to go to when you press Cancel. Select the List of Values icon.

You want to select the 3 Projects page link.
Enter 3 for the Finish Branch to Page and click Next >.
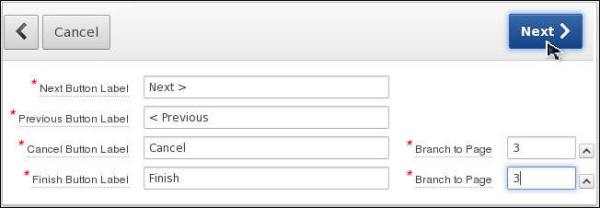
You are ready to create the Data Load Wizard pages. Click Create.
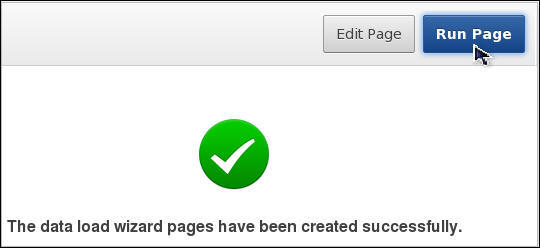
Click Run Page.
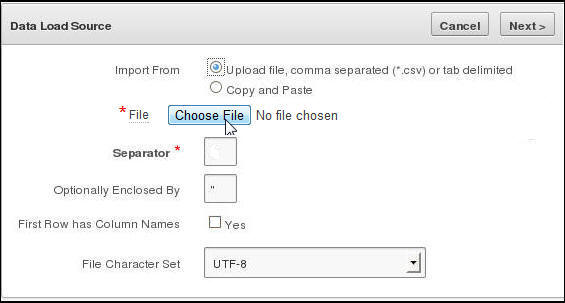
Notice that you see the flow of the wizard on the left. The first wizard page is where you specify the Data Load Source. You want to upload a file with task data. Select Upload File for Import From and click Choose File.
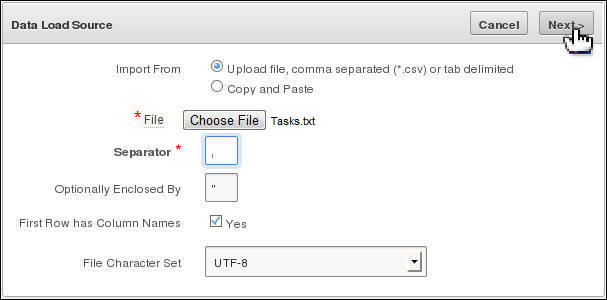
Select the tasks.txt from the C:\Downloads\files directory. The tasks.txt file is comma delimited so change the Separator to ',' (comma) and select the Yes checkbox for First Row has Column Names and click Next >.
The Data / Table Mappings are displayed. Notice that the Column Name for the third column is not selected. This is because the name of the column in the file does not match the column in the database. Select the COST column from the pull down.
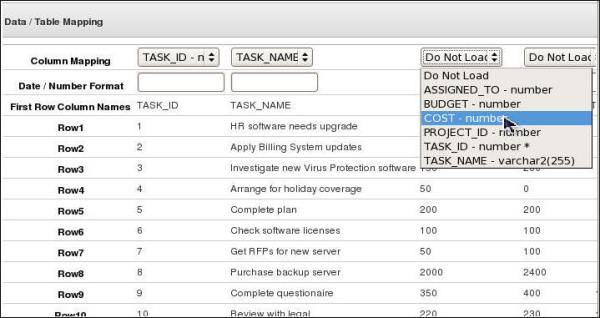
For the next column to the right, select the BUDGET column from the pull down.
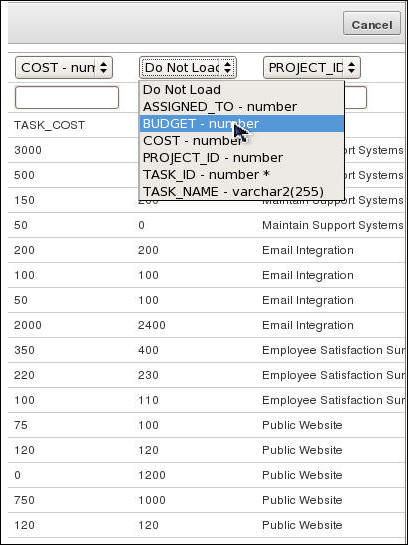
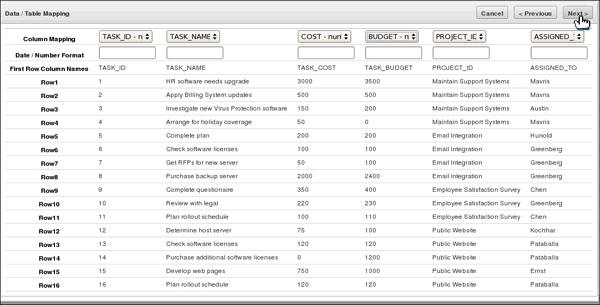
Scroll to the right to make sure all the other columns are specified and click Next >.
The Data Validation page is displayed. This page displays the data that will be inserted into the database. Notice that the lookups are applied so the PROJECT_ID rather than the PROJECT_NAME will be inserted and the EMPLOYEE_ID instead of the LAST_NAME will be inserted. In addition, the TASK_NAME was transformed to all Uppercase. Click Load Data.
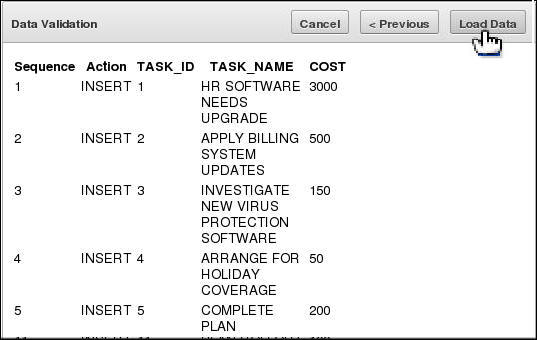
Notice that 16 rows were inserted. Click Finish.

Notice that Page 3 is now displayed. Select the edit icon next to one of the Projects.
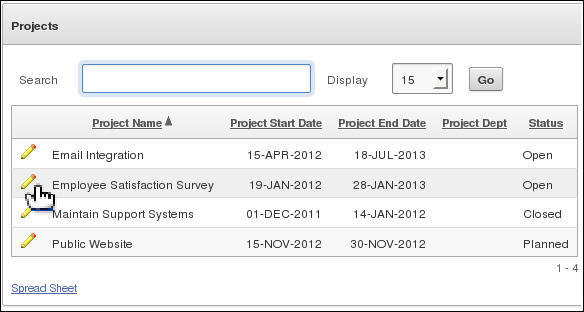
The tasks that you loaded are now displayed for this project. Click the Application<n> button in the Developer Toolbar. In the next topic, you create and apply a List of Values (LOV) to some of the items on your page.
Creating and Applying List of Values (LOVs)
In this topic, you customize some of the page items to show a list of values (LOVs). You create an LOV on the MANAGER_ID page item and then convert it to a Shared LOV.
In addition, you create a Shared LOV to show a list of jobs and then associate the LOV with the JOB_ID page item.
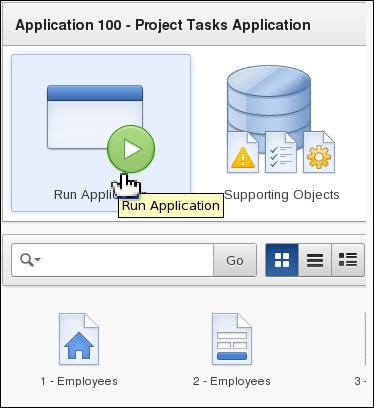
Click Run Application.
Click the edit icon in front of one of the rows in the Employee Report.
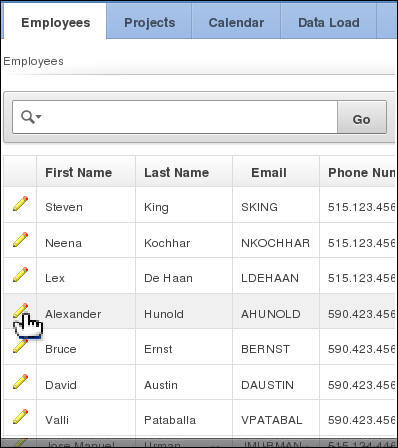
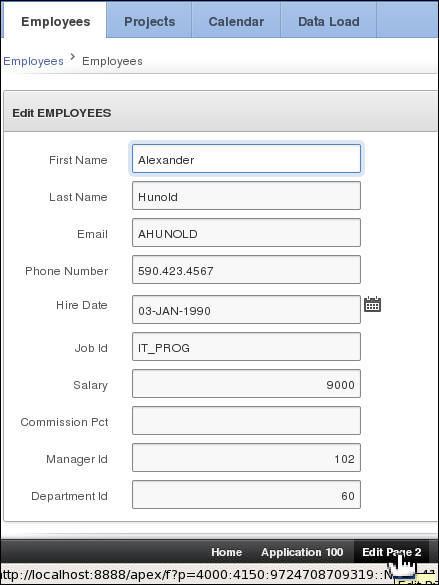
Notice that the EMPLOYEE_ID for the Manager is displayed. You want this to be a select list and show the managers last name. Click Edit Page <n> button in the Developer Toolbar.
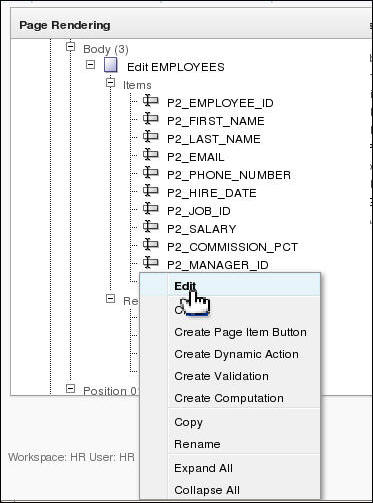
Scroll down the Page Rendering section and right-click the P2_MANAGER_ID page item and select Edit. Alternatively, you can double-click the page item.
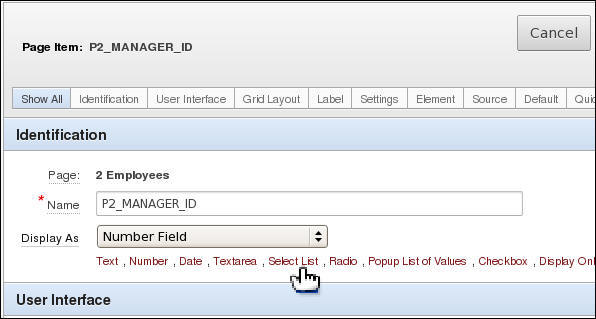
Select the Select List quick pick for the Display As field.
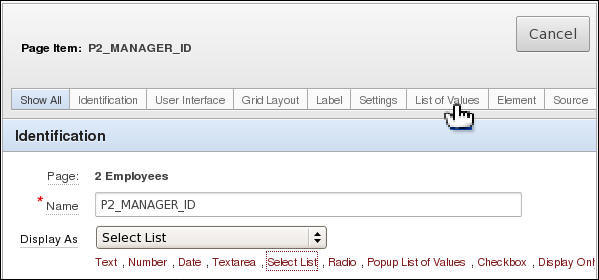
Notice that after you change the Display As, the List of Values subtab appears. Select List of Values to go to that section on this page.
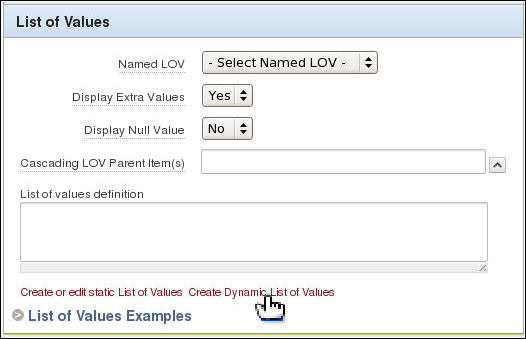
You want a list of employees to be dynamically displayed. Click the Create Dynamic List of Values link.
Select the EMPLOYEES table from the list of values (using the icon) or enter the name in the Table or View field. Then click Next >.

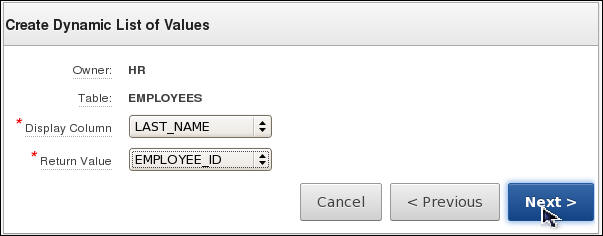
Select LAST_NAME for Display column and EMPLOYEE_ID for Return Value and click Next >. Note you must have a display and return value for each List of Values you create.
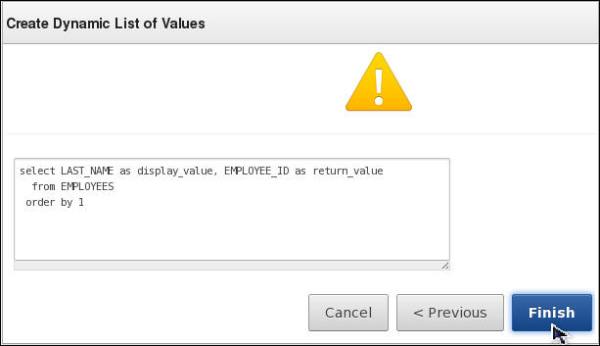
The SQL query that will execute for this item is displayed. Click Finish.
Click Apply Changes.
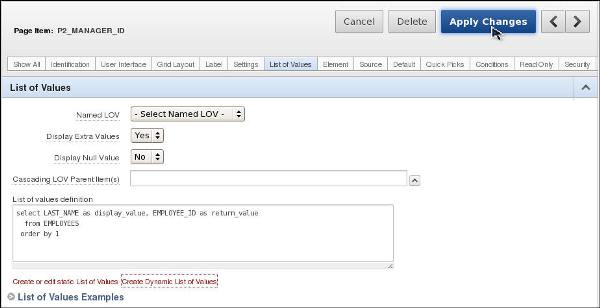
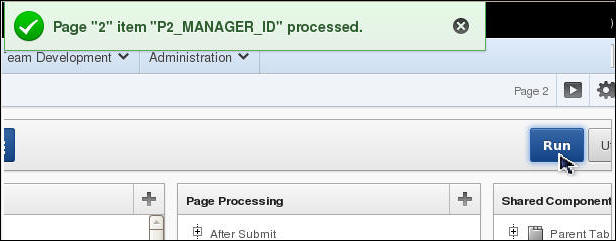
Your changes were saved. Click Run.
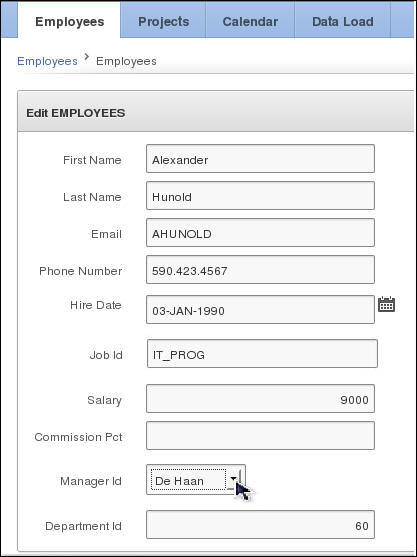
Notice that the Managers Last Name is now listed instead of the Managers Employee ID. Select the List of Values icon.
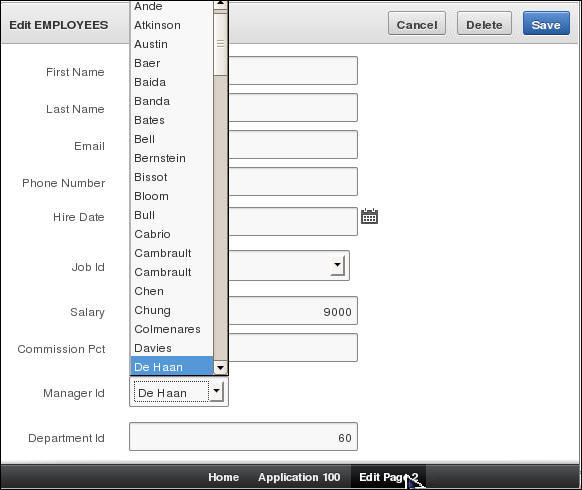
The list of values is displayed. You might want to use this List of Values on other pages in your application. As a result, you want to make it a Shared LOV. Click the Edit Page <n> button in the Developer Toolbar.
Double-click the P2_MANAGER_ID page item to open its property page.
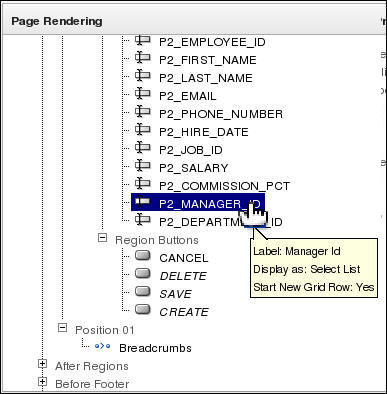
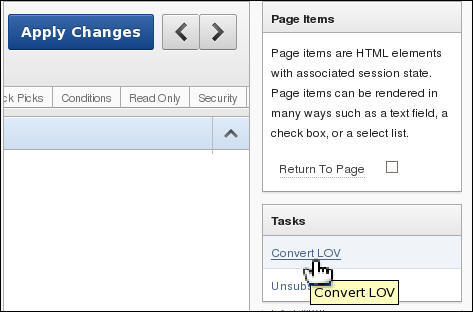
Because you last selected the List of Values subtab, you should be automatically directed to that section. To convert the LOV to a shared LOV, select Convert LOV from the list of Tasks on the right.
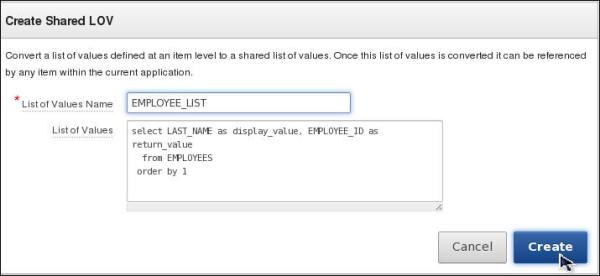
The Create Shared LOV window is displayed with the LOV SQL query. Enter EMPLOYEE_LIST for List of Values Name field and click Create.
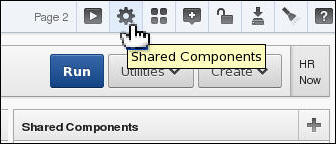
The LOV was created successfully. To view all the Shared LOVs, select the Shared Components icon in the upper right corner of the page.
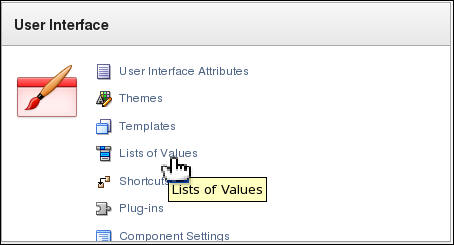
Under User Interface, select List of Values.
You want to create another LOV to show a list of Job Titles. This time, you create the Shared LOV and then reference it on the page item properties page. Click Create >.

Accept the default and click click Next >.

Enter JOB_LIST for name and click the Dynamic radio button. Then click Next >.

Change the SQL query to the following and click Create List of Values.
select job_title d, job_id r
from jobs
order by 1
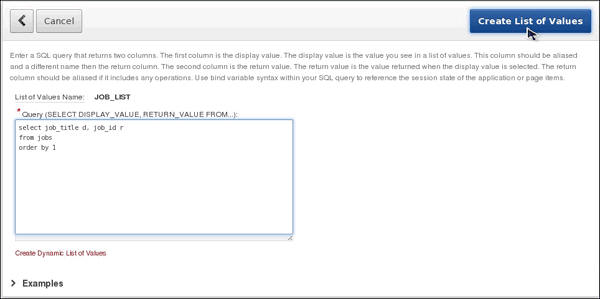
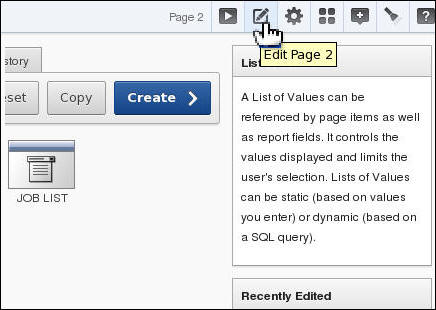
The JOB_LIST LOV was created successfully. Now you can reference it in your page item for JOB_ID. Click the Edit Page 2 icon in the upper right of this page. Note that this Edit Page icon references the last page you edited.
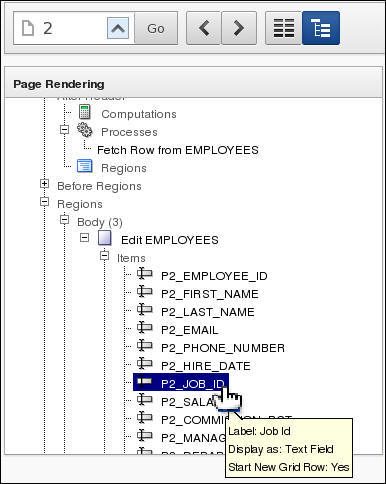
Scroll down under Page Rendering and double-click the P2_JOB_ID page item.
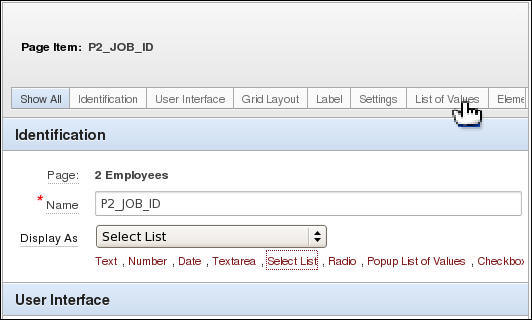
Select the Select List quick pick link.
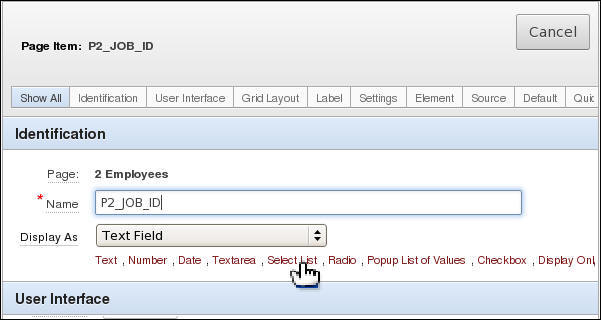
Click the List of Values subtab.
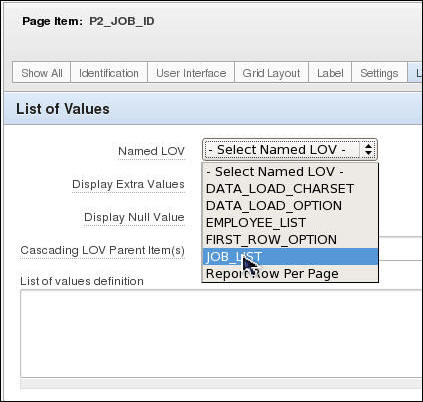
Select JOB_LIST from the list of Named LOVs.
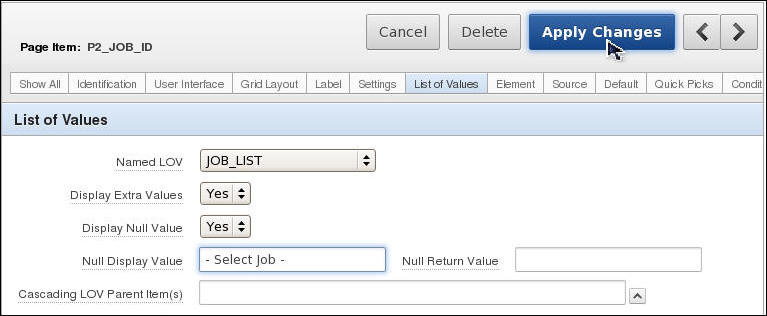
If the JOB_ID is empty, you may want to specify a default value. Select Yes for Display Null Value and enter - Select Job - for Null Display Value and click Apply Changes.
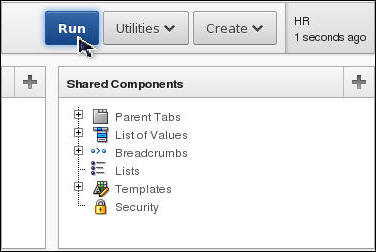
Click Run Page.
Notice that the Job Id now displays the title of the job rather than the id. Click Edit Page <n> button in the Developer Toolbar. In the next topic, you create a validation for this page.
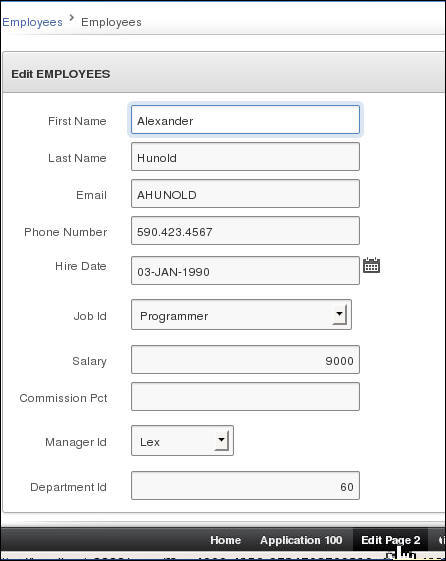
Creating Validations
In this topic, you create two validations on the Employees page. The first validation checks to make sure the Manager doesn't report to him/her self. The second validation checks to make sure the hire date is less than todays date.
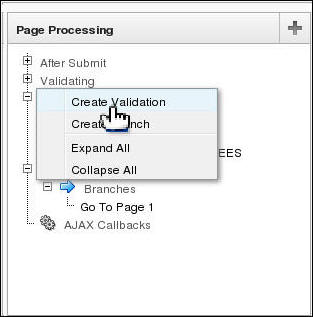
On the Page 2 Properties window, under Page Processing, right-click Validating and select Create Validation.
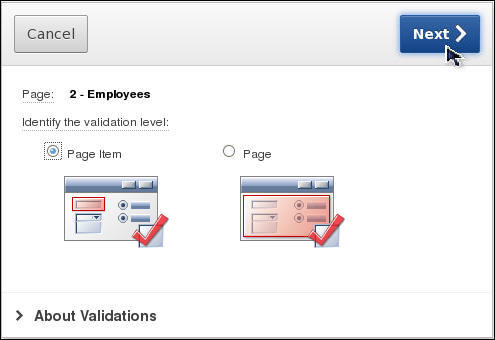
Make sure Page item is selected and click Next >.
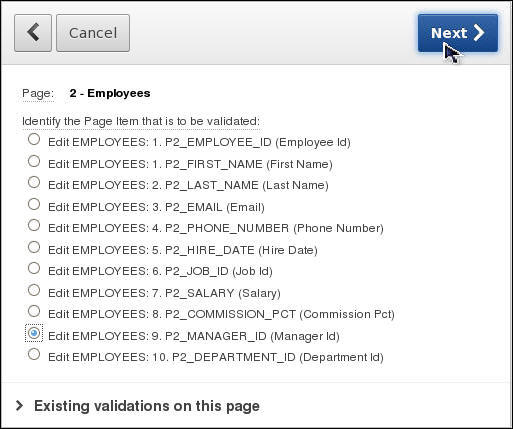
Select P2_MANAGER_ID from the list of Page items and click Next >.
Enter something like 'Manager not report to self' for Validation Name and click Next >. Note that you will receive the error message inline at the field location as well as at the top of the window.

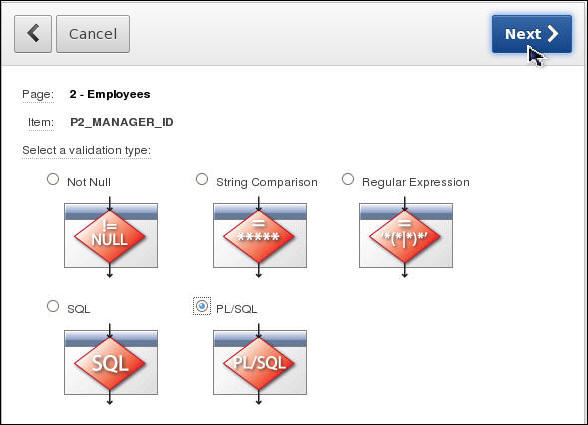
Select PL/SQL for validation type and click Next >.
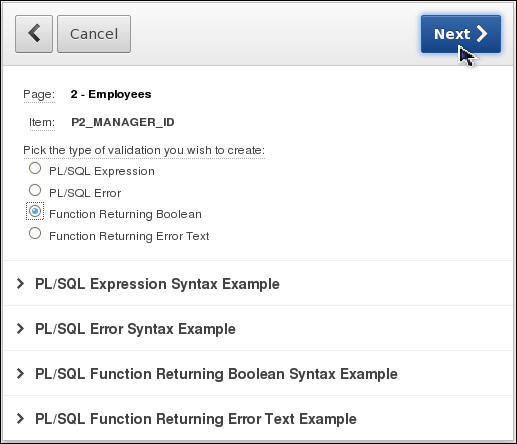
Select Function Returning Boolean and click Next >.
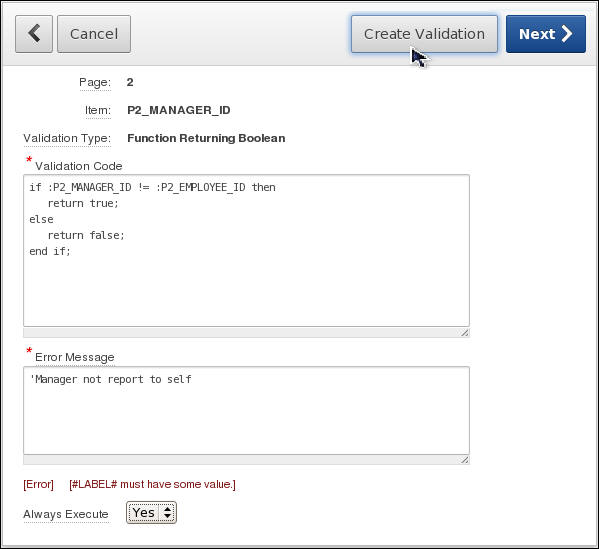
Enter the following code in the Validaton Code area, specify an error message, select Yes for Always Execute and click Create Validation.
if :P2_MANAGER_ID != :P2_EMPLOYEE_ID then
   return true;
else
   return false;
end if;
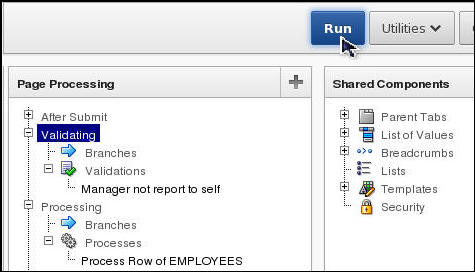
Your validation was created. Click Run.
Select the same last name of the employee you are editing and click Save.
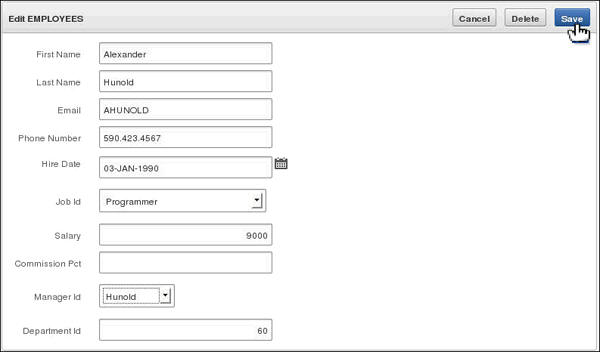
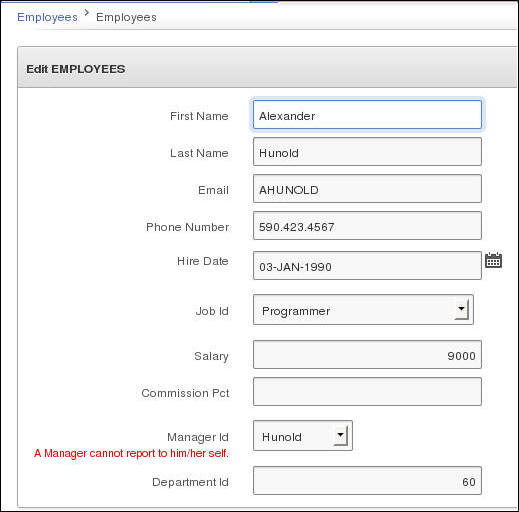
The error message is displayed inline as well as next to the field. You want to create another validation. Click the Edit Page <n> button in the Developer Toolbar.
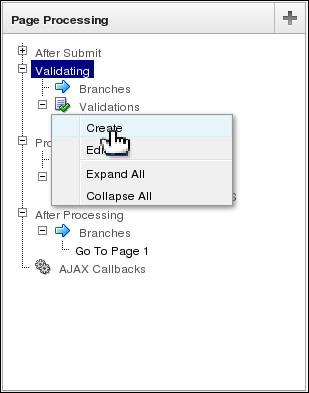
You want to create another validation which will make sure that the hire date is before today's date. Under Page Processing, right-click Validating and select Create.
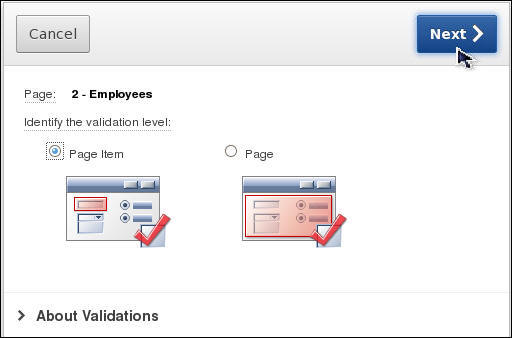
Make sure Page Item is selected and click Next >.
Select the P2_HIRE_DATE page item and click Next >.
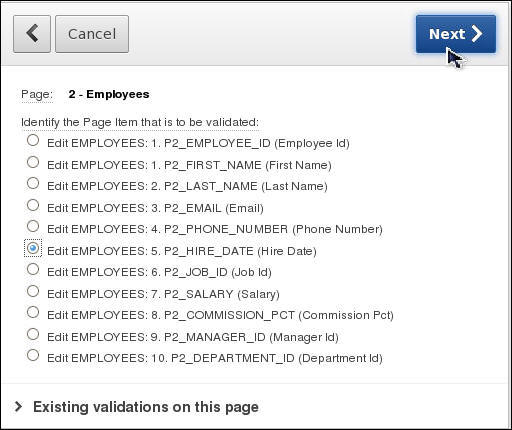
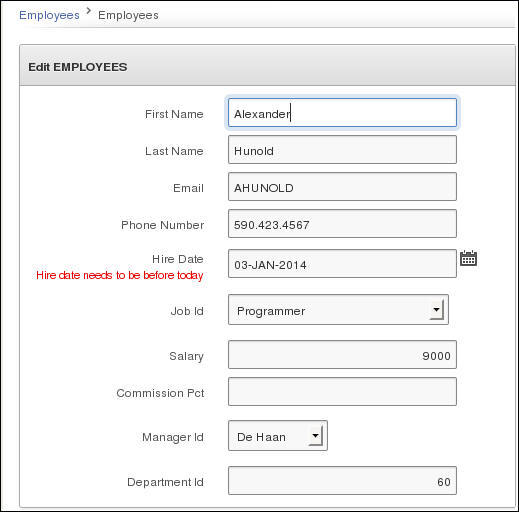
Enter Hire Date must be before today for Validation Name and select Inline with Field for Error Display Location. This time the error message is only displayed next to the field itself. Then click Next >.

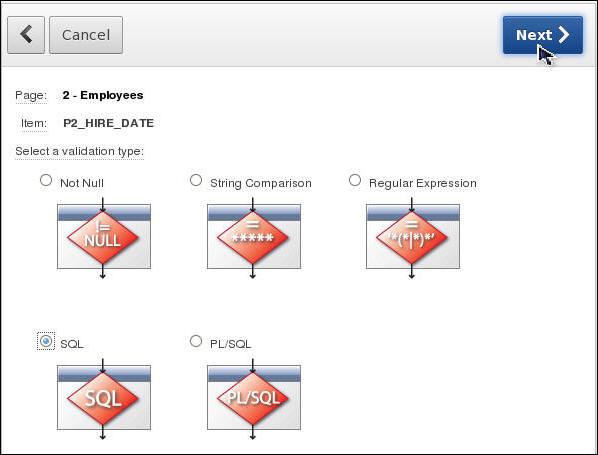
Select SQL for validation type and click Next >.
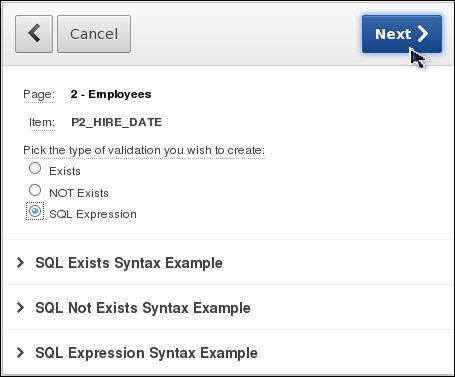
Select SQL Expression for type of validation and click Next >.
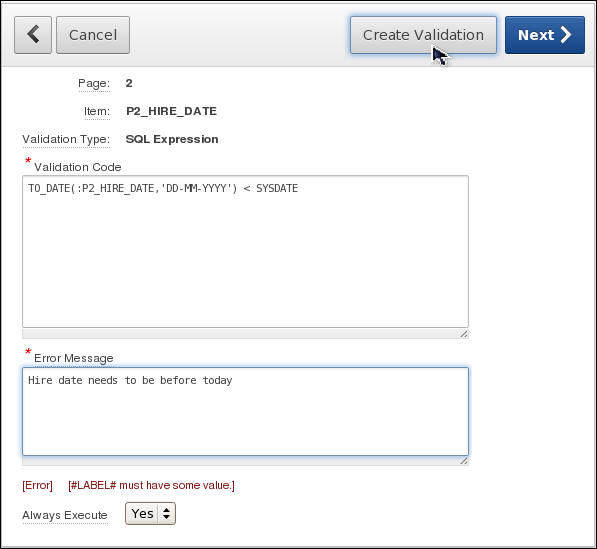
Enter TO_DATE(:P2_HIRE_DATE,'DD-MM-YYYY') < SYSDATE for Validation Code, enter some message in the Error Message field and select Yes for Always Execute and click Next >.
You only want this validation to execute if the button pressed is Create or Apply Changes (which is a SAVE request). Select Request Is Contained within Expression 1 for Condition Type and enter CREATE,SAVE for Expression 1 and click Create Validation.
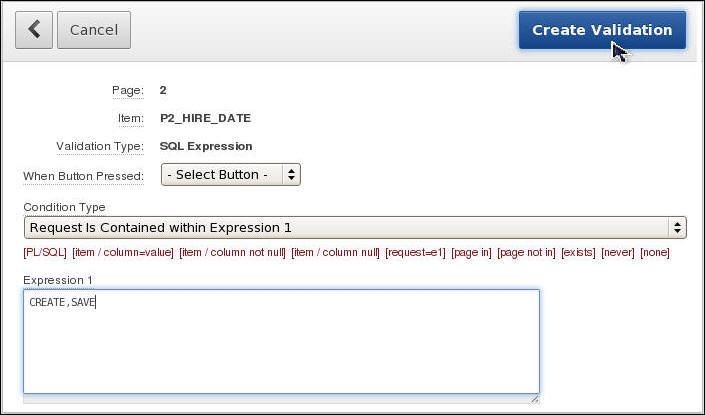
Your validation was created. Click Run.

Change the year to 2014 and click Save.
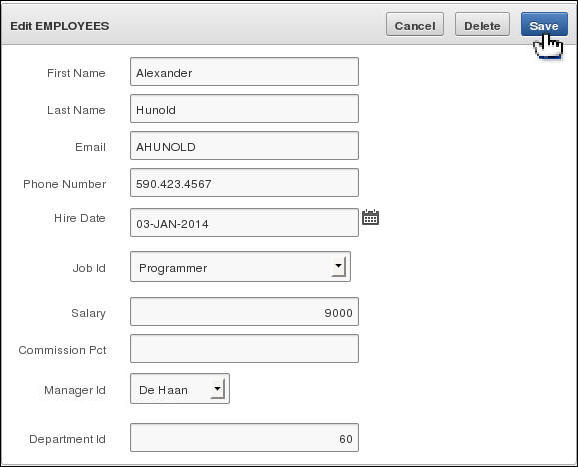
The error is displayed.
Creating and Running a Websheet Application
- Create and share content over the web using your browser.
- Organize web pages in a hierarchy and cross-link pages (using [[ pagename ]] syntax)
- Create and manage tabular data using an embedded feature called Data Grids.
- Create interactive reports using SQL on existing data structures in your database.
- Expose Data Grid and Report data within pages as a chart or a report
- Annotate pages with files, tags and notes. Associated images can be shown inline within page content (using [[image: filename]] syntax)
- Search page content (using search box in upper right hand)
- Manage who can login and once logged in, who can read, write or administer the application (authentication and authorization
Websheet applications are collections of pages that support
wiki syntax. Each page can be organized into sections. Pages can
also be organized into a hierarchy. Sections can be edited using
a friendly editor.
Websheets provide the following functionality:
To create a Websheet Application log in to your Oracle Application Express workspace and perform the following steps:
Click the down arrow in the Application Builder tab and select Websheet Applications.
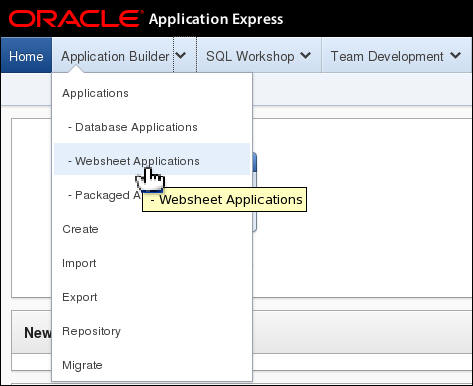
Click Create >.

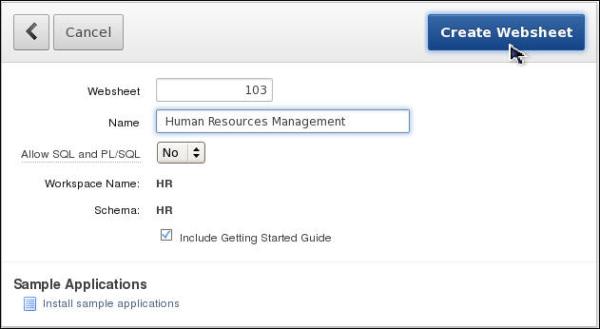
Enter Human Resources Management for Name and click Create Websheet .
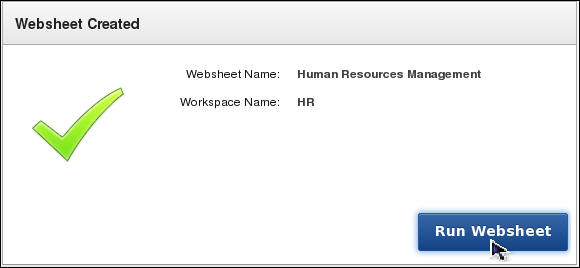
Click Run Websheet.
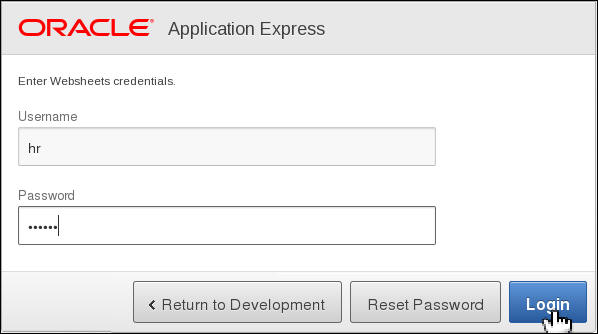
If Prompted, enter the credentials you used to log in to your Application Express workspace and click Login.
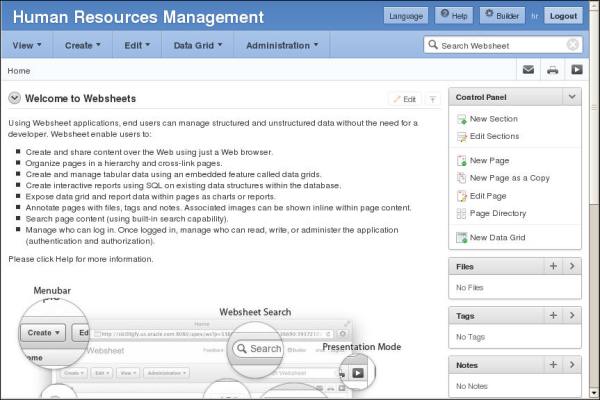
The Application is created with a default Home page. In the next sections, you will customize your application.
Installing and Utilizing Packaged Application
- Sample applications
- Productivity applications
Oracle Application Express includes two types of packaged
applications:
Both sample and productivity applications are fully functional
applications that have been designed to address a specific
business need. The main difference between a sample and
productivity application is the level of support. By default,
sample applications are fully editable. In contrast, you must
unlock productivity applications before you can edit them.
Unlocking a productivity application makes it ineligible for
future upgrades or support by Oracle Support.
To install a Packaged Application log in to your Oracle
Application Express workspace and perform the following steps:
Installing a Packaged Application
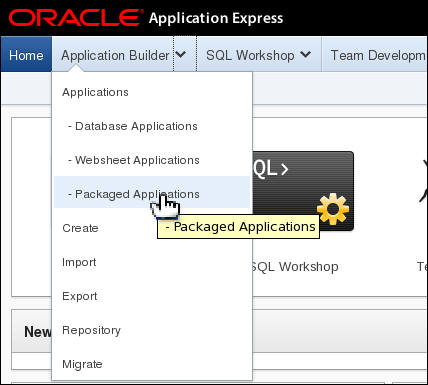
Click the down arrow in the Application Builder tab and select Packaged Applications.
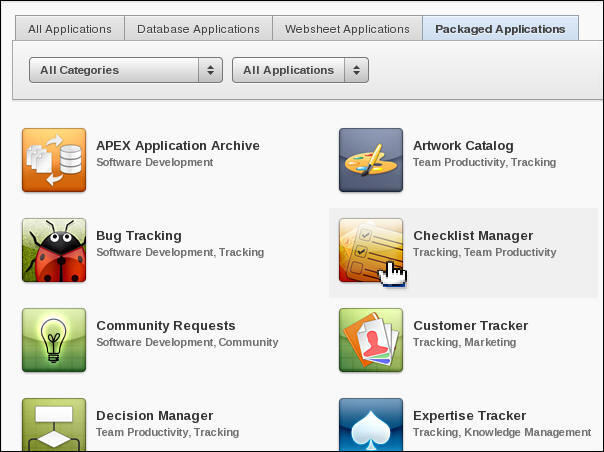
The Packaged Applications page appears. Click the Checklist Manager application image to install.
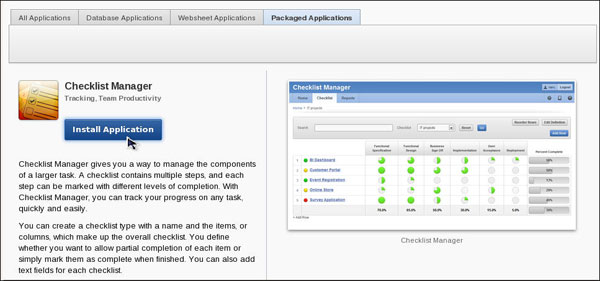
A summary page appears. Click Install Application.
Select an Authentication scheme. In this
tutorial, select Application Express Accounts
for Authentication scheme and click Next >.

Click Install Application.
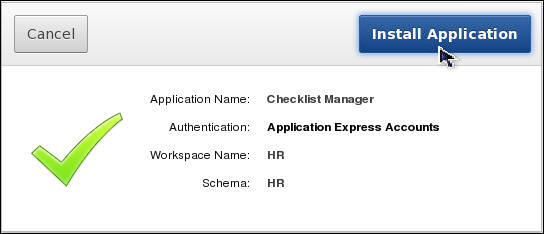
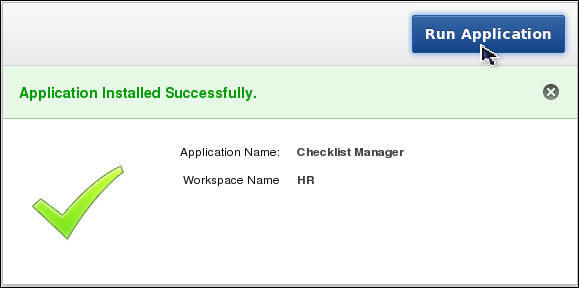
Click Run Application.
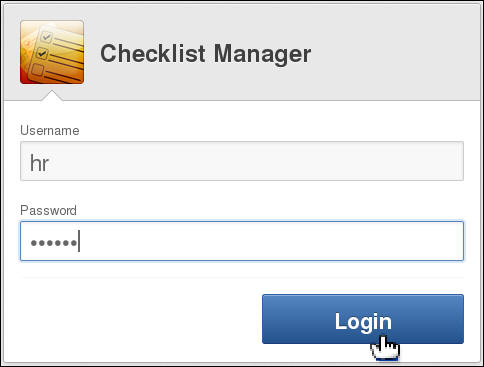
Enter hr for Username and oracle for Password and click Login.
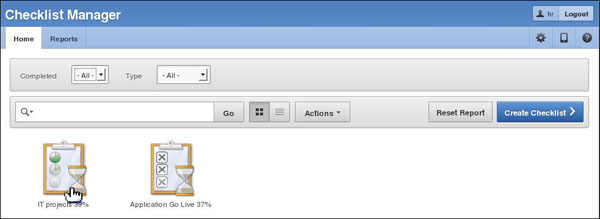
The application has been installed. Click IT projects 39% checklist.
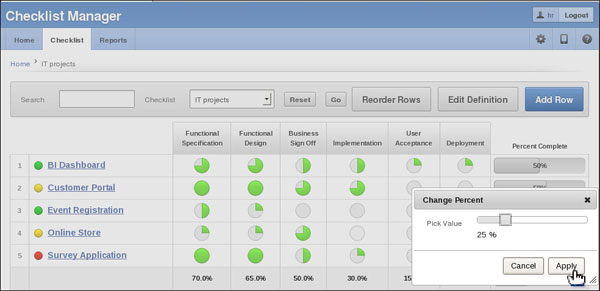
This checklist represents IT projects. Each row
represents a project and each column represents a task
that is completed for that project. To change Percent
Completed of a task, click on the respective circle.
Then move the Charge Percent slider as required and click Apply.
Unlocking an Installed
Productivity Application
After a productivity application is installed, you can run the application directly and you must unlock it before you can edit it. To run an installed productivity application log in to your Oracle Application Express workspace and perform the following steps:
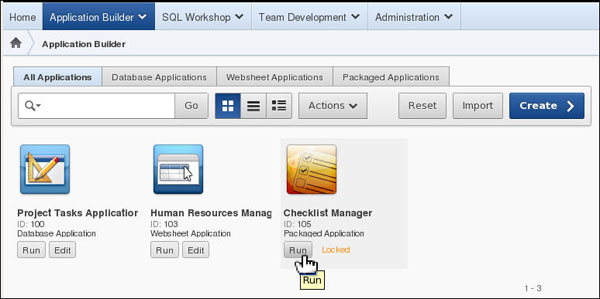
Click the down arrow in the Application Builder tab and select Packaged Applications.The Packaged Applications page appears.

Click Run for the Checklist Manager application image.
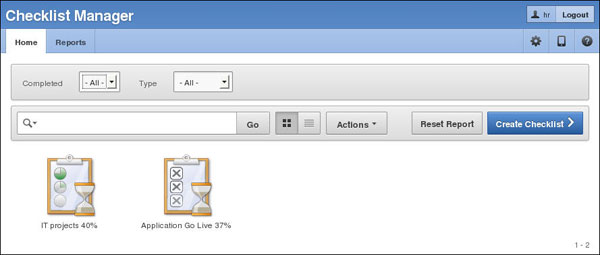
Enter hr for Username and oracle for Password and click Login.

To unlock an installed productivity application perform the following steps:
Switch back to the tab showing Application Builder > Packaged Applications page.

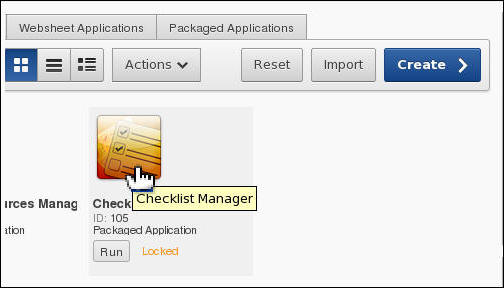
Click the Checklist Manager application image to be unlocked.
Click Manage.
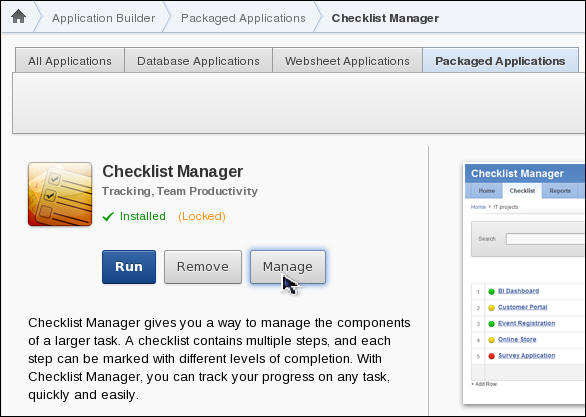
Select Unlock Application for Manage Application and click Next >.
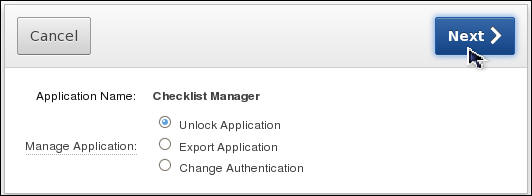
When prompted, click Unlock Application.

Installing and Running a Sample Application
By default, Sample Applications are fully editable. You do not need to specifically unlock them. Perform the following steps to install and run a Sample Application:
In the Packaged Applications page, click All Categories select list and select Sample. You see the sample applications available.
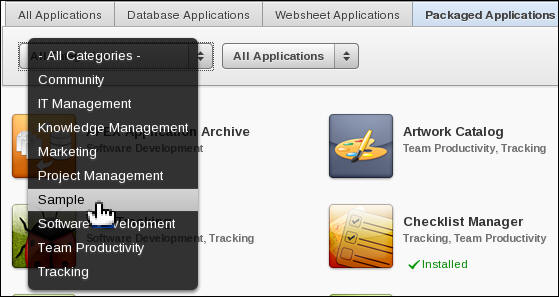
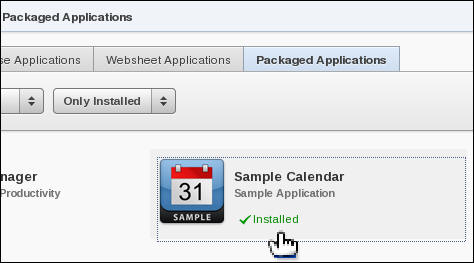
Click the Sample Calendar application image to install.
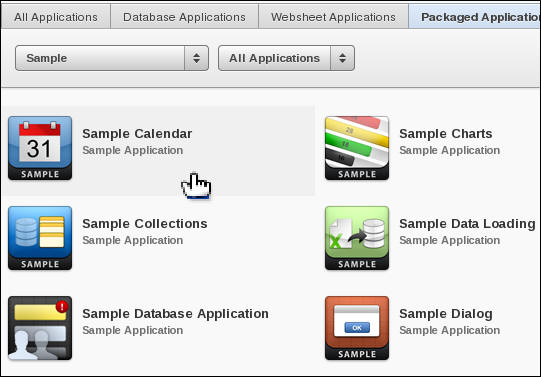
A summary page appears. Click Install Application.
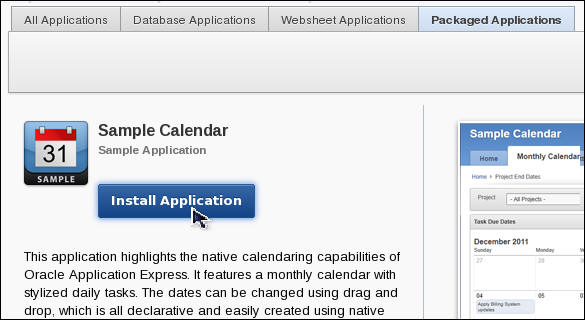
Select Application Express Accounts for Authentication scheme and click Next >.

Click Install Application.
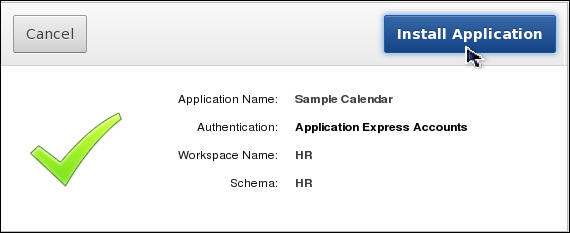
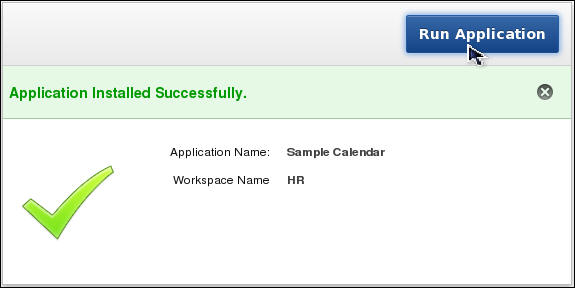
Click Run Application.
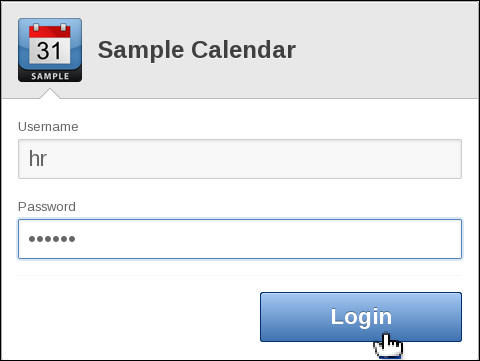
Enter hr for Username and oracle for Password and click Login.
The application has been installed.
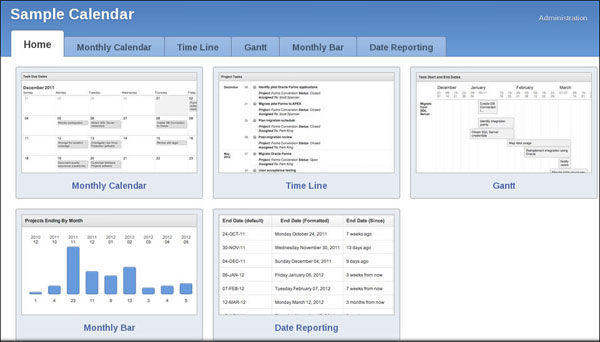
To check whether the Sample Calendar is automatically unlocked, click the Packaged Applications tab and select Sample Calendar image.
The page shows you that the application is automatically unlocked.
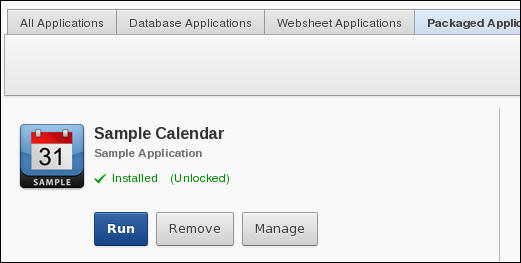
Note: All the sample applications are automatically unlocked.
Summary
- Use Data Workshop to load data into a table
- Create a database application using the application wizard
- Modify an interactive report
- Create and manipulate data in a calendar
- Add a data upload wizard
- Create and apply a list of values
- Create a validation
- Create and run a Websheet application.
- Install and run a Packaged Application.
- APEX OTN Home Page
- Oracle Application Express: Developing Web Applications.
- Oracle Learning Library
- Oracle University
- Lead Curriculum Developer: Dimpi Sarmah
- Other Contributors: David Peake, Chaitanya Koratamaddi
In this tutorial, you have learned how to:
Resources
Credits
To help navigate this Oracle by Example, note the following:
- Hiding Header Buttons:
- Click the Title to hide the buttons in the header. To show the buttons again, simply click the Title again.
- Topic List Button:
- A list of all the topics. Click one of the topics to navigate to that section.
- Expand/Collapse All Topics:
- To show/hide all the detail for all the sections. By default, all topics are collapsed
- Show/Hide All Images:
- To show/hide all the screenshots. By default, all images are displayed.
- Print:
- To print the content. The content currently displayed or hidden will be printed.
To navigate to a particular section in this tutorial, select the topic from the list.