Using Oracle and Ruby on Rails
1. Purpose
This tutorial shows you the installation of Ruby/Rails with Oracle and shows how to develop highly efficient and functional Ruby/Rails applications. You will gain the knowledge needed to create powerful Ruby/Rails applications for your enterprise.
2. Time to Complete
Time to Complete: 1 to 3 hours, depending on interest.
This tutorial covers a significant amount of material, and is structured so that you may choose to focus on certain segments of that material. It is divided into five main segments, located in the following sections:
5. Brief Introduction to ActiveRecord (approximately 5 minutes)
- A brief but very valuable introduction to data modelling in Rails
6A. Connecting Ruby on Rails to Your Database (approximately 10 minutes)
- Setup necessary to use Rails with your database; a prerequisite for 6B, 6C, and/or 6D
6B. Using Scaffold to Build a Ruby on Rails Application for an Existing Database (approximately 45 minutes)
- Creating new Rails applications from existing data
6C. Modeling Data Relationships and Building Applications with Ruby on Rails (approximately 40 minutes)
- Creating new databases and Rails applications together
6D. Using AJAX with Ruby on Rails (approximately 30 minutes)
- Extending a Rails applications to use Web 2.0 AJAX techniques
7. Practice with Ruby (approximately 40 minutes)
- Writing Ruby scripts to interact with data in Oracle 11g
It is recommended that you complete sections 5 and 6A, continue with one or more of 6B, 6C, 6D according to interest, and finish with section 7.
3. Overview
Ruby on Rails is a free web application framework that aims to increase the speed and ease with which database-driven web sites can be created and offers skeleton code frameworks (scaffolding) from the outset. Often shortened to Rails, or RoR, Ruby on Rails is an open source project written in the Ruby programming language and applications using the Rails framework are developed using the Model-View-Controller design pattern.
RoR has gained significant traction among J2EE and PHP programmers. The attraction of both J2EE and PHP programmers makes a lot of sense when you look at the strengths of RoR. For one thing, it uses a strict model-view-controller architecture that any self-respecting design-patterns wonk would admire—this explains its attraction to J2EE developers. Second, it’s easy to build basic systems with Rails—which is attractive to PHP developers.
RoR provides gratifying solution for MVC. A model is more than just data; it enforces all the business rules that apply to that data. The model acts as both a gatekeeper and a data store. The view is responsiible for generating a user interface, normally based on data in the model. Although the view may present the user with various ways of inputting data, the view itself never handles incoming data. The view's work is done once the data is displayed. Controllers receive events from the outside world (normally user input) , interact with the model, and display an appropriate view to the user.
RoR supplies ActiveRecord as an object-relational mapping (ORM) layer to connect to database and manipulate data. ActiveRecord closely follows the standard ORM model: tables map to classes, rows to objects, and columns to object attributes.
When a Rails application is created the following directories and files will be generated under the root: app, components, config, db, doc, lib, log, public, Rakefile, README, script, test, tmp, vendor.
Ruby is a dynamic, open source programming language with a focus on simplicity and productivity. It has an elegant syntax that is natural to read and easy to write. To learn more about the Ruby language, see the Appendix: Ruby Primer.
To find out more information, you can view the Ruby on Rails OTN forum.
4. Prerequisites
Before starting this tutorial, you should:
|
. |
Download and install Oracle Database 11gR2. Install the sample HR schema. |
|---|---|
| . |
Extract these files to your $HOME location. |
| . |
Start a SQL*Plus session and create the schema and objects needed for this tutorial. The script setup_ruby_hol.sql (located in the zipped file in the step above) contains the necessary statements. Note: When you run this script, you are prompted for your DBA username and password and your SID. You are also prompted for a username for this exercise. It is recommended that you use the name rubyhol for the username and welcome for the password. |
|
. |
Install Ruby (Ruby 1.8.7 or 1.9.2) Install RubyGems and Rails |
|
. |
Install Oracle Instant Client and Ruby-OCI8 |
|
. |
Install ActiveRecord oracle_enhanced adapter (version 1.3.1 is recommended) |
5. Brief Introduction to ActiveRecord
Active Record connects business objects and database tables to create a persistable domain model where logic and data are presented in one wrapping. It's an implementation of the object-relational mapping (ORM) design pattern. To use ActiveRecord in this example, perform the following steps.
|
. |
From your terminal window, execute the activerecord.rb script by executing the following command: ruby activerecord.rbThe output is shown in the screenshot.
The contents of the activerecord.rb file is as follows: # activerecord.rb: Using ActiveRecord, the ORM module
|
|---|

6. Ruby on Rails Applications Using Oracle RDBMS 11g
In this rest of the tutorial, you will use the following terms:
| Rake | A Ruby program that builds other Ruby programs. In Rails, Rake is used to execute a series of tasks such as db:migrate, db:schema:dump, db:schema:load, db:test:prepare, db:test:purge. It is similar in scope and purpose to the popular Linux make tool. |
| Model | A Ruby class that represents an important object in your application, linked to your database table via ActiveRecord's ORM. |
| Migration | A developer can create, modify and delete his database objects in Ruby instead of Data Description Language (DDL). |
| Scaffold | Provides a simple interface to your data, with ways of creating, editing, viewing and deleting entries that is reflected by your ActiveRecord class. When a Scaffold is generated, it will contain both controller files (which determines which pages the user of your application eventually goes to) and view files (which renders the page that the user of your application sees). |
A. Connecting Ruby on Rails to Your Database
In the following sections of the tutorial, you will be building applications that access data in Oracle RDBMS 11g. To do so, you first need to create a rails application structure, connect it to your database, and start a web server. Perform the following steps:|
. |
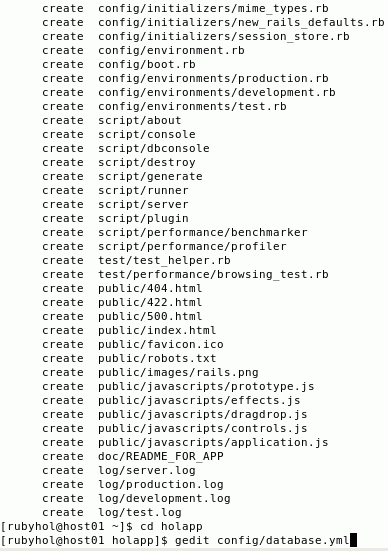
You will create a most basic Rails application named holapp. From your terminal window, execute the following command: rails holapp A set of create statements will appear, as shown in the screenshot below. Then execute the following commands:
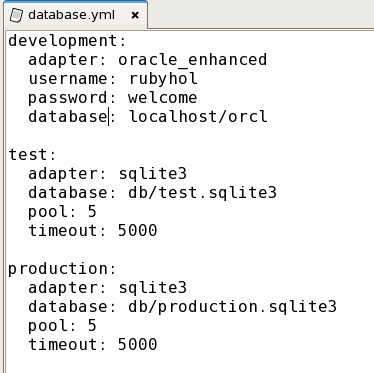
gedit config/database.yml
|
|---|---|
|
. |
Replace the development section in the file config/database.yml with the following content and then save and close the file. development:adapter: oracle_enhanced username: rubyhol password: welcome database: localhost/orcl
|
|
. |
In a separate terminal window, start the web server that comes with Rails: cd cd holapp ruby script/server => Booting WEBrick
=> Rails 2.3.8 application starting on http://0.0.0.0:3000
=> Call with -d to detach
=> Ctrl-C to shutdown server
[2010-08-04 11:28:35] INFO WEBrick 1.3.1
[2010-08-04 11:28:35] INFO ruby 1.9.1 (2009-07-16) [1686-Linux]
[2010-08-04 11:28:35] INFO WEBrick::HTTPServer#start: pid=3880 port=3000 Note: minimize, but do not close, this window. |
B. Using Scaffold to Build a Ruby on Rails Application for an Existing Database
In this part of the tutorial, we wish to use Scaffold to build a Rails application from an existing database. In particular, we want to use the EMPLOYEES and JOBS tables from the HR sample schema included with the Oracle RDBMS 11g.
|
. |
To do so, make sure you have followed the steps above in "Connecting Ruby on Rails to Your Database", then from your terminal window, execute the following commands: cd holapp ruby script/generate scaffold --skip-migration employee employee_id:integer first_name:string last_name:string email:string phone_number:string hire_date:date job_id:string salary:float commission_pct:float manager_id:integer department_id:integer Note: The above command, beginning with ruby script/generate scaffold is a single continuous command. Note: The --skip-migration syntax prevents scaffold from creating scripts that would create database tables. Since we are using an existing database table, we do not want database creation scripts ("migrations") for this model.
|
|---|

Run the web application
At this point, Ruby on Rails has generated the basic web application and you should be able to run it.
|
. |
Open a Web browser. If a "Using Oracle and Ruby on Rails" tutorial opens, just open a new browser tab, and go to the following page in your browser:
|
|---|
There is an error at this point, because Ruby on Rails expects the tables to have their primary key column name "id". In our database, it's "employee_id." Let's fix it.

|
. |
Tell Ruby on Rails that the table employees has a different primary key by modifying the employee.rb model file. In a terminal session, from the holapp directory, issue the following command:
When the editor opens, add the command set_primary_key :employee_id as shown below, and save the file.
|
|---|

| . |
Run the application in your browser again:
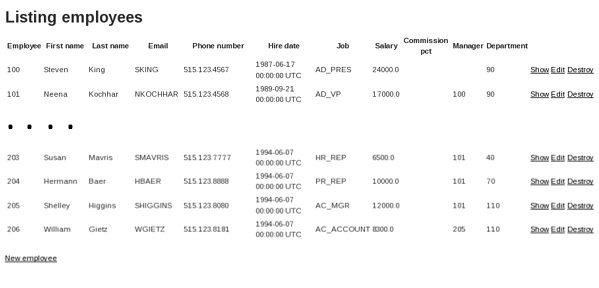
This time you see the list of the employees in the web page that Ruby on Rails has generated by default:
|
|---|
|
. |
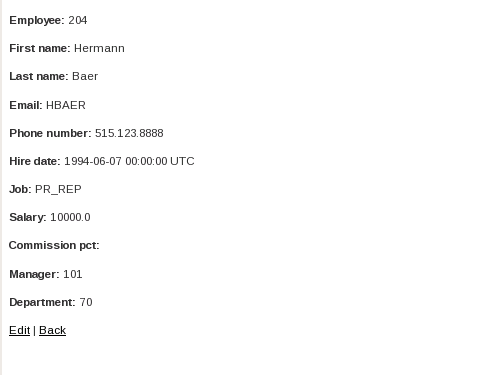
You can navigate through all the application by following the links. Click Show to view an employee record:
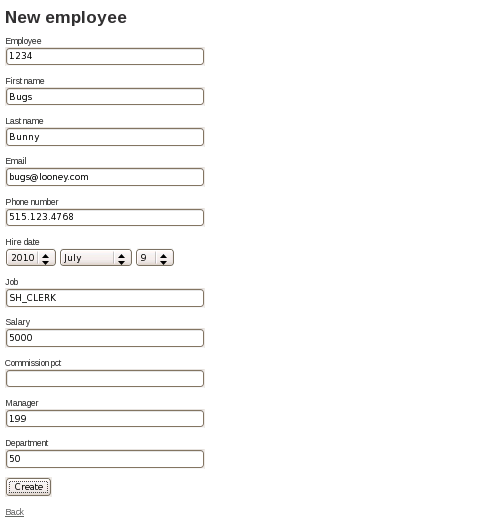
Click Back, then click New employee at the bottom of the page to create a new employee record, and fill in the following details:
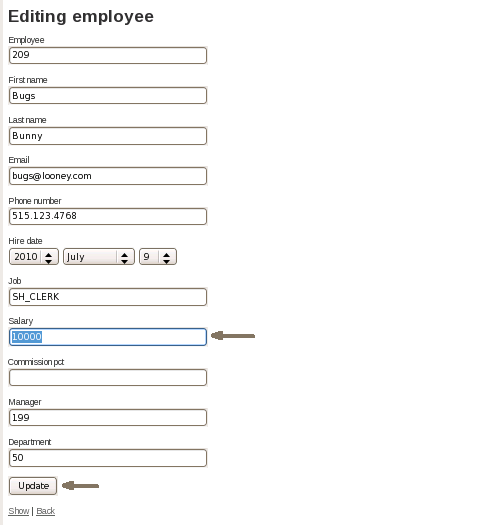
Click Create to finish. Now click Edit to edit an employee record and change the Salary to 10000:
Click Update and then Back to finish. Now click Destroy to delete an employee record:
|
|---|

|
. |
From your terminal window, in the holapp directory, execute the following commands: ruby script/generate scaffold --skip-migration job job_id:string job_title:string min_salary:integer max_salary:integer Note: The above command, beginning with ruby script/generate scaffold is a single continuous command.
|
|---|---|
|
. |
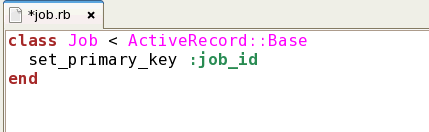
We need to indicate the primary key as we have done in the case of the employees table. Modify the file app/models/job.rb In a terminal session, from the holapp directory, issue the following command: gedit app/models/job.rb When the editor opens, add the command set_primary_key :job_id as shown below, and save the file.
|
|
. |
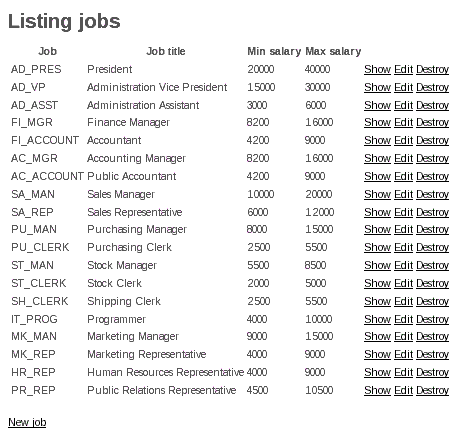
Run the application for the jobs table from your browser: http://localhost:3000/jobs You will see the standard display for the jobs:
|

At this point, we have used Ruby on Rails to create a web application on two existing tables (employees and jobs) that exist in the Oracle database. In this case, we take benefit of all the features that have been defined in the data model (primary keys, foreign keys, constraints, etc.), and we can easily see them enforced when we try to add an employee and we do not enter the right data.

This attempted record entry is rejected due to invalid Job ID:

SQL> SELECT * FROM user_sequences WHERE sequence_name LIKE 'EMPLOYEE%';SEQUENCE_NAME MIN_VALUE MAX_VALUE INCREMENT_BY CYCLE_FLAG ORDER_FLAG CACHE_SIZE LAST_NUMBER------------------------------ ---------- ---------- ------------ ---------- ---------- ---------- -----------EMPLOYEES_SEQ 1 1E28 1 N N 0 221SQL>.
Thus we do not need to enter the employee id when creating a new employee.
|
. |
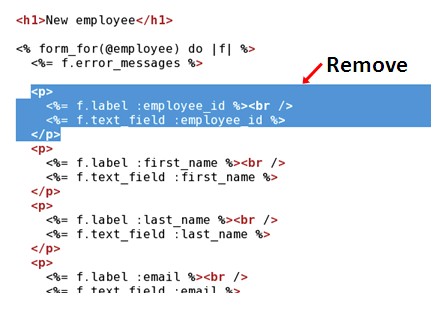
So let's modify app/views/employees/new.html.erb as follows: In a terminal session, from the holapp directory, issue the following command:
When the editor opens, remove the lines for employee_id, as shown below, and save the file.
Run the application in your browser again:
Click the New employee link at the bottom of the listing. Due to the above edit, notice that there is no longer an Employee field at the top of the record entry form. Try adding a new employee again, using the values shown in the following screenshot. The Job field is case sensitive, so enter ST_CLERK in all uppercase.
You should be able to create the record now without receiving an error. |
|---|

See job title in employee list
Currently, we see a job_id when viewing employees. That's useful, but not as useful as the job title.
|
. |
To show the job title instead of the job id in the list of employees, modify app/views/employees/index.html.erb as follows (we can also remove some columns from the standard listing, since those columns are shown in the view for each record). In a terminal session, from the holapp directory, issue the following command:
The editor opens index.html.erb. Edit the file as indicated by red and green font in the following screenshot.
|
|---|

Before testing these edits to index.html.erb, let's also modify the employee detail page (seen previously when you clicked the "Show " link ).
|
. |
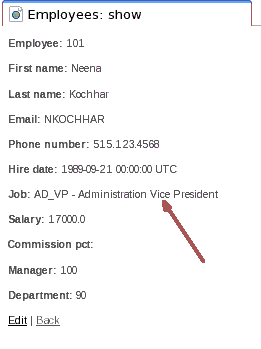
To show the job title along the job id in the "Show" view of the employee, modify app/views/employees/show.html.erb as follows. In a terminal session, from the holapp directory, issue the following command:
The editor opens show.html.erb. Edit the file as shown, adding the two rows in red font, and save the file: <p>
<b>Employee:</b>
<%=h @employee.employee_id %>
</p>
<p>
<b>First name:</b>
<%=h @employee.first_name %>
</p>
<p>
<b>Last name:</b>
<%=h @employee.last_name %>
</p>
<p>
<b>Email:</b>
<%=h @employee.email %>
</p>
<p>
<b>Phone number:</b>
<%=h @employee.phone_number %>
</p>
<p>
<b>Hire date:</b>
<%=h @employee.hire_date %>
</p>
<p>
<b>Job:</b>
<%=h @employee.job_id %>
<%=h ' - ' %>
<%=h Job.find(@employee.job_id).job_title %>
</p>
<p>
<b>Salary:</b>
<%=h @employee.salary %>
</p>
<p>
<b>Commission pct:</b>
<%=h @employee.commission_pct %>
</p>
<p>
<b>Manager:</b>
<%=h @employee.manager_id %>
</p>
<p>
<b>Department:</b>
<%=h @employee.department_id %>
</p>
<%= link_to 'Edit', edit_employee_path(@employee) %> |
<%= link_to 'Back', employees_path %> |
|---|
|
. |
Run the application in your browser again, going to the main Employees list page:
Note the appearance of "Job" title in the Employee list page:
Click the Show link. Observe the appearance of job title also in the detail page:
|
|---|

Add a drop down list
When creating the employee, you can add a drop down list for the fields that are a foreign key, for example for job title and manager.
|
. |
Modify app/views/employees/new.html.erb as shown in red font (save your edits, but don't test it just yet):
|
|---|
Before testing this, note that we used an attribute called "full_name" in the drop-down for manager. We need to define that helper attribute, composing it from the existing first_name and last_name attributes.
|
. |
Modify app/models/employee.rb, adding the rows shown in red font (save your edits, but don't test it just yet): class Employee < ActiveRecord::Base |
|---|
|
. |
Run the application in your browser again, going to the main Employees list page:
Scroll to the bottom of the list and click the "New employee" link. The Manager field is now a select list.
Try adding the following record. Here is the completed form showing the values chosen from the Job and Manager drop down lists:
|
|---|


Enhancing the presentation views
It is very easy to enhance the presentation layer of the application. Let's try some examples.
|
. |
Modify the file rubyhol/holapp/public/stylesheets/scaffold.css by adding the code, indicated in red, at the end of hte file: body { background-color: #fff; color: #333; } .fieldWithErrors { #errorExplanation { #errorExplanation h2 { #errorExplanation p { #errorExplanation ul li { .background0 { .background1 { Save your edits, but do not yet test the results. |
|---|
|
. |
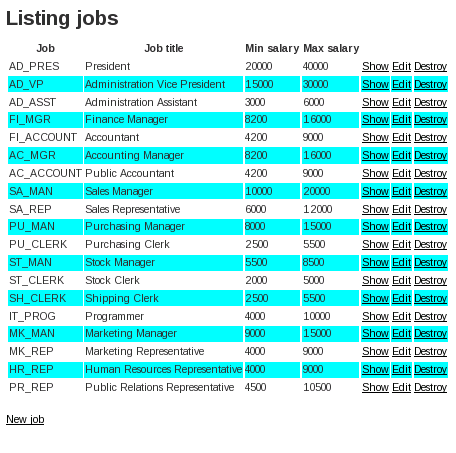
Modify the file holapp/app/views/jobs/index.html.erb as follows, adding the code shown in red font. Save your edits: <h1>Listing jobs</h1> <table> <br /> <%= link_to 'New job', new_job_path %> |
|---|
|
. |
Run the application from your browser: http://localhost:3000/jobs You will see that the list of jobs is displayed with rows of alternating background color.
|
|---|
C. Modeling Data Relationships and Building Applications with Ruby on Rails
This section of the tutorial will help you learn how to model different data relationships and build databases and applications for them in Rails. You will do so by creating an application that maintains an articles and authors database.
C.1. Create Authors and Articles
You will first create an application that will allow you to enter authors and articles. In addition, you will change the forms to show a popup list of Authors when entering an Article and display the Author for the Article on the Listing and Show pages. This application will currently have a one to one relationship between tables. To do so, make sure you have followed the steps above in "Connecting Ruby on Rails to Your Database", then perform the following steps:
| 1. |
In your terminal window execute the following commands: cd cd holapp
|
2. |
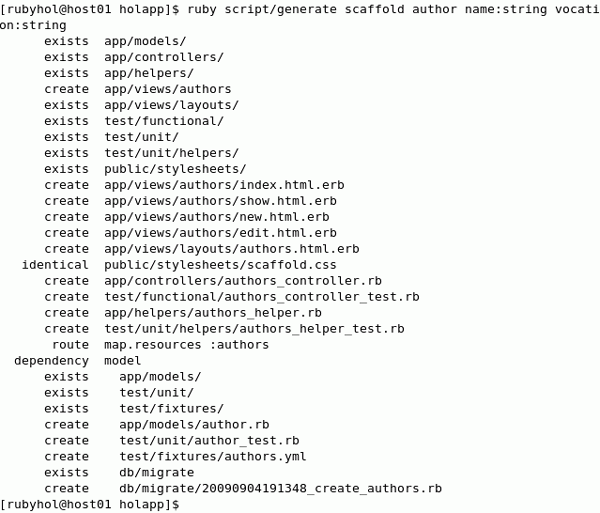
Generate the scaffold with model for author. From your terminal window, execute the following command: ruby script/generate scaffold author name:string vocation:stringIf asked the following question, answer with "n":
|
3. |
Generate the scaffold with model for article. From your terminal window, execute the following command: ruby script/generate scaffold article title:string author_id:integer abstract:text Again, if asked the following question, answer with "n":
|
4. |
Now you need to tell Rails about the relationship from Author to Article models. To do so, you need to edit the author model script that was generated. From your terminal window, enter the following command: gedit app/models/author.rb
|
5. |
Replace the contents of the file with the following and then save and close the file. class Author < ActiveRecord::Basehas_one :article end
|
6. |
Next, you want to establish the relationship in the other direction, from Article to Author models. From your terminal window, enter the following command: gedit app/models/article.rb
|
7. |
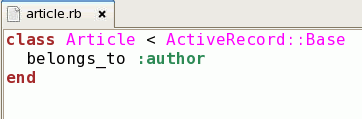
Replace the contents of the file with the following and then save and close the file. class Article < ActiveRecord::Basebelongs_to :author end
|
8. |
You can now rake the database migration to generate target tables. From your terminal window, enter the following command: rake db:migrate
|
9. |
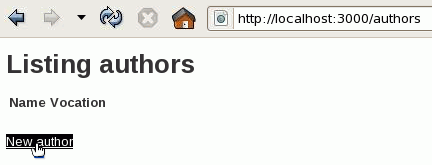
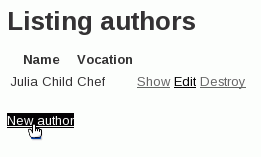
You can view the application. Open a browser window and enter the following URL and then select New author . http://localhost:3000/authors
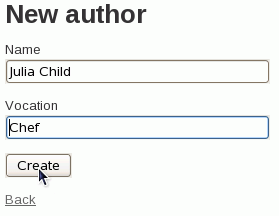
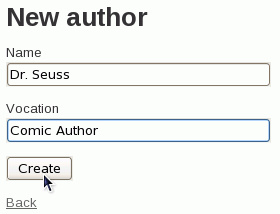
Enter a new author and click Create .
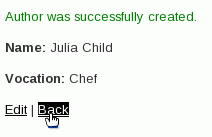
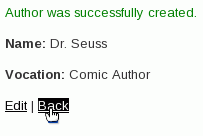
Your author was created successfully. Click Back .
|
10. |
You want to create one more author. Select New author .
Enter another author and click Create .
The author was created successfully. Click Back .
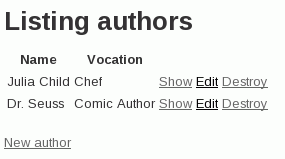
The list of authors you added are displayed.
|
11. |
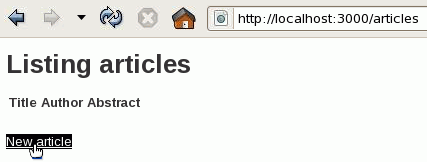
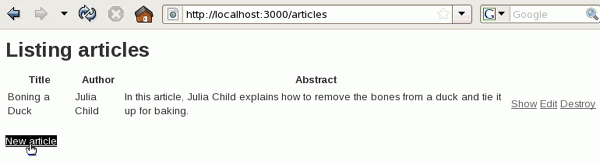
Now you want to create some articles. Enter the following URL and select New article . http://localhost:3000/articles
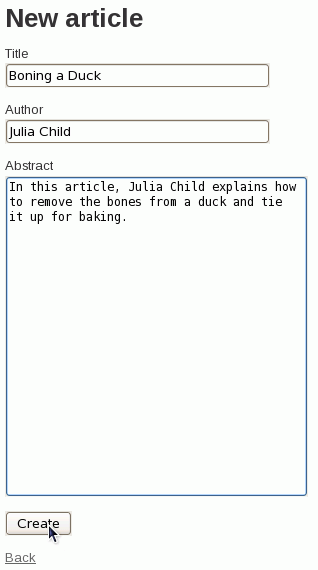
Enter a Title, specify Julia Child for the Author and any abstract. Then click Create .
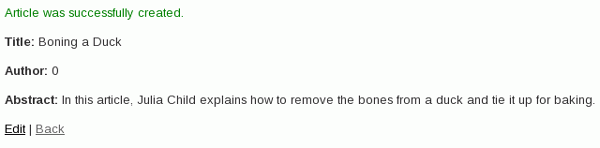
The article was created successfully.
Notice that Author: 0. This is because we have an invalid value for author_id, changing "Julia Child" to 0. In the next section, you will improve the "New" and "Edit" forms to allow you to pick an author by name using a popup list that show name but returns author_id in the code.
|


C.2. Improve Forms and Listings for Articles
You will improve the forms that were generated to produce a popup for the Author field when an article is created. In addition, you will modify the listings and show pages so they display the author appropriately. Perform the following steps:
1. |
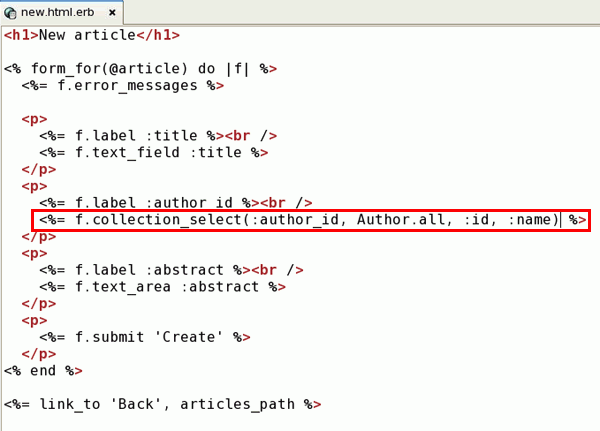
Enter the following commands: cd cd holapp gedit app/views/articles/new.html.erb Replace the following line: <%= f.text_field :author_id %>with <%= f.collection_select(:author_id, Author.all, :id, :name) %>The file should now look as follows.
|
2. |
Do the same thing with the edit.html.erb file in the articles directory. Enter the following command in your terminal window : gedit app/views/articles/edit.html.erb
|
3. |
Replace the following line: <%= f.text_field :author_id %>with <%= f.collection_select(:author_id, Author.all, :id, :name) %>The file should now look as follows.
|
4. |
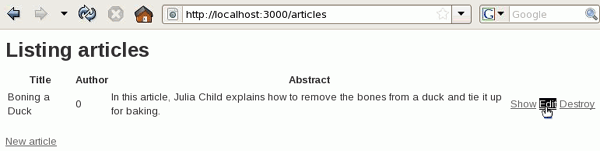
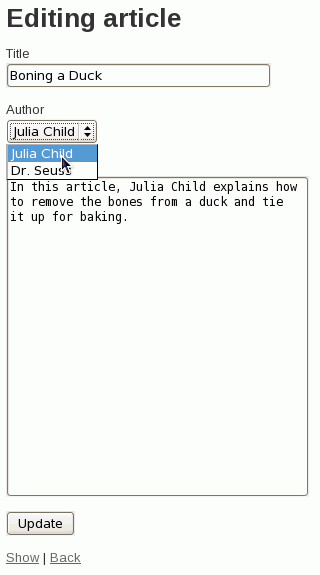
Enter the following URL again. Notice that the article you created previously is in the list. Select Edit .
Notice that now you can select the Author from a select list. Select Julia Child . Then click Update .
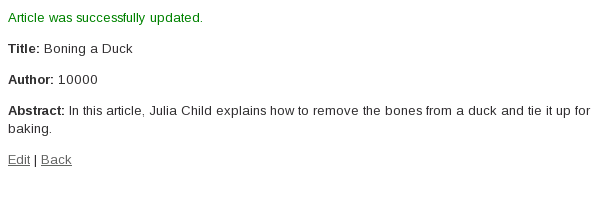
The article was updated successfully.
Notice that Author: 10000. This is the value for author_id. You can change this to the name.
|
5. |
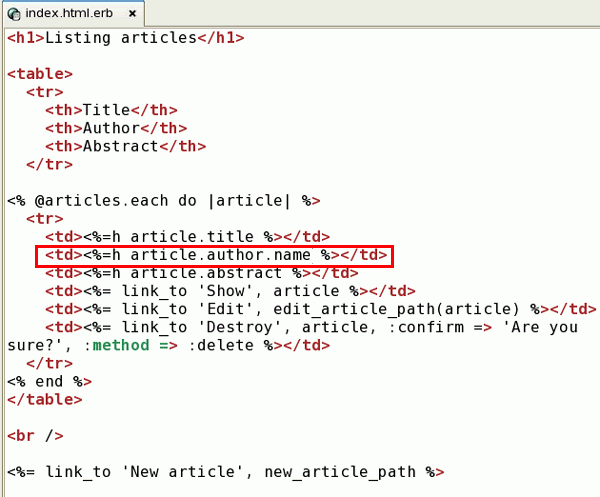
You will change the index.html.erb file in the articles directory. Enter the following command in your terminal window : gedit app/views/articles/index.html.erb
|
6. |
Replace the following line: <td><%=h article.author_id %></td>with <td><%=h article.author.name %></td>The file should now look as follows.
|
7. |
Do the same thing with the show.html.erb file in the articles directory. Enter the following command in your terminal window : gedit app/views/articles/show.html.erb
|
8. |
Replace the following line: <%=h @article.author_id %>with <%=h @article.author.name %>The file should now look as follows.
|
9. |
Enter the following URL again. Notice that the author now appears in the list. Select Show .
You now see all the information in Show mode.
|


C.3. Allow an Author to Write More than One Article
You want to allow an Author to write more than one article. This will change the relationship between the Authors and Articles tables to a one to many relationship. Perform the following steps:
1. |
In order to show this, you need to make a change to the author.rb file. From your terminal window, enter the following command: gedit app/models/author.rb
|
2. |
Replace the following: has_one :articlewith has_many :articles
|
3. |
Enter the following URL again and select New article.
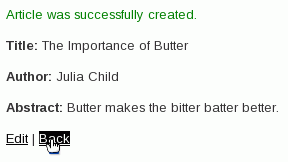
Create a new article. Select Julia Child as the Author and click Create .
The article was created successfully. Click Back .
Both articles are displayed.
|

C.4. Permit Multiple Authors to Collaborate on One Article
You want multiple authors to collaborate on an article. This will change the relationship between the Authors and Articles tables to a many to many relationship. Perform the following steps:
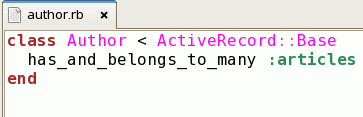
1. |
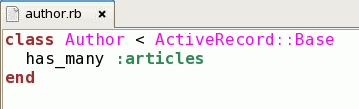
You need to change the relationship again in the authors.rb file. From your terminal window, enter the following command: gedit app/models/author.rb
|
2. |
Replace the following: has_many :articleswith has_and_belongs_to_many :articles
|
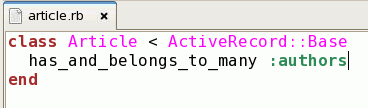
3. |
You also need to change the article.rb file. From your terminal window, enter the following command: gedit app/models/article.rb
|
4. |
Replace the following: belongs_to :authorwith has_and_belongs_to_many :authors
|
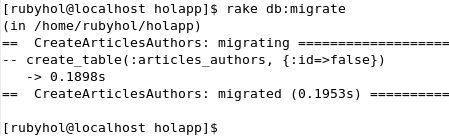
5. |
You now need to create a join table between Authors and Articles. From your terminal window, in the holapp directory, enter the following command: script/generate migration CreateArticlesAuthors
|
6. |
You now need to update the file that was just created to create a table to store the authors and articles. From your terminal window, enter the following command: gedit db/migrate/*_create_articles_authors.rb
|
7. |
Replace the following: def self.upend def self.down end with def self.upcreate_table :articles_authors, :id => false do |t| t.integer :author_id t.integer :article_id t.timestamps end end def self.down drop_table :articles_authors end
|
8. |
You can now rake the database migration to generate target tables. From your terminal window, enter the following command: rake db:migrate
|
9. |
Enter the following URL again. Notice that you receive an error. http://localhost:3000/articles
|
10. |
Now that you have a many to many relationship, the Article model now has methods named authors and author_ids instead of author and author_id . To correct the error, you need to create and edit the popup lists and display fields you previously created to handle multiple authors in the new.html.erb file. Enter the following command in your terminal window. gedit app/views/articles/new.html.erb
|
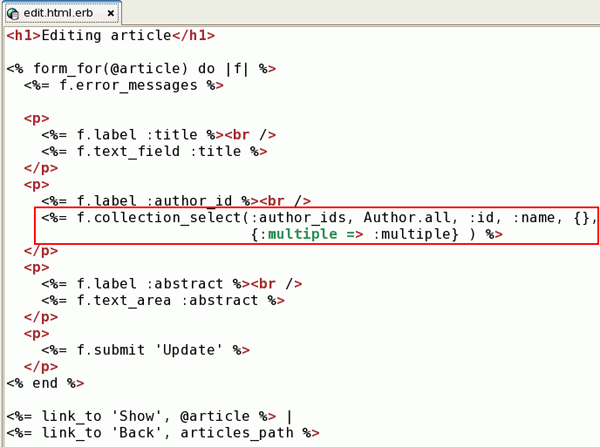
11. |
Replace the following line: <%= f.collection_select(:author_id, Author.all, :id, :name) %>with <%= f.collection_select(:author_ids, Author.all, :id, :name, {}, {:multiple => :multiple} ) %>The file should now look as follows.
|
12. |
You need to also change the edit.html.erb file in the articles directory. Enter the following command in your terminal window : gedit app/views/articles/edit.html.erb
|
13. |
Replace the following line: <%= f.collection_select(:author_id, Author.all, :id, :name) %>with <%= f.collection_select(:author_ids, Author.all, :id, :name, {}, {:multiple => :multiple} ) %>The file should now look as follows.
|
14. |
You need to also change the index.html.erb file in the articles directory. Enter the following command in your terminal window : gedit app/views/articles/index.html.erb
|
15. |
Replace the following line: <th>Author</th>with <th>Authors</th>You need to get the names of all authors and join (concatenate) them. Replace the following line: <td><%=h article.author.name %></td>with <td><%=h article.authors.map {|auth| auth.name}.join(", ") %></td>The file should now look as follows.
|
16. |
And finally change the show.html.erb file in the articles directory. Enter the following command in your terminal window : gedit app/views/articles/show.html.erb
|
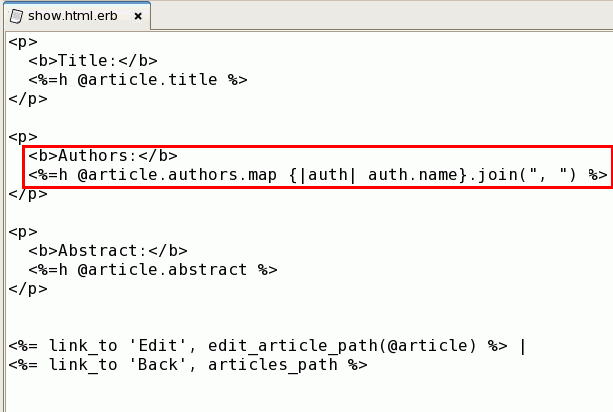
17. |
Replace the following lines: <b>Author: </b><%=h @article.author.name %> with <b>Authors: </b><%=h @article.authors.map {|auth| auth.name}.join(", ") %> The file should now look as follows.
|


18. |
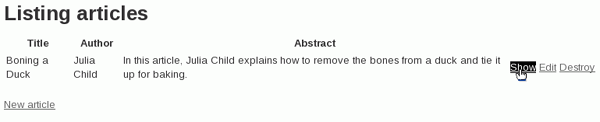
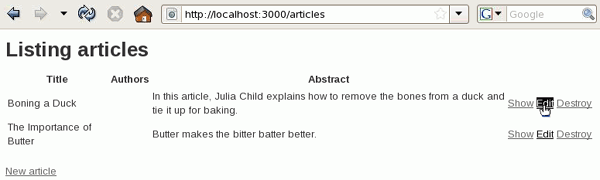
Enter the following URL again. Notice that you see no authors in the list. That is because you switched your representation. You could have fixed this with a migration to pull data from the articles table into the articles_authors table. Instead, you will add them back using the application. Select the Edit link for the Boning a Duck title.
Select Julia Child as the Author and click Update . Notice that this select list allows you to select multiple authors instead of just one.
The article was updated successfully. Click Back .
Select the Edit link for The Importance of Butter title.
Control-Select both Authors and click Update .
Your article was updated successfully. Click Back .
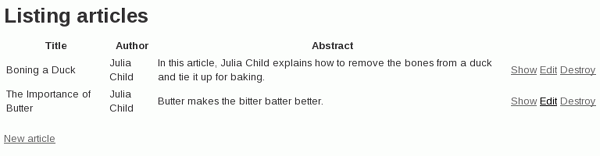
Your article now shows more than one Author for an article.
|


D. Using AJAX with Ruby on Rails
The idea of AJAX is to have a smarter browser side, almost like a "regular" application. Your pages can be interactive and get updates from the server without repainting the window.
For example, you might have articles that start out as works in progress, and then are finished later. You want to be able to always see a list of your unfinished articles. When you mark one finished, you want that list to be updated without having to redraw the whole page.
|
. |
Note: this section builds on the application created in section C on Modeling Data Relationships and Building Applications with Ruby on Rails. If you completed section C, then skip to step 2. If you did not complete section C, follow the instructions in step 1 to get a working copy of that application. Stop any running webserver by typing Control+c in the window where it is running. Now, get the application by typing the following commands in your terminal window:
And start the webserver again by typing the following command in the terminal window:
Then use the following page in your browser to create some articles. Use any titles and authors.
|
|---|
|
. |
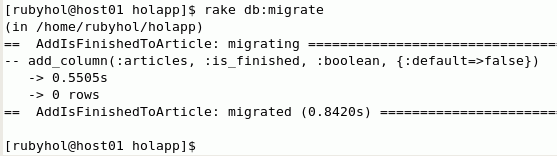
Before you use AJAX, it's easiest to start with a non-AJAX "unfinished" list. You need to update your database table to know whether an article is finished. Articles will start unfinished; you'll have a button to mark them finished. You'll have in your layout a list of all unfinished articles for easy access. Perform the following steps: Add a boolean column is_finished. From a terminal window in the holapp directory, execute the following command: script/generate migration AddIsFinishedToArticle is_finished:boolean
|
|---|---|
|
. |
Then you need to mark the existing articles as unfinished. From your terminal window, execute the following command: gedit db/migrate/*_add_is_finished_to_article.rb
|
|
. |
Change the following line: add_column :articles, :is_finished, :boolean to add_column :articles, :is_finished, :boolean, :default => false Article.reset_column_information Article.find(:all).each do |a| a.is_finished = false end
|
|
. |
Now you will update the database. From your terminal window, enter the following command: rake db:migrate
|
|
. |
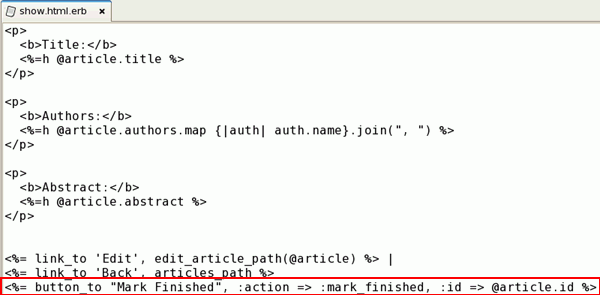
Next, you want to add a "Mark Finished" button which will call a new mark_finished action.. From your terminal window, enter the following command: gedit holapp/app/views/articles/show.html.erb
|
|
. |
Add the following line after <%= link_to 'Back', articles_path %>. <%= button_to "Mark Finished", :action => :mark_finished, :id => @article.id %>
Save and close the file. |
|
. |
You need to update the layout to show links to unfinished articles. You should keep this code separate from the main layout. You will make a new "partial template" (which starts with "_" (underscore) character to show it's not a full template). It will look up articles with is_finished false and link to them. From your terminal window, execute the following commands: cd cd holapp/app/views/articles gedit _unfinished.html.erb An empty file opens. |
|
. |
Add the following code to the file: <div class="unfinished-title">Unfinished Articles</div><table> <% for article in Article.all(:conditions => {:is_finished => false}) %> <tr> <%= link_to article.title, :action => :show, :id => article.id %> </tr> <% end %> </table>
Save and close the file. |
|
. |
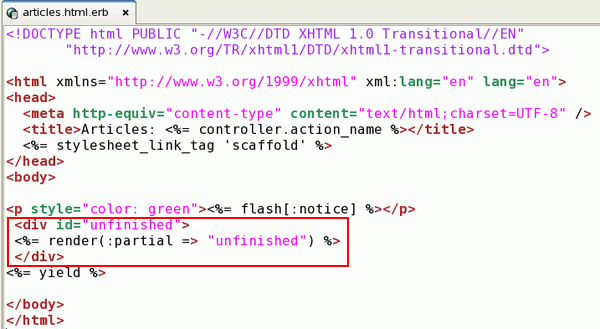
Next, you need to refer to the new "partial template" in your layout so all the pages will show it. From your terminal window, execute the following commands: cd gedit holapp/app/views/layouts/articles.html.erb |
|
. |
Put the following code right after <p style="color: green"><%= flash[:notice] %></p> <div id="unfinished"><%= render(:partial => "unfinished") %> </div>
Save and close the file. |
|
. |
Next you need to code the mark_finished action that the new button will use. From your terminal window, execute the following command: gedit holapp/app/controllers/articles_controller.rb
|
|
. |
Scroll down to the bottom of the file. Right before the last 'end', add the following: # POST /articles/mark_finished/1# POST /articles/mark_finished/1.xml def mark_finished @article = Article.find(params[:id]) @article.update_attribute(:is_finished, true) respond_to do |format| format.html { redirect_to(:action => :show) } format.xml { head :ok } end end
Save and close the file. |
|
. |
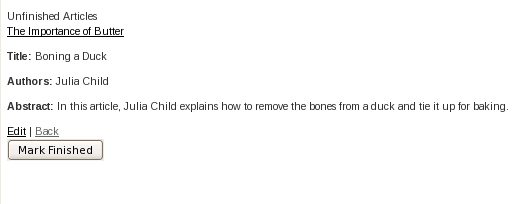
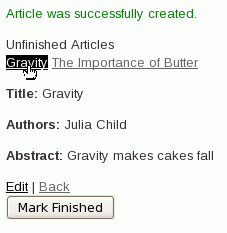
You have updated the database, added your button and action and added your list to the layout. You can test this functionality now. Enter the following URL in your browser: http://localhost:3000/articlesNotice that the Unfinished articles are listed at the top of the page. Select the Boning a Duck link.
Click the Mark Finished button.
Notice that the Boning a Duck has been removed from the list of Unfinished Articles. Select Back.
|
|
. |
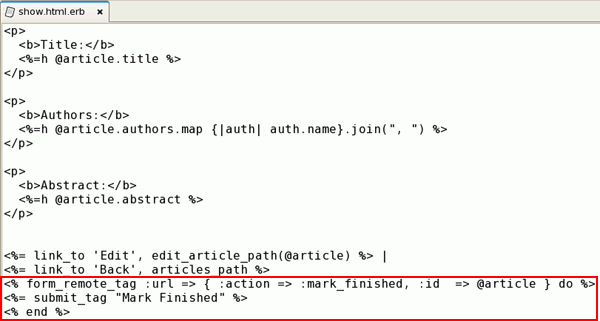
At this point you are ready to try AJAX! You want change the application so that when you hit the button, your window changes automatically, without repainting the screen. To do that, you want the "Mark Finished" button to send an AJAX command to do the mark_finished action, then send back a command to update the "Finshed articles" header. You will first change the button to a remote (AJAX) form. From your terminal window, execute the following: gedit holapp/app/views/articles/show.html.erb
|
|
. |
Change the following statement from: <%= button_to "Mark Finished", :action => :mark_finished, :id => @article.id %>to <% form_remote_tag :url => { :action => :mark_finished, :id => @article } do %><%= submit_tag "Mark Finished" %> <% end %>
Save and close the file. |
|
. |
When you hit the button, the application will still do its update, but instead of sending a whole page, you need to send back some JavaScript to update just the unfinished list. With a remote javascript template, Rails can generate that JavaScript for you. From your terminal window, execute the following to create a new file: cd cd holapp/app/views/articles gedit mark_finished.js.rjs An empty file opens. |
|
. |
Enter the following line: page.replace_html("unfinished" , :partial => "unfinished")
Save and close the file. |
|
. |
For this to work, there has to be some default JavaScript subroutines in all pages. You need to edit your layout. From your terminal window, execute the following to open the articles.html.erb file: cd gedit holapp/app/views/layouts/articles.html.erb |
|
. |
After <%= stylesheet_link_tag 'scaffold' %> add the following line: <%= javascript_include_tag :defaults %>
Save and close the file. |
|
. |
Next, you need to update the mark_finished action to use your new remote template, which it knows has same name as the action. From your terminal window, execute the following to edit the articles_controller.rb file: cd gedit holapp/app/controllers/articles_controller.rb |
|
. |
Change the following from: # POST /articles/mark_finished/1# POST /articles/mark_finished/1.xml def mark_finished @article = Article.find(params[:id]) @article.update_attribute(:is_finished, true) respond_to do |format| format.html { redirect_to(:action => :show) } format.xml { head :ok } end end to # *AJAX* /articles/mark_finished/1def mark_finished @article = Article.find(params[:id]) @article.update_attribute(:is_finished, true) respond_to do |format| format.js end end
Save and close the file. |
|
. |
You have switched to using an AJAX request form and to send Javascript back which will update the list. Enter the following URL in your browser: http://localhost:3000/articlesCreate a new article. Select New article.
Enter Gravity for Title, select Julia Child for Author, enter Gravity makes cakes fall for Abstract and click Create.
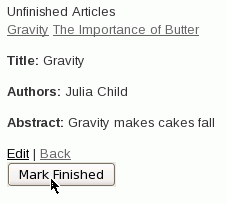
Notice that Gravity is listed in the list of Unfinished Articles. Select the Gravity link.
Click Mark Finished.
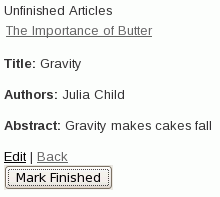
Gravity disappears from the list immediately. The full page is not redrawn. This is the power of AJAX. On a simple screen like this the difference may not be very obvious, since the page your web server is sending is small. But on more complicated screens, with images, Flash, and/or lots of data, it can make a huge difference that, with AJAX, the server sends only the necessary changes. Then you'll really appreciate Rails' AJAX support!
|


7.. Practice with Ruby
A. Ruby Primer
This part of the tutorial gives you an overview of the Ruby language. The objects you will encounter are listed below. If you are familiar with Ruby, skip this section and move onto the next.
|
B. Creating a Connection
The commands you use in this section are as follows:
| OCI8.new (userid, password, dbname = nil, privilege = nil): |
Connect to Oracle by userid and password. dbname is the connect string of Net8. If you need DBA privilege, set privilege as :SYSDBA or :SYSOPER.
|
|
| OCI8#logoff |
Disconnect from Oracle. Uncommitted transactions will be rollbacked. |
|
| OCIError | The exception class with Oracle's error code. You can get the error message by OCIError#message and error code by OCIError#code. | |
The first task in creating a ruby script is to create a connection to the database. Perform the following steps:
|
. |
From a terminal window, execute the connect.rb script by executing the following commands: cd export NLS_LANG=American_America.UTF8 ruby connect.rb
You should see the above message if the connection is successful, or an error if it was not. The contents of the connect.rb file is as follows: # connect.rb: Create connections to Oracle
|
|---|---|
|
. |
The commands that will be included in the rest of your scripts throughout this tutorial are as follows: require 'config.rb'# create connection conn = OCI8.new(DB_USER, DB_PASSWORD, DB_SERVER) # operations on conn goes here # log out conn.logoff
|

C. Querying Data
The commands you use in this section are as follows:
| OCI8#parse (sql) |
Create a cursor, prepare to execute SQL statement and return the instance of OCI8::Cursor. |
|
| OCI8#exec (sql, *bindvars) |
Execute the SQL statement. The type of return value depends on the type of SQL statement. When bindvars are specified, they are bound as bind variables before execution. |
|
| OCI8::Cursor#exec(*bindvars) | Execute the SQL statement assigned with the cursor. The type of return value depends on the type of SQL statement. | |
| OCI8::Cursor#getColNames | Get the names of select-list as array. Use this method after exec. | |
To create a simple query, and display the results, perform the following steps.
|
. |
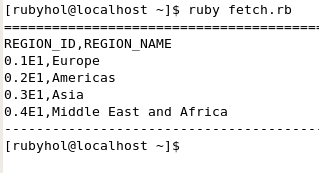
From your terminal window, execute the fetch.rb script by executing the following command: ruby fetch.rbThe output is shown in the screenshot.
The contents of the fetch.rb file is as follows: #fetch.rb: Fetch data from database
|
|---|---|
|
. |
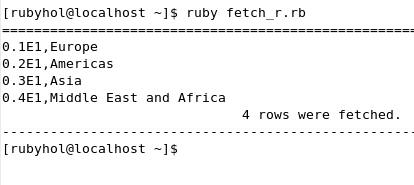
There is another way to write the same code that is more specific to ruby. From your terminal window, execute the fetch_r.rb script by executing the following command: ruby fetch_r.rbThe output is shown in the screenshot.
The contents of the fetch_r.rb file is as follows: # fetch_r.rb: Fetch in a more ruby-like way
|
|
. |
Prefeching helps performance when many rows are fetched. From your terminal window, execute the prefetch.rb script by executing the following command: ruby prefetch.rbThe output is shown in the screenshot.
The contents of the prefetch.rb file is as follows: # prefetch.rb: Prefetch data
|

D. Binding Variables
Binding variables improve code reusability, and remove the risk of SQL injection attacks. The commands you use in this section are as follows:
| OCI8::Cursor#bind_param(key, val, type = nil, length = nil) |
Bind variables explicitly. When key is number, it binds by position, which starts from 1. When key is string, it binds by the name of placeholder. |
|
| OCI8#exec (sql, *bindvars) or OCI8::Cursor#exec(*bindvars) |
Can also bind variables via bindvars. |
|
| OCI8::Cursor#[key] | Get/Set the value of the bind variable. | |
To use bind variables in this example, perform the following steps.
|
. |
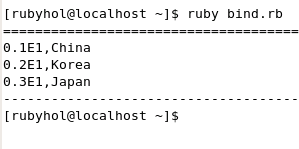
From your terminal window, execute the bind.rb script by executing the following command: ruby bind.rbThe output is shown in the screenshot.
The contents of the bind.rb file is as follows: # bind.rb: How to bind variables
|
|---|---|
|
. |
To test the performance improvement by using bind variables, execute the bind_perf_test.rb script by executing the following command: ruby bind_perf_test.rbThe output is shown in the screenshot.
The contents of the bind_perf_test.rb file is as follows: # bind_perf_test.rb: Performance test for binding variables
|

E. Defining Datatypes
The command you use in this section are as follows:
| OCI8::Cursor#define(pos, type, length = nil) |
Use this method within parse and exec. pos starts from 1. length is used when type is String. |
|
You can explicitly indicate the date type of the fetched value. To define datatypes in this example, perform the following steps.
|
. |
From your terminal window, execute the define.rb script by executing the following command: ruby define.rbThe output is shown in the screenshot.
You can see the difference between the two blocks of output. The contents of the define.rb file is as follows: # define.rb: Define output columns
require 'config.rb'
# Create a connection to Oracle
conn = OCI8.new(DB_USER, DB_PASSWORD, DB_SERVER)
# Prepare the data
conn.exec("DELETE FROM test_define");
conn.exec("INSERT INTO test_define VALUES(1,'Scott Tiger', SYSDATE, SYSTIMESTAMP)")
# Define to fetch Date and Time
cursor = conn.parse("SELECT name,birthdate,lastvisit FROM test_define WHERE id = :id")
cursor.bind_param(1, 1)
cursor.define(1, String, 100)
cursor.define(2, Date)
cursor.define(3, Time)
cursor.exec
while r = cursor.fetch
puts r.join("\n")
end
puts
# Define to fetch Date and Time as String
#conn.exec("ALTER SESSION SET nls_territory='TAIWAN' nls_language='TRADITIONAL CHINESE'")
cursor = conn.parse("SELECT name,birthdate,lastvisit FROM test_define WHERE id = :id")
cursor.bind_param(1, 1)
cursor.define(1, String, 100)
cursor.define(2, String, 100)
cursor.define(3, String, 100)
cursor.exec
while r = cursor.fetch
puts r.join("\n")
end
conn.logoff
puts '-'*80
|
|---|

F. Managing Transactions
When you manipulate data in an Oracle database (insert, update,
or delete data), the changed or new data is only available within your database
session until it is committed to the database. When the changed data is committed
to the database, it is then available to other users and sessions. This is
a database transaction.
Committing each change individually causes extra load on the server. In general
you want all or none of your data committed. Doing your own transaction
control has performance and data-integrity benefits.
The commands you use in this section are as follows:
| OCI8#autocommit |
Get/Set the state of the autocommit mode. The default value is false (remember: not committed transactions are rollbacked when logoff). If true, the transaction is committed automatically whenever executing insert/update/delete statements. |
|
| OCI8#commit() | Commit the transaction. | |
| OCI8#rollback() | Rollback the transaction. | |
To learn how to manage transactions, perform the following steps.
|
. |
From your terminal window, execute the transaction.rb script by executing the following command: ruby transaction.rbThis script updates a row using connection conn1. In Oracle, new data is only visible in the original database session until it is committed. The output is shown in the screenshot.
In this case, connection conn2 doesn’t know what happened in conn1’s not-committed transactions. The contents of the transaction.rb file is as follows: # transaction.rb: How to use transactions
|
|---|---|
|
. |
Update the transaction.rb script and uncomment conn1.autocommit = true and save the file. Execute the script again using the following command: ruby transaction.rbNow conn2 knows there is something new. The output is shown in the screenshot.
|
|
. |
Committing each row individually causes extra load on the server. You can compare the performance difference between committing each row individually versus at the end of the transaction. To test the difference, execute the trans_perf_test.rb script using the following command: ruby trans_perf_test.rbNotice that the second number is smaller than the first one. The output is shown in the screenshot.
The contents of the trans_perf_test.rb file is as follows: # trans_perf_test.rb: Performance test for transactions
|
G. Using PL/SQL
PL/SQL is Oracle's procedural language extension to SQL. PL/SQL stored procedures and functions are stored in the database, so accessing them is incredibly fast. Using PL/SQL stored procedures lets all database applications reuse logic, no matter how the application accesses the database. Many data-related operations can be performed in PL/SQL faster than extracting the data into a program (for example, Ruby) and then processing it.
The command you use in this section are as follows:
| DBMS_UTILITY and DBMS_OUTPUT |
Oracle stored packages. TO_CHAR is a built-in function. |
|
To call PL/SQL procedure and functions in a Ruby script, perform the following steps.
|
. |
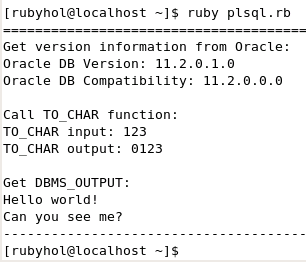
From your terminal window, execute the plsql.rb script by executing the following command: ruby plsql.rbThe output is shown in the screenshot.
The contents of the plsql.rb file is as follows: # plsql.rb: Call PL/SQL procedures and functions
|
|---|
H. Using LOB: Store/Retrieve Images
Oracle Character Large Object (CLOB) and Binary Large Object (BLOB) columns (and PL/SQL variables) can contain very large amounts (gigabytes) of characters and binary data. The command you use in this section are as follows:
| OCI8::BLOB#available |
Check whether BLOB is available or not. To use BLOB you need to insert EMPTY_BLOB() at first. |
|
| OCI8::BLOB#read(size = nil) | Read at most size bytes from BLOB, or to the end of file if size is omitted. | |
| OCI8::BLOB#write(string) | Write the given string to BLOB. | |
To create a small application to load and display images to the database, perform the following steps.
|
. |
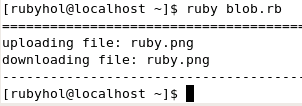
A PNG file is in the same folder with the script file. Create a folder called download.
cd mkdir download ruby blob.rb The output is shown in the screenshot.
The contents of the blob.rb file is as follows: #blob.rb: Save and Load BLOB
|
|---|---|
|
. |
Review the file sizes for the ruby.png files. Execute the following command: ls -l ruby.png download/ruby.png
|

I. Using XML
All editions of Oracle database contain "XML DB". This lab covers the basics of returning XML data from Oracle to Ruby. The command you use in this section are as follows:
| DBMS_XMLGEN.getxml (statement) |
Generate XML from relational data based on a SELECT statement. It returns CLOB. |
|
To learn the basic XML capabilities of Oracle, perform the following steps.
|
. |
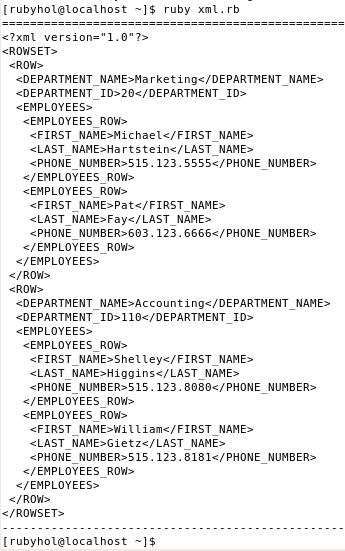
From your terminal window, execute the xml.rb script by executing the following command: ruby xml.rbThe output is shown in the screenshot.
The contents of the xml.rb file is as follows: # xml.rb: Generate a xml document based on relational data
|
|---|
8. Summary
In this tutorial, you have learned how to:
- Connect Ruby to an Oracle database with ActiveRecord
- Use scaffold to build a Ruby on Rails application for an existing database
- Model data relationships and build applications with Ruby on Rails
- Use migration to make database changes for a Ruby on Rails application
- Use AJAX with Ruby on Rails
- Access an Oracle 11g RDBMS from Ruby programs, including how to:
- Create a connection to Oracle Database
- Query data
- Bind variables
- Define datatypes
- Create and manage transactions
- Use PL/SQL
- Use LOB to store and retrieve Images
- Use XML
9. Resources
10. Appendix: How to Modify Database Tables by Rails Migration
In Rails, if you want to add the column "t.column :price, :float" in the table "articles" from the Authors/Articles application above, perform the following steps:
|
. |
You can now generate the article model. From your terminal window, execute the following commands: cd cd holapp ruby script/generate migration add_price_to_articles
|
|---|---|
|
. |
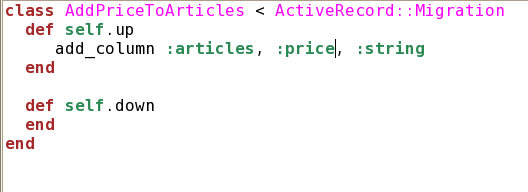
You want to edit the script that was generated. From your terminal window, enter the following command: gedit db/migrate/*_add_price_to_articles.rb
|
|
. |
Replace the self.up section with the following content and then save and close the file. def self.upadd_column :articles, :price, :string end
|
|
. |
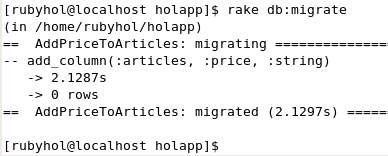
You can now rake the database migration to generate target tables. From your terminal window, enter the following command: rake db:migrate
Before the application will show the new column, the various views will need to be changed to allow prices to be entered and displayed. Note: To remove
a column we can add a line like "remove_column :articles, :price" in the
self.up method; To rename a column we can add a line like "rename_column
:articles, :price, :new_price" in the self.up method; To change a column
we can add a line like "change_column :articles, :price, :integer" in
the self.up method.
|

![]()

|
About
Oracle |Oracle and Sun | |