Migrating a Microsoft SQL Server Database to Oracle Database 11g
Purpose
This tutorial shows you how to migrate a Microsoft SQL Server database to Oracle Database 11g using Oracle SQL Developer 3.0.
Time to Complete
Approximately 45 minutes
Overview
What Is SQL Developer?
Oracle SQL Developer is a free graphical tool that enhances productivity and simplifies database development tasks. Using Oracle SQL Developer, you can browse database objects, run SQL statements, edit and debug PL/SQL statements and run reports, whether provided or created.
Microsoft SQL Server Migration Overview
Using Oracle SQL Developer Migration Workbench, you can quickly migrate your third-party database to Oracle.
There are four main steps in the database migration process:
| Capture the Source Database | The first step is to capture a "snapshot" of the
Microsoft SQL Server database. This can be done in two ways.
Using SQL Developers Offline Capture feature, the Microsoft SQL Server
Northwind sample database has been extracted into offline data files.
The SQLServer2005.ocp file generated by the Capture tool contains the
database schema information for the Microsoft SQL Server Northwind Traders
database. Oracle SQL Developer Migration Workbench uses this file as
the basis for building a representation of the structure of the source
Microsoft SQL Server database. This structure is called the Captured
Model. |
| Convert the Captured Database | Oracle SQL Developer Migration Workbench uses the Captured Model to convert the captured objects to Oracle-format objects, building up a representation of the structure of the destination database. This structure is called the Converted Model. |
| Generate the Oracle Database | Oracle SQL Developer Migration Workbench generates DDL statements to create the new Oracle database, based upon the Converted Model objects. Running the DDL statements will result in the creation of the objects in the Oracle database. |
| Migrate the Data | The last step in the process is to migrate the data. You
can do this in one of two ways.
|
Prerequisites
Before starting this tutorial, you should:
|
. |
Install the Oracle Database 10g or later, or Oracle Database XE |
|---|---|
|
. |
Download and unzip Oracle SQL Developer here. |
|
. |
Install SQL Developer 3.0 by unzipping the file retrieved in step 2. |
|
. |
Download and unzip the |
Creating the mwrep User
To create a new database user, perform the following steps:
Note: If you already have a system_orcl connection and a mwrep user, you can skip these steps.
|
. |
If you installed the SQL Developer icon on your desktop, click the icon to start your SQL Developer session. If you do not have the icon located on your desktop, find the executable file (either named "sqldeveloper.exe" on Windows or "sqldeveloper.sh" on Linux), and run it.
|
|---|---|
|
. |
Select View > Connections.
|
|
. |
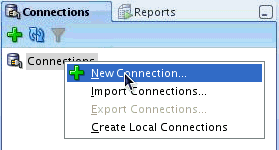
In the Connections tab, right-click Connections and select New Connection. A New / Select Database Connection window will appear.
|
|
. |
Enter system_orcl in the Connection Name field (or any other name that identifies your connection), system for the Username field, and <your password> for the Password field. Select the Save Password check box. Enter <hostname> in the Hostname field and orcl in the SID field. Click Test.
|
| . |
Check for the status of the connection on the left-bottom side (above the Help button). It should read Success. To save the connection, click Save. To connect, click Connect. Close the window.
|
|
. |
The connection is saved and you can see it listed under Connections in the Connections tab.
|
|
. |
Expand the system_orcl connection. Note: When a connection is opened, a SQL Worksheet is opened automatically. The SQL Worksheet allows you to execute SQL against the connection you just created.
|
|
. |
Enter the following code in the SQL Worksheet to create a user for the migration repository CREATE USER MWREP
|
|
. |
Run the script , using the "Run Script (F5)" icon.
|
|
. |
The mwrep user was created successfully.
|


Creating the Migration Repository
To convert the Microsoft SQL Server database to Oracle, you need to create a repository to store the required repository tables and PL/SQL packages. To do this, perform the following steps:
Note: If you already have a mwrep_orcl connection and a migration repository for it, you can skip these steps.
|
. |
Before you create the repository, you need to create a connection to the mwrep user. In the Connections tab, right-click Connections and select New Connection. A New / Select Database Connection window will appear. Note: If this tab is not visible, select View > Connections.
|
|---|---|
|
. |
Enter mwrep_orcl in the Connection Name field (or any other name that identifies your connection), mwrep for the Username and Password fields. Select the Save Password check box. Enter <hostname> in the Hostname field and orcl in the SID field. Click Test.
|
|
. |
Check for the status of the connection on the left-bottom side (above the Help button). It should read Success. To save the connection, click Connect. Close the window.
|
|
. |
The connection is saved and you can see it listed under Connections in the Connections tab.
|
|
. |
Right-click the mwrep_orcl connection and select Migration Repository > Associate Migration Repository.
|
|
. |
A progress window appears. Click OK.
|


Capturing the Microsoft SQL Server Exported Files
The procedure for creating the Microsoft SQL Server database scripts has been completed for you and the files are available in the zip file provided in the prerequisites.
To load the captured Microsoft SQL Server database scripts into Oracle SQL Developer, perform the following steps:
|
. |
Select Tools > Migration > Migrate.
|
|---|---|
|
. |
The migration wizard appears and it will walk you through the steps to convert third party databases to Oracle.
|
|
. |
In step 2, you need to select a connection for the migration repository. Select the mwrep_orcl connection, and click Next.
|
|
. |
In step 3, you need to provide the Project details. A Project is a container for the migration entities. Provide a Name to the project, and specify the Output Directory. Click Next.
|
|
. |
In step 4, you need to provide the Source Database details. Select the mode as Offline. Click Choose to select the Offline Capture Source file.
|
|
. |
Select the sqlserver2005.ocp file and click Open.
|
|
. |
Click Next.
|
|
. |
In step 5, you need to select the database for definition capture. Select the Northwind database and click Next.
|
|
. |
In Step 6, you can specify the conversion options. You can add a new rule. Click Next.
|
|
. |
Step 7 provides you the Target Database details. Select the mode as Offline. You can select to drop the target objects here. Note down the Generated Script Directory location, and click Next.
|
|
. |
Step 8 provides details about the Data Move. Note down the location of the Data Move Script Directory, and click Next.
|
|
. |
Step 9 provides you the summary of the entire Project. Note down the details and you can always click Back to make modifications. Finally, click Finish.
|
|
. |
The Data Migration happens successfully.
|
|
. |
Once you receive the message box, click Ok.
|


Executing the Script to Create the Oracle Database Objects
To generate the SQL script with DDL statements that will be executed to create the objects in an Oracle Database, perform the following steps:
|
. |
The SQL from the script is shown. Select system_orcl from the drop-down on the right. icon.
|
|---|---|
|
. |
Click Run Script (F5).
|
|
. |
The results are display from the script execution.
|
|
. |
Now that your scripts have run successfully, you can create a connection for the dbo_Northwind user. Right-click Connection and select New Connection.
|
|
. |
Enter dbo_northwind_migrated_orcl in the Connection Name field (or any other name that identifies your connection), dbo_Northwind for the Username and Password fields. Select the Save Password check box. Enter <hostname> in the Hostname field and orcl in the SID field. Click Test.
|
|
. |
Check for the status of the connection on the left-bottom side (above the Help button). It should read Success. To save the connection, click Connect. Close the window.
|
|
. |
Expand the dbo_Northwind_migrated_orcl connection.
|
|
. |
Expand Tables.
|
|
. |
The database tables that were converted to Oracle are listed. Select the EMPLOYEES table.
|
|
. |
Select the Data tab. Notice that currently there is no data in the table. You will migrate the data later in this OBE.
|


Checking Offline Data Move Preferences
A date format mask can be specified in the preferences so that the Offline Data Move scripts (in particular, the Oracle SQL*Loader control files) can reference the correct format.. To do so, perform the following steps:
|
. |
Select Tool > Preferences.
|
|---|---|
|
. |
Expand Migration and select Data Move Options.
|
|
. |
Make sure the Date Mask format matches the following Mon dd yyyy HH:mi:ssAM
|
|
. |
Make sure the Timestamp Mask matches the following. Mon dd yyyy HH:mi:ss:ff3AM Click OK.
|


Analysis and Estimation
The migration from Microsoft SQL Server to an Oracle database can be straightforward. But it is worth noting that some objects and syntax are not automatically migrated. Therefore manual intervention is required.
Analyzing the Capture Model and identifying the number, type and complexity of objects can help you to calculate the estimated time required for manual tasks.
The following Reports can be used with your own task and project estimation.
- Migration Reports> Migration Summary
- Migration Reports> Migration Details
- Migration Reports> Automatic Name Changes
Estimate time to:
- Resolve each object the failed to convert manually
- Verify and test each object
- Changes to the application due to name changes
Migrating the Data
The data has already been generated from Microsoft SQL Server.
To import the data using the scripts provided, perform the following steps:
|
. |
Open a terminal and execute the following commands: <prompt> cd <location where files are> <prompt> dos2unix oracle_ctl.sh <prompt> sh oracle_ctl.sh <username> <password>@<connection> Note: oracle_ctl is a bat file that contains statements to load the data. It uses sqlldr to load the data.
|
|---|---|
|
. |
The command executes successfully.
|
|
. |
Switch to Oracle SQL Developer and Refresh the connection.
|
|
. |
The data for the table has been loaded successfully.
|


Testing and Deployment
Depending on the complexity of the database being migrated, a large part of the migration project could be testing.
Currently Oracle does not provide any tools that can automatically validate a migrated database for you. This phase of the migration should be planned and taken into account before the migration begins.
The following should be part of your project plan
- Verify Database Structure
- Verify Database Security
- Verify Data
- Verify Logical Correctness of Views
- Test Application
As a part of the SQL Developer 3.0, there is a simple way to migrate 3rd party databases. This is called "Copy to Oracle". This is a replacement of the Quick Migrate functionality in the previous releases.
Using this feature, you can copy tables quickly and easily from a third party database to an oracle connection.
Click here to view a demo of "Copy to Oracle" feature of SQL Developer 3.0.
Summary
In this tutorial, you have learned how to:
- Create the mwrep User
- Create the Migration Repository
- Convert to the Oracle Model
- Execute the Script to Create the Oracle Database Objects
- Check Offline Data Move Preferences
- Migrate the Data
- Lead Curriculum Developer: Pallavi Rajan
- Other Contributors: Dermot ONeill
![]()

|
About
Oracle |Oracle and Sun | |