 Creating
an Oracle Traffic Director Instance and Enabling SSL on the Listener
Creating
an Oracle Traffic Director Instance and Enabling SSL on the Listener Before You Begin
This 15-minute tutorial shows you how to create an Oracle Traffic Director instance on a WebLogic domain and enable SSL on a listener by using WebLogic Scripting Tool (WLST) commands for Oracle Traffic Director.
Background
Oracle Traffic Director distributes the requests that it receives from clients to servers in the back end based on the specified load-balancing method and routes the requests based on the specified rules.
To secure data during transmission and to ensure that only authorized users access the servers in the back end, you can configure SSL-enabled listeners for Oracle Traffic Director instances.
In this tutorial, you learn how to enable SSL on an Oracle Traffic Director instance by associating a certificate with an Oracle Traffic Director listener or a virtual server.
What Do You Need?
- Installed WebLogic Server and Oracle Traffic Director
- The [create_ssl_instance.tar] file downloaded and extracted to your local folder
 Create
a WebLogic Server Domain
Create
a WebLogic Server Domain
In this section, you create a WebLogic Server Restricted JRF domain for Oracle Traffic Director.
- Navigate to the WebLogic Server installation
common/bindirectory and execute theconfig.shscript to start the Fusion Middleware Configuration Wizard.$ cd $ORACLE_HOME/oracle_common/common/bin/ $ ./config.sh
ORACLE_HOMEis the path where WebLogic Server is installed. In this tutorial, the path is/u01/Middleware/Oracle_Home/. - Create a WebLogic Server Restricted JRF domain with the
following settings:
Entity Settings Template Oracle Traffic Director Restricted JRF-12.2.1.x.0[otd]
Oracle Enterprise Manager-Restricted JRF-12.2.1.x.0[em]
Oracle Restricted JRF-12.2.1.x.0 [oracle_common]
WebLogic Coherence Cluster Extension-12.2.1.x.0 [wlserver]Admin User User Name: your user-name
Password: your passwordDomain Mode and JDK Mode: Production
JDK: DefaultAdvanced Configuration Administration Server
Node Manager
TopologyAdmin Server Localhost: 7001 Node Manager (per domain) User Name: your user-name
Password: your passwordManaged Servers Managed Server Name: ManagedServer_01
Port: 7003Coherence Clusters Port: 0 Machines Machine Name: Machine_01
Port: localhost, 7005
 Set Up
Your Environment
Set Up
Your Environment
Before you create an instance, ensure that you start the
WebLogic Server and Node Manager services. You must also
download the create_ssl_instance.tar file that
contains the scripts used in this tutorial.
- Start the WebLogic Administration Server.
$ cd
$DOMAIN_HOME/ $ ./startWebLogic.shDOMAIN_HOMEis the path where the Oracle Traffic Director domain is created. In this tutorial, the path is$ORACLE_HOME/user_projects/domains/<DOMAIN_NAME>.The following message is displayed:
<Notice> <WebLogicServer> <BEA-000360> <The server started in RUNNING mode.>
<Notice> <WebLogicServer> <BEA-000365 Server state changed to RUNNING.>
- Start the Node Manager.
$ cd $DOMAIN_HOME/bin/
$ ./startNodeManager.sh
At the command prompt, enter the user name and password for the Node Manager.
The following message is displayed:
<INFO> <Server Implementation Class: weblogic.nodemanager.server.NMServer$ClassicServer.>
<INFO> <Secure Socket listener started on port 7005, host localhost/127.0.0.1>
- Go to the folder in your lab environment that contains the
create_ssl_instance.tarfile and unpack the tar file.$ cd /u01/ $ tar -xvf create_ssl_instance.tar $ ls -l
The following files are displayed:
create_instance.py
enable_ssl_ls.py
 Create
an Oracle Traffic Director Instance
Create
an Oracle Traffic Director Instance
After you set up the environment, create an Oracle Traffic Director instance demo.
- Review the
create_instance.pyscript.$ cd /u01/ $ gedit create_instance.py
The
create_instance.pyscript should look similar to this:#!/usr/bin/python #Replace 'your username' and 'your password' with the user name and password specified #while creating the domain. connect('your username','your password','t3://localhost:7001') editCustom() startEdit() props = {'origin-server': 'localhost:7003', 'listener-port': '8080', 'configuration': 'demo', 'server-name': 'demo'} otd_createConfiguration(props) props={'configuration': 'demo', 'machine': "Machine_01"} otd_createInstance(props) activate() start("otd_demo_Machine_01", 'SystemComponent') state("otd_demo_Machine_01")Note: The script uses
localhostas the origin server and8080as the HTTP listener port. Change the HTTP listener port if the port number8080is already being used.To verify the used port numbers:
- Log in to Fusion Middleware Control. (
http://hostname:admin
                        port/em
) - To select your Oracle Traffic Director configuration from WebLogic Domain, select Administration, and then select OTD Configurations.
- To see the list of listeners and their port numbers, select Traffic Director Configuration, Administration, and then select Listeners.
- Log in to Fusion Middleware Control. (
- Run the
create_instance.pyscript.$ cd
$ORACLE_HOME/oracle_common/common/bin/ $ ./wlst.sh /u01/create_instance.pyORACLE_HOMEis the path where WebLogic Server is installed. In this tutorial, the path is/u01/Middleware/Oracle_HOME/.The following message is displayed:
Starting system component "otd_demo_Machine_01"...
...
System component with name "otd_demo_Machine_01" started successfully
Current state of otd_demo_Machine_01" : RUNNING
- To verify that the instance demo was
created, log in to the Fusion Middleware Control
(http://<hostname>:<admin port>/em). From WebLogic
Domain, select Administration,
and then select OTD Configurations.
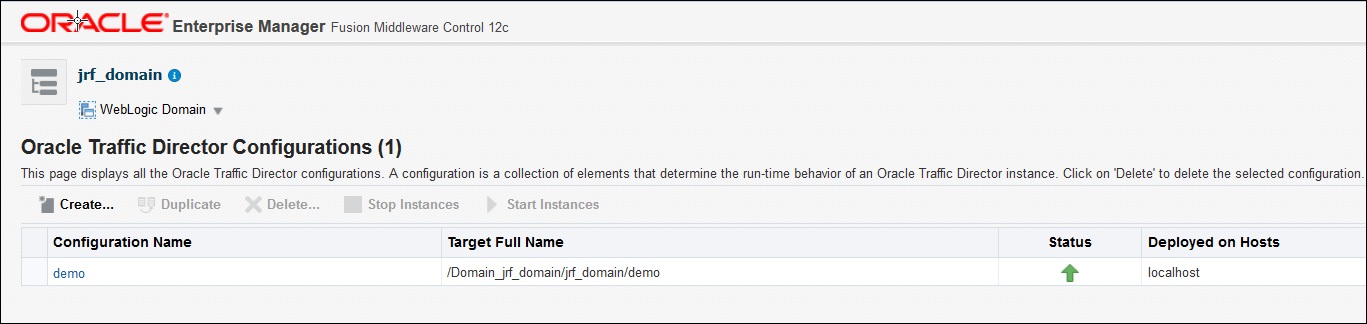
Description of the illustration otd_configurations.jpg
 Enable
SSL on Listener
Enable
SSL on Listener
Enable SSL on the default HTTP listener http-listener1
by running enable_ssl_ls.py.
- Review the
enable_ssl_ls.pyscript.$ cd /u01/ $ gedit enable_ssl_ls.py
The
enable_ssl_ls.pyscript should look similar to [this code]. - Run the
enable_ssl_ls.pyscript.$ cd
$ORACLE_HOME/oracle_common/common/bin/ $ ./wlst.sh /u01/enable_ssl_ls.pyORACLE_HOMEis the path where WebLogic Server is installed. In this tutorial, the path is/u01/Middleware/Oracle_Home/.The following message is displayed:
The edit lock associated with this edit session is released once the activation is completed.
Activation completed
 Test
Your Service
Test
Your Service
- Verify that SSL is enabled on the listener.
$ cd
$INSTANCE_HOME/bin $ ./stopserv $ ./startservINSTANCE_HOMEis the path where the Oracle Traffic Director instance is created. In this tutorial, the path is$DOMAIN_HOME/config/fmwconfig/components/OTD/instances/<MACHINE_NAME>. - Verify that the following message is displayed. When SSL is
enabled on the listener, the browser connects to the
https://URLOracle Traffic Director 12.2.1.3.0 B170731.180312 [WARNING:1] On HTTP Listener http-listener-1, server name demo does not match subject of certificate CN=demo.com, OU=Webtier, O=Oracle, ST=California, C=US' [NOTIFICATION:1] [OTD-10358] http-listener-1: https://demo:8080 ready to accept requests [NOTIFICATION:1] [OTD-10487] successful server startup