Using the Oracle Service Bus Tuxedo Transport
Purpose
In this tutorial, you learn how to configure all the components required to run the Oracle Service Bus (OSB) Tuxedo Transport so your applications can utilize Tuxedo services from Java EE applications via OSB proxy and business services.
After completing this course, you should be able to:
- Explain how the integrated technology works
- Describe the configuration points required to use the OSB Tuxedo Transport
- Build, start up, shut down, and monitor a simple Tuxedo application/domain with Visual Studio and the command line
- Configure a WebLogic Tuxedo Connector (WTC) gateway to expose Tuxedo services to OSB
- Generate and modify artifacts that are used by OSB and calling clients
- Configure OSB proxy and business services that enable an OSB client to call Tuxedo services via the Tuxedo Transport
Time to Complete
Approximately 2-4 hours.
Overview
OSB provides a Tuxedo Transport option that enables you to expose your Tuxedo services to your Java EE applications through the configuration of the service bus. This provides the added benefits that OSB provides for mediating service calls.
Scenario
In this tutorial, you build and start up the Tuxedo uBike bicycle inventory application so its services are ready to call. Next, you review the Tuxedo uBike /DOMAIN configuration in order to determine how to configure WTC on WebLogic Server (WLS) for use by OSB. Then, you configure the OSB proxy and business services, the route between them, and all other needed artifacts. Finally, you deploy and run the uBike Web application that renders the data retrieved from the uBike Tuxedo application services to see if the uBike inventory data was retrieved from the Tuxedo application.
The diagram below displays the high-level architecture of this tutorial:

Software Requirements
The following is a list of software requirements:
- Windows 2000 or later (Windows 2000 and XP are not officially supported, but this tutorial works with these platforms.)
- Microsoft Visual Studio (2005) (run installer)
- NOTE: First login to the http://edelivery.oracle.com site prior to clicking on the Tuxedo and SALT download links below.
- Oracle Tuxedo 10gR3 (download)
- Oracle Service Bus with Oracle WebLogic Server (download)
Prerequisites
Before starting this tutorial, you should install:
- Oracle Tuxedo 10gR3
- Oracle Service Bus 10gR3 (WebLogic Server 10gR3 is included)
Note: Screen captures for this tutorial were taken in a Windows XP Professional environment; therefore, Start menu options will vary.
Set Up the Environment
Before performing the steps required to complete this tutorial, the development environment must be set up for Visual Studio 2005, the Tuxedo uBike domain, and the OSB domain. This section takes you through each aspect of setting up the environment.
Windows
| . |
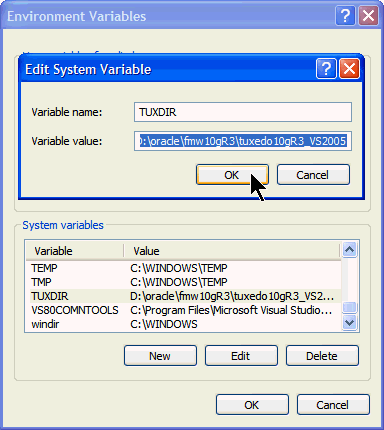
Set TUXDIR so that all applications will know how to run Tuxedo commands. This is set automatically for you when Tuxedo is installed, but may need a little tweak for the setting to take place in new DOS windows. a. Right-click My Computer and select Properties. b. In the System Properties dialog box, click the Advanced tab, and then click the Environment Variables button to display the Windows environment variable settings:
|
|---|---|
. |
Add or edit TUXDIR within the System Variables box, delete the last character, and put it back to reset the variable. Click OK in all the subsequent dialog boxes.
|
. |
Verify that TUXDIR is getting set properly by opening a DOS window and entering: echo %TUXDIR%
|
Visual Studio 2005
. |
If you have not already installed Microsoft Visual Studio 2005, then install it from the link provided in the Software Requirements section. Note: As the versions of Visual Studio progress, it is not possible to find earlier versions of the software easily online. As a result, you will need to install using the installer included in this tutorial. The uBike Tuxedo application has been tested with Visual Studio 2005 successfully. Testing with Visual Studio 2008 was not successful and, therefore, is not supported at this time. |
|---|---|
| . | In the Welcome to Setup dialog box that appears, click Next.
|
| . | Accept the license and click Next on the License Terms screen.
|
| . | On the Installation Options screen, deselect the optional products, make sure that the Graphical IDE option is selected, and click Next.
|
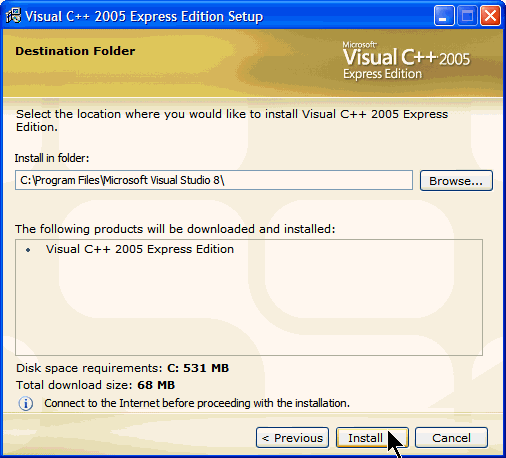
| . | Choose the default folder location for installation on the Destination Folder screen, click Next, and wait for the download and installation process to complete.
|
| . | Click Exit on the Setup Complete screen, and then select Restart my Machine to complete the installation process.
|
uBike Tuxedo Side
Now you need to set up the Tuxedo side of the environment. This section guides you through extracting the uBike application to a location of your choice, getting it to build within Visual Studio, and starting up the uBike application.
. |
Extract the uBikeTux.zip contents to a location of your choice. For this example, it is assumed that it is installed to C:\, resulting in the application installing to C:\uBike.
|
||||||||||||
|---|---|---|---|---|---|---|---|---|---|---|---|---|---|
| . | Most of the environment for Tuxedo is automatically handled by the setenv.cmd script. Some values may need to be altered to match your installation locations.
In Windows Explorer, open the setenv.cmd file for editing in the uBike folder. Set the appropriate values for your environment using the following table for guidance. After you have finished editing the setenv.cmd file, save your changes and close the file.
|
||||||||||||
| . | In the uBike folder, double-click the DOSPrompt.cmd file to open a command shell and run setenv.cmd.
Apart from setting the environment, this script also creates the uBike make file that is used by Visual Studio to build and clean the uBike application.
The make file is created using your environment settings. It will only create the file if it does not already exist. You can leave this command shell open to start Tuxedo up in a few steps. If you close the window, open it and run setenv.cmd to set up Tuxedo again.
Note: Tuxedo applications are written in C or C++, which use make files to build projects much like ant is used in the Java world. |
||||||||||||
| . | Start Visual Studio:
a. In your uBike folder, double-click the uBikeTuxSvr1.dsw file to open the uBike project in Visual Studio. b. If you see a message that says, "The project 'uBikeTuxSvr1.dsp' must be converted to the current Visual C++ project format....," click Yes to convert the project.
c. If you see a message box that says "A Visual C++ project of the name uBikeTuxSvr1.vcproj already exists...," click Yes to load the existing project.
d. If it is not expanded yet, expand the uBikeTuxSvr1 project in the window on the left.
|
||||||||||||
| . | Ensure that your development environment contains all needed Microsoft libraries:
There are a few Microsoft Windows library files that Tuxedo processes need in order to compile correctly. They are not included with Visual Studio 2005 and you have two choices for obtaining them. (Warning: Read both options completely before making a choice.)
You need to configure Visual Studio to use these libraries. After the SDK is installed, go to the Visual Studio IDE and select Tools > Options > Projects and Solutions > VC++ Directories to open the configuration window for adding directory paths to the project. In the upper-right side of the window, select Library files in the drop-down list box . Next, click the Folder icon |
||||||||||||
| . | Build uBike Tuxedo application:
a. Within Visual Studio, press the F7 key to build the project. Visual Studio will run the uBikeTuxSvr.mak file using the following command: (You can also run the uBikeTuxSvr.mak file from the command line if desired) nmake -f uBikeTuxSvr.mak b. Check the output window in the IDE to see if the build had any errors. A clean build should look like the image below, and you should see the following files in your uBike folder. The build process also creates other files that are covered later.
|
||||||||||||
| . | Start uBike Tuxedo application:
a. Within the command shell with the environment set, enter the following command: tmboot -y
|
||||||||||||
| . | Test uBike:
Run the ud32 command, which is an out-of-the-box (OOTB) Tuxedo client that uses search.ud32 as an input file to call the SEARCHINVENTORY Tuxedo service to return all bicycles in inventory with a SKU of RJ4500. NOTE: The in-memory database that is created during the first initialization of the uBikeTuxSvr is generated with random values. As a result, your screen results may vary slightly with the screen shot below. ud32 < search.ud32
|
||||||||||||
| . | Monitor some basic Tuxedo components:
Use the commands within the Tuxedo Administration command-line tool to monitor the activities within the uBike application. This will help you verify that your Tuxedo services were actually called. First run tmadmin at your command prompt to start the tool, and then try each of the following commands to get familiar with them to use later. Note that the short version of the command is listed within parenthesis.
Example of printserver: Notice how the uBikeTuxSvr server has performed one request since you ran the SEARCHINVENTORY service.
Example of printservice: See that the SEARCHINVENTORY service has executed once.
Now the Tuxedo uBike application is built, configured, and running. |
uBike OSB/WLS Side
. |
Configure OSB domain using the Configuration Wizard: Start the WebLogic Server Configuration Wizard using Start > Programs > Oracle WebLogic > WebLogic Server 10gR3 > Tools > Configuration Wizard.
|
|---|---|
| . | On the Welcome screen, keep the default selection and click Next.
|
| . | On the Select Domain Source screen, select WebLogic Server and Oracle Service Bus, and then click Next.
NOTE: Your screen may vary slightly from what is shown in the screen shot below. As long as you have the options that are selected below, and have them selected, this exercise will function properly.
|
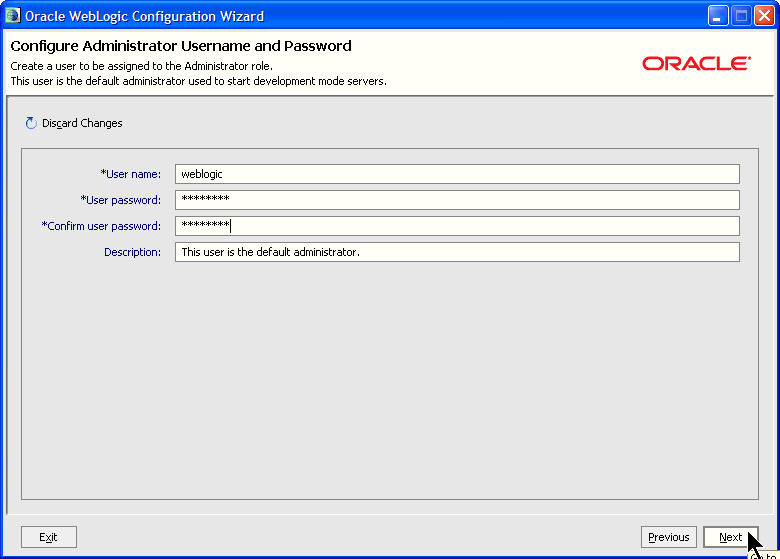
| . | On the Configure Administrator Username and Password screen, enter weblogic as the username and password, and then click Next.
|
| . | On the Configure Server Start Mode and JDK screen, leave the default settings and click Next.
|
| . | On the Customize Environment and Services Settings screen, leave the default setting to No and click Next.
|
| . | On the Create WebLogic Domain screen, choose where you want to create your domain and click Create.
Keep in mind that the domain name relates to a folder, so the example below would create your domain in C:\uBike\uBikeDomain.
|
| . | On the Creating Domain screen, note the location of your domain, ensure that the Start Admin Server check box is NOT selected, and click Done.
|
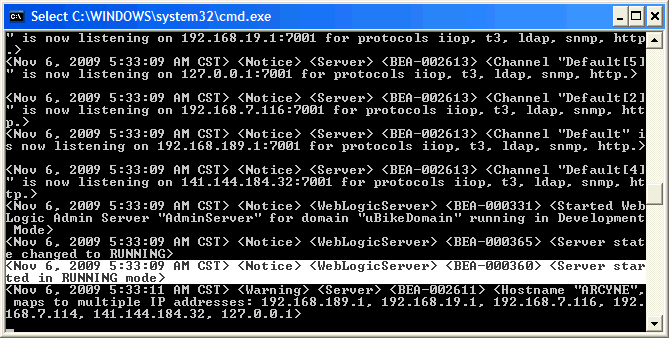
| . | Start your uBike domain to make sure that it starts successfully. Go to your domain folder you just created and double-click the startWebLogic.cmd script. This will open a DOS command window and show the output of the running server on the console. Look for the server is RUNNING message to know when the server has completed its startup process.
In the next section, you will log in to the WebLogic Administration console, which shows that the server is working correctly. |
Configure WTC Gateway
Examine Tuxedo /DOMAINS Configuration
Tuxedo provides a feature called /DOMAINS that allows two or more separately administered Tuxedo domains to share and call the services of each other. A Tuxedo domain is analogous to a WLS domain: one configuration file equals one domain. The concept of a domain originated with Tuxedo, and the concept was added to WLS sometime around the year 2000. Sometime after that, WTC was created to communicate from Java (in WLS) to C (in Tuxedo) using the same /DOMAINs protocol over the network.
The OSB Tuxedo Transport uses the WTC gateway that is part of WLS. WTC provides bidirectional compatibility between WLS and Tuxedo, including XA transaction and security propagation. This section guides you through the configuration of WTC, so OSB can be configured to use Tuxedo services.
| . |
Examine uBike.dom configuration file:
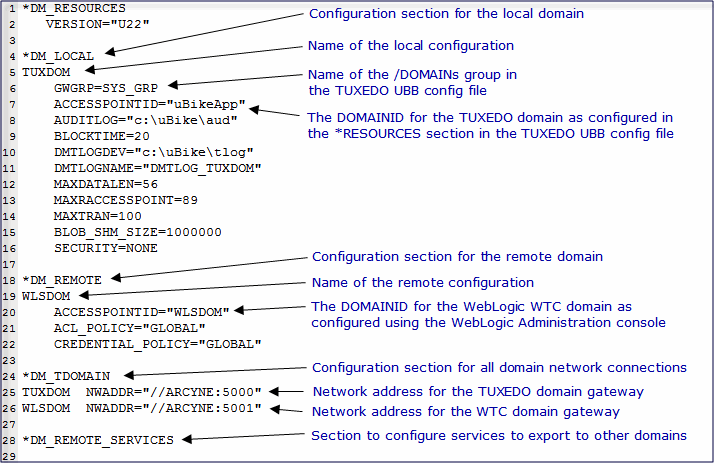
The uBike application has a /DOMAINs gateway already configured and running on the Tuxedo side. You will use this file as the basis for configuring the WLS WTC side of the gateway. Open and examine the uBike.dom file contained within your uBike folder. Look at the screen shot below and take a few minutes to become familiar with the parameters. You will need some of these parameters to configure the WTC side within the WebLogic Server Administration console. Note: The Tuxedo Universal Bulletin Board (UBB) configuration file is called uBike.ubb for your application. Open it to examine how it relates to the /DOMAINs configuration file below. Pay close attention to the DOMAINID parameter, and the GWADM, DMADM, and GWTDOMAIN /DOMAINs servers that belong to the SYS_GRP group, which are the settings that directly relate to configuring the domain gateway on the Tuxedo side.
|
|---|
Configure WTC on WLS
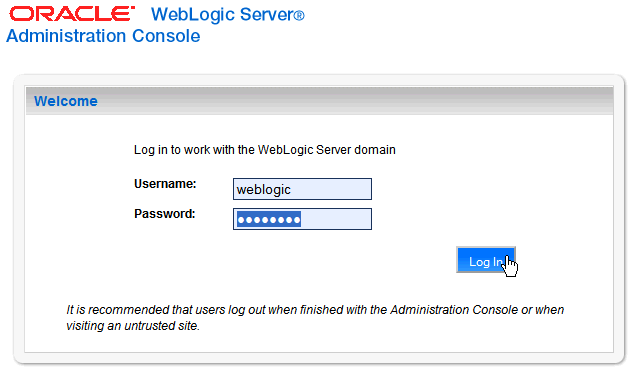
You need to configure the WTC gateway on the WLS side to match the settings on the Tuxedo /DOMAINs side. This section will guide you through this process.| . | Open a Web browser and browse to http://localhost:7001/console to open the WebLogic Server Administration Console. Log in using the credentials you used when creating the domain, weblogic/weblogic.
|
|||||||||||||||
|---|---|---|---|---|---|---|---|---|---|---|---|---|---|---|---|---|
| . | Expand the Interoperability node under the Domain Structure tree on the left and select WTC Servers.
|
|||||||||||||||
| . | On the Summary of WTC Servers page, click the New button to create a new WTC gateway configuration.
|
|||||||||||||||
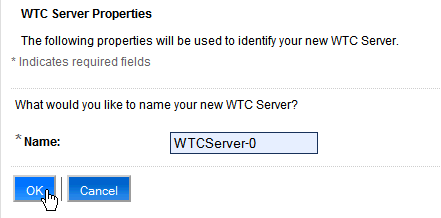
| . | Use the default name and click OK.
|
|||||||||||||||
| . | Click the WTCServer-0 entry you just created to open the configuration page.
|
|||||||||||||||
| . | Click the Local APs tab and click the New button to configure a new Local Access Point to represent the WLS side of the gateway.
|
|||||||||||||||
| . | This is where the information in the uBike.dom file is used.
Enter the following values and click OK:
|
|||||||||||||||
| . | Click the Remote APs tab and click the New button to configure a new Remote Access Point to represent the Tuxedo side of the gateway.
|
|||||||||||||||
| . | Again, this is where the information in the uBike.dom file is used.
Enter the following values and click OK:
|
|||||||||||||||
| . | Click the Imported tab and click the New button to configure services you want to import from the remote Tuxedo domain.
|
|||||||||||||||
| . | Enter the following values and click OK:
|
|||||||||||||||
| . | Now you need to target this WTC server configuration to your WLS server.
Click the Target
tab, select the AdminServer check box, and click the Save button.
This completes the basic configuration for setting up WTC to work with your remote Tuxedo domain. Now you need to configure a user within WLS that matches the Tuxedo ACCESSPOINTID parameter so the domains can establish a trusted connection. |
Configure WTC User on WLS
You need to configure a user that matches the Tuxedo ACCESSPOINTID name to ensure that only properly configured domain gateways can connect to WLS. This section shows you how to configure this user.
| . | In the WebLogic Administration console, select Security Realms > myrealm > Users and Groups and click the New button to create a new user.
|
|||||||||||||||
|---|---|---|---|---|---|---|---|---|---|---|---|---|---|---|---|---|
| . | Enter the following values and click OK:
Now you have configured WTC and are ready to begin configuring OSB services to use your WTC gateway to Tuxedo. |
Configure OSB Services
Create Web Service Artifacts for Tuxedo Services
Although Tuxedo services have well defined input and output parameters most of the time, there is no external or visible service contract definition to tell you which services are offered and what parameters are required.
A Web service provides a contract using a Web Services Description Language (WSDL) file that defines everything that is needed by a client that may need to call the service.
Because you will be calling your Tuxedo services via an OSB proxy Web service, you need a way to translate the Tuxedo service and its parameters into a WSDL contract that your Web service client can use. Tuxedo provides a mechanism for doing this without having to start completely from scratch.
The overall process for deriving your WSDL definition from a Tuxedo service involves:
- Creating a service contract metadata file in plain text format
- Loading the service contract metadata into a binary metadata repository file using the Tuxedo tmloadrepos tool
- Unloading the service contract metadata repository using the Tuxedo tmunloadrepos tool with the -w option which processes the unload in the form of a WSDL definition that can be redirected to a file
- Modifying the WSDL file so it will work with OSB and the Tuxedo Transport
Follow the steps below to guide you through this process.
| . | Create service contract metadata file:
Open and examine the uBike.meta file located in your C:\uBike folder. Use the image below to identify the purpose of the various settings. This file is provided for you to learn by using a working example. See http://download.oracle.com/docs/cd/E13161_01/tuxedo/docs10gr3/ads/admrp.html for more information about the Tuxedo service metadata repository.
|
|---|---|
| . | Set environment:
Open a command window in C:\uBike, run setenv.cmd, and run setDomainEnv.cmd in your WLS domain to get your environment set correctly. This sets the Tuxedo and WLS environment so you can run tools for both products.
|
| . | Load service contract into metadata repository:
Tuxedo provides the tmloadrepos tool to take a service metadata file as input to store in binary format within a Tuxedo metadata repository file. You need to store this data in the repository so you can run a tool to extract the WSDL form of this definition from the repository. The tmloadrepos tool does not generate WSDL directly. See http://download.oracle.com/docs/cd/E13161_01/tuxedo/docs10gr3/rfcm/rfcmd.html#wp1789066 for more information about the Tuxedo tmloadrepos tool. Note: Oracle provides a product called SALT that enables you to expose Tuxedo services as Web services. SALT has other tools that can perform similar functions; however, it is a separate download and this tutorial is focused on providing a solution using only the out-of-the-box capabilities of Tuxedo and OSB. You can read more about SALT at http://download.oracle.com/docs/cd/E13161_01/salt/docs10gr3/index.html. Enter the following to run the tmloadrepos command: cd c:\uBike tmloadrepos -e -i uBike.meta -y metarepo
|
| . | Generate uBike WSDL:
Tuxedo provides the tmunloadrepos tool to generate WSDL from a service contract stored in a metadata repository. See http://download.oracle.com/docs/cd/E13161_01/tuxedo/docs10gr3/rfcm/rfcmd.html#wp1791154 for more information about the Tuxedo tmunloadrepos tool. You run tmunloadrepos and redirect the output to create a WSDL file within the uBikeClient folder by executing the following command: tmunloadrepos -w metarepo > uBikeClient\uBike.wsdl
|
| . | Examine and Modify WSDL, Bike Schema, and FML to Bike List Hierarchy XQuery:
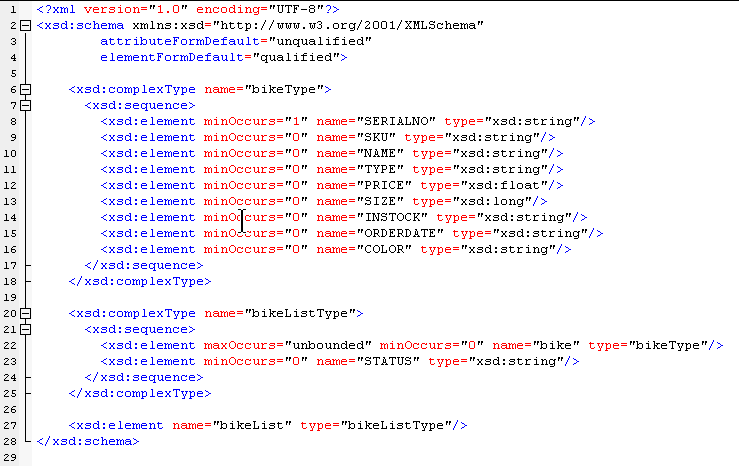
The WSDL that is generated results in a message payload that is not compatible with the OSB Tuxedo Transport. As a result, a few changes need to be made to the WSDL to make it work properly. Additionally, the response payload from the OSB Tuxedo Transport business service is not structured in a way that is meaningful to OSB Web service clients, so you will need to create an XML schema that represents how the response should be returned and include it in your WSDL file. You will then need to transform the response payload from the business service to your XML schema type using an XQuery function. This section will guide you through examining and setting up these constructs, and the next section will take you through applying them to your OSB configuration. Examine BikeSchema.xsd Right-click and save the BikeSchema.xsd file to c:\uBike\uBikeClient. This file contains the schema definition of the Java data types that the calling Web service client will use as the operation's return type. Examine the BikeSchema.xsd file to become familiar with its definitions:
A Tuxedo FML buffer is an allocated memory space that contains a set a field arrays. Each field is stored in the buffer as an array of occurrences, starting at an index of 0. Typically, a Tuxedo service returns a buffer with multiple instances (or occurrences) of multiple fields. The index number of the occurrence is used to correlate related fields into a single data record. While this model works in cases where the calling client and the service are tightly coupled, it is not suitable for an SOA application because the calling client has no way of knowing how the data is structured and how to make sense of the data. The data is meaningless without some structure. The BikeSchema.xsd file defines an element, called bikeList, that contains a list of bike elements and a single STATUS element. The bike element defines the proper grouping of the particular data fields that comprise a bicycle record that represents what the Tuxedo service thinks is a bicycle record. Examine FMLtoHierarchy.xq Right-click and save the FMLtoHierarchy.xq file to c:\uBike\uBikeClient. This file contains the XQuery function that transforms the response payload of the uBike Business service into the BikeList data type defined in the BikeSchema.xsd file. Examine the FMLtoHierarchy.xq file to become familiar with how it performs the transformation:
Now that the BikeSchema.xsd file defines the desired data structure of the uBike SEARCHINVENTORY service return type, something needs to transform the <FML32>...</FML32> into <bikeList><bike>...</bike><bike>...</bike><bike>...</bike>...</bikeList>. The FMLtoHierarchy XQuery function defined here will take the <FML32>...</FML32> payload as input, iterate through each of its elements, and create the bikeList XML payload using the data contained within $fmlout at each iteration count using $count as the index into the FML32 element list. The FMLtoHierarchy file specifies that the FML32 element is defined externally, which in fact is defined within the uBike.wsdl file. Actually, it isn't defined yet. You will make those modifications next. Examine and Modify uBike.wsdl Open the c:\uBike\uBikeClient\uBike.wsdl file to edit its contents:
<xsd:schema attributeFormDefault="unqualified" elementFormDefault="qualified" targetNamespace="http://example.org/tuxedo/typedef"> with <xsd:schema attributeFormDefault="unqualified" elementFormDefault="qualified">
<xsd:include schemaLocation="BikeSchema.xsd"/> right before the following line <xsd:element name="SEARCHINVENTORY">
<xsd:element name="SEARCHINVENTORY"> to <xsd:element name="SEARCHINVENTORY" type="fml32_SEARCHINVENTORY_In"/>
<xsd:element name="SEARCHINVENTORYResponse"> to <xsd:element name="FML32" type="fml32_SEARCHINVENTORY_Out"/>
<wsdl:part element="SEARCHINVENTORYResponse" name="FML32"/> to <wsdl:part element="bikeList" name="bikeList"/> Click uBike.wsdl to compare your WSDL file with the solution to make sure it is correct. Save the file with your changes when done. |
| . | Jar uBikeFML class:
Part of the configuration of the OSB business service that will use the Tuxedo Transport requires you to provide a Java class that represents the Tuxedo FML fields that are used for the Tuxedo service call. This class is generated as part of the Tuxedo make process you ran earlier. You may not have noticed this as the last part of the build process. Let's examine the picture below that shows the commands used to build this class:
Package the uBikeFML.class file into a jar file called uBikeFML.jar by entering the command below in your command window: jar cvf uBikeFML.jar uBikeFML.class |
OSB Setup
| . | Create a new OSB project:
Note: The remainder of this tutorial will assume that you are properly using the change management mechanism of OSB. All configuration changes made using the OSB Administration Console involve clicking the Create button, making changes, and then either clicking the Discard button to roll back your changes, or clicking the Activate button to commit and label your changes. Troubleshooting Tip: if you receive an error at any time using the OSB Administration Console or the Workshop IDE that says the WLS edit lock is currently held by another user, it usually means that either you have inactivated changes in the WebLogic Administration Console that need to be activated, or you need to click Undo All Changes if there are no changes to activate and click the Log Out link on the top of the page because the auto lock and edit feature of WLS always has the edit lock held when it is logged in. Logging out releases the lock.
|
||||||||||||
|---|---|---|---|---|---|---|---|---|---|---|---|---|---|
| . | Create OSB folders:
Your screen should look similar to the following:
Click the Activate button, enter a description of changes you made, and then click the Submit button to commit your changes. |
||||||||||||
| . | Add the BikeSchema resource:
Click the WSDL folder under the Tuxedo uBike project on the left of the page. In the Resources section, click the Create Resource list box and select XML Schema under Interface. Enter the values as follows, and click the Save button.
After saving your changes you should see an entry for this resource similar to the following:
|
||||||||||||
| . | Add an XQuery resource:
Click the WSDL folder under the Tuxedo uBike project on the left of the page. In the Resources section, click the Create Resource list box and select XQuery under Transformation. Enter the values as follows, and click the Save button.
After saving your changes you should see an entry for this resource similar to the following:
|
||||||||||||
| . | Add a WSDL resource:
Click the WSDL folder under the Tuxedo uBike project on the left of the page. In the Resources section, click the Create Resource list box and select WSDL under Interface. Enter the values as follows, and click the Save button.
After saving your changes you should see an entry for this resource similar to the following:
|
||||||||||||
| . | Add a jar resource:
Click the JAR folder under the Tuxedo uBike project on the left of the page. In the Resources section, click the Create Resource list box and select JAR under Utility. Enter the values as follows, and click the Save button.
After saving your changes, you should see an entry for this resource similar to the following:
|
Configure Business Service using Tuxedo Transport
| . | Add an OSB business service:
Click the Business Services folder under the Tuxedo uBike project on the left of the page. In the Resources section, click the Create Resource list box and select Business Service under Service. Enter the values as follows, and click the Next button.
|
||||||||||||||||||
|---|---|---|---|---|---|---|---|---|---|---|---|---|---|---|---|---|---|---|---|
| . | Configure business service transport options:
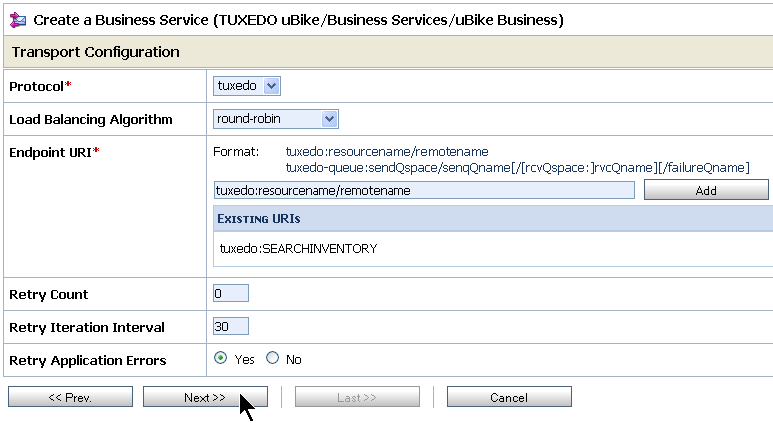
On the Transport Configuration page, enter the following values, leave the rest of the options at their default values, and click the Next button.
|
||||||||||||||||||
| . | Configure Tuxedo Transport options:
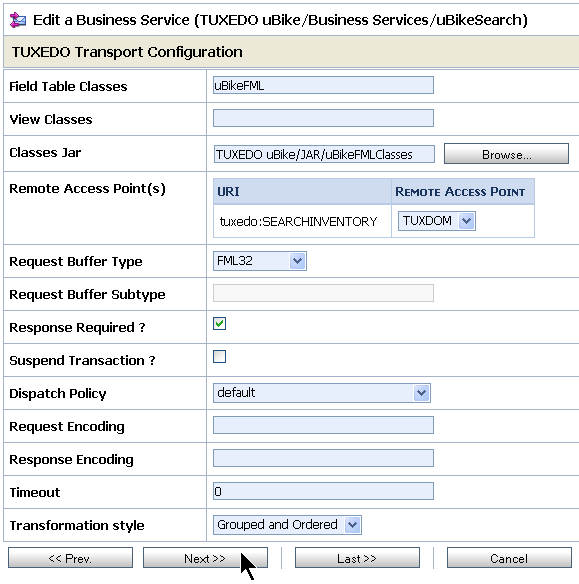
On the Tuxedo Transport Configuration page, enter the following values, leave the rest of the options at their default values, and click the Next button. Note: You will have to select the uBikeFML.jar in the Classes Jar property prior to setting the Field Table Classes property.
|
||||||||||||||||||
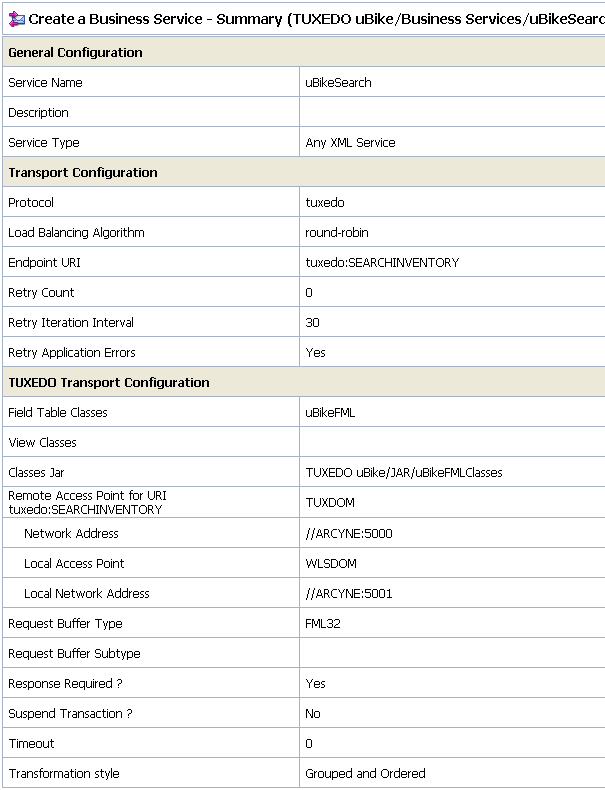
| . | Review Configuration:
On the Business Service Configuration Summary page, review your settings to make sure that they match the screen below, and then click the Save button.
|
||||||||||||||||||
| . | Test Tuxedo business service:
Test your business service to verify that you have a connection to Tuxedo and can call the SEARCHINVENTORY service:
<FML32>
Note: If you get an error that the system could not get a TuxedoConnection or a TuxedoSession, you may have to restart WLS and/or Tuxedo for the servers to properly establish their connection. If this does not work, then you may have to perform the following to force it into working: tmshutdown -y, del BDMCONFIG, dmloadcf -y uBike.dom, tmboot -y. Make sure that all of the Tuxedo server processes shut down before running dmloadcf. If this does not work, contact Mark Lindros.
Now that the business service is configured and working, you can set up the OSB proxy service that will route requests to it. |
Configure Proxy Service
| . | Add an OSB proxy service:
Click the Proxy Services folder under the Tuxedo uBike project on the left of the page. In the Resources section, click the Create Resource list box and select Proxy Service under Service. Enter the values as follows, and click the Next button.
|
||||||||||||
|---|---|---|---|---|---|---|---|---|---|---|---|---|---|
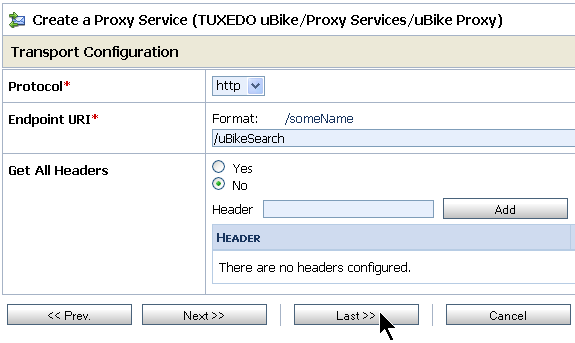
| . | Configure proxy service transport options:
On the Transport Configuration page, enter the following values, leave the rest of the options at their default values, and click the Last button.
|
||||||||||||
| . | Review Configuration:
On the Proxy Service Configuration Summary page, review your settings to make sure that they match the screen below, and then click the Save button.
Now that the proxy service is configured, you need to pair it up with your Tuxedo business service. The next section guides you through adding a route between your services. |
Configure Route Between Proxy and Business Services
| . | Open the message flow editor:
Click the Proxy Services folder under the Tuxedo uBike project on the left of the page. Click the
|
|---|---|
| . |
Add a route between the OSB proxy and business services:
Note: The OSB Administration Console does not display the Change Center on this screen. Clicking the Edit button starts an edit session. To commit your changes, you will need to ensure that you click the Save button on each page until you see the Change Center again, and then click the Activate button.
|
| . | Click the RouteNode1 node and select the Edit Route option.
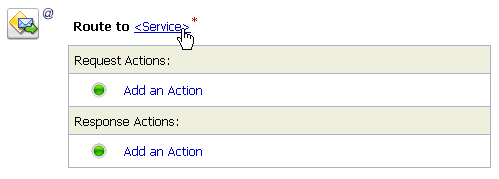
On the page that appears, click Add an Action > Communication > Routing to bring up the Route to service page..
|
| . | Configure route to uBike Search business service:
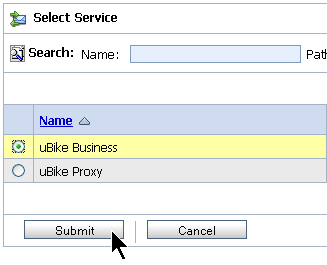
Click the <Service> link to open the Select Service window.
Select the uBike Business service and click the Submit button.
Your screen should now look similar to the following:
|
| . | Configure response transformation:
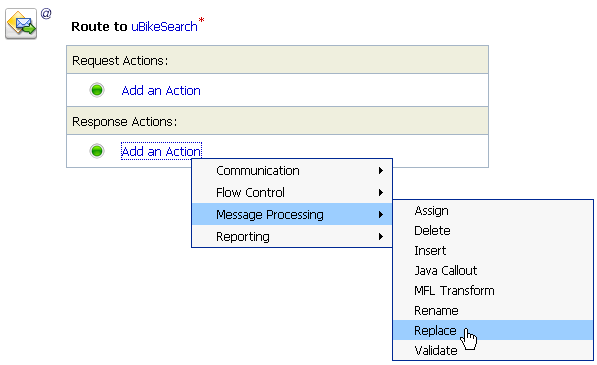
Under Response Actions click Add an Action > Message Processing > Replace to add a replace node transformation. This is where you will configure the proxy service to transform the uBike Business service response into the bikeList schema defined in BikeSchema.xsd.
Within the Replace configuration form, select the Replace node contents option, leave the <XPath> entry as it is, type in body as the variable where the replace takes place, and click on <Expression> to configure this action to use our FMLtoHierarchy XQuery function that transforms the response payload into a list of bike records.
On the XQuery/XSLT Expression Editor page, select the XQuery Resources link to open the XQuery Resources configuration page.
Click the Browse button to open the file select window.
Select the FMLtoHierarchy option and click the Submit button.
Enter $body/FML32 in the Binding text box within the Bind Variables section. This will assign the fmlout variable that gets passed to the XQuery function defined in FMLtoHierarchy to the node contents contained within the FML32 element of the response body. This effectively passes the uBike Business service's response payload of <FML32>...</FML32> to the XQuery function. Click the Save button, and any subsequent Save buttons, and Activate your changes.
|
| . | Test uBike Proxy service:
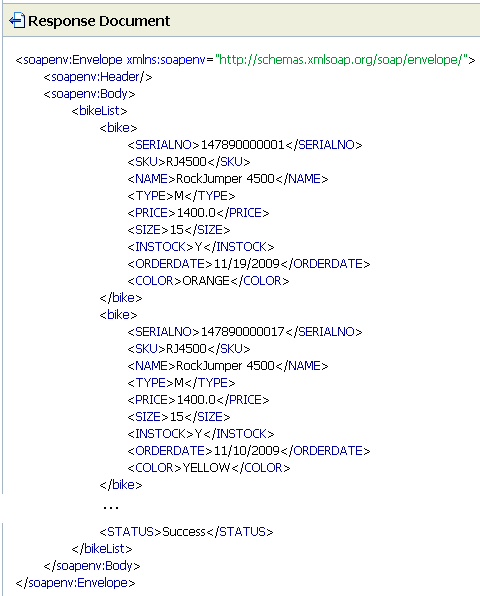
Click the <SEARCHINVENTORY> You should see a response similar to the following:
Now that you have successfully configured OSB to communicate with Tuxedo via the Tuxedo Transport; you need to build, deploy, and test the Web service client code that calls the service. |
Deploy and Test Integration
Import and Configure uBike Web Application
| . | Open the Workshop application and create an Eclipse Workspace. It is assumed you are already familiar with this process, but some quick directions are included here.
|
|---|---|
| . | Extract the uBikeFrontEnd.zip contents to a location of your choice.
Within Workshop, select File > Import to import the uBike front end application, select General > Existing Projects into Workspace, and click the Next button.
Click the Browse button and locate the root folder where you extracted the uBikeFrontEnd.zip contents, click Ok, ensure that both the uBikeEar and uBikeWeb project check boxes are selected and click the Finish button.
|
| . | Configure Java Build Path:
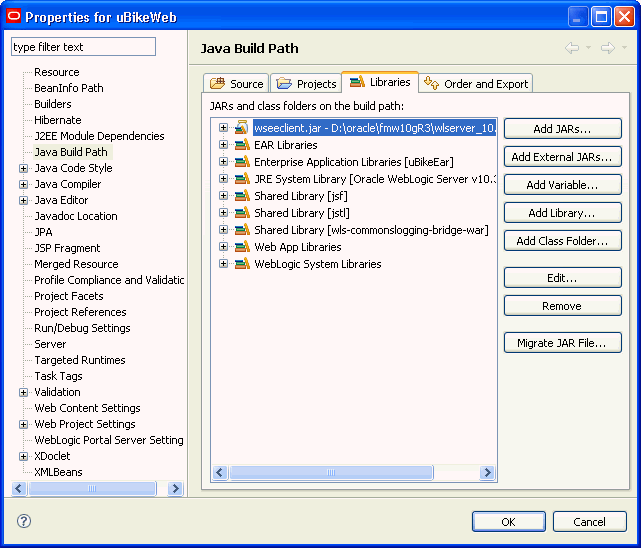
Right-click on the uBikeWeb project in Workshop and select Properties. On the uBikeWeb Properties dialog box that opens, click Java Build Path > Libraries to display the library configuration for the application. Ensure that the entry for wseeclient.jar is referencing the appropriate location in your environment. It can be found at WL_HOME\server\lib. Click Ok when finished.
|
| . | Configure server and projects to deploy:
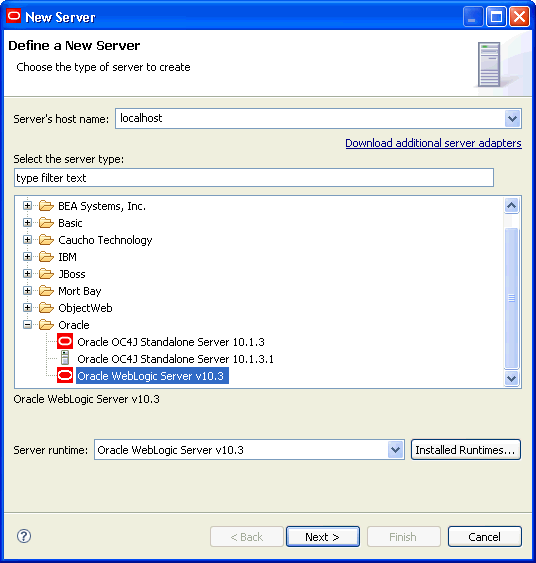
In Workshop, click the Servers tab, right-click inside the Servers window and select New > Server to display the New Server dialog window. Ensure that Oracle WebLogic Server v10.3 is selected and click the Next button.
Click the Browse button and browse to the location where you created your OSB/WLS domain to select it as the domain for your server configuration, and click the Next button. On the Add or Remove Projects dialog window, add the uBikeEar project to Configured Projects and click the Finish button. |
Build uBike Web Service Client Jar
| . | You must build the Web service client jar that contains the Java classes that represent your WSDL and BikeSchema changes prior to attempting to run the uBike application. You are building this now because the ant script uses the deployed WSDL location specified by the uBike Proxy service you created earlier: http://localhost:7001/uBikeSearch?WSDL. OSB modifies the WSDL slightly and this ensures that all of our references are properly managed.
Open a command window, set your environment as specified previously, and cd to the C:\uBike\uBikeClient folder so you can use it to create the Web service client classes needed to call your OSB proxy service. From your command window, run ant to perform the build.
You should see a jar file called uBikeClient.jar in your base folder. Copy the uBikeClient.jar file to the APP-INF\lib folder of your EAR, so your code can make calls to your proxy Web service. Open the uBikeClient.jar file to examine its contents to see how clientgen generated classes that reflect the BikeSchema.xsd file and other schema types defined in the uBike.wsdl file. Hint: You may have to right-click the APP-INF\lib folder and refresh the project within Workshop for it to recognize that the jar file is there.
All compilation errors should be cleared and you are now ready to test your end to end integrated application. |
|---|
Test uBike Application End to End
| . | Review JSP code:
Click the index.jsp and searchForm.jsp links to view the source code for the uBike Web application to understand how it works. Pay particular attention to how index.jsp obtains the bikeList from the request and iterates through the list to display the uBike Web page. Also look at how searchForm.jsp simply passes the SKU parameter to the Search servlet so it can pass it in as a search parameter when calling the uBike Proxy Web service. index.jsp:
searchForm.jsp:
|
|---|---|
| . | Review Servlet code:
Click the Search.java link to view the source code for the uBike Web application to understand how it works. Pay particular attention to the doPost() method where the actual Web service call is made to the OSB uBike Proxy Web service. Once the bikeList data has been returned by the Web service, it is placed in the request and the Search servlet redirects back to the index.jsp page to display the results.
|
| . | Deploy and run uBike Web application:
In your uBike Tuxedo command shell, run tmadmin and run the psc command. Take note of the #Done for the SEARCHINVENTORY service. Within Workshop, expand the uBikeWeb project to locate WebContent\index.jsp. Right-click index.jsp and select Run As > Run on Server. If you see a Run on Server dialog window, check the Always use this server when running this project box and click the Finish button. When the uBike Web application runs the first time, the bikeList variable is not populated, so the index.jsp page redirects to the Search servlet to call the Tuxedo SEARCHINVENTORY service with no parameters, which returns a list of all bicycles in the inventory. Enter the psc command in your tmadmin command shell again to see that the #Done for the SEARCHINVENTORY service has incremented by 1. You should see a screen similar to the following:
|
| . | Run uBike search:
Select a SKU from the drop down list box on the index.jsp page that is displayed in your browser and click the Search button.
This causes the SKU to be passed to the Search servlet to pass as a parameter to the OSB Proxy service using a payload similar to the following: <SEARCHINVENTORY> This is sent to the uBike Business service and translated to an FML32 buffer by the Tuxedo Transport which sends the FML32 buffer with the SKU as input to the Tuxedo SEARCHINVENTORY service. The service will return a list of all bicycle records that match the SKU, and the response is sent back to the Search servlet as a bikeList data type. Your screen should look similar to the following:
|
Solution Setup
This section contains instructions for installing the solutions for this tutorial. Please note that not all aspects of the tutorial contain a canned solution, and may require manual steps that are included in this tutorial. All required software installations must be completed before attempting to use any solution materials.
Solution File |
Instructions |
|---|---|
|
|
|
|
uBike Tuxedo Application |
|
Summary
Congratulations! You have successfully completed this OBE tutorial.
The OSB Tuxedo Transport provides a bidirectional gateway for OSB and WLS to communicate with Tuxedo. This enables SOA applications to call Tuxedo via OSB exposed services, and provides service bus capabilities to mediated Tuxedo services. As you can see, exposing Tuxedo services to OSB using the Tuxedo Transport is a very quick and easy process, requiring mostly configuration tasks to connect the two technologies.
In this tutorial, you should have learned how to:
- Explain how the integrated technology works
- Describe the configuration points required to use the OSB Tuxedo Transport
- Build, startup, shutdown, and monitor a simple Tuxedo application (or domain) with Visual Studio and the command line
- Configure a WTC gateway to expose Tuxedo services to OSB
- Generate and modify artifacts that are used by OSB and calling clients
- Configure OSB proxy and business services that enable an OSB client to call Tuxedo services via the Tuxedo Transport
Check back on OTN for more OBE tutorials that build on this example to demonstrate other Tuxedo buffer types, as well as other technology examples.
Resources
- Oracle Tuxedo Documentation
- Oracle Service Bus Documentation
- WebLogic Server WTC Documentation
- Oracle Service Bus Tuxedo Transport
- To learn more about integrating Oracle Tuxedo with other Oracle products, refer to additional OBEs on the OTN Web site
![]()
















 icon for the uBike Proxy service under Actions to open the message flow editor.


