Managing Oracle Forms Menu Modules
Purpose
In this tutorial, you learn how to control Forms menus programmatically. You also learn to manage the interaction between the menu and the form, and you implement application security through the menu.
Time to Complete
Approximately 1 hour .
Overview
This tutorial is aimed at Oracle Forms developers who wish to broaden their skills with the tool, enabling them to create more user-friendly applications. You learn how you can manage custom menus.
Scenario
In this tutorial, you learn how to modify menus dynamically and how to control application security through menu access.
You are maintaining the Orders and Customers forms. The Orders form uses a custom menu, Summit_menu. You want to duplicate in the menu some of the functionality that is programmed into the form's buttons and triggers. You want to be able to switch and replace menus dynamically. You also want to add security to the Customers form through its menu.
Software Requirements
The following is a list of software requirements:
- Oracle Forms Builder
- Oracle database
- Application server compatible with Forms Builder
This tutorial is not specific to a particular version of Forms. However, it was developed using Oracle Forms 11g 11.1.1.4, Oracle WebLogic Server 10.3.4, and Oracle database 11g 11.2.0.1.
Prerequisites
This tutorial is a follow-up to the tutorial Creating Oracle Forms Menu Modules. Before starting this tutorial, you should perform the following setup steps::
- Download the file Menu2OBE.zip and unzip it to the directory of your choice.
- Ensure that the directory where you unzipped the file is included in your FORMS_PATH environment variable (set in default.env or other environment file that you use for your application). To see how to set environment variables for Forms Runtime, see the deployment guide for the version of Forms that you are using, such as
Oracle Fusion Middleware Forms Services Deployment Guide
11g Release 1. - If you did not previously create the scema for the menu tutorials, create the schema by performing the following steps:
- Open a command window and navigate to the directory where you unzipped the file.
- Run SQL*Plus and log into your database as the SYSTEM user.
- Run the script create_user.sql to create the summit user with the password oracle.
- In SQL*Plus, connect to your database as the summit user.
- Run the script create_schema.sql to create database objects for the user summit.
- Log out of SQL*Plus and exit the command window.
Using PL/SLQ in Menu Item Code
PL/SQL menu item commands are structurally similar to Forms triggers. You can use menu item commands to perform any actions, such as navigation, validation and database interaction.
PL/SQL code in menus is subject to the following restrictions:
| You cannot directly reference the value of form module objects. | |
| You must use the NAME_IN built-in function to determine the current value of the object. | |
| You cannot use direct assignment to set the value of a form module object. | |
| You must use the COPY built-in procedure. |
This example shows usage of referencing module objects using built-ins:
IF :s_emp.title = 'MANAGER' THEN ... -- INCORRECT
IF NAME_IN('s_emp.title') = 'MANAGER' THEN ... -- CORRECT
:s_product.name := 'PUMP'; -- INCORRECT
COPY ('PUMP','s_product.name'); -- CORRECT
The Orders form may be used alone, or it may be called from the Customers form. When the Customers form opens the Orders form, it passes a global variable containing the ID of the currently-selected customer. The Orders form has a When-New-Form-Instance trigger that queries all orders if the global variable is null, or only one customer's order if the global variable contains a customer ID.
You want to add a menu item that enables users to re-query using the same criteria. Note that there is an easier way to perform this functionality by just using Pre-Form and Pre-Query triggers, but this example shows you how you would need to modify trigger code for use in a menu.
To add PL/SQL code to your menu module, perform the following steps:
| . |
In Oracle Forms Builder, open the Orders and Customers forms and the Summit_Menu menu.
|
||||||
|---|---|---|---|---|---|---|---|
| . |
In the Object Navigator, expand the ORDERS and TRIGGERS nodes, and then double-click the icon to the left of the WHEN-NEW-FORM-INSTANCE node to invoke the PL/SQL editor for the trigger.
|
||||||
. |
In the PL/SQL editor, select and copy all of the code.
|
||||||
. |
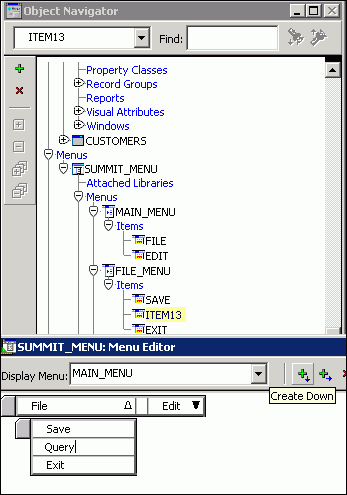
Invoke the Menu Editor by double-clicking the icon to the left of the SUMMIT_MENU node, and then select the Save node in the Menu Editor and click Create Down.
|
||||||
. |
Relabel the new menu item as Query by overtyping the label in the Menu Editor. This changes the display label of the menu item and also changes the name in the Object Navigator after you enter the text.
|
||||||
. |
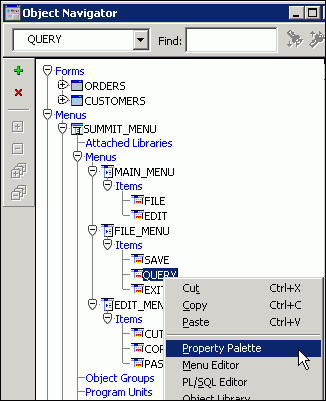
Invoke the Property Palette for the Query item by double-clicking its node in the Menu Editor, or by right-clicking its node in the Object Navigator and selecting Property Palette .
|
||||||
. |
Set the following values for the Query menu item:
|
||||||
. |
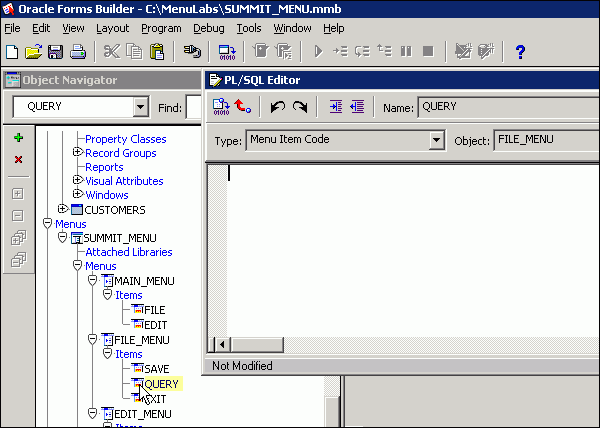
Open the PL/SQL editor for the Query menu item; one way to do this is to double-click the icon to the left of its node in the Object Navigator.
|
||||||
. |
With your cursor in the PL/SQL editor, select Edit > Paste from the Forms Builder menu to paste in the trigger code that you copied earlier.
|
||||||
. |
Because you cannot refer directly to form values in menu code, change :s_ord.customer_id to the following indirect reference: NAME_IN('s_ord.customer_id')
Note: You could also change the references to the global variable to use the NAME_IN built-in; however, this is not strictly necessary, because global variables are available directly throughout the application. |
||||||
. |
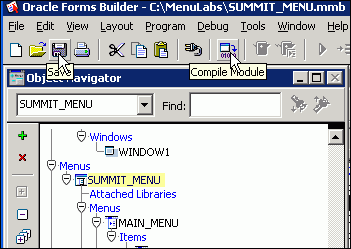
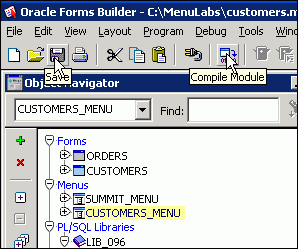
Save and compile the menu by selecting the SUMMIT_MENU node or any of its subnodes in the Object Navigator, and then clicking Save and then Compile Module.
|
||||||
. |
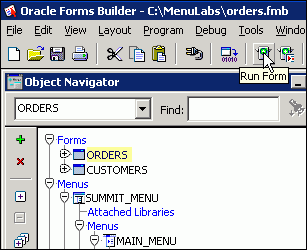
Select ORDERS in the Object Navigator and click Run Form to run the Orders form by itself .
|
||||||
. |
When the form appears in the browser, use the down arrow key a few times to scroll through the records. You can see that orders from various customers are shown. Then select File > Query from the menu or click Query in the menu toolbar.
The same query is re-executed, showing orders for all customers. |
||||||
. |
Exit the form and close the browser window. |
||||||
. |
Now run the Customers form from Forms Builder and click Show Orders.
|
||||||
. |
The Orders form displays the orders for the selected customer. Click Query, or select File > Query from the menu.
The same query is executed, showing orders only for the selected customer. Exit both forms and close the browser. |
Using Menu Built-Ins
You can change certain menu characteristics dynamically at run time by using built-in subprograms.These enable you to get or change menu item properties or to hide, display, or replace the current menu.
The menu built-ins are:
| FIND_MENU_ITEM | Gets the ID of a menu item; the receiving variable must be declared as a menu item type
|
|
| GET_MENU_ITEM_PROPERTY | Returns the current value of the given property for a specified menu item
|
|
| SET_MENU_ITEM_PROPERTY | Modifies the state of a menu item-specific characteristic
|
|
| REPLACE_MENU | Replaces the current menu with a specific one, without making it active (use this procedure to modify the display style and security) |
Just as multiple form modules can be combined into a single application, so too can multiple menu modules be used as needed. You can design an application so that several form modules share the same menu module, or have each form in the application run its own menu. How menus are loaded in multiple-form applications depends on whether you are using OPEN_FORM, NEW_FORM, or CALL_FORM.
In this tutorial section, you use menu built-ins to perform the following tasks:
| Replace a menu | ||
| Change menu item properties | ||
There are two ways to replace a form's menu with another:
- Use the REPLACE_MENU built-in procedure to dynamically replace the current form's menu with a different menu. Note that if REPLACE_MENU is called from a menu item, code that follows the REPLACE_MENU call is not executed because the context of that menu has been destroyed and replaced with the new menu.
- Use the CALL_FORM built-in with the DO_REPLACE argument to replace the default menu of the called form with the menu being used by the calling form. Note that if you use OPEN_FORM or NEW_FORM to call the second form, the called form's menu is not replaced.
The Customers form uses a menu that is similar to the Forms default menu except that it has the Forms menu item added, with a menu item that enables users to display the orders for a customer. Some users would prefer to have the limited set of options that are defined in the Summit_menu menu, so you decide to provide a button that switches the Customers form to that menu. Additionally, when the Orders form is called from the Customers form, you want its menu to be the same as whatever is being used by the Customers form.
To perform this menu replacement for the Customers and Orders forms, perform the following steps:
| 1. | Add a button to the Control block of the Customers form, setting its properties as follows:
|
||||||||||||||||||||||
| 2. |
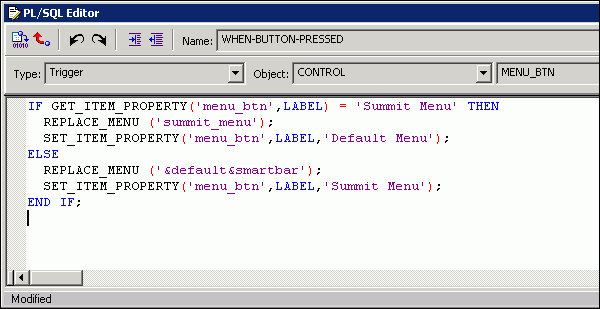
Define the following When-Button-Pressed trigger for the Menu_Btn button:
IF GET_ITEM_PROPERTY('menu_btn',LABEL) = 'Summit Menu' THEN
|
||||||||||||||||||||||
| 3. |
The When-Button-Pressed trigger for the Orders_Btn button currently uses the OPEN_FORM built-in to open the Orders form. This enables both forms to be open at the same time time so that the user can navigate between them.
However, because you want the Orders form, when opened from Customers, to use whatever menu the Customers form is using, you need to change the built-in to CALL_FORM with the DO_REPLACE argument. Change the When-Button-Pressed trigger for the Orders_Btn button to use the following code: :global.customer_id := :s_customer.id;
|
||||||||||||||||||||||
| 4. |
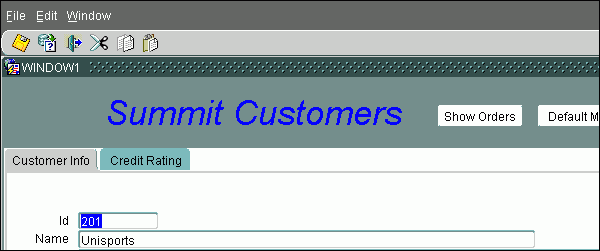
Run the Customers form to test it. When you click the Show Orders button, notice that the menu from the Customers form is also used for the Orders form.
|
||||||||||||||||||||||
| 5. | Click Exit to return to the Customers form and then click Summit Menu. The menu for the Customers form changes, and the button's label changes to "Default Menu". |
||||||||||||||||||||||
| 6. | Now click Show Orders again. The Orders form inherits the Summit menu.
Exit the forms and close the browser window. |
Changing Menu Item Properties
The Summit_Menu menu contains a File_Menu.Query menu item that is specific to the Orders form. You do not want to display this item when you are using this menu with the Customers form. Additionally, the Customers menu has a submenu called Forms that should not be shown when the Orders form is using that menu.
To use menu built-ins to conditionally change the visibility of these menu items, perform the following steps:
| 1. | Modify the When-Button-Pressed trigger for the Control.Menu_Btn button in the Customers form by adding the following line of code just before the ELSE statement:
SET_MENU_ITEM_PROPERTY('File_Menu.Query',DISPLAYED,PROPERTY_FALSE);
|
| 2. | Modify the When-Button-Pressed trigger for the Control.Orders_Btn button in the Customers form to contain the following code:
DECLARE
|
| 3. | Run the Customers form to test the changes:
Exit the forms and close the browser window when you are finished testing. |
Sharing Code Between Forms and Menus
You can share code between form modules and menu modules in three ways:
| Setting up libraries and attaching them to the modules | |
| Creating user-defined triggers in the form module and calling them from a menu item in a menu module by using the EXECUTE_TRIGGER built-in | |
| Using the DO_KEY built-in to fire the corresponding trigger or function from a menu item |
Duplicating code between menus and forms is inefficient and makes maintenance of forms and menus more difficult. In this tutorial section, you define shared code by performing the following tasks:
| Use a shared library | ||
| Create a user-defined trigger | ||
| Use the DO_KEY built-in | ||
A shared library is especially useful when code is to be shared among multiple modules. A single library can be attached to multiple form and menu modules.
You have modified the button in the Customers form that calls the Orders form, but you have not modified the Forms.Orders menu item, so it is not calling the Orders form in the same way. This is a common problem when you simply copy code from a form trigger to a menu item; this duplication in code often results in inconsistencies. Placing the code in a shared library, and then calling the code from both the menu and the button, solves this problem.
To define shared library code to call the Orders form from the Customers form, perform the following steps:
| 1. | Copy all of the code from the When-Button-Pressed trigger of the Orders_Btn button in the Customers form. |
| 2. |
In the Object Navigator, select the PL/SQL Libraries node and click Create.
|
| 3. |
Under the new library's node, select Program Units and click Create.
|
| 4. |
Name the procedure Show_orders and click OK.
|
| 5. | The PL/SQL editor opens. Select all except the first line of code, and then paste the code you copied earlier.
|
| 6. | Make the following changes to the code:
|
| 7. | Save and compile the library.
|
| 8. | In the Customers_Menu menu, select the Attached Libraries node and click Create.
|
| 9. | In the Attach Library dialog box, click Browse to navigate to the saved library and open it, then answer Yes to the alert that asks if you want to remove the path.
|
| 10. | Modify the code in the Forms_menu.Show_Orders menu item of the Customers_Menu menu to simply call the SHOW_ORDERS procedure from the attached library:
show_orders; |
| 11/ | Save and compile the Customers_Menu menu.
|
| 12. | In a similar fashion, attach the library to the Customers form, and then modify the When-Button-Pressed trigger of the Control.Orders_btn button to call the SHOW_ORDERS procedure from the attached library.
|
| 13. | Save and run the Customers form. Test that the Forms > Orders menu item and the Show Orders button function identically. Exit the forms and close the browser when you are finished.
Note: If you are using Forms 11g and receive FRM-40735 or FRM-21011 and ORA-06508 errors when clicking the button or selecting the menu item, you may need to apply
Patch 10407723 to the Fusion Middleware 11g ORACLE_HOME directory. |
Creating a User-Defined Trigger
Another option for sharing code is a user-defined trigger. This is ideal if the code is used by only one form, so it would work for our example of calling the Orders form from the Customers form.
To revise this application to utilize a user-named trigger instead of the PL/SQL library, perform the following steps:
| 1. |
Copy the code to call the Orders form from the Show_Orders procedure in the library.
|
| 2. |
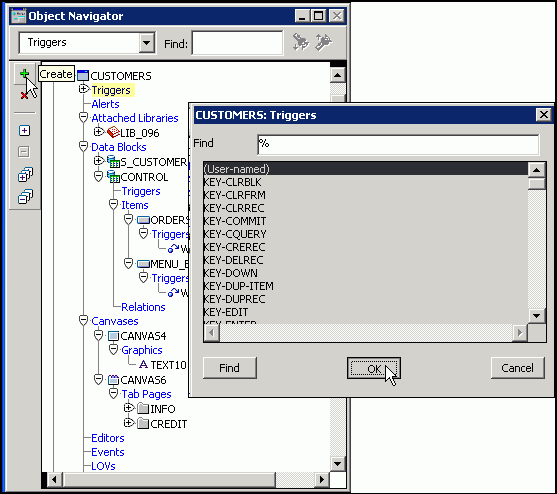
In the Customers form, create a form-level user-named trigger named Show_Orders.
Hint: First create the trigger, and then rename it by clicking its name in the Object Navigator and typing over it. |
| 3. | The PL/SQL editor opens; paste in the code that you copied from the library and replace the first line with the following: DECLARE |
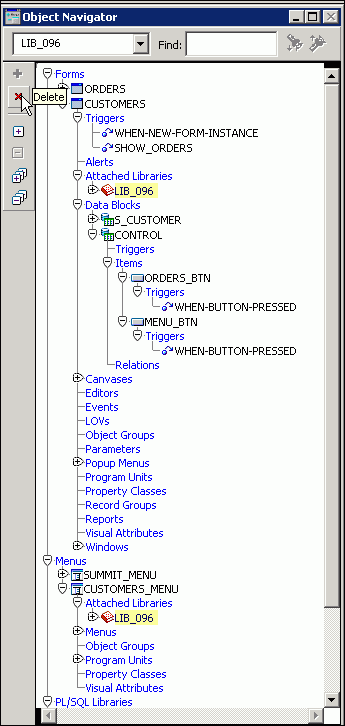
| 4. | Detach the attached library from both the Customers form and the Customers_Menu menu by selecting the nodes in the Object Navigator and clicking Delete.
|
| 5. | For both the When-Button-Pressed trigger of the Control.Show_Orders button of the Customers form, and for the Forms_Menu.Show_Orders menu item of the Customers_Menu menu, set the code to:
EXECUTE_TRIGGER('Show_orders'); |
| 6. | Save and compile the Customers_Menu menu, and then save and run the Customers form. The menu item and the button should function identically. |
Using the DO_KEY Built-in
The DO_KEY built-in executes the key trigger that corresponds to the specified built-in subprogram. If no such key trigger exists, then the specified subprogram executes. This behavior is analogous to pressing the corresponding function key.
Using the DO_KEY built-in in combination with defining a key trigger ensures consistent behavior whether the user presses a function key or executes the key functionality in some other way, such as by clicking a button. The DO_KEY built-in can also be called from a menu item, providing another way to share code between a form and a menu.
The Orders form uses special code in a menu item and in the When-New-Form-Instance trigger to execute a restricted query if the form is called by the Customers form. However, when a user executes a query by using a function key, the code is not executed and an unrestricted query is always performed.
To ensure consistent behavior, perform the following steps:
| 1. |
In PL/SQL Editor of the File_Menu.Query item of the Summit_Menu menu, select all the code and Cut it.
|
| 2. |
Enter the following code:
DO_KEY('Execute_Query');
Save and compile the menu. |
| 3. | In the Orders form, define a form-level Key-Exeqry trigger and paste into it the code that you previously cut from the menu item.
Note: Because this code is part of the form, it does not need to use indirect references, even when it is called from a menu. However, using indirect references is always a good idea because you would not need to change the code if you move it to a menu or a PL/SQL library. |
| 4. | Modify the form-level When-New-Form-Instance trigger of the Orders form; replace its code with the DO_KEY bult-in:
DO_KEY('Execute_Query');
|
| 5. | Test the functionality as follows:
Note: To determine the function key to use for executing a query, select Help > Keys from the default menu. For example, the Execute Query function key on Windows is by default Ctrl + F11. Exit both forms and close the browser window when you are finished. |
Managing Menu Security
What is Menu Security?
Your application has a certain amount of security by default, because only users with access privileges to the database schema that is used can access the application. However, by default, these users would then be able to access any part of the application. You can use menu security to set up access rights on menu items. You can choose between two security policies for the users:
| Grant or deny users access to all menu items in a module | |
| Grant or deny users access only to specific menu items |
When you want to deny a user access to a menu item, you can either hide the item or disable it.
Once the users and roles are defined, any developer can assign those roles to the menu module or menu items. This controls who has access to any part of the menu application.
In this tutorial section, you perform the following tasks:
| Define security roles | ||
| Assign access to menu items | ||
A role is a named set of privileges. You create roles once, and then assign them to users to provide:
- Database-level access privileges, including table privileges (such as inserting data in tables)
- System privileges (such as connecting to the database)
- Application security (by limiting access to certain menu items)

You can think of a role as being a list of users that, because of their job responsibilities, have similar requirements for access to information.
With respect to Forms menus, by using database roles you can grant access privileges to each menu item individually. If access is granted only to some roles, only users belonging to those roles can access those items. Using this feature, you can deliver the same application for different kinds of users.
To create the roles, perform the following steps:
| 1. |
As the DBA, run the script to create the FRM50_ENABLED_ROLES view; this view of the enabled roles for a user is necessary to implement menu security.
The DBA can create this view by running the script frmXXsec.sql, where XX is the Forms version number. For 10.1.2 and above the script name omits the version number, so it is frmsec.sql. This script is located in a subdirectory of ORACLE_HOME. For example, for 11g this script is located in the following directory: <ORACLE_HOME>\tools\dbtab\forms.
|
| 2. |
As the DBA, grant the summit user access to the FRM50_ENABLED_ROLES view by running the frmXXgrt.sql script.
|
| 3. |
As the DBA, create two roles: TEST_CLERK and TEST_MGR, and grant the TEST_CLERK role to the SUMMIT user. Execute the following statements:
create role test_clerk; create role test_mgr; grant test_clerk to summit;
|
Assigning Menu Access
Your department is in charge of maintaining customer information. Clerks in your department should have access to some parts of the application, but other parts should be available only to managers. Clerks have been assigned the TEST_CLERK role, while manager have the TEST_MGR role.
To use menu security to restrict access to certain menu items, perform the following steps:
| 1. |
In the Property Palette for the Customers_Menu menu, set Use Security to Yes, and then click More in the Module Roles property to add the roles TEST_CLERK and TEST_MGR in the Menu Module Roles dialog box, typing over the default CLERK and MANAGER roles that were previously defined.
Click OK to save the roles. |
| 2. |
When you first implement security for a menu, none of the menu items has access granted to it. In other words, if you were to run the Customers form at this point, you would get an error stating that there are no active items in the application's root menu, and the form would appear without a menu. When security is implemented, you must go to each menu item and specify which role or roles should have access to it. To test assigning access to menu items, give both roles access to the Exit menu item. In Customers_Menu, open the Property Palette for the Action.Exit menu item and click More in the Item Roles property. Then in the Menu Item Roles dialog box, Ctrl-click to select both roles that you have specified to use for the menu and click OK.
|
| 3. | The user must also have access to an item on the root, or main, menu of the application. In the same way as you did in the previous step, grant access to both roles for the Main_Menu.Action submenu, which is the parent of the Exit menu item.
|
| 4. | In a similar fashion, grant access to TEST_CLERK on the Action.Save menu item, and to TEST_MGR on the Action.Print menu item. When you change the Action.Save menu item, also change its Icon Filename property from rt_save to save.
|
| 5. | Save and compile the menu, and then run the Customers form. Because the SUMMIT user has been granted only the TEST_CLERK role, you should see only the Action > Save and Action > Exit menu choices.
Exit the form and close the browser window. Note: The Forms and Window submenus are displayed, but they are disabled. The reason that they appear is that the Display without Privilege property for these menu items is set to Yes. This enables the user to see the grayed-out menu option without having access to it. You could change this if you wanted to. |
| 6. | The user has been promoted from clerk to manager. In the SQL*Plus window, grant the TEST_MGR role to the SUMMIT user: grant test_mgr to summit; |
| 7. | Run the Customers form again. Both the Save and Print menu choices should now appear, because the SUMMIT user has been granted both roles.
Exit the form and close the browser window. |
| 8. | In the SQL*Plus window, revoke the TEST_CLERK role from the SUMMIT user:
revoke test_clerk from summit; |
| 9. | Run the Customers form again. The Print menu choice appears, but not the Save menu choice, because the SUMMIT user now has only the TEST_MGR role.
Exit the form and close the browser window. |
Summary
This tutorial showed you how to enhance Forms menus with code and use menu security.
In this tutorial, you should have learned how to:
- Use PL/SQL in menu item code
- Use menu built-ins to replace one menu with another and to set menu item properties
- Share code between forms and menus by using a shared library, a user-defined trigger, and the DO_KEY built-in
- Implement menu security to restrict access to menu items based on a user's assigned server roles


